Major MR150 Installation and maintenance instructions

Operator Manual
and Parts List
MAJOR
FINISHING MOWERS
MR150, MR180 and MR235

Head Ofce
Major Equipment Intl Ltd
Ballyhaunis,
Co. Mayo,
Ireland
Tel.: 09496 30572
Fax: 09496 30788
UK Ofce
Major Equipment Ltd.
Major Industrial Estate.
Middleton Rd
Heysham
Lancs.
LA3 3JJ
Tel.: 01524 850 501
Fax: 01524 850 502
NL & GERMANY OFFICE
Major Equipment Intl Ltd
Postbus 29
NL-7700 AA
Dedemsvaart
Nederland
Tel: + 31 (0) 6389 19585
Web: www.major-equipment.com
We suggest that you record your machine details along with your dealers address & telephone
number for your convenience
MODEL: ______________ SERIAL NO: __________________
DEALER: ________________________________________________________
ADDRESS: ________________________________________________________
________________________________________________________
________________________________________________________
TEL NO: ________________________________________________________
Disclaimer
While every effort has been made in the production of this manual to ensure that the information contained herein is full and
correct, Major assumes no responsibility for errors or omissions.
Major reserves the right to modify the machinery and the technical data contained within the manual without prior notice.
Further to this, Major assumes no liability for any damages which may result from the use of the information contained within this
manual.

Contents
Introduction
Identication Data 2
Main Parts 2
Safety Regulations
General Safety regulations 3
Regulations for use of the driveline 3
Starting regulations 4
Warning and danger plates and stickers 5
Key to safety devices 6
Delivery of the mower 7
Hitching to the tractor
Preliminary instructions on use of the machine 8
Coupling the machine to the tractor 11
Shortening the driveline 12
Use of the Machine
Preparing the implement for work 13
Use of the machine 14
Demounting the implement from the tractor 15
Maintenance
Technician specications 15
Inspections before use 16
Periodical inspections 16
Storage of machine 19
Spare Parts
Spare parts list 20
Trouble shooting 28
Warranty procedure 30

EEC certicate of conformity for machines
(conforming to Directive 98/37/EEC)
Company: Major Equipment Ltd.
Address: Coolnaha,
Ballyhaunis,
Co. Mayo,
Ireland.
Tel. +353949630572
Fax +353949630788
declares in sole responsibility that the product:
FINISHING MOWER
When properly installed, maintained and used only for it’s intended purpose, complies with
all the essential Health & Safety requirements of:
• THE SUPPLY OF MACHINERY (SAFETY) REGULATIONS 2008.
• S.I. No. 299 of 2007, Safety, Health and Welfare at Work (General Application)
Regulations 2007 (Ireland).
• Health & Safety at Work, etc. Act 1974 (c.37) (UK).
• EN ISO 12100:2010, ISO 11684:1995.
• EN ISO 13857:2009, EN 349:2009, EN ISO 4413:2011.
• EN ISO 4254-12:2012, EN ISO 4254-1:2010
I certify on behalf of Major Equipment Int. Ltd., that this machine when properly installed
and operated correctly, complies with all the essential Health & Safety requirements of
all legislation referred to above.
Signature : ______________ Date 11/01/2013
Managing Director

1
INTRODUCTION
Thank you for purchasing this Major Finishing Mower. Please carefully read this operation manual and strictly
observe these instructions for the safety of you and the personnel around you. In this manner, you will enjoy
long and satisfactory use of this product.
The user of the mower (also called "Implement" or "Machine" in the text) is personally responsible for his own
safety and that of any other people in the vicinity of the machine.
It is therefore essential for the user to possess detailed knowledge about how to use, service and correctly
mount the mower on the tractor. The machine's user must be an operator with a suitable technical background to
enable him to understand the contents of this manual, including the diagrams found herein. The figures and
descriptions in this handbook give both users and maintenance staff all the basic instructions to comply with
when using and servicing the mower.
The user is responsible for ensuring that connection to the tractor and use of the mower complies with the
current provisions in merit. The machine may only be used and serviced by persons who have be come fully
familiar with the contents of this manual, which should always be kept ready to hand. Users should become
particularly familiar with chapter 2 concerning safety precautions.
Always comply with the given instructions. Consult the Major After-Sales Service Centre or your nearest dealer
in case of doubt. In the event of faults or problems which require the assistance of a qualified technician, contact
the manufacturer directly or your nearest dealer.
This machine is consigned according to the warranty conditions valid at the moment of purchase. The user must
not tamper with the machine or make modifications to its parts since such action shall void the guarantee.
The manufacturer reserves the right to modify the machine specifications and performances without advance
warning and declines all responsibility for any errors caused by incorrect installation or improper use of the
equipment.
Contact MAJOR or your nearest dealer if there are substantial differences between the implement and the
indications in this handbook. The standards that govern the guarantee are cited in the "Certificate of Guarantee"
which is supplied to the user with this manual.
This symbol is used in the manual to call the reader's attention to various levels of danger that if not
avoided will result in death or serious injury.
Important: References to this manual to the right side and left side of the machine mean to the right and left
side of the operator seated in the tractors driving seat.
IMPORTANT NOTICE
BEFORE OPERATING THIS MACHINE, BE SURE TO CHECK THE
FOLLOWING CHECK-POINTS (HAVING FIRST STOPPED THE TRACTOR
ENGINE, DISENGAGED THE PTO AND CAREFULLY READ AND
UNDERSTOODF THE OWNER’S MANUAL):
1. Check oil levels (if necessary and SAE 90 EP oil)
2. Grease the driveline spiders
3. Grease all marked points on the machine
4. Check to be sure the nuts/bolts are snug on those parts which are under
the most stress (tines, blades, front linkage bolts, gear box bolts etc)

2
IDENTIFICATION DATA & GUIDE TO MAIN PARTS
The data plate indications must not be altered for any reason. We suggest that you write the data pertaining to
your mower in the spaces below (Fig. 2.1)
1. Year of Manufacture
2. Machine type or model
3. Serial Number
Key to the main parts
1. Three-point linkage used to couple the
implement to the tractor.
2. Gearbox: Increases the rotation speed
of the tractor PTO.
3. Chassis: This is the bearing structure of
the implement.
4. Pivoting wheels: The machine is
supported by pivoting wheels which can
also be used to adjust the cutting height.
5. Rear discharge conveyor.
6. Side closing part.
7. Side discharge conveyor. (MR150 &
MR180 only)
8. Rear closing part.
(Fig. 2.2)
Side Discharge Mower
The main feature of this machine is its versatility, since the user (if in possession of the transformation kit) can
modify the machine from the rear discharge version to the side discharge version and vice versa. The essential parts
of the machine are as follows: a
1. Kiln-lacquered, electro-welded steel frame;
2. A gearbox unit to be connected to the tractor's power takeoff with a PTO shaft.
3. Four pivoting wheels to support the machine on the ground while it is in use.
4. Three blades with a milled cutting edge.
5. Conveying and discharging set, positioned on the side or the rear of the machine.
Fig 2.1
Fig 2.2

3
GENERAL SAFETY & SAFETY REGULATIONS
The mower must only be used with a suitable tractor and driven by an adequate driveline driven from the
tractor PTO. All other use is strictly prohibited. Users should become thoroughly familiar with the contents of this
manual before using, servicing or mounting the implement on the tractor and all other pertinent operations.
Never wear jewellery, loose clothing such as ties, scarves, belts, unbuttoned jackets or dungarees with
open zips which could become caught up in moving parts. Always wear approved garments complying with
accident prevention provisions such as: non-slip shoes, ear muffs, goggles and gauntlets.
Consult your dealer, the "Labour Health Service" or your nearest equivalent authority for information about
the current safety provisions and specific regulations to comply with in order to ensure personal safety. If the
machine is used in the evening, follow the relevant instructions.
REGUALTIONS FOR THE USE OF THE DRIVELINE
The machine maybe supplied with a driveline; the driveline is complete with shields able to ensure the operator's
safety (see Figure 3.6 page 8)
Keep the non-rotation shields efficient and in a good condition. If their condition is poor, they should be changed
before the implement is used. Unless it is correctly protected, the driveline could even cause the user's death
since it can catch on parts of the body or clothing. Always check that the shields are installed and perfectly
efficient before using the machine. Check that they are well fixed and correctly inserted into their housings.
Check that the retaining chains are correctly fixed to the tractor or mower in order to prevent the shields from
turning together with the driveline.
Check that the driveline is free to turn within the shield. Take great care to prevent the shields from being
damaged when the implement is coupled and released from the tractor. Keep the grooved parts perfectly clean
and greased so that they are able to correctly slide.
Besides being described in this manual, the method by which the driveline is coupled must also be checked out
with the instructions in the tractor manufacturer's manual. The correct rotation speed of the tractor PTO is
indicated on the PTO shaft guards of each machine.
This rate is usually 540 or 1000 rpm. Always comply with the indicated speed. The following items are applied to
the driveline (if delivered with the machine):
•Adanger sticker on the shaft guard (Fig. 3.1)
•A danger sticker on the driveline which becomes visible if the shield is damaged or missing (Fig. 3.2)
Strictly comply with the instructions on the sticker.
Fig. 3.1
Fig.
3.2
Fig.
3.3
Fig.
3.4

4
STARTING REGULATIONS
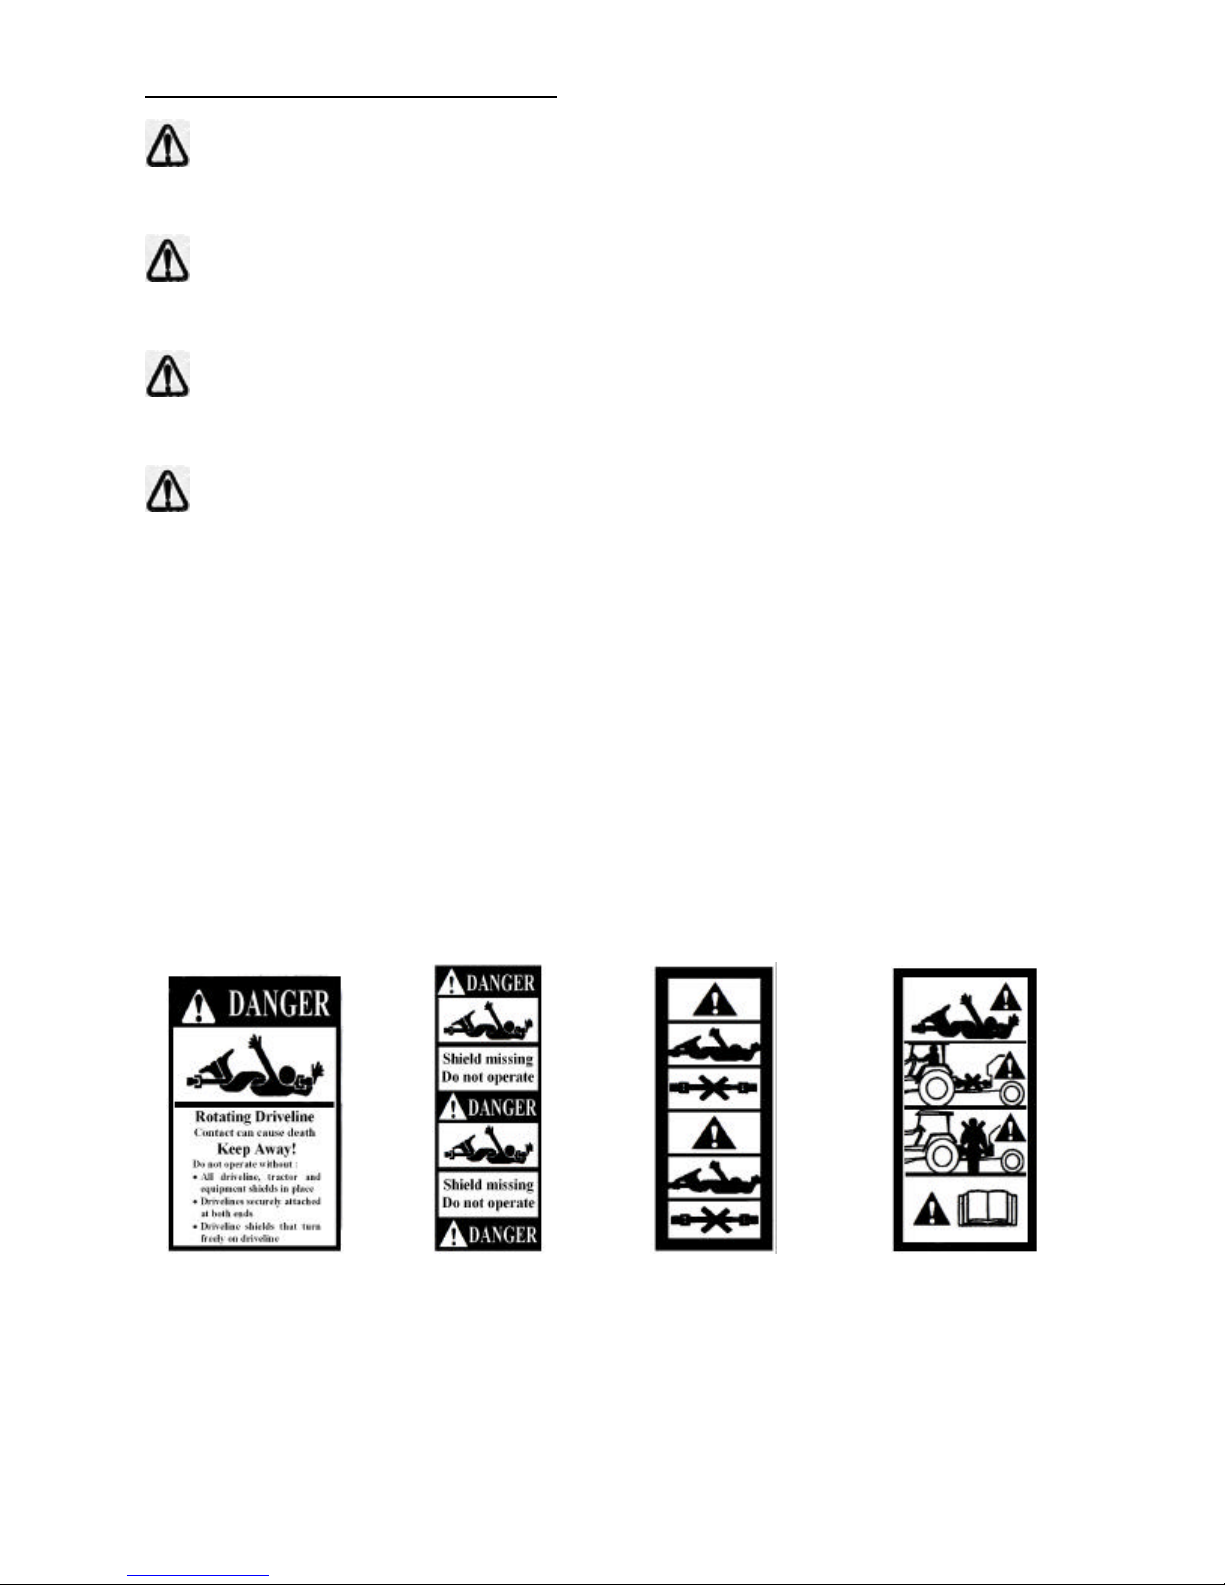
1. Always check that any imminently dangerous condition has been appropriately eliminated before using
the implement. Check that all guards and safety shields are installed, efficient and correctly mounted in
place.
2. Never allow inadequately trained personnel to use the implement.
3. Before starting, always check that there are no persons, particularly children and animals, within the
operative range of the implement. Examine the work area in order to become familiar with the type of
soil in question. Check that there are no obstructions or objects in the area that could be caught up by
the implement and thrown up at a distance. Clean all such objects from the area.
4. Never work near roads, paths, housing areas or places potentially frequented by people, vehicles,
animals, etc. If such action is inevitable, check that these areas are deserted be-fore beginning work and
while on the job.
5. Never start the tractor before being correctly seated in the driving position. Never start a faulty
implement, even when such a condition is only suspected. Contact your nearest dealer, or the person in
charge, and ask for the implement to be inspected.
GENERAL OPERATION
1. Never ever use the mower under influence of alcohol or the effect of medicines such as tranquillisers,
sedatives, stimulants, drugs or any other substance as could slow or alter the reflexes or sight.
2. Never ever work when there are persons on the implement .No one must ride on the tractor apart from
the driver unless this is explicitly allowed by the tractor manufacturer. The tractor must be equipped with
a roll-bar and/or all other safety devices prescribed by the current laws in force. To ensure his personal
safety, the operator must use these devices correctly. Consult and strictly comply with the instructions in
the tractor use and maintenance manual.
3. The operator should never allow himself to be distracted when working. He should pay great attention
and concentrate on what he is doing. Constantly keep the vehicle under control and always remember
how to quickly stop and switch off both the tractor and implement.
4. Always check that children, adults and animals keep at an adequate safety distance from the mower
when it is in use.
5. Take great care when working on sloping surfaces. It is preferable to work upwards or downwards rather
than crosswise in order to avoid the risk of over-turning. Always check and comply with the tractor
manufacturer's instructions, particularly in relation to the maximum gradient on which it is possible to
work. When working on slopes, it is advisable to reduce the work speed, gradually varying the speed
and direction of the vehicle during manoeuvres. Never repeatedly stop and start the machine.
6. Never operate on wet, slippery grass or soil or where the tyre grip is precarious. If such action is
inevitable, always work at low speed to ensure the operator's safety. Pay great attention to any
obstructions, stones or other objects which could hit the knives. The tractor engine must always be
turned off, and the ignition key must be removed from the dashboard when intervening on the machine.
For example, when it is necessary to detach the machine from the tractor or if grass or other objects that
might have become tangled up in it must be removed.
7. Before dismounting from the tractor, always disengage the power takeoff (P. T.O.), turn off the engine,
remove the ignition key from the dashboard, insert the brake, and do not approach the machine before
the tools have come to a complete stop.
8. After having hit an obstacle, simultaneously stop the tractor and machine tool, turn off the engine,
remove the ignition key from the dashboard, insert the brake, and check for any possible damage. If the
machine has been damaged, all repairs must be carried out before continuing the working process.
Always carry out any required repairs before continuing work. When the knives are turning, always keep
the limbs well away from moving parts and those which heat during operation such as the over gear unit.
Never ever attempt to check or adjust the belt tension while the implement is operating. Always stop it
before this operation. Never ever lubricate the machine while it is operating, or when the PTO is
engaged.
9. Never smoke while refuelling. Never refuel near smouldering, sparking material or open flames.
10. Always check whether the soil around the tractor is slippery. Clean all mud from the soles of the shoes
before mounting the tractor. Keep the steps, bearing surfaces, handrails, shackles and tractor pedals
(brake, clutch and accelerator) clean and free from all foreign bodies such as oil, grease, mud or snow in
order to prevent all possibility of slipping or tripping.
11. Keep the operator support areas on the tractor free from mud or any thing else that could cause the
operator to slip when the implement is mounted or demounted from the tractor. Never jump on or off the
tractor. Always keep both hands and one foot well anchored. Never use the control levers or hose pipes
as holds. These are mobile parts and do not offer a safe grip. Involuntary activation of a control could
also cause the tractor or implement to accidentally move. Before the machine is released from the
tractor, it should be rested on the ground in a stable position using the support foot where installed.

5
Always check that the machine is balanced and stable, then release it from the tractor, checking again to
ensure that it is firmly positioned.
TRANSIT ON PUBLIC HIGHWAYS
1. When driving on public roads, always comply with the Highway Code provisions in force in the country
where the machine is being used. Pay particular attention near crossroads, underpasses, and level
crossings, when meeting other vehicles, overtaking stationary or slower vehicles. Drive near the edge of
the road and try not to hold up the traffic.
2. Never park the tractor and/or mower near crossroads, bends, level crossings or where the equipment
could be a danger or obstruction to pedestrian traffic.
3. Never drive on public highways when the implement or tractor is particularly dirty since soil, grass and
other items could drop on to the road and obstruct the normal road traffic. Disengage the PTO and
disconnect the driveline when transporting the implement.
INSTRUCTIONS FOR MAINTENANCE TECHNICIANS
1. The implement must be stationary and the tractor PTO disengaged before any work is carried out on the
implement.
2. Routine and extraordinary maintenance operations must be carried out in a specially prepared place
using correct and efficient tools. This place must always be kept clean and dry. There must be sufficient
space around the implement to allow work to be easily carried out. Only trained and specialised
personnel must be allowed to service the implement. Contact your nearest dealer when maintenance
work is required.
3. Comply with the indicated bans and procedures when servicing the implement. Never ever use gasoline,
solvents or other inflammable fluids as detergents. Use the non-flammable and non-toxic commercially
available solvents authorised by the competent authorities. Never use compressed air or highly
pressurised water to clean the implement. When this is absolutely inevitable, protect the eyes using
goggles with side guards and use the lowest possible pressure.
4. At the end of the job, check and inspect the implement while it is still disconnected from the tractor.
Check the cutting blades for wear. Never carry out welding operations without the manufacturer's
permission and instructions. Before welding, always detach the implement from the tractor in order to
prevent damage to the battery. Always wear a protective mask, goggles and gauntlets when welding,
lapping or grinding, hammering or drilling. The implement should be lubricated as described the
maintenance section (page 15).
5. Correctly remount all guards and shields that were removed during the maintenance and repair
operations.
TEST REGULATIONS
1. Always operate the machine outdoors. If the machine connected to the tractor must inevitably be started
in a closed room, e.g. during tests after maintenance, always ensure that there is adequate ventilation to
prevent harmful exhaust gas from accumulating.
2. Carry out various manoeuvres assisted by specialized personnel in order to simulate the different work
conditions and acquire the necessary familiarity with the implement. Before starting, always check that
there are no foreign bodies such as stones, soil or other, clinging to the rotors. When the rotor turns,
such items could detach and be violently thrown notable distances. Always operate within a protective
cage, or at least near a solid wall.
3. Always check that no one is too near or in a potentially dangerous position if the implement is to be
operated raised from the ground, when testing for example.
4. Always disengage the PTO before driving the tractor to transport the implement from one place to the
other.
WARNING DANGER PLATES AND STICKERS
1. Comply with the warnings on the stickers. (See picture for locations & details of warning stickers on the
machine) Failure to comply with the given instructions could cause death or serious personal injury.
2. Check that the stickers are always installed and legible. If this is not the case, contact your nearest
dealer or "MAJOR" in order to obtain replacements (state the code number printed on the left hand side
of each sticker when ordering).

6
STICKER NUMBERS & LOCATIONS
KEY TO SAFETY DEVICES
1. PTO shaft guard.
A cowling where the driveline couples with the
shredder over-drive protects the rotating end
of the driveline itself.
2. Drive belt guard.
Prevents access to the drive belts and
pulleys.
3. Snap Pin.
Prevents the wheel with the fork slipping off
accidentally.
4 Driveline shield.
The driveline is supplied with adequate plastic
shields and relative fixing chains.
5. Guards (only on the rear discharge
version)
Prevents the product leaking out of the side of
the machine
6. Rear Guards
Prevent any solid objects there may be in the
earth from being ejected great distances.
7. Safety Pin
Prevents the pin in the attachment point 3
slipping out accidentally. Fig. 3.5
1
2
3
5
6
Fig.
3.5
4
MR150 &
MR180 only

7
NOISE
Measurements of the noise issued by the machine indicate that the equivalent noise level is such as to maintain
the daily level to which the operators are exposed within a value of less than 70 dBA. This measurement was
made with a sound level meter set at a distance of about 1.6 m from the machine and at a height of 2 m,
operated (no-load) at a PTO rotation rate of 450 rpm on grassy land. Please also note that the machine is
normally used outdoors and that the position occupied by the operator is seated in the driving seat of the tractor.
Also consult the prescriptions listed in the tractor use and maintenance manual.
VIBRATIONS
During normal operation, the machine will not transmit appreciable vibrations to the tractor or, thus, to the
operator. These vibrations are less than 2.5 m/sec2. to the operator's upper limbs and less than 0.5m/sec•'. to
the seated part of the operator's body. Consult the tractor manual for the vibrations transmitted by the tractor
itself.
DISCLAMER
The mower has been built in compliance with the accident prevention regulations in force and therefore the
manufacturer cannot be held responsible for damage resulting from:
•Use of the machine with faulty or missing guards
•Improper use of the machine
•Use of the machine by untrained or unauthorised personnel
•Incorrect assembly of the mower;
•Use of the mower on the wrong tractor;
•Lack of maintenance
•Unauthorised modifications or work carried out on the machine
•Use of non-original spare parts or those which are not specific to the machine
•Failure to observe all or some of the instructions & exceptional weather conditions.
DELIVERY OF THE MOWER
All mowers are tested in our plants to ensure that all moving parts operate correctly. All items are thoroughly
checked before dispatch or delivery. When the implement is received, always check that it has not been
damaged during transport. Contact your dealer if such damage is discovered.
The machine is usually delivered partially disassembled and wrapped in a heat-sealed film. The disassembled
parts are contained inside the packing, attached firmly to the machine
Hoisting & Handling the Packed Machine
Do not place the packed machines on top of each other as the packing is not designed to be piled up.
•Hoisting with a Forklift
Open the forks as wide as possible, hoist the machine using a lift truck, with an adequate carrying capacity to lift
the machine, checking its weight in the table on page 15.Check that the load is stable and well positioned on
the truck forks.
Keep the load as low as possible when moving the implement. This will ensure greater stability and visibility.
•Hoisting with a Crane or Bridge Crane
There is a small eyelet in the upper part of the machine to facilitate its hoisting. When hoisting the machine, only
hook up to this eyelet, not any other part. Take care to avoid swinging the load as this could be hazardous for
the operator and the machine could be damaged. Use chains, cables and hooks whose capacity is greater than
the load to be hoisted. Take particular care to use chains or cables that are intact and show no signs of fraying
or wear, which could put the user's safety at risk.

8
ASSEMBLING THE MOWER & HITCHING TO TRACTOR
Handle all the heavy parts with a hoist whose capacity is greater than the load to be hoisted. Make sure all the
units and parts are supported by suitable harnesses and hooks. Make sure there is no one near the load to be
hoisted. Handle all the parts with care. Never put your hands or fingers between the parts. Always wear
approved accident prevention gear. Make sure the tools supplied with the machine are in good working order.
Never use tools with upset or deformed heads. After the machine has had a part dismounted and then
remounted, it must be tested to check the new part has been mounted correctly.
The mower may be supplied in a variety of ways:
1) mower with rear discharge;
2) mower with side discharge;
3) mower with rear discharge and side discharge transformation kit;
4) mower with side discharge and rear discharge transformation kit;
5) mower-machine base and transformation kit for both side and rear
discharge versions.
Important: The user is responsible for the following:
•the assembly of the separate pieces;
•transforming the machine from rear to side discharge versions or vice versa.
The operator responsible must have the necessary skills and background to carry out the operations required
correctly and safe
Assembling the Mower –With Rear Discharge Unit
Ref No Description Ref No Description
1Three point
attachment 12 M12 Nut -Auto Lock
2M12 x 20 Screw (UNI 5737) 13 Guard
3M10 x 30 Screw (UNI 5739) 14 M8 x 20 Screw (UNI 5739)
4M10 Nut 15 Conveyor
5M12 Nut -Auto Lock 16 M10 x 20 Screw (UNI 5739)
6M12 x 35 Screw (UNI 5739) 17 Washer M10
7M12 Nut -Auto Lock 18 Washer M10
8M12 x 35 Screw (UNI 5739) 19 M10 x 20 Screw (UNI 5739)
9M12 Nut -Auto Lock 20 Guard
10 Wheel with support 21 Washer M10
11 M12 x 40 Screw (UNI 5739) 22 M10 x 20 Screw (UNI 5739)
•
Mount the three-point attachment "1"
on the machine base using the
relative screws, nuts and pins
•Mount the guard 13 using the screws
"14".
•Mount the four wheels "10" using the
screws "11 " and the nuts "12".
•Mount the conveyor "15" using the
screws "16" and "19" and the
washers "17"and "18". Fig. 5.1
WARNING: Make sure all the guard chains
"A " are mounted in the correct position.
Mount the guard "20" using the screws "22"
and the washers "21"
Fig.
5.1

9
Assembling the Mower –With Side Discharge Unit
Ref No Description Ref No Description
1Three point
attachment 10 Wheel with support
2M12 x 20 Screw (UNI 5737) 11 M12 x 40 Screw (UNI 5739)
3M10 x 30 Screw (UNI 5739) 12 M12 Nut -Auto Lock
4M10 Nut (UNI 5588) 13 Guard
5M12 Nut -Auto Lock 14 M8 x 20 Screw (UNI 5739)
6M12 x 35 Screw (UNI 5739) 15 Conveyor
7M12 Nut -Auto Lock 16 M10 x 20 Screw (UNI 5739)
8M12 x 35 Screw (UNI 5739) 17 Washer M10
9M12 Nut -Auto Lock
Transforming the Rear Discharge Mower into the Side Discharge Version (MR150 & MR180 only)
•
Mount the three-point
attachment "1 " on the
machine base using the
relative screws, nuts and pins.
•Mount the guard "13" using the
screws "14".
•Mount the four wheels "10"
using the screws "11 " and the
nuts "12".
•Mount the conveyor "15" using
the screws "16" and the
washers "17". Fig. 5.2
Step 1:
Dismount the rear conveyor "1";
Dismount the guard "2".
Fig. 5.3
Fig. 5.2
Fig.
5.3

10
Transforming the Side Discharge Mower into the Rear Discharge Version
S
tep 2
:
Dismount the internal
conveyor "3".
Fig. 5.4
Step 3
:
Mount the rearguard "1"
using the screws "2" and the
washers "3".
Mount the side conveyor "4"
using the screws "5" and the
washers "6".
Fig. 5.5
Step 1
:
Unscrew screws "2" and
dismount the rearguard "1";
unscrew screws "4" to
dismount the side guard "3".
Fig. 5.6
Step 2
:
•-Mount the rear conveyor "1" using
the screws "2"(M10x20UN15739) and
the washers "3" (0 10).
•-Mount the side guard "4" using the
screws "5" (MI Ox 20 UN1 5739) and the
washers "6" (0 10).
WARNING: Make sure all the guard chains "A "
are mounted in the correct position. Fig. 5.7
Mount the guard
Fig.
5.4
Fig.
5.5
Fig.
5.6
Fig.
5.7

11
Hitching the Mower to the Tractor
Check that all the guards and shields listed on page 6 are installed and efficient. Always operate on a flat and
levelled surface when hitching the implement to the tractor. This will prevent dangerous movements.
Keep the hands and feet well away from the knives when hitching the mower to the tractor. Never allow anyone
to stand between the tractor and the mower.
The implement must be used with a suitable tractor. Pay particular care when checking the following conditions:
•Stability -the weight and dimensions of the implement must suit the technical specifications of the
tractor. An initial indication as to the most suitable tractors is given in the "Average power" column in
technical data information on page 15 and introduction
•Maximum tractor power rating -Consult the values in the "Maximum power" column on page 15 –
Technical Data
•PTO speed -Consult the values in the "PTO speed" column on page 15 –Technical Data when
choosing the work speed.
The user shall ensure that the implement is fit for use with the tractor in his possession.
Prevent damage to the gears by checking the level of lubricant in the gearbox before using the mower. Top up
with oil of the same type if necessary. Check that the rotors supports have been greased. Consult page 15 for
the required type of lubricant. Check that the blades are free from foreign bodies. Very worn or broken knives
must be replaced in compliance with the instructions in Maintenance section –page 15. Check that all warning
and danger stickers are installed and legible. Replace them if necessary. Check that the tractor is in a good
condition. Check the oil levels in the engine, gearbox and brakes. Check the cooling water level and tyre
pressure. Always refer to the instruction manual supplied with the tractor.
Reverse the tractor towards the mower, aligning the tractor lift links with the two side coupling pins "1" (Fig. 5.9)
Turn off the tractor engine, remove the ignition key from the dashboard and insert the brake.
Insert the ends of the lift links into implement coupling pins "1". Fix them in place by means of the relative safety
pins “2” (Fig. 5.9)Fix the top link “12” (Fig. 5.10)of the three-point hitch “11” and adjust it until the PTO of the
implement is parallel to the ground. If used on uneven land, fix rod “12” into the oval hole.
Start the tractor engine and lift the mower from the ground. Now switch off the tractor engine. Operate lift link rod
“13” to prevent excessive oscillations to the side. Oscillation of about 50 mm each side (2 inches) is
Step 3
:
Mount the guard "7" using the screws "8" Fig.
5.8
Fig.
5.8
Fig.
5.9
Fig.
5.10
Fig 5.11

12
recommended. Level the mower at the sides by adjusting the tractor lift links. The knives must be at the same
distance from the ground on both sides of the implement. Mount the driveline, checking that it correctly meshes
at both ends.
Consult the descriptions on the following pages for greater details. If a safety system is required, this must be
mounted from the side of the implement and not from the side of the tractor. Check that the driveline is the
correct length
The minimum coupling length must be no less than 150 mm (6 inches) in each work position. Driveline travel
must still be about 25 mm (1 inch) in the maximum coupling position. (Fig. 5.11)
These are the correct regulations for safe working conditions. If the driveline is too short and tends to slip out of
place, it must be replaced with a longer one
PTO SHAFT LENGTH
The tractor PTO shaft length may be altered to suit the
individual tractor model. When the machine is in operation, the
PTO shaft should have a minimum 1/3 engagement as shown
in the diagrams to the right . (Fig. 5.12)
Contact your nearest dealer or a specialised retail outlet if the
PTO must be replaces with a longer one, since this must
belong to the same power category and possess the same
characteristics
If the PTO shaft is too long, it should be shortened in the
following way:
•Set the machine at a minimum distance from the tractor,
the brake the tractor and switch off the engine.
•Separate the two halves of the PTO. Insert the female part
into the tractor PTO and the male part into the mower PTO,
checking that the position is correct by means of the fixing
pins.
•Near the two halves of the PTO together, keeping them
parallel.
•Using a marker pen, match mark the place where the two
halves must be shortened as shown.
•First cut shield “1” and use part “2” as a reference to cut the
splined shaft. (Fig 5.13)
•Proceed in the same way for the second half.
•Trim and chamfer the two cut ends of the PTO and clean
off all swarf and shavings. (Fig 5.14)
•Grease the two profiles and join the two halves of the PTO
together again.
•Mount the PTO shaft and check that its length is correct as
before. The shaft must not reach the end of the tube or
project from this.
Fig.
5.12
(Fig 5.14)
Fig 5.13

13
OPERATION & USE OF THE MOWER
Driving on the Roads
When driving on public roads with the mower attached to the tractor, always respect the highway code. Check
that the reflectors, hazard flashers and/or slow vehicle and/or projecting load indicators are installed when
required, and efficient. These indicators must be installed at the rear of the implement. They must be clearly
seen by the drivers of other vehicles behind. If the implement must be transported at night or in other conditions
of poor visibility, it should be equipped with sidelights of the type approved by the Highway Code regulations in
force. During transport, the mower should be kept completely lifted with the PTO disengaged. No one must be
allowed to lean against and/or climb on to the
mower during either work or transport.
Preparing the Mower for Work
Always be careful to check that the power rating of the tractor used to tow the implement does not exceed the
maximum power rating for the model in your possession (Consult Maintenance Section page 15). Check that
the speed of the PTO complies with the speed required by the implement. Compare the values on the shield of
the PTO shaft.
IMPORTANT: Comply with these instructions in order to prevent early faults and damage to the implement.
Every time the mower is adjusted, the procedure must be as follows:
•Disengage the power takeoff;
•Insert the tractor brake;
•Turn off the tractor engine;
•Remove the ignition key from the dashboard.
Keep body parts clear of the rotating blades. Wait for them to stop moving.
The cutting height is regulated by the four wheels. All four wheels must be adjusted in the same way so that the
machine will cut the grass uniformly and will not be damaged.

14
Using the Mower
Before working always check that all the safety shields listed in page 6are installed, correctly mounted and
efficient. Failing this, stop the mower and replace or repair the damaged shields. Never continue work until all
the shields installed by the manufacturer are efficient. Contact your nearest after-sales service centre if
necessary. Always become familiar with mower use before working with the implement. Make sure that you
know how to quickly stop the work operations.
Step 1: Lower the machine until the four wheels are resting on the ground.
Step 2: If any further adjustments are necessary, carry out the work as described in the paragraph –Adjusting
the Cutting Height
Step 3: Accelerate the tractor by depressing the accelerator pedal to about half its travel and then engage the
PTO.
Step 4: Advance with the tractor, setting the PTO to the required rpm rate (usually 540 or 1000 rpm). The
travelling speed of the tractor must be selected according to the grass to be cut, its quantity and the cutting finish
required. Optimum work speeds will be between 3 and 8 Km/hour (2/5 mph).
Adjusting the Cutting Height
–
Fig 6.1
To alter the cutting height, proceed as follows:
•Remove the split pin 1
•Slide out the wheel axle 2;
•Slide the spacers supplied with each wheel or parts of these
spacers onto the wheel axis 2 according to the height
required.
•Mount the wheel axis 2 onto the wheel support 3, slide any
remaining spacers on and lock them in place with the split
pins 1 (see fig. 6.1). The spacers are all different-sized to
enable the height to be altered as accurately as possible.
The more spacers are placed below the wheel support "3",
the further away the blades will be from the ground (until
reaching the maximum cutting height).
IMPORTANT: However the spacers are laid out, the wheel axle must
have the minimum clearance.
CAUTION: Always check that the driveline is unable to touch the
implement when the mower is raised from the ground.
Important:
•The cutting finish will better if the tractor travels slowly while
operating. Always raise the implement from the ground during
manoeuvres, round bends and when reversing. After having
worked for a few meters, stop and check whether the desired
result is being obtained. Make any adjustments as may be
necessary and then continue with the job.
•Never reverse with the implement unless this is strictly
necessary. In such cases, disengage the pto and carefully
check to see whether there are any obstructions at the rear.
•
Never lift the implement more than 250 mm from the ground with the pto engaged or the driveline
could break and risk injury to the operator. The maximum tilt the driveline can bear with the PTO
engaged is 35° (Fig. 6.2).
Fig. 6.1
Fig. 6.2

15
Demounting the Implement from the Tractor
•Disengage the PTO. Set the implement on a flat surface. Stop the tractor and engage the parking brake.
•Rest the mower on the ground.
•Switch off the tractor engine.
•Remove the ignition key from the dashboard.
•Remove the driveline.
•Block the mower's wheels with wedges or other suitable means.
•Detach the implement from the tractor by disconnecting the three-point hitch.
MAINTENANCE OF THE MOWER
The machine must always be disconnected from the tractor before any cleaning, lubricating and servicing
operations are carried out. If interventions must inevitably be carried out while the machine tool is still attached to
the tractor,
proceed as follows:
•disengage the power takeoff;
•insert the brake;
•turn off the tractor engine;
•remove the ignition key from the dashboard.
To prevent all risks, the operator should not merely trust in the hydraulic system of the tractor since this can be
liable to leaks able to lower the machine even when the engine is off. Always block the machine with a rigid
support when work must be carried out underneath.
Good, regular maintenance and correct use are essential if the mower is to remain safe and long lasting.
Respect the following rules, which can also be found on the plates attached to the machine.

16
Checks made in our Factory
Your implement will have been subjected to various tests and trials both in our factory and on the dealer's
premises. This procedure ensures that operation and the necessary adjustments will be correctly carried out. In
particular, the following inspections are made:
1. The implement is checked to see that the serial number and all stickers have been affixed.
2. All points are greased as described in Fig 7.5. The oil level in the gearbox is also checked.
3. The transmission belts are checked to ensure that their tension is correct.
4. Check for oil leaks.
5. Check to see that all safety devices are installed and efficient.
6. General inspection during operation.
Inspection before use
Inspect the knives to ensure that they are free from foreign bodies. Check the implement for wear and damage.
Particularly check that the knives, the drive belts and wheels are in a good condition. Check that all nuts and
bolts are fully tightened, with particular reference to the knife bolts. Check that the oil and greases in the various
points are at the correct level, as described below. Despite the previous inspections, lubricant may have partially
spilt during transport and need topping up.
Inspections to be made periodically
Every 8 hours service
•Grease the rotary shaft supports (see diagram below).
•Check the condition of the driveline and grease the joints
•Grease the wheel axles.
Every 50 hours service
•Check the belt tension.
•Check the oil level in the gearbox.
•Check the knives for wear. Replace them if necessary, in compliance with the instructions in paragraph
below.
•Demount and clean the driveline. Be sure to remove all foreign bodies from the sliding parts of the shaft.
•Cover the sliding parts with grease before remounting the driveline. Check that all nuts and bolts are
fully tightened.
Every 250 hours service
•Change the oil in the gearbox. Consult paragraph below for the recommended type of oil. The following
operations must be performed when carrying out the work required:
Cleaning & Greasing the Driveline
•Remove the splined parts.
•Using non-toxic and non-inflammable solvents, degrease the dirty parts, particularly the sliding
grooved sections and universal couplings. Use non-toxic, non-inflammable solvents to prevent the
risk of intoxication or fire outbreaks
•
Using a clean brush, spread a film of
grease on the surfaces of the sliding
section. (Fig 7.1) Consult paragraph
below for the recommended type of
grease.
•Grease the journals until grease oozes
from all the articulations of each journal.
Fig. 7.1
This manual suits for next models
2
Table of contents
Other Major Lawn Mower manuals

Major
Major SWIFT MJ71-190FM Installation and operation manual

Major
Major MJ36-140 Installation and maintenance instructions

Major
Major Verge Installation and operation manual

Major
Major Swift S2 MJ71-190 Installation and operation manual

Major
Major MJ71-190 User manual

Major
Major CS PRO MJ65-150 Installation and operation manual

Major
Major CYCLONE MJ31-200 Installation and maintenance instructions

Major
Major TDR Series Installation and operation manual

Major
Major CyClone MJ30-630 User manual