Malloca MOV-72 CB User manual

USER MANUAL
HƯỚNG DẪN SỬ DỤNG
Model: MOV-72 CB
L
Ò
N
ƯỚ
NG KẾT HỢP VI SÓNG
Â
M T
Ủ
HƯỚNG DẪN LẮP ĐẶT, SỬ DỤNG VÀ BẢO DƯỠNG
VN


SAFETY INFOR
Intended use
Warning
Causes of damage
28
28
TEST FOOD ACCORDING TO EN 60350-1
DATASHEET (EU 65/2014 & EU 66/2014)
AUTOMATIC RECIPES
ACCESSORIES
ENERGY EFFICIENT USE
ENVIRONMENT
HEALTH
MAINTENANCE YOUR APPLIANCE
APPLIANCE DOOR
CURE YOUR APPLIANCE WHEN NEEDED
CUSTOMER SERVICE
TIPS AND TRICKS
INSTALLATION
OPERATING THE APPLIANCE
Identifying the appliance
MOV-72 CB
Component
Before using the appliance
Types of heating
Using your appliance
CONTENTS
2
2
2
5
11
6
8
8
8
8
9
10
14
15
18
18
19
19
22
23
25
26

SAFETY INFORMATION
WARNING
Intended Use
Thank you for buying Malloca Build-in Microwave Combination Oven. Before unpacking
it, please read these instructions carefully. Only then will you be able to operate your
appliance safely and correctly. Warmly recommend retain the instruction manual and
installation instructions for future use or for subsequent owners.
The appliance is only intended to be fitted in a kitchen. Observe the special installation
instructions.
Check the appliance if there is any damage after unpacking it. Do not connect the appli-
ance if it has been damaged. Only a licensed professional may connect appliances
without plugs. Damage caused by incorrect connection is not covered under warranty.
Only use this appliance indoors. The appliance must only be used for the preparation of
food and drink. The appliance must be supervised during operation.
This appliance may be used by children over the age of 8 and by persons with reduced
physical, sensory or mental capabilities or by persons with a lack of experience or knowl-
edge if they are supervised or are instructed by a person responsible for their safety how
to use the appliance safely and have understood the associated hazards.
Children must not play with, on, or around the appliance. Children must not clean the
appliance or carry out general maintenance unless they are at least 8 years old and are
being supervised.
Keep children below the age of 8 years old at a safe distance from the appliance and
power cable.
And please always slide accessories into the cavity the right way round.
precautions to avoid possible exposure to excessive microwave energy
(a) Do not attempt to operate this oven with the door open since this can result in
harmful exposure to microwave energy. It is important not to break or tamper with the
safety interlocks.
(b) Do not place any object between the oven front face and the door or allow soil or
cleaner residue to accumulate on sealing surfaces.
(c) WARNING: If the door or door seals are damaged, the oven must not be operated
until it has been repaired by a competent person.
Risk of electric shock!
Incorrect repairs are dangerous. Repairs may only be carried out and damaged power
cables replaced by one of our trained after-sales technicians. If the appliance is
defective, unplug the appliance from the mains or switch o the circuit breaker in the
fuse box. Contact the aftersales service.
1.
2

Risk of burns!
The appliance becomes very hot. Never touch the interior surfaces of the appliance or
the heating elements.
Always allow the appliance to cool down.
Keep children at a safe distance.
Accessories and ovenware become very hot. Always use oven gloves to remove acces
sories or ovenware from the cavity.
Alcoholic vapors may catch fire in the hot cooking compartment. Never prepare food
containing large quantities of drinks with high alcohol content. Only use small quanti
ties of drinks with high alcohol content. Open the appliance door with care.
When heating food in plastic or paper containers, keep an eye on the oven due to the
possibility of ignition.
The contents of feeding bottles and baby food jars shall be stirred or shaken and the
temperature checked before consumption, in order to avoid burns.
Risk of scalding!
The accessible parts become hot during operation. Never touch the hot parts. Keep
children at a safe distance.
When you open the appliance door, hot steam can escape. Steam may not be visible,
depending on its temperature. When opening, do not stand too close to the appli-
ance. Open the appliance door carefully. Keep children away.
Water in a hot cavity may create hot steam. Never pour water into the hot cavity.
Risk of injury!
1.
2.
3.
4.
5.
6.
7.
1.
2.
3.
The cable insulation on electrical appliances may melt when touching hot parts of the
appliance. Never bring electrical appliance cables into contact with hot parts of
the appliance.
Do not use any high-pressure cleaners or steam cleaners, which can result in an
electric shock.
A defective appliance may cause electric shock. Never switch on a defective appli-
ance. Unplug the appliance from the mains or switch o the circuit breaker in the fuse
box. Contact the after-sales service.
2.
3.
4.
Scratched glass in the appliance door may develop into a crack. Do not use a glass
scraper, sharp or abrasive cleaning aids or detergents.
The hinges on the appliance door move when opening and closing the door, and you
may be trapped. Keep your hands away from the hinges.
1.
2.
3

Hazard due to magnetism!
Permanent magnets are used in the control panel or in the control elements. They may
aect electronic implants, e.g. heart pacemakers or insulin pumps. Wearers of electronic
implants must stay at least 10 cm away from the control panel.
Risk of fire!
Combustible items stored in the cavity may catch fire. Never store combustible items in
the cavity. Never open the appliance door if there is smoke inside. Switch o the
appliance and unplug it from the mains or switch o the circuit breaker in the fuse box.
A draught is created when the appliance door is opened. Greaseproof paper may come
into contact with the heating element and catch fire. Do not place greaseproof paper
loosely over accessories during preheating. Always weight down the greaseproof paper
with a dish or a baking tin. Only cover the surface required with greaseproof paper.
Greaseproof paper must not protrude over the accessories.
1.
2.
Use microwave carefully
Read and follow the specific:"PRECAUTIONS TO AVOID POSSIBLE EXPOSURE TO
EXCESSIVE MICROWAVE ENERGY".
WARNING: It is hazardous for anyone other than a competent person to carry out any
service or repair operation that involves the removal of a cover which gives protection
against exposure to microwave energy.
Only use utensils that are suitable for use in microwave ovens.
Microwave heating of beverages can result in delayed eruptive boiling, therefore care
must be taken when handling the container.
Eggs in their shell and whole hard boiled eggs should not be heated in microwave
ovens since they may explode, even after microwave heating has ended.
The microwave oven must be operated with the decorative door open. (for ovens with
a decorative door.)
The microwave oven is intended for heating food and beverages. Drying of food or
clothing and heating of warming pads, slippers, sponges, damp cloth and similar may
lead to risk of injury, ignition or fire.
Metallic containers for food and beverages are not allowed during microwave cooking.
WARNING: When the appliance is operated in the combination mode, children should
only use the oven under adult supervision due to the temperatures generated.
1.
2.
3.
4.
5.
6.
7.
8.
9.
4
3.WARNING: Liquids and other foods must not be heated in sealed containers since they
are liable to explode.
4. Microwave heating of beverages can result in delayed eruptive boiling, therefore care
must be taken when handling the container.

Causes of Damage
Accessories, foil, greaseproof paper or ovenware on the cavity floor: do not place
accessories on the cavity floor. Do not cover the cavity floor with any sort of foil or
greaseproof paper. Do not place ovenware on the cavity floor if a temperature of
over 50 ºC has been set. This will cause heat to accumulate. The enamel will be
damaged.
Aluminum foil: Aluminum foil in the cavity must not come into contact with the door
glass. This could cause permanent discoloration of the door glass.
Silicone pans: Do not use any silicone pans, or any mats, covers or accessories that
contain silicone. The oven sensor may be damaged.
Water in a hot cooking compartment: do not pour water into the cavity when it is
hot. This will cause steam. The temperature change can cause damage to the enamel.
Moisture in the cavity: Over an extended period of time, moisture in the cavity may
lead to corrosion. Allow the appliance to dry after use. Do not keep moist food in the
closed cavity for extended periods of time. Do not store food in the cavity.
Cooling with the appliance door open: Following operation at high temperatures, only
allow the appliance to cool down with the door closed. Do not trap anything in the
appliance door. Even if the door is only left open a crack, the front of nearby furniture
may become damaged over time. Only leave the appliance to dry with the door open
if a lot of moisture was produced while the oven was operating.
Fruit juice: when baking particularly juicy fruit pies, do not pack the baking tray too
generously. Fruit juice dripping from the baking tray leaves stains that cannot be
removed. If possible, use the deeper universal pan.
Extremely dirty seal: If the seal is very dirty, the appliance door will no longer close
properly during operation. The fronts of adjacent units could be damaged. Always
keep the seal clean.
Appliance door as a seat, shelf or worktop: Do not sit on the appliance door or place
or hang anything on it. Do not place any cookware or accessories on the appliance
door.
Inserting accessories: depending on the appliance model, accessories can scratch the
door panel when closing the appliance door. Always insert the accessories into the
cavity as far as they will go.
Carrying the appliance: do not carry or hold the appliance by the door handle. The
door handle cannot support the weight of the appliance and could break.
If you use the residual heat of the switched o oven to keep food warm, a high
moisture content inside the cavity can occur. This may lead to condensation and can
cause corrosion damage of your high quality appliance as well as harm your kitchen.
Avoid condensation by opening the door or use “Defrost” mode.
Operating the microwave without food: Operating the appliance without food in the
cooking compartment may lead to overloading. Never switch on the appliance unless
there is food in the cooking compartment.
1.
2.
3.
4.
5.
6.
7.
8.
9.
10.
11.
12.
13.
5

INSTALLATION
To operate this appliance safe , please be sure that it has been installed to a professional
standard respecting the installation instructions . Damages occur because of incorrect
installation are not within the warranty.
While doing the installation , please wear protective gloves to prevent yourself from
getting cut by sharp edges .
Check the appliance if there is any damage before installation and do not connect the
appliance if there is .
Before turning on the appliance , please clean up all the packaging materials and adhe-
sive film from the appliance.
The dimensions attached are in mm.
It is necessary to have the plug accessible or incorporate a switch in the fixed wiring, in
order to disconnect the appliance from the supply after installation when necessary.
Warning:The appliance must not be installed behind a decorative door in order to avoid
overheating.
+8
min.
600
min.
550
560
546
20
435
576
530
596
595
min.
550
560+8
460 460
105
min. 5
+8
105
min.35
min.
600
min.
550
560
546
20
435
576
530
596
595
590
min.585
max.595 min.
550
560+8
460 460
105
min. 5
min.35
min.35
6

INSTALLATION
1x 2 2x 2 3x 2
1
2
3
Once the oven has been lifted into place inside the appliance housing, locate the two holes
in the casing of the oven and fix it into place using , and .
Do not over tighten the screws to avoid damage to the oven or appliance
housing - use a screwdriver only!
1 2 3
Caution
1
7

IDENTIFYING THE APPLIANCE
Confirm the model number. You can distinguishmodel number by the control panel.
OPERATING THE APPLIANCE
8
MOV-72 CB
COMPONENT
1. ON/OFF
2. Micro wave symbol
3. Timer / Child-Proof Lock
4. End time
5. Quick preheat
6. F-symbol
7. Slider
8. Auto recipes
9. Clock/Time/Temperature
10. Weight
11.Lamp
12. Start
Usemicrowave and microwave combination function.
Usetimer function/use child-proof lock with 3s press
Set an end timetothe cooking duration.
Usethis to have aquick preheat.
Touch the F-symbol toselect functions. Youcan fast
switching by along press.
You can use the slider or “+/-“symbol nearby to
change the adjustment values shown in the display.
Press to use autorecipes.
Set clook instandby mode/Change between time
setting and temperature stting.
Press toset weight when you use autorecipes.
Start and pausethe cooking process.
1 2 3 4 5 6 7 8 9 1210 11

BEFORE USING THE APPLIANCE
First using for the first time
Before using the appliance to prepare food for the first time, you must clean the
cavity and accessories.
Remove all stickers, surface protection foils and transport protection parts.
Remove all accessories and the side-racks from the cavity.
Clean the accessories and the side-racks thoroughly using soapy water and a dish
cloth or soft brush.
Ensure that the cavity does not contain any leftover packaging, such as polystyrene
pellets or wooden piece which may cause risk of fire.
Wipe the smooth surfaces in the cavity and the door with a soft, wet cloth.
To remove the new-appliance smell, heat up the appliance when empty and with the
oven door closed.
Keep the kitchen highly ventilated while the appliance is heating up first time. Keep
children and pets out of the kitchen during this time. Close the door to the adjacent
rooms.
Adjust the settings indicated. You can find out how to set the heating type and the
temperature in the next section.
→"Using Your Appliance" on page 11
1.
2.
3.
4.
5.
6.
7.
8.
Heating Mode
Temperature
Time
250°C
1h
Settings
After the appliance has cooled down:
Clean the smooth surfaces and the door with soapy water and a dish cloth.
Dry all surfaces
Install the side-racks
1.
2.
3.
Setting the time
Before the oven can be used, the time should be set.
After the oven has been electrically connected, touch the clock symbol then you can
set time of day in hours by slider or “+/-“symbol.
Touch clock symbol again then you can set time in minutes by slider or “+/-“symbol.
Touch clock symbol to finish the setting.
1.
2.
3.
NOTE: The clock has a 24 hour display.
9
TYPES OF HEATING
Your appliance has various operating modes which make your appliance easier to use.
To enable you to find the correct type of heating for your dish, we have explained the
dierences and scopes of application here.
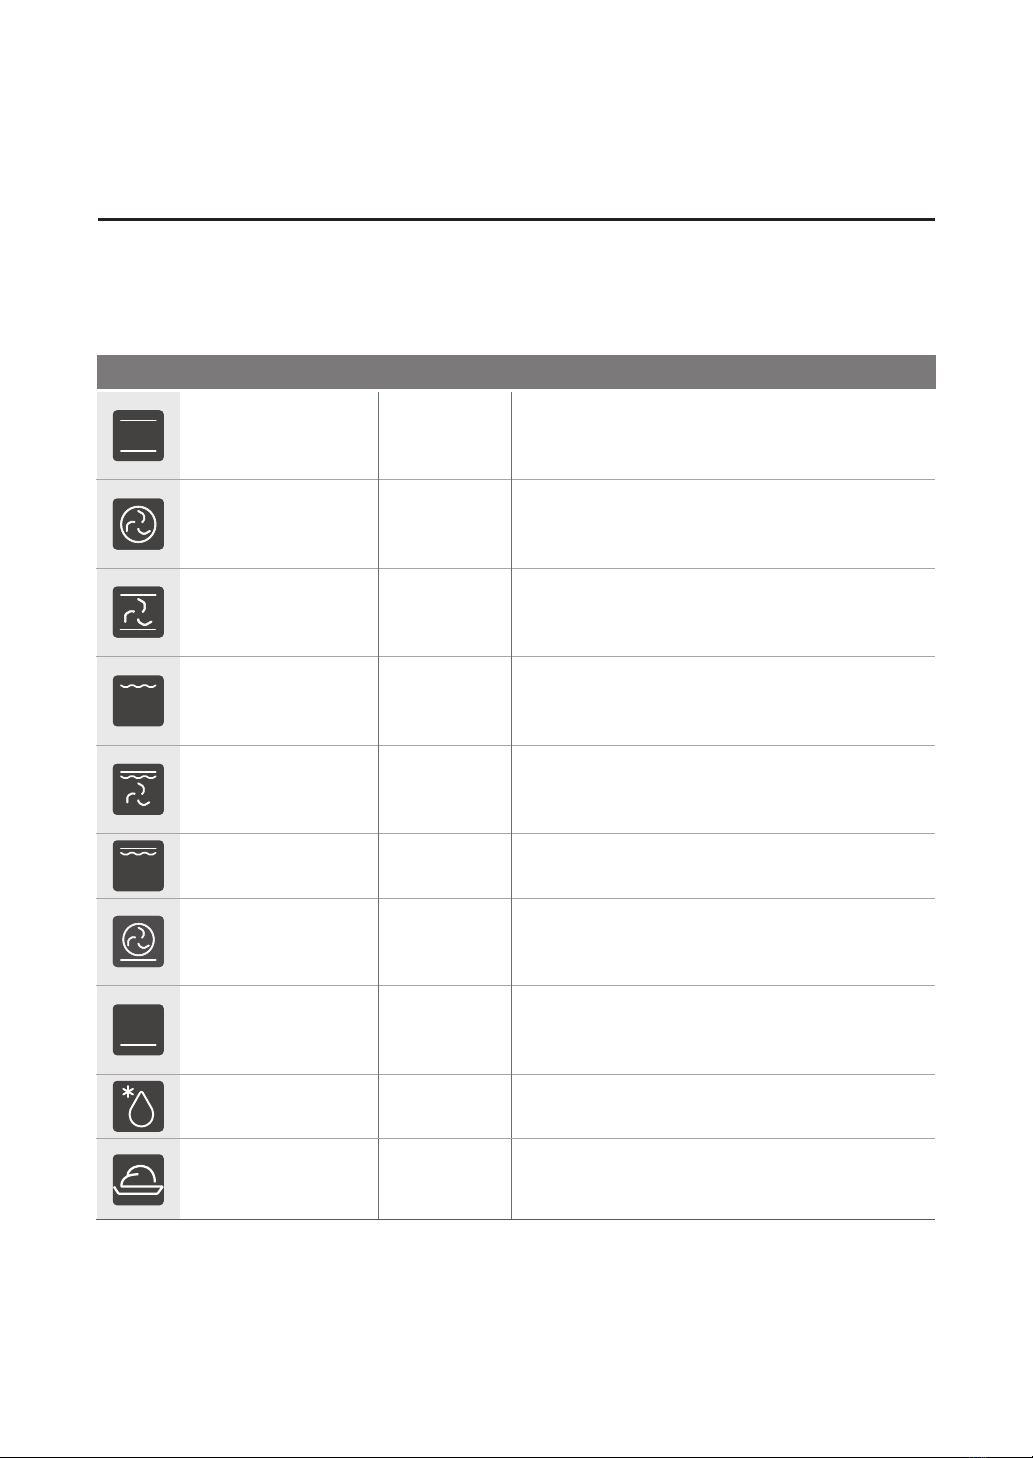
Types of Heating Temperature Use
Conventional 30~250℃
For traditional baking and roasting on one
level. Especially suitable for cakes with
moist toppings.
Convection 50~250℃
For baking and roasting on one or more
levels. Heat comes from the ring heater
surrounding the fan evenly.
Conventional + Fan 50~250℃
For baking and roasting on one or more
levels. The fan distributes the heat from the
heating elements evenly around the cavity.
Radiant Heat 150~250℃
For grilling small amounts of food and for
browning food. Please put the food in the
center part under the grill heating element.
Double Grill + Fan 50~250℃
For grilling flat items and for browning
food. The fan distributes the heat evenly
around the cavity.
Dough Proving 30~45℃For making yeast dough and sourdough to
prove and culturing yogurt.
Defrost _For gently defrosting frozen food.
Double Grill 150~250℃For grilling flat items and for browning food.
Pizza 50~250℃
For pizza and dishes which need a lot of
heat from underneath. The bottom heater
and ring heater will work.
Bottom Heat 30~220℃
For add extra browning to the bases of
pizzas, pies, and pastries. Heating come
from the bottom heater.
10

Notes
USING YOUR APPLIANCE
1.
2.
3.
To defrost big portions of food, it is possible to remove the side-racks and place the
container on the cavity floor.
To warming tableware, it is beneficial to remove the side-racks and the heating modes
“Hot Air Grilling” and “Fan Heating” with temperature setting of 50°C are useful. “Hot Air
Grilling” should be used, if more than half of the cavity floor is covered by the tableware.
Due to an optimum evenness of heat distribution inside the cavity during “Fan Heat-
ing”, the fan will work at certain times of the heating process, to guaranty the best
possible performance.
Cooling fan
The cooling fan switches on and o as required. The hot air escapes above the door.
Caution!
Do not cover the ventilation slots. Otherwise, the appliance may overheat.
To make the appliance cools down more quickly after the operation, the cooling fan may
continue to run for a period afterwards.
Cooking with oven
1.
2.
3.
NOTE: After temperature setting, you can touch clock symbol to set the cooking
duration time, you can set it by slider or “+/-“symbol.
After the oven has been electrically connected, touch the oven-function symbol to
select functions, use the slider or “+/-“symbol to set cooking temperature.
Touch START/PAUSE symbol, oven begin to work, if not, oven will back to clock after 5
minutes.
During the cooking process, you can touch to cancel it.
Quick preheat
You can use quick preheat to shorten the preheat time. When you select a function,
touch the quick preheat symbol ,the mark of quick preheat in the screen will lights
up. If this function can’t quick preheat, then there will be a “beep”, there is no quick
preheat in auto recipes, defrost and dough proving.
Caution!
If you open the appliance door during an on-going operation, the operation will be
paused. Please be especially careful with the risk of burns.
11
Notes
Set a finish time
Then you finished the time setting, you can set a time when cooking end.
Change during cooking
Changing modes/temperature/rest cooking time may have some negative influences for
the result of cooking, we warmly recommend you not to do so unless you are well
experienced on cooking.
Caution!
After the appliance switched o, it becomes very hot especially inside the cavity. Never
touch the interior surfaces of the appliance or the heating elements. Use oven gloves to
remove accessories or ovenware from the cavity, and allow the appliance to cool down.
Keep children at a safe distance at the same time to avoid the injury of burns.
Touch , then you can use slider or “+/-“symbol to set end time in hours, touch
again then set it in minutes. When you finished the setting, touch to make sure.
When you set the end time, you need set cooking duration time. Please check cook-
ing with oven→NOTE to see how to set cooking duration time.
For example, when you set end time is 10 o’clock, and cooking duration time is 1 hour,
then oven will heat up at 9 o’clock, and finish at 10 o’clock.
1.
2.
3.
During the period of appliance operating, you can change the heating type setting and
temperature setting by oven-function or slider. After the change, if there no other action
after 6 seconds the oven will heat as what you changed.
If you want change cooking duration time in the cooking process, please touch
and change it by slider or “+/-“symbol. After the change, if there no other action after 6
seconds the oven will work as what you changed. During the cooking process with a end
time setting, or in the auto recipes, you can’t do any change.
When you want cancel the cooking process, please touch .
You can use timer function by touch . When the time arrived, oven will give “beep”
for remind. At the first touch of , set timer by hours, then touch again, set timer
by minutes. Touch again and the setting is finished.
You can set the timer before and during cooking process, but when you are selecting
function and temperature, it’s not available.
Timer
12
again then set it in minutes. When you finished the setting, touch to make sure.
When you set the end time, you need set cooking duration time. Please check cook-
ing with oven→NOTE to see how to set cooking duration time.
For example, when you set end time is 10 o’clock, and cooking duration time is 1 hour,
then oven will heat up at 9 o’clock, and finish at 10 o’clock.
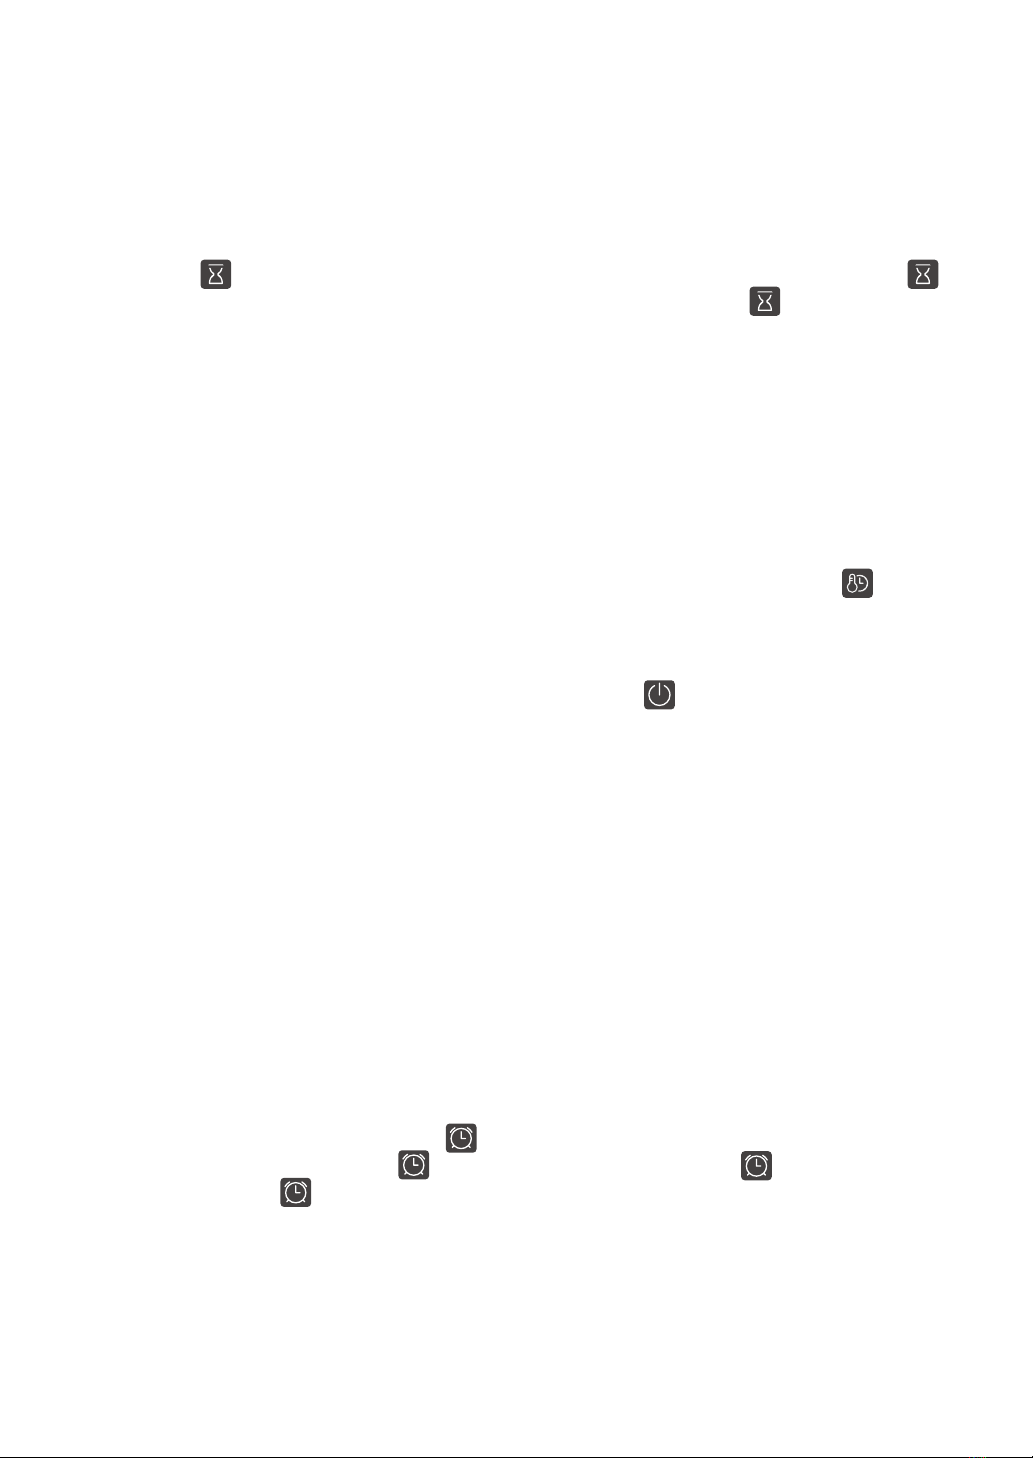
1. Your appliance has 4 kinds of microwave functions, including single microwave and
microwave combination.
Microwave and microwave combination
Types of Heating Default power
Microwave 800W
Microwave +
convection 320W
320W
Microwave +
pizza mode 320W
Default
temperature
/
160℃
180℃
180℃
Temperature
/
50~250℃
50~250℃
50~250℃
Time
00: :00min
00:01-01:30hr
00:01-01:30hr
00:01-01:30hr
Microwave +
double grill+
fan
10-30
13
543 2 1
Microwave Power 100% (800) 70% (560) 50% (400) 30% (240) 10%
(80)
combination Power 40% (320) 30% (240) 20% (160) 10%
(80)
2. The standby state is pressed by the microwave key, the microwave function is selected,
the microwave icon is lit, the default time is 1 minute, the default power is 800W, and
then the microwave bond is pressed, the power is flashing, and the microwave power can
be changed by pressing the sliding slider. The change range is 80W~ 800W, a total of
5 paragraphs, see the list below.
3.
4.
5. Always press the microwave key to cancel the microwave function for 3 seconds.
6. The power of the microwave and combination function can be remembered after the
standby state is selected. Until the menu is run or the cancel key is cancelled, the default
value is returned.
Press the time key, microwave time flicker, press slide bar to change the microwave time,
change the range of 10seconds to 30 minutes, step in 10 seconds within 15 minutes, step
in more than 15 minutes for 30 seconds.
General .hot air tube, upper tube + infrared + hot fan, pizza three menus can be combined
with microwave function, choose other menus and press microwave keys invalid,
accompanied by invalid buzzer.
When microwave cooking is suspended, time and power flashing display.
2. In the suspended state, press the microwave key first, then press the “+,-” sign or
sliding slider to change the microwave power.
Note
1.

Note
When you cook with recipes d01, d02, d03, A01, A02, the tray can’t be used.
AUTOMATIC RECIPES
Your oven has a wide range of Automatic programs to enable you to achieve excellent
results with ease. Simply select the appropriate program for the type of food you are
cooking and follow the instructions in the display.
MicrowaveRecipesNO Weight
d01
d02
YES
YES
YES
YES
YES
NO
NO
NO
NO
NO
NO
NO
NO
Preheat(min)
NO
NO
NO
NO
8
8
NO
7
NO
NO
NO
NO
10
0.2Kg
0.2Kg
/
/
1Kg
/
/
/
0.2Kg
0.1Kg
d03
A01
A02
A03
A04
A05
A06
A07
A08
A09
A10
Defrost (Meat)
Defrost (Poultry)
Cheese Cake
Quiche Loraine
Meatloaf
Defrost (Fish)
Marmor Cake
Flat Bread
Apple Pie
Fresh Pizza on a Tray
Apple Cake with Crumbles
Popcorn
Potato cheese gratin 0.5Kg
/
/
14
Childproof lock
In standby, reminder, reservation and menu work, pause state, longpress the reminder
key 3s, beep, lock, Child Lock Icon Lit; Then Long Press the reminder key 3s, beep,
unlock, child lock icon extinguished.
In the child lock state, the microwave function can not be cancelled.

ACCESSORIES
Your appliance is accompanied by a range of accessories. Here, you can find an overview
of the accessories included and information on how to use them correctly.
Accessories included
Your appliance is equipped with the following accessories:
For ovenware, cake tins and
ovenproof dishes. For roasts
and grilled food
For tray bakes and small
baked products.
Wire Rack Baking Tray
You can use the tray to place liquid or cooking food with juice.
Only use original accessories. They are specially adapted for your appliance.
You can buy accessories from the after-sales service, from specialist retailers or online.
15
Note
The accessories may deform when they become hot. This does not aect their function.
Once they have cooled down again, they regain their original shape.
The wire rack can be used not only for grill cooking, but also for microwave cooking.
And, the tray can't be used for microwave cooking.
The second layer of the appliance is recommended for microwave function which
cooking best.
Do not use microwave function without any food in the cavity.
1.
2.
3.
4.
1.
2.
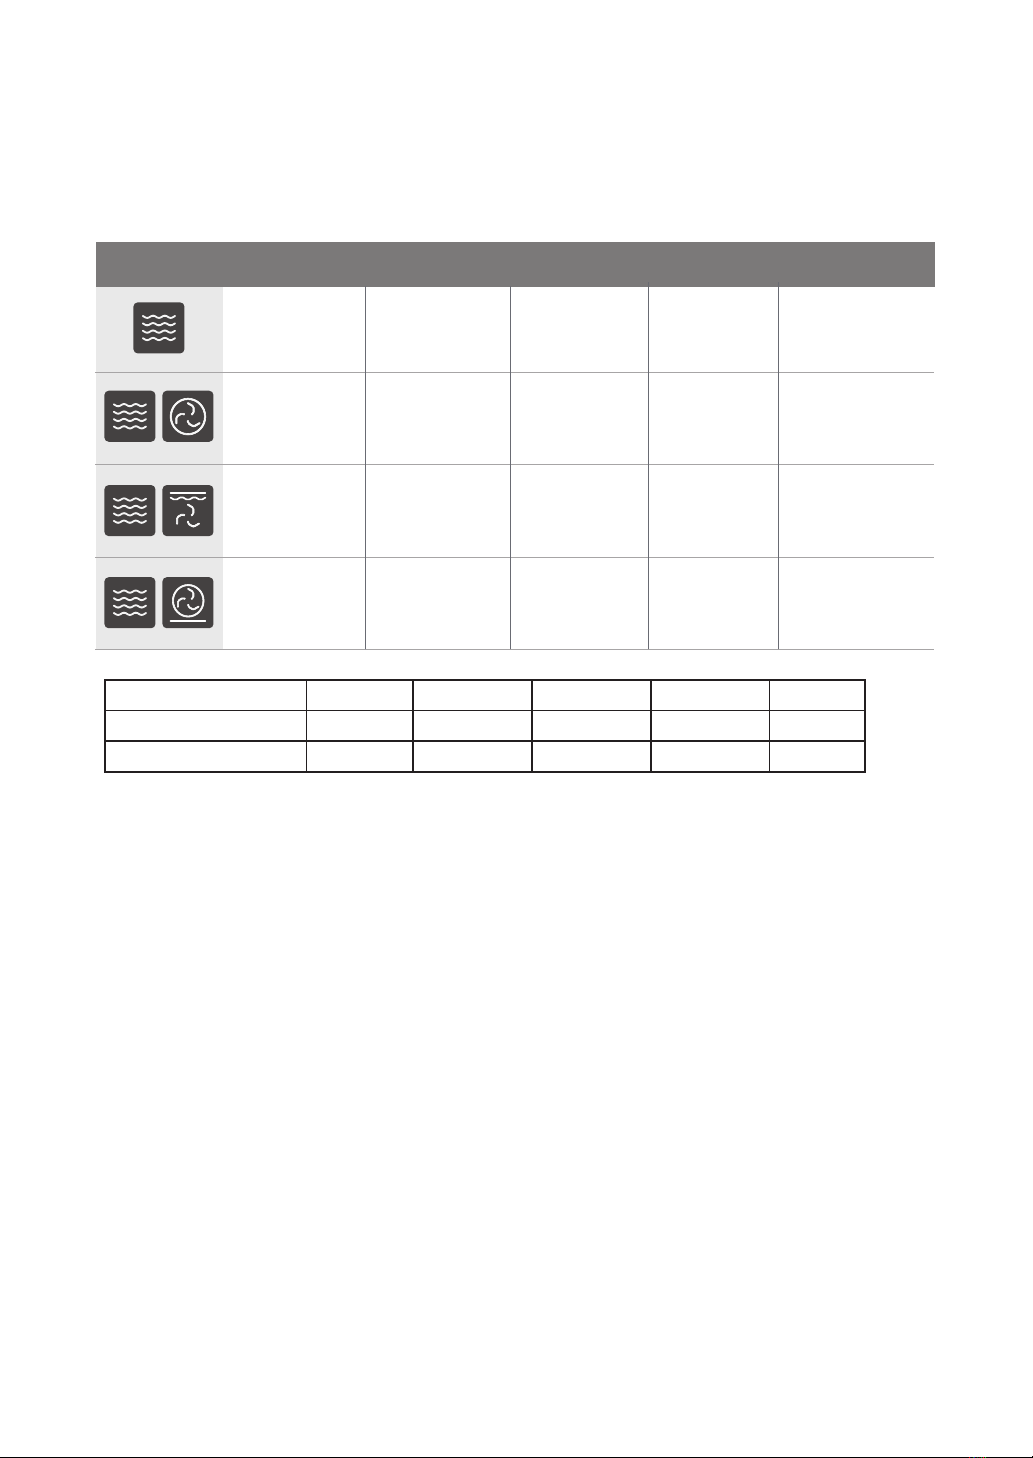
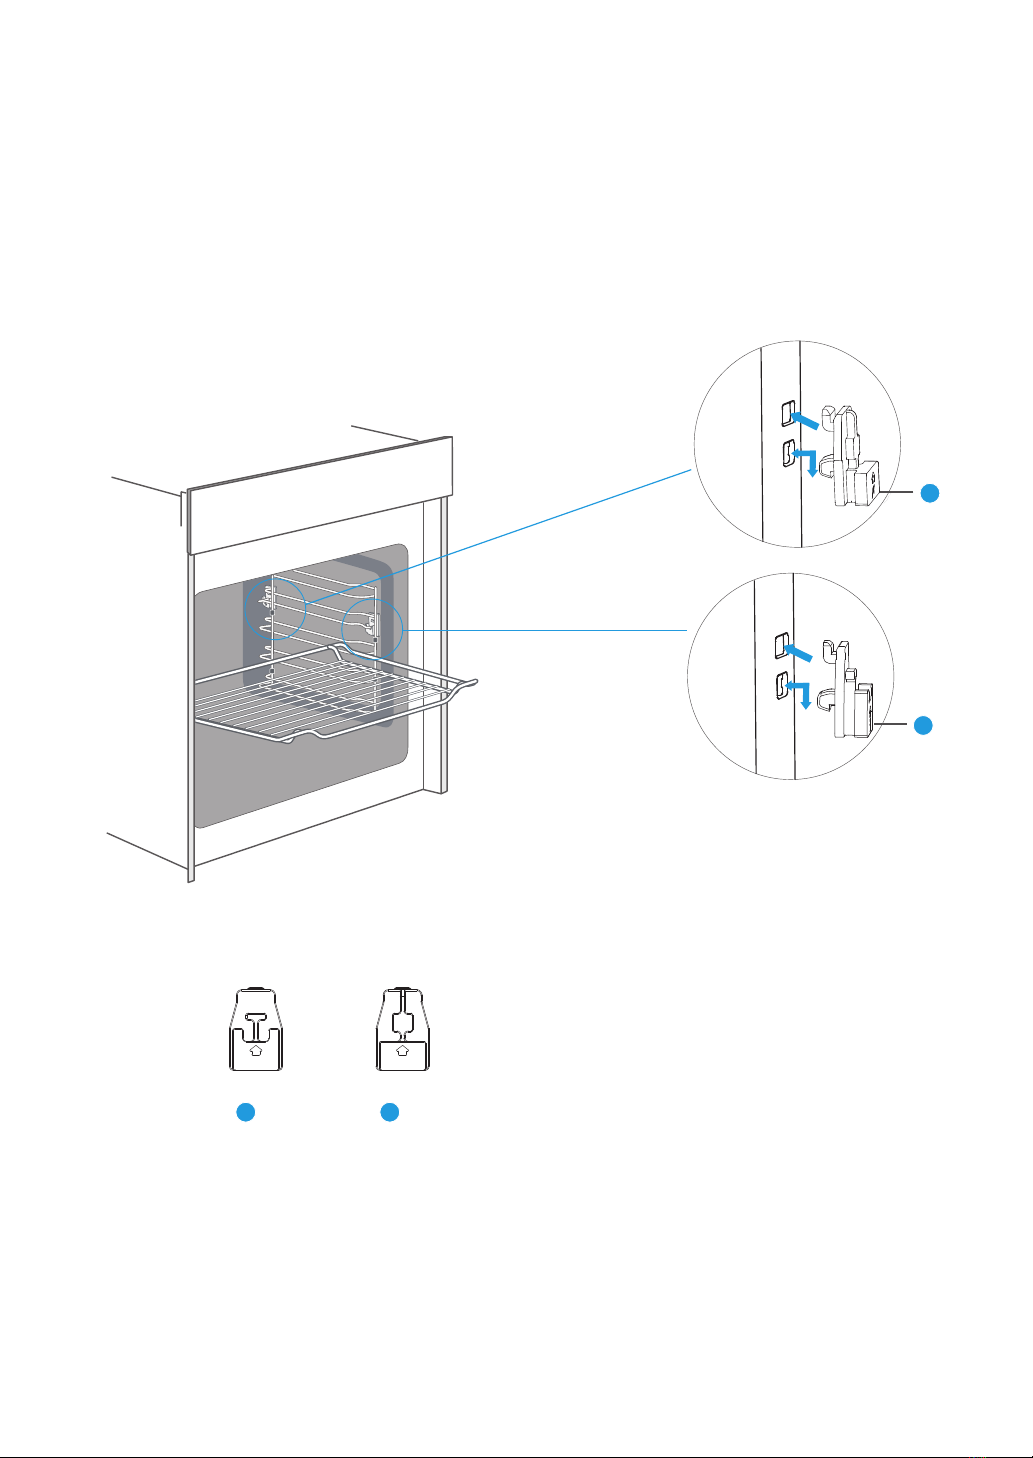
Inserting accessories
The cavity has five shelf positions. The shelf positions are counted from the bottom up.
The accessories can be pulled out approximately halfway without tipping.
Notes
Ensure that you always insert the accessories into the cavity the right way round.
Always insert the accessories fully into the cavity so that they do not touch the
appliance door.
Locking function
The accessories can be pulled out approximately halfway until they lock in place. The
locking function prevents the accessories from tilting when they are pulled out. The
accessories must be inserted into the cavity correctly for the tilt protection to work properly.
When inserting the wire rack, ensure the wire rack is onto the right facing direction like
the picture .
3
When inserting the backing tray, ensure the backing tray is onto the right facing direction
like the picture .
1 4
1 3
4
5
4
3
2
1
2
1
44
16
Inserting accessories
21
1
The ceramic clips
x 2 x 2
F R
2
2
2
17

ENERGY EFFICIENT USE
ENVIRONMENT
Remove all accessories, which are not necessary during the cooking & baking process.
Do not open the door during the cooking & baking process.
If you open the door during cooking & baking, switch the mode to “Lamp” (Without
change the temperature setting).
Decrease the temperature setting in not fan assisted modes to 50°C at 5min to 10min before
end of cooking & baking time. So you can use the cavity heat to complete the process.
Use “Fan Heating”, whenever possible. You can reduce the temperature by 20°C to 30°C.
You can cook and bake using “Fan Heating” on more than one level at the same time.
If it is not possible to cook and bake dierent dishes at the same time, you can heat
one after the other to use the preheat status of the oven.
Do not preheat the empty oven, if it is not required.
If necessary put the food into the oven immediately after reaching the temperature
indicated by switching o the indicator light the first time.
Do not use reflective foil, like aluminum foil to cover the cavity floor.
Use the timer and or a temperature probe whenever possible.
Use dark matt finish and light weighted baking molds and containers. Try not to use
heavy accessories with shiny surfaces, like stainless steel or aluminum.
Do not use microwave function without any food in the cavity.
1.
2.
3.
4.
5.
6.
7.
8.
9.
10
11.
12.
The packaging is made for protect your new appliance against damages during transport.
The materials used are selected carefully and should be recycled. Recycling reduces the
use of raw materials and waste. Electrical and electronic appliances often contain valu-
able materials. Please do not dispose of it with your household waste.
18
Table of contents
Languages:
Other Malloca Microwave Oven manuals

Malloca
Malloca MW-944R User manual

Malloca
Malloca MW-927J User manual

Malloca
Malloca MW-820B User manual

Malloca
Malloca BMG25BK User manual

Malloca
Malloca MW-925BF User manual

Malloca
Malloca MW 927BG User manual

Malloca
Malloca MW-40CP User manual

Malloca
Malloca MW-944TA User manual

Malloca
Malloca MW-LX12 User manual

Malloca
Malloca MW35-IX03 User manual


