MAMMOTION LUBA User manual

LUBA Robotic LawnMower
User Manual
V1.1

1
LUBA Robotic LawnMower
..........................................................................................................................................1
1. Safety andRegulations ...........................................................................................................................................................................1
2.Introduction..............................................................................................................................................................................................2
3.Preparation &Activation...........................................................................................................................................................................6
4.Charging Station &RTK Reference Station Installation..........................................................................................................................13
5.Initialization of LUBA .............................................................................................................................................................................23
6.Setup Mowing Task...............................................................................................................................................................................26
7.Start Mowing .........................................................................................................................................................................................28
8.How to feed back...................................................................................................................................................................................30
9.Cutting Blades Replacement.................................................................................................................................................................30
10.Specifications:.....................................................................................................................................................................................33

1
Thank you for choosing MAMMOTION as your garden carelawn mower.This Quick Start
Guide will help you learn and operate MAMMOTION LUBA.
1. Safety andRegulations
Operating MAMMOTIONLUBA requests training and practice. Please readthroughthis document
before operating it in yourgarden.
Do NOT charge the LUBA by third-party charger
Do NOT flip over the mower when it’s running
Do NOT put your feet/hands under the mower when it’s running
Do NOT push/pull the mower when it’s running
Do NOT disassemble any parts when it’s powered
Do NOT use hands to touch or replace the running blades
Do NOT use hands to touch the charging ports
Do NOT run mower in the puddle
Do NOT run mower on ground with sticks or rubbles
Clean the lawn before deploying the mower for work
Keep the charging port clean and dry
2
2.Introduction
2.1 About MAMMOTIONLUBA
MAMMOTIONLUBA is a 4-wheels-differential(4WD) robotic lawn mower.The 4WD
enablesLUBAtobreakthelimitsofmowing jobs.
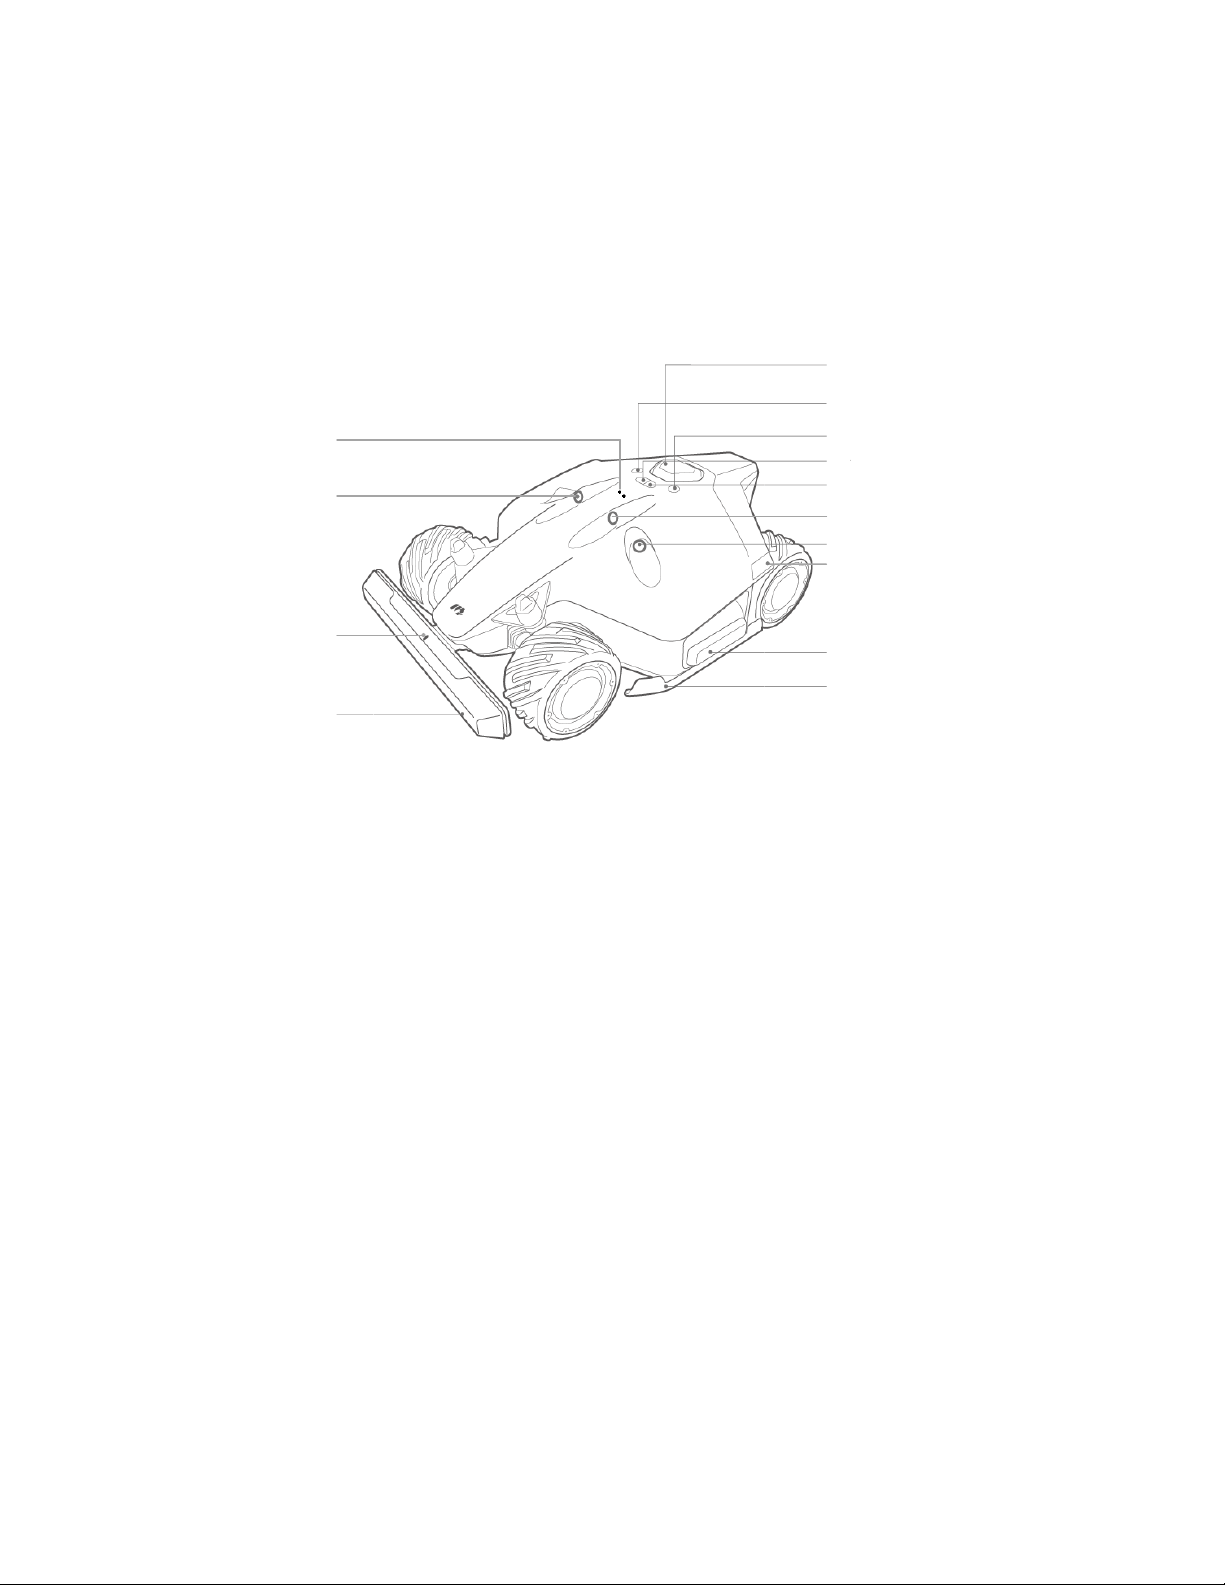
LUBA Robotic Mower
1.
Stop button
2.
Start button
3.
Power button
4.
Auto-return button
5.
Grass cutting button
6.
Ultrasonic sensor
7.
LED side light1
8.
Side collision sensor
9.
Protecting bracket
10.
Front bumper
11.
Bumper connecting indicator
12.
Rain sensor
Note:
1. The LED side lights are: 1) constantly red when working; 2) breathing flash, when charging & upgrading &
sleeping; 3) fast flash if there are any issues(with buzzing);
2. Switch on/off LUBA: long press Power button;
3. Continue mission & Unlock LUBA: press Grass cutting button, then press Start button;
4. Call back LUBA: press Auto return button, then press Start button;
1
2
3
4
5
6
7
8
9
10
11
6
12
6
3
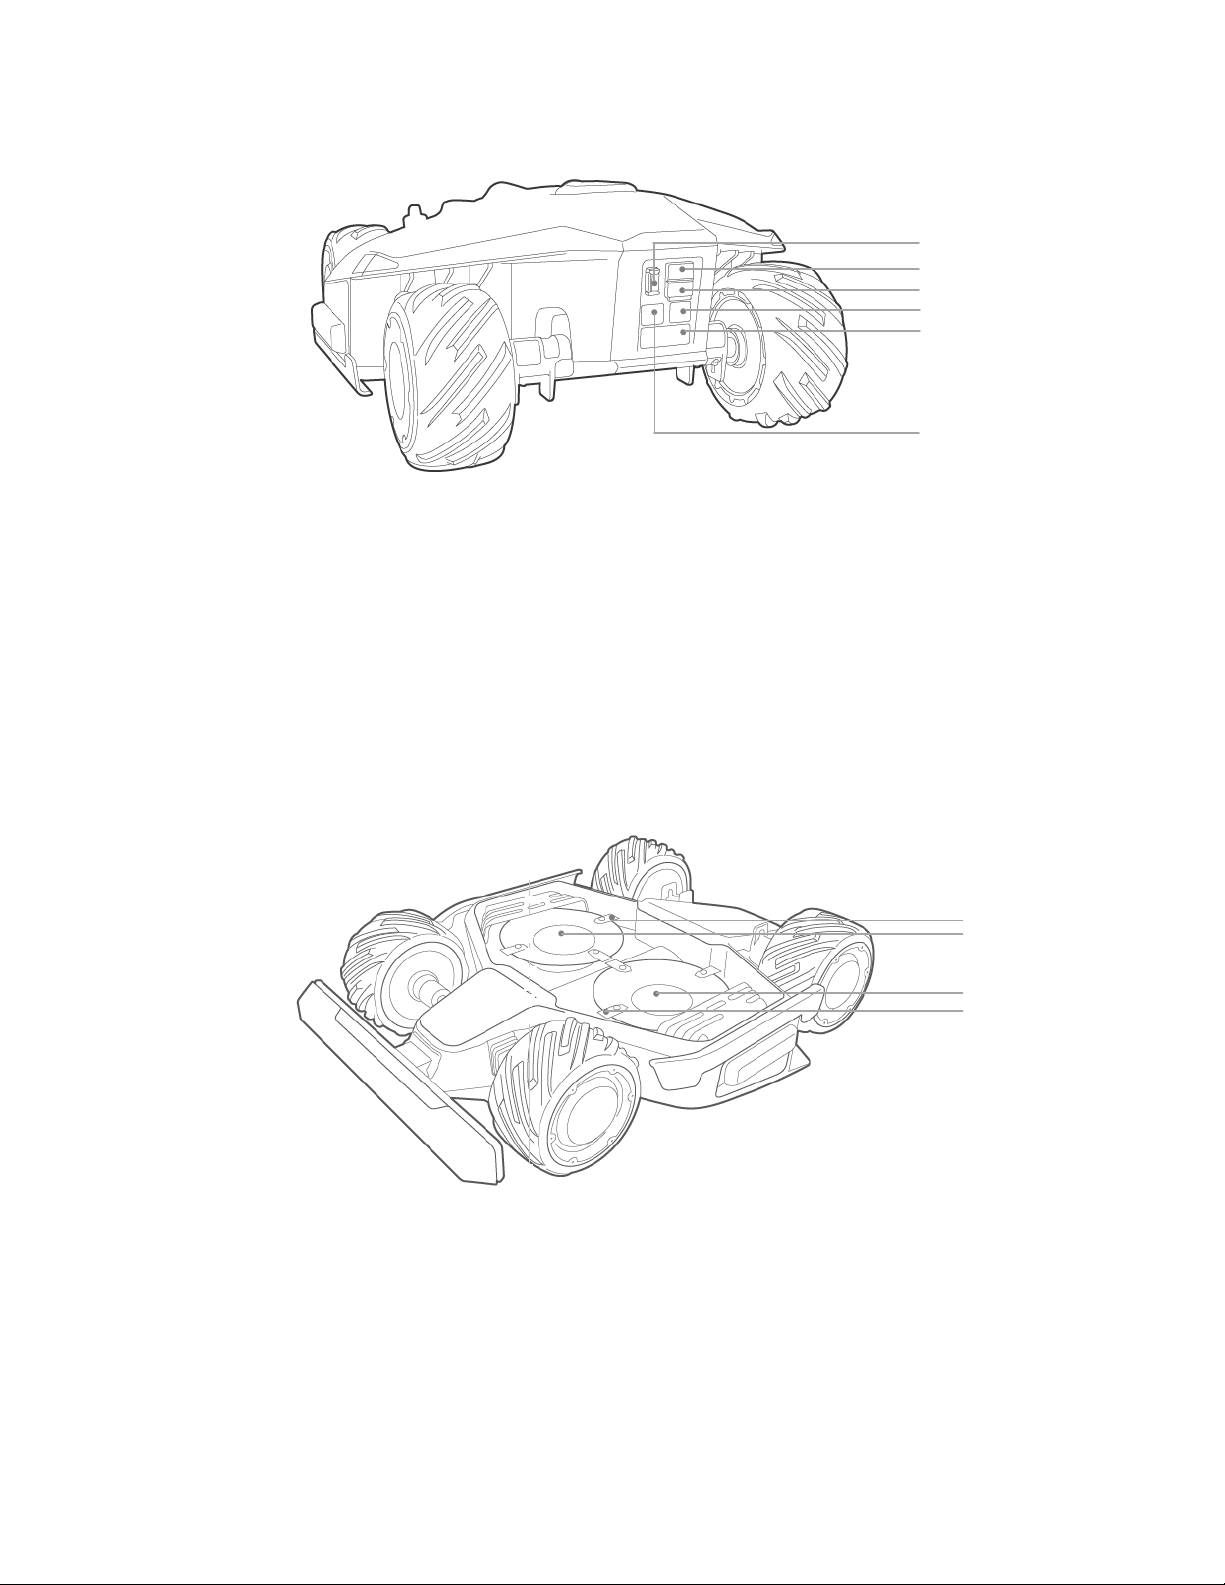
1. Secure key
2. SIM port(Reserved1)
3. USB port
4. Charging port
5. Infrared sensor
Note:
The reserved port might not function in some previous versions of mower.
1. Cutting blade*8 2. Blade disk*2
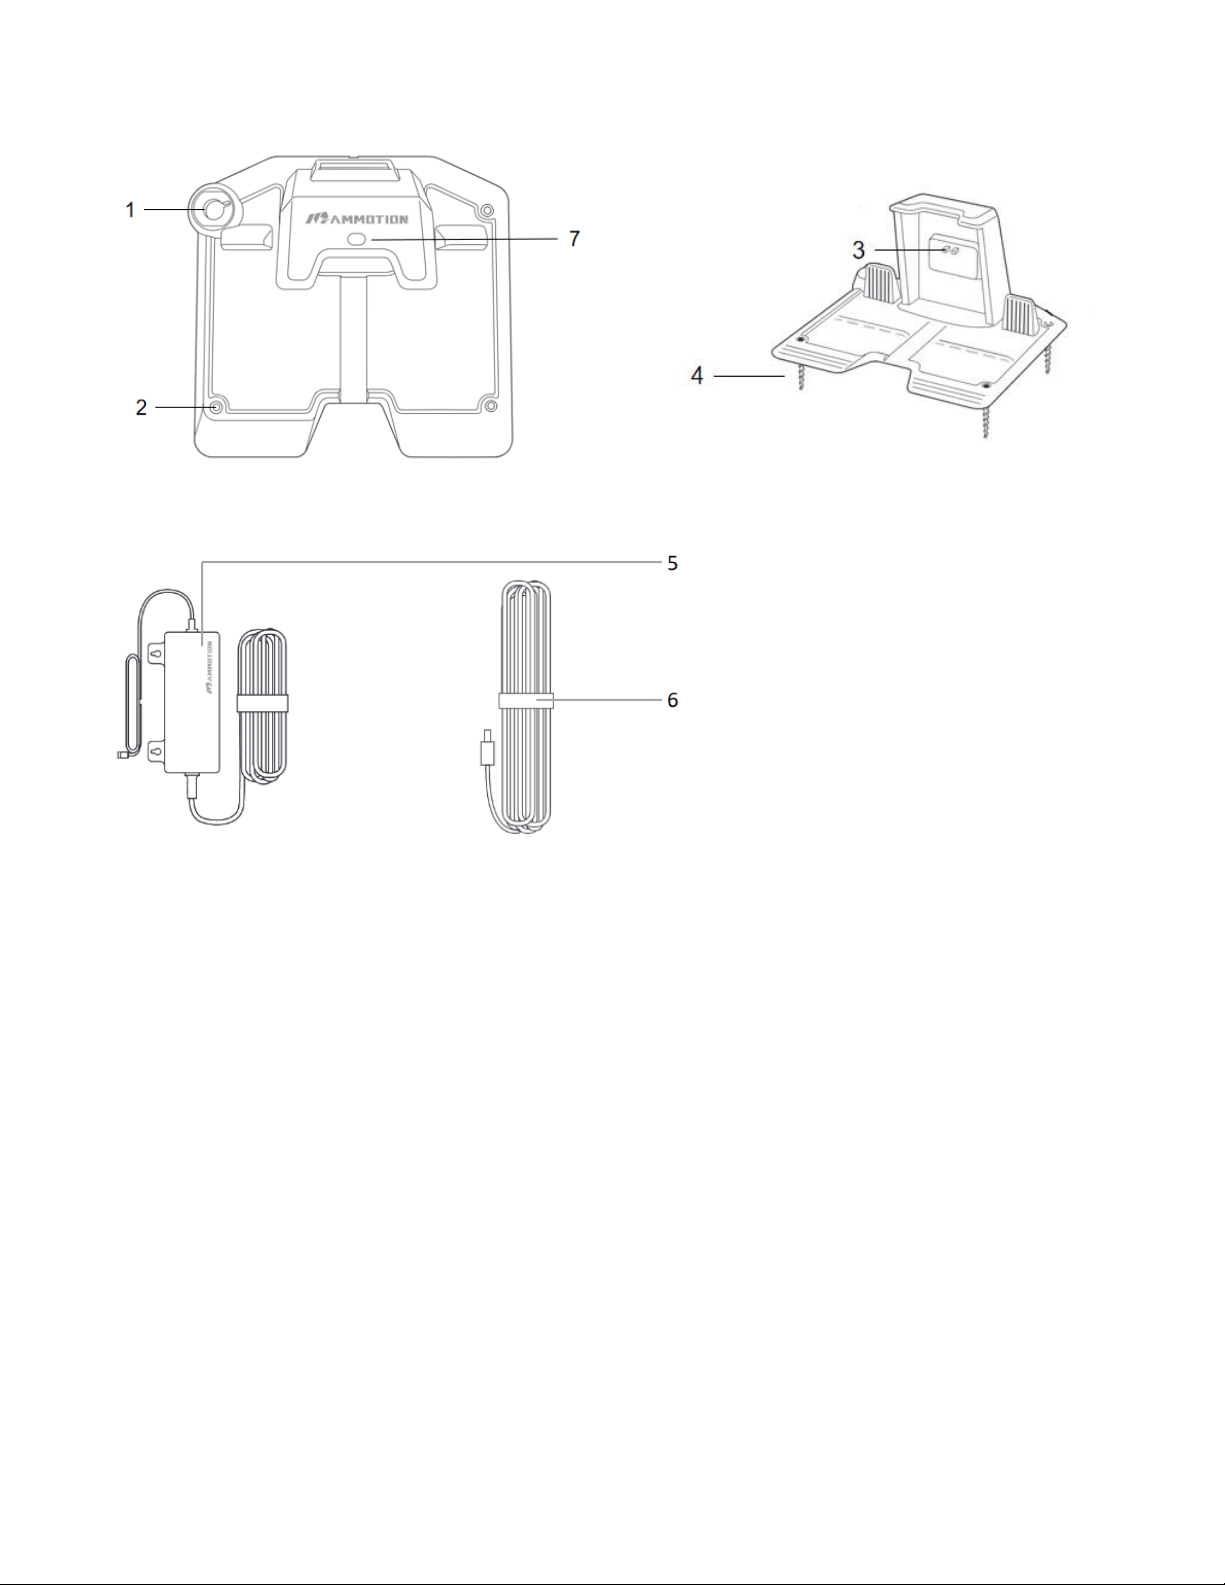
Charging Station
1
2
3
4
5
4
1
2
2
1
4
1. Mounting hole for RTK base pole
2. Mounting holes*3
3. Charging ports for LUBA
4. Screws*3
5. Power adaptor
6. Extension wire(10meters)
7.LED light of charging station
Note:
When the LED indicator light on the charging station is red, please unplug the power supply and re-plug in to
charge Luba.
When the LED indicator light on the charging station is green, meaning the charging station works properly.
RTK Reference Station

5
1. Radio Antenna
2. RTK Reference Station
3. Wire(2.5meter)
4. Mounting pole
Note:
The LED indicator light on the RTK Reference Station: 1) Working properly: green light(constant); 2) Initializing: blue
light (constant);3)Upgrading: blue light(flash); 4) With issues: red light(constant);
1
2
3
4
6
3. Preparation &Activation
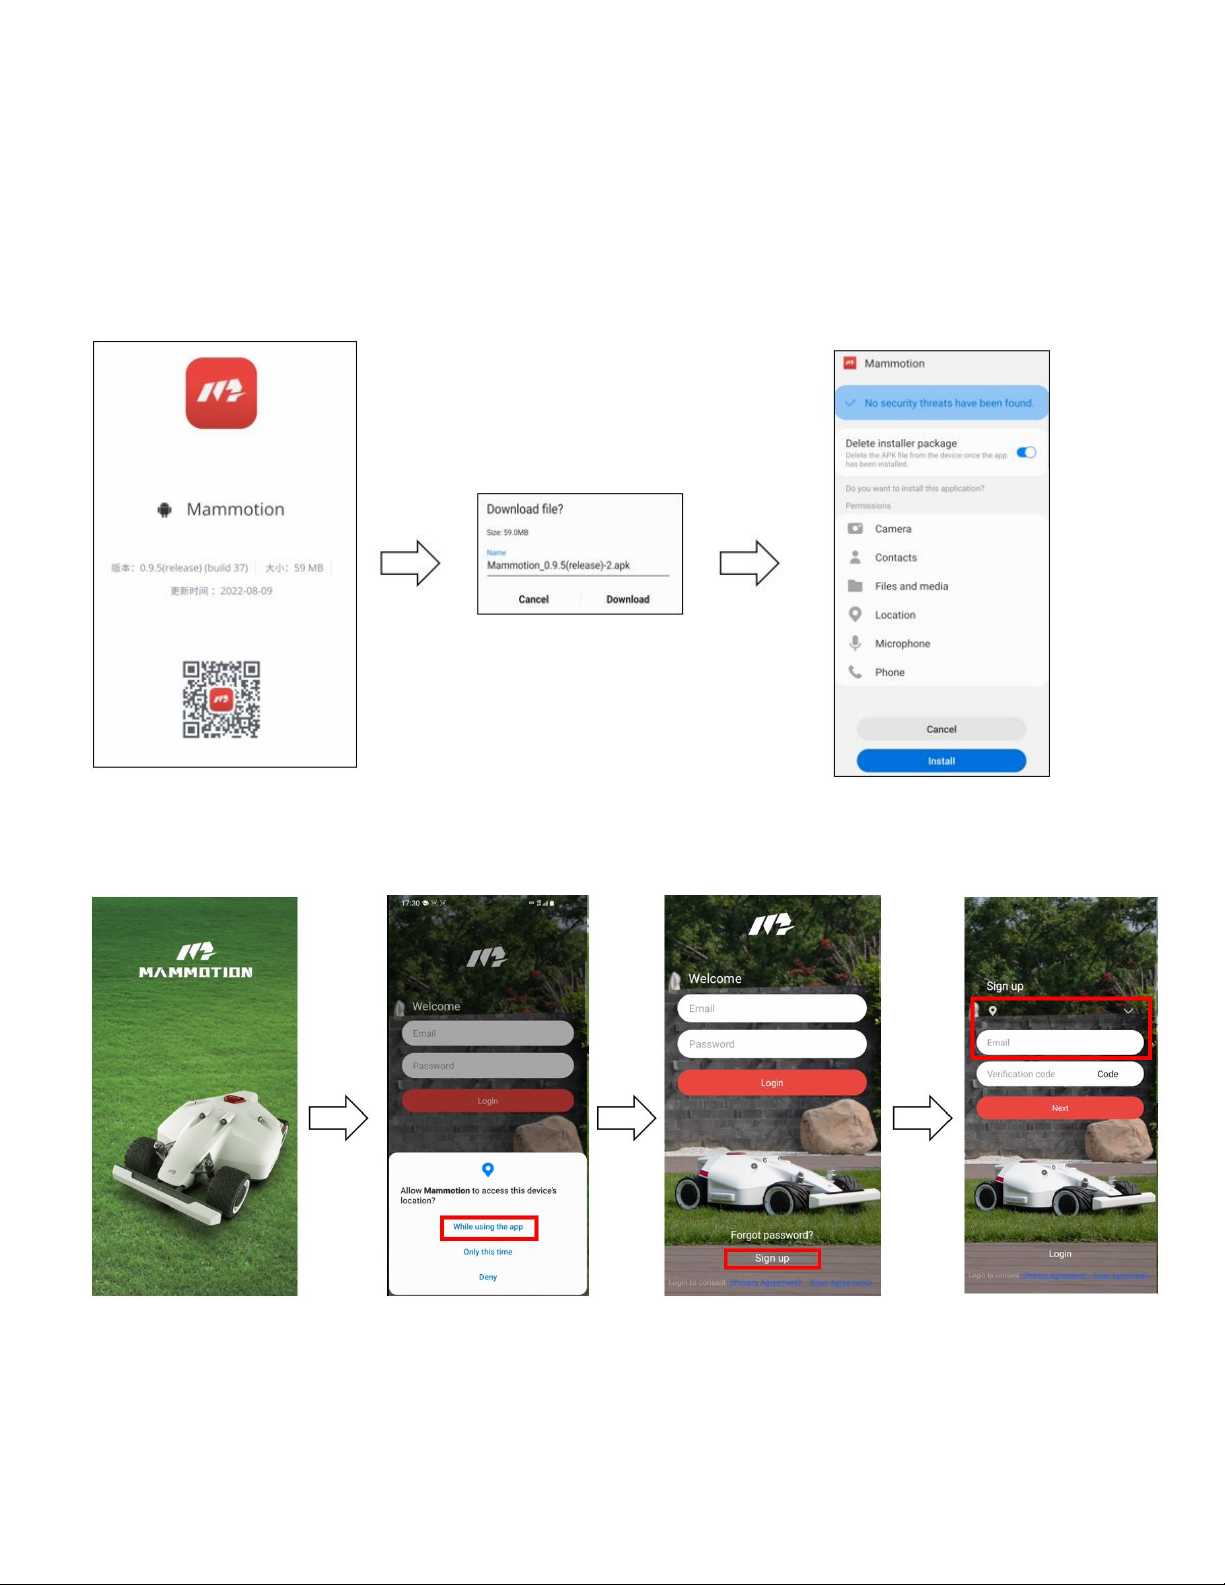
3.1 MAMMOTIONAPPdownload & Installations
For beta testers, only Android App is available. Download the link below for the MAMMOTION App (For
Android).
Link:
Android App Download link (choose English version of APP): https://www.pgyer.com/5WVG
Version 0.9.6.5(release)
3.2 MAMMOTION account sign up and login
1. Switch on the Position and Bluetooth on your phone. Click Sign up and Select the country and input
your email address.
2.Then click Code. A verifying code will be sent to your email(if you don’t receive the verify code,
please check your spam folder or check the blacklist of your Email and wait several minutes and retry
to click the Code).
3.Input the verifying code to the App and click Next to complete the sign up.

7
4.Setup your own password for the account. Set the user account and password and click “Login”.
After users login the App for the first time, it needs to Add device to it.
Note:
1. Please make sure that your LUBA is switched on(with the side LED lights constant red);
2. Make sure the distance between your phone and LUBA is less than 3m;
3. Make sure that there is good WIFI or hot spot signal;
4. If it shows “ ”,please wait a moment;
5. If it shows error/issue when adding the device, please check the notes before and then retry(kill and
restart APP and restart LUBA), we are also optimizing now;
6. One LUBA can be connected to ONLY ONE MAMMOTION account. ONLY ONE phone can control
8
ONE LUBA at same time.
3.3 Add your LUBA to MAMMOTION account
Adding device contains two parts:
1) Bluetooth connection between LUBA and phone;
2) Adding LUBA on the cloud to authorize;
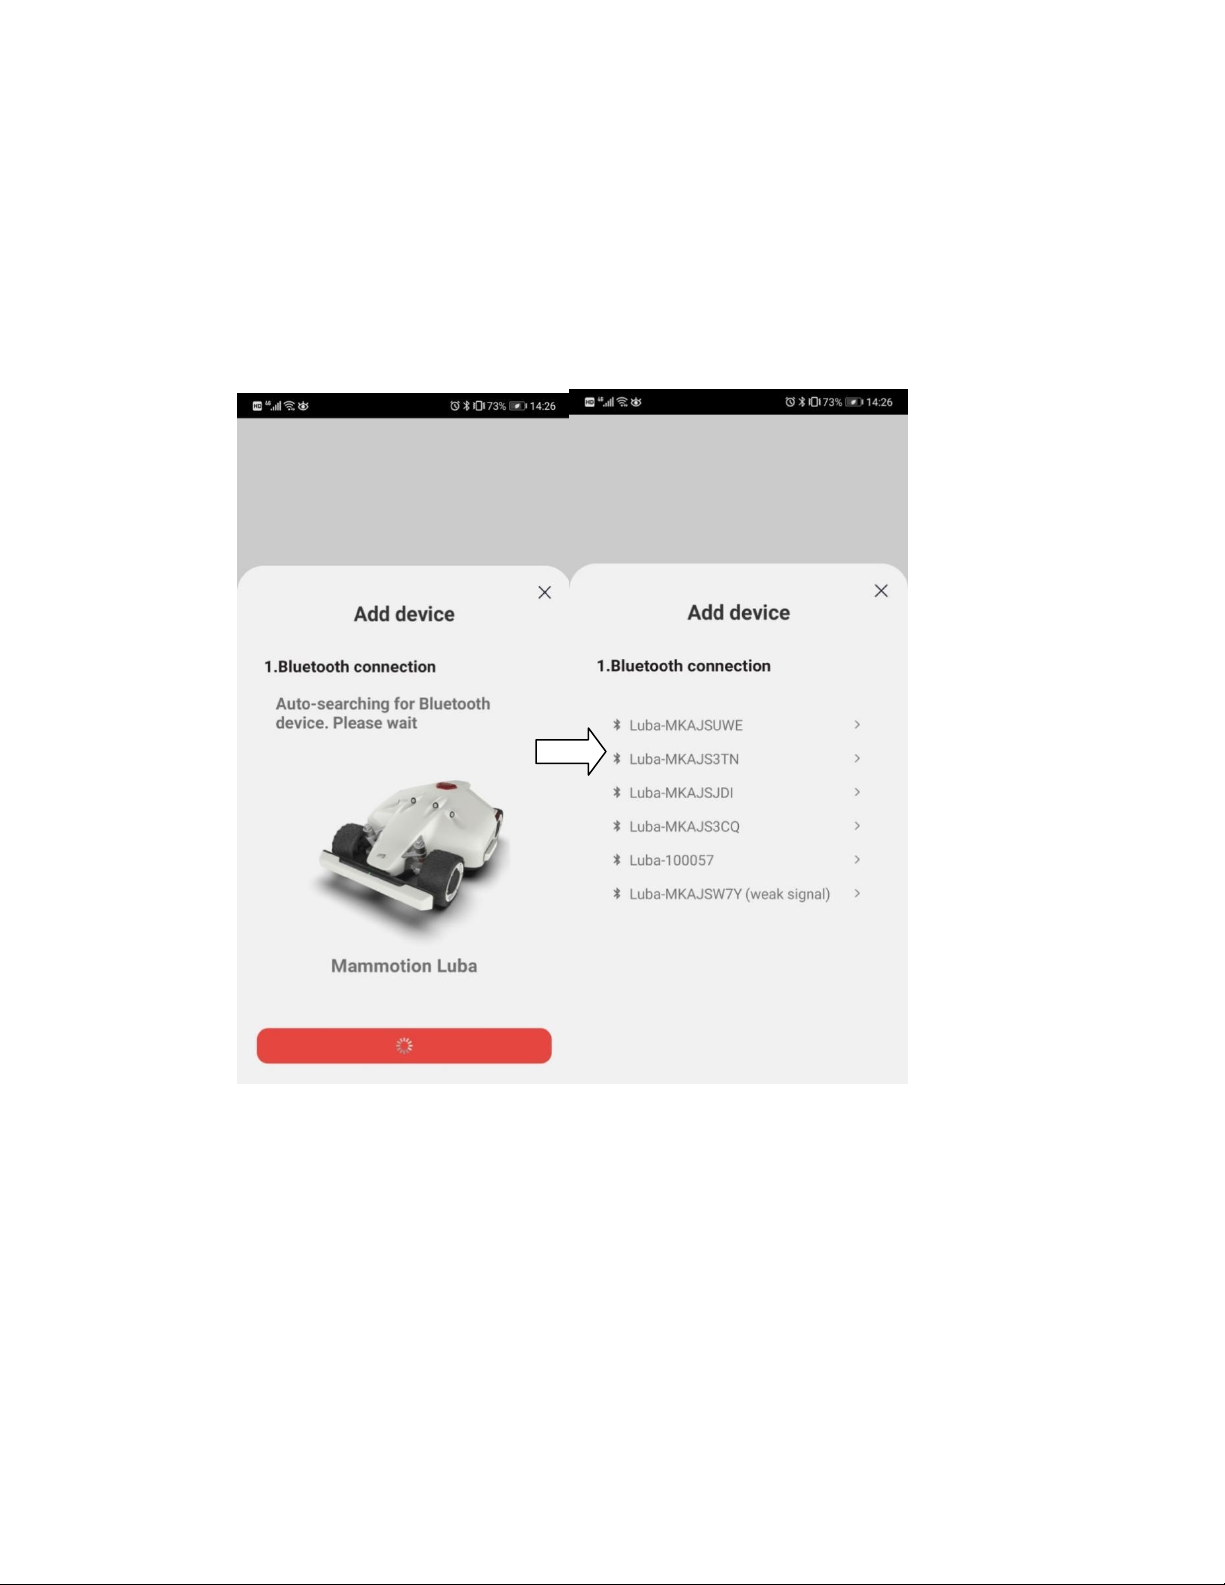
1. Switch on LUBA:long press the POWER BUTTON on the LUBA until you hear“Di...” sound. Both
LED side lightsare on andconstantly turning red.
2. Then we click Add device on the App, it will search the Bluetooth of the LUBA nearby automatically.
Then select the Bluetooth ID of your own LUBA, which is on the top of LUBA’s bottom.
3. Activate LUBA:After the Bluetooth connection, it needs to connect LUBA to Wi-Fi & Hot spot for
activation.
Note:
The connection is between LUBA and MAMMOTION Cloud, it has nothing to do with how your phone
connect to the Internet, which means you do not have to connect your phone to the same WIFI & hot
spot. You can also set your phone as hot spot if your phone has good signal.
The App will search the available WiFi signal nearby. Please notice that we highly recommend your to
select the WIFI & Hot spot with best signal quality. Otherwise the activation can fail sometimes.

9
Select WiFi &hot spot, enter password and then click Next. Wait until the App shows Device is
successfullyadded. Then click Finished.
Note:
Once you add LUBA to your account, it will not unbind automatically. Next time you switch on LUBA
use the same account, LUBA will still be there. And once LUBA is added, Internet(WIFI & hot spot) is
not necessary for map planning, mission setting and working.
However, if you’d like to remotely receive information and check the status of LUBA, we recommend
you to cover your whole lawn with WIFI or use 4G version( come later);

10
3.4 App introduction
The interface of LUBA is currently as shown below(stilloptimizing):
Note:
1. Our LUBA App is still optimizing and upgrading, both the function and the interface.
2. The newest version of LUBA(see ”Device Version”) is 0.9.6.28 , please check the
“Firmware Version”to see if your LUBA is already with the newest version. It is very important to
upgrade your LUBA and App to the latest version when you receive upgrading message from us.
3. In the “Configure Network”, you can connect your LUBA with WIFI& Hotspot.
4. The connection status of LUBA does not affect the normal mission and working of LUBA.
3.5 Firmware upgrading:
Preparation:
1. Only upgrade LUBA when you get the message from us.
2. Please make sure that your LUBA is switched on(with the side LED lights constant red).
3. Make sure the distance between your phone and LUBA is less than 3m;
4. Make sure that there is good ans stable WIFI or hot spot signal;

11
5. DO NOT switch off LUBA or cut the Internet connection when upgrading, otherwise the upgrading
may fail.
Upgrading Process:
1. Connect LUBA to the WIFI & hot spot by clicking “NETWORK SETTINGS”;
2.After the net connection is done (with turns to );
3.Start upgrading: click “UPGRADE”button
4.The message box will show you what is optimized &fixed in the new firmware. Click “One click
upgrade”;
5.Wait until the upgrading is done (the percentage of upgrading and the time left is not accurate now,
please just ignore them);
6.When the APP shows that LUBA is successful upgraded, the LUBA will automatically switch off,
please LONG Press (Press about 10s until the LED side lights is on) the power button of LUBA to
switch on.

12
7.Check if the firmware of LUBA and APP have already reached the newest firmware by clicking
“setting”-”Version”. If yes, then you can start LUBA with the newest firmware now. If no, please contact
us to solve the issue.
13
4.Charging Station &RTK Reference Station Installation
Note:
1. Read and understand the safety chapter before you install the product.
2. Use original spare parts and installation material.
General preparations
1. Water filled holes in the lawn can cause damage to the product.
2. Give an overview of your house, your lawn and include all obstacles. This makes it easier to examine
where to put the charging station, the reference station, and setup the virtual boundaries.
3. Decide where to install the charging station, the RTK reference station, the point of interest, the
transport paths and the virtual boundaries for the work areas and no go zones.
4. Fill in large holes in the lawn.
4.1 RTK Reference Station Installation
Factors that affect the Signal and Positioning Accuracy:
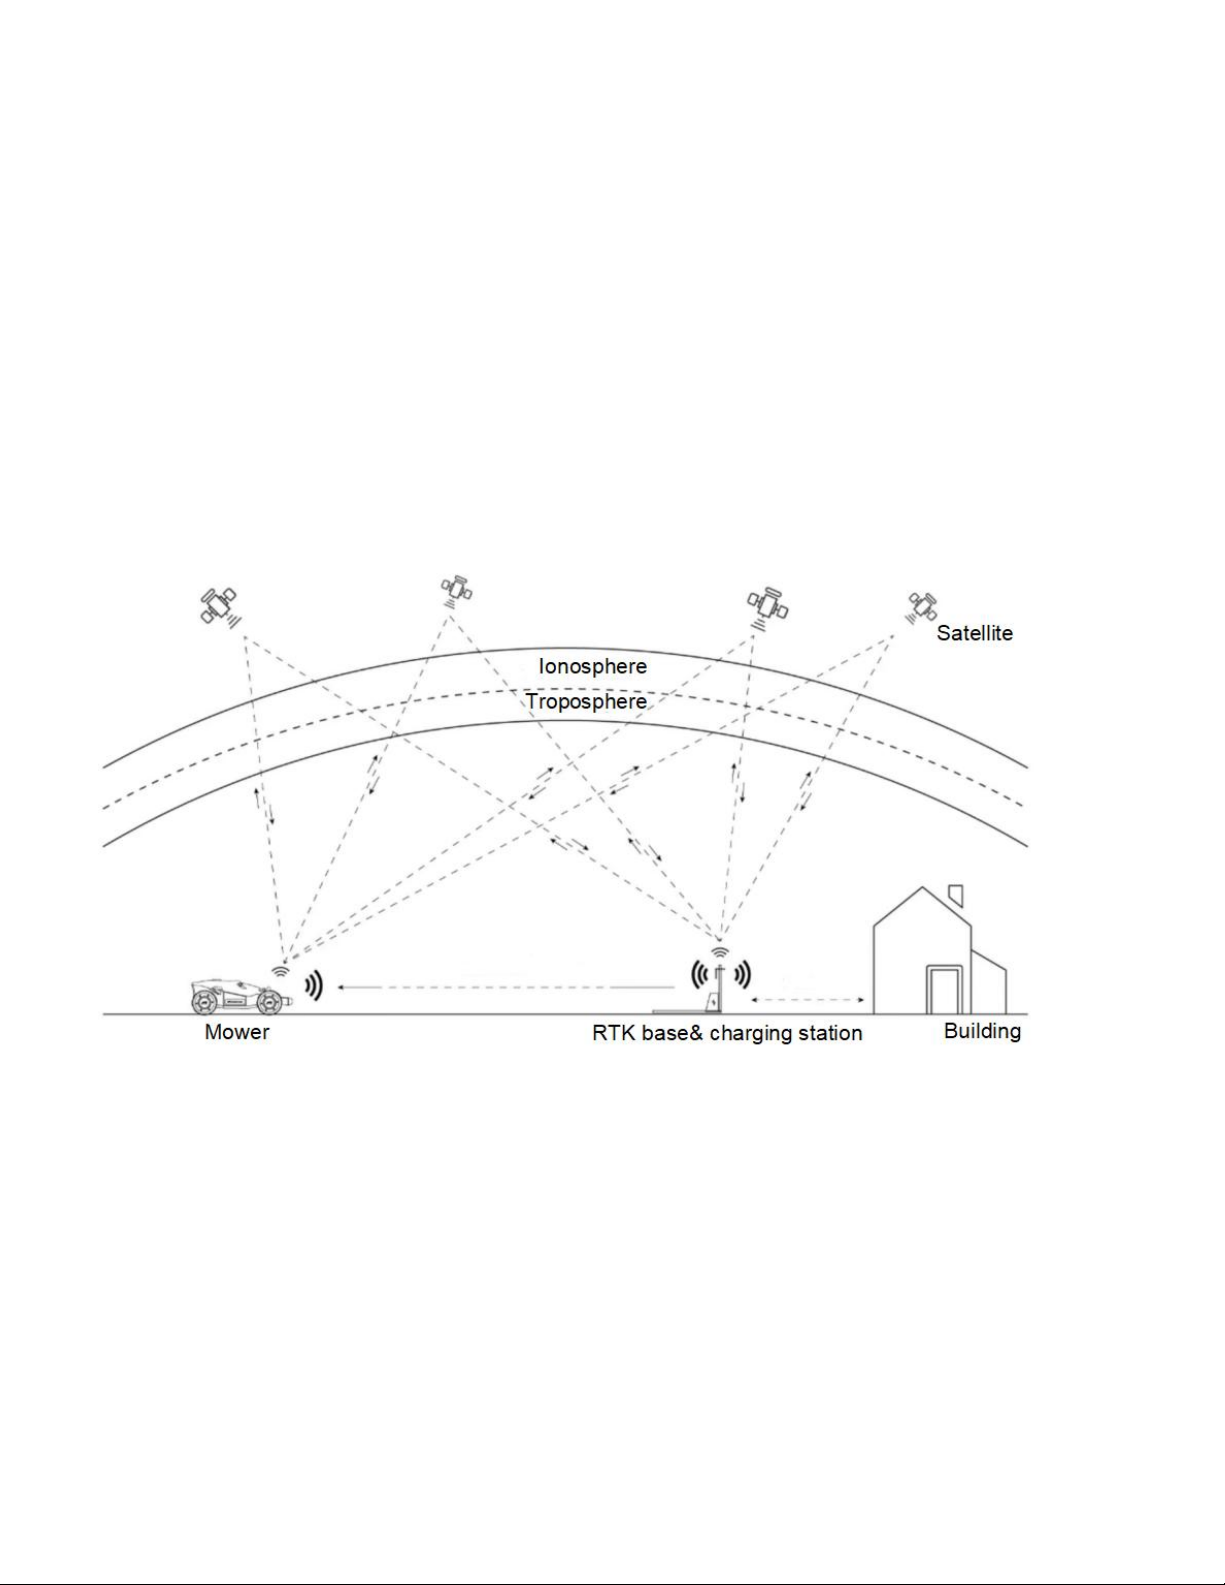
The RTK system of LUBA uses full frequencies multiple satellite-based system, such as GPS, BeiDou,
GLONASS, Galileo, which improves the positioning accuracy to approximately 2 cm. However, the
accuracy crucially relies on the GNSS signal, which can be weakened by the following:
Factor 1: Blocking:
1. If there is anything on or surrounding the antenna of RTK reference station, charging station and/or
the mower, the signal will be weakened or blocked.
Solution: DO NOT install the changing station and GNSS antenna near the roof, wall,tree or anywhere
that may block the signal. We recommend you to install the RTK Reference Station of LUBA in a
opensky1area or on the roof&wall2.
Note:
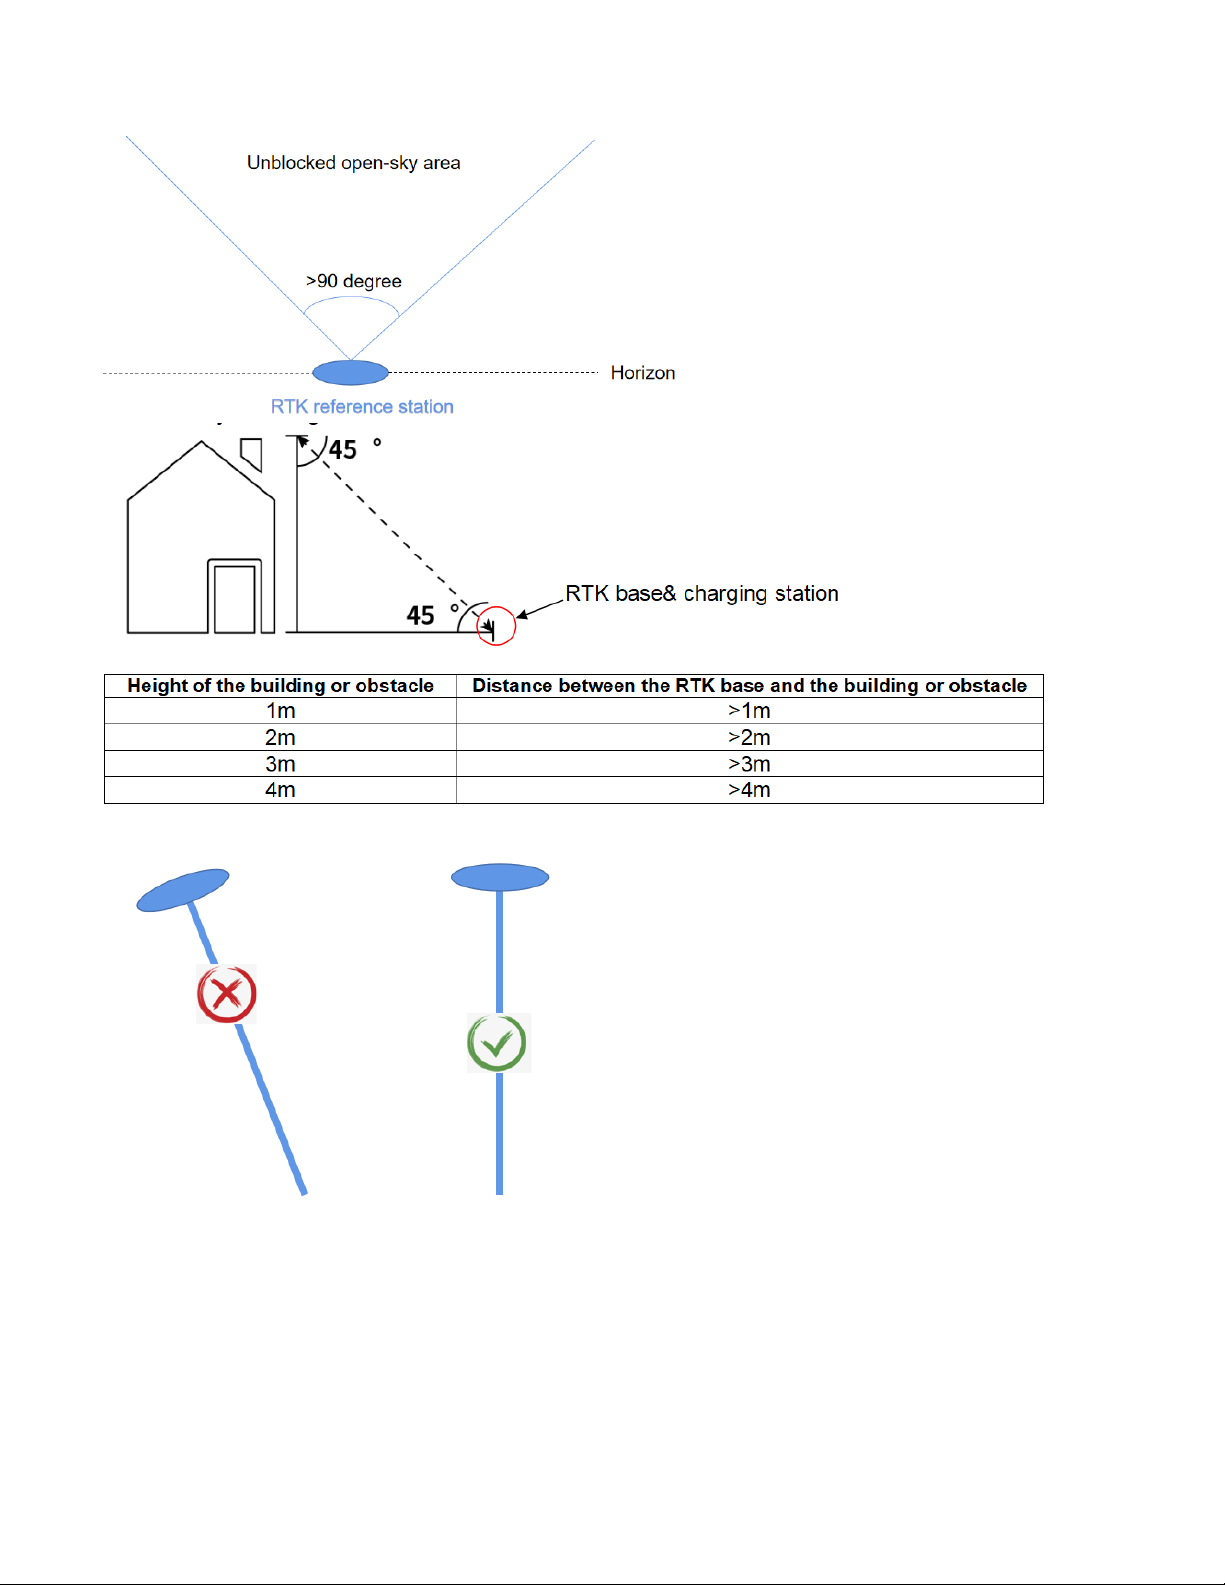
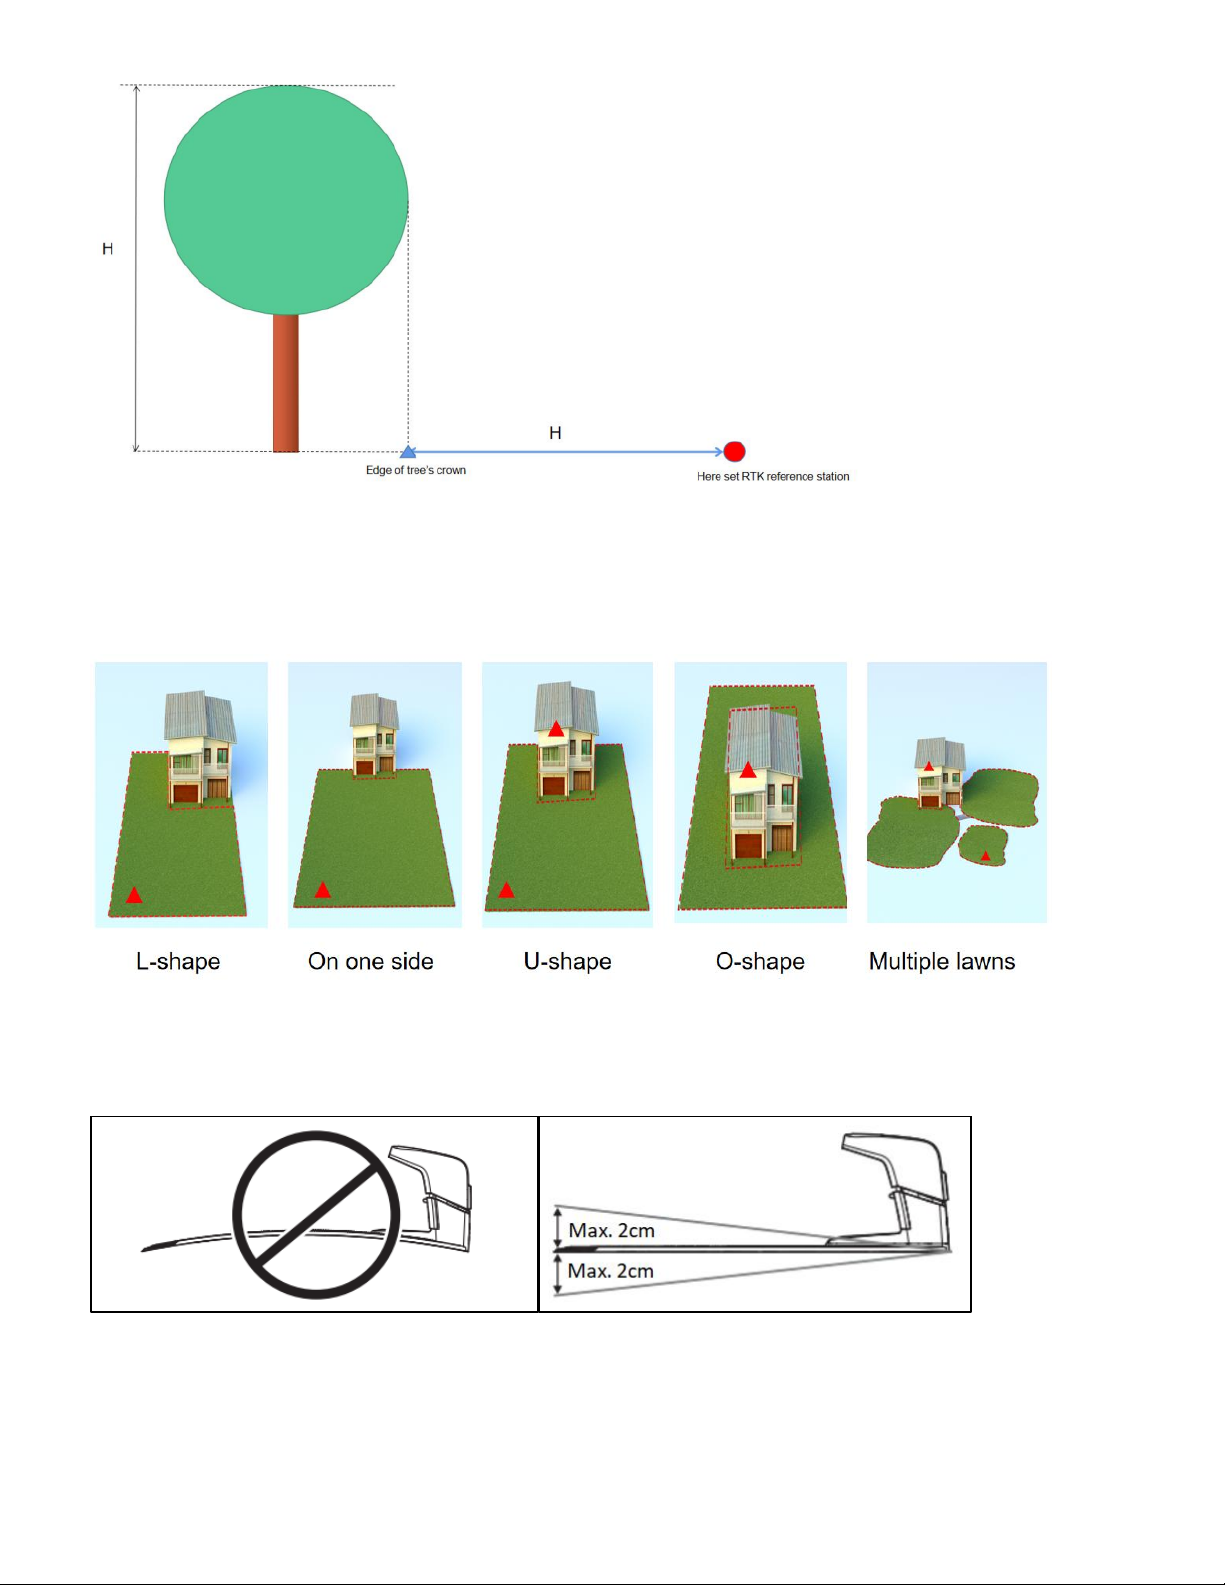
1) The distance between RTK Reference Station and the wall&roof&tree should be ideally at least the
same as the height of the wall&roof&tree,as shown below;
2) As shown below, to set the RTK reference station the wall/roof to avoid coverage.
14
2. If the transmission path from RTK Reference Station and LUBA is fully obstructed by large metal wall
or concrete wall. LUBA could not the the data from RTK Reference station and could not get cm level
accuracy.
Solution:
1) Make sure there is a free transmission path from reference station to the charging station(For the
initialization, LUBA need to be set on the charging station and get data from both satellites and
reference station)
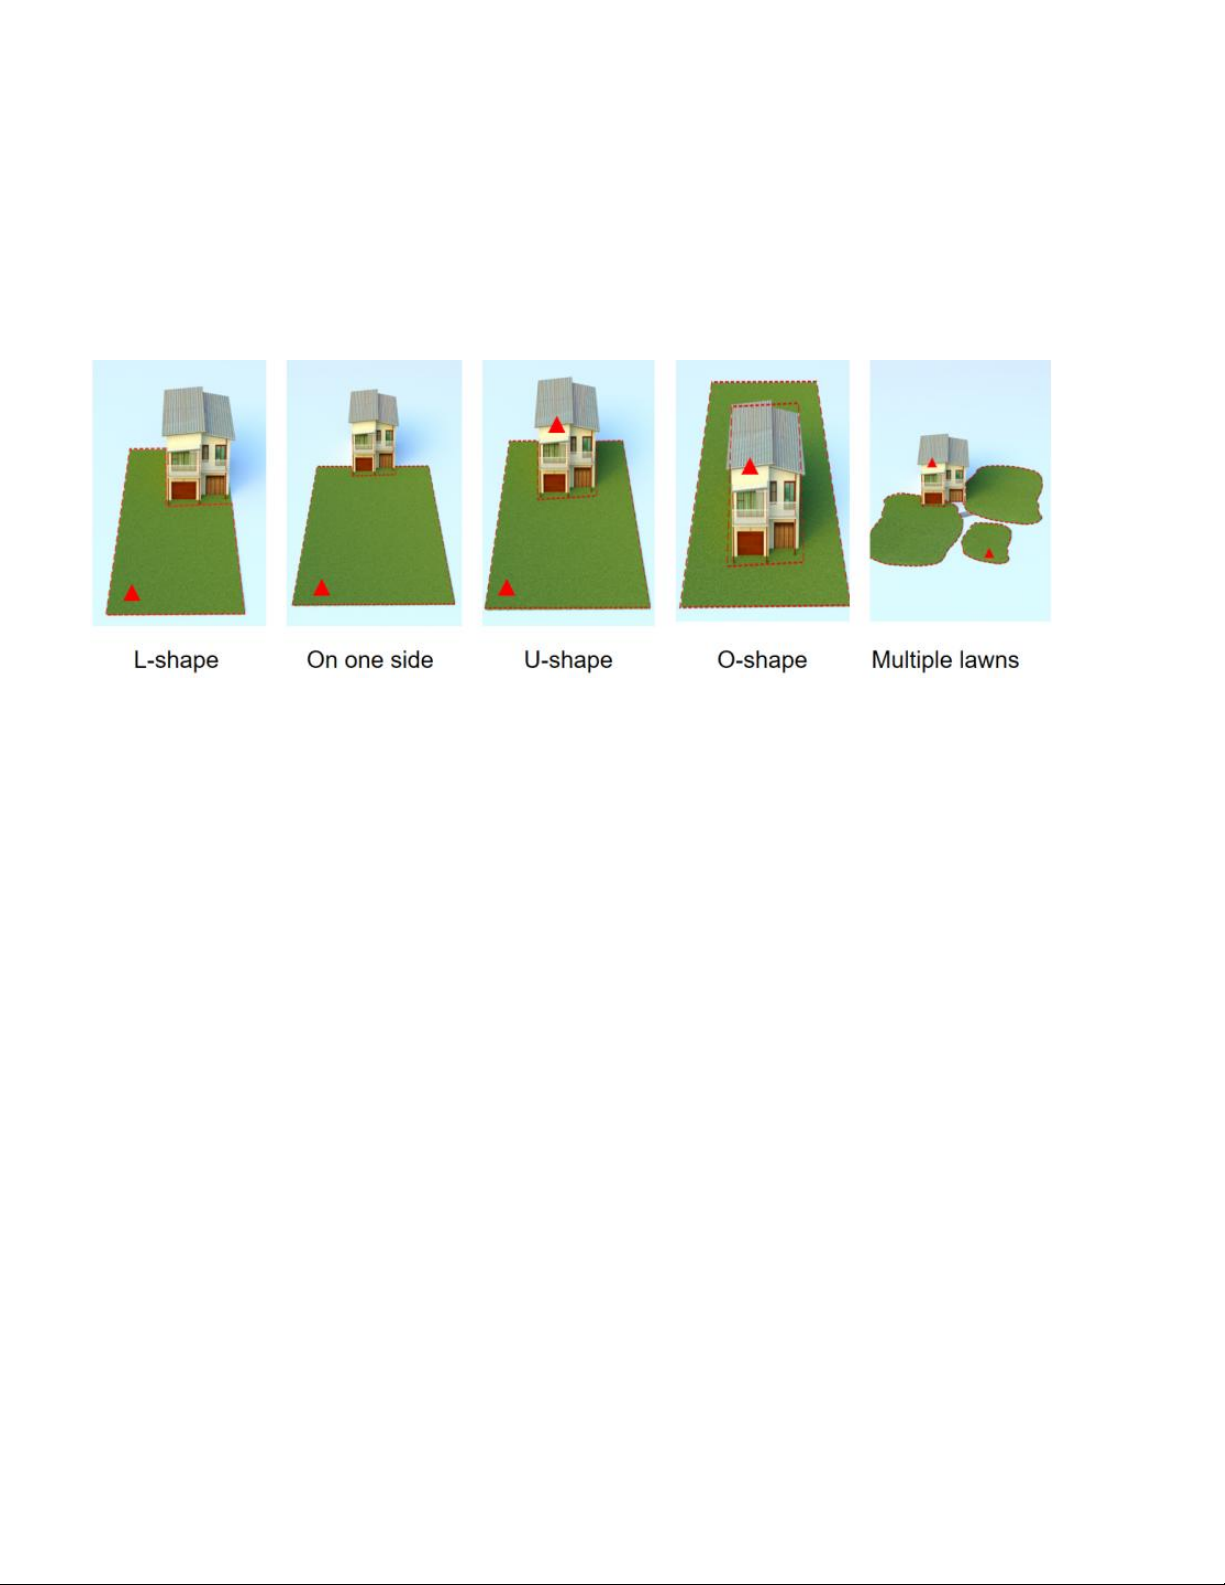
2) If your lawn is with “O”-shape, “U” shape , or with separate lawns,we recommend you to set the RTK
reference station on a higher place, like on the roof. If your lawn is with “L”-shape, you can set the
reference station on the roof or on the point as shown below.
3) If your Lawn is with “O”-shape, “U” shape , or with separate lawns,we recommend you to also use
the signal extension kit to enlarge your reference station signal cover area.
3 .If there is a high long wall & roof & very dense tree in/around the lawn, the satellite signal of LUBA
can be poor in the covered area. We recommend you to avoid most of the covered area when setting
the map.
Although our integrated navigation system can continue doing the positioning for LUBA, however, the
accuracy of positioning without RTK is not as good as with RTK and can be decrease fast when
satellite signal long time not come back( like LUBA does not get out of the heavy coverage).
Also our App will show the position reliability map when the map is set, we highly recommend you to
adjust your boundary with the “poor” positioning parts, to decrease the “poor” parts less than 10%.
Factor 2: Signal Interference:
The communication transmission power gets weakened with long distance.Please make sure that the
distance between boundary of the map and the reference station is less than 80m.
Signals from the satellite are transmitted to the antenna after being reflected by the glass wall, large
area of water surface(lake/swimming pool) instead of directly from the air. This is called Multi-path
Effect.
Solution:Install the reference station away(at least 5m) from glass wall or lake to get rid of the Multi-
path Effect.
4.2 Find a Good Spot to install RTK Reference Station
As shown above, the RTK Reference Station should be set in a place:
1. At least 5m away from large glass wall & lake/swimming pool;
2. With open-sky area, meaning there is no any coverage on the top with at least 90 degree zenith
angle( means the distance between RTK reference station should at least be the same as the height
ofthe obstacle itself,as shown below);
15
3. The RTK Reference station should be set straight.
4. If there are tall trees with large crown, and we set RTK reference station in the lawn as shown below.
The distance between the reference station should be at least the same as the height of the tree to the
edge of the crown.
16
5. For “O”-shape, “U”shape , or with multiple lawns, we recommend you to set the RTK reference
station the roof or wallas shown below. Also notice that the RTK Reference Station should not be
covered by the roof or the concrete wall of the building;
6. For “L”-shape and the lawns on one side,and some “U”shape lawns, you can both set the reference
station in the lawn or on the roof&balcony. Please notice that the transmission path between working
area and the reference station should not be fully obstructed.
4.3 Find a Good Place to set Charging Station
Note:
1. The charging plate of the charging station must not be bent.
2. Put the charging station on a level surface.The max. tilt distance of charging plate is 2cm;
3. Put the charging station (A) were the docking point (B) has open-sky view. This means that 90°of
the sky in all directions must be unblocked. The charging station docking point (B) is 2m. in front of the
charging station.

17
4. Both charging station (A) and the docking point (B) can not be covered by roof/wall/tree or any non-
original mower house/garage
5. There should be(do not have any obstacle) between charging station (A) were the docking point (B).
6. Put the charging station near a power outlet.
7. Do not cut or extend the low-voltage cable. There is a risk of electrical shock.
8. Put the power supply in an area with a roof and protection from the sun and rain. Put the power
supply in an area with good airflow.
4.4 The RTK base is installed on the charging station
Over view of the installation when it’s completed:
Installation Kit:

18
①Charging station
②RTK base
③Power adaptor for charging station
④Extension wire for charging
station(10meters)
⑤RTK wire (2.5 meters)
⑥RTK base mounting pole
①
②
③
④
⑤
⑥
Table of contents
Other MAMMOTION Lawn Mower manuals

Popular Lawn Mower manuals by other brands

Husqvarna
Husqvarna 917.279100 owner's manual

Snapper
Snapper E250815BE Safety instructions & operator's manual

Wheel Horse
Wheel Horse A-60 Electric Horse owner's manual

Snapper
Snapper 7800378 Initial setup

McCulloch
McCulloch M4553CM instruction manual

Husqvarna
Husqvarna M48 Pro, M53 S Pro Operator's manual


