OILING
Excessive
oiling
collects
dust.
Refrain
from
putting
oil
on
the segment
or
type
bars.
A
•.
light
grease,
such
as
petroleum
jelly,
may.
be
used
on
the
teeth
of
the
escapement
rack
underneath
the
carriage,
also
on
the
ends
of the
Universal
Bar
TYPING
Do
not type
against
the
bare
roll,
always
have
paper
in
the
machine.
Try
to
avoid
striking
two keys at the same
time. Should
the
type
bars
become bent
and stick, they should
be
adjusted
so they
enter
the type guide
fre
e
ly
by
bending slightly
in
either
dire
ction.
How
ever
the
bars
should
not
be
bent
far
enough
to
twist
them.
;
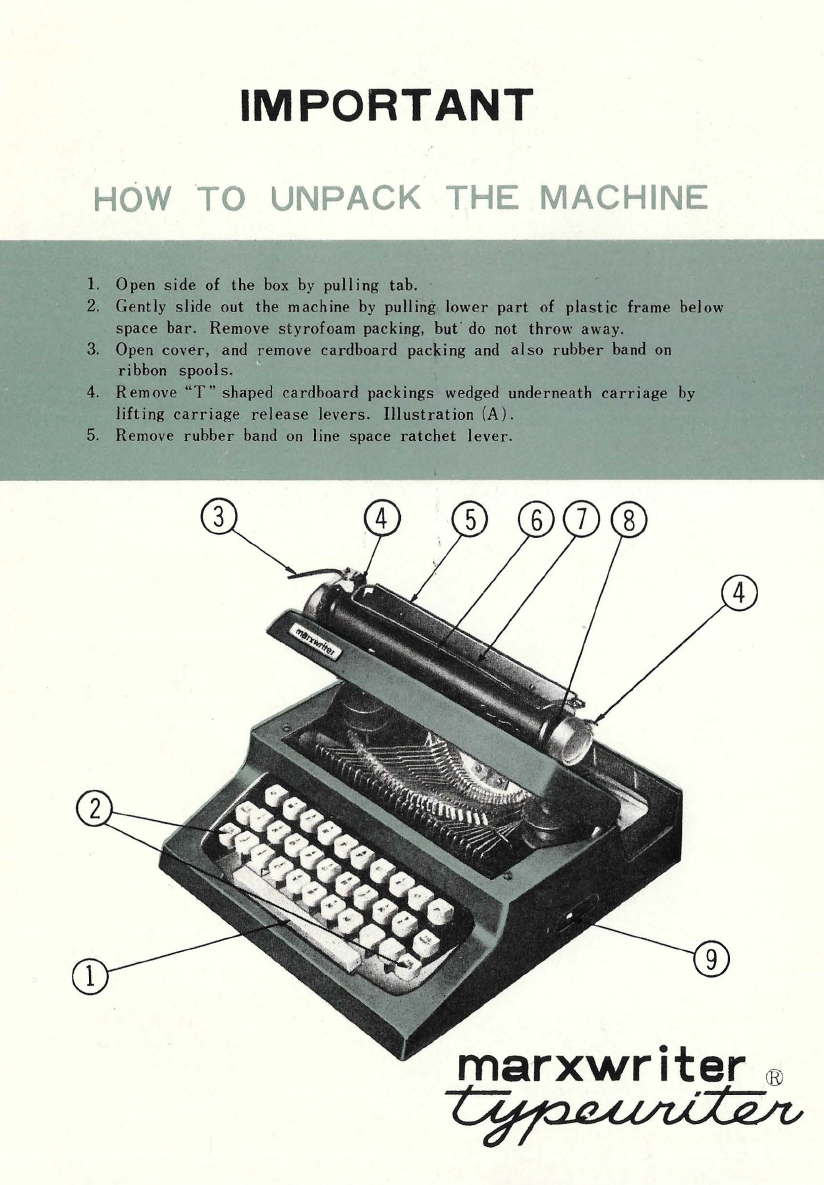
IMPORTANT
ILLUSTRATION
(B)
ILLUSTRATION
(AI
INSTRU
CT
IONS FOR
RICPLACEMENT
OF
RIBBON
~'"'
GUIDE
REEl.
If
ribbon jumps out of
ribbon
guide,
this
indicates
it
has
not
he.en
installed
properly
and
has
not been
placed
across
the
backside
of
the
ribbon
guide.
To
replace
spools
on
the
Marxwriter,
refer
to
the
above
sketches
and
proceed
as
follows:
(a)
First,
make
sure
the
felt
washer
is
on
the
bas.e
of each spool shaft.
.
('b)
Place
the spool
on
the
shaft,
with the grooved holes toward the bottom, making
sure
that the spool
i-s
properly
seated
on the
shaft.
(c)
Place
r.ubber
knob
on
the top of each shaft to
ho
ld spool
in
place.
(
d)
Place
the ribbon
across
the backside of the ribbon guide, next to the
carriage
roll
and then
slip
the
ribbon through the
slots
at
each end of the ribbon guide.
SEE
ILLUSTRATION "A."
(e)
Please
note that the ribbon then
will
be
in position next to the paper which
you
are
using.
(
f)
Do
not
attempt
to place the ribbon between
the
rear
of the type guide and the
fr
o
nt
of the ribbon guide,
or
across
the front of the type guide,
as
the machine will not
operate
properly
.
SEE
ILLUSTRATION"B."
"If
your
typewriter
does not
operate
properly
, do not
attempt
to
make any
repairs,
hut
write
to
us
immediately,
describing
the
difficulty
and we
will
furnish
you
with
proper
instructions."
Printed
in
Japan
LOUIS MARX & CO., INC.
SERVICE DIVISION
GIRARD, PENNSYLVANIA.
© LOUIS
MARX
&
CO
., INC. MCMLXV