Matec V12 User manual

Digital Voice Recorder Watch
User's Manual - V12
*Please read this user manual carefully before use*
*Please use the original data cable when connecting to computer*
1

★ Check Video Instruction at device disk on computer or Youtube
link https://youtu.be/UayzGsHmmYA before use.
★ For Most mal-function problem, format or reboot(check software
and instruction at device drive on computer) works.
★ For any problem, please contact us for help before return or refund.
Gurantee 100% fast satisfaying customer service.
★ Operation Guide - https://youtu.be/UayzGsHmmYA
★ Format Instruciton - https://youtu.be/bs99KSih76c
★ Reboot Instruciton - https://youtu.be/iov705MI5Lw
★ Data Recovery - https://youtu.be/8rs8Gm69BWA
★ Charging Instrcution - https://youtu.be/QGFfVkT5ntQ
★ Computer Connection Problem - https://youtu.be/Bv8vxCbxpQo
Video Instruction Link
Important Note Before Use
2
Contact Information:
Email: [email protected] / [email protected]

Device:
★ Note:
►Press: after pressing button, release it immediately.
►Long press: after pressing button, hold it on for 3-5 second.
►Please update date/time of the device before first use.
Product Illustration
Horn
3
OFF-Save Recording
ON-Recording
Earphone/Charge
/USB Port
Volume Up/ Next
Volume Down/
Previous
Power on/Off
Play/Pause/Confirm/Return

1. Turn On/Off
① Turn On: at screen “off” state, long press the “ ” button.
② Turn Off: long press the “ ” button until the number ①②③
light up in sequence, then device will be power off.
Recording Operation
2. Normal Recording - One Key Operation
① Start Normal Recording: turn on device, push recording button
to the “ON” position.
② Save Recording File: push recording button to “OFF” position.
3. Voice Activated Recording - VAR
① Voice Activated Recording Mode Set: in the main menu
interface, choose "Recordings-->AVR mode-->On"
② Start Voice Activated Recording: push recording button to
the “ON” position to start “VAR” recording .
4

③ Save Voice Activated Recording File: push recording button to
the “OFF” position to save recordings.
④ Turn Off Voice Activated Recording Mode: long press the “ ”
button to return to main menu interface, choose "Recordings--
>AVR mode-->Off" .
★Note: The display screen will show “VOX ON” if the device at
Voice Activated Recording mode.
① Turn On Listening While Recording Mode: in the main menu
interface, choose "Recordings-->Monitor-->On".
② Start Recording: plug earphones, push recording button to the
“ON” position to start “Listening While Recording”.
③ Save Recording File: push recording button to the “OFF” position.
④ Turn Off Listening While Recording Mode: long press the “ ”
button to return to main menu interface, choose "Recordings--
>Monitor-->Off" . 5
4. Listening While Recording - Monitor

Step 1: Set Timer Start Time: choose "Recordings-->Timer-->Start".
Press the “+”/“-” button to adjust the time, then press the “ ”
button to confirm start time. Step 2: Set Timer End Time: choose
"Recordings-->Timer-->End". Press the “+”/“-” button to adjust the
time, then press the “ ” button to confirm end time.Step 3: Set
Timing period: choose "Recordings-->Cycle". Step 4:Turn On Timer
Switch: in the main menu interface, choose "Recordings-->Timer--
>Switch-->On". Step 5: Turn Off Timer Mode: in the main menu
interface, choose "Recordings-->Timer-->Switch-->Off".
6. Timing Recording- Timer
Step 1: connect the device to computer/charger through original USB
cable.
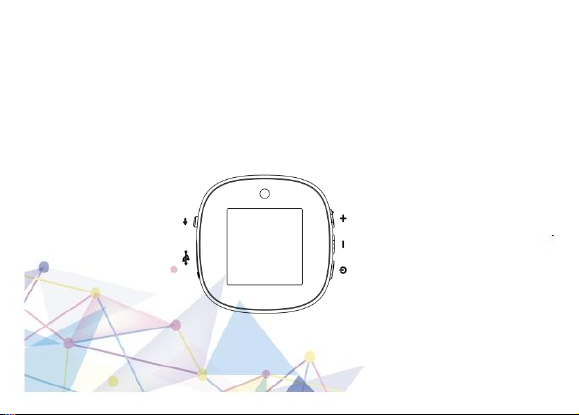
Step 2: long press “ ”button, push recording button to “ON”position.
Step 3: push recording button to “OFF” position to save recordings.
6
5. Recording While Charging

7. Other Recording Set
7
Recording library
Manage all recording files, including playback, deletion,
selection, etc.
Files are named by Year/Month/Day/Hour/Minute/Second.
Record Format
Supports MP3 and WAV format.
Note: Please choose a format supported by media player on
your computer /phone.
Set rec bitrate
6 bitrates(256kbps-3072kbps) to choose , the higher the
bitrate, the clearer the sound quality and the larger disk space.
Segment
Set the size of each recording file, when the time is up, it will
be automatically saved as a file. eg: Segment set 30 minutes,
the device will generate a recording file every 30 minutes.
MIC Level
5 Level(class 1-class 5) to choose, the larger the value, the
higher the sensitivity, and the more sound is detected and
recorded. Note: If the sound source is far from the device, it is
recommended to increase the sensitivity and vice versa.

① Choose Recording Files: in the main menu interface, choose
"Recordings-->Recording library".
② Playback Recording Files: press the “ ” button to play recording.
③ Pause Recording Files: press the “ ” button to pause.
④ Exit Pause/Replay: press the “ ” button to exit pause status.
★Note: The device has built-in speaker, files can be played at both
device and through earphone.
Playback Operation
8
1. Playback / Pause
2. Volume Up / Down/Previous/Next File
① Switch Files: press the “+”/“-” button to switch between next
and previous files.
② Adjust Volume: long press “+” / “-” button to increase or
decrease volume.
3. Delete File at Device

This menu contains the contents of 11 modules, all the
relevant operation and version/disk information about the
device can be found here.
Button Guide:
① Press “+”/“-” to change options.
② Press “ ” to confirm options.
③ Long press “ ”to return to previous menu.
① Delete Current Playing File: long press ''+'' and choose
“Delete”, then will delete current file.
② Delete All File: Step 1 - Long press the “ ” button to return
to main menu interface. Step 2 - Choose the "Recordings--
>Recordings library-->Delete All".
★ Note: Don’t delete all files at the device if unnecessary to
avoid any files loss.
9
Set

Set
Displaying Settings
Set Brightness/Backlight Time/Screen Saver
Date and Time
Set Time and Date
Password
Set Password
Power Off Set
Automatic shutdown after no operation (min)
Sleeper Time
Set automatic shutdown time
Volume Limit
Set the maximum volume for playback
Language
Language Setup
Tools
Calendar,Stopwatch
Information
Version information and Disk Space
Format
Format all data
Factory settings
Resume factory setting (Password will also be
reset to default 000)

① Time setting: first select the “Time Format <12-hour / 24-
hour>” , then select “Set Time”, press “ ” button to change /
confirm the setting option, and press ''+'' /''-'' to set time.
② Date setting: First select the “Set Date Format”, then select “Set
Date”, press “ ” button to change / confirm the setting option,
press ''+'' /''-'' button to set date.
★ Note: Please set date and time of the device before first use.
① Brightness setting: adjust the brightness of the device's display.
② Backlight Time setting: set the time for the device to enter the
screen saver or the screen to turn off when there is no operation.
③ Screen Saver setting: 3 digital clock screensavers to choose,
press''+'' /''-'' to select , and press “ ” to confirm.
★ Note: if you just use it as a watch, you can choose a screen
saver, turn off the device, and press the ''+'' /''-'' to check the time.
1. Displaying Settings
11
2. Set Date and Time

★ Note: After the password function is turned on, you will need to
enter password every time you turn on the machine to unlock the
machine.
① Turn on Password: in the main menu interface,choose "Set--
>Password-->Swith-->On".
② Set New Password: input device's default password is “000”,
press the ''+'' /''-'' button to adjust the password, then press the
“ ” button to confirm the change.
③ Turn off Password setup: choose "Set-->Password-->Swith--
>Off".
Automatic shutdown after no operation (min).
★ Note: the default power off time of device is 30 minutes after
no operation.
★ eg : If set 30 minutes, the device will shut down after 30
minutes with no operation.
3. Set Password
12
4. Power Off Set

Set automatic shutdown time. ★ e.g : If set 30 minutes, the device
will shut down automatically after 30 minutes.
The device has 28 language to choose.You can select the language
that you like.
★ Note: If you accidentally choose a language you are not familiar
with, remember that English is in the 3th, German is in the 5th, and
Spanish is in the 6th.
★ Note: Please check the disk space regularly to avoid file loss
due to disk full. New recordings will override previous recording if
memory is full.
5. Sleeper Time
13
6. Language Setup
7. Information (Version and Disk Space)

① Select music files: enter music folder, press “+”/“-” to choose
music files.
② Play/Pause Music: press “ ” to play or pause.
★ Note: If you want delete music files, please enter “Folder View--
> Sounds”,then long press “+” to delete.
When the device has disk-related problems like messy file name,
wrong file memory size or wants to clear data, you can try to
format the device.
★ Note: This action will delete all files, please back up your files to
computer before do it.
14
8. Format at device
Extended Function
1. Music
2. Folder View

Displays the internal files of the machine in the form of folders.
All recording files in “RECORD” folder. All music files in “Sounds”
folder. You can play/delete recording/music files in the menu.
Delete file: Select a file, long press “+” to delete the file, and
then press “ ”to confirm the setting.
15
Charging
►
Charging via computer: connect the device directly to
computer by USB cable included at the packaage to charge.
►
Charging via the charger: plug into an adapter for charging.
* Please use adapter ≤ 1A charging current/≤5 voltage to
avoid any potential damages to this unit.* In general, it takes
about 2-3 hours before fully charged.
★ Note: • When fully charged, the battery column is full and
stops beating.
Video Instruciton Link - https://youtu.be/QGFfVkT5ntQ

16
Connecting to Computer
●Turn off device first.Connect the device to computer through
original White USB cable included. Recording File path: “My
PC(Window)/Finder(Mac) - VOICE-RECORD”. Files can be
transferred quickly between the device and computer.
★ Note: 1. Support system are WindowME/2K/XP 7,8,10
Vista,Mac OS10 or above. Linux not supported.
2. Please use“Safely Remove Hardware”(in Windows) or “Eject”(in
Mac os) when disconnect device from computer.
3. Please use original usb cable at the box or usb data cable rather
than usb charging cable when connect computer. otherwise the
recorder might not be recognized by computer.
4. Some tools are EXE format file which may not be support by
Mac system. Goggle to find a software to transform to Windows.
5. If have computer connection problem, please check:
Video Instruciton Link - https://youtu.be/Bv8vxCbxpQo

►
Connect with Android Phone: Turn off device first.Connect original
usb cable & 2-in-1 OTG cable. Plug original USB cable to recorder first,
then plug 2-in-1 OTG cable into Andriod phone. Open “Record disk-
Huashen USB drive” at Android phone and then manage files.
►
Connect with iPhone: Turn off device first.Connect original usb
cable & OTG-for-iPhone cable. Plug original USB cable to recorder first,
then plug OTG-for-iPhone cable into iPhone - Find App “File” at phone
- Click Browse to find recorder disk [RECORD] - Open file folder
“RECORD” to play/download/delete recordings at iPhone.
★ Note: 1. Please make sure your Android phone support OTG
function. And open OTG function at your phone.
2. Please note the recorder only support connection with system IOS
13 or higher (iPhone 8 and above).
3. Please check video at https://youtu.be/uLpX59hw_Kc if you have
problem when use this function.
17
OTG Connection with Phone

● When charging or connecting to computer, turn off the device
first. Please use“Safely Remove Hardware”(in Windows) or
“Eject”(in Mac os) when disconnect device from computer.
● After finish recording, push recording button to “OFF” to save
the recordings,otherwise the recordings might be lost or damage.
● Please use the original white usb cable when connec to
computer to ensure that the drive is recognized.
● Please back up files from device to computer regularly to
prevent file loss.
Specification
Package include: *1 x Voice Recorder Watch, *1 x White USB
Cable, *1 x User Manual, *1 x Wired Earphone, *1 x 2-in-1 OTG
cable, *1 x OTG-for-iPhone cable, *1 x After-sale Card, *Many
Video instruction at file “Must Read-Important Note Before
Use” on device’s disk, check at computer before use.
Precautions
18

Product
Voice Recorder
Watch
Product
Weight
1.63oz
Product Size
0.59x1.65x9.52 in
Play
Format
MP3/WAV/W
MA
Recording
Format
WAV/MP3
Distortion
<0.008%
Frequency
Response
20Hz-20KHz
Sampling
Rate
48KHz
Signal to noise
ratio
>90db
Headphon
e Interface
3.5mm
Bit Rate
256-1536 kbps
Charging
Time
2-3 Hour
Support
Operation
System
Window
98/ME/2K/XP/
Vista;Mac OS10
Resolution
LCM 240*240
19

1. How to format or reboot device?
✱For most malfunction problem, Reset, Format or Reboot the
device can solve these problem.
①Reset: Press the " " button for 15 seconds, the device will reset
and restart. If this doesn't work, please try method 2 or 3.
②Format: method 1-at device: turn on, enter “Set>choose format
or factory setting” to format device. method 2-at computer:
connect device to computer, click 'My Computer', Find driver of
the device, right click the mouse, select 'Format', and then select
'Quick Format'. Format Guide - https://youtu.be/bs99KSih76c
③Reboot: If reset&format not works, please open 'Reboot
Software and Instruction' file at the device's driver to reboot the
device or check this video https://youtu.be/iov705MI5Lw.
★ Note: Please back up all files and tools at the device to
computer before formatting or rebooting to prevent any loss.
Troubleshooting
20
Table of contents
Popular Watch manuals by other brands

Velleman
Velleman WC3320 user manual

Chronos Manufactures
Chronos Manufactures Chrono Diamond Hektor 11600 instruction manual

Breguet
Breguet REINE DE NAPLES 9825 Instructions for use

iwc
iwc IW5111 operating instructions

aiko
aiko One R10 Quick user guide

Krüger & Matz
Krüger & Matz SmartKid KM0469 owner's manual