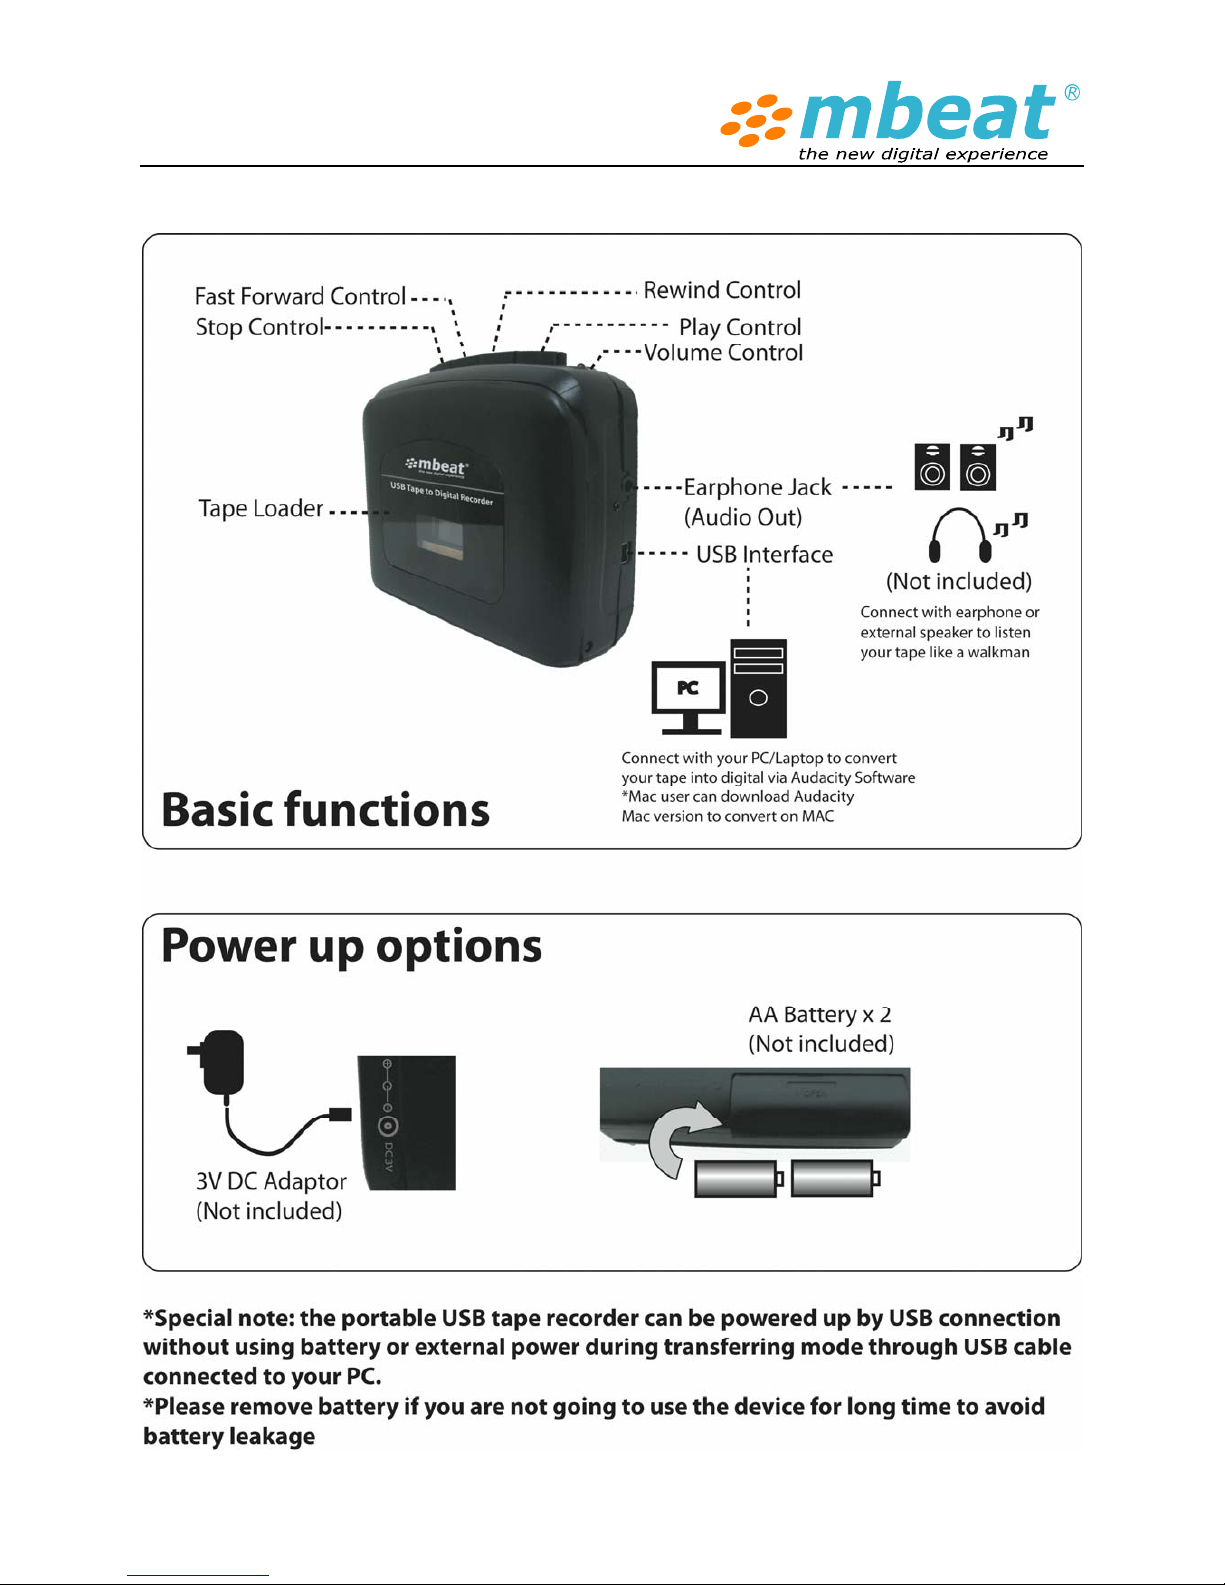
mbeat USB-TAPE02 User manual

mbeat® USB Tape to Digital Recorder
Model: USB-TAPE02
Read instructions carefully before use and store in a safe place for future reference. Product color and specification
are subject to change without prior notice. The manufacturer or distributor reserves the right to amend the
instruction manual at anytime to reflect the latest product design changes or limitations

Product introduction

Quick guide for use

Initial start up
Power on (Play back mode)
You need 2 x AA batteries to power up the device or you can choose a +3V AC/DC power adaptor
with the right size of pin connector to power up the device if you want to listen the music like a
normal walkman.
Power on (USB conversion mode)
If you just need to convert the tape to digital via PC, you do not need to put battery or power, the
USB tape to digital can work with USB power cable directly
Earphone (Audio out) connection
You can connect your earphone plug to the earphone jack or simply connect your speaker audio
line in into the earphone (Audio out) jack to playback music
Play the tape
1. Insert the tape into the tray
2. Put batteries in or connect with external power
3. Press “PLAY” button to playback the music or start to record ( in USB mode)
4. Adjust volume up/down to suit your earphone plug or adjust the volume up/down during
recording ( in USB mode)
5. Press “ FF” to fast forward the tape , press “RW” to rewind the tape, press “ STOP” to stop
playing
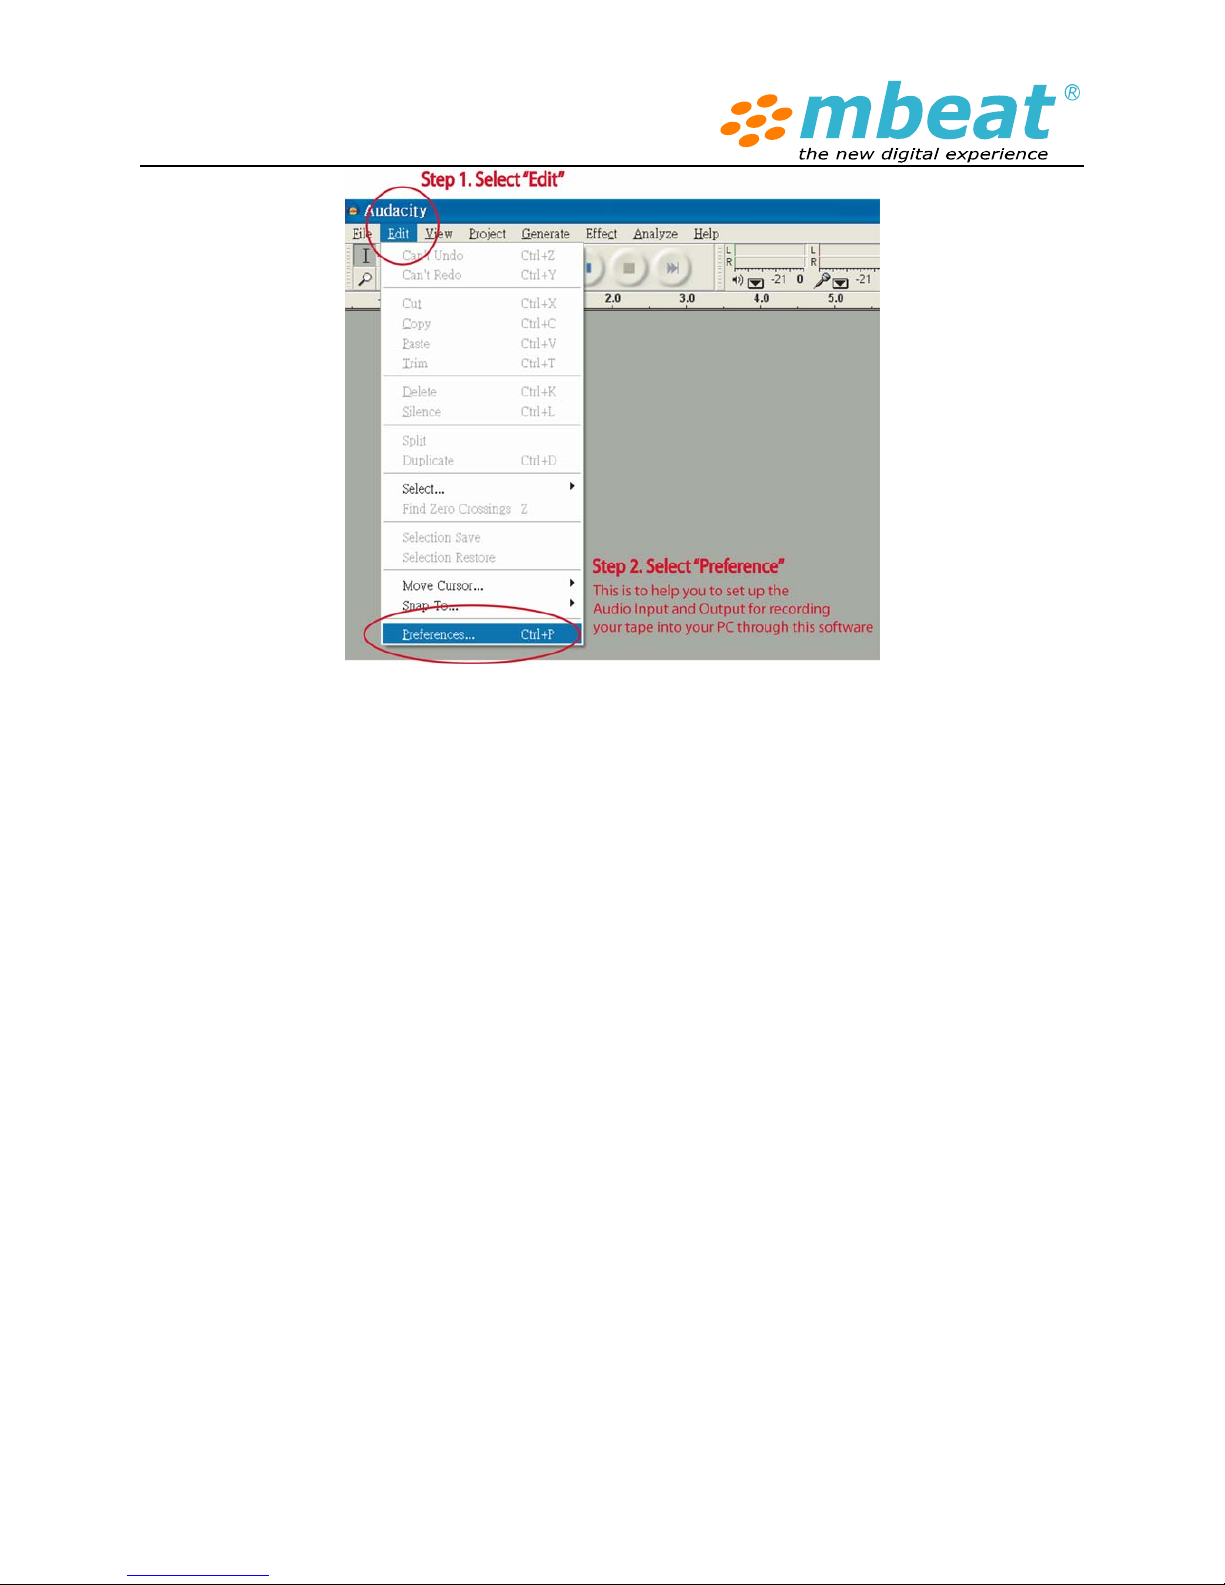
6. Plug USB cable into the tape recorder and connect it with PC to start the USB conversion
process after your installed audacity audio editing software on the PC
After use care
1. Remove the tape and remove the batteries
2. Keep manual and driver CD for future reference
3. Place the device in a safe place to avoid direct sunlight and moisture environment
4. Do not drop the device in ground or hard surface
5. Tape head may need to clean up if the playback quality is low in months use
* To clean tape heads, use pure isopropyl alcohol and lint-free swabs. Wipe the metal parts
of the transport with alcohol (DON'T wipe the rollers!) and allow them to dry. Throw the
swab away after use.

To use USB tape to digital function
Step 1. Install the “Audacity” audio edit software
Put the CD disk into your computer and run “Aduacity.exe” file to install the software on your
computer. After installation you can launch the software on your desktop, looking for this icon
on your desktop or starter menu on your Windows OS.
When first time to launch the software, select your prefer language as “English”
Follow the on screen instructions to install this audio editing software program. With the software
installed, you can record tape into digital format and store it on your PC.
*If you using Windows 7 OS or MAC OS X, you can also download the free version of the latest
“Audacity” software to install on your computer (Details please refer “Audacity Software Quick Guide”
later). Download link: http://audacity.sourceforge.net/download/
Step 2. To connect your Tape recorder with your PC
1. Plug your USB tape to digital recorder to the USB port of your computer.
2. Open the “audacity” program that you have installed.

Step 3. How to use Audacity to record your music
mbeat® USB tape to digital recorder is able to transfer music from TAPE to PC with USB connection
by using the powerful audio edit software named “Audacity”. For the detailed software guide please
refer to the “Audacity Software Quick Guide” and Audacity official website as well.
Please note your computer audio configuration may slightly different as our manual
description, please check it carefully and make prompt changes to suit your system.
Some software knowledge is required to operate software in handling more complicated
functionalities (Please read this chapter carefully in order to find the right Audio In and Out
for your tape to digital recorder and your PC)
1. Turn on the USB tape to digital recorder, connect the USB cable to the device and computer, no
extra driver is required to drive the tape recorder
2. Your computer should detect a new “USB PnP Audio “device (USB Plug and Play Audio Device)
or it could named like “Generic USB Audio Device”, or whatsoever, they are the same thing, just
depending on how your PC call it.
3. Double click to open up the Audacity program and you will see this similar interface screen on
your computer.

4. Check the Stereo Mix column in the drop down menu and just to keep the default settings, the
software shall be able to auto default the USB tape recorder setting as “Stereo Mix” or “Line”, or
remain gray inactive color according your computer hardware configuration. Those factors are
not such key important and you can set up in“Preference” , under “Edit” menu as well
5. Adjust the output and input volume to get your desire sound volume when you using computer
speaker to play back , please note that this setting will not effect the final recording track volume
level, only effect the computer speaker volume, just works like your Windows OS volume and
microphone controller panel.
6. Very Important is to Select the “Edit” menu on the top bar of the software and then select
“Preference” in the drop down menu, it will lead you to the audio input/output source
settings. (Some users may not right set up the correct Audio I/O , so the PC can not capture
the recorder’s audio signal , thus you can not record )

After enter “ Preference” section, choose Audio I/O section:
Under Playback drop down menu:
Select “Realtek HD Audio output “ , which means it is your sound card audio output to listen the
music playback through tape recorder while doing the recording internally.
Under recording drop down menu:
Select “USB PnP Audio”, which indicated the audio source from the tape recorder when it is
plugged into the computer. Your system may show the name like “Generic USB Audio device”,
or “USB PnP Device”, it does not matter. Important is to find the proper recording source that is
match with this USB tape to digital recorder
Please also tick “Software play through (Play new track while you are recording)” this
function enables you to real time monitor the recording track and playback (SEE DETAILS AS
BELOW)

7. When everything is ready, then you can select the RECORD button to start recording
your tape music into digital format.
8. You can turn the USB tape to digital recorder volume down and turn on the computer speaker to
monitor your records.
7. Select the PAUSE button to pause the recording.

8. Select the STOP button to stop the recording.
9. Select the to skip to start.
10. Select the button to go to end.
11. You can see the recorded file on your computer and convert the recorded file to other formats
including .WAV/ MP3/Ogg Vorbis. Once the tape reaches its end, the tape recorder will stop to work
and you can turn around another side or change a new tape to keep recording as you like
Please note: if you try to convert the file into MP3 format, you need to install
“LAME” encoder software, and you install it at the first time you using then it will
work in the future

How do I download and install the LAME MP3 encoder?
Because of software patents, we cannot distribute MP3 encoding software ourselves. Follow these
instructions to use the free LAME encoder to export MP3 files with Audacity.
Windows OS Users, follow these steps
zCheck your CD disk , there should have this file in the CD disk , and you
can copy into your computer somewhere that you can find to reload it on Audacity
zIf you can not find out this file, you can download and follow below steps to install it. Go
to the LAME download page. (Steps as Below)
zUnder "For Audacity on Windows", left-click the link "Lame v3.98.2 for Audacity on
Windows.exe" and save the file anywhere on your computer. Do not right-click the link
to the .exe file.
zDouble-click "Lame_v3.98.2_for_Audacity_on_Windows.exe" to launch it (you can
safely ignore any warnings that the "publisher could not be verified").
zFollow the "Setup" instructions to install LAME for Audacity. Do not change the offered
destination location of "C:\Program Files\Lame for Audacity".
zThe first time you use the "Export as MP3" command, Audacity will ask for the location of
"lame_enc.dll". Navigate to "C:\Program Files\Lame for Audacity", select "lame_enc.dll",
then click "Open" and "OK".
zIf you prefer the Zip option for the LAME download, save the zip file to anywhere on your
computer, extract "lame_enc.dll" to any location, then show Audacity where to find it as
in Step 5 above.
zIn case of difficulty, please view our more detailed instructions on the Audacity Wiki.

12. Play the saved file.
Put the saved file in the Audacity program and press the PLAY button to play the file.
13. Download music into the digital MP3 or iPod device
Please save those converted music into a folder that you can easily to find, then you can copy or
paste those converted MP3/WMA/OGG files into your MP3 /MP4 player, or you can load them into
your iTunes then transfer into your iPod.
Please note, some of the digital MP3/MP4 player may not able to fully support all type of converted
music file, such as FLAC,. OGG due to the original hardware limitation, however most of digital music
player can support MP3 or WMA files.
Trouble shooting and FQA
1. Device is not power on
zCheck your batteries get enough power
zCheck whether the power LED indicator is light on
zCheck whether your USB cable connection is intermittent, or your USB cable is damaged (in
USB mode)
2. Can not play back tape
zCheck whether the tape is jammed in the tray
zCheck whether the tape is play to the end and need to change side
zCheck volume settings is not mute
zCheck the earphone is working properly

3. Noise from the tape earphone plug
zYour old tape may has little background noise due to its natural acoustic character and
minor background noise is consider as normal
zCheck the earphone plug is fitted with earphone jack, no intermittent
zCheck whether the tape roll is damage or fade out due to storage issues
zDo not turn the USB tape to digital recorder volume to max to get distortion on your
earphone
zCheck whether the tape head is due to clean up and need to be cleaned
4. Can not find the USB audio device when plug it into my computer
zPlease refer manual topic “To use USB tape to digital function ” , please pay attention to
Audio I/O section settings on the audacity software , to get the record signal , you need to
set up the proper in / out source under“Preference”
zOr you can refer the following “Audacity Software Quick Guide” – under topic “ Software
configuration”
5. Can not convert music into MP3 file and Save it
zYou need to install “LAME MP3 encoder” into your computer first time to make the audacity
save the music into MP3 format please refer “How do I download and install the LAME MP3
encoder?
6. How can I playback my recorded music?
zYou can play back your recorded music using Windows Media Player or iTune, for details
please refer Microsoft and Apple website for download and support content
****************************************************************************************************
Audacity Software Quick Guide
For the complete manual please check the following website.
http://audacity.sourceforge.net/help/documentation
Before recording and editing music please install the supplied software first. You can
also download the software from the website directly if your disk is not readable
http://audacity.sourceforge.net
****************************************************************************************************

To Install Software (PC) & Record
1.Insert the CD that came with your product
2.Click on the “Audacity” file to open it and then click on the “audacity.exe” to run it. Follow the
on screen instructions to install the program.
3.With the software installed, you can record tape to your PC.
4.Plug in your tape to digital recorder to the USB port of your computer.
5.Open the audacity program that you have installed and press PLAY button to playback your
tape and press the Record button on the software to start recording
Software Configuration
1. Select the “Edit” menu and then “ Preferences”
Select the USB audio device under the “Recording” selection as shown. Select “Software Play
through” to hear the audio while recording.
Note: The USB tape to digital recorder may show up with a different name in Windows
operation system. This may depend on your computer model and operating system. Please
select the proper device name
If you are still having difficulty finding the USB tape to digital recorder, try to check your system
settings or control panel to adjust audio input settings from the sound control panel.
After you have completed the above settings, you are ready for recording.

To record
1. Start tape recorder and insert the tape to the tape tray and press PLAY button to play. Click
the red record button on the toolbar to begin recording from tape to PC.
2. When the track has finished recording click the orange stop button.
3. Drop down the“File”menu and select the intended music format to be “exported as”.
4. Select where you would like to save the file e.g. my music, name the file and save. (as the
audacity software can not save MP3 directly, please install the “lame_enc.dll” that can be found on
the installation disc, all other formats will save automatically).
Toolbars
Selection tool - for selecting the range of audio you want to edit or
Listen to.
Envelope tool - for changing the volume over time.
Draw tool - for modifying individual samples.
Zoom tool - for zooming in and out.
Timeshift tool - for sliding tracks left or right.
Multi tool-lets you access all of these tools at once depending on the
location of the mouse and the keys you are holding down.

Audio Control Buttons
Skip to Start - moves the cursor to time 0. If you press Play at this
point, your project will play from the beginning.
Play - starts playing audio at the cursor position. If some audio is
selected, only the selection is played.
Loop - if you hold down the Shift key, the Play button changes to a Loop button,
which lets you keep playing the selection over and over again.
Record-starts recording audio at the project sample rate (the sample rate in the
lower-left corner of the window). The new track will begin at the current cursor position, so
the“Skip to Start” button first if you want to the track to begin at time 0
Pause-temporarily stops playback or recording until you press
pauseagain.
Stop-stops recording or playing. You must do this before
applying effects, saving or exporting.
Skip to End - moves the cursor to the end of the last track.
Edit Toolbar

All of the buttons on this toolbar perform actions – and with a couple of exceptions, they’re all just
shortcuts of existing menu items to save you time. Holding the mouse over a tool will show a
“tooltip” in case you forget which one is which.
Cut
Copy
Paste
Trim away the audio outside the selection
Silence the selected audio
Undo
Redo (repeat last command)
ZoomIn
ZoomOut
Fit selection in window – zooms until the selection just fits inside the
window.
Fit project in window – zooms until all of the audio just fits inside the
window.
Track Pop-Down Menu
The Track Pop-Down Menu appears when you
click in a track’s title. This lets you access a few
special commands that apply to individual
tracks.

Name - lets you change the name of the track.
Move Track Up – exchange places with the
track above this one.
Move Track Down – exchange places with
the track below this one.
Waveform(dB) – similar to Wave form ,but
on a logarithmic scale, measured in decibels
(dB).
Spectrum – display the track as a
spectrogram, showing the amount of energy in
different frequency bands.
Pitch (EAC) – highlights the contour of the
fundamental frequency (musical pitch) of the
audio, using the Enhanced Autocorrelation
(EAC) algorithm.
Mono – makes this track a mono track,
meaning it is played out of just one speaker, or
played out of the left and right speakers
equally.
Left Channel – makes this track come out of
only the left speaker.
Right Channel – makes this track come out
of only the right speaker.
Make Stereo Track – if there is another
track below this one, joins them to make a
single stereo track, with the top track
representing the left speaker, and the bottom
track representing the right speaker.
When tracks are joined into a stereo pair, all
edits automatically apply to both the left and
right channel.
Split Stereo Track – if the selected track is a
stereo track (a pair of left and right tracks joined
together as a single track), this operation splits
them into two separate tracks that you can
modify and edit independently.
Set Sample Format –this determines the
quality of the audio data and the amount of
space it takes up. 16-bit is the quality used by
audio CD’s and is the minimum quality that
Audacity uses internally converted when you
open them). 24-bit is used in higher-end audio
hardware. 32-bit float unless you have a slow
computer or are running out of disk space.
Set Rate – sets the number of samples per
second of the track, 44100Hz is used by audio
CDs.
Tracks can have different sample rates in
Audacity; they are automatically re-sampled to
the project sample rate (in the lower-left corner
of the window).
[MENU]
File Menu
New – creates a new empty window
Open …- opens an audio file or an Audacity
project in a new window (unless the current
window is empty).
To add audio files to an existing project window,

use one of the Import commands in the Project
menu.
Close – closes the current window, asking you
if you want to save changes. On Windows and
Unix, closing the last window will quit Audacity,
unless you modify this behavior in the Interface
Preferences.
Save Project –
saves everything in the
window into an Audacity-specific format so that
you can save and quickly continue your work
later. An Audacity project consists of a project
file, ending in “.aup”, and a project data folder,
ending in “_data”. For example, if you name
your project “Composition”, then Audacity will
create a file called “Composition.aup” and a
folder called Composition_data. Audacity
project files are not meant to be shared with
other programs – use one of the Export
commands (below) when you are finished
editing a file.
Save Project As… - same as Save Project
(above), but lets you save a project as a new
name.
Recent Files –
brings up a list of files you
have recently opened in audacity to be
re-opened quickly.
Export As WAV - exports all of the audio in
your project as a WAV file, an industry-standard
format for uncompressed audio. You can
change the standard file format used for
exporting from Audacity by opening the File
Format Preferences. Note that exporting will
automatically mix and re-sample if you have
more than one track, or varying sample rates.
See also File Formats.
Export Selection As WAV - same as above,
but only exports the current selection.
Export as MP3 - exports all of the audio as
an MP3 file. MP3 files are compressed and
therefore take up much less disk space, but
they lose some audio quality. Another
compressed alternative is Ogg Vorbis (below).
You can set the quality of MP3 compression in
the File Format Preferences. See also MP3
Exporting.
Export Selection as MP3- same as above,
but only exports the current selection.
Export as Ogg Vorbis - exports all of the
audio as an Ogg Vorbis file. Ogg Vorbis files are
compressed and therefore take up much less
disk space, but they lose some audio quality.
Ogg Vorbis files tend to take up a little less disk
space than MP3 for similar compression quality,
and Ogg Vorbis is free from patents and
licensing restrictions, but Ogg Vorbis files are
not as widespread. You can set the quality of
Ogg compression in the File Format
Preferences.
Export Selection As Ogg Vorbis -
sameas above, but only exports the current
selection.
Export Labels - if you have a Label Track in
your project, this lets you export the labels as a
text file. You can import labels in the same text
format using the “Import Label…” command
in the Project Menu.

Export Multiple – lets you split your project
into multiple files all in one step. You can either
split them vertically (one new file per track), or
horizontally (using labels in a Label Track) to
indicate the breaks between exported files.
Page Setup – configure how Audacity will
print out the track waveforms using the Print
option, and what printer to use.
Print –
Print out the main window view from
audacity showing the tracks and waveforms.
Exit (Quit) – closes all windows and exits
Audacity, prompting you to save any unsaved
changes first.
Edit Menu
Undo – This will undo the last editing
operation you performed to your project.
Audacity supports full unlimited undo –
meaning you can undo every editing operation
back to when you opened the window.
Redo –This will redo any editing operations
that were just undone. After you perform a new
editing operation, you can no longer redo the
operations that were undone.
Cut – Removes the selected audio data and
places it on the clipboard. Only one “thing” can
be on the clipboard at a time, but it may
contain multiple tracks.
Copy – Copies the selected audio data to the
clipboard without removing it from the project.
Paste – Inserts whatever is on the clipboard at
the position of the selection or cursor in the
project, replacing whatever audio data is
currently selected, if any.
Trim – Removes everything to the left and
right of the selection.
Delete – Removes the audio data that is
currently selected without copying it to the
Silence – Erases the audio data currently
selected, replacing it with silence instead of
removing it.
Split –Moves the selected region into its own
track or tracks, replacing the affected portion of
the original track with silence. See the figure
below:
Duplicate – Makes a copy of all or part of a
track or set of tracks into new tracks. See the
figure below:
Select…> ALL-Selects all of the audio in all
of the tracks in the project.
Select…>Start to Cursor-Selects from the
beginning of the selected tracks to the cursor
position.
Table of contents
Other mbeat Voice Recorder manuals