Media Visual Navigation Series User manual

Robot Vacuum Cleaner
Instruction Manual
Visual Navigation series
Clean So excellent
Thank you for choosing our product
Please read this instruction carefully before use

Quick Start Instruction …………………………………………..…………………………….
Important Information …………………………………………………………………………..
Safety instructions …………………………………………………..………………………….
Components …………………………………………………………………………………………
Operation ………………………………………………………………..………………………….
Cleaning and maintenance …………………………………………………………………
Trouble shooting ………………………………………………………..………………………
Specifications ……………………………………………………………..………………………
Appendix-Operating instructions ………………………………..……………………..
Page 1
Page 3
Page 4
Page 5
Page 9
Page 14
Page 16
Page 18
Page 19
QUICK-START INSTRUCTIONS
Please remove the EVA
protection stopper
before using.
Clear the area to be
cleaned. Remove power
cords and small objects
from the floor, tuck rug
fringe under the rug
base, and lift items such
as curtains and
tablecloth off the floor
Under Mopping, please
pay attention to the
robot, add water or
clean up water tank in
time.
Seal the water inlet
cover well, otherwise
the water will release
too fast from the water
tank.
Do not charge the
robot under MOP
mode. And the robot
will not response to the
"Auto recharge" if you
press this button on the
remote controller.
Do not use MOP
function on the carpet.
Turn the power switch,
"1" to ON, "0" to OFF
IMPORTANT INSTRUCTIONS OF
FUNCTIONING
IMPORTANT INSTRUCTIONS
BEFORE USE
Direct Charge by
Adapter plug in the
robot charge hole.
Put the robot onto the
charge dock, make
sure the charge pins in
well contact, connect
the Adapter with the
charge dock and then
connect to the power
supply.
Note: The robot will
only response to
"Clean" button on
robot and "Start/Stop"
button on remote
controller when it
under charging. Any
other buttons will not
response and show up
the voice "Wrong
instruction".
IF THERE ARE ANY FAULTS SHOW UP,
PLEASE RESTART THE ROBOT AFTER THE
FAULT IS SOLVED.
TWO WAYS TO CHARGE
Table Of Contents
1
2

Important Information
Use
Before using the robot, make sure that
the power outlet is switched on and
remove all obstacles from the
immediate environment.
The robot will pass over each section of
the floor several times to ensure
thorough cleaning.
The rotating brushes may occasionally reject smaller particles (dogfood, cat litter),
but the robot will remove them all eventually.
Empty the dust box after each use to ensure maximum performance.
The robot may eject some of the dirt if the dust box is full, although it does not emit
a warning signal.
For maximum performance
Empty the dust box and clean the filter of the IMASS after each use.
Do not use water to clean the HEPA filter.
Replace the HEPA filter if the suction power of the IMASS diminishes and the
robot removes less dirt than before.
Battery life
To extend the battery life of the of the IMASS and maintain maximum suction power:
Charge the robot overnight before using it for the first time.
Switch off the power supply if the robot will remain unused for a longer period.
Charge the robot as quickly as possible; leaving it for days in the docking
station can damage the battery.
Use the robot frequently.
Warning: The product contains electronic components. Do NOT immerse the IMASS
in water or spray it with water. Only use a dry cloth to clean the robot.
Safety Instructions
Carefully read the following safety instructions and adhere to all of the
instructions before putting the device into operation.
Make sure that the device is switched on before attempting to use it.
Turn off the device using the switch on the right if the device will remain unused
for a longer period.
WARNING
1. Only authorised technicians may dismantle the device. Users must never dismantle or
repair the device.
2. Only use the original adapter supplied by the manufacturer. The use of unsuitable
adapters may cause electric shocks and fire or damage the device.
3. Do not touch the plug or the adapter when your hands are wet.
4. Do not allow items of clothing or limbs to become caught in the wheels on the device.
5. Keep the device away from cigarettes, lighters, matches or other flammable materials.
6. Wait until the battery is fully recharged before cleaning the device.
7. Do not use force to bend the power cable and do not expose it to pressure from heavy or
sharp objects.
8. The device is only intended for use in closed rooms. Do not use it outside.
9. Do not sit on the device or place any object on top of the device.
10. Do not use the device in a wet or damp environment (any environment in which there are
liquids).
11. Clear the floor before using the device (remove all breakable objects and cables, clothes,
papers and curtains, etc., as they may become caught in the device).
12. Do not place the device in a position from which it may fall (tables, chairs, etc.).
13. Turn off the power supply if the device will remain unused for a longer period.
14. Check before each use that the adapter and plug are correctly connected.
15. Tell everyone in your home or office when the device is in operation so that nobody trips
over the device.
16. The device is unable to overcome elevation differences of more than 10 mm.
17. Only use the device in the temperature range between -10 °C and +40 °C (degrees
Celsius)and do not expose the device to higher temperatures.
18. Remove the battery before scrapping the device.
19. Disconnect the device from the power supply before removing the battery.
20. Dispose of the battery properly.
Note: Make sure that children and persons with mental or physical handicaps are
supervised when using the device.
3
4
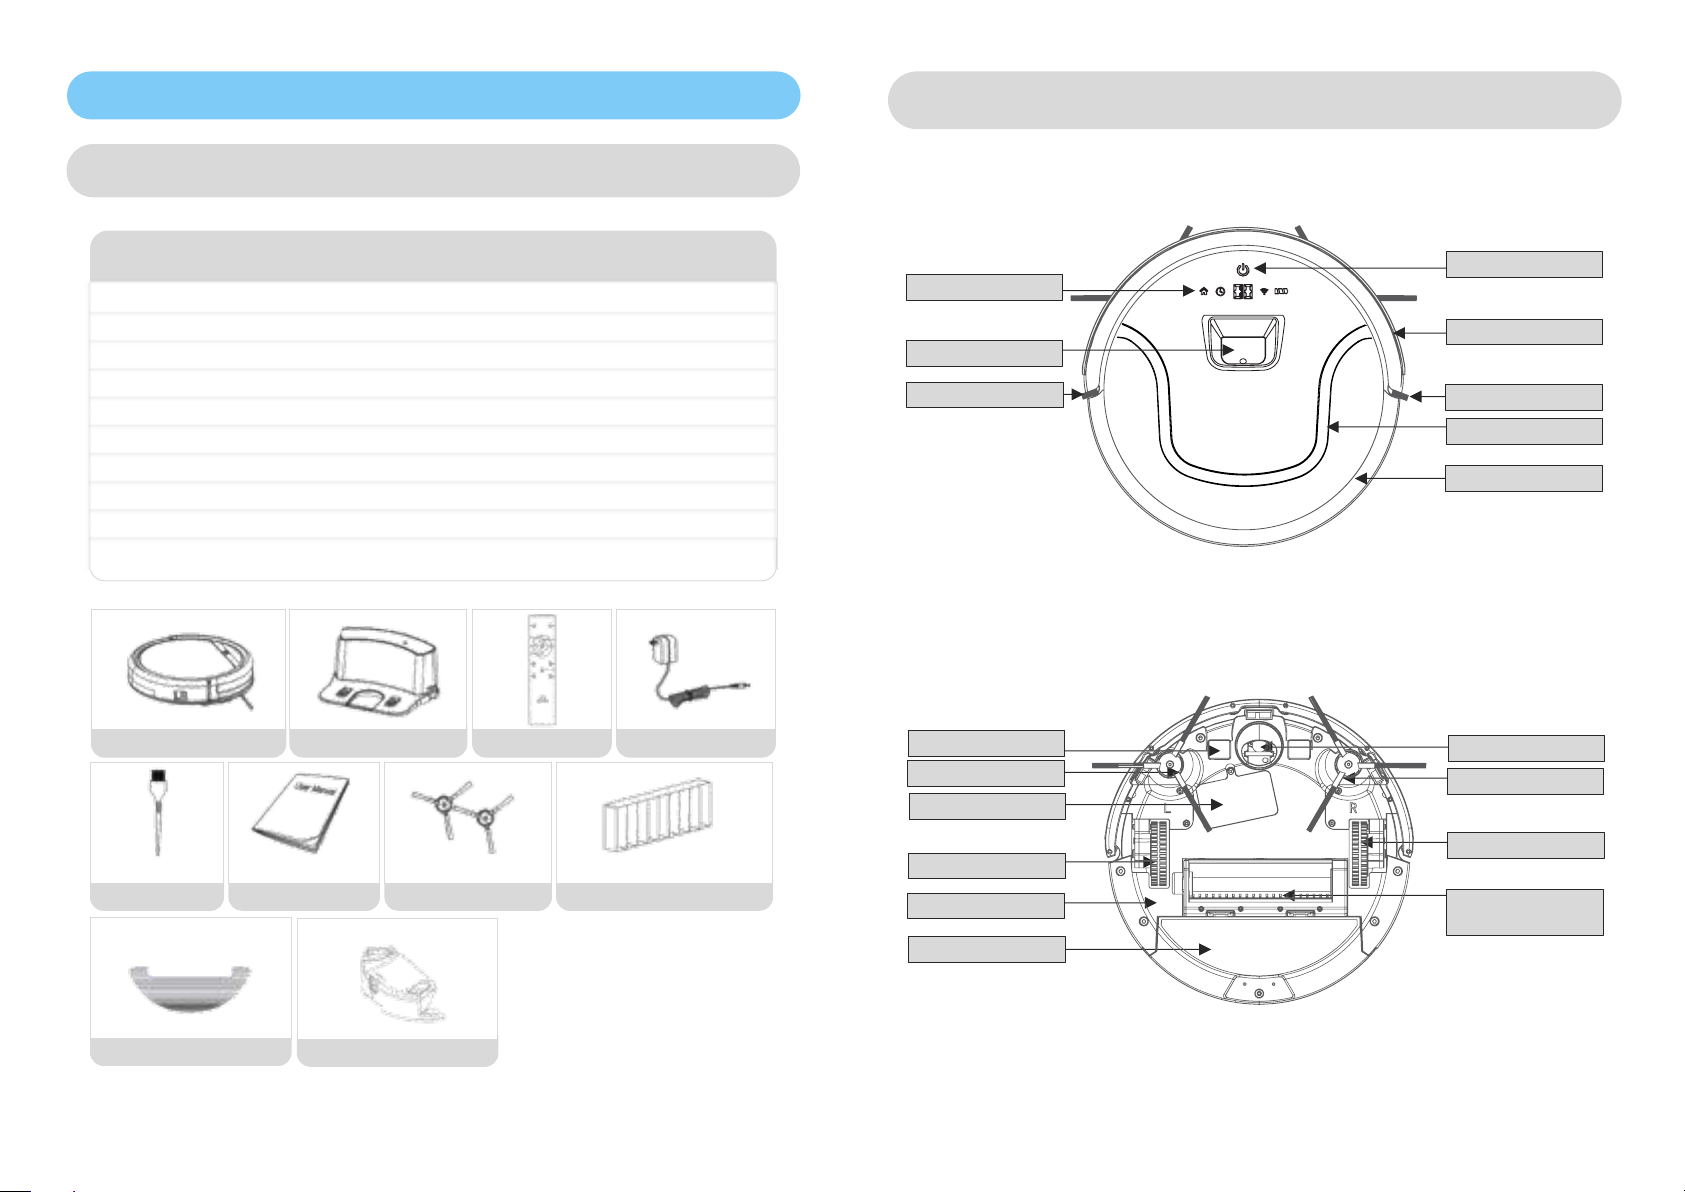
Robot Design
Components and accessories
Components
1
2
3
4
5
6
7
8
9
10
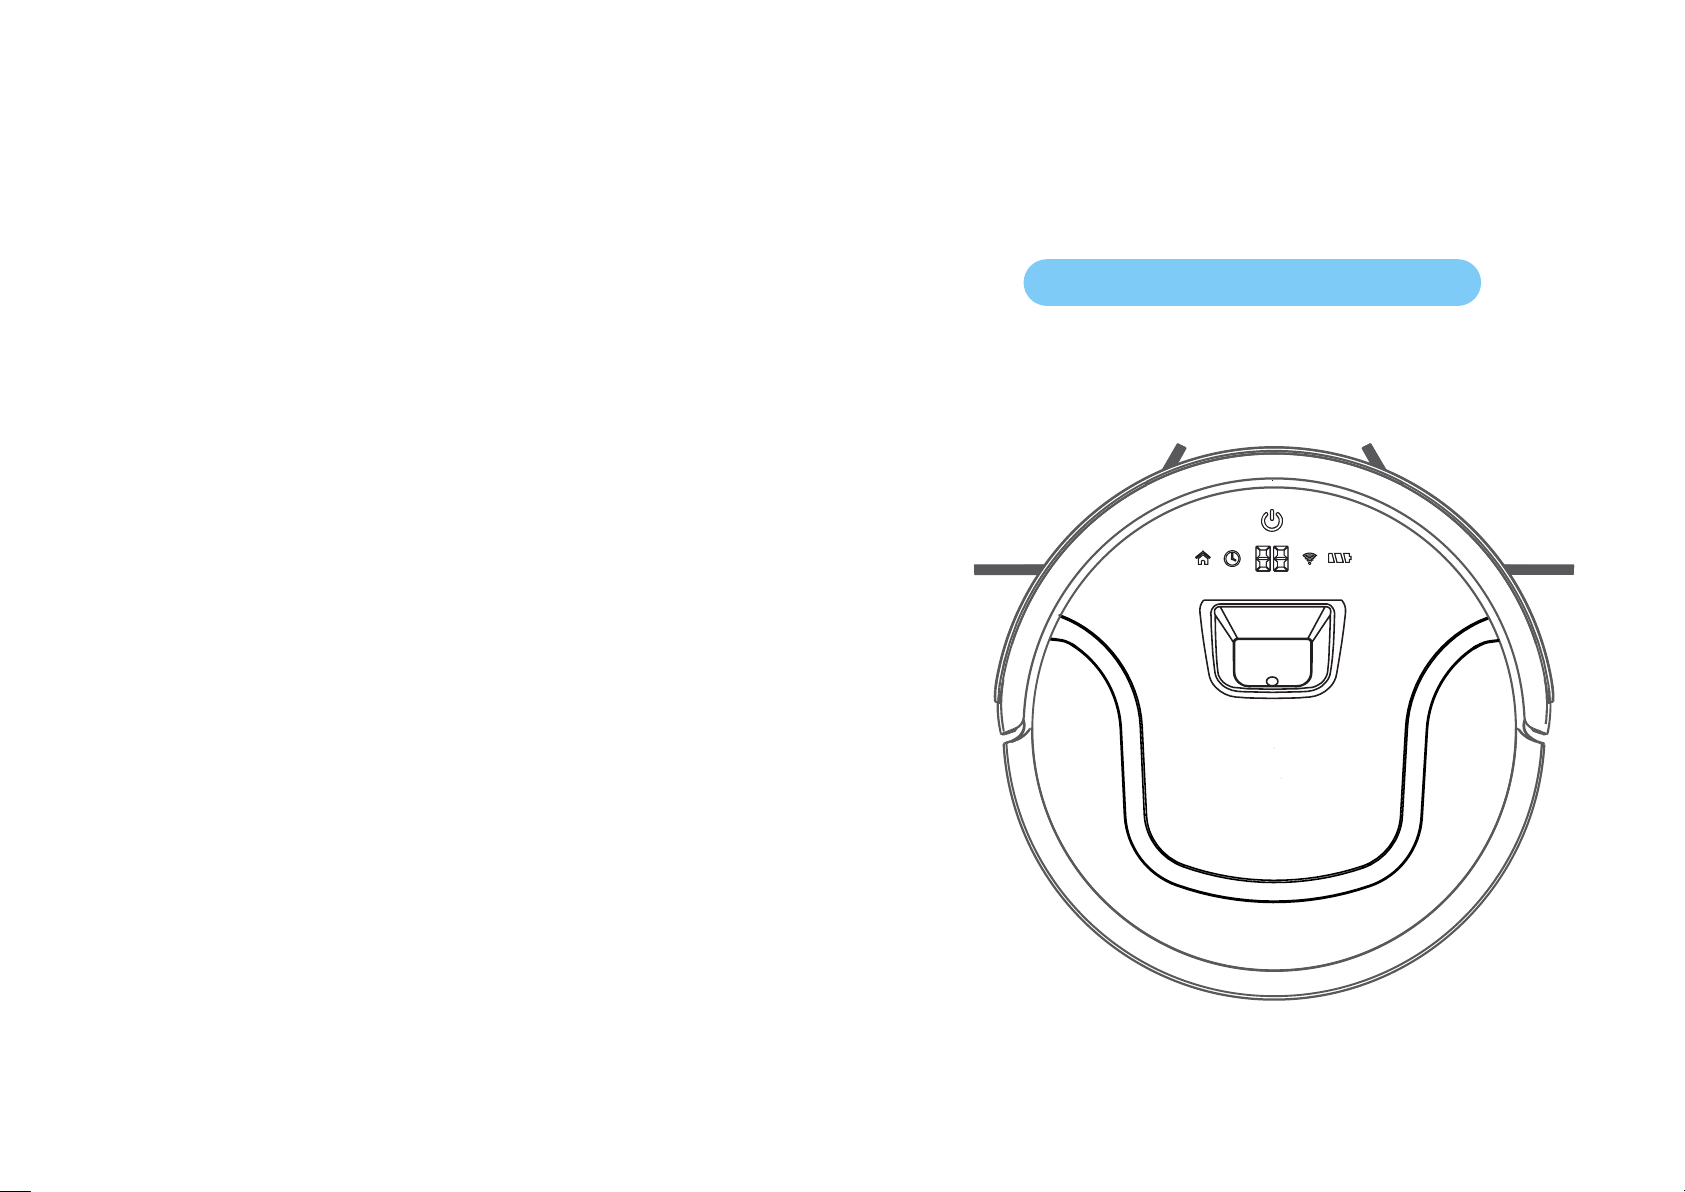
LED display
Navigation Camera
EVA foam
Dust box/water
tank
Undercarriage
Left wheel
Battery cover
Lateral brush, left
Charging contact
pins
Dust intake/central
brush
Right wheel
Lateral brush, right
Wheel steering
On / off
Lid
EVA foam
Shock absorber
Start / Pause
No. Description
Quantity
1
Main unit
1
2
Docking station
1
3
Remote control (battery included)
1
4
Adapter/power pack
1
5
Cleaning tool
1
6
Operating instructions
1
7
Additional lateral brushes
2
8
HEPA filter
1
9
Microfiber cloth
1
10
Water tank
1
5
6

<
Docking Station
Charging contacts
Remote Controller
Power On/Off
Forwarder
Left
Wi-Fi
Max Power
Wall follow / Edge
cleaning
Voice On/Off
Spot cleaning
Mini Room cleaning
Right
Start / Pause
Re-charge
Cleaning Status Button
Robot Status
Display status
Charging
Display flashes Red
Charge complete
Display in green
Operating mode
Display in Green
Robot error
All display flash
Low battery
Display turns red
Using The Remote Controller
Press this button to turn on / off the robot
Press this button to send the robot back to
charging station for re-charge
Press this button to start / pause cleaning
Press this button to move the robot forward
Press this button to turn the robot to right
Press this button to turn the robot to left
Press this button to turn on the Wi-Fi of robot
Press this button to clean in a small area
Press this button to start spot cleaning
Press this button to start max power cleaning
Press this button to start clean along the wall
Press this button to turn on/off the voice guide
1
2
3
10
9
8
7
6
5
4
11
12
11
10
7
6
4
1
12
9
8
5
3
2
Note:
1) Place two AAA type batteries
into the remote controller.
2) Remove the batteries if you will
not use the remote controller for
a long period.
Power display
7
8

<
Operation
How to start cleaning
Assemble the docking station and switch on
the adapter. The signal lamp on the docking
station should start to flash.
Note: Place the docking station close to a wall
and remove obstacles approx. 1 m on both sides
and approx. 2 m in front of the device.
1
Switch on the power supply. The display
should now flash.
The robot vacuum cleaner switches to sleep
mode if it does not receive any commands
within 16 seconds.
Note:
A. Make sure that the power switch is always
turned on, as the robot cannot be put into
operation otherwise.
B. The selected mode is stopped if the power
switch is turned off.
Attention: Make sure that the power switch is
turned on before charging the robot, as the
robot cannot charge otherwise.
2
Automatic charging
The robot automatically returns to the docking
station when the battery is low.
4
Charge the robot in a scenario as shown
below:
A. Connect the plug to a socket.
B. Press the HOME button to send the robot
back to the docking station for charging.
To extend battery life:
A. Charge the robot overnight before using it for
the first time. The display field disappears when
charging is complete.
B. During normal use, always return the robot to
the docking station, which is connected to the
power supply.
C. Fully charge the robot, then turn off the
power switch and place the robot in a cool, dry
place if you will not use it for a longer period.
3
Start |Pause |Sleep
The robot vacuum cleaner is not in operation.
The LED display on the clean button is turned
off and the power switch is on.
Sleep Mode
The robot vacuum cleaner is not in operation. The LED display on the clean button is illuminated.
Cleaning Mode
The robot vacuum cleaner is not in operation.
The LED display on the clean button flashes.
Selected Mode
1. Commissioning
A. Make sure that the power switch is turned on.
B. Press the CLEAN button on the main unit or the remote control to start cleaning.
Note: When the robot is in sleep mode, press the robot’s CLEAN button to wake it
up. The robot will immediately start cleaning if you press the CLEAN button a
second time.
2. Pause
Press the CLEAN button on the main unit or the remote control to switch the robot
mom cleaning mode to the selected mode.
Note: If you have paused the robot, press the CLEAN button to restart cleaning.
3. Sleep
To switch the robot from the selected mode to sleep mode:
A. Press and hold the CLEAN button on the main unit for three seconds.
B. The robot automatically switches to sleep mode if it does not receive a
command within 15 seconds.
9
10

3. Click Add Device, the
select All Devices at top-
right side.
App Instruction Manual
Note: The App only apply
to the Robot with Wi-Fi
function
1. Please scan the QR code
below to download the
APP; (Please keep your
mobile phone connecting
to Wi-Fi)
5. Turn on your Robot, after the
welcome words voice, press
Wi-Fi button on remote
controller until "Ding Dong"
sound shows up.
6. The indicator light will
keep blinking when enter
Wi-Fi setting Click
“Confirm indicator rapidly
blink”
7. Fill in your home Wi-
Fi name and password.
(Please make sure to
fill in correct name and
password)
8. Click Completed
after robot added
successfully
4. Find Robot Vacuum in
the list and Select it.
2. Register & Log in the APP
11
12

Cleaning Mode
Auto-cleaning mode (default mode)
This is the most frequently used mode. When in auto-cleaning mode, the robot
describes a zigzag pattern during cleaning and changes direction when it
encounters an obstacle.
Spot Cleaning mode
This mode is selected to deal with a lot of dirt or dust in one place. When in spot
cleaning mode, the robot describes a spiralling pattern around a particular area t
has been instructed to clean.
Zigzag smart cleaning mode
This mode is selected to deal with a lot of dirt or dust in a small area. The robot
describes a zigzag pattern with a width of 1 metre to ensure thorough cleaning.
Edge cleaning mode
This mode is selected to clean the edges and corners of a room. When in edge
cleaning mode, the robot cleans along an edge (e.g. a wall). The robot
automatically returns to default mode once it has cleaned all areas.
Schedule for cleaning mode
This mode is used to define an automatic cleaning schedule. It is defined using the
smartphone app (note: the default cleaning mode for scheduled cleaning is AUTO
cleaning mode).
Cleaning And Maintenance
Cleaning the lateral brushes
Clean the lateral brushes and replace them if they are damaged.
Note: Before replacing the lateral brushes, check the L & R markings on the two
lateral brushes and make sure the match the corresponding markings on the under
carriage of the robot.
Cleaning the main brush
A) Turn off the robot vacuum cleaner. Press the two tabs on the main brush cover
to remove the main brush. Remove the main brush from the right. Use the supplied
cleaning kit to remove hair and other dirt from the main brush.
B) Rinse the main brush under running water and do not replace it until it has dried
completely.
[ Water release level adjustment for MOP ]
For Electric Control Water Tank only
Press " " button to enter water release level adjustment mode when the water
tank set in position
Press " " one time to set up one level, Press " " one time to set down one level,
total 3 levels Low - Medium - High.
After adjustment done, press " " to confirm, or else after 5s without any operation,
robot will confirm and quit the adjustment mode automatically.
Note: Please remove the EVA foam before using the robot
Eva foam Eva Foam
Main brush cover
Main brush
13
14

cleaning the dust box and the filter
Hold the dust box in a horizontal position and press the yellow unlocking button to
open its lid. Empty the dust box, remove the filter, rinse the dust box. The filter
webbing and the sponge filter under running water, dry the dust box, filter webbing
and the sponge filter completely before replacing them in the robot.
Remark:
1) Switch off the robot and disconnect the
docking station plug before cleaning and
maintaining the robot.
2) Check that there are no objects in the suction
intake and then clean it.
3) The filter lasts for 24 months; please clean
the filter once or twice a month.
4) Make sure that the dust box, the filter webbing and the sponge filter are
completely dry before replacing them.
(Note: Do not expose the filter to direct sunlight for extended periods)
Unlocking button for
the dust box (yellow)
Cleaning the cliff sensors and charging contacts
Use a soft dry cloth to gently clean the sensors’ window and the charging contacts.
Note: Do not use water or liquid to clean the sensors or charging contacts.
Charging
contact pin
Cliff sensors
Charging
contact pin
Troubleshooting
LED digital display code list
01
Stand-by
02
Wall follow / Edge cleaning mode
03
Cleaning
04
Back to charging dock
06
Infrared remote control
10
Charging
14
Pause
*Note: Under regular status, the LED display in Green light
[ Error code list ]
Error code
Description & Solution
02
Main brush entangled, please clear the main brush
04
Left wheel entangled, please clear the left wheel
05
Right wheel entangled, please clear the right wheel
07
Side brushes entangled, please clear the side brushes
09
Anti-collision sensors in stuck, please clear the anti-collision bumper
12
Ground sensors had been blocked, please clean the sensors
13
Low battery, please charge the battery
15
Fan motor entangled, please clear the fan motor
18
Unusual error, please contact us to solve the problem
*Note: Under error status, the LED display in Red light
15
16

Error message
Error message
Possible cause
Solution
Acoustic signal
Side wheel on the robot is
blocked
Remove hair and dirt from the
robot's wheels. Push in and
pull out the wheels and then
check that they are rotating
freely. Restart the robot at a
new location.
Acoustic signal
Main brush is blocked
Check the main brush, then
remove and clean it.
Acoustic signal
The shock absorber is not
working properly
Tap the edge of the robot's
shock absorber 10-20 times in
quick succession to remove
any deposits trapped beneath
the shock absorber.
Acoustic signal
Weak battery capacity. Does not
charge completely
Replace the battery. Recharge
the battery.
Acoustic signal
Poor contact
Clean the charging
contacts/docking station and
check the connection between
the docking station and the
battery. Check the contacts on
the docking station.
Acoustic signal
HEPA filter is dirty or wet.
Clean or replace the HEPA
filter.
Acoustic signal
Dust box is full.
Empty the dust box.
Acoustic signal
Cleaning performance is
diminished or dirt falls out of the
device.
Dust box is full. Clean the dust
box.
Note:
do the following if none of these solutions help.
1. Press the power switch to reset the robot.
2. Please contact your dealer if resetting the robot vacuum cleaner does not help.
Specifications
Classification
Item
Details
Mechanical specifications
Diameter
315 mm
Height
71.5mm
Weight
4,5 kg
Electrical specifications
Voltage/power
14.8 V / 30 W
Battery specifications
Lithium Ion 2600mAh
Cleaning specifications
Dust box capacity
0.8 L
Charging methods
Auto-charging/manual
charging
Cleaning mode
Auto, spot, edge, daily
schedule
Charging time
Approx. 240 min
Cleaning time
Up to 150 minutes
Water tank capacity
0.35 I
Remark: Keep the device in the temperature range between -10 °C and +40 °C.
17
18
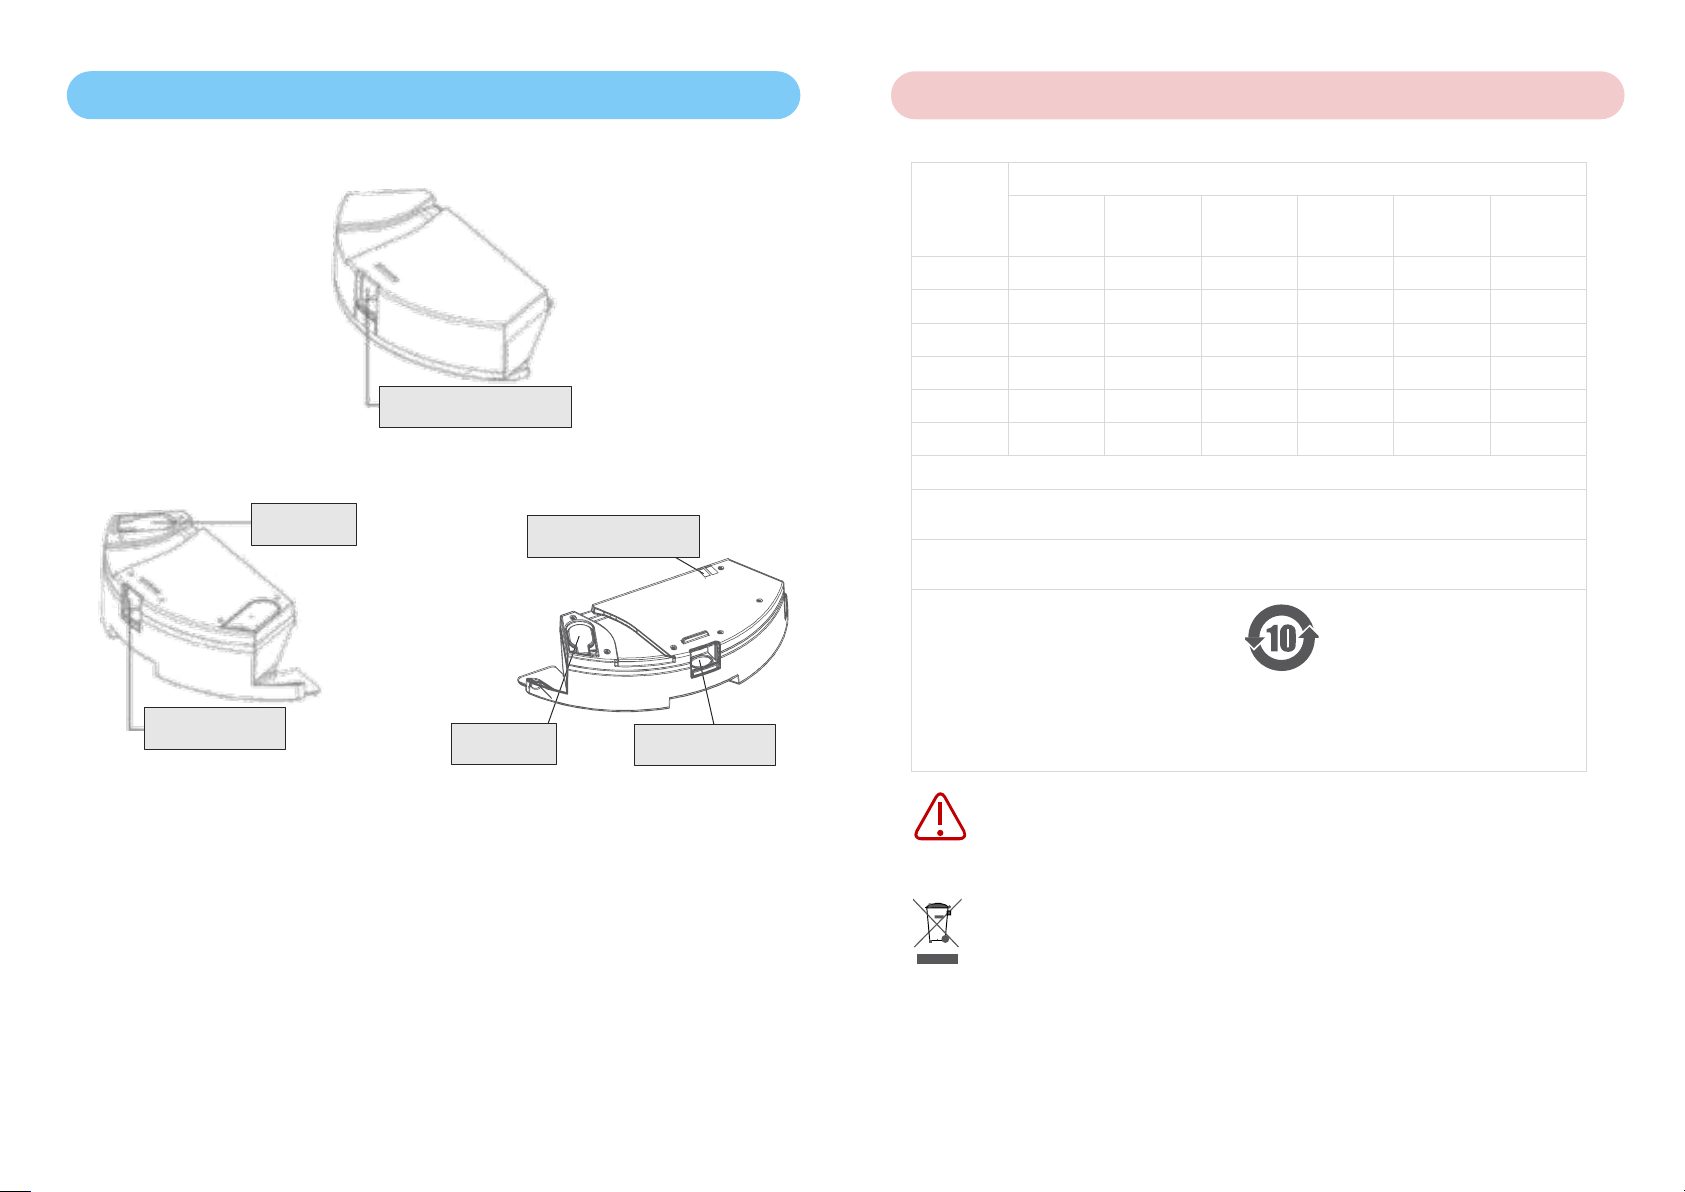
Appendix - Operating Instructions
Dust box
Removal button
Water inlet
Removal button
Water tank
Electric control Water tank
(Optional)
Removal button
Water inlet
Electric control pins
1. The filling funnel is used for chemical cleaning and the water tank for wet cleaning.
2. Make sure that the mop is attached before activating the mopping function.
3. Pour water into the water tank.
4. Place the water tank into the robot. Make sure that the outlet aperture on the water tank
is aligned with the outlet aperture on the robot unit.
5. Press the CLEAN button to start mopping. The vacuum function is not available during
mopping.
6. It is advisable to carry out vacuum cleaning (chemical cleaning) before mopping in order
to achieve a better result.
7. Remove the water tank when the robot vacuum cleaner is being charged.
Description of toxic or harmful substances
Components
Toxic or Harmful substances or elements
Lead (Pb)
Mercury (Hg)
Cadmium (Cd)
Hexavalent
Chromium
(CrVl)
Polybrominated
Diphenyl (PBB)
Polybrominated
Diphenyl Ethers
(PBDE)
Plastic
Motor
PCB
X
Power cord
Metal parts
X
Battery
This form follow SJ/T 11364 standard to made up
Means the content of the harmful substance in all homogeneous materials of the component
is below the prescribed limit specified in GB/T 26572.
XMeans the content of the harmful substance at least in one homogeneous material of the
component is exceeds the limit specified in GB/T 26572.
This product compliance with requirements of ROHS environmental protection, and harmful
substances contained in some components cannot be replaced under the current international
technical standards.
The environmental protection service life of the product means the safe life of the product
without leakage of harmful substances or elements under normal service conditions.
Caution:
This product has built-in lithium ion batteries. When discarding this product, do not
decompose the batteries or put them together with the general domestic garbage,
to avoid environmental pollution. Please give it to the designated recycling bin or
professionals.
19
20
Robot Stofzuiger
Instructiehandleiding
Visuele Navigatie Reeks
Rein Zo Excellent
Bedankt voor het kiezen voor ons product
Lees deze instructie zorgvuldig door vóór gebruik

Snelstartinstructie …………………………………………..…………………………….
Belangrijke informatie …………………………………………………………………………..
Veiligheidsinstructies …………………………………………………..………………………….
Onderdelen …………………………………………………………………………………………
Werking ………………………………………………………………..………………………….
Reiniging en onderhoud …………………………………………………………………
Problemen Oplossen ………………………………………………………..………………………
Specificaties ……………………………………………………………..………………………
Bijlage-Gebruiksaanwijzign …………………………………………..……………………..
Pag. 1
Pag. 3
Pag. 4
Pag. 5
Pag. 9
Pag. 14
Pag. 16
Pag. 18
Pag. 19
SNELSTARTINSTRUCTIES
Verwijder de EVA-
beschermingsstop voor
gebruik.
Maak het te reinigen
gebied vrij. Verwijder
stroomkabels en kleine
voorwerpen van de vloer,
steek de rand van het
tapijt onder de
vloerbedekking en til
voorwerpen zoals
gordijnen en tafelkleden
van de vloer.
Let bij het dweilen op
de robot, voeg water
toe of maak het
waterreservoir op tijd
schoon.
Sluit het
waterinlaatdeksel goed
af, anders zal het
water te snel uit het
waterreservoir
ontsnappen.
Laad de robot niet op in
de MOP-modus. En de
robot zal niet reageren
op de "Auto recharge"
als u op deze knop op
de afstandsbediening
drukt.
Gebruik de MOP-
functie niet op het
tapijt.
Zet de hoofdschakelaar,
"1" op AAN, "0" op UIT.
BELANGRIJKE FUNCTIONELE
INSTRUCTIES
BELANGRIJKE INSTRUCTIES VOOR
GEBRUIK
Directe oplading door
middel van een
adapterplug in het
oplaadgat van de
robot.
Zet de robot op het
laadstation, zorg
ervoor dat de
laadpinnen goed
contact maken, sluit de
adapter aan op het
laadstation en sluit
vervolgens aan op de
stroomvoorziening.
Opmerking: De robot
reageert alleen op de
knop "Clean" op de
robot en de knop
"Start/Stop" op de
afstandsbediening
wanneer deze onder
het laadstation staat.
Alle andere knoppen
zullen niet reageren en
tonen de stem
"Verkeerde instructie".
ALS ER FOUTEN OPTREDEN, START DAN DE
ROBOT OPNIEUW OP NA HET OPTREDEN
VAN DE FOUT.
TWEE MANIEREN OM TE LADEN
Inhoudsopgave
1
2

Belangrijke Informatie
Gebruik
Voordat u de robot gebruikt, moet u ervoor zorgen
dat het stopcontact is ingeschakeld en alle
obstakels uit de directe omgeving verwijderen.
De robot zal verschillende keren over elk deel
van de vloer gaan om een grondige reiniging
te garanderen.
De roterende borstels kunnen af en toe kleinere
deeltjes (hondenvoer, kattenbakvulling) afwijzen, maar de robot zal ze uiteindelijk
allemaal verwijderen.
Leeg de stoffenbak na elk gebruik om maximale prestaties te garanderen.
De robot kan een deel van het vuil uitwerpen als de stofkast vol is, hoewel deze
geen waarschuwingssignaal afgeeft.
Voor maximale prestaties
Maak de stofkast leeg en reinig het filter van de IMASS na elk gebruik.
Gebruik geen water om het HEPA-filter te reinigen.
Vervang het HEPA-filter als de zuigkracht van de IMASS afneemt en de robot
minder vuil verwijdert dan voorheen.
Levensduur van de batterij
Om de levensduur van de batterij van de IMASS te verlengen en de maximale
zuigkracht te behouden:
Laad de robot 's nachts op voordat u hem voor het eerst gebruikt.
Schakel de stroomtoevoer uit als de robot voor een langere periode ongebruikt
blijft. Laad de robot zo snel mogelijk op; laat hem dagenlang in het laadstation
staan om de batterij te ontladen.
Gebruik de robot regelmatig.
Waarschuwing: Het product bevat elektronische componenten. Dompel de IMASS
NIET onder in water en besproei hem niet met water. Gebruik alleen
een droge doek om de robot te reinigen.
Veiligheidsinstructies
Lees de volgende veiligheidsinstructies zorgvuldig door en volg alle instructies
op voordat u het apparaat in gebruik neemt.
Zorg ervoor dat het apparaat is ingeschakeld voordat u het in gebruik neemt.
Schakel het apparaat uit met de schakelaar aan de rechterkant als het apparaat
voor langere tijd niet wordt gebruikt.
WAARSCHUWING
1. Alleen geautoriseerde technici mogen het apparaat demonteren. Gebruikers mogen het
apparaat nooit demonteren of repareren.
2. Gebruik alleen de originele, door de fabrikant geleverde adapter. Het gebruik van
ongeschikte adapters kan elektrische schokken en brand veroorzaken of het toestel
beschadigen.
3. Raak de stekker of de adapter niet aan als uw handen nat zijn.
4. Laat geen kledingstukken of ledematen vastlopen in de wielen van het apparaat.
5. Houd het apparaat uit de buurt van sigaretten, aanstekers, lucifers of andere brandbare
materialen.
6. Wacht tot de batterij volledig is opgeladen voordat u het apparaat reinigt.
7. Gebruik geen kracht om de voedingskabel te buigen en stel deze niet bloot aan druk van
zware of scherpe voorwerpen.
8. Het apparaat is alleen bedoeld voor gebruik in gesloten ruimtes. Gebruik het niet buiten.
9. Ga niet op het apparaat zitten en plaats geen voorwerpen op het apparaat.
10. Gebruik het apparaat niet in een natte of vochtige omgeving (elke omgeving waarin zich
vloeistoffen bevinden).
11. Maak de vloer vrij voordat u het apparaat gebruikt (verwijder alle breekbare voorwerpen
en kabels, kledij, papier en gordijnen, etc., aangezien deze in het apparaat kunnen vast
komen te zitten).
12. Plaats het apparaat niet in een positie waar het kan vallen (tafels, stoelen, enz.).
13. Schakel de stroomvoorziening uit als het apparaat voor een langere periode ongebruikt
blijft.
14. Controleer voor elk gebruik of de adapter en de stekker correct zijn aangesloten.
15. Vertel iedereen in uw huis of op kantoor wanneer het apparaat in werking is, zodat
niemand over het apparaat heen struikelt.
16. Het apparaat is niet in staat om hoogteverschillen van meer dan 10 mm te overbruggen.
17. Gebruik het apparaat alleen in het temperatuurbereik tussen -10 °C en +40 °C (graden
Celsius) en stel het apparaat niet bloot aan hogere temperaturen.
18. Verwijder de batterij voordat u het apparaat sloopt.
19. Koppel het apparaat los van de stroomvoorziening voordat u de accu verwijdert.
20. Gooi de batterij op de juiste manier weg.
Opmerking: Zorg ervoor dat kinderen en personen met een geestelijke of
lichamelijke handicap onder toezicht staan bij het gebruik van het
apparaat.
3
4

Robotontwerp
Onderdelen en toebehoren
Onderdelen
1
2
3
4
5
6
7
8
9
10
LED-display
Navigatiecamera
EVA-schuim
Stofbak/watertank
Onderstel
Linkerwiel
Batterijklep
Zijdborstel, links
Laadcontactpinnen
Stofopname /
centrale borstel
Rechterwiel
Zijdborstel, rechts
Wielbesturing
Aan/uit
Deksel
EVA-schuim
Schokbreker
Start / Pauze
Nmr. Beschrijving
Hoeveelheid
1
Hoofdapparaat
1
2
Laadstation
1
3
Afstandsbediening (batterij inbegrepen)
1
4
Adapter/powerpack
1
5
Reinigingsgereedschap
1
6
Gebruiksaanwijzing
1
7
Extra zijborstels
2
8
HEPA-filter
1
9
Microvezeldoek
1
10
Waterreservoir
1
5
6

<
Laadstation
Laadcontacten
Afstandsbediening
Aan/uit-knop
Doorspoelen
Links
Wi-Fi
Maximaal vermogen
Muurvolging /
Randschoonmaak
Stemmen aan/uit
Vlekreiniging
Minikamerreiniging
Rechts
Start / Pauze
Herladen
Knop Voor De Status Van De REINIGING
Robotstatus
Statusweergave
Charging
Oplaadindicatie knippert rood
Laadt volledig
Weergave in groen
Gebruiksmodus
Weergave in Green
Robotfout
Alle beeldschermen knipperen
Lage batterij
Display wordt rood
Gebruik Van De Afstandsbediening
Druk op deze knop om de robot aan / uit te zetten
Druk op deze knop om de robot terug te sturen naar
het laadstation om opnieuw te laden.
Druk op deze knop om de reiniging te starten / te
pauzeren
Druk op deze knop om de robot vooruit te bewegen
Druk op deze knop om de robot naar rechts te draaien
Druk op deze knop om de robot naar links te draaien
Maak deze knop om op de Wi-Fi van de robot te
trimmen.
Druk op deze knop om te reinigen in een kleine ruimte
Druk op deze knop om de vlekkenverwijdering te
starten
Druk op deze knop om het maximale vermogen van de
reiniging te starten
Druk op deze knop om te beginnen met schoonmaken
langs de muur
Druk op deze knop om de stembegeleiding aan/uit te
zetten
1
2
3
10
9
8
7
6
5
4
11
12
11
10
7
6
4
1
12
9
8
5
3
2
Let op:
3) Plaats twee batterijen van het type
AAA in de afstandsbediening.
4) Verwijder de batterijen als u de
afstandsbediening lange tijd niet
zult gebruiken.
Vermogensweergave
7
8

<
Werking
Hoe te beginnen met schoonmaken
Monteer het laadstation en schakel de
adapter in. Het signaallampje op het
laadstation moet gaan knipperen.
Aanwijzing: Plaats het laadstation in de buurt
van een muur en verwijder hindernissen van ca.
1 m aan beide zijden en ca. 2 m voor het
apparaat.
1
Schakel de stroomvoorziening in. Het display
moet nu gaan knipperen.
De robotstofzuiger schakelt over naar de
slaapstand als er binnen 16 seconden geen
commando's worden gegeven.
Let op:
A. Zorg ervoor dat de stroomschakelaar altijd is
ingeschakeld, omdat de robot anders niet in
werking kan worden gesteld.
B. De geselecteerde modus wordt gestopt als
de stroomschakelaar wordt uitgeschakeld.
Let op: Zorg ervoor dat de stroomschakelaar is
ingeschakeld voordat u de robot oplaadt, omdat
de robot anders niet kan worden opgeladen.
2
Automatisch opladen
De robot keert automatisch terug naar het
docking station als de batterij bijna leeg is.
4
Laad de robot op in een scenario zoals
hieronder weergegeven:
A. Sluit de stekker aan op een stopcontact.
B. Druk op de HOME-knop om de robot terug te
sturen naar het laadstation voor het opladen.
Om de levensduur van de batterij te
verlengen:
A. Laad de robot 's nachts op voordat u hem
voor het eerst gebruikt. Het weergaveveld
verdwijnt wanneer het laden voltooid is.
B. Breng de robot bij normaal gebruik altijd
terug naar het laadstation, dat op de
stroomvoorziening is aangesloten.
C. Laad de robot volledig op, schakel
vervolgens de stroomschakelaar uit en plaats de
robot op een koele, droge plaats als u hem voor
langere tijd niet zult gebruiken.
3
Start |Pauze |Slaapstand
De robotstofzuiger is niet in bedrijf. Het LED-
display op de reinigingsknop is uitgeschakeld en
de stroomschakelaar is ingeschakeld.
Slaapstand
De robotstofzuiger is niet in werking. Het LED-display op de clean-toets brandt.
Schoonmaakmodus
De robotstofzuiger is niet in werking. Het LED-
display op de clean-toets knippert.
Geselecteerde Modus
1. Ingebruikname
A. Zorg ervoor dat de stroomschakelaar is ingeschakeld.
B. Druk op de knop CLEAN op het hoofdtoestel of op de afstandsbediening om de
reiniging te starten.
Opmerking: Als de robot in de slaapstand staat, druk dan op de CLEAN-knop van
de robot om hem wakker te maken. De reiniger zal onmiddellijk beginnen te reinigen
als u een tweede keer op de REINIGINGS-toets drukt.
2. Pauzeer
Druk op de toets CLEAN op het hoofdtoestel of op de afstandsbediening om de
reinigingsmodus van de robotmoeder in de geselecteerde modus te schakelen.
Opmerking: Als u de robot hebt gepauzeerd, drukt u op de toets CLEAN om de
reiniging opnieuw te starten.
3. Slapen
Om de robot van de geselecteerde modus naar de slaapmodus te schakelen:
A. Houd de knop CLEAN op het thema-inzetstuk drie seconden lang ingedrukt.
B. De robot schakelt automatisch over naar de slaapstand als hij niet binnen 15
seconden een opdracht ontvangt.
9
10

App Instructiehandleiding
Opmerking: De App is
alleen van toepassing op
de Robot met WiFi-
functie.
1. Scan de onderstaande
QR-code om de APP te
downloaden; (Houd uw
mobiele telefoon
verbonden met WiFi)
5. Zet uw Robot aan, na de
welkomstwoord stem, druk op de
Wi-Fi knop op de
afstandsbediening tot het "Ding
Dong" geluid verschijnt.
6. Het indicatielampje zal
blijven knipperen wanneer
de Wi-Fi instelling wordt
ingevoerd Klik op
"Bevestig indicator snel
knipperen".
7. Vul uw Wi-Fi-naam
en wachtwoord thuis in.
(Zorg ervoor dat u de
juiste naam en het
juiste wachtwoord
invult)
8. Klik op Voltooid
nadat de robot
succesvol is
toegevoegd
4. Zoek Robot
Stofzuiger in de lijst en
selecteer deze.
2. Registreer & log in de App
11
12
3. Klik op Apparaat
toevoegen, selecteer
Alle apparaten
rechtsboven.

Hoofdborstel deksel
Hoofdborstel
Reinigingsmodus
Autoreinigingsmodus (standaardmodus)
Dit is de meest gebruikte modus. In de automatische reinigingsmodus beschrijft de
robot een zigzagpatroon tijdens het reinigen en verandert hij van richting wanneer
hij een obstakel tegenkomt.
Vlekreinigingsmodus
Deze modus is geselecteerd om veel vuiligheid op één plaats te kunnen verwerken.
Wanneer de robot in de spot-reinigingsmodus staat, beschrijft hij een
spiraalvormig patroon rond een bepaald gebied x is geïnstrueerd om te reinigen.
Zigzag slimme reinigingsmodus
Deze modus is geselecteerd om veel vuil of stof op een klein oppervlak te kunnen
verwerken. De robot beschrijft een zigzagpatroon met een breedte van 1 meter om
te zorgen voor een stevige reiniging.
Randenreinigingsmodus
Deze modus is geselecteerd om de randen en hoeken van een rommeltje schoon
te maken. In de randreinigingsmodus reinigt de robot langs een rand (bijv. een
muur). De robot keert automatisch terug naar de standaardmodus zodra hij alle
zones heeft gereinigd.
Schema voor de reinigingsmodus
Deze modus wordt gebruikt om een automatisch reinigingsschema te definiëren.
Deze wordt gedefinieerd met behulp van de smartphone-app (let op: de standaard
reinigingsmodus voor de geplande reiniging is de AUTO-reinigingsmodus).
Reiniging En Onderhoud
Het reinigen van de zijborstels
Maak de zijborstels schoon en vervang ze als ze beschadigd zijn.
Opmerking: Controleer voor het vervangen van de zijborstels de L & R-markeringen
op de twee zijborstels en zorg ervoor dat deze overeenkomen met de
corresponderende markeringen op de onderwagen van de robot.
Reiniging van de hoofdborstel
A) Schakel de robotstofzuiger uit. Druk de twee lipjes op het deksel van de
hoofdborstel in om de hoofdborstel te verwijderen. Verwijder de hoofdborstel aan
de rechterkant. Gebruik de meegeleverde reinigingskit om haar en ander vuil van de
hoofdborstel te verwijderen.
B) Spoel de hoofdborstel af onder stromend water en vervang hem niet tot hij
volledig gedroogd is.
[ Aanpassing van het waterpeil voor MOP ]
Alleen Voor De Elektrische Watertank
Druk op de " " knop om de modus voor het aanpassen van het waterpeil te
openen wanneer het waterreservoir in positie is gebracht.
Druk één keer op " " om een niveau in te stellen, druk één keer op " " om een
niveau in te stellen, totaal 3 niveaus Laag - Gemiddeld - Hoog.
Na het instellen, druk op " " om te bevestigen, of anders zal de robot na 5s zonder
enige handeling, de instelmodus automatisch bevestigen en verlaten.
Opmerking: Verwijder het EVA-schuim voordat u de robot gebruikt.
EVA-schuim EVA-schuim
13
14

het schoonmaken van de stofbox en het filter
Houd de stofbox in een horizontale positie en druk op de gele ontgrendelingsknop
om het deksel te openen. Maak de stofkast leeg, verwijder het filter en spoel de
stofkast af. De filterband en de sponsfilter onder stromend water, droog de
stofkast, de filterband en de sponsfilter volledig afspoelen voordat u ze in de robot
terugplaatst.
Opmerking:
1) Schakel de robot uit en trek de stekker van
het laadstation uit voordat u de robot
reinigt en onderhoudt.
2) Controleer of er geen voorwerpen in de
aanzuigopening zitten en reinig deze vervolgens.
3) De filter gaat 24 maanden mee; reinig de filter één of twee keer per maand.
4) Zorg ervoor dat de stofkast, de filterband en de sponsfilter volledig droog zijn
voordat u ze vervangt.
(Opmerking: Stel het filter niet langdurig bloot aan direct zonlicht).
Ontgrendelingsknop
voor de stofbox (geel)
Reiniging van de klimsensoren en laadcontacten
Gebruik een zachte droge doek om het venster van de sensoren en de
laadcontacten voorzichtig te reinigen.
Opmerking: Gebruik geen water of vloeistof om de sensoren of laadcontacten te
reinigen.
Laadcontactpin
klimsensoren
Laadcontactpin
Problemen Oplossen
LED digitale display-codelijst
01
Stand-by
02
Muur volgen/ Randschoonmaakmodus
03
Schoonmaken
04
Terug naar laadstation
06
Infrarood-afstandsbediening
10
Opladen
14
Pauze
*Aanwijzing: Onder normale status, de LED-display in groen licht
[ Foutcode lijst ]
Foutcode
Beschrijving & Oplossing
02
Hoofdborstel verstrikt, gelieve de hoofdborstel te ontruimen
04
Linkerwiel verstrikt, maak het linkerwiel vrij.
05
Rechterwiel verstrikt, maak het rechterwiel vrij.
07
Zijborstels verstrengeld, gelieve de zijborstels te verwijderen.
09
Anti-botsingssensoren in vastzittend, gelieve de anti-koloningsbumper
te ontruimen.
12
De aardingssensoren waren geblokkeerd, maak de sensoren schoon.
13
Lage batterij, gelieve de batterij te laden
15
Ventilatormotor verstrikt, gelieve de ventilatormotor te ontruimen
18
Ongebruikelijke fout, neem contact met ons op om het probleem op te
lossen
*Aanwijzing: Onder foutstatus, de LED-display in Rood licht
15
16
Table of contents
Languages:
Other Media Vacuum Cleaner manuals

Popular Vacuum Cleaner manuals by other brands


MIRKA
MIRKA 912 operating instructions

Nilfisk-Advance
Nilfisk-Advance SLX 025 Instructions for use

Russell Hobbs
Russell Hobbs Power Cyclonic 18378 user manual

Shark
Shark Cordless Pet Perfect II SV780 Series instructions

Rowenta
Rowenta cleanette Instructions for use

Black & Decker
Black & Decker Dustbuster PV1205 instruction manual


