manuals.online logo
Brands
  1. Home
  2. •
  3. Brands
  4. •
  5. Medion
  6. •
  7. Monitor
  8. •
  9. Medion AKOYA X58434 User manual

Medion AKOYA X58434 User manual

1
86,4 cm (34“) LED Backlight Monitor
MEDION® AKOYA® X58434 (MD 22434)
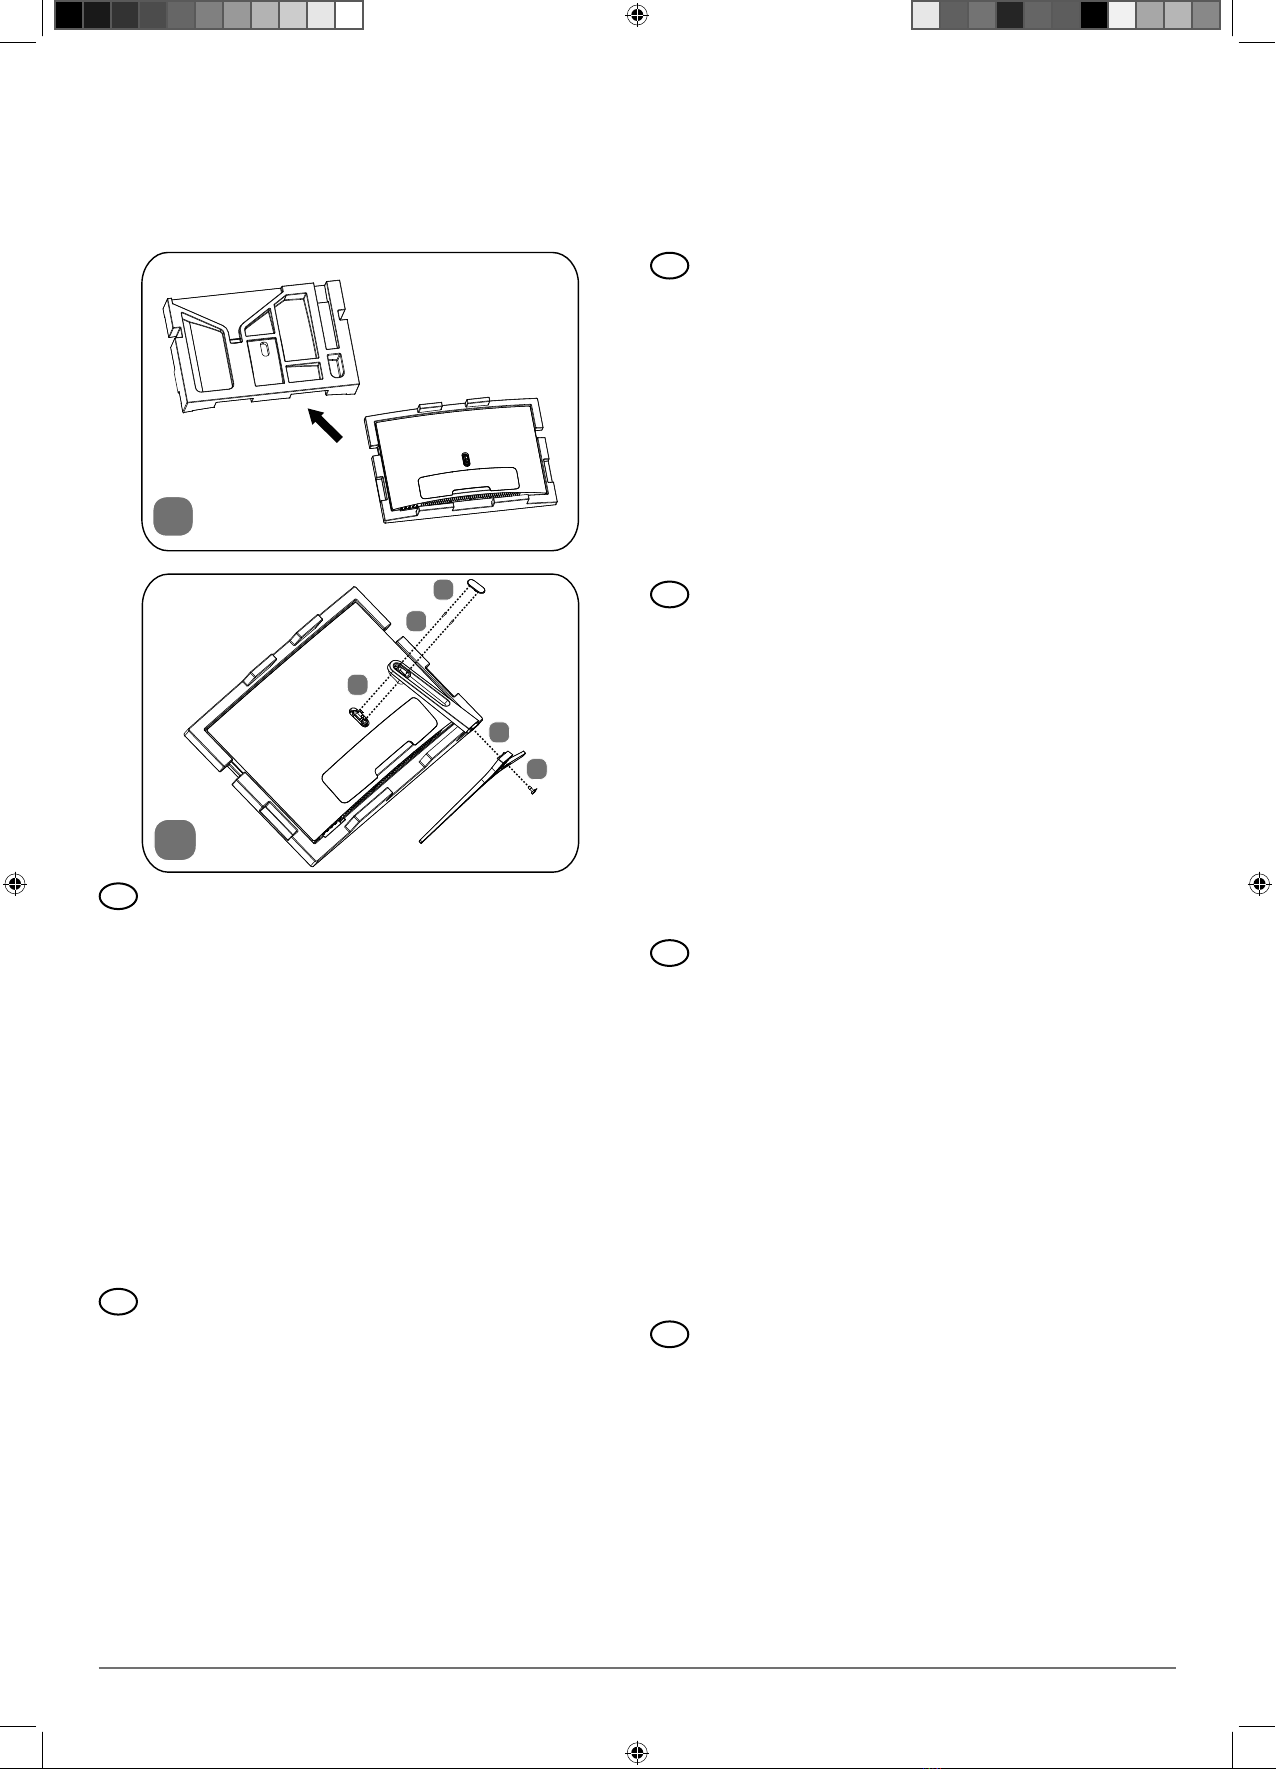
1) Legen Sie zunächst den Monitor (zurück) in die
Styroporschale der Verpackung, damit er bei der
Installation geschützt ist.
2) Führen Sie die Installation des Fußes wie folgt
durch. Beachten Sie die Abbildungen.
a) Stecken Sie den Standfuß auf den Arm.
b) Drehen Sie drei der mitgelieferten Schrauben
zwischen Arm und Standfuß fest.
c) Stecken Sie den Arm auf die Rückseite des Mo-
nitors.
d) Drehen Sie auch hier zwei der mitgelieferten
Schrauben zwischen Arm und Moni-
tor fest.
e) Stecken Sie abschließend die Abdeckung auf
die Rückseite des Armes auf.
1) First place the monitor back in the polystyrene
packaging, to protect it during the installation.
2) Install the stand as follows. Please refer to the
diagrams.
a) Place the stand onto the arm.
b) Tighten three of the supplied screws between
the arm and stand.
c) Place the arm onto the rear of the monitor.
d) Tighten two of the supplied screws between
the arm and monitor.
e) Finally put the cover onto the rear of the arm.
Montage / Installation / Fixation du pied de l‘écran / Montaggio /
Bevestiging van de monitorvoet / Montering af monitorens fod
DE
EN
FR
IT
NL
DK
1
2
a
c
d
e
b
1) Mettez (ou remettez) tout d’abord l’écran dans la
coque en polystyrène de l’emballage afin qu’il soit
protégé pendant l’installation.
2) Installez le pied comme expliqué ci-dessous. Te-
nez compte des illustrations.
a) Mettez le pied en place sur le bras.
b) Vissez solidement trois des vis fournies entre
bras et pied.
c) Mettez le bras en place au dos de l’écran.
d) Vissez ici aussi solidement deux des vis four-
nies entre bras et écran.
e) Mettez enfin le cache en place au dos du bras.
1) Innanzi tutto reinserire il monitor nella sagoma di
polistirolo della confezione in modo che sia pro-
tetto durante l’installazione.
2) Effettuare l’installazione del piede come segue.
Osservare le illustrazioni.
a) Inserire il piede di supporto sul braccio.
b) Fra il braccio e il piede di supporto stringere
tre delle viti fornite in dotazione.
c) Inserire il braccio sul retro del monitor.
d) Anche fra il braccio e il monitor stringere due
delle viti fornite in dotazione.
e) In seguito posizionare la copertura sul retro
del braccio.
1) Plaats eerst het beeldscherm (terug) in de
piepschuim verpakking zodat dit tijdens de instal-
latie is beschermd.
2) Bevestig de voet als volgt. Let op de afbeeldingen.
a) Bevestig de voet aan de arm.
b) Draai drie van de meegeleverde schroeven
tussen de arm en de voet vast.
c) Bevestig de arm op de achterkant in het
beeldscherm.
d) Draai ook hier twee van de meegeleverde
schroeven tussen de arm en het
beeldscherm vast.
e) Bevestig vervolgens de afdekking op de ach-
terzijde van de arm.
1) Læg først skærmen (tilbage) i emballagens
polystyrenhylster, så den er beskyttet ved instal-
lationen.
2) Foretag installationen af foden som følger. Læg
mærke til illustrationerne.
a) Sæt foden på armen.
b) Skrue tre af de medfølgende skruer fast mel-
lem armen og foden.
c) Sæt armen på skærmens bagside.
d) Skrue også her to af de medfølgende skruer
fast mellem armen og skærmen.
e) Sæt til sidst coveret på armens bagside.
2
Anschlüsse und Bedienelemente / Connections and operating elements /
Prises et éléments de commande / Connessioni e comandi /
Aansluitingen en bedieningselementen / Tilslutning og betjeningselementer
1 2 3456
7 8 9 10
3
DE EN FR
IT NL DK
1) Ouvrir / fermer le menu
2) Dans le menu : naviguer vers le
gauche
Sur l’écran de base : afficher/mas-
quer quatre réticules différents
3) Dans le menu : naviguer vers le
droite
Sur l’écran de base : sélectionner le
mode d’image
4) Dans le menu: confirmer la sé-
lection
5) Allumer l’écran/le mettre en
mode Veille
6) LED indiquant l’état de fonctionne-
ment
7) DVI IN – port DVI-D
8) HDMI IN – port HDMI
9) DP IN – port Displayport
10) AC IN – prise pour l’alimentation
électrique
1) Åbning/lukning af menuen
2) I menuen: naviger nedad
I grundtilstanden: Vis/skjul fire fors-
kellige trådkors
3) I menuen: naviger opad
i grundtilstanden: vælg billedtils-
tande
4) I menuen: Bekræft valget
5) Tænd skærmen/sæt skærmen på
standby
6) Drifts-LED’en viser driftstilstanden
7) DVI IN – DVI-D-stik
8) HDMI IN – HDMI-stik
9) DP IN – Displayport-stik
10) AC IN – Stik til strømforsyning
1) Öffnen / Schließen des Menüs
2) Im Menü: nach links navigieren
im Grundzustand: Ein-/Ausblenden
vier verschiedener Fadenkreuze
3) Im Menü: nach rechts navigie-
ren
im Grundzustand: Bildmodi wählen
4) Im Menü: Auswahl bestätigen
5) Bildschirm einschalten / in den
Standby-Modus schalten
6) Betriebs-LED zeigt den Betriebszus-
tand an
7) DVI IN – DVI-D-Anschluss
8) HDMI IN – HDMI-Anschluss
9) DP IN – Displayport-Anschluss
10) AC IN – Anschluss für Stromver-
sorgung
1) Apertura/chiusura del menu
2) Nel menu: spostamento verso a
sinistra
Nella schermata di base: mostra/
nasconde quattro diversi mirini
3) Nel menu: spostamento verso a
destra
nella schermata di base: selezione
delle modalità immagine
4) Nel menu: conferma selezione
5) Accensione del monitor / attiva-
zione della modalità standby
6) Il LED di funzionamento indica lo
stato di funzionamento
7) DVI IN – presa DVI-D
8) HDMI IN – presa HDMI
9) DP IN – presa Displayport
10) AC IN – presa per l’alimentazione
elettrica
1) Open/close the menu
2) In the menu: navigate left
In basic status: Show/hide four
different crosshairs
3) In the menu: navigate right;
In the basic state: select picture
modes
4) In the menu: confirm selection.
5) Switch on the monitor/switch
the monitor into standby mode
6) The operating LED displays the
operating state.
7) DVI IN – DVI-D connection
8) HDMI IN – HDMI connection
9) DP IN – Displayport connection
10) AC IN – connection for power
supply
1) Oproepen/sluiten van het menu
2) In het menu: links navigeren
In de basisinstelling: vier ver-
schillende dradenkruizen in-/
uitschakelen
3) In het menu: rechts navigeren
In de uitgangstoestand: Beeldmo-
di kiezen
4) In het menu: Keuze bevestigen
5) Beeldscherm inschakelen/op
stand-by zetten
6) Bedrijfs-led geeft de bedrijfsmo-
dus aan
7) DVI IN – DVI-D aansluiting
8) HDMI IN – HDMI-aansluiting
9) DP IN – Displayport-aansluiting
10) AC IN – Netaansluiting
4

Other manuals for AKOYA X58434

1

Other Medion Monitor manuals

Medion BUSINESS P52470 User manual

Medion

Medion BUSINESS P52470 User manual

Medion AKOYA E53020 User manual

Medion

Medion AKOYA E53020 User manual

Medion AKOYA P55491 User manual

Medion

Medion AKOYA P55491 User manual

Medion Akoya P5505 User manual

Medion

Medion Akoya P5505 User manual

Medion MD 20144 User manual

Medion

Medion MD 20144 User manual

Medion MD 7475 AB User manual

Medion

Medion MD 7475 AB User manual

Medion Pure Retro User manual

Medion

Medion Pure Retro User manual

Medion AKOYA E54009 User manual

Medion

Medion AKOYA E54009 User manual

Medion Akoya P54016 User manual

Medion

Medion Akoya P54016 User manual

Medion MD 1998LE User manual

Medion

Medion MD 1998LE User manual

Medion FLAT PANEL LCD TFT MONITOR User manual

Medion

Medion FLAT PANEL LCD TFT MONITOR User manual

Medion ERAZER Spectator X10 User manual

Medion

Medion ERAZER Spectator X10 User manual

Medion Akoya E54005 User manual

Medion

Medion Akoya E54005 User manual

Medion AKOYA P53206 User manual

Medion

Medion AKOYA P53206 User manual

Medion LCD COLOR MONITOR User manual

Medion

Medion LCD COLOR MONITOR User manual

Medion AKOYA X57299 User manual

Medion

Medion AKOYA X57299 User manual

Medion AKOYA P54037 User manual

Medion

Medion AKOYA P54037 User manual

Medion AKOYA P54060 User manual

Medion

Medion AKOYA P54060 User manual

Medion MD Business P54017 User manual

Medion

Medion MD Business P54017 User manual

Medion AKOYA P54031 User manual

Medion

Medion AKOYA P54031 User manual

Medion FLAT PANEL LCD TFT MONITOR User manual

Medion

Medion FLAT PANEL LCD TFT MONITOR User manual

Medion AKOYA P52424 User manual

Medion

Medion AKOYA P52424 User manual

Medion FLAT PANEL LCD TFT MONITOR User manual

Medion

Medion FLAT PANEL LCD TFT MONITOR User manual

Medion AKOYA P53290 User manual

Medion

Medion AKOYA P53290 User manual

Popular Monitor manuals by other brands

Xycom 5017T user manual

Xycom

Xycom 5017T user manual

LG 58393 user guide

LG

LG 58393 user guide

Asus SV425 user manual

Asus

Asus SV425 user manual

Hanns.G HL205 user manual

Hanns.G

Hanns.G HL205 user manual

Acer NITRO VG2 VG272S quick start guide

Acer

Acer NITRO VG2 VG272S quick start guide

LG StudioWorks E700B Service manual

LG

LG StudioWorks E700B Service manual

Canon DP-V2410 instruction manual

Canon

Canon DP-V2410 instruction manual

JVC KW-M560BT instruction manual

JVC

JVC KW-M560BT instruction manual

AOC E970SWN manual

AOC

AOC E970SWN manual

aci Q6 Series Installation, operation and maintenance manual

aci

aci Q6 Series Installation, operation and maintenance manual

2easy DT243/D4 Product information

2easy

2easy DT243/D4 Product information

Orbit Research Orbit Reader 20 Plus user guide

Orbit Research

Orbit Research Orbit Reader 20 Plus user guide

Ikegami VCM-14H instruction manual

Ikegami

Ikegami VCM-14H instruction manual

BELINEA 10 user manual

BELINEA

BELINEA 10 user manual

ASA Electronics AOM713WP troubleshooting guide

ASA Electronics

ASA Electronics AOM713WP troubleshooting guide

Philips 42HF7544D Specifications

Philips

Philips 42HF7544D Specifications

Samsung SMT-3232 user manual

Samsung

Samsung SMT-3232 user manual

Asus VH208 Series user guide

Asus

Asus VH208 Series user guide

manuals.online logo
manuals.online logoBrands
  • About & Mission
  • Contact us
  • Privacy Policy
  • Terms and Conditions

Copyright 2025 Manuals.Online. All Rights Reserved.