mekappa COOKER HOO User manual
DAVLUMBAZ COOKER HOOD Вытяжка
KULLANMA KLAVUZU INSTRUCTION MANUAL Руководство по эксплуатации
Çe vr ey e du ya rl ı ve m od er n tesislerde üretilen ve sıkı kalite kontrolden geçirilmiş ürününüzün size en iyi verimi sunmasını arzu ediyoruz. Klavuzun tüm
bölümlerini, ürünüzü kullanmadan önce dikkatle okumanızı ve bir başvuru kaynağı olarak saklamanızı önemle rica ederiz.
We hope that this product, which was manufactured in environment-friendly and modern facilities and released after strict quality control, offers you the highest level
of efciency. We suggest that you carefully read all sections of this manual before using your product and keep it as a source of reference.
Мы хотим предложить вам нашу продукцию, выпущенную на современном и экологически безопасном предприятии, прошедшую очень тщательный контроль качества,
обладающую лучшей производительностью. Прежде чем приступить к пользованию этим изделием, просим вас внимательно прочесть все разделы руководства
пользователя и сохранить эту брошюру в качестве источника информации для дальнейшего обращения.
TR
EN
RU
AR
PE
ANKASTRE ÜRÜNLER BUILT-IN APPLIANCES Встроенные продукции
INTÉGRÉ DANS DES APPAREILS
COOKER HOOD
INSTRUCTION MANUAL
Vous souhaitez que votre produit soit respectueux de la l’environnement, produit dans des usines modernes et passé par un contrôle qualité rigoureux vous donne
la meilleur performance. Nous vous prions de lire toutes les parties de la notice avec attention avant d’utiliser votre produit et de la conserver comme une référence
en cas de besoin.
FR

Language
Türkçe.................................................1
English.................................................... 7
Русский...............................................11
Français................................................15
..............................................19
..........................................23

TÜRKÇE
1
Montaj işlemlerini mutlaka yetkili servislere yaptırtınız. Montaj işlemlerinde sayfa 28’de yer alan Teknik Bölümdeki model seri montaj
resimlerine ve aşağıdaki açıklamalara dikkat ediniz.
* Cihaz üzerinden alınacak işaretlemelerle delikler delinip, verilen dübel ve vidalarla ürün gövdesi emniyetli ve doğru şekilde duvara sabitlenir.
* Verilen baca destek sacları, dübel ve vidalarla uygun şekilde duvara sabitlenir. Baca ve gövdeyle bağlantısı yapılır.
* Kullanıcı tarafından temin edilecek uygun çap (tercih çap 150mm) ve boydaki esnek boruyu ürünle verilen redüksüyonlu klapeli (çap 120-
150mm) ile irtibatlandırılarak diğer ucunun dışarıya /bacaya bağlantısı sağlanır.
* Hava ve titreşim seslerinin olmaması için borunun tam, sızdırmaz ve hareketsiz sabit bağlantılı hale getirilmesini sağlayınız.
Değerli Müşterilerimiz
Güvenli montaj ve bakım için kullanma klavuzunuzu dikkatli bir şekilde okunuyunuz, gereken durumlarda kolay ulaşılabilen bir
yerde saklayınız.Bu el kitabı birden fazla cihaz için kullanılmaktadır. H-Kodlama Bölümü ile cihazınıza ait modeli tanımlayın.
Cihazınızla birlikte her ürün için farklı adet ve ölçülerdeki klapeli baca, baca destek sacı, dübel ve vida tipleri ürün kutusu içinde bulunur. Lütfen
kontrol ediniz.
* Ürünümüz sanayi tipi değil ev tipidir.
* Ürünlerimizin montajı yetkili servislerimiz tarafından kontrollü ve gözetimli olarak yapılacaktır.
* Ürünün istemimiz dışında yanlış kurulumundan doğabilecek olan hasarlarla ilgili olarak tarafımızca sorumluluk kabul edilmeyecektir.
* Ürün kutu ve ambalajını garanti kapsamı sürecinde mutlaka koruyunuz ve saklayınız.
* Sürekli gelişme politikamız gereği, ürünlerimiz üzerinde,önceden herhangi bir açıklama yapma gereği olmadan,değişim ve düzeltme
hakkımız saklıdır. Revize edilmiş tüm ürünlerimiz sorumluluğumuz altındadır.
* Ürünlerimizin kullanım ömrü 10 yıldır. Bu sürenin kullanıcının ürün kullanma klavuzundaki talimatları eksiksiz uygulamasıyla
gerçekleşeceğini unutmayınız.
* Cihazınızı çalıştırmadan önce voltaj ve elektrik gücünün şebekeye uygunluğunu ürün içindeki elektrik şemasına bakarak kontrol ediniz.
Herhangi bir sorunla karşılaştığınızda uzman bir elektrikçiye başvurunuz. Uygunsuz durumlarda cihazı monte ettirmeyiniz.
* Cihazınız için topraklı pirize ihtiyaç vardır. Mutlaka doğruluğunu onaylatınız.
* Davlumbazınız çalışır vaziyette yada şe takılı iken bakım yapmayınız.
* Aydınlatma açık iken yada uzun süreli kullanımın ardından ampullere yada yakınına dokunmayınız.
* Davlumbazınız çalışırken yüksek harlı ateş ile yemek pişirmeyiniz.
* Kızartma yaparken yüksek sıcaklıktaki yağın neden olabileceği yangın tehlikesini göz önüne alarak yemeğinizi devamlı olarak kontrol ediniz.
* Cihaz çocukların veya gözetim gerektiren yetişkinlerin kullanımı için uygun değildir.
* Cihazınıza talimatlara uygun bir temizleme işlemi yapılmadığı taktirde yangın tehlikesi arz edebilir. Temizliklerini aksatmayınız.
* Davlumbazın hava emiş orta mesafesi ile pişiricinin en üst noktası arasındaki minimum dik mesafe 65 cm olmasına mutlaka uyunuz.
* Ortamdaki sıcak havayı ya da dumanı dışarı atan cihazlar ile davlumbaz hava çıkışını aynı yere bağlamayınız.
* Bacalı bağlantı yapılacaksa bacamızın açık, temiz, geri tepmesiz ve sorunsuz olduğunu tespit ettiriniz.
* Ürünü karbon ltreli kullanıyorsanız kullanım sıklığınıza göre 3-6 ayda bir karbon ltreyi değiştiriniz.
* Dışarıya hava tahliyesi konusunda yerel kanunları göz önünde bulundurunuz.
* Cihazların güvenliğinden sorumlu bir kişi tarafından cihazın kullanımı ile ilgili gözetim ve yönetim sağlanmadıkça bu cihazın ziksel duyu ve
zihinsel yetenekleri özürlü olan ( çocuklar dahil) veya deneyim ve bilgi eksikliği olan kişiler tarafından kullanılması amaçlanmamıştır. Cihazla
oynamamalarını güvenceye almak için çocuklar gözetim altında bulundurmalıdır.
* Cihaz, 8 yaş ve üzeri çocuklar ve ziksel, algısal ve zihinsel yetenekleri azalmış veya tecrübe ve bilgi eksikliği olan kişiler tarafından gözetim
veya cihazın güvenli bir şekilde kullanımına ve karşılaşılan ilgili tehlikelerin anlaşılmasına dair talimat verilirse kullanılabilir. Çocuklar cihazla
oynamamalıdır.
* Temizleme ve kullanıcı bakımı 8 yaşından büyük ve gözetim altında olmadıkça çocuklar tarafından yapılmamalıdır.
* Elektrikli ocak üstü davlumbaz, gaz ve diğer yakıtları kullanan cihazlarla aynı anda kullanıldığında, odanın havalandırması yeterli olmalıdır.
* Gaz veya diğer yakıtları kullanan cihazlardan çıkan dumanların dışarı atılması için kullanılan baca içine hava kesinlikle boşaltılmamalıdır.
2006/95EC “Düşük voltaj”
EN 60335-1 2005; A2:2007
EN 60335-2-31 2004; A1:2007
Kullanma Klavuzu

TÜRKÇE
2
* Cihazınızı, pişirme işlemine başlamadan önce çalıştırmanız tavsiye edilir. Ortamdaki yemek kokusunu uzaklaştırmak için cihazınızı yemek
pişirme işlemi bittikten sonra 15 dakika daha çalıştırınız.
* Yağ ltresi havadaki yağ zerreciklerini yakalar, cihazınızı kullanım sıklığınıza bağlı olarak ltreniz tıkanabilir. Yangın tehlikesine karşı
aşağıdaki talimatlara uygun olarak en fazla 2 ayda bir ltrenizi temizleyiniz.
* Filtreyi cihazınızdan çıkarınız ve su içerisine herhangi bir doğal deterjan ilave ederek yıkayıp, sabundan arındırmaya özen gösteriniz.
* Ilık su ile durulayıp kuruması için bırakınız.
* Filtrenizi dilerseniz bulaşık makinesinde yıkayabilirsiniz (max 40 C).
* Alüminyum panel birkaç yıkamadan sonra renk değiştirecektir. Bu, gayet normal bir durumdur fonksiyonel olarak problem teşkil etmez.
* Karbon ltrenin görevi ortamdaki havayı temizlemektir. Karbon ltreler yıkanmamalı, kullanma sıklığınıza göre en fazla 3-6 ayda bir yenisi
ile değiştirilmelidir.
* Cihazınızın yüzeylerini nemli bir bez veya aşındırmayan bir deterjan yardımıyla temizleyiniz. Çamaşır suyu, kezzap gibi aşındırıcılarla ve sert
süngerlerle kesinlikle temizlemeyiniz. İnox bakımı için Mekappa yada diğer markaların temizleme ürünlerini temin edebilirsiniz.
* Aydınlatma sistemi yemek pişirirken kullanılmak üzere dizayn edilmiştir. Ortamı aydınlatmak maksadıyla uzun süre kullanılmamalıdır. Bu
aydınlatma ekipmanlarına zarar verebilir.
Tüm ürünlerimizdeyemek buharlarıyla emilen yağ zerreciklerini cihaza girişte yakalamak üzere çok katlı alüminyum kaset ltreler kullanılır.
ltreler ürün seri ve tiplerine bağlı olarak farklı boylarda ve çeşitlidirler. Yerine takılıp çıkarılması kolaydır. Doğal deterjanla darbesiz ve
baskısız elle yıkanabileceği gibi, bulaşık makinasında da yıkanabilir. Kullanıma bağlı olarak 2-3 ayda bir temizlenmesi hem yangın emniyeti
hemde cihaz verimliliği için gereklidir.
İç havanın dışarıya atılamadığı özel durumlarda kullanılmak üzere daha hassas, yağ ve kokuyu alan ve opsiyonel olan YKF A,B ve C tipi
karbon ltreler ürün seri ve tiplerine bağlı olarak tüm cihazlarımızda kullanılabilir. Karbon ltreler ocak ve yemek yapma sistemine bağlı
olarak 3-6 aylık dönemlerle yerine yenisi takılarak değiştirilmesi gerekir. Tip YKF C : Karbon ltre plastik motor gövdesinin her iki yanındaki
tırnaklara oturtulduktan sonra 90° (çeyrek tur) döndürülüp ‘klik’ sesi duyulduğunda montajı tamamlanmış olur. Geri sökmek için bu işlemlerin
tersi yapılmalıdır.(Figür E, H). Tip YKF-B: Motor kitinin içerisinde bulunduğu metal kutunun önüne takılmaktadır. Filtrenin altındaki tırnaklar
kutunun duvara gelen yüzeyindeki deliklere oturtulur daha sonra ltrenin üst kısmındaki klipsler kutunun içerisine doğru itilerek kilitleme
yapılır ve montajı tamamlanır. (Figür F). Ürününüzde motor metal bir kutunun içinde ise B tipi, Metal kutu içinde değil ise C tipi karbon ltre
ürününüze uygundur. Ankastre aspiratörlerde A tipi karbon ltre kullanılır.
İhtiyaç halinde YALF ve YKF ltreleri sayfa 27 Teknik Bölüm 3’deki resimler doğrultusunda, ürünün kodu belirtilerek yetkili satıcı, servis ve
tarafımızdan temin edilebilir.
Ürününüzde modeline göre değişken olan kumanda tipleri aşağıda açıklanmıştır. Ürününüzün kumanda tipini Madde H’daki ürün kod
sisteminden tespit edebilirsiniz.
5 devirli olarak programlanmıştır. T2004-1 ve T2004 motorlarda kullanılmaktadır.
Motoru açıp-kapamaya yarar. Motor başlangıçta 5.devirden başlar.
Devir eksiltme tuşudur. Butona basılı tutularak devirler ardı ardına azaltılabilir. Min 1. devir
Devir arttırma tuşudur. Butona basılı tutularak devirler ardı ardına arttırılabilir. Max 5. devir
Turbo: Timer tuşuna basıldığında motor en yüksek devirde çalışmaya başlar ve 5 dakika sonra kapanmaya
programlanmış olur. Timer devrede iken DEVİR– veya DEVİR+ butonuna basıldığında motor turbodan önceki devrine geri döner ama timer
devam eder. Timer devrede iken turbo timer led’i yanar. 5 dakika dolduğunda motor kapanır. Lambanın durumunda bir değişiklik olmaz.
Timer devrede iken timer tuşuna basılırsa motor kapatılır.
Lamba/Led açıp-kapamaya yarar. Kısa basılırsa lamba, 3 saniye basılı tutulursa led kumanda edilir. Led ve
aydınlatma beraber çalışabildiği gibi birbirinden bağımsızda çalışabilir.
Motor 60 saatlik çalışma süresine ulaştıktan sonra ltreyi temizleyin veya değiştirin (ltre tipine göre) anlamında
5 saniye boyunca ekrana ‘ C ‘ (Clean or Change) yazılacaktır. Motor her açıldığında ‘ C ’ uyarısı yeniden verilerek kullanıcıya hatırlatılır.
Filtre süresini sıfırlamak için on/off tuşuna ekranda ‘ E ‘ (Erased) yazana kadar (yaklaşık 5s.) basılır ve 60 saatlik süreç yeniden başlatılmış
olur.
Kullanma Klavuzu
* Elektrik bağlantısı yapılıp çalışma testinden sonra bacalar vidalanarak sabitlenir.
* Figur G1 ve G2’daki gibi dolabın içine cihazınızın montaj deliklerini ürünle verilen şablona göre delin.
* Cihazınızı dolap içine yerleştirin ve cihazla beraber gelen m4x40 vidalarla sabitleyin.
* Kullanıcı tarafından temin edilen 100 mm’lik esnek boruyu baca klapesine takın ve hava çıkışını sağlayın.

TÜRKÇE
3
Kullanma Klavuzu
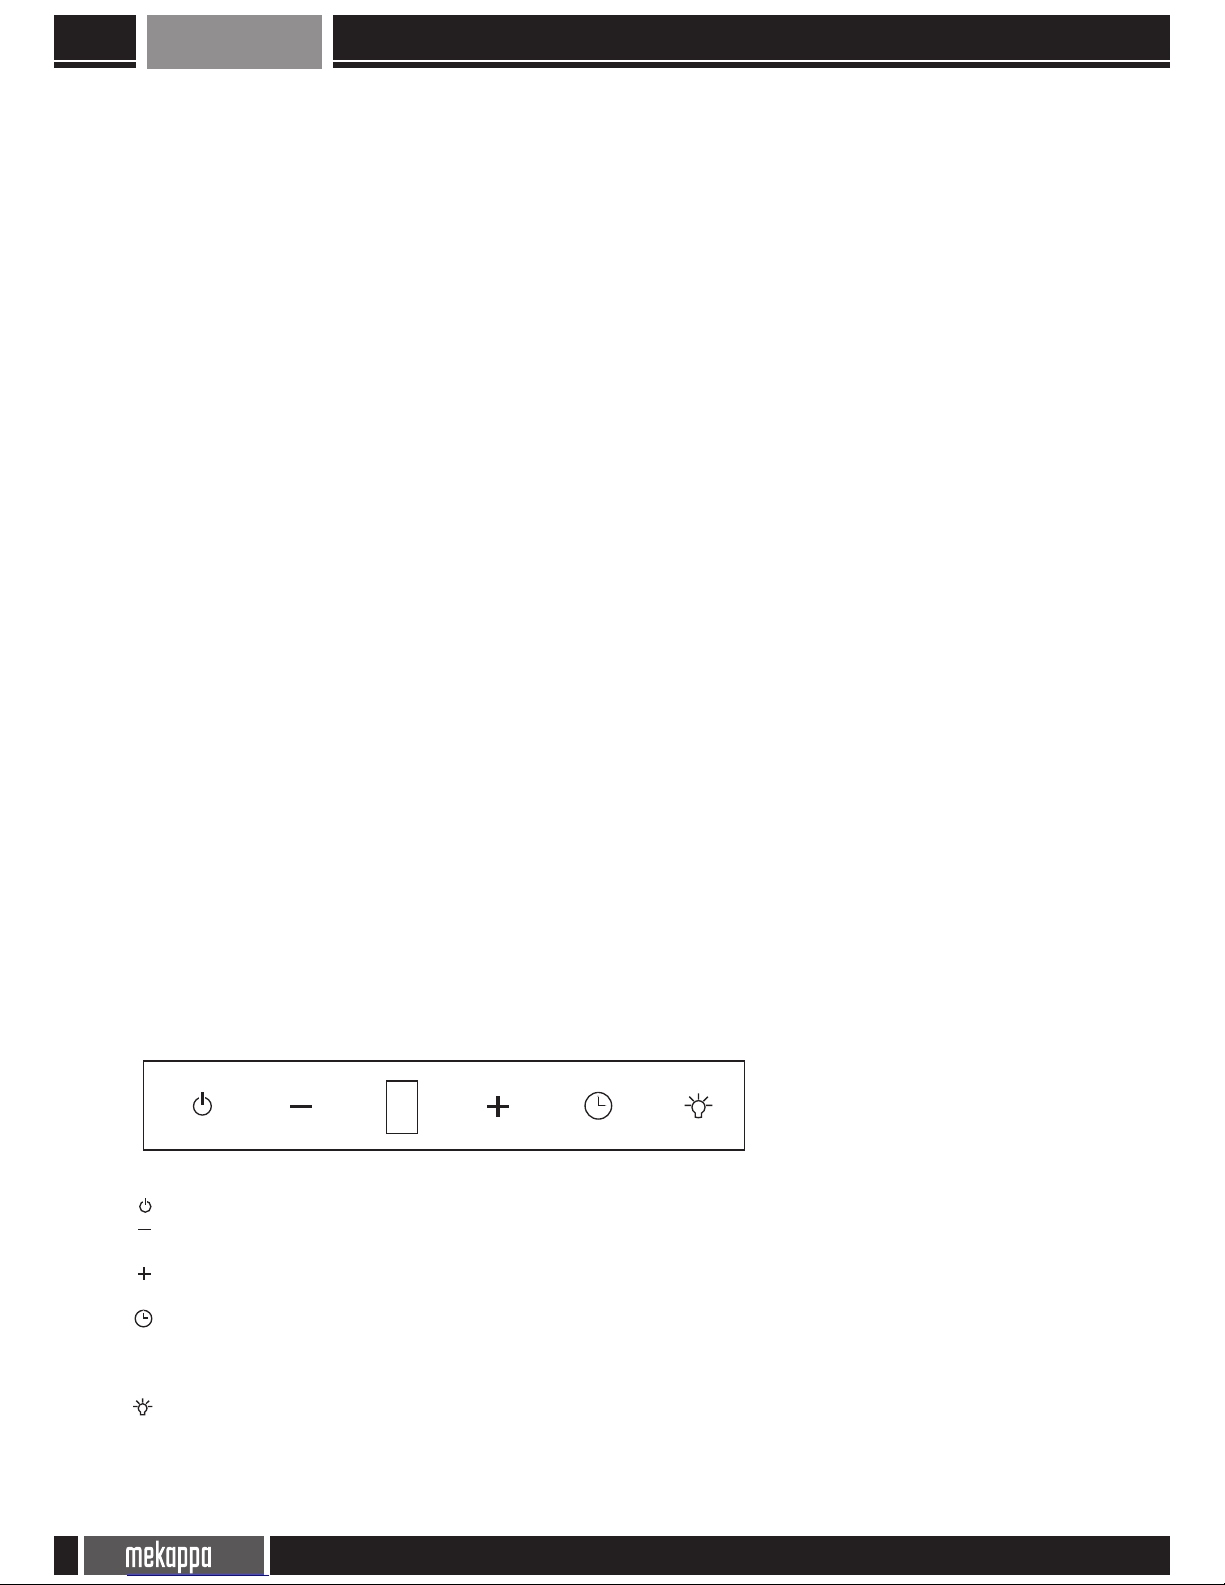
5 devirli olarak programlanmıştır. T2004-1 ve T2004 motorlarda kullanılmaktadır.
Motoru açıp-kapamaya yarar. Motor başlangıçta 2.devirden başlar.
Devir eksiltme tuşudur. Butona basılı tutularak devirler ardı ardına azaltılabilir. Min 1. devir
Devir arttırma tuşudur. Butona basılı tutularak devirler ardı ardına arttırılabilir. Max 5. devir
Motor çalışırken timer butonuna basıldığında cihazın çalışacağı süre ekranda görünür. İstenirse (+ -) tuşlarına
basılarak değiştirilebilinir. Süre sonunda motor durur, aydınlamta pozisyonunda değişiklik olmaz.
Lambayı açıp-kapamaya yarar.
Motor 5. devirde çalışırken +>(artı) butonuna basıldığında ekrana ‘turbo’ gelir ve motor maksimum güçte 5 dakika çalıştır. 5
dakikanın sonunda motor 2. devire döner.
Motor 60 saatlik çalışma süresine ulaştıktan sonra ltreyi temizleyin veya değiştirin (ltre tipine göre) anlamında 5 saniye
boyunca ekrana ‘ C ‘ (Clean or Change) yazılacaktır. Motor her açıldığında ‘ C ’ uyarısı yeniden verilerek kullanıcıya hatırlatılır. Filtre
süresini sıfırlamak için on/off tuşuna ekranda ‘ E ‘ (Erased) yazana kadar (yaklaşık 5s.) basılır ve 60 saatlik süreç yeniden başlatılmış olur.
Motorların çalışıyor olmasından bağımsız olarak bu tuşa basıldığında ekranda, 5 dakikalık alarm timer’ı başlangıç
değeri gösterilir ve çan ikonu 5 kez ash yapar. Çan ikonu timer süresi bitene kadar ekranda gösterilir. Timer bittiğinde buzer 20 saniye çalar
ve çan ikonu aşlar. Buzer çalarken alarm timer tuşuna basılarak buzer susturulabilir.
Her iki timer içinde geçerli olmak üzere: Flashlama esnasında EKSİ veya ARTI tuşlarına basarak timer değeri 1’er 1’er 1 dakika ile 9 saat
59 dakika arasında ayarlanabilir. EKSİ veya ARTI tuşlarına basılı tutulduğunda timer değeri hızlı artar veya azalır. Timer kurulu iken timer
tuşuna basıldığında timer’ın o anki değeri ekranda gösterilir. Başlatılan bir timer iptal edilmek isteniyorsa başlatılan timer tuşuna tekrar basılır
ve EKSİ tuşuna basılarak timer sıfırlanana kadar azaltılır.
Kapanma timer’ı, alarm ve lamba tuşlarına aynı anda 4 saniye basılı tutulduğunda, RGB renk
ayarlama moduna girilir. Ekrana Red(Kırmızı renk) yüzdesi gelir. Kapanma timer’ı tuşuna basılarak Red(kırmızı renk), alarm tuşuna
basılarak Green(yeşil renk), lamba tuşuna basılarak Blue(mavi renk) için ekranda o anki renk yüzdesi gösterilir. EKSİ ve ARTI tuşlarına
basılarak %100 ile %0 arasında ayarlama yapılabilir. Aynı 3 tuşa 4 saniye basılarak yapılan ayar kaydedilir. Kayıt edilmeden programdan
çıkmak isteniyorsa on/off tuşuna basılmalıdır.
: EKSİ ve ARTI tuşlarına beraber basılarak saat ayarlama moduna girilir. Saat ayarlama esnasında, ekranda saatin tam
ortasında üçgen ikonu yanıp söner. EKSİ ve ARTI tuşları ile saat ayarlanır. EKSİ ve ARTI tuşlarından farklı bir tuşa basılırsa saat ayarlama
modundan çıkılır
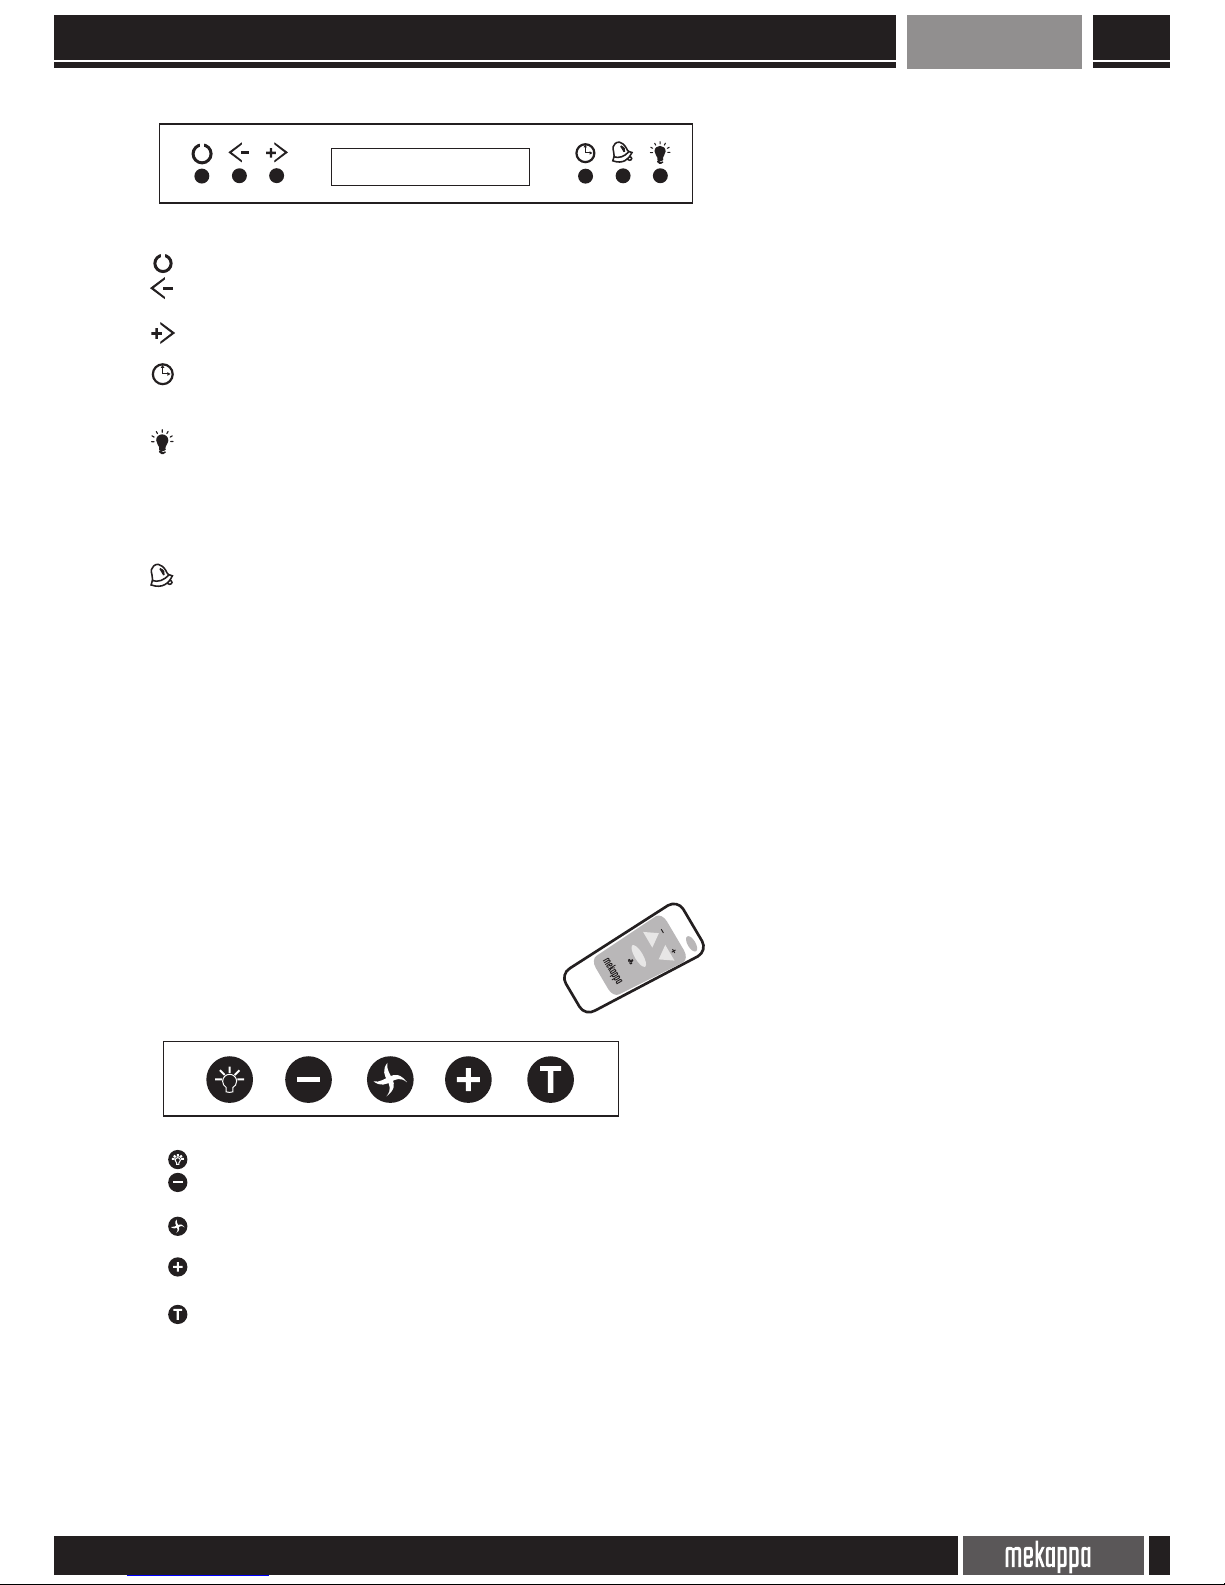
9 devir olarak programlanmıştır. T2004-1 ve T2004 motorlarda kullanılmaktadır.
Lamba tuşu aspiratörün aydınlatmasını devreye alıp çıkartır. Lamba yanarken lamba led’i yanar.
Motor çalışıyorken çalıştığı deviri azaltmayı sağlar. – butonu ile en düşük devire gelindiğinde – led’i aşlar.
Motor duruyorken motoru çalıştırmayı, çalışıyorken durdurmayı sağlar. Motor çalışmaya en son kapatıldığı devirden
başlar.
Motor çalışıyorken çalıştığı deviri artırmayı sağlar. + butonu ile en yüksek devire gelindiğinde + led’i aşlar.
Turbo Timer tuşuna basıldığında motor en yüksek devirde çalışmaya başlar ve 5 dakika sonra kapanmaya
programlanmış olur. Timer devrede iken DEVİR– veya DEVİR+ butonuna basıldığında motor turbodan önceki devrine geri döner ama timer
devam eder. Timer devrede iken turbo timer led’i yanar. 5 dakika dolduğunda motor kapanır. Lambanın durumunda bir değişiklik olmaz.
Timer devrede iken timer tuşuna basılırsa motor kapatılır.
Motor 60 saatlik çalışma süresine ulaştıktan sonra:
Filtre için uyarı süresi dolu iken M.on/off veya turbo timer tuşu ile motor açıldığında M.on/off led’i yaklaşık 5 saniye aşlar.
Filtre temizlendikten sonra, M.on/off tuşuna uzun basarak (yaklaşık 3 saniye) ltre süresini sıfırlayabilirsiniz. Filtre süresi sıfırlandığında
M.on/off led’i bir kez yanıp söner.

TÜRKÇE
4
Kullanma Klavuzu
Country serisi davlumbazların alt kısmında yer alan, kolay şekillenen, nem ve ısıdan
etkilenmeyen, 1. sınıf fırınlanmış malzemeden yapılmış ahşap kuşaktır. Ürününüzü
satın aldığınızda, kuşağı boyasız ve hamdır. Mutfağınızla ile uyumlu olması için
tarafınızdan belirlenen renk ile boyatabilirsiniz. Boyanmış kuşak ürünün alt kenarında
bulunan kuşak yuvasına yerleştirilip, geriye itilir ve vidalanarak ürün üzerine montajı
yapılır.
2 devirli olarak GR114 motorlarda mekanik olarak kullanılır.
Aydınlatma butonu ( 0 konumunda kapalı, I konumdada açık)
Devir butonu (0 konumunda kapalı, I konumunda minumum devir, II konumunda maximum devirde)
Sürgü sacı çekili değil ise motor ve aydınlatma çalışmayacaktır.
* Cihaz çalışmıyor : Öncelikle güç kaynağına bağlı olup olmadığını kontrol ediniz. Sürgülü aspiratörde sürgü sacının çekili olup olmadığını
kontrol ediniz.
Cihaza güç geldiği halde çalışmıyorsa sadece uzman servis personeli sizlere yardımcı olabilir.
Servisi arayın,servis dışında tamir ettirmeye çalışmayın aksi durumda cihazınız garanti kapsamı dışında kalacaktır.
* Cihaz yeteri kadar çekmiyor : Karbon ltre ile kullanıyorsanız değişim zamanı gelmiş olabilir yenisi ile değiştirin. Karbon ltreli değil ise
Alüminyum ltreler temizlenmesi gerekebilir.
* Işık yanmıyor : Ürünün aydınlatma ampulleri gevşemiştir. Gevşek ise sıkın. Yanmış ise yenisi ile değiştirin. Maksimum ampul gücü ürün
içerisinde belirtilmiştir.
Cihaz Serisi CL : Line (dekoratif) CK: Klasik CC : Rustic CS : Ada CLA: Açılır Kapak CA: Aspiratör
B Tipi karbonlreli CTipi karbonlreli C Tipi karbonlreli B Tipi karbonlreli B Tipi karbonlreli A Tipi karbonlreli
Cihaz Model No Her tip davlumbaz ayrı bir model numarasına sahiptir.
60 Cihaz Ölçüsü Davlumbazların genişlik ölçüsüdür. Bu ölçüler 50, 60, 70, 85, 90, 120 cm ‘dir.
XCihaz Rengi X: Inox XF: Inox Füme B: Beyaz S: Siyah SG: Siyah Gold BG: Beyaz Gold J: Bej K: Kahve
Cihaz Motor Tipi 4: T2004 Motor (600m3 çekiş gücüne sahip) Akım:1,5A Güç: 180W - 1: T2001 Motor (1000m3 çekiş gücüne
sahip) Akım:1,8 A Güç:340W - GR114 Motor (500m3 çekiş gücüne sahip) Akım:1,5A Güç:240W
Halojen Aydınlatma H har var ise davlumbaz halojen (2x20Wat) aydınlatmalıdır. Bu alan boş ise klasik lamba (2x40Wat)
aydınlatmalıdır.
Cihaz Kumanda
Tipi
Davlumbazın hangi tuş takımıyla kumanda edildiğini gösterir.
PB: Push Buton TC: Dokunmatik HM: Multicolor SA: Sürgülü LCD: LCD Ekranlı (bkz. sayfa 2,3,4)
Uzaktan Kumandalı Davlumbazın uzaktan kumanda ile kontrol edilebildiğinide gösterir.
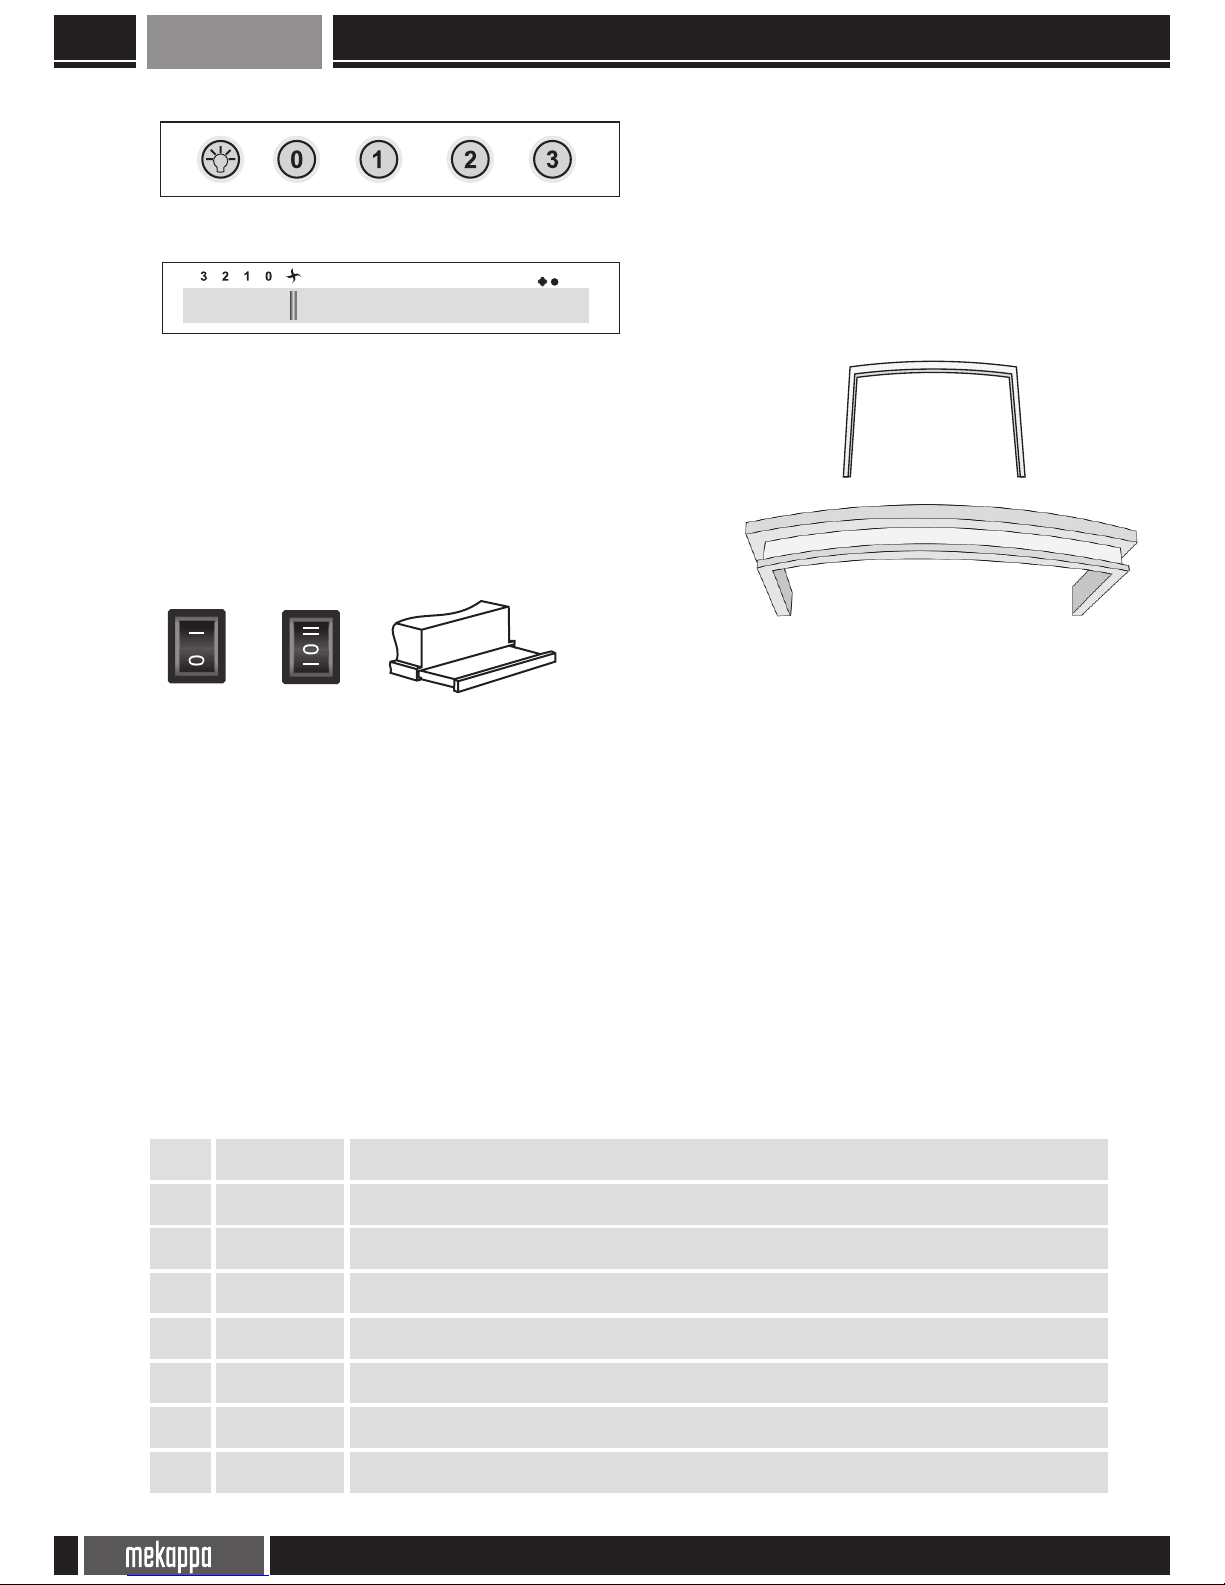
Her tip motorda 3 devirli olarak kullanılabilir.
Lambayı açıp-kapamaya yarar.
1-2-3 butonlarına basarak motorun devri ayarlanır.
butonuna basıldığında motoru kapatır.
3 devirli olarak T2004 motorlarda mekanik olarak kullanılır.
Sürgü ile1-2-3 konumlarına getirerek devir ayarlanır..
Lambayı açıp-kapamaya yarar.

TÜRKÇE
5
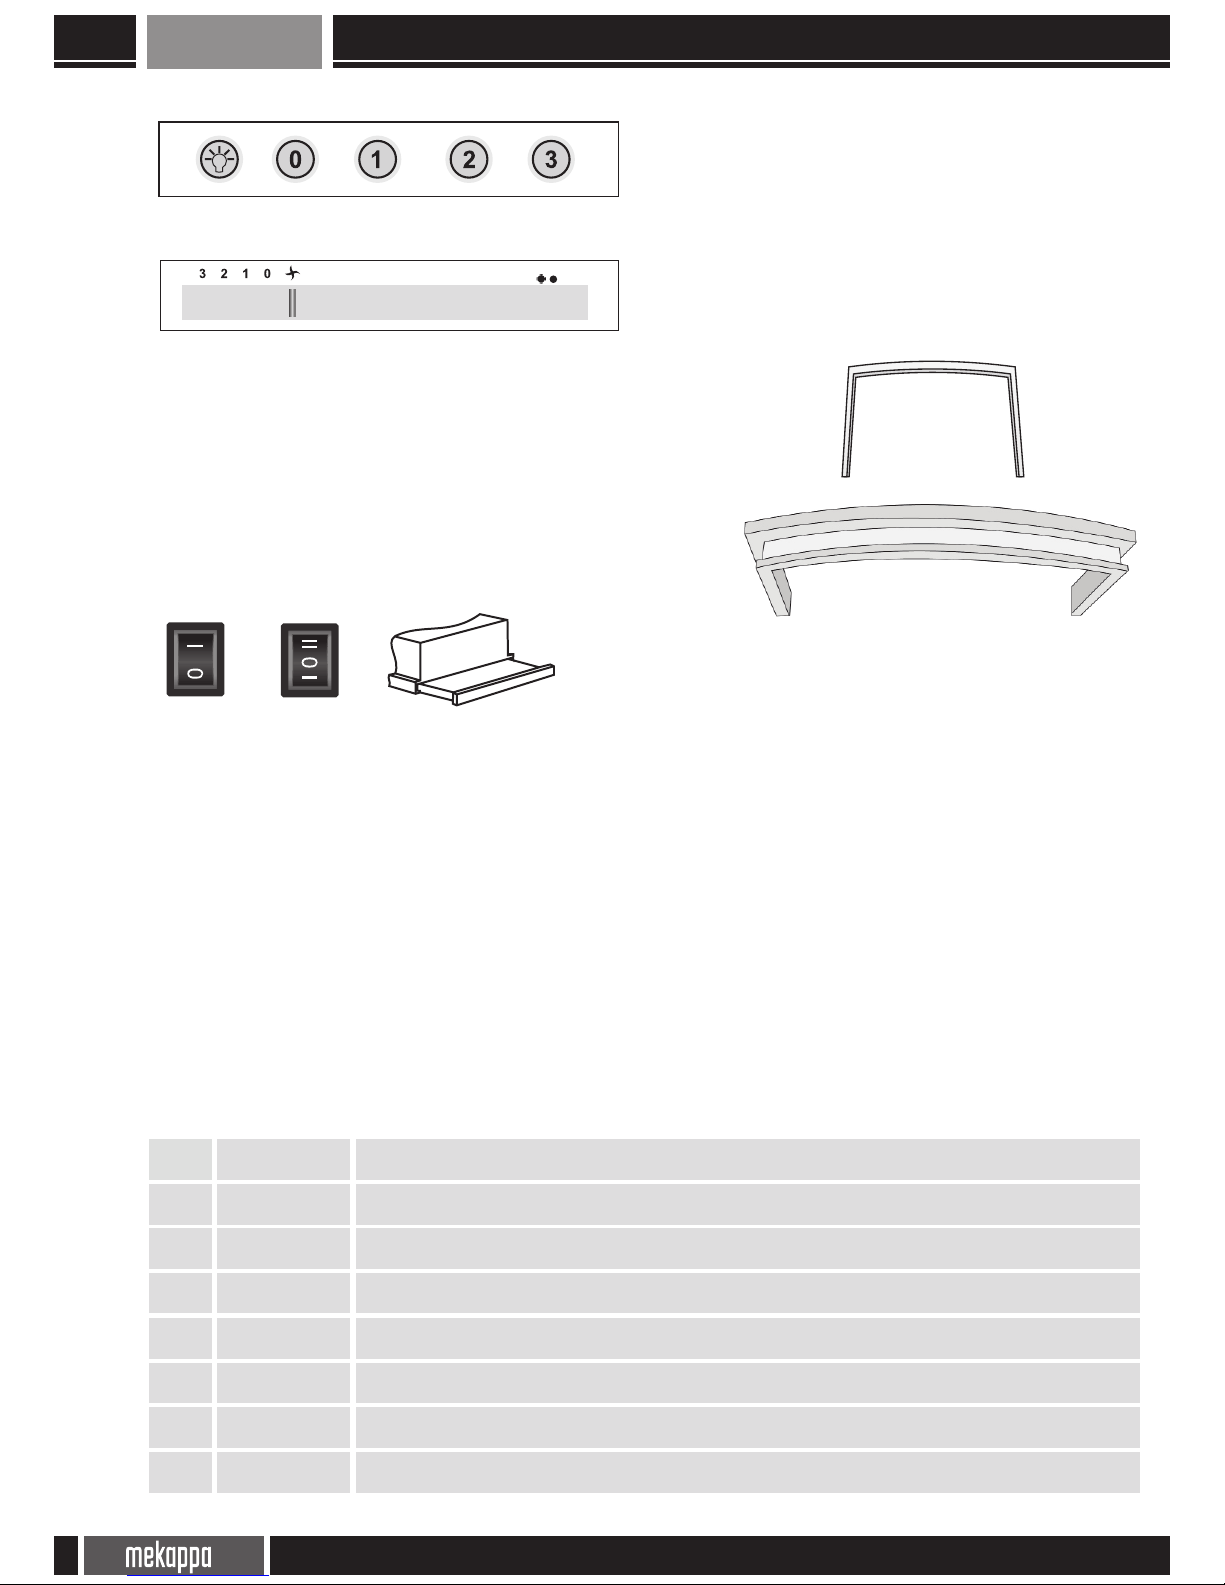
Her tip motorda 3 devirli olarak kullanılabilir.
Lambayı açıp-kapamaya yarar.
1-2-3 butonlarına basarak motorun devri ayarlanır.
butonuna basıldığında motoru kapatır.
3 devirli olarak T2004 motorlarda mekanik olarak kullanılır.
Sürgü ile1-2-3 konumlarına getirerek devir ayarlanır..
Lambayı açıp-kapamaya yarar.
Garanti Belgesi

TÜRKÇE
6
Garanti Belgesi

7
ENGLISH
Prior to carrying out maintenance operations, ensure that the safety precautions specied in Article A and B have been taken.
Ensure that istallation is carried out by the authorized service provider. Take into consideration the model verions, series and installation gures
given in page 27 as well as the following instructions for the installation process.
For the fume hood;
* Drill holes on the points marked on the device and safely x the device body on the wall using the xing pulgs and screws that come in the product
package.
* Fix the provided ue support plates to the wall using the xing plugs and screws. Connect the ue to the device body.
* Connect a exible pipe of appropriate diameter (150 mm preferred) and length to be provided by the user to the reducing ap ue (120 to 150 mm
of diameter) and ensure that the other end goes outside.
* To avoid vibration and suction noise, ensure that the pipe is leakage-free, its connection is appropriate and it does not move.
* Fix the ues using screws after carrying out the power connection and the operation test.
Dear Customers,
Please read the user’s manual for safe mounting and maintenance and keep it in an accessible location for easy urgent acces. This manual was
prepared for more than one device. Refer to Seciton H - Coding for your device’s model.
Flap ues, ue supporting plate, xing plugs and screws are provided inside the product package in different sizes and dimensions for each
product. Please check the package for them.
* This product is not for industrial use; it is for domestic use.
* Installation of our products will be carried out by our authorized service providers in a controlled and supervised manner.
* We cannot be held responsible for damages arising from inappropriate installation of the product by incompetent persons who are not part of our
authorized service.
* Keep and maintain the product package throughout the product’s warranty period.
* As required for our constant development policy; we reserve the right to carry out modications and corrections on our products without prior
notice. We hold the sole responsibility for all of our revised products.
* The life of service for our products is 10 years. Note that this life of service is valid only if the user fully complies with the instructions provided in
the user’s manual.
* Check the product’s power diagram to make sure that the device’^s power and current requirements are appropriate for your power circuit. In case
you experience a problem, consult an competent electrician. Do not install the device in case of inappropriate circumstances.
* You need a earthed plug for your device. Ensure that your plug is earthed.
* Do not carry out maintenance operations while your fume hood is on.
* Do not touch the light bulbs or their surrounding area when the lighting is on or has been used for a long time.
* Do not cook on high temperatures while your fume hood is operating.
* Check your food regularly in case a re might break out due to hot oil when frying food.
* This device is not appropriate for use by children or adults who require supervision.
* In case the device is not cleaned in accordance with cleaning instructions, risk of re will be present. Do not neglect cleaning the device.
* Ensure, at al times, that there is a vertical distance of 65 cm between the middle suction area of the fume hood and the top point of the cooker.
* Do not connect ventilation devices evacuating warm air or smoke and the air evacuation output of the fume hood in the same area.
* If a ue connection is to be established; have your ue checked to ensure that it is clean, unobstructed, recoilles and problem-free.
* If you are using carbon lters on your product, replace the carbon lter in every 3 to 6 months in accordance with your frequency of use.
* Comply with local regulations for evacuation of air.
*This appliance is not manufactured for use by people who have disability about physical, sense and mental ability (including children) or people who
lack experience and knowledge without supervision or management of the person who responsible about safety of this appliance.
*Keep children under supervision to ensure, they do not play with the appliance.
*Appliance can use by 8 years old and older children and people with reduced physical,sense and mental ability or people who lack experience and
knowledge with under supervision or use the appliance safely and introduction is given for understanding of the dangerous. Children do not play
with appliance.
*Cleaning or user maintenance can not be done by children are older then 8 years old and without supervising.
*If you will use cooker hood with appliences that are used with gas or other fuels, ventilation should be enough.
*Do not blow air in to the appliance that are used with gas or other fuels in order to expel smoke.
2006/95EC
EN 60335-1 2005; A2: 2007
EN 60335-2-31 2004, A1: 2007
Instruction Manual
8
ENGLISH
* You are advised to start your device before starting cooking. Keep your device operating for 15 minutes after nishing cooking in order to
eliminate the food smell in the room.
* The oil lter will capture oil particles in the room and this lter might get clogged in accordance with your frequency of use. Comply with the
following instructions and clean your lter at least once in every 2 months in case of risk of re.
* Remove the lter from your device. Wash it using any type of natural detergent in water and rinse it thoroughly without leaving detergent
residues on it.
* Rinse with warm water and leave it to dry.
* You can wash your lter in your dish washer (max 40 C).
* The aluminum panel will change color after being washed a couple of times. This is totally normal and it will not cause any functional problem.
* The function of the carbon lter is to clean the air in the room. Carbon lters should be cleaned regularly and replaced within every 3 to 6
months in accordance with your frequency of use.
* Clean the surface of your device using a damp piece of cloth and a non-abrasive detergent. Do not, under any circumstances, clean it using
abrasive substances like vitriol or bleachers or rough pieces of sponge. You are advised to use cleaning products of the Mekappa brand or other
brands for inox maintenance.
* The lighting system is designed to be used while cooking. It should not be used to illuminate the room for prolonged periods. This might damage
the lighting equipment.
Aluminum cartridge lters are used in all of our products in order to capture oil particles sucked along with food vapor before they enter the
device. These lters vary in size and type in accordacne with the product series and types. They are easy to remove and reassenble. They can
washed in hand without applyinh pressure or impacts using natural detergents and they can be washed in dish washers as well. Cleaning lters
once in every 2 to 3 months in accordance with frequency of use is crtitical for both re safety and device efciency.
More sensitive optional YKF A, B and C type carbon lters can also be used in all of our products in accordance with product series and types in
order to evacuate oil particles in the air and odour in special cases where the indoor air cannot be evacuated. Carbon lters should be replaced
in every 3 to 6 months in accordance with stove and cooking systems. Type YKF C : After locating the carbon lter on the lugs at both sides of
the plastic engine body, turn it 90° (a quarter turn) and the assembly will be completed when you hear the ‘click’ sound. Retrace these steps to
disassemble it (Figure E, H). Type YKF-B: This should be located in front of the metal box in which the engine kit is located. Locate the lugs under
the lter on the holes on the surface of the box which faces the wall and nish the assembly by pushing the clips on the upper section of the lter
towards the inside of the box (Figure F). If the engine is located inside a metal box in your product, then type C carbon lters are convenient for
your product. Type A carbon lters are used for ush ventilation hoods. In case you need YALF and YKP lters, they can be purchased from the
authorized service provider or our company after selecting your lter from the gures in subsection 3 of the Technical Section.
Controller types which vary depending on your product model are described below. You can determine the controller type for your product by
checking the product code section of Article H.
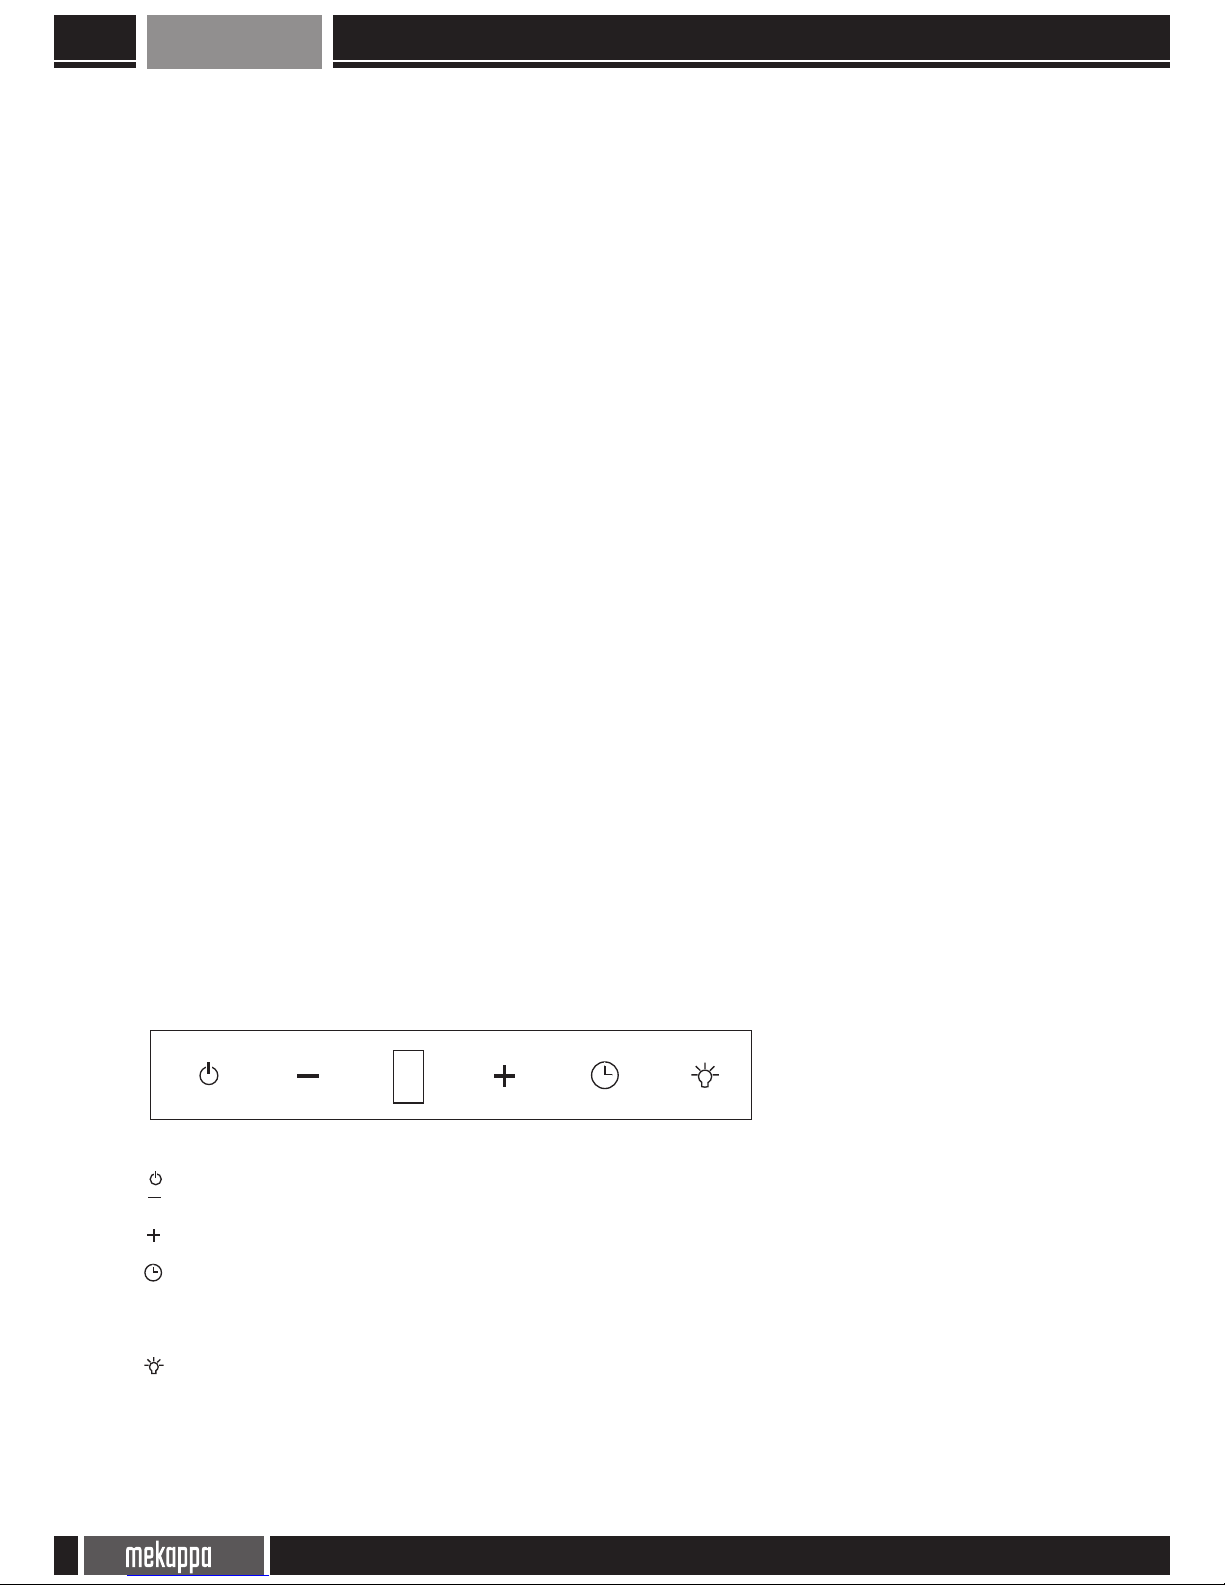
It was designed with 5 rotation speeds. It is used for T2004-1 and T2004 engines.
It turns the engine on and off. The engine will start at the 5nd cycle at startup.
This is the rotation speed reduction button. You reduce rotation speed by keeping this button pressed. The minimum rotation
speed is 1.
This is the button for increasing rotation speed. You can incerase rotation speed by keeping this button pressed. The maximum
rotation speed is 5.
When you press the Turbo Timer button, the engine will operate at the highest rotation speed and it will be programmed
for automatic shutdown after 5 minutes. The motor operation will revert to normal if you press ROTATION- or ROTATION+ when the timer is
on but the timer will continue. When the times is on, the timer led will be on and automatic shutdown will initiate after 5 minutes. The state of
the led light will not change though. The engine will shut down if the timer button is pressed when the timer is on.
This button is for turning the Light/Led on and off. If you briey press it, the light will be turned on and if you keep it pressed
for 3 seconds, the led light will be turned on. The led light and lighting system can be turned on at the same time and they can also operate
separately.
Filter Warning: ‘C’ (Clean or Change) warning will be displayed on the indicator after the engine reaches 60 hours of operation. This requires
the user to clean or replace the lter (in accordance with your lter type). Keep the on/off button pressed until ‘E’ (Erased) is displayed on the
indicator (for about 5 seconds) in order to reset the lter time.
Instruction Manual
For the ventilation hood;
* Drill the holes as shown in Figure G1 and G2 inside your closet according to the template provided with the product.
* Place the device inside the closet and x it using the m4x40 screws that come with the device.
* Connect the 100 mm exible pipe provided by the user to the the ue ap and ensure air discharge.
9
ENGLISH
It was designed ve rotation speeds. It is used for T2004-1 and T2004 engines.
It turns the engine on and off. The engine will start at the 2nd cycle at startup.
This is the rotation speed reduction button. You reduce rotation speed by keeping this button pressed. The minimum
rotation speed is 1.
This is the button for increasing rotation speed. You can incerase rotation speed by keeping this button pressed. The
maximum rotation speed is 5.
When the “timer” button is pressed while the engine is on, the time for which the device will operate will be shown on the
display. This time can be modied by pressing (+ -) buttons as desired. At the end of this time, the engine will stop and there will be no
change in the lighting position.
I turns the lamp on and off.
Turbo: ‘turbo’ will display on the screen if you press the + (plus) button while the engine is operating at the 5th rotation speed and then, the
engine will operate at maximu power for 5 minutes. The engine will revert to the 2nd rotation speed at the end of these 5 minutes.
Filter Warning: ‘C’ (Clean or Change) warning will be displayed on the indicator after the engine reaches 60 hours of operation. This
requires the user to clean or replace the lter (in accordance with your lter type). Keep the on/off button pressed until ‘E’ (Erased) is
displayed on the indicator (for about 5 seconds) in order to reset the lter time and 60-hour period will restart.
The 5-minute alarm timer starting value will be displayed and the chime icon will ash 5 times after pressing this
button regardless of whether the engines are operating or not. The chime icon will be displayed on the screen until the timer period ends.
The buzzer will buzz for 20 minutes after the timer ends and the chime icon will ash. You can press the timer button to silence the buzzer.
For both timers: You can adjust the timer value between 59 minutes and 9 houırs 1 by 1 by pressing the MINUS and PLUS buttons. The
timer value can be rapidly decreased or increased by keeping the MINUS or PLUS button pressed. Pressing the timer button while the
timer is on will display the current timer value. If you wish to cancel a started timer countdown, press the started timer button again and
reset the timer value to zero by pressing the MINUS button.
RGB color adjustment mode will initiate if you keep the Shutdown Timer, alarm and lamp buttons
pressed for 4 seconds at the same time. The Red percentage ratio will be displayed on the screen. You can view the current red ratio by
pressing the shutdown timer button, green by presising the alarm button and blue by pressing the lamp button. You can adjust relevant
ratios between 100% and 0% by presing the MINUS and PLUS buttons. Adjustments will be saved by keeping the the same button
pressed for 3 to 4 seconds. If you wish to exit the program without saving your adjustments, press the on/off button.
Time Adjustment: You can enter the time adjustment mode by pressing the MINUS and PLUS buttons pressed at the same time. During
time adjustment, a triangle icon will ash in the middle of the clock. You can adjust the time using the MINUS and PLUS buttons. Pressing
a button other than the MINUS and PLUS buttons will enable you to exit the time adjustment mode.
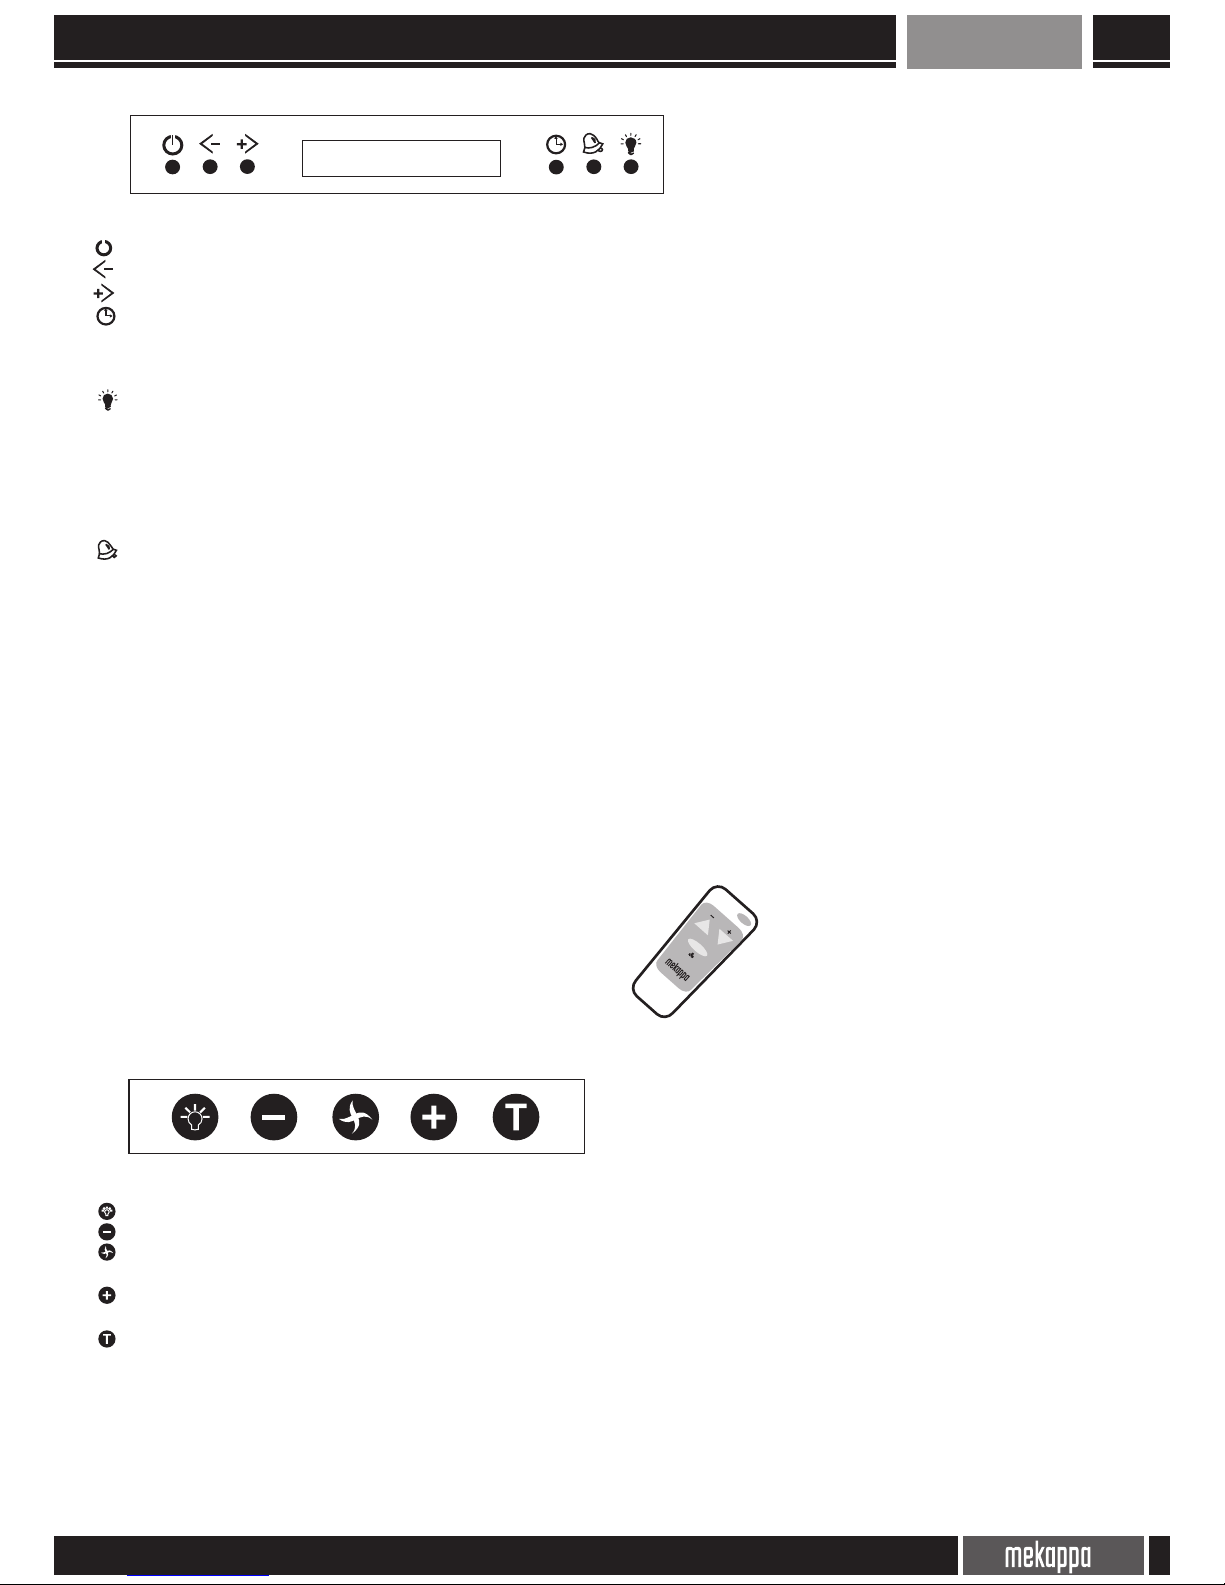
You can control devices with this controller by
using the its remote controller (Figure 4)
It is programmed with 9 rotation speeds. It is used for T2004-1 and T2004 engines.
The lamp button controls the ventilation hood’s lighting. The led will be on when the lighting is on.
It reduces rotation speed while the engine is operating. When the lowest value is reached by pressing the
-- button, the -- led will ash.
It stops the engine while it is operating and starts it when it is off. The engine will start its operation at the last rotation
speed set prior to shutdown.
It increases rotation speed while the engine is operating. When the lowest value is reached by pressing the +
button, the + led will ash.
When you press the Turbo Timer button, the engine will operate at the highest rotation speed and it will be
programmed for automatic shutdown after 5 minutes. The motor operation will revert to normal if you press ROTATION- or ROTATION+ when
the timer is on but the timer will continue. When the times is on, the timer led will be on and automatic shutdown will initiate after 5 minutes.
The state of the led light will not change though.
If you press the timer button when the timer is on, the engine will shut down.
After the engine reaches 60 hours of operation period: The M.on/off led light will ash for 5 seconds when the warning period is expired after
starting the engine by pressing either the M.on/off or the turbo timer button.
After cleaning the lter, you can reset the lter time by keeping the M.on/off button pressed (for about 5 seconds).
When the lter time is reset, the M.on/off led light will ash once.
Instruction Manual

10
ENGLISH
Wooden belts are located on the lower section of Country series fume hoods. They
are heat and humidity resistant, easy to shape amd manufactured from 1st class
materials. The belt will be unpainted. You can paint it with the color of your choice in
order to ensure that it ts your kitchen decoration. Locate the painted belt in the belt
housing on the lower corner of the device, push it backwards and assemble by
screwing it on the product.
It can be used as a 2-rotation speed mechanical controller for GR114 engines.
Lighting button ( 0 off, I on)
Rotation speed button (0 off, I minimum rotation speed, II maximum rotation speed)
If the slider plate is not pulled, engine and lighting will not function.
* The device will not start: First, check power connection. If you have a slider ventilation hood, check whether the slider plate is pulled.
If the device will not start although there are no power connection problems, expert service personnel will help you.
Call the service and do not try to manually repair it by yourself. Otherwie, your device’s warranty will become void.
* Device suction is insufcient: If you are using a carbon lter, its life of service might have expired. Replace it. If you do not use a carbon lter,
your aluminum lter might need cleaning.
* The light will not be lit: The lighting bulbs might have gotten losse. If so, retighten them. If they are out of order, replace them. Maximum light
bulb power is specied on the device.
Instruction Manual
Device Series CL : Line (decorative) CK: Classic CC : Rustic CS : Isle CLA: Flapped CA: Ventilation Hood
B Type carbon ltered C Type carbon ltered C Type carbon tered B Type carbon tered B Type carbon tered A Type carbon ltered
Device Model No Each type of fume hood has its own model number.
60 Device
Measurements These are the device’s width measurements. These are 50, 60, 70, 85, 90 and 120 cm.
XDevice Color X: Inox XF: Inox Smoky B: White S: Black SG: Black Gold BG: White Gold J: Beige K: Brown
Device Engine Type 4: T2004 Engine (600m3 traction) Current:1,5A Power: 180W - 1: T2001 Engine (1000m3 traction) Current:1,8 A
Power:340W - GR114 Engine (500m3 traction) Current:1,5A Power:240W
Halogene Lighting If there is letter H, this means that the fume hood has halogene (2x20Wat) lighting. If this area is empty, this
means that it has classic lamp bulb (2x40Wat) lighting.
Device Controller
Type
Indicates which keypad controls the fume hood.
PB: Push Buton TC: Touch Sensitive HM: Multicolor SA: Slider LCD: LCD Screened (see page 8,9,10)
Remote Controlled Indicates that the fume hood is remote controllable.
Example Code and Description
It can be used in all types of engines with 3 rotation speeds.
It turns the lamp on and off.
You can adjust engine rotation speed by
pressing the 1, 2 and 3 buttons.
The engine can be shut down by pressing the 0 button.
It can be used for T2004 engines with 3 rotation speeds.
You can select 1, 2 or 3 with the slider to set rotation
speed.
It turns the lamp on and off.

11
Русский
Прежде чем перейти к монтажу устройства, необходимо убедиться в том, что все меры по технике безопасности, приведенные в разделах “A и
B”, выполнены.
Для выполнения монтажа обязательно пригласите представителей авторизованного сервиса. Следите за тем, чтобы последовательность
монтажных операций совпадала с рекомендациями, приведенными на 27-й странице технического раздела, пользуясь приведенными для
каждой серии и модели рисунками и последующим описанием.
Для корпуса вытяжки;
* Отметить на стене, к которой будет крепиться корпус вытяжки, места нахождения крепежных отверстий, просверлить отверстия и надежным
и правильным способом прикрепить вытяжку к стене.
* Для безопасного крепления вытяжки используются опорный лист, опорные штифты и шурупы. Выполнить соединение корпуса вытяжки с
дымовыводящей трубой.
* С помощью гибкой трубы соответствующего диаметра (предпочтительно 120-150 мм), наличие которой должен обеспечить пользователь,
соединить трубу, идущую в комплекте с устройством, с редукторным переходником и заслонкой (диаметр 120-150 мм), другой конец вывести
наружу/присоединить к центральной дымовыводящей трубе (если есть).
* Чтобы не допустить появления звуков от потока воздуха и вибрации, место соединения должно выполняться полностью герметичным, а вся
конструкция должна быть неподвижной.
* Труба фиксируется после подключения к электросети и рабочего испытания.
Для аспиратора;
* В соответствии с прилагаемым к устройству шаблоном, просверлить внутри шкафа монтажные отверстия, как показано на рис. “G1” и “G2”.
* Поместить устройство внутри шкафа и прикрепить с помощью прилагаемых к устройству винтов М4x40.
* С помощью гибкой трубы диаметром 100 мм, наличие которой обеспечивает пользователь, соединить устройство с дымовыводящей трубой с
заслонкой, вывести конец трубы наружу.
Уважаемые клиенты
С целью выполнения надежного монтажа и обслуживания, внимательно прочтите это руководство и сохраните в доступном месте для
возможности получения необходимой информации в дальнейшем.Эта брошюра была подготовлена для нескольких моделей изделий.
Описание модели прибора приобретенного вами дается в разделе под кодом “H”.
В комплекте с изделием в коробке поставляются в разном количестве и разном диаметре: дымовыводящая труба с заслонкой, опорный лист
трубы, винтовые крепежные элементы (опорные штифты, шурупы). Пожалуйста, проверьте.
* Наше изделие не предназначено для промышленного пользования, только для домашнего применения.
* Монтаж нашего изделия должен производиться под контролем и в присутствии представителей нашего авторизованного сервиса.
* Наша фирма не несет ответственность за последствия неправильно выполненного монтажа с нарушением наших инструкций.
* Обязательно обеспечить целостность и сохранить всю упаковку изделия в течение всего гарантийного срока.
* В рамках нашей политики непрерывного развития, фирма сохраняет за собой право на внесение любых изменений и исправлений в
продукцию, без необходимости в предварительном уведомлении. Вся пересмотренная продукция находится под нашей ответственностью.
* Срок службы изделия 10 лет. Не забывайте об ответственности пользователя за соблюдение всех инструкций изготовителя, приведенных в
руководстве.
* До начала применения устройства, проверить соответствие напряжения и иных электрических параметров, указанных в электросхеме тому
напряжению и параметрам, которые имеются в вашей электросети. В случае возникновения любого сомнения, обратиться к квалифицированному
электрику. Не следует начинать монтаж устройства в случаях несоответствия.
* Для подключения этого устройства необходимо наличие розетки с заземлением. Обязательно потребуйте подтверждения, что заземление
имеется.
* Не производить никаких процедур по обслуживанию во время работы вытяжки или после включения вилки устройства в розетку.
* Не прикасайтесь к лампе освещения и окружающему участку в то время, когда она включена или после того, как она была включена в течение
длительного периода.
* В процессе работы вытяжки не следует готовить блюда на огне с высоким пламенем.
* В процессе жаренья продуктов в раскаленном масле, не следует забывать, что масло, является горючим материалом, поэтому следует
обеспечить непрерывный контроль.
* Устройство не подходит для пользования детьми или недееспособными взрослыми, нуждающихся в постоянном присмотре.
* Несоблюдение условий о периодической чистке устройства, может привести к пожару. Не нарушайте инструкций по чистке.
* Обязательно соблюдайте расстояние по вертикали между воздухозаборником вытяжки и самой высокой точкой пламени, оно должно
составлять как минимум 65 см.
* Никогда не использовать выходное отверстие вытяжки для подключения другого оборудования по отводу горячего воздуха или дыма из
помещения.
* Выполняя крепление трубы дымохода, необходимо обязательно обеспечить свободный, чистый и безоткатный (препятствующий обратному
ходу) проход, убедиться в том, что выбранная позиция обеспечит безупречную работу вытяжки.
* Если в устройстве используется угольный фильтр, этот фильтр необходимо периодически менять в течение 3-6 месяцев.
* Пожалуйста, соблюдайте местные предписания в отношении выброса продуктов сгорания в окружающую среду.
2006/95EC
EN 60335-1 2005; A2: 2007
EN 60335-2-31 2004, A1: 2007
Руководство по эксплуатации
12
Русский
* Включать устройство рекомендуется до начала приготовления пищи. Чтобы удалить остатки запахов пищи, после окончания приготовления,
необходимо оставить вытяжку включенной в течение еще 15 минут.
* Масляный фильтр задерживает частицы масла попадающие в воздух, и в зависимости от частоты пользования вытяжкой могут стать
причиной закупорки фильтра. Для обеспечения противопожарной безопасности масляный фильтр рекомендуется очищать не реже одного
раза в 2 месяца.
* Отсоединить фильтр от устройства и промыть в воде с любым природным моющим средством, затем тщательно прополоскать в чистой воде
от моющего средства.
* Прополоскать в чистой теплой воде и высушить.
* При желании, фильтр можно мыть в посудомоечной машине (макс 40 C).
* Алюминиевая панель после нескольких моек меняет цвет. Это нормальное явление, которое никаким образом не влияет на
функциональность устройства.
* В обязанность угольного фильтра входит очистка воздуха. Угольный фильтр не промывается, его меняют на новый в зависимости от частоты
пользования устройством через 3-6 месяцев пользования.
* Поверхность устройства очищается тканью, слегка смоченной в моющем средстве, не содержащем абразивных веществ. Никогда не
применять для очистки панелей отбеливателей, щелочных или кислотосодержащих средств или жестких губок и щеток. Для очистки
поверхностей из нержавеющего металла предпочтительно пользоваться такими средствами чистки, как “Mekappa” или других марок.
* Осветительная система рассчитана только для работы в процессе приготовления пищи. Она не должна включаться на длительное время с
целью освещения помещения. Это может стать причиной выхода из строя осветительного оборудования.
Во всех видах наших устройств, для удерживания частиц масла из пара образуемого в процессе приготовления пищи, используется
многоступенчатый алюминиевый кассетный тип фильтра, устанавливаемый на входе в устройство. Эти фильтры имеют различную длину и
форму в зависимости от серии и типа устройств, в которых они будут устанавливаться. Продумана возможность легкой установки и съема от
устройства. Фильтры могут мыться вручную в воде с мягким природным моющим средством, не подвергая механическим ударам и сжатию
или в посудомоечной машине. Периодичность промывки фильтра зависит от частоты пользования устройством, но не должна быть реже
одного раза в 2-3 месяца так как это является важным не только для обеспечения противопожарной безопасности, но и с целью сохранения
работоспособности прибора.
Угольные фильтры, предназначенные для очистки от масла и запаха воздуха, не выбрасываемого наружу в отдельных случаях, имеют
варианты выбора из типов YKF A, B и C, и могут применяться во всех видах наших изделий в зависимости от серии и типа устройства, в
котором устанавливаются. Угольные фильтры необходимо менять на новые через 3-6 месяцев пользования, что зависит от конструкции и
системы приготовления пищи. Тип YKF C: Для монтажа угольного фильтра необходимо установить его между двумя боковыми скобами на
пластиковом корпусе мотора, после чего зафиксировать поворотом на 90° (четверть поворота) до появления звука щелчка. Чтобы отсоединить
угольный фильтр необходимо произвести эти операции в обратном порядке. (Рис. E, H). Тип YKF-B: Устанавливается на переднюю часть
металлической коробки находящейся в комплекте с мотором. Фильтр устанавливается снизу в выемки той стороны коробки, которая смотрит
на стену, затем, с помощью клипс на верхнем участке фильтра проталкивается вовнутрь коробки и фиксируется. (Рис. F). Если мотор вашего
устройства находится в металлической коробке, для него подходит угольный фильтр типа B, если не в металлической коробке, типа C. Во
встроенных аспираторах применяется угольный фильтр типа A.
В случае необходимости, вы можете ознакомиться с информацией о фильтрах YALF и YKF, пользуясь рисунками приведенными на 27-й
странице 3-го технического раздела и получив код устройства, заказать требуемый тип фильтра у дилера, авторизованной службы сервиса
или нашей фирмы.
Тип панели управления отличается в зависимости от конструкции устройства и описан ниже. Определить код типа вашей системы
управления, можно посмотрев информацию о кодах систем в разделе “H”.
Может программироваться на 5 скоростей. Применяется с моторами T2004-1 и T2004.
Применяется для включения/выключения мотора. При пуске мотор начинает работать со 5 скорости оборотов.
Кнопка снижения скорости оборотов. При непрерывном нажатии производится поступенчатое снижение скорости.
Минимальная 1 скорость.
Кнопка повышения скорости оборотов. При непрерывном нажатии производится поступенчатое повышение скорости.
Максимальная 5 скорость.
При нажатии на кнопку турбо-таймер, мотор включается на самых высоких оборотах и запрограммировано
выключается через 5 минут. Если пр включенном таймере нажать на кнопку “СКОРОСТЬ” – или “СКОРОСТЬ+”, мотор возвратится на
предыдущую скорость, но таймер продолжит отсчет времени. При включенном таймере загорается светодиод турбо-таймера. По истечении 5
минут мотор автоматически выключится. В работе лампы никаких изменений не производится.
Если при работающем таймере нажать на кнопку таймера, выключится мотор.
применяется для включения/выключения лампы/светодиода. При одном кратком нажатии загорится лампа, непрерывным
нажатием в течение 3 секунд подается команда на светодиод. Светодиод и лампа освещения могут работать как вместе, так и независимо
друг от друга.
После достижения 60 часов работы мотора, на дисплей выходит надпись ‘ C ‘ (Clean or Change),
что означает необходимость в промывке или замене фильтра (в зависимости от типа фильтра), которая остается в течение 5 секунд. Этот
предупредительный сигнал ‘ C ’ будет появляться на дисплее при каждом новом включении мотора, чтобы напомнить пользователю о
необходимости промывки фильтра. Чтобы осуществить сброс на счетчике времени пользования фильтром, необходимо нажать на кнопку on/
off и держать непрерывно (примерно 5 секунд) до появления на дисплее буквы ‘ E ‘ (Erased), после чего начнется новый отсчет 60 часов.
Руководство по эксплуатации

13
Русский
Может программироваться с 5 скоростями. Применяется с моторами T2004-1 и T2004.
Применяется для включения/выключения мотора. При пуске мотор начинает работать со 2 скорости оборотов.
Кнопка снижения скорости оборотов. При непрерывном нажатии производится поступенчатое снижение скорости.
Минимальная 1 скорость.
Кнопка повышения скорости оборотов. При непрерывном нажатии производится поступенчатое повышение скорости.
Максимальная 5 скорость.
Если нажать на таймер во время работы мотора, на экране появится остаток времени работы мотора до выключения. При
желании изменить это время, нажмите кнопки +/-. По истечении заданного времени мотор выключится. В работе лампы никаких изменений
не производится
применяется для включения/выключения лампы.
Если нажать на кнопку + (плюс) при включенном на 5 скорости моторе, на дисплее покажется буква ‘turbo’ и мотор будет
продолжать работать на самой высокой скорости еще 5 минут. По истечении 5 минут, мотор вернется в режим 2 скорости.
Предупредительный сигнал о фильтре: После достижения 60 часов работы мотора, на дисплей выходит надпись ‘ C ‘ (Clean or Change),
что означает необходимость в промывке или замене фильтра (в зависимости от типа фильтра), которая остается в течение 5 секунд. Этот
предупредительный сигнал ‘ C ’ будет появляться на дисплее при каждом новом включении мотора, чтобы напомнить пользователю о
необходимости промывки фильтра. Чтобы осуществить сброс на счетчике времени пользования фильтром, необходимо нажать на кнопку
on/off и держать непрерывно (примерно 5 секунд) до появления на дисплее буквы ‘ E ‘ (Erased), после чего начнется новый отсчет 60 часов.
Независимо от того будет ли включен мотор в момент нажатия на эту кнопку, после нажатия на кнопку
на дисплей выйдет первоначальный показатель 5-минутного таймера и иконка с колоколом мигнет 5 раз. Иконка с колоколом будет
находиться на дисплее до истечения времени таймера. После истечения времени таймера в течение 20 секунд будет раздаваться звуковой
сигнал окончания времени и иконка с колоколом будет мигать. Выключить звуковой сигнал можно путем нажатия на кнопку таймера.
Путем нажатия на кнопку МИНУС или ПЛЮС в момент мигания, время настройки
таймера будет прибавляться или убавляться по 1 минуте в зависимости от того, какая кнопка была нажатой и может регулироваться до в
пределах от 1 минуты до 9 часов 59 минут. Ускорить прибавление или убавление времени настройки можно путем непрерывного нажатия
на кнопку МИНУС или ПЛЮС. Время настройки можно узнать путем одного нажатия на кнопку таймера и если таймер был настроен на
дисплее покажется показатель с остатком времени. Если возникнет желание отменить настроенное время отсчета, необходимо нажать на
кнопку таймера и с помощью кнопки МИНУС сбросить значение до нулевого.
Ввод в модуль настройки цветности RGB осуществляется одновременным нажатием
на кнопки выключения таймера, сигнализации и лампы освещения и удерживания в течение 4 секунд. На дисплее покажется процентный
показатель красного цвета (Red). Нажатием на кнопку выключения таймера на дисплей вызывается процентный показатель красного
цвета (Red), на кнопку сигнализации - зеленого (Green), лампы освещения - голубого (Blue). Прибавление или убавление цветности
осуществляется с помощью кнопок МИНУС и ПЛЮС, диапазон настройки колеблется в пределах от 100% до 0%. Чтобы сохранить в памяти
настроенные значения, необходимо нажать одновременно на все 3 кнопки и удерживать в течение 4 секунд. При желании выйти из модуля
настроек без внесения в память выполненных настроек, нажать на кнопку on/off.
Одновременным нажатием на кнопки МИНУС и ПЛЮС, осуществляется ввод в модуль настройки времени. В момент
настройки реального времени на дисплее, прямо посередине экрана мигает иконка с треугольником. Прибавление или убавление значений
времени производится с помощью кнопок МИНУС и ПЛЮС. Выход из модуля настройки реального времени производится путем нажатия на
любую кнопку, кроме кнопок МИНУС и ПЛЮС.
Этим устройством можно управлять с помощью
дистанционного управления (Рис. 4)
Может программироваться на 9 скоростей. Применяется с моторами T2004-1 и T2004.
Применяется для включения и выключения лампы освещения аспиратора. При включенной лампе горит светодиод.
Обеспечивает снижение оборотов мотора при работающем моторе. Со снижением скорости с помощью кнопки – до
минимального значения, начинает мигать светодиод -.
Применяется для включения мотора когда он стоит и для выключения когда он находится в работе. Мотор включается в
работу с той скоростью, на которой он был выключен.
Обеспечивает повышение оборотов мотора при работающем моторе. С прибавлением скорости с помощью кнопки +
до максимального значения, начинает мигать светодиод +.
При нажатии на кнопку турбо-таймер, мотор включается на самых высоких оборотах и запрограммировано
выключается через 5 минут. Если пр включенном таймере нажать на кнопку “СКОРОСТЬ” – или “СКОРОСТЬ+”, мотор возвратится на
предыдущую скорость, но таймер продолжит отсчет времени. При включенном таймере загорается светодиод турбо-таймера. По истечении
5 минут мотор автоматически выключится. В работе лампы никаких изменений не производится.
Если при работающем таймере нажать на кнопку таймера, выключится мотор.
После истечения 60 часов работы мотора:
После достижения заданного срока использования фильтра, при нажатии на кнопку М.on/off или турбо-таймер, светодиод будет мигать
примерно в течение 5 секунд.
После промывки фильтра, необходимо нажать на кнопку М.on/off и подержать примерно 3 секунды, затем сбросить значение времени
работы фильтра до нуля. После сброса значения работы фильтра до нуля, светодиод кнопки М.on/off мигнет один раз.
Руководство по эксплуатации
14
Русский
Для вытяжек серии Country предусматривается деревянный каркас, занимающий
место внизу устройства, легко принимающий форму, устойчивый против
воздействия влаги и температуры, выпускаемый из древесины 1 сорта. В момент
покупки устройства, этот каркас не окрашен и не обработан. Вам предоставляется
возможность окрасить эту деталь в такой цвет, который наиболее сочетается с
цветами вашей кухни. Окрашенный каркас устанавливается в специальные выемки
на нижних краях устройства, подвигается назад и прикручивается шурупами.
механическое применение с мотором GR114 и 2-скоростной настройкой.
Кнопка включения освещения ( Позиция 0 - выключить, позиция I - включить)
Переключатель скоростей (Позиция 0 - выключить, позиция I - минимальная скорость оборотов, позиция II - максимальная скорость
оборотов)
Если выдвижной лист задвинут, мотор и лампа освещения не включатся.
*Устройство не включается: Прежде всего необходимо проверить места подключения к источнику электроэнергии. В аспираторах с
управлением выдвижного типа, необходимо проверить вытянут ли выдвижной лист.
Если в электролинии нет никаких сбоев и электричество поступает на устройство, но устройство не работает, оказать помощь вам могут только
представители авторизованной службы сервиса.
Не пытайтесь отремонтировать устройство самостоятельно, в противном случае ваша гарантия станет недействительной. Позвоните в
сервисную службу, все виды ремонта и замена деталей производятся только квалифицированными работниками сервиса.
* Недостаточная мощность устройства : Если в устройстве установлен угольный фильтр возможно пришло время его замены на новый. Если в
устройстве установлен алюминиевый фильтр возможно пришло время его промывки.
* Не горит лампа освещения: Ослаблено положение лампы в патроне. Закрутить плотнее. Если лампа перегорела, заменить на новую.
Максимально допускаемая мощность лампы указана на изделии.
Руководство по эксплуатации
Серия прибора CL : Line (декоративный) Угольный фильтр тип B; CK: Klasik Угольный фильтр тип C; CC : Rustic Угольный фильтр тип C; CS : Ada Угольный фильтр
тип B; CLA: Открывающаяся крышка Угольный фильтр тип B; CA: Аспиратор Угольный фильтр тип A.
№ модели
устройства Каждый тип вытяжки имеет отдельный номер модели.
60 Габариты
устройства Показатель ширины вытяжки. Этот показатель составляет 50, 60, 70, 85, 90, 120 см.
XЦвет устройства X: Inox XF: Inox копченый B: Белый S: Черный SG: Черный Gold BG: Белый Gold J: Бежевый K: Коричневый
Тип мотора
устройства
4: T2004 Мотор (мощность вытяжки 600m3) Ток:1,5A Мощность: 180W - 1: T2001 Мотор (мощность вытяжки
1000m3) Ток:1,8 A Мощность:340W - GR114 Мотор (мощность вытяжки 500m3) Ток:1,5A Мощность:240W
Галогенная лампа
освещения Если стоит буква H, в системе освещения устройства используется галогенная лампа (2x20 Ватт).
Если в этой графе стоит пропуск, применяется обычная лампа накаливания (2x40Ватт).
Тип управления
устройством
Показывает какой тип набора кнопок применяется для управления вытяжкой. PB: Push Buton TC: Бесконтактный
HM: Multicolor SA: С выдвижным листом и ЖК-дисплеем: с ЖК-дисплеем (См. стр. 12,13,14)
С дистанционным
управлением Показывает возможность дистанционного управления вытяжкой.
Пример кода и описание
Применяется с любым типом моторов, с настройкой на 3 скорости.
Применяется для включения и выключения
лампы.
Скорость оборотов мотора регулируется
путем нажатия на соответствующие кнопки 1-2-3.
Мотор выключается путем нажатия на кнопку 0.
Механическое применение с мотором T2004 с 3-скоростной настройкой.
С помощью выдвижного регулятора
скорости обеспечивается настройка скорости оборотов мотора в 1-2-3
позициях.
Для включения и выключения
лампы освещения.

FRANÇAIS
15
Faites effectuer le travail de montage par les services agrée. Lors des travaux de montage portez votre attention sur les photos de série de
montage de la partie technique à la page 27 et aux explications ci-dessous.
* sur l’appareil faire les trous aux endroits indiqués et xez sur le mur de façon sure et juste le corps avec les chevilles et les vices données.
* Les tôles de maintien de la hotte sont xées aux murs de façon juste avec les chevilles et les vices données. Le raccord avec la cheminée et le
corps est effectué.
* Avec le tuyau souple de la dimension et taille compatible apporté par l’utilisateur, le tuyau sera mis en contact avec le clapé à réduction
(diamètre 120-150mm), l’autre bout est raccordé à l’extérieure / cheminée.
* Pour ne pas avoir de bruit de vibration et d’air assurez-vous que le tuyau est raccordé complètement, sans inltration et de façon immobile.
* Après le raccordement électrique et le test de fonctionnement les tuyaux de cheminée sont vissés.
*Comme sur les gures G et H, dans l’armoire faites les trous de montage selon le schéma donné avec le produit.
* Placez votre appareil dans l’armoire et xez avec les vices m4x40 envoyées avec l’appareil.
* Raccordez le tuyau souple de 100mm apporté par l’utilisateur au clapé de la cheminée et assurez vous de la sortie de l’air.
Chers clients,
Pour un montage et un entretien en sécurité lisez avec attention la notice d’utilisation et conservez dans un endroit facile d’accès. Cette notice est
utilisée pour plusieurs produits. Dans la partie avec le codage – H déterminez le modèle de votre appareil. Avec votre appareil dans la boite se
trouve une cheminée à clapé, tôle de soutien pour cheminée, les chevilles et les vices de taille différente pour chaque produit. Contrôler s’il vous
plait.
* Notre produit est de type habitation et non industriel
* Le montage de nos produits sera effectué par nos services agrée avec contrôle et vérication.
* Nous n’accepterons pas de responsabilité des dommages survenus sur les produits en raison du mauvais montage contrairement à nos
indications.
* Tout au long de la durée de la garantie conserver la boite et l’emballage du produit.
* En raison de notre politique de développement permanent, nous nous gardons le droit de changer et rectier nos produits sans obligation de
donner une explication préalable. Tous nos produits soumis à révision seront sous notre responsabilité.
* La durée de vie de nos produits est de 10 ans. Ce délai est valable tant que l’utilisateur utilise le produit conformément à la notice d’utilisation.
* Avant de faire fonctionner votre appareil, contrôlez la conformité du voltage et de la puissance électrique du réseau en regardant sur le schéma
électrique se trouvant dans le produit. Si vous rencontrez un problème faite appel à un électricien spécialisé. En cas de non-conformité ne faites
pas monter le produit.
* Votre appareil a besoin d’une prise terre. Vériez l’existence.
* Ne pas effectuer d’entretien lorsque la hotte est en fonction ou sur courant.
* Ne pas touchez aux ampoules ou aux environs lorsque elles sont allumées ou après une longue utilisation.
* Lorsque la hotte fonctionne ne pas cuisiner avec une grande amme.
* Lorsque vous cuisinez des fritures, en prenant en compte le risque d’incendies éventuels dus à l’huile très chaud, surveiller régulièrement votre
plat.
* L’appareil n’est pas conforme pour l’utilisation des enfants ou des personnes adultes dont une surveillance est nécessaire.
* Si vous ne nettoyez pas votre appareil conformément aux instructions, il peut y avoir un risque d’incendie. Ne pas oubliez les nettoyages.
* Conformez-vous absolument à la distance entre le centre d’aspiration de l’air de la hotte et le point le plus haut de la cuisinière qui doit être de
65 cm.
* Ne pas raccorder au même endroit les appareils d’évacuation de la chaleur ou de la fumée au meme lieu avec la hotte.
* En cas de raccordement à la cheminée faites constater que la cheminée est ouverte, propre, ne propulse pas à l’inverse et sans problème.
* Si vous utilisez le produit avec un ltre carbone selon votre utilisation changer le ltre tous 3 -6 fois par mois.
Pour l’évacuation de l’air vers l’extérieure prenez en compte les lois locales.
Manuel d’instruction

FRANÇAIS
16
* Il est conseillé de faire fonctionner votre appareil avant de cuisiner. Pour éliminer les odeurs de plats, continuez à faire fonctionner votre appareil
15 minutes de plus après la n du travail.
* Le ltre à huile retient les particules d’huile dans l’air, selon la fréquence de votre utilisation le ltre peut être encombré. Pour éviter les risques
d’incendie, conformément aux instructions ci-dessous, nettoyez votre ltre au plus une fois tous les 2 mois.
* Enlevez le ltre de l’appareil et lavez avec de l’eau et un nettoyant naturel et ensuite débarrasser le ltre du nettoyant utilisé.
* Rincez avec de l’eau tiède et séchez-le.
* Si vous le désirez vous pouvez laver votre ltre dans la lave vaisselle (maximum 40°C).
* Le panel en aluminium va changer de couleur après quelques lavages. Ceci est une situation normale et ne pose pas de problème pour la
fonctionnalité.
* La fonction du ltre en carbone sert au nettoyage de l’air ambiant. Les ltres en carbone ne sont pas lavables, selon la fréquence d’utilisation il
faut les changer tous les 3 -6 mois avec de nouveaux.
* Les surfaces de l’appareil doivent être nettoyées avec un chiffon humide et un produit non abrasif. Ne pas nettoyer avec des produits tels que
l’eau de javel ou l’acide et des éponges dures. Pour l’entretien de l’inox vous pouvez utiliser les produits de Mekappa ou des marques similaires.
* Le système d’éclairage a été conçu pour une utilisation lors de la cuisson. Il ne doit pas être utilisé de façon prolongée pour un éclairage de la
pièce. Ceci peut endommager les équipent d’éclairage.
Dans tous nos produits sont utilisés des ltre casettes en aluminium multi couche pour retenir à l’entrée de l’appareil les particules d’huile
aspirées avec la vapeur des plats. Les ltres selon la série et le type du produit sont de tailles et de dimensions différentes. Le montage et de
démontage est très facile. Ils peuvent être lavés à la main avec du produit nettoyant naturel sans porter de pression ou coup mais ils sont aussi
lavables en machine. Selon la fréquence de l’utilisation, pour éviter les risques d’incendie et pour augmenter le rendement il faut les nettoyer une
fois tous les 2- 3 mois.
Pour une utilisation dans les cas spéciques de la non évacuation de l’air intérieur vers l’extérieure peuvent être utilisés les ltres de carbone
optionnel de type YKF A, B et C plus sensibles, aspirant l’huile et l’odeur selon le type et la série du système utilisé. Les ltres en carbone en
rapport avec la cheminé et le style de cuisson doivent être changé par de nouveaux ltres tous les 3-6 mois. Le type YKF C : le ltre en carbone
après l’avoir posé sur les onglets sur les deux cotés du corps du moteur plastique il faut le tourner de 90° degrés, quand vous entendez le « click
» le montage est terminé. Pour le démontage effectuer l’opération inverse. (gures E, H). Le type YKF – B ; doit monter devant la boite en métal
où se trouve l’ensemble moteur. Les onglets en dessous du ltre sont placés dans les trous sur la surface de la boite sur le mur ensuite les clips
de blocage au dessus du ltre sont poussés vers l’intérieure de la boite, le verrouillage et le montage est terminé (gure F). Pour votre ltre en
carbone, si le moteur se trouve dans une boite en métal est appliqué le type B et s’il n’est pas dans une boite en métal le type C est compatible.
Dans l’aspirateur encastré le ltre de carbone de type A est utilisé. En cas de besoin, les ltres YALF et YKF dans le cadre des photos à la partie
Technique 3 page 27 peuvent être proposés par le vendeur agrée, le service et par nous même.
Les différents types de commandes selon les types de modèle du produit sont expliqués ci-dessous. Le type de commande de votre produit
peut être déterminé par le système de codage du produit à l’article H.
Programmé en 5 cycles. Utilisation des moteurs T2004-1 et T2004.
Ouverture et fermeture du moteur. Le moteur au début commence au cycle 2. (moins)
permet de diminuer le cycle. En tenant appuyé sur le bouton les cycles diminuent. Cycle minimum 1.
Bouton d’augmentation du cycle. En tenant appuyé sur le bouton le cycle augmente. Cycle maximum est 5.
en cas de pression sur le bouton turbo compteur le moteur commence à fonctionner au cycle le plus élevé et
est programmé de façon à s’éteindre après 5 minutes. Quand le compteur est en fonction si vous appuyer sur le bouton CYCLE – ou
CYCLE + le moteur revient à son cycle d’avant mais le compteur (compteur) continu a fonctionner. Quand le compteur est en fonction le
Del du compteur s’allume. Au bout de 5 minute le moteur s’arrête. Il n’y aura pas de modication dans les lampes. Lorsque le compteur
est en route, s’il est appuyé sur le bouton compteur le moteur s’arrête.
permet d’allumer et d’éteindre la Lampe/Del. En cas de pression de 3 secondes le DEL peut être commandé.
Le DEL et la lampe peuvent fonctionner ensemble et séparément.
après que le moteur ait atteint 60 heures de fonctionnement sur l’écran est inscrit ‘C’ (Clean or Change) pendant
5 seconde pour signier qu’il faut changer ou nettoyer le ltre (selon le type de ltre). A chaque allumage du moteur l’avertissement ‘C’
sera afché pour un rappel à l’utilisateur. Pour la mise à zéro de la durée du ltre il faut appuyer sur la touche on/off jusqu’à que sur l’écran
apparaisse le lettre ‘E’ (erased) (environs 5s.) et la durée de 60 heures commence.
Manuel d’instruction
FRANÇAIS
17
Manuel d’instruction
Programmé en 5 cycles. Utilisation des moteurs T2004-1 et T2004.
Ouverture et fermeture du moteur. Le moteur au début commence au cycle 2.
permet de diminuer le cycle. En tenant appuyé sur le bouton les cycles diminuent. Cycle minimum 1.
Bouton d’augmentation du cycle. En tenant appuyé sur le bouton le cycle augmente. Cycle maximum est 5.
en cas de pression sur le bouton compteur lorsque le moteur fonctionne le nombre de cycle commence à clignoter sur
l’écran. Après 15 minutes de clignotement le moteur et si est allumé la lampe s’éteignent.
S’il est appuyé une nouvelle fois sur le bouton compteur le clignotement s’arrêt et le compteur est annulé. Avec les touches -/+ la durée du
temps de 15 minutes est changée.
permet d’allumer et d’éteindre la Lampe.
lorsque le moteur fonctionne au cycle 5 en cas pression sur le bouton +> (plus) le ‘t’, apparait sur l’écran et le moteur fonctionne pendant
5 minutes à la puissance maximale. A la n des 5 minute le moteur revient au cycle 2.
Après que le moteur ait atteint 60 heures de fonctionnement sur l’écran est inscrit ‘C’ (Clean or Change) pendant 5
seconde pour signier qu’il faut changer ou nettoyer le ltre (selon le type de ltre). A chaque allumage du moteur l’avertissement ‘C’ sera afché
pour un rappel à l’utilisateur. Pour la mise à zéro de la durée du ltre il faut appuyer sur la touche on/off jusqu’à que sur l’écran apparaisse le lettre
‘E’ (erased) (environs 5s.) et la durée de 60 heures commence.
indépendamment du fonctionnement du moteur en cas de pression sur cette touche sur cet écran la valeur de
début de l’alarme compteur de 5 minute est indiqué et l’icône cloche clignotera 5 fois. L’icône cloche est visible sur l’écran pendant toute la durée
du compteur. A la n du compteur la sonnerie sonne pendant 20 secondes et l’icône cloche clignote. Quand la sonnerie fonctionne il est possible
de l’arrêter en appuyant sur le bouton compteur.
lors du clignotement il est possible d’augmenter le compteur entre 1 minute à 9 heures 59 minutes en
appuyant sur les boutons PLUS ou MOINS. En cas d’appuie prolongé sur le bouton PLUS ou MOINS la valeur du compteur augmente plus vite
ou diminue plus vite. Quand le compteur est réglé si on appuie sur le bouton compteur la valeur du compteur à cet instant est indiquée. Pour
l’annulation du compteur le bouton compteur est appuyé et en appuyant sur le bouton MOINS il peut être diminué jusqu’à zéro.
Lorsque qu’on appuie sur les touches du compteur d’arrêt, de l’alarme et de la lampe pendant
4 secondes, le mode de règlement de couleur RGB est actionné. L’écran arrive au pourcentage Red (couleur rouge). S’il est appuyé sur le bouton
arrêt du compteur la couleur rouge, sur le bouton de l’alarme la couleur verte et sur le bouton de la lampe la couleur bleu est montré. En appuyant
sur les boutons MOINS et Plus la couleur peut être réglée entre 100% et 0%. Aux 3 touches en appuyant 4 secondes le réglage est enregistré.
Pour sortir sans enregistrer le réglage appuyer sur le bouton on/off.
en cas d’appuie simultané sur les boutons MOINS et PLUS le mode de réglage de l’heure est activé. Lors du réglage de
l’heure, l’icône triangle clignote sur l’écran au milieu de l’heure. Avec les boutons PLUS et MOINS l’heure est réglée. En cas d’appuie sur un autre
bouton que le bouton PLUS et MOINS le mode de réglage de l’heure est abandonné.
Programmé en 9 cycles. Utilisation des moteurs T2004-1 et T2004.
la touche de la lampe met en fonction l’éclairage de l’aspirateur. Quand la lampe est allumée le DEL s’allume.
permet de diminuer le cycle lorsque le moteur fonctionne. Quand il arrive au cycle le plus bas le DEL clignote.
permet de faire fonctionner le moteur à l’arrêt et d’arrêter le moteur en fonction. Le moteur commence à fonctionner au cycle de
la dernière fermeture.
permet d’augmenter le cycle lors du fonctionnement du moteur. Avec le bouton + quand le cycle arrive au plus au niveau le
DEL+ clignote.
en cas de pression sur le bouton turbo compteur le moteur commence à fonctionner au cycle le plus élevé et est
programmé de façon à s’éteindre après 5 minutes. Quand le compteur est en fonction si vous appuyez sur le bouton CYCLE – ou CYCLE + le
moteur revient à son cycle d’avant mais le compteur continu. Quand le compteur est en fonction le Del du compteur s’allume. Au bout de 5 minute
le moteur s’arrête. Il n’y aura pas de modication dans les lampes.
Après que le moteur ait atteint 60 heures de fonctionnement.
Quand la durée du ltre est complète quand le moteur est allumé avec le bouton M.on/off ou le bouton de compteur turbo, le bouton on/off
clignote Après le nettoyage du ltre, vous pouvez amener à zéro la durée du ltre en appuyant sur le bouton M.on/off (environs 3 seconde).
Quand la durée est mise à zéro le Del de M.on/off s’allume et s’éteint une fois.
FRANÇAIS
18
Manuel d’instruction
Placé an bas des hotte de la série Country, n’est pas affecté par l’humidité et la
chaleur, bande en bois de 1ère qualité. Quand vous achetez votre produit, la bande
est sans peinture et elle est brute. Pour qu’elle soit en harmonie avec votre cuisine
vous pouvez la peindre avec la couleur de votre choix. La bande peinte est placé
dans l’emplacement prévue pour la bande puis elle est poussée et avec les vices
elle est montée.
En 2 cycles utilisés mécaniquement dans les moteur GR114.
Bouton d’éclairage (0 fermée, I ouvert)
Bouton de cycle (0 fermé, I cycle minimum, II cycle maximum)
si la tôle en forme de glissière n’est pas retiré le moteur et l’éclairage ne fonctionnera pas.
* L »appareil ne fonctionne pas : en premier vérier si le courant est branché ou non. Pour les aspirateurs avec glissière vériez si la glissière est
tirée ou non. Si l’appareil sous courant ne fonctionne pas le personnel du service compétent vous viendra en aide.
Appelez le service, n’essayez pas de faire intervenir une personne hors du service dans le cas inverse l’appareil ne sera plus sous garantie.
* L’appareil ne respire pas sufsamment : si vous utilisez un ltre carbone le temps de le changer est peut être arrivé, changer le avec un nouveau
ltre. Si ce n’est pas un ltre en carbone il faut nettoyer les ltres en aluminium.
* Pas d’éclairage : Les ampoules peuvent être dévissées. Si elles sont dévissées revisser les. Si elles sont grillées changer les. La puissance
maximum est indiquée dans le produit.
Série d’appareil CL : Line (décoratif) CK: Classique CC : Rustique CS : Ile CLA: Couvercle ouvrable CA: Aspirateur
Type B Carbone ltre Type C Carbone ltre Type C Carbone ltre Type B Carbone ltre Type C Carbone ltre Type C Carbone ltre
No de modèle de
l’appareil Tous les types de hotte ont un numéro de modèle différent.
60 Dimension de
l’appareil Sont les mesures de la largeur de la hotte. ces mesures sont 50, 60, 70, 85, 90, 120 cm.
XCouleur de l’appareil X: Inox XF: Inox fumée B: Blanc S: Noir SG: Noir Gold BG: Blanc Gold J: Beige K: Café
Type de moteur de
l’appareil 4: T2004 Moteur (600m3 puissance ce traction) Flux:1,5A Puissance: 180W - 1: T2001 Moteur (1000m3 puissance de traction)
Flux :1,8 A Puissance :340W - GR114 Moteur (500m3 puissance de traction) ux :1,5A Puissance:240W
Eclairage halogène Si lettre H la hotte a une éclairage en halogène (2x20Wat). Si cette case est vide éclairage classique
(2x40Wat).
Commande appareil
Type
Montre l’ensemble des touche de la commande de la hotte.
PB: Push Buton TC: tactile HM: Multi couleur SA: A glissière LCD: écran LCD (regarder pages 3,4,5)
commande
à distance montre que la hotte peut être contrôlé par une commande à distance.
Est utilisé sur tous type de moteur comme 3 cycles.
permet d’allumer et d’éteindre la lampe.
en appuyant les boutons 1-2-3 le cycle peut être réglé.
le moteur est arreté avec l’appuie sur le bouton 0
En trois cycles utilisés de façon mécanique pour les moteurs T2004.
avec la glissière le cycle est réglé en amenant sur 1-2-3.
permet d’allumer et d’éteindre la lampe
This manual suits for next models
1
Table of contents
Languages:
Popular Ventilation Hood manuals by other brands

Blomberg
Blomberg DKP 2020 instruction manual

KOBE
KOBE BRILLIA SERIES INX-026OVS-INX2630SQB-600-40 Installation instructions and operation manual

Guzzanti
Guzzanti GZ-600 manual

IKEA
IKEA FOLJANDE 10392192 manual

SCHOLTES
SCHOLTES SOHT1910X Instruction manual/safety instructions

Frigidaire
Frigidaire FHWC3055LS Use & care guide


