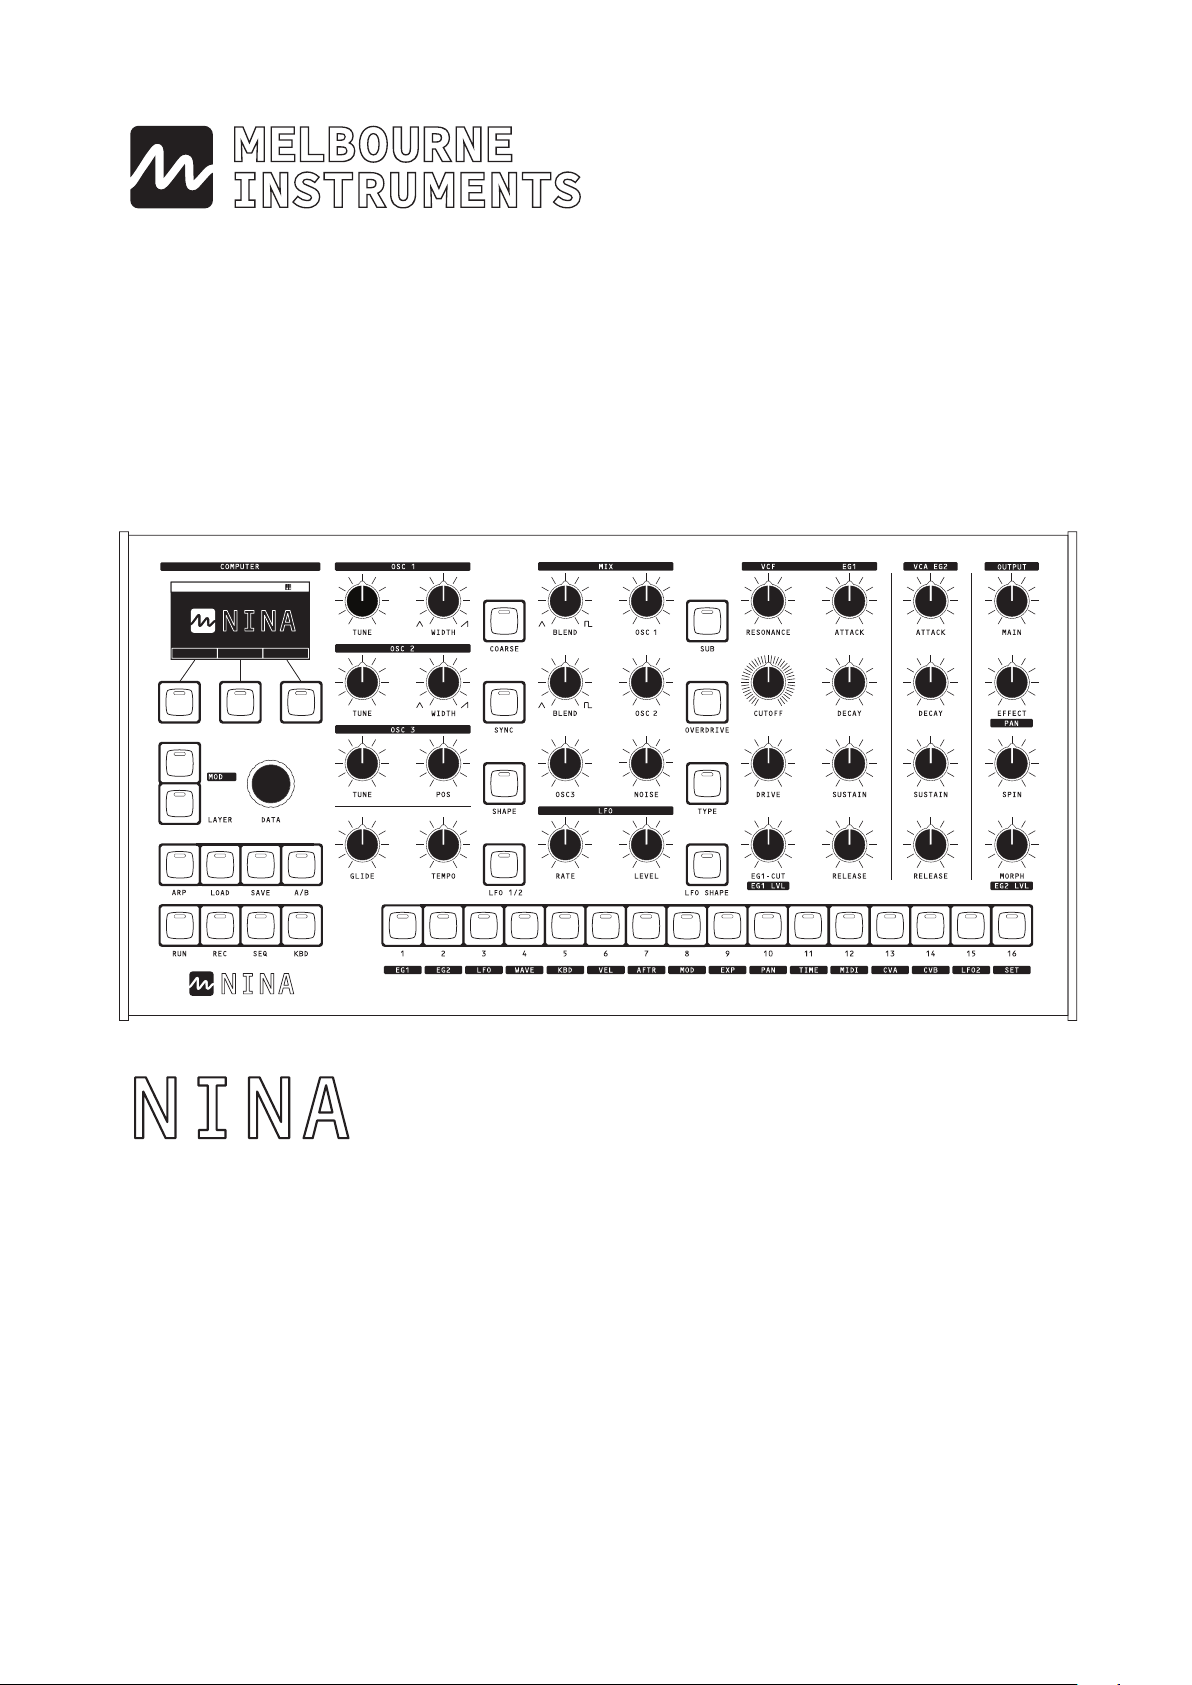
Melbourne NINA User manual

User Manual
12 Voice Analog Polyphonic Synthesizer
BOOGIE BASS*L1090
SYSTEM- - -
- - -

1
MELBOURNE INSTRUMENTS – NINA V1.1
Contents
Introduction ........................................3
Safety & Compliance Statements ................. 3
Overview ...........................................4
Voice Architecture ..................................4
Unit Overview ......................................6
Main Control Panel . . . . . . . . . . . . . . . . . . . . . . . . . . . . . . 6
NINA Keys ........................................8
NINA Knobs ......................................9
Rear Panel & Connections ......................10
Display Layout ................................... 12
Basic User Interface Principles..................... 12
Presets ............................................ 14
Loading Presets ................................. 14
Initialize Preset .................................. 14
Banks ........................................... 14
Rename ......................................... 14
Saving Presets ................................... 15
Import & Export Presets .......................... 15
Morphing and A/B Compare ....................... 15
Dance Mode..................................... 16
DJ Mode ........................................ 16
Store to A/B ......................................17
Load a Preset into B ..............................17
Patch Design .......................................17
Nina Voice Block Diagram .........................5
Analog VCOs .....................................17
Digital Oscillator ................................. 18
Noise and Other Sources .......................... 19
XOR ............................................. 19
White............................................ 19
Pink ............................................. 19
Aux In ........................................... 19
Input Select ....................................... 19
Ex Input Gain .................................... 19
Voice Mix ..........................................20
Drive & Overdrive..................................20
Filter / VCF........................................20
Filter Envelope EG1 ................................ 21
EG1-CUT ........................................ 21
VCA EG2 ........................................22
Glide / Portamento ................................22
Stereo Innite Panning.............................23
The Panner ......................................23
MOD Matrix Pan .................................23
Unison ..........................................24
Spin .............................................24
Modulation ........................................25
LFOs ............................................25
EG1-CUT ........................................26
MOD mode ......................................27
Modulation Sources..............................28
Modulation Destinations..........................29
Layers / Multi-timbral Operation...................30
Eects with Multi-Timbral.........................30
Arpeggiator with Multi-Timbral .................... 31
Multi-Timbral Conguration....................... 31
Reset............................................ 31
Current Layer .................................... 31
Layer Voices ..................................... 31
Output Routing ..................................32
Low Note / High Note ............................32
MIDI Channel ....................................32
CV A and CV B Source ...........................32
Volume ..........................................32
Patch/Preset Global Settings ......................32
Poly Mode.......................................32
Unison Voices and Unison Detune ................33
Panner Voices and Panner Mode .................33
Pitch Bend Range................................33
Time Mod Rate. . . . . . . . . . . . . . . . . . . . . . . . . . . . . . . . . . . 33
Melbourne Instruments Pty. Ltd.
331 Johnston St,
Abbotsford VIC 3067
Australia

2MELBOURNE INSTRUMENTS – NINA V1.1 3
MELBOURNE INSTRUMENTS – NINA V1.1
Loading and Saving Layer Setups ..................33
Load ............................................33
Save ............................................33
Arpeggiator .......................................36
Basic Operation..................................36
Dir Mode ........................................36
Hold.............................................36
Note Value.......................................36
External Sync ....................................36
Sequencer.........................................37
Recording a Sequence ...........................37
Playing a Sequence..............................37
Eects.............................................37
Chorus ..........................................38
Reverb ..........................................38
Delay............................................38
System Functions..................................39
Global Settings ..................................39
MIDI Clock In ....................................39
MIDI Echo Filter ..................................39
CV Oset Gain and Mode ........................39
Backup ..........................................39
Restore..........................................39
Bank/Patch Management.........................40
Import Bank .....................................40
Export Bank. . . . . . . . . . . . . . . . . . . . . . . . . . . . . . . . . . . . . . 41
Add bank ........................................ 41
Clear Bank.......................................42
Wavetable Management ..........................42
Import & Export ..................................42
Delete ...........................................42
About .............................................42
Firmware Upgrades ................................42
USB Flash Drive Removal .........................42
Appendix A: MIDI ..................................43
Appendix B: Wavetables ............................44
Appendix C: Technical Specications ...............45
Appendix D: Troubleshooting & Support ............46
Warranty ..........................................46
Introduction
Welcome to NINA, the rst synthesizer from Melbourne
Instruments.
Nina is a modernised version of the classic analog
synthesizer. It is our 12 Voice agship, featuring a fully
motorized control panel, virtually unrestricted and unlimited
modulation matrix, multi-timbral operation and a modern
computer architecture built on an open-source platform.
We are particularly pleased with the Morph function, the
way Nina’s motorised control panel makes it easy to set
up the Mod matrix, the quality of the digital eects, and
the haptics that give dynamic tactile feedback which is
useful and fun.
Nina’s patent pending motorized knobs are a world
rst in synthesizers. They have been custom designed
from a 3 phase brushless drone motor design. They
are an extremely robust, high reliability design that will
practically never wear out. The position sensing is done
using a contactless optical system with extremely high
resolution and ultra-low noise.
The circuits are custom designed and do not use resistor
trimpots (which can go out of calibration). Tuning is
maintained by measuring the temperature characteristics
of the transistors in a factory calibration step, and then
high precision FPGA monitoring of the circuits to track
their operating point with temperature while the unit is
running.
This manual is a guide that assumes you already have a
good understanding of how these kinds of classic analog
and wavetable synthesizers are used to create sounds.
It will explain all the newer features of Nina that build on
this foundation.
Safety & Compliance
Tested to comply with FCC Standards
FOR HOME OR OFFICE USE.
This device complies with Part 15 of the FCC Rules.
Operation is subject to the following tow conditions:
(1) This device may not cause harmful interference and
(2) this device must accept any interference received,
including interference that may cause undesired
operation.
For technical support email:
support@melboureinstruments.com

4MELBOURNE INSTRUMENTS – NINA V1.1 5
MELBOURNE INSTRUMENTS – NINA V1.1
Overview
Motorized Control Panel
Nina’s unique motorized control panel dierentiates it
from all other synthesizers. This new technology allows
all the control surface knobs to automatically move to
where they are supposed to be. During Patch editing,
they show how the oscillators, VCF, VCA etc are set.
In Modulation Mode, they show you how much each
MOD destination is assigned. In multi-timbral, they jump
between the dierent presets as you change the current
layer, and in MORPH mode the entire control panel
updates on the y, according to the Morph amount.
This User Manual will explain all these dierent modes of
operation.
An important aspect of the knobs is that they are
very high resolution. They are as higher resolution
than traditional potentiometers, and are based on
a contactless optical analog position sensor. The
resolution of the sensor is extremely high, around
15000 steps. This resolution is what actually controls
the audio circuitry and what is stored in the Preset. The
LCD display will show a rounded down version of this eg
0 to 100 in steps of 1, but that does not mean that the
position is only dened by 100 steps.
The DATA Knob is used to interact with the LCD screen,
and the 3 Keys under the LCD are soft-keys, with their
functions labelled on the LCD. The remainder of the
knobs have dedicated functions printed under them. The
main output volume is the only standard potentiometer
in the unit.
Nina’s red keys each have an LED to indicate status.
These are summarized in the table on page 8.
Voice Architecture
The main stereo output analog signal is sampled by an
internal 96kHz, 24bit ADC, and passed through stereo
digital eects which are mixed back into the main analog
outputs. The 2 Aux outputs are always sent out without
eects.
See Block Diagram on page 5 for more information.

6MELBOURNE INSTRUMENTS – NINA V1.1
Main Control Panel
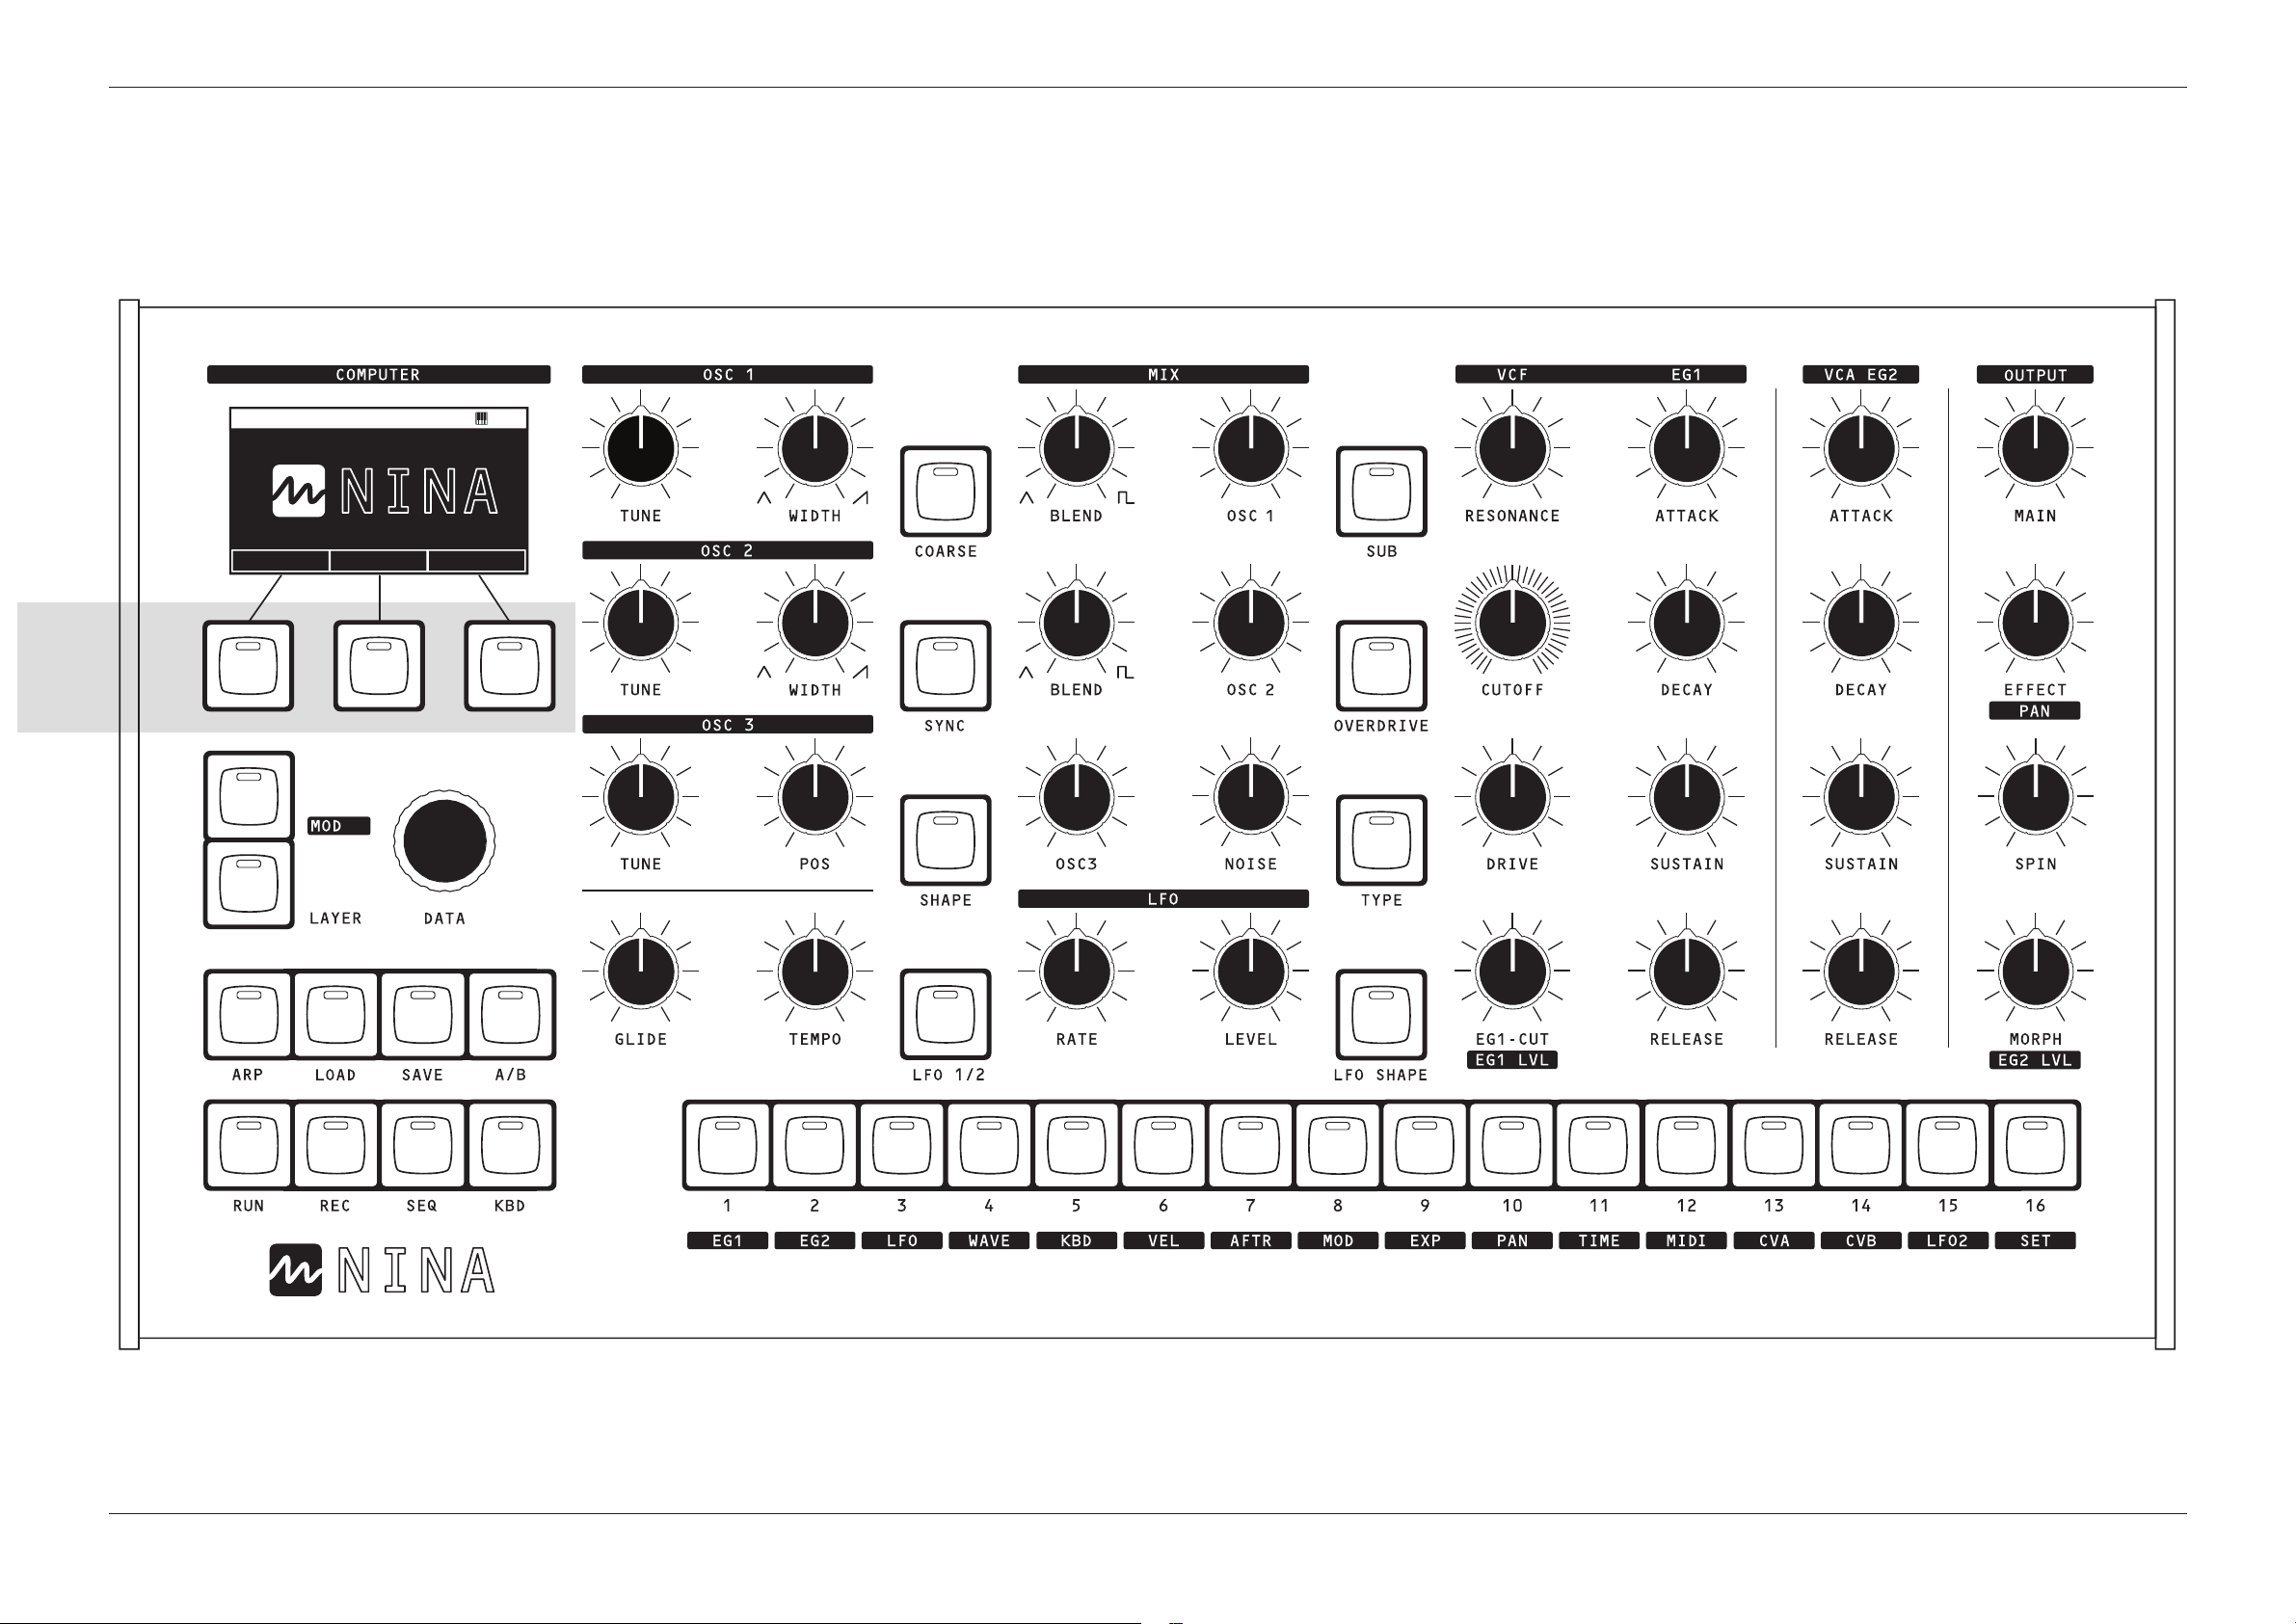
See Pages 8-13 for detailed descriptions and basic operations.
Refer also to the Getting Started Guide included with NINA.
BOOGIE BASS*L1090
SYSTEM- - -
- - -
SOFT
KEYS
1-3

8MELBOURNE INSTRUMENTS – NINA V1.1 9
MELBOURNE INSTRUMENTS – NINA V1.1
KEY LED STATUS FUNCTION
SOFT KEY 1 ON = key pressed EXIT / BACK / BANK
SOFT KEY 2 ON = mode active EDIT / RENAME
SOFT KEY 3 ON = key pressed SYSTEM / ENTER / SAVE / LOAD / RESET / STORE TO / OK
MOD Blinking = MOD mode active Enter modulation mode
LAYER ON = Layer Menu active Multi-timbral setup and global Preset parameters.
ARP ON = Arpeggiator ON Short Press: turn the Arpeggiator on or o, and display Arp settings.
Long Press: display Arp settings without turning the Arpeggiator on or o.
LOAD ON = Load Menu active Load a Preset onto the current Patch, on the active Layer.
If in LAYER menu, load a Layer setup.
SAVE ON = Save Menu active Save the Patch on the current Layer to a Preset.
If in LAYER menu, save a Layer setup.
A/B OFF = A
ON = B
Switch between the A and B sound of a Preset.
RUN ON = Sequencer running Run the sequencer.
SEQ ON = Sequencer menu active Set up the sequencer
REC ON = Recording sequence Record a sequence
KBD ON = Keyboard On,
display KBD Menu.
Keys 1-16 ON = sharp/at key
Turn Keys 1 to 16 into a built-in keyboard
COARSE ON = Coarse Tune
OFF= Fine Tune
Switch between FINE and COARSE for OSC 1,
OSC 2 & OSC 3 Tune Knobs
SYNC ON = Sync ON
OFF = no sync
Hard Sync VCO 2 to VCO 1
SHAPE ON = Wavetable selection
list active
Select wavetable for OSC 3
LFO 1/2 OFF = LFO 1
ON = LFO 2
Switch LFO RATE, LEVEL, SHAPE controls and LCD menu between LFO
1 and LFO 2
SUB ON = SUB Osc
OFF = Normal Pulse
Switch VCO 1 pulse to sub-octave square
OVERDRIVE ON = Overdrive
OFF = Standard drive
Large boost for very overdriven VCF sound
TYPE (NOISE) ON = display Type menu Select White/Pink/Analog XOR or AUX In for the NOISE source
LFO SHAPE ON = display LFO Shape menu Select LFO waveform
KEYS 1-16 ON = Item in list / preset
ON = Active step
ON = Active step
ON = Sharps/ Flats
ON = Active MOD Source
LOAD operation: Short-cut to rst 16 Presets or Banks in the list.
SEQ operation: Sequencer position, rests or ties
RUN sequencer: Sequencer step display
KBD Operation: Indicates Sharps/Flats
MOD Mode: Active Modulation Source
NINA Keys NINA Knobs
SECTION LABEL FUNCTION
OSC 1 TUNE Fine tune +/- 7 semitones (1/5).
Coarse Tune +/- 2 octaves.
WIDTH Shape shift from Triangle to Saw.
OSC 2 TUNE FINE & COARSE Tune for Analog VCO 2.
WIDTH Shape shift from Triangle to Saw.
OSC 3 TUNE FINE & COARSE TUNE for Digital OSC 3.
POS Wavetable position for Digital OSC 3.
GLIDE Glissando/Portamento — causes smooth
changes in pitch between notes.
TEMPO Sets the playback speed of arpeggio or sequence.
MIX (OSC 1) BLEND Blend between Pulse and Saw.
OSC 1 Level of OSC 1 into mix.
MIX (OSC 2) BLEND Blend between Pulse and Saw.
OSC 2 Level of OSC 2 into mix.
MIX (OSC 3) OSC 3 Level of OSC 3 into mix.
NOISE Level of Noise/XOR source into mix.
LFO RATE LFO rate control.
LEVEL Set the LFO Level (Gain).
VCF RESONANCE Set the VCF Resonance.
CUTOFF Set VCF Cuto Frequency.
DRIVE Amount of overdrive for smooth distortion control.
EG1 CUT How much the VCF Envelope (EG1) aects VCF Cuto.
MOD Mode - EG1 Level as Destination.
EG1 AT TAC K Set Attack amount for EG1
DECAY Set Decay amount for EG1
SUSTAIN Set Sustain amount for EG1
RELEASE Set Release amount for EG1
EG2 AT TA CK Set Attack amount for EG2
DECAY Set Decay amount for EG2
SUSTAIN Set Sustain amount for EG2
RELEASE Set Release amount for EG2
OUTPUT MAIN Main/Master level control.
EFFECT / MOD PAN Level of Eects mix in output. Choose type and parameters.
MOD Mode - PAN as Destination.
SPIN Speed control of Stereo Innite Panning Spin.
MORPH / MOD EG2 LVL MORPH all patch parameters between A and B sounds.
MOD Mode - EG2 LVL as Destination.
COMPUTER DATA LCD Navigation / General control access

10 MELBOURNE INSTRUMENTS – NINA V1.1 11
MELBOURNE INSTRUMENTS – NINA V1.1
Rear Panel & Connections
1. PHONES:
1/4” Headphone jack.
2. OUTPUTS:
Main Audio Left & Right: Line Out.
For best results use a TRS Balanced cable.
3. AUX AUDIO LEFT & RIGHT:
Auxiliary Audio Out. No eects and xed level.
4. INPUTS:
Inputs 1/2/3: Line level Audio or CV.
5. INPUT 4:
Line or Mic Level Audio or CV.
6. MIDI:
Standard DIN MIDI.
7. DAW (USB HOST):
USB-C connection for Mac/PC.
NINA appears as a MIDI device.
8. USB DEVICES:
USB MIDI Keyboards and controllers,
USB thumb drives.
9. POWER INPUT:
Use supplied power accessories only.
12V 8A.
10. POWER SWITCH:
On/O.
1 3 2 5 4 6 7 8 9 10

MELBOURNE INSTRUMENTS – NINA V1.1 13MELBOURNE INSTRUMENTS – NINA V0.9
LCD Display Context Switching
A key design goal of Nina’s Display was “no menu diving”
as much as possible. One key solution to this is that the
display automatically switches to display the parameters
of one section, when any knobs or keys in that section
are moved.
For example, if you want to set up the Eects, a very
small movement of the Eects Knob will pop up all the
settings to congure the Eects. You can then use
the DATA Knob and the Soft-keys to adjust the eects
settings:
As another example, adjusting any of the controls for
OSC 1 will bring up all the settings for OSC 1 on the
display:
When this list is displayed the DATA Knob and Soft-keys
can be used to move around the list and see a numerical
value. EDIT will let you change the setting or amount
with the data knob. Note that a value change with the
Data Knob will not be as high resolution as using the
dedicated Knob for that setting, eg OSC 1 Level Knob
has true hires control, whereas the DATA Knob will just
set 0 to 100 in steps of 1.
The EDIT soft-key has 2 modes of operation -
LATCHED: If you press EDIT momentarily, it will latch the
data knob will adjust the current value up or down, until
you press EDIT again.
QUICK EDIT: Press and hold down the EDIT soft-key
while you turn the data knob to adjust the value without
latching or needing to press EDIT a second time to exit .
Display Layout
LOAD PRESETS Screen
MODULATION Screen example
Title Bar
MOD Source
Patch/Bank Number and Name
Active Layer
Active Layer
MIDI Signal Tempo
Tempo
Soft Keys 1-3
Soft Keys 1-3 Amount / Level
List of Presets or
other settings
List of active
MOD Destinations
12

14 MELBOURNE INSTRUMENTS – NINA V1.1 15
MELBOURNE INSTRUMENTS – NINA V1.1
Presets
Sounds that are saved on Nina are called Presets in this
Guide. The current live sound that you are working on is
called the Patch.
Nina’s Presets are stored in Banks. Each Bank contains
127 Presets and there are 32 Banks. New Banks can be
created, up to 127. New Banks can be added and cleared,
and Banks can be imported and exported via USB Flash
drives, see Bank/Patch Management on page 40 under
the System menu.
The Preset data includes the Patches (A and B),
Arpeggiator, Sequencer Data and Eects setup.
Note that there are some global Preset parameters which
are accessed via the LAYER menu, see page 31.
Loading Presets
Press the LOAD Key to show the list of Presets in the
current Bank. The display will show the current bank
in the title bar (01 FAVORITES) and the list of Presets,
starting with the last Preset loaded.
Pressing KEYS 1-16 will quickly load the Preset at that
number position on the list. If you want to go further
down the list than 16, use the DATA W HEEL and the
LOAD soft-key to load the Preset.
When a Preset loads, the display will remain on the LOAD
screen and the LOAD Key LED will stay ON. To exit the
Load screen, press the LOAD Key. You can adjust the
Patch using the Knobs and Keys while still in the LOAD
screen, but the LCD screen will not show the usual Patch
editing information.
Note: the above description is the normal LOAD
behaviour, when the A/B Key is on A (LED O). For a
description of how B sound loading is done, see the
section Load a Preset into B on page 178.
Initialize Preset
To initialize a Preset to a very simple state simply choose
the INIT PATCH Preset.
Once initialised, The Mod matrix has everything o
except vital minimum mappings. The lter is open and
envelopes are very simple. OSC1 is the only audible
oscillator and it is a sawtooth at max volume.
Banks
The BANK soft-key allows you to access Presets from
another Bank. Pressing BANK will display the list of
available Banks:
Press ENTER to open the selected bank and show the
Presets in that bank. If you press EXIT, you will exit Load
mode and the display will return to the Home screen.
Rename
The RENAME soft-key allows you to rename Preset or
Bank Names shown in the list.
Use the Data Wheel to scroll the cursor left or right.
Press and hold EDIT while you adjust the data knob
to change the letter or number at the current cursor
position. Note that all the letters to the right of the
cursor are greyed out. The greyed out letters will be
trimmed o the name when you press ENTER. If you want
to retain all character in current name, move the cursor
to the end before you press ENTER.
Press BACK to cancel the rename operation and return
to the Bank or Preset list.
Saving Presets
Saving Presets is very similar to loading.
Press the SAVE key to show the list of Presets in the
current Bank.
The list will always start from where you last loaded. If
you simply wish to overwrite the Preset, press SAVE.
Otherwise scroll down to a dierent location, or use
BANK soft-key to navigate to a dierent Bank and Preset
location.
When you press SAVE, you will be prompted to change
or update the name:
Use the DATA knob to select the letters and EDIT to
change them.
If you press SAVE again, Nina will briey inform you that
the Preset has been saved. If you changed the name,
the new name will be saved to the Preset and displayed
on the Title Bar. The LCD will then return to the home
screen, and SAVE mode will be exited.
If you press BACK, you can either navigate to a dierent
Preset location, or EXIT to the home screen. You can
also exit the SAVE mode without committing changes by
pressing SAVE key.
Import & Export Presets
Banks of Presets can be imported and exported from
Nina to .zip les stored on a USB ash drive. See section
Bank/Patch Management on page 40, under System
Functions.
Morphing and A/B Compare
All Presets have the ability to store 2 sounds, referred to
here as the A sound and the B sound. The main use for
these 2 sounds are for comparing an original sound with
a modied version you are working on (A/B compare),
or for exploring new sounds that are a morph between
these A and B sounds.
The A/B key switches between the sounds. If the A/B
Key LED is OFF, you are editing the A sound; if the LED
is ON, you are editing the B sound. If you wish to quickly
try this, press the A/B key, and see how the knobs will
jump between the 2 sounds (assuming A & B sounds are
already set).
Morph is a great way to explore new sounds for Preset
creation. It can also be used dynamically in playing live
music or creating interactive cinematic sound-scapes
as you play. The Morph position can also be automated
using a DAW.
As you press the A/B Key, you will notice that the Morph
Knob jumps between fully-left and fully-right. When you
turn the Morph knob, the sound will morph between the
A and B sounds according to the position of the Knob.
B is active
when key is
illuminated
16 MELBOURNE INSTRUMENTS – NINA V1.1 17
MELBOURNE INSTRUMENTS – NINA V1.1
Store to A/B
At any point you can save the morphed sound to the A
or B Patch by pressing the STORE TO A or STORE TO B
soft-key (determined by A/B key).
Note: Always take notice of the state of the A/B Key
before you start to Morph, because that is where you
will be able to save it.
Below: STORE TO B soft-key shown because A/B is on.
Load a Preset into B
A great way to explore new sounds is to load 2
completely dierent sounding Presets into the A and B
sounds, and morph between them.
You can load a Preset into the B sound using the A/B
Key in combination with LOAD.
To be specic: you can load the “A” sound from another
Preset into the current Patch B sound.
A normal Preset LOAD, as described in the section on
Loading Presets on page 14, is one where the A/B Key is
on A (LED o). In a normal load, the full Preset with both
A and B sounds will be loaded.
However, if the A/B Key is on B (LED on) when you load,
then the Preset you selected will just load into the B
sound. The A sound and the rest of the current Patch will
remain unchanged.
When the A/B Key is on B, the soft-key for loading
changes to LOAD B.
Patch Design
Analog VCOs
Nina has 2 Analog VCOs, OSC1 and OSC2. These
are discrete-transistor VCOs which generate a
Sawtooth/Triangle shape and a Pulse Shape.
The control of Nina’s sawtooth to triangle wave shape
has a unique feature —
Most existing synthesizers do a crossfade between
triangle and sawtooth when you adjust the shape control.
Nina’s oscillators do a smooth shape transition between
triangle and saw, which follows the pulse width. This is
creates a unique set of timbres between the two shapes.
The following diagram shows a picture of how the Width
Knob changes the shape of the Saw/Triangle and Pulse
waveforms:
Tip: Modulate the Width with an LFO to create
interesting phaser-like bass sounds.
The morph is not a crossfade between the 2 sounds,
it is a creating entirely new timbres between them. The
morphed sound is made by smoothly interpolating
every parameter between the settings in the 2 patches,
including the entire Modulation Matrix.
Some settings cannot be morphed in the same way,
so work a bit dierently.
Setting Morph Operation
OSC 3 Crossfades between the sound of
OSC3 on A and B
COARSE Tune Steps between the octaves on A
and B in even steps divided over the
Morph Range
SUB Oscillator
Enable
Steps between the A sound and B
sound setting at the 50% Morph
position
SYNC Enable Steps between the A sound and B
sound setting at the 50% Morph
position
NOISE Type Steps between the A sound and B
sound setting at the 50% Morph
position
OVERDRIVE Setting is always the same on A and
B. Does not morph.
EFFECTs Setting is always the same on A and
B. Does not morph.
TEMPO, ARP,
SEQUENCER
Setting is always the same on A and
B. Does not morph.
Operating the Morph control will bring up the Morph
menu on the LCD.
Below: STORE TO A soft-key shown because A/B is o.
The Mode setting allows you to select Dance or DJ
mode.
Dance Mode
In Dance mode, the knobs will all move to show their
positions in the Morph, and you can edit that Morphed
sound as you go.
As you morph between the two, you can also move any
of the front panel knobs to lock in that parameter. For
example, if you are morphed ¼ of the way from A to B,
and you adjust the Resonance Knob, then when you
move the morph knob again, the Resonance Knob will;
not move anymore.
DJ Mode
In DJ mode, the Morph knob will morph between the
sounds, and you will hear the morphed sound, but the
knobs will not move. The controls will either be editing
the A or B sound, depending on the A/B Key.
Tip: DJ Mode works well if you are automating the
Morph control from a DAW and want to use the patch
editing knobs at the same time.
In Dance mode, you edit the Morphed sound if you
adjust with the knobs, but in DJ mode you edit the
original A and B sounds when you adjust the knobs.

18 MELBOURNE INSTRUMENTS – NINA V1.1 19
MELBOURNE INSTRUMENTS – NINA V1.1
Noise and Other Sources
In addition to the 3 Oscillators, sounds sources labelled
as NOISE can be mixed into each voice.
The TYPE Key displays a list of the sound sources that
can be used:
XOR
This source is an analog signal which is a ring modulation
of the Pulse outputs of VCO1 and VCO2. This ring
modulation is created by a discrete transistor XOR gate.
This kind of sound has a very particular and unusual
timbre.
White
This source is digitally generated white noise. This is full
audio bandwidth bright noise.
Pink
This source is digitally generated pink noise. Pink noise
has less high frequency energy, so sounds darker and
less harsh than white noise.
Aux In
Selecting this source allows the Analog Inputs (line level
or MIC) to be inserted into the front end of the voice.
This lets you mix in external sources to each voice and
pass through the overdrive, VCF, VCA and eects.
Operating the NOISE Knob brings up the Noise settings
menu, which has some further options.
Input Select
This option chooses which analog inputs are routed into
the Aux In:
Setting Description
1, 2, 3 or 4 This selects Analog Input 1 , 2, 3 or 4
as a mono source
Stereo 1-2 This selects Analog Inputs 1 & 2 as a
stereo pair (Left & Right respectively)
into pairs of voices.
In order to get the voices to work as
a stereo pair, set Unison Voices (see
page 33) to a multiple of 2. To get a
stereo spread, set Panner Number to
2, and mode to Spread or Ping-Pong
(see page 33).
Stereo 3-4 Works the same way as Stereo 1-2,
but uses inputs 3 & 4 as Left & Right
respectively.
Stereo Out 1-2 This routes Nina’s Channel 1 & 2
outputs back to the voices in a stereo
pair to create a feedback loop.
Ex Input Gain
Adjusts the gain on the analog inputs.
The Blend control is a crossfade between the
Saw/Triangle output and Pulse output of each VCO.
The SUB key makes OSC 1’s pulse output drop 1 octave
and become a square wave.
The SYNC Key makes OSC 2 hard sync to OSC 1. This
means the every time OSC 1 restarts its waveform it
forces OSC 2 to restart.
The TUNE Knob is used for either ne or coarse tune
adjustment, as determined by the state of the COARSE
Key. If the Coarse Key LED is o, the TUNE Knob is a ne
tune control in cents (1/100 of a semitone), with a range
of +/-7 semitones (700 cents) ie a perfect fth.
If the COARSE Key LED is on, the TUNE Knob is an
octave transpose 5 position switch with a range of +/- 2
octaves.
Digital Oscillator
OSC 3 is a Digital Wavetable Oscillator.
Nina’s included factory wavetables cover a range
of styles, from retro 80s style to modern high
resolution interpolated waveforms. Wavetables can
be imported and exported, and formats from popular
software synthesizers are supported. See Wavetable
Management for more details.
The TUNE Knob performs the same coarse and ne tune
functions as it does with OSC 1 and OSC 2.
The POS Knob sets the wavetable position. You
can manually adjust the position and the position is
often assigned as a modulation destination to let the
wavetable sound evolve as it plays.
The wavetable Interpolate option determines how the
wavetable sounds. If Interpolation is on, the wavetable
Position (POS) will smoothly transition the sound
between the wavetables. If it is o, then it will step from
one to the next. How ‘steppy’ the sound is will depend on
many steps the chosen wavetable contains.

20 MELBOURNE INSTRUMENTS – NINA V1.1 21
MELBOURNE INSTRUMENTS – NINA V1.1
aected by the notes played. Key Track is a value from
-100% to 100%. At 100% the lter will change the cut-
o frequency by fully tracking the notes played. At 50%
the lter will adjust by half the note change. For example
if you play a note one octave higher, the lter cut-o
will move half an octave higher. The Key Tracking can be
negActive, which means the cut-o frequency will move
down as the note numbers go up, and vice-versa.
Note: The Key Track setting is just a shortcut to the
modulation matrix. It is the controlling the modulation
setting Source as KBD and modulation destination as
CUTOFF.
Filter Envelope EG1
Envelope Generator 1 (EG1) is a standard Attack-Decay-
Sustain-Release (ADSR) envelope generator, usually
assigned to control the Filter cut-o.
The RESET option (shown in the LCD only) chooses what
happens if a note is still being heard when a new one is
played.
If RESET is ON, then the old note will be instantly turned
o, and the envelope will start the Attack phase from zero.
If RESET is OFF the old note is not silenced, instead the
envelope starts the Attack phase from the tail of the
previous note.
EG1-Cut
The dedicated EG1-CUT knob sets the amount that
the envelope aects the VCF cut-o. It has a range
of -100 to +100, so the envelope can move the cut-
o frequency down (negActive values) or up (positive
values) as the note plays. The range is curved, so small
values, say under 10, move the lter less than a semitone,
whereas 100 moves the lter 127 semitones with the
envelope.
Note: The EG1-CUT knob is a shortcut way to access
the modulation matrix. It sets the amount of modulation
of the assignment EG1 to CUTOFF. If you adjust the
EG1-CUT knob, and then go into MOD mode and press
Voice Mix
All of the four sound sources: OSC 1, OSC 2, OSC 3
and NOISE are mixed together using their level control
Knobs. Use these to adjust the timbre of the sound.
To get the best sound out of the MIX section, set the
dominant oscillator’s level control to its maximum and
adjust the other oscillators down relActive to that. This
will give the best dynamic range and SNR.
Drive & Overdrive
The mixed signal goes through an overdrive circuit
before it goes into the VCF. The DRIVE Knob controls
the level of the overdrive. The normal 12 o’clock position
of the DRIVE knob will give a smooth sound with no
overdrive for a typical level coming out of the mix. As you
turn the drive up, you will hear the sound thickening as
the overdrive level starts to distort the input of the VCF.
This is often used for adding character and weight.
If the sound from the mix is quite high level because
there is a lot being added together, and you hear a bit of
overdrive character in the signal that you don’t want, you
can turn the overdrive to the left of 12 o’clock to reduce
the overall level and make a cleaner sound.
If the sound from the mix is quite high level because
there is a lot being added together, and you hear a bit of
overdrive character in the signal that you don’t want, you
can turn the overdrive to the left of 12 o’clock to reduce
the overall level and make a cleaner sound.
The OVERDRIVE Key is used to apply a large signal
boost. With this on, the signal will always sound
overdriven, and DRIVE knob range adjusts from moderate
to extreme overdrive.
Filter / VCF
Nina’s VCF is a classic 4 pole transistor ladder lter
as designed by Robert Moog in the 1960s. The
RESONANCE Knob sets the amount of resonance, and
the lter can self-oscillate.
The CUTOFF knob sets the lter cut-o frequency.
Note that the frequency is not precisely tuned to exact
semitones. Instead, it is allowed to have a bit of natural
variation due to each analog voice circuit’s individual
characteristic. This variation adds character and depth as
dierent voices are allocated to dierent notes played,
but it also means you cannot use the self-oscillation of
the lter to play in-tune notes.
The Key Track setting, which is shown (only) on the
LCD, determines how much the VCF cut-o frequency is

22 MELBOURNE INSTRUMENTS – NINA V1.1 23
MELBOURNE INSTRUMENTS – NINA V1.1
Stereo Innite Panning
Nina has advanced panning capabilities, far more than
a simple left-to-right pan. There are a powerful set of
functions to allow control and movement in the stereo
eld in normal and anti-phase. We call this Stereo
Innite Panning.
Each voice in Nina has two nal VCAs which are a stereo
pair. The VCAs are a custom four-quadrant (aka through-
zero or attenuverter) circuit, which allows for each
voice to be panned beyond the apparent edges of the
speakers, or behind the listener with headphones.
This is based on a psycho-acoustic eect which is
sometimes used in mastering and surround sound. To
explain this eect, imagine a hard left pan. This is full
level on the left and zero on the right. From this, if you
then invert (anti-phase) the signal in the right channel
and increase its level, then it will appear that the sound
is moving past the left of the left speaker, or behind your
head if you are wearing headphones.
Note that this is an illusion, so the eect is not as precise
as a real bee buzzing around you. However, the eect
does give a huge stereo image. Experiment with it and
see how it aects the sounds you make.
The Pan value which comes out of the modulation matrix
sets the position of each voice. Hard left is -100, center
is 0 and +100 is hard right. The range of -100 to -200
goes into anti-phase, giving the eect of being behind
the headphones or beyond the speakers.
There are a number of tools you can use to position
multiple voices around this 360° eld, control their
stereo spread and spin them in the eld. These are
explained in the following sections.
The Panner
As each note is played, the panner decides what the pan
position of that note will be. The settings for the Panner
are global parameters in the Preset and are accessed via
the LAYER key.
There are 3 Pan Modes, and a Pan Number.
- Pan Mode OFF sets no panning. The starting Pan
position of every note is 0 (center).
- Pan Mode SPREAD plays each note evenly across the
Left to Right stereo eld, according to the number set
in Pan Number. For example if Pan Number is set to
3, the notes will be placed evenly at Hard Left, Centre
and Hard Right. The order is always from left to right
and is allocated as notes are played.
- Pan Mode PING PONG will make each note’s position
alternate Hard Left, Hard Right, Hard Left and so on
The Panner is only the rst step in deciding a note’s pan
position. The settings in the modulation matrix determine
how the Panner values control the actual position in the
stereo eld.
MOD Matrix Pan
Each voice’s nal pan position at the audio outputs is
determined by the modulation matrix PAN destination.
The Modulation matrix is described in the section
Modulation on page 25.
The PAN source key (Key 10) is the Panner, as described
in the previous section. In order to make the Panner
aect the Pan position, make an assignment from the
PAN (Panner) source to the PAN destination.
The amount set in the Mod Matrix determines how wide
the stereo spread is. A modulation amount of 100 gives
100% of the spread dened by the Panner, 50 give 50%
and 0 gives no spread so all voices will be dead center.
The diagram on next page depicts this example.
the EG1 source key, you will see the same amount is
shown on the CUTOFF knob.
VCA EG2
Envelope Generator 2 (EG2) is also a standard ADSR
envelope generator, and is always (note: always)
assigned to control the nal VCA in each voice. You
can also assign EG2 to control any other modulation
destination in the mod matrix.
The RESET option (shown in the LCD only) chooses what
happens if a note is still being heard when a new one is
played.
If RESET is ON, then the old note will be instantly turned
o, and the envelope will start the Attack phase from
silence. This makes an abrupt transition at each note
start. This is a common setting for bass sounds, where
the attack phase needs to be heard on each note.
If RESET is OFF, then the old note is not silenced, instead
the envelope starts the Attack phase from the tail of the
previous note. This makes a smooth transition from one
note to the next, especially when the envelope has a
slow release.
The DRONE option is used for special cases. With drone
ON, the VCA is always at full volume. There is no Attack,
Delay, Sustain or Release phase, the voices continuously
send their sound out. This is often used in combination
with modular synth setups.
Glide/Portamento
The GLIDE Knob controls how quickly the pitch of notes
changes as dierent notes are played. A glide setting of
0 makes the pitch change instantly, like a piano does.
As you increase the setting, the pitch change between
notes will take longer, which is a portamento eect.
The Glide Type option show on the LCD is selectable
between Linear and Logarithmic. The choice between
these comes down to the style of playing and sound and
personal preference.
\

24 MELBOURNE INSTRUMENTS – NINA V1.1 25
MELBOURNE INSTRUMENTS – NINA V1.1
Modulation
Nina has a powerful modulation matrix setup, where
virtually anything can modulate anything else. It
does not have a limit on the number of modulation
connections (commonly called slots) that can be made.
The common problem with these kind of modulation
capabilities is that synthesizers typically just show
a list of modulation Source to Destination settings,
and looking through this list is unintuitive and hard to
navigate as the list grows.
Nina addresses this problem by using the capabilities
of its Motorized Knobs and the 16 Keys along the
bottom, to quickly view and modify all the active matrix
connections. See MOD Mode below for a full description.
Modulation is additive, except for the Keyboard Velocity.
For example if the Filter cut-o level is 50, and the
modulation matrix assigns the MOD wheel with an
amount of 25, then the MOD wheel will vary the cut-o
from (50+0) to (50+25). Modulation destination amounts
are positive and negActive, so they can be made to
increase or decrease the value.
The Keyboard Velocity is additive to all destinations
except the Envelope Generators. For EG1 and EG2 the
Mod Matrix sets how sensitive to velocity the envelope
is. An assignment of 0 makes EG1 and EG2 not sensitive
to velocity, so they will play at full amplitude. An
assignment of 100 makes EG1 and EG2 100% sensitive,
so will play full range from quiet to loud. In between this,
for example an assignment of 50 will make the notes play
between 50% and 100% amplitude according to the
velocity.
Note that the Analog VCOs are not available as
Modulation Sources. If you want FM type sounds, try
using OSC 3 (digital oscillator) as the modulation source
and the Analog VCOs as the destination.
Modulation is generally bipolar, so the range has
negActive and positive amounts. This combined with
Nina’s four quadrant (through-zero) VCAs, means that
negActive Mix amounts will invert the signals from the
VCOs into the mix. For example, if you set the Mix Level
of OSC 1 at 0, it will be silent. If you add a modulation
source of LFO1 to the OSC 1 Mix Level with an amount
of 50, then OSC 1 will be heard in the mix, going from
in-phase at 50% level (when the LFO is at +50), down
to zero level (when the LFO is at 0), and then up to 50%
level anti-phase when the LFO is at -50.
The front panel oers direct controls for LFOs and
EG1-Cut modulation.
LFOs
The LFO1/2 Key Switches all the LFO controls between
LFO1 and 2. The LED will be OFF for LFO 1 and ON for
LFO 2.
The title bar on the screen will show LFO 1 or LFO 2
accordingly, and the knobs will jump to the correct
positions for the RATE and LEVEL of the LFO.
The LFO Rate is set by the RATE knob and has a
frequency of 1/33 Hz at 0 to 30Hz at 100. The LFO Rate
is also a Modulation destination, so it can be made a lot
faster by adding a SET amount in the Mod Matrix to the
LFO Rate.
The LFO Level knob sets the amplitude of the LFO from
0 to 100. Note that amplitude is set before the LFO is
sent into the Mod matrix, so it combines (multiplies) with
the amount set in the mod matrix. The LFO is bipolar,
so for an amplitude of 100, it will range from (100 to
+100). If you wish to make a unipolar LFO, or oset the
waveform, you can apply a SET to add a value to the
same destination. See SET in the Modulation Sources
below for more details.
The LFO SHAPE Key sets the LFO’s waveform shape.
The choices are Sine, Triangle, Square, Ramp Up, Ramp
Down or Random.
Adjusting any of the LFO settings will display all the LFO
settings on the LCD, including some which can only be
accessed using the Data Knob and EDIT.
Note that the Mod Matrix can make the Pan position
move into the antiphase region. If the sum of all the
mod sources is greater than 100 at the Pan destination
(or less than -100), then the Pan position will be in the
antiphase region. For example, if you had a Mod Amount
of 100 in the above diagram and you also have a Sine
LFO going to the Pan with a Mod Amount of 100, then
the peak pan position will be 100+100 = 200, giving the
sound an anti-phase eect.
Unison
Unison operation plays each note with multiple voices, to
create a thicker, more powerful sound. Unison repeating
of the notes happens before the Panner, so the Panner
will aect each of the unison voices separately. For
example, if Unison Voices is set to 3 and the Pan Spread
is set to 3, then each note plays with 3 voices across the
stereo eld left, center and right.
Spin
The last part of Nina’s Stereo Innite Panning capabilities
is spin. Spin is applied after the modulation matrix, so
spins all the notes playing together.
For example, if you have 5 notes playing in Unison, the
Panner set to Spread and the Panner->Pan Mod Matrix
amount is 100 left to right in a unison pan, the stereo
eld will sound as shown in (a) diagram below. Spin will
spin all of that group of 5 around the stereo eld while
holding the same apparent distance between them.
The SPIN knob determines the speed and direction of
the spin. Spin is clockwise for positive and counter-
clockwise for negActive amounts.
Note that the diagram shows the sounds coming from
behind the listener, which is not exactly correct as the
eect is less distinct at the back. However, it is a very
wide stereo eect. Play with this eect to hear how it
sounds. Imagine what it would sound like in a stadium or
club environment.

26 MELBOURNE INSTRUMENTS – NINA V1.1 27
MELBOURNE INSTRUMENTS – NINA V1.1
MOD Mode
Nina has a quick and simple way to access the
Modulation Matrix using the motorized knobs to expose
the settings and see how a sound is created.
Press the MOD Key to enter modulation mode. In
modulation mode, all of the Knobs change their function.
The MOD LED will blink, as a reminder that the Knobs are
not doing their normal function.
+
In MOD mode, the 16 red keys along the bottom select
the Modulation Sources.
As you press each of these the corresponding Knobs will
move into position according to how much this source
aects the destination at each Knob.
For example if you press Key 1 EG1, the CUTOFF Knob
will move to the amount that EG1 aects the Filter Cut-
o frequency. The CUTOFF knob has a center detent, at
zero, so allows a range of -100 through 0 to 100. The
negActive range makes the EG1 envelope move the cut-
o frequency down, and positive makes it move up.
Tip: A quick step through the Keys 1 to 16 in MOD Mode
is a great way to get an overview of how a Preset has
set up the modulation matrix to create its sound.
The Title Bar shows which source has been selected and
the list shows each destination that is aected by this
source. Use the DATA Wheel and the EDIT soft-key to
adjust the value. (Note: Using the corresponding knob
is a higher resolution and oers greater control than
setting the value in steps of 0 to 100.)
The RESET soft-key is a quick way to zero the
modulation amount to the selected destination in the list.
If Retrigger is On, then the LFO waveform will restart with
each note played, if it is O then it will free-run, but each
voice will have its own LFO running independently. If it
is Global then this LFO will feed every voice at exactly
the same amplitude and waveform phase, so they will all
move together.
If Tempo Sync is O, the LFO will not be synchronous
to anything else in system, and the RATE Knob sets the
tempo.
If Tempo Sync is On then the LFO will follow the tempo
of incoming MIDI clock pulses the Arpeggiator and
Sequencer (or MIDI Clock if enabled). When this sync is
on, the LFO Rate knob chooses a multiple of the Tempo,
as shown in this table:
Sync Rate Tempo to LFO Frequency Multiplier
0.125 1/8 (0.125)
0.25 1/4 (0.25)
0.5 1/2 (0.5)
1d 2/3 (0.667)
1 1
2d 4/3 (1.333)
2 2
4d 8/3 (2.667)
4 4
4t 4x(4/3) = 16/3 (5.333)
8 8
8t 8x (4/3) = 32/3 (10.667)
16 16
16t 16x (4/3) = 64/3 (21.333)
32 32
32t 32x (4/3) = 128/3 (42.667)
EG1-CUT
The EG1-CUT knob is a shortcut way to access the
modulation matrix. It sets the amount of modulation of
the assignment EG1 to CUTOFF.
If you adjust the EG1-CUT knob, and then go into MOD
mode and press the EG1 source key, you will see the
same amount is shown on the CUTOFF knob.
All of the other settings in the Mod Matrix are accessed
by going into MOD Mode.

28 MELBOURNE INSTRUMENTS – NINA V1.1 29
MELBOURNE INSTRUMENTS – NINA V1.1
Name Function
OSC 1 TUNE The pitch of VCO 1. The response of VCO 1 to the amount received is shaped so that small
values give a small detune while larger values move pitch a lot more.
OSC 1 WIDTH
A value of 100 will match exactly 127 semitones. This means if you assign the KBD (MIDI note
number) to pitch with a value of 100, then each note on the keyboard will play its correct
frequency. A small value such as 10 will apply a small detune, such as for vibrato from an LFO.
OSC 1 BLEND The pulse width and Sawtooth/Triangle shape amount of VCO1
OSC 1 MIX The Blend between Pulse and Saw/Triangle output of VCO1
OSC 2 TUNE The Level of the OSC 1 outputs into the Mix. Note that a negActive value at the Mix level
amount destination mean that the OSC outputs will be inverted and mixed in at that level.
OSC 2 WIDTH See OSC 1 TUNE
OSC 2 MIX See OSC 1 WIDTH
OSC 3 TUNE See OSC 1 MIX
OSC 3 POS See OSC 1 TUNE
OSC 3 MIX Osc 3 Wavetable position
NOISE See OSC 1 MIX
LFO1/2 Rate Level Noise/Fuzz source in the Mix. Note that a negActive value at the Mix level amount
destination mean that the OSC outputs will be inverted and mixed in at that level.
LFO1/2 Level The LFO 1 or LFO 2 Rate (according to the LFO1/2 Key). The LFO sources cannot modulation
the LFO destinations.
RESONANCE The LFO 1 or LFO 2 Level (according to the LFO1/2 Key). The LFO sources cannot modulation
the LFO destinations.
CUTOFF The VCF Resonance.
DRIVE The VCF Cuto Frequency.
EG 1 AT TAC K VCF overdrive level.
EG1 DECAY Envelope Generator 1 Attack Time
EG1 SUSTAIN Envelope Generator 1 Decay Time
EG1 RELEASE Envelope Generator 1 Sustain Level
EG1 LVL Envelope Generator 1 Release Time
EG2 ATTACK Envelope Generator 1 Level. This scales the entire ADSR envelope of EG1, so maintains the
shape while changing the amplitude of the envelope.
EG2 DECAY Envelope Generator 2 Attack Time
EG2 SUSTAIN Envelope Generator 2 Decay Time
EG2 RELEASE Envelope Generator 2 Sustain Level
EG2 LVL Envelope Generator 2 Release Time
SPIN Spin rate. See the section on Spin on page 22.
PAN The Pan Position of the voice. The Pan response to the value is dened in the section Stereo
Innite Panning on page 23.
Modulation Destinations
MOD Key # Name
1 EG1 The ADSR Envelope from Envelope Generator 1. This envelope is very commonly
assigned to the Filter Cutoff frequency, but it does not have to be. The envelope
2 EG2 The ADSR Envelope from Envelope Generator 2. This envelope is always assigned to the
output stereo VCA from each voice at 100%. This is not shown in the list on the LCD, because
it is a xed connection, always on.
3 LFO You can also assign it to any other destination.
4 WAVE The OSC3 Wavetable waveform. An example use is assigning this source to modulate OSC1
(VCO 1) Tune can create FM sounds.
5 KBD The MIDI Note Number. This is normally assigned 100% to the Tune destination of OSC1, 2 and
3, so that the keys play notes at the correct frequency. An example use is assigning this source
to the PAN destination to create a sound that pans left to right as you play from the left to right
hand side of an attached keyboard.
6 VEL The MIDI Note Velocity. An example use is to assign to the EG2 sustain to make notes play
louder or softer according to how hard or softly you play. This modulation source works
dierently
7 AFTR The MIDI Channel Aftertouch. This is the pressure on the keyboard after notes are pressed
down. An example use it to assign to Filter Cuto to open the lter by pressing on the
keyboard.
8 MOD The MIDI Mod Wheel. An common use is to assign this to the LFO1 or LFO2 Level.
9 EXP The MIDI Expression Control. This is MIDI controller number 11. The MIDI specication denes
this as “Expression is a form of volume accent above the programmed or main volume.”,
however it is a normal MIDI controller and can be assigned to any destination.
10 PAN The Panner. See section Stereo Innite Panning on page 19 for details. Note that this is not the
MIDI Pan control.
11 TIME Is a constantly increasing level from 0 to 100 which acts like an envelope with only an Attack
phase. Time starts with a value of 0 when a note is played and the attack phase starts, and
ramps upwards with an inverse exponential (RC type) shape. The speed or rate of attack (1
Time Constant or 63% of amplitude) is around 60ms at the fastest rate of 0, up to around 4
minutes at the slowest rate of 100. The time amount is best set by ear, and the Time Rate is
accessed in the Layer menu, see Time Mod Rate on page 33.
12 MIDI MIDI controller CC Number 2. This is dened as the “Breath controller” in the MIDI
Specication. It is commonly assigned to a ribbon controller on MIDI keyboards.
13 CVA Control Voltage A. The mapping of this to an analog input is described in section CV A and
CV B Source on page 32.
14 CVB Control Voltage B. The mapping of this to an analog input is described in section CV A and
CV B Source on page 32.
15 LFO2 LFO 2. See the section on LFOs above for details.
16 SET Is a constant value. This value is added onto the destination at all times. For example if you
want to make the LFO values go between 0 and 100, instead of 100 to 100, make the LFO
amplitude 50, and add a SET of 50 to the same destination as the LFO. This will make the total
value in the destination
Modulation Sources

30 MELBOURNE INSTRUMENTS – NINA V1.1 31
MELBOURNE INSTRUMENTS – NINA V1.1
Layer Setups & Multi-timbral
Operation
Multi-timbral operation splits Nina into 4 independent
synthesizers, on 4 layers.
Each synthesizer has a Preset loaded into it, a number of
voices assigned to it, a start and end note of the keyboard
and a MIDI channel that it responds to, and some
other settings. When you change the current layer, the
motorized controls all move to the settings for the Patch
on that layer.
One examples of layer setups is to have the bottom half of
the keyboard assigned to Layer 1 with a mono bass sound,
and the top half of the keyboard to a polyphonic lead
synthesizer sound, for live performance. Another example
is to make a double-stack, where every note plays 2
dierent sounds together from 2 layers.
The LAYER menu is accessed by pressing the LAYER Key.
All operation in Nina is intrinsically multi-layer. Normal
operation with a single timbre is just the simple case of
Layer 1 having all 12 voices assigned to it, and layers 2, 3
and 4 turned o (0 voices assigned).
Layer 1 is the master layer. The Preset on Layer 1
determines the Eects, Arpeggiator and Sequencer
conguration. There is only 1 Eects processor,
Arpeggiator and Sequencer.
Note: Every Preset stores its own settings for Eects,
Arp and Sequencer, these settings are ignored on
layers 2, 3 and 4. If you save a Preset on these layers,
these settings are left unchanged in the Preset.
A LAYER SETUP is the complete set of all settings on all
4 layers. Layer Setups can be loaded and saved using
combinations of the LOAD + SAVE keys while the LAYER
menu is active (layer LED On). Layer Setup loading and
saving is described in detail on page 33.
LOAD A SAVED LAYER SETUP
+
SAVE A NEW LAYER SETUP
+
Also in the LAYER Menu are some parameters that are
global level settings for the Patch on each layer, such as
mono or polyphonic playing. Although these settings are
accessed from the Layers Menu, they are actually loaded
and saved with the Preset and not the Layer setup. The
sections below are divided into Multi-timbral and Patch/
Preset Settings.
Note: When you power on, Nina will reload the last
used Layer Setup. Additionally, if you had loaded
dierent Presets into any layers before you powered
o, those Presets will be loaded after the Layer Setup
is loaded.
This will return you to the previous setup as quickly as
possible when you power on, and remembers all the
Presets you had loaded.
Eects with Multi-Timbral
There is one eects processor in Nina. The Preset on
Layer 1 determines the Eects conguration.
The Eects operate on Analog Outputs 1 and 2 (Left and
Right, respectively). All layers that are routed to outputs
1 and 2 are mixed together and can have eects applied
to them. All layers that are routed to Analog Outputs 3
and 4 have no eects applied to them, they are clean
outputs.
For example, if you route Layers 1, 2 and 3 to outputs
1 and 2, the signals of layers 1, 2 and 3 are all added
together and passed into the Eects processor. The
eects are applied to this mix of layers 1, 2 and 3, and
the Eected sound is then added to outputs 1 and 2.
The Eects knob (level) determines how much of the
Eected signal (wet) is added to the analog signal (dry).
Arpeggiator with Multi-Timbral
Nina has one Arpeggiator, and it is congured from the
Preset on Layer 1.
The arpeggiator receives notes from a keyboard, and
sends them out in a repeating sequence. The MIDI
channel assigned in Layer 1 is the channel used.
All notes received on this MIDI channel will be
arpeggiated and sent to the same channel. If the channel
is 0 (omni), then the notes received on any channel will
be arpeggiated, and sent to the same channel that they
came in on.
If Layers 2, 3 or 4 are congured with the same MIDI
channel as layer 1, then the arpeggiated notes will play
on layers 2, 3 or 4 also. If the Layer 1 MIDI channel is
omni, then the arpeggiated notes will play on layer 1 and
any other layer that has the same MIDI channel as the
incoming notes.
Multi-Timbral Conguration
Pressing the LAYER key will bring up the LAYER Menu.
The rst set of items in the list congure the multi-timbral
operation:
Layers Reset
The RESET soft-key (bottom right) will reset the whole
Layer Setup to single-timbre operation. This can be
useful if the current layer conguration is complex and
want to go to the basic working state.
Pressing RESET will:
- Assign 12 voices to Layer 1 and 0 voices to Layers 2, 3
and 4.
- Set the Output Routing to all outputs, 1-2-3-4.
- Set the Low note to 0 (lowest possible MIDI note).
- Set the High note to 127 (highest possible MIDI note).
- Set the MIDI Channel on Layer 1 to 0 (omni). Set the
CV A Source to Analog Input 1 and the CV B Source to
Analog Input 2.
- Set the Volume for Layer 1 to 100 (max).
Note that for a RESET, the settings on Layers 2, 3 and 4
are not changed, apart from the assignment of 0 voices.
A conrmation page with ‘Reset layers back to one
Layer default’ will appear. Press YES to conrm, or BACK
if you don’t want to reset.
Current Layer
Use this to set the active Layer. When you change this,
all the other items in the menu will show the setting
for that layer, and the large number will show the layer
number. Underneath the number will be the name of the
Preset in the layer, or “0 Voices” if the layer is turned o.
The Knobs will all turn to the settings for the Preset on
the active layer. Note that this will happen even if there
are no voices assigned to the layer. If you increase the
number of voices, then you will see the name of the
Preset on that layer, and the controls will be ready for
any notes played.
When you exit the layers menu, by either pressing the
LAYER key again or the EXIT soft-key, the active layer will
be shown in the title bar as L1, L2, L3 or L4.
Layer Voices
This item sets the number of voices assigned to each
layer, and you must manually set this. It is a foundation of
the multi-timbral setup.

32 MELBOURNE INSTRUMENTS – NINA V1.1 33
MELBOURNE INSTRUMENTS – NINA V1.1
The total number of voices across the layers must be 12
or less. If you cannot increase the number of voices on
a layer, then you may need to go to another layer and
reduce the number of voices allocated to that layer. A
layer assigned 0 voices is turned o.
Tip: The ONE LAYER default layer setup has 12 voices
assigned to Layer 1. To enable more layers, you
must rst reduce this so you can allocate voices to
additional layers.
Output Routing
This sets which of Nina’s 4 analog outputs to send the
layer to. Note that the Voices are always stereo.
Assignment Routing
1 Route the Left signal from all the voices
to Analog output 1.
2 Route the Right signal from all the voices
to Analog output 2.
3 Route the Left signal from all the voices
to Analog output 3.
4 Route the Right signal from all the voices
to Analog output 4.
1-2 Route the stereo signal from all the
voices to Analog outputs 1 & 2
3-4 Route the stereo signal from all the
voices to Analog outputs 3 & 4
1-2-3-4 Route the stereo signal from all the
voices to Analog outputs 1 & 2 and 3 & 4
Low Note / High Note
These two settings are used to create keyboard splits.
Notes in the range of Low Note to High Note (inclusive)
will play on the layer, and all other notes ignored.
Tip: If you play a key on an attached keyboard while or
after you press EDIT, then the note number will be set
to that key.
MIDI Channel
This setting chooses which MIDI channel the layer will
respond to, from 1 to 16. The extra setting of 0 (omni) will
make the layer respond to MIDI on all channels.
Volume
This setting sets the overall volume of the layer between
0 (silence) and 100 (full volume). Use this to adjust the
mix of sounds that are going to the same analog outputs.
CV A and CV B Source
Chooses which of the 4 analog inputs are used for the
CVA and CVB Mod Matrix sources. For details on how to
adjust the control voltage gains and osets, see Global
Settings on page 37.
Patch/Preset Global Settings
The following settings in the layer menu are actually part
of the Preset on that layer, and are saved and loaded
with the Preset, even though they are accessed from the
LAYER key.
Poly Mode
Mono mode is monophonic, only 1 voice is used. The EG1
and EG2 envelopes play the full ADSR with every new
note played.
Legato sets Monophonic legato mode, where the
envelope does not retrigger when you play legato style.
If you release one note before pressing down the next,
the envelope generator will restart from Attack. If you
start playing a new note before you release the last
one, then the envelope generator will not restart, it will
just continue with the same envelope shape, and the
oscillator will change pitch to the new note.
Poly mode is polyphonic. Notes are played up to the
maximum number of voices.
Note: Voice stealing: If the maximum number of voices
is allocated and a new note is played, then the oldest
played note that is in its Release phase is taken. If no
notes are in the release phase, then the oldest played
note is taken.
Unison Voices and Unison Detune
Unison Voices sets how many voices are played for each
note. Because Nina is an analog instrument, each voice
naturally has a slightly dierent character. Using unison
to overlay multiple voices playing the same note gives
a power and texture to the sound. Unison Detune adds
to this dierence in character by detuning the voices as
they play together.
Tip: When you have a lot of voices playing in Unison,
applying a small amount detune (eg 4) usually gives a
nicer sound than having detune at 0.
Panner Voices and Panner Mode
These two settings congure the Panner. For a detailed
description of how the Panner operates, see The Panner
on page 25.
Pitch Bend Range
This sets how far an external Pitch Bend MIDI controller
aects the pitch, in semitones.
Time Mod Rate
This sets the speed of the Time modulation source.
See the section on Modulation Sources on page 25 for
details.
Loading and Saving Layer Setups
Up to 127 LAYER Setups can be stored on Nina. When
the Layer menu is active and the LAYER Key LED if on,
press LOAD or SAVE to load or save layer setups.
Load
If you press LOAD, the display shows a list of all saved
layer setups:
Note that there is a default layer setup called “ONE
LAYER”. This setup is for single timbre operation, with
12 voices assigned to layer 1 and layers 2, 3 and 4 all
turned o (0 voices assigned).
Save
To save the current/new LAYER Setup, choose a position
on the list where you want to save and press the SAVE
soft-key. The display will go to the rename page, which
will allow you to set the name that you wish to save. The
renaming works in the same way as for saving Presets,
see Saving Presets on page 15. Press the ENTER soft-
key to save the layer setup or the BACK soft-key if you
change your mind.

34
Layer Setups &Multi-timbral
Operation: Block Diagram
+
+
MELBOURNE INSTRUMENTS – NINA V1.1

36 MELBOURNE INSTRUMENTS – NINA V1.1 37
MELBOURNE INSTRUMENTS – NINA V1.1
Arpeggiator
Nina has a simple Arpeggiator. If you play multiple notes,
the Arpeggiator will play those notes in an repeating
sequence, according to its settings and the rate control
TEMPO Knob.
The settings for the Arpeggiator are saved with the
Presets. When you load or save a Preset, the Arpeggiator
settings will be loaded or saved with it.
Note that for Multi-Timbral setups, the Arpeggiator is
tied to the Preset on Layer 1 only. See the section on
Layer Setups & Multi-timbral on page 31.
Basic Operation
+
The ARP Key is used to turn the Arpeggiator on and o,
and to access the Arpeggiator settings.
A short press of the Arp Key will turn the Arpeggiator
ON or OFF, and display the settings. A long press
(more than ½ second) of the ARP Key will bring up the
Arpeggiator settings without changing whether it is on
or o.
\\
The arpeggiator receives notes from a keyboard, and
plays them out in a repeating sequence. The MIDI
channel assigned in Layer 1 in the LAYERS Menu is the
channel used. All notes received on this MIDI channel
will be Arpeggiated and sent to the same channel. If
the channel is 0 (omni), then the notes received on
any channel will be arpeggiated, and sent to the same
channel that they came in on. For details of the MIDI
channel assignments in a Multi-Timbral setup see the
section Arpeggiator with Multi-Timbral on page 30.
The Arpeggiator settings are described below:
Dir Mode
Sets the direction of notes played out
For example, if the Temp is 60 BPM, and the setting is
“1/4”, the Arpeggiator will play one note per second. The
“T” settings have triplet timing.
Assignment Routing
Up Notes are played from the lowest to the
highest, then restarting from the lowest.
Down Notes are played from the highest to the
lowest, then restarting from the highest.
Up-down Notes are played from the lowest to the
highest, then back down to the lowest.
Random Notes are played in a random order. They
are shued each time they repeat.
Assigned Notes are played in the order they were
played on the keyboard.
Hold
With Hold on, the arpeggiator will continue to play after
you release the notes, until you turn the arpeggiator o.
With hold o, the arpeggiator will play out while you hold
notes down, and will stop when you release the notes.
Note Value
Multiplies the TEMPO BPM to play the Arpeggiator. The
meaning of Beats per Minute follows the MIDI convention
that a Beat is a quarter-note.
For example, if the Tempo is 60 BPM, and the setting is
1 /4 , the Arpeggiator will play one note per second.
The T settings have triplet timing.
Setting Multiplier
1/4 1 note per Beat
1/8 2 notes per Beat
1/16 4 notes per Beat
1/32 8 notes per Beat
1/4T 1.5 notes per Beat (Triplet)
1/8T 3 notes per Beat (Triplet)
1/16T 6 notes per Beat (Triplet)
1/32T 12 notes per Beat (Triplet)
External Sync
You can lock the arpeggiator and sequencer to an
external MIDI clock source, such as a DAW, to keep it in
time with other instruments. External sync operation is
set in the System Menu, see page 39.
Sequencer
Nina has a 16 step sequencer. The sequencer notes
and settings are stored with each Preset. Each step is
polyphonic, so can record chords or single notes.
The sequencer settings are accessed by pressing the
SEQ key. The REC Key is used to record a new sequence
and the RUN key to run it. The Sequencer is triggered by
playing a note, and the sequence is transposed to start
playing from the note you play. The sequencer can free-
run (when the Hold setting is On) or run only when you
hold down a note (when the Hold setting is O).
The sequencer is a step sequencer so it records the
notes but not the velocity, duration, or control changes.
Recording a Sequence
To record a new sequence, press the REC Key. Play one
or more notes at the same time. When you release all
notes, this will record one step and move to the next.
Keys 1-16 LED will show the current step, stepping
forward as you play. Notes can also be played using the
internal KBD function.
To nish the sequence, press REC again.
To insert a rest (silence for 1 step), press the currently
illuminated Key from 1-16. For example, when you press
REC, Key 1 will illuminate to show that is the current step,
if you press 1, then a rest will be placed at step one, and
it will move to step 2.
To insert a tie (hold a note for a number of steps), press
the step one or more ahead of the currently illuminated
step. For example, when you press REC, Key 1 will illuminate,
if you press 2, then Keys 1 and 2 will illuminate, and the next
note you play will play at step 1 and tie for step 2.
Playing a Sequence
Press the RUN Key to run the sequencer. If the Hold
setting is ON, it will free-run. If it is OFF then it will play
once if you press a key, or continue to cycle through the
sequence when you hold down a note. The sequence will
be transposed to play from the note you play, at any step
in the sequence.
Eects
Nina has one digital eects processor. The main channel
1 and 2 mix is sampled with a 96kHz, 24 bit ADC,
processed in stereo by the eects and then added back
to the outputs The Eects menu is displayed when the
EFFECT Knob is used. The rst menu item is Type, which
is the type of eect, and all the other menu items will
change to the
The eects conguration is saved with each Preset. In
Multi-Timbral Setups/Layer Setups, the same eect
applies across all layers and it is determined by the eects
set for the Preset on Layer 1. To permanently save eects
to a LAYER SETUP, the eects must be saved with the
LAYER 1 Preset.
Other manuals for NINA
1
Table of contents
Other Melbourne Synthesizer manuals