Melopero Cookie RP2040 User manual
Getting started with
Melopero Cookie RP2040
Getting started with Melopero Cookie RP2040
Version 1.0.3 - 20 October 2022
Cookie
RP2040
MELOPERO
QW/ST
ON
21
RS
BT
ON
A B
MELOPERO.COM
VBAT
A0
A1
GND
A2
A3
3.3V
2
3
SCK
MISO
MOSI
3.3V
SCL
GND
RX
TX
SDA

Getting started with Melopero Cookie RP2040
Version 1.0.3 - 20 October 2022
This guide is constantly updated with corrections
and new content.
When a new version is released, we also update the
version number:
Version 1.0.3
20 October 2022

Getting started with Melopero Cookie RP2040
Version 1.0.3 - 20 October 2022
Contents
1. Hardware overview ......................................................4
2. Pinout .............................................................................5
3. Powering the Cookie RP2040 ....................................6
4. Cookie software pack ..................................................7
4.1 Download the software pack . . . . . . . . . . . . . . . . . . . . . . . . 7
5. Installing CircuitPython ...............................................8
5.1 Install Mu editor . . . . . . . . . . . . . . . . . . . . . . . . . . . . . . . 9
5.2 Mu quick start . . . . . . . . . . . . . . . . . . . . . . . . . . . . . . . 10
5.3 The REPL . . . . . . . . . . . . . . . . . . . . . . . . . . . . . . . . . . 10
5.4 How to run demo code for Circuitpyhon . . . . . . . . . . . . . . . . 11
6. Installing MicroPython ............................................. 12
6.1 Download MicroPython . . . . . . . . . . . . . . . . . . . . . . . . . . 12
6.2 Install Thonny editor. . . . . . . . . . . . . . . . . . . . . . . . . . . . 13
6.3 Thonny quick start . . . . . . . . . . . . . . . . . . . . . . . . . . . . . 14
6.4 The REPL . . . . . . . . . . . . . . . . . . . . . . . . . . . . . . . . . . 14
7. Setting up Arduino IDE ............................................. 15
7.1 Download the Arduino IDE . . . . . . . . . . . . . . . . . . . . . . . . 15
7.2 Add Cookie RP2040 to Arduino IDE . . . . . . . . . . . . . . . . . . . 15
7.3 Uploading an Arduino Sketch. . . . . . . . . . . . . . . . . . . . . . . 16
8. Clear the Flash memory ........................................... 17

Getting started with Melopero Cookie RP2040
Version 1.0.3 - 20 October 2022
1. Hardware overview
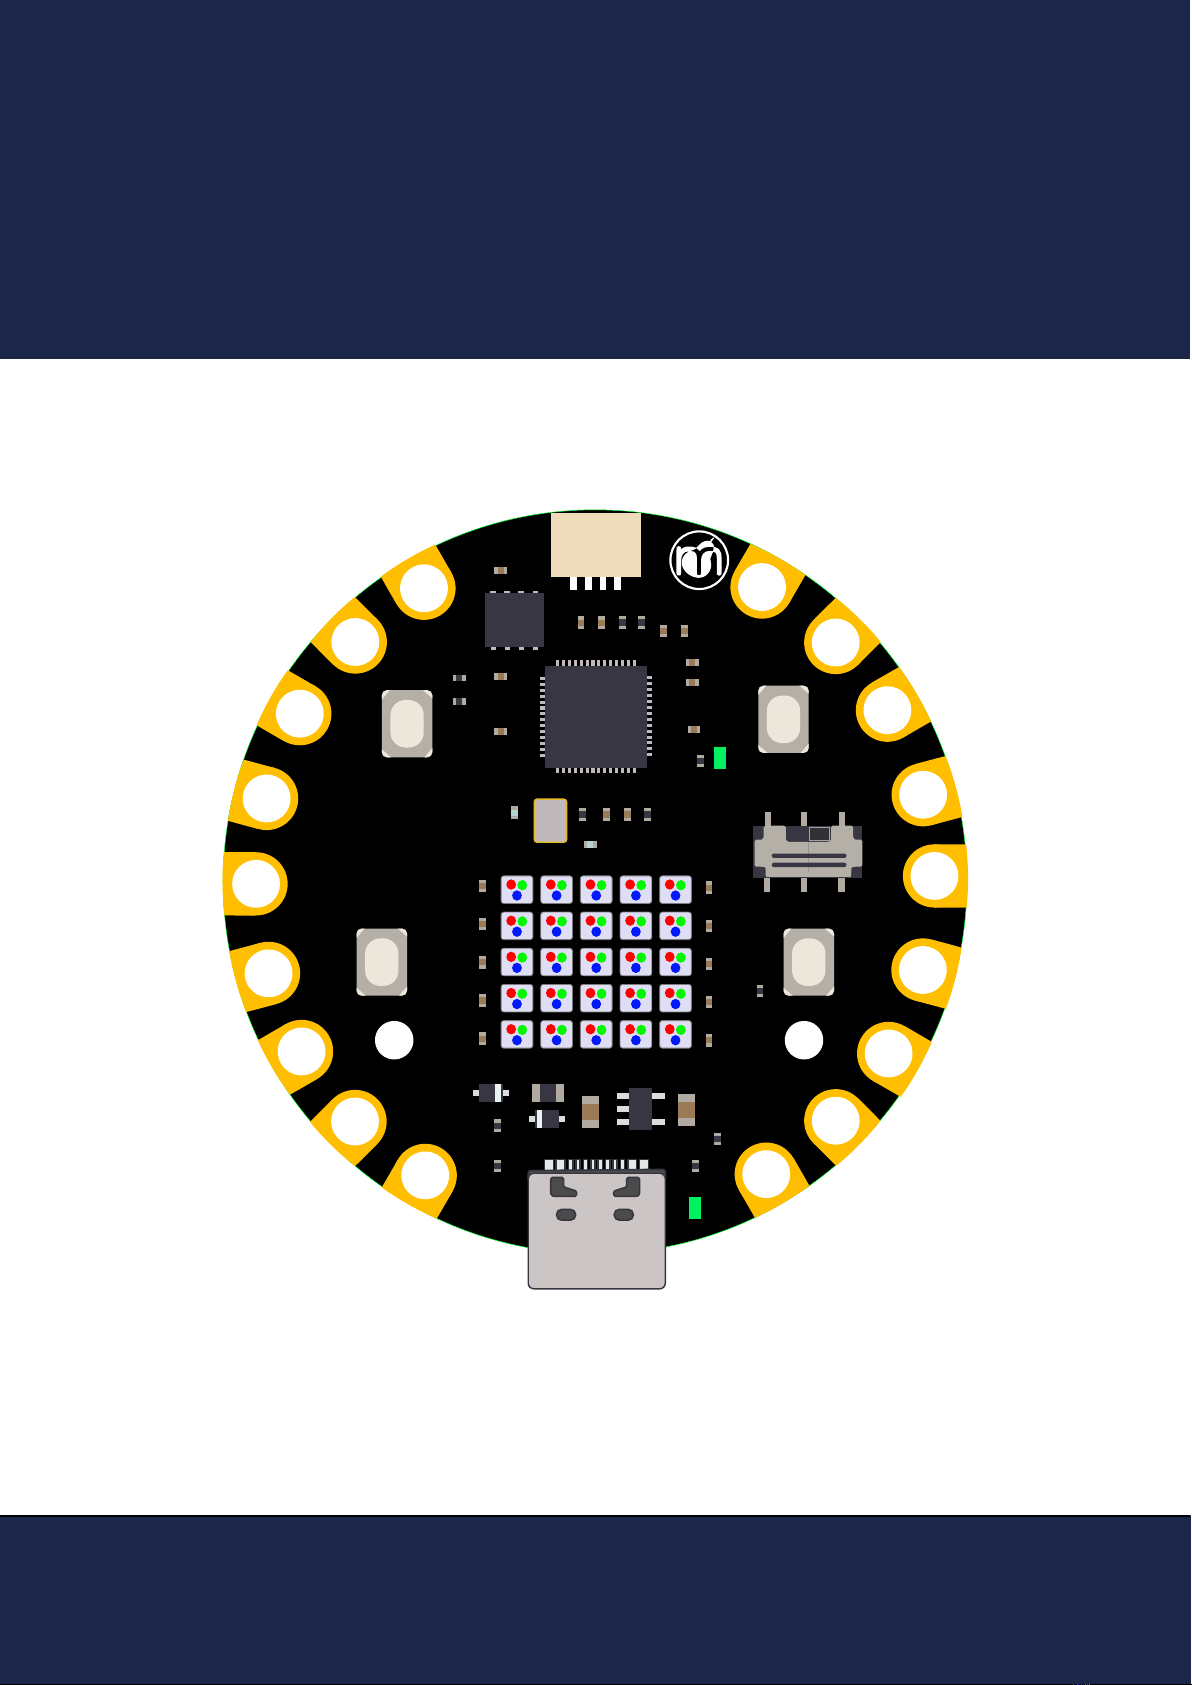
The Melopero Cookie RP2040 is a development board based on the Raspberry Pi RP2040 micro-
controller, programmable in C/C++, MicroPython, CircuitPython and with the Arduino IDE.
The board features:
• 8MB of FLASH Memory
• Reset and boot buttons (no need to detach/attach the board to enter boot mode)
• Qwiic/Stemma QT connector for attaching lots of Melopero, Adafruit and SparkFun sensors
• USB-C connector for powering, programming and charging
• Green user LED on pin 21
• WS2812 (aka NeoPixel) Matrix Display
• Green Power LED
• 2 mounting holes
• Programmable in C/C++, MicroPython, CircuitPython and with the Arduino IDE.
Dimensions: 50.8mm x 50.8mm
Qwiic/Stemma connector
On/Off switch
user LED (GPIO 21)
Power LED
Button A (GPIO 10)
Neopixel Matrix (GPIO 17)
BOOT
RESET
Button B (GPIO 11)
VBAT pin. Connect only one power source at a
time (USB-C or VBAT) to avoid backpowering your
computer or battery

Getting started with Melopero Cookie RP2040
Version 1.0.3 - 20 October 2022
2. Pinout
The pinout chart above is useful to quickly nd the right name of a specic pin, depending on the language
and IDE. As example, note how the pins labeled as 28 and 29 change name depending on which platform
you are using to program the board:
• CircuitPython refer to those pins as D28 and D29
• In the Arduino IDE they are 28 and 29 (check the green labels)
• For use with MicroPython, they are called with the number you nd on the GPxx labels (only the number)
Cookie
RP2040
MELOPERO
QW/ST
ON
21
RS
BT
ON
A B
MELOPERO.COM
VBAT
A0
A1
GND
A2
A3
3.3V
2
3
SCK
MISO
MOSI
3.3V
SCL
GND
RX
TX
SDA
MELOPERO
PINOUT
Cookie RP2040
WWW.MELOPERO.COM
MELOPERO®
2
TX
RX
22
3 3
4
5
3
1512
12
1313
19
19
20
20
1818
SDA0
I2C_0
SCL0 16
30
RP2020 Physical PIN
I2C
SPI
UART
RP2040 GPIO
CircuiPython
Arduino IDE
VBAT
GND
3.3V
3.3V
GND
38 26 26
27 27
28 28
29 29
39
40
41
31
29
SDA1
SCL1
00
1
1
MISO0
SCK0
MOSI0
CS0
MISO1
MOSI1
SCK1
CS1
D26
D27
D28
D29
D2
D3
D0
D1
D12
D13
D19
D20
D18
NEOPIXEL
MATRIX 28 17 17D17
NEOPIXEL / Qwiic
POWER
GPIO Max Current 12mA per pin
User
Button B
User LED
27 16 16
D16
14 11 11D11
13 10 10
D10
32 21 21
D21
User
Button A
(by default power is enabled (LOW). Set HIGH to disable it)
Wire1
Wire
A
B
!
Input range 4V - 5.5V
3.3V
Connect only one power source at a time (VBAT OR USB-C),
to avoid back-powering your computer or battery.
!
SDA
SCL
GND
(by default QWIIC/Stemma power is enabled (LOW).
Set pin GPIO 16 to HIGH to disable it )
Connect only one power source at a time (USB-C OR VBAT),
to avoid back-powering your computer or battery.
!
Getting started with Melopero Cookie RP2040
Version 1.0.3 - 20 October 2022
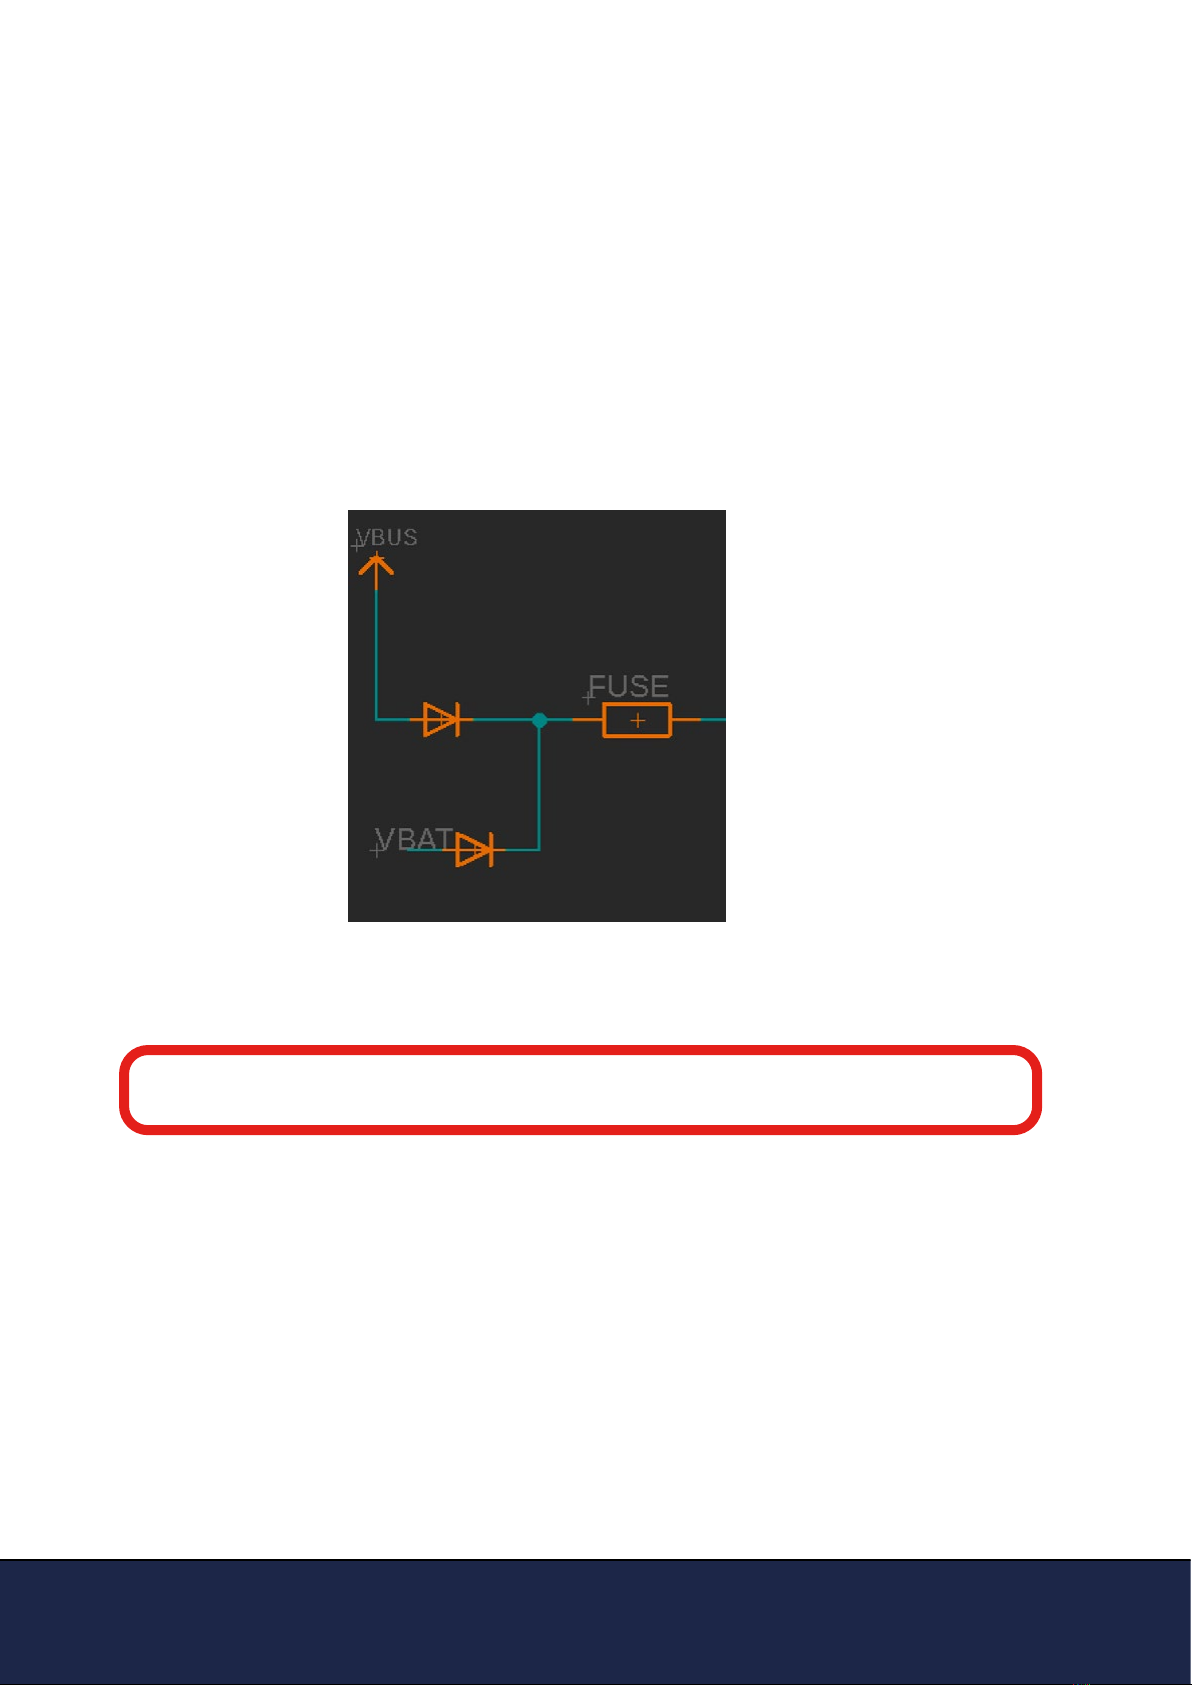
There are two input connectors that can be used, one at a time and not together, to supply
power to the Cookie RP2040:
1. USB-C connector (also used for programming the board)
2. VBAT pad
The applied input voltage must be in the range 4-5.5V.
Both inputs are protected with diodes and a resetable fuse limits the input current to 500mA:
3. Powering the Cookie RP2040
Despite the presence of diodes, we strongly reccomend to power only one of the above
connectors at a time, for best safety and to avoid backpowering your battery or computer
WARNING

Getting started with Melopero Cookie RP2040
Version 1.0.3 - 20 October 2022
4. Cookie software pack
4.1 Download the software pack
First of all, downlad the zip le with all the software and demo code for your Cookie:
www.melopero.com/Melopero_Cookie_RP2040.zip
The Cookie software pack contains all the les needed to install CircuitPython or MicroPython,
the ash reset le, demo scripts and libraries.
Getting started with Melopero Cookie RP2040
Version 1.0.3 - 20 October 2022
5. Installing CircuitPython
CircuitPython is a derivative of MicroPython designed to simplify experimentation and education
on low-cost microcontrollers. Simply copy and edit les on the CIRCUITPY drive to iterate.
CircuitPython is developed and maintained by Adafruit Industries, along with many sensors
libraries to start your project in the blink of an eye.
After downloading the latest version of Cookie software pack (see section 3 of this guide), activa-
te the bootloader mode on your Cookie (a drive called RPI-RP2 will appear on your computer) and
copy the circuitpython .uf2 le to it.
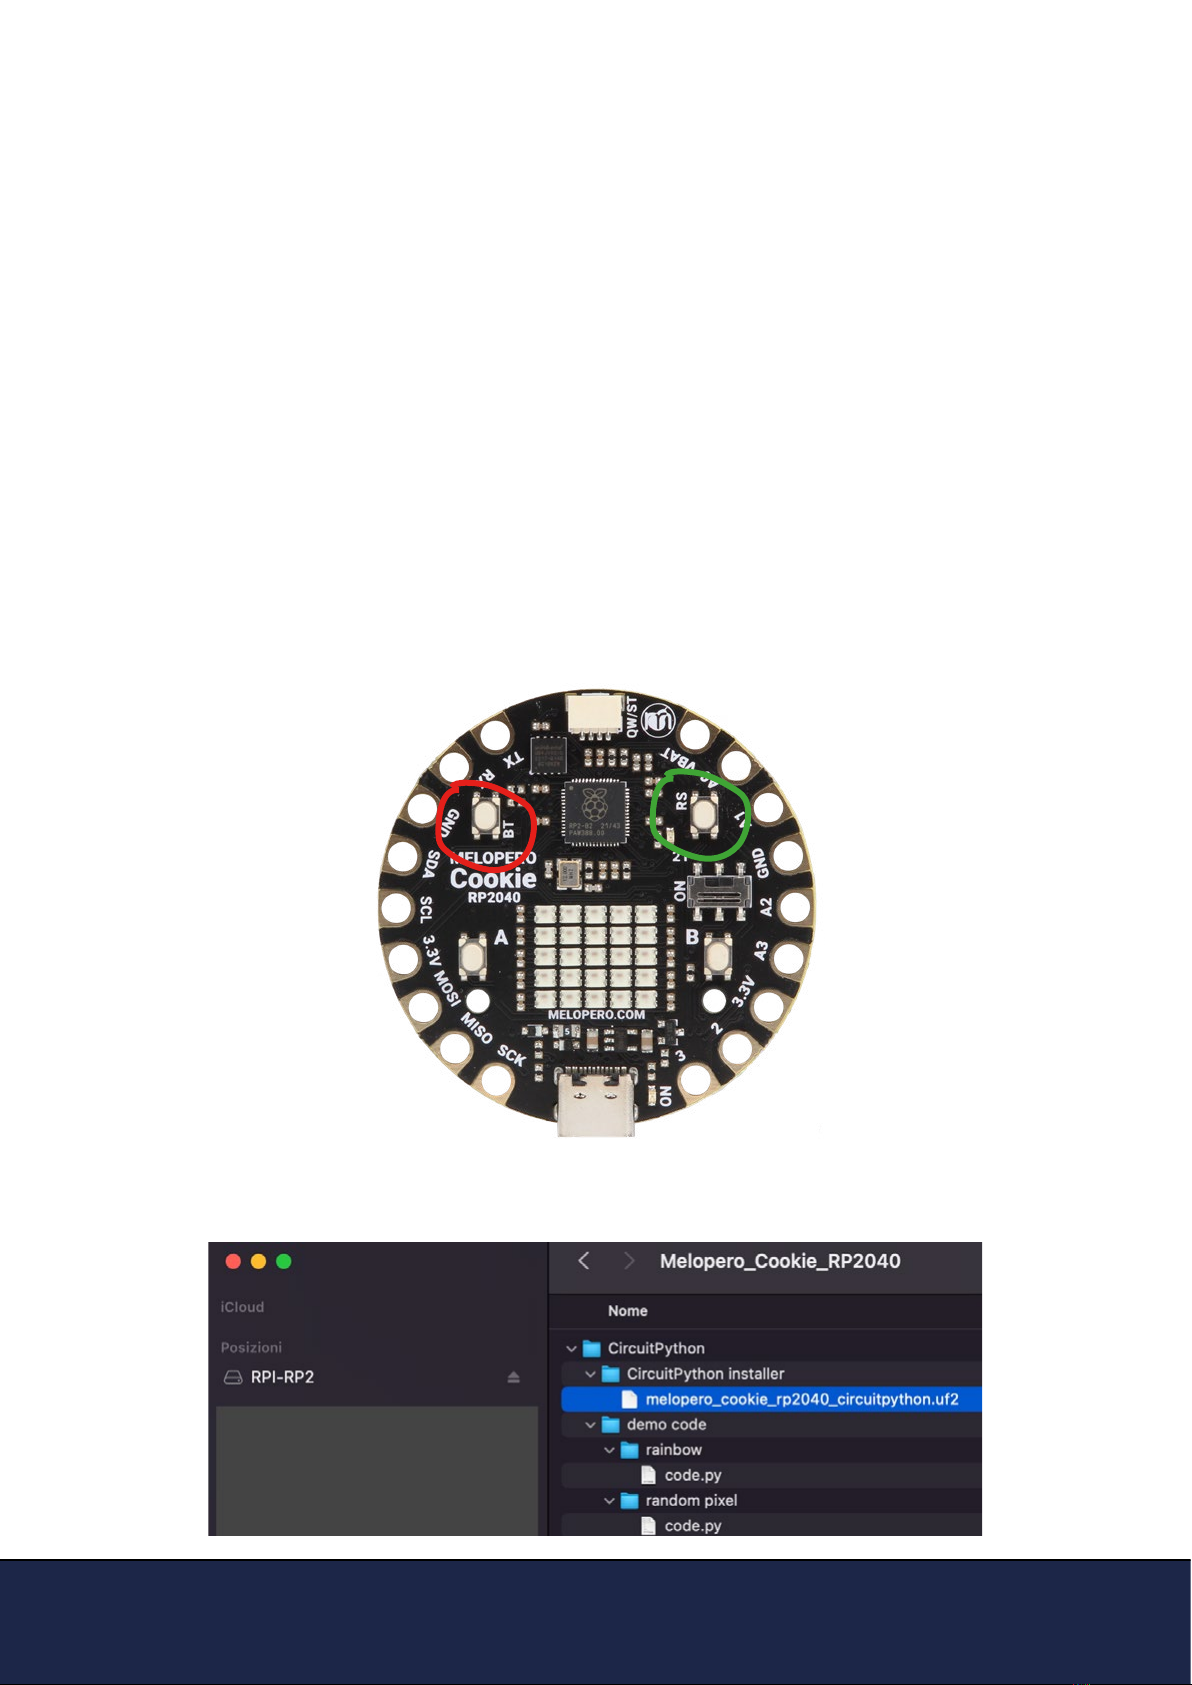
To activate the bootloader mode, when the Cookie is already connected to your computer's USB
port, press and hold the BOOT / BT button (circled in red in the image below), then press and
release the reset button (circled in green). Continue holding the BOOT / BOOTSEL button until the
RPI-RP2 appears.
You can also start with your board unplugged from USB, press and hold the BT button on your
Cookie RP2040. While holding the button, connect the other end of the USB cable to the Cookie
board. This will cause Cookie to load his bootloader. You should see RPI-RP2 appearing as a new
drive on your computer.
Drag and drop (or copy and paste) melopero_cookie_rp2040_circuitpython.uf2 le to RPI-RP2.
The RPI-RP2 drive will disappear and after a few seconds a new disk drive called CIRCUITPY will
appear.
Getting started with Melopero Cookie RP2040
Version 1.0.3 - 20 October 2022
Mu is a Python code editor for beginner programmers and it’s the recommended editor for pro-
gramming in CircuitPython.
It’s available for Windows, Mac and Linux at the following address:
https://codewith.mu/en/download
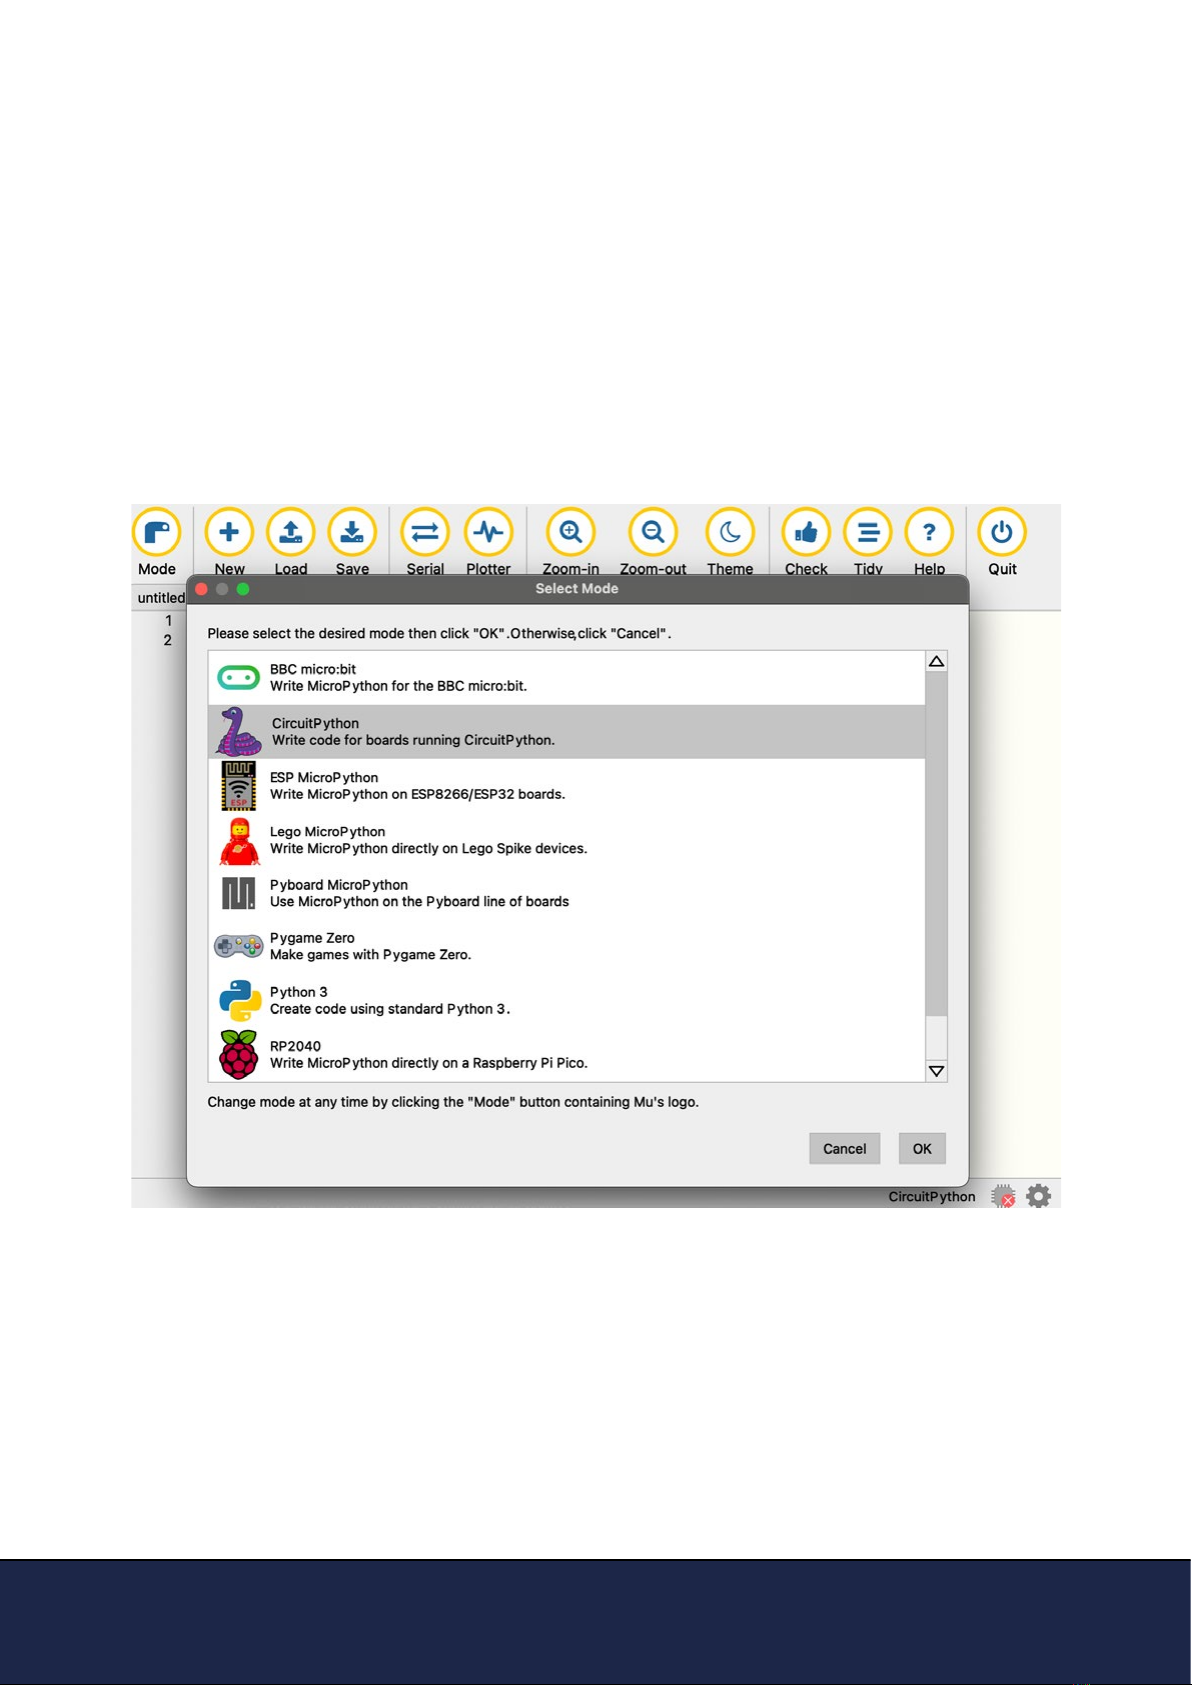
The rst time you’ll run Mu editor, it should ask for which mode you want to load.
Select “CircuitPython”. You can always change mode by clicking on “mode” in the upper menu
and selecting your favourite one.
5.1 Install Mu editor

Getting started with Melopero Cookie RP2040
Version 1.0.3 - 20 October 2022
5.2 Mu quick start
5.3 The REPL
Mu will auto-detect your CircuitPython board.
On the upper menu, clicking “new”, you’ll create a new le.
Once you have connected the Melopero Cookie RP2040, click “Load“, then select the CIRCUITPY
driver, and open code.py. After editing this le, click “Save“, and it’ll be loaded on your board.
The script should run automatically, otherwise click on the RESET button.
The REPL, Read-Evaluate-Print-Loop, allows you to execute lines of code directly in the console
and get an immediate result.
Click “Serial“ to open the serial console and then press any key to enter the REPL.
Use CTRL-D to reload.
Try to run the command print(“hello world“) and press enter.
The REPL will interpret the line of code and get you the result, in this case it’ll print “hello world”.
Getting started with Melopero Cookie RP2040
Version 1.0.3 - 20 October 2022
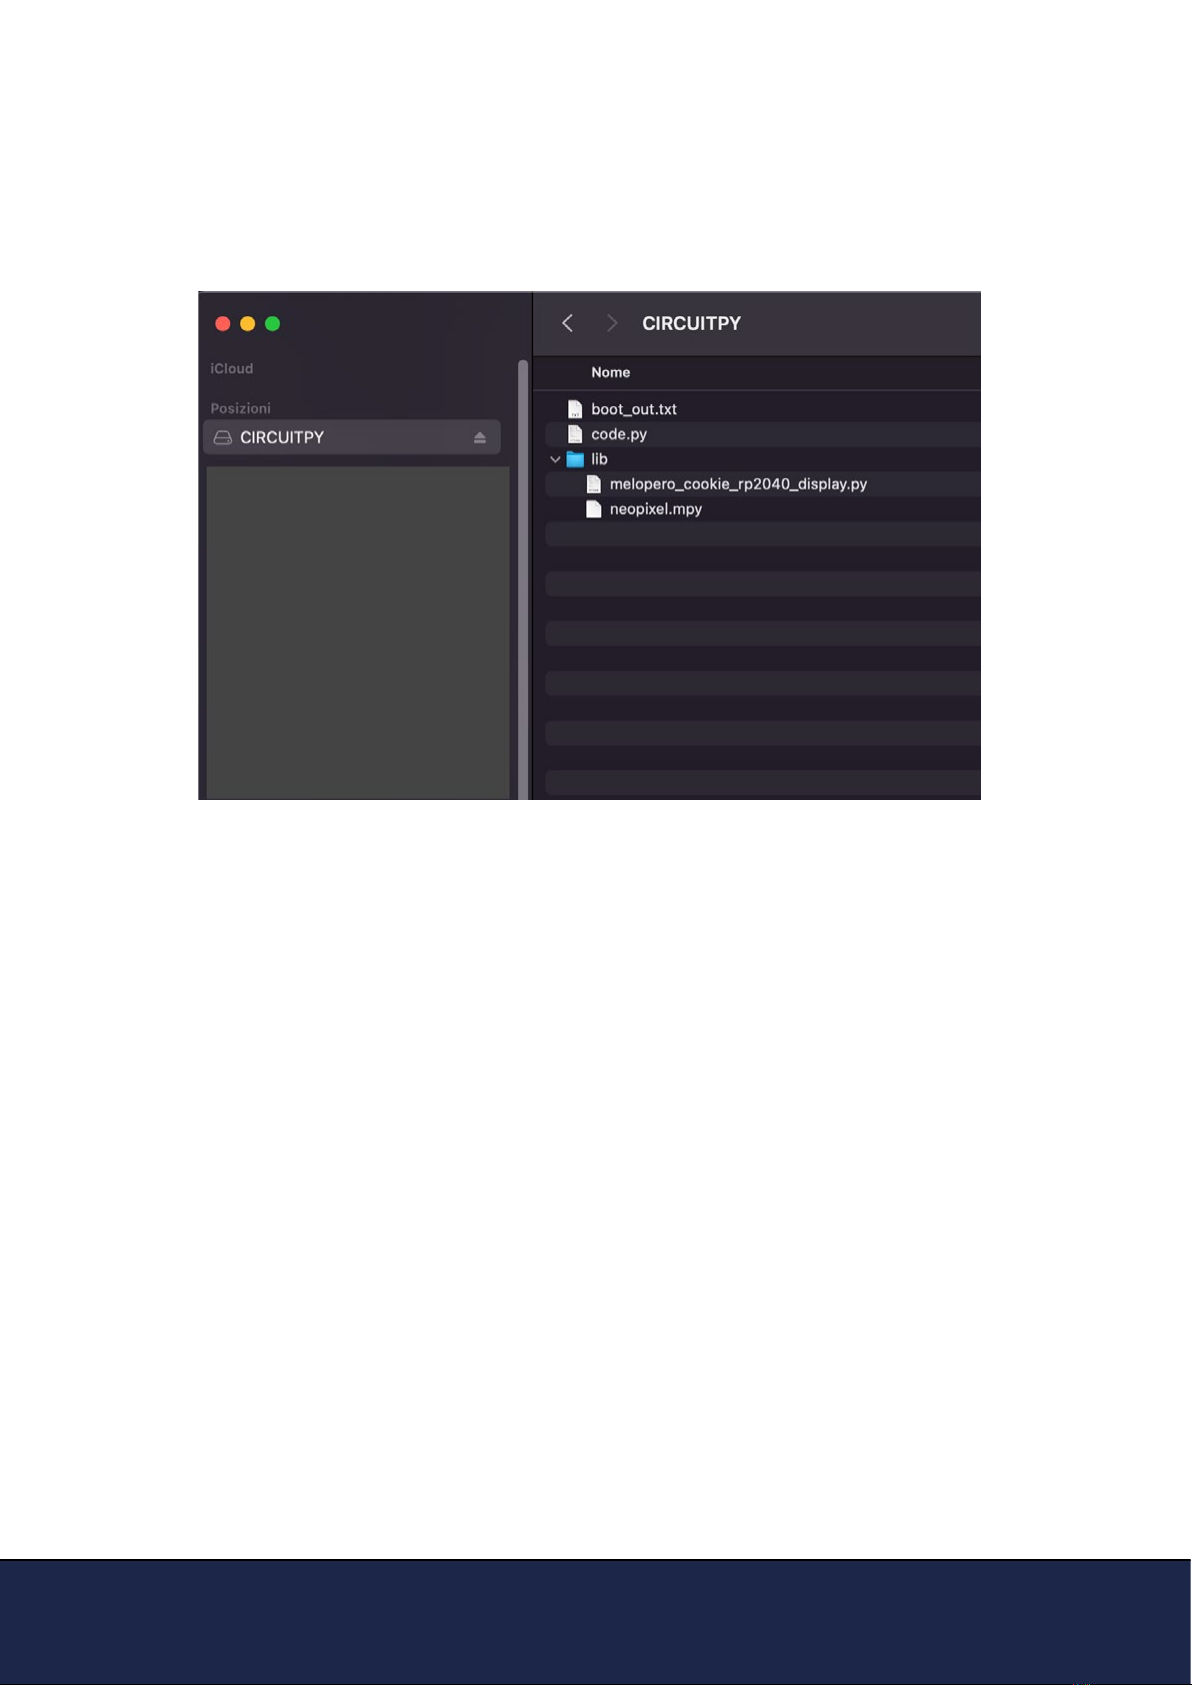
5.4 How to run demo code for Circuitpyhon
In order to run circuitython demo code, you must copy the realtive demo code.py le in the root
directory of your Cookie and the library les into the /lib directory, as shown in the picture below.
After copying all the les, if the demo doesn’t start automatically, push the reset button once.
Getting started with Melopero Cookie RP2040
Version 1.0.3 - 20 October 2022
6. Installing MicroPython
MicroPython is a lean and ecient implementation of the Python 3 programming language that
includes a small subset of the Python standard library and is optimised to run on microcontrollers
and in constrained environments.
MicroPython is a full Python compiler and runtime that runs on the bare-metal. You get an inte-
ractive prompt (the REPL) to execute commands immediately, along with the ability to run and
import scripts from the built-in lesystem. The REPL has history, tab completion, auto-indent and
paste mode for a great user experience.
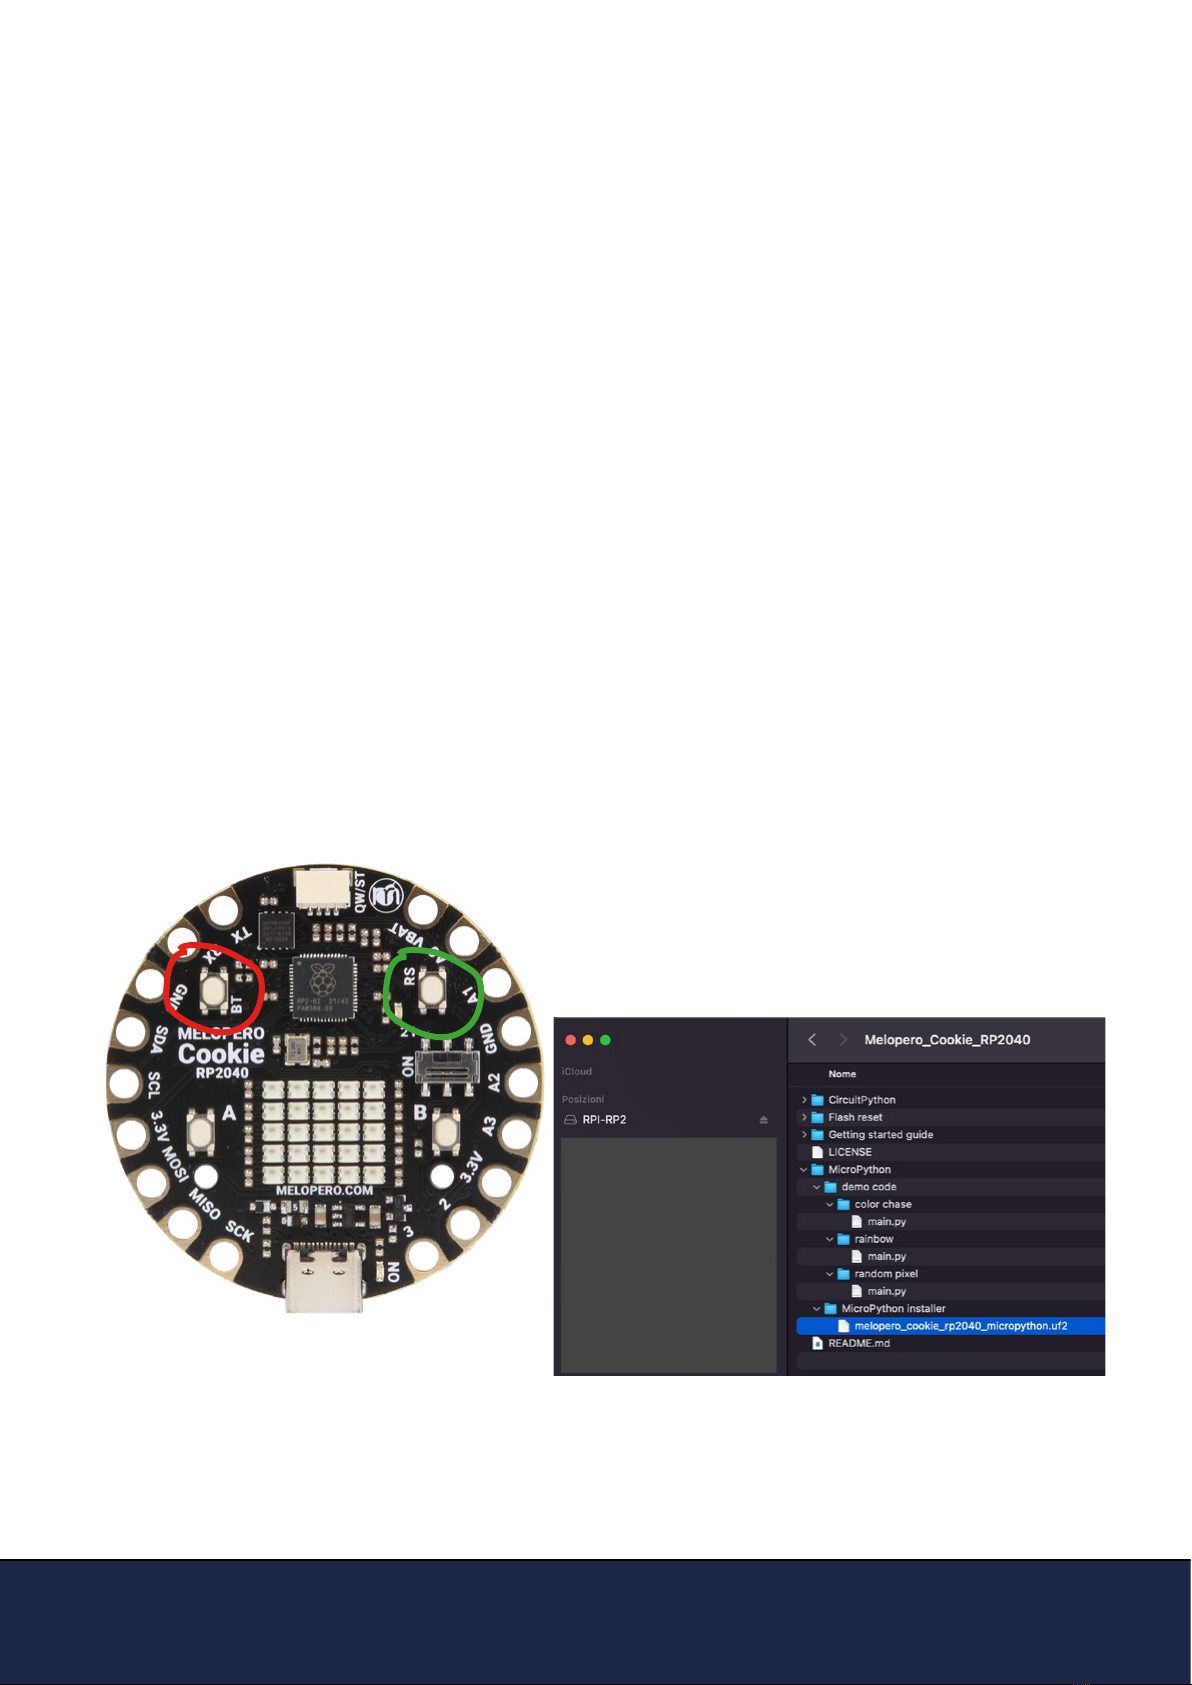
After downloading the latest version of Cookie software pack (see chapter 3 of this guide), acti-
vate the bootloader mode on your board and copy the micropython .uf2 le to it.
To activate the bootloader mode, when the Cookie is already connected to your computer’s USB
port, press and hold the BOOT / BT button (circled in red in the image below), then press and
release the reset button (circled in green). Continue holding the BOOT / BOOTSEL button until the
RPI-RP2 drive appears.
You can also start with your board unplugged from USB, press and hold the BOOTSEL button
on your Cookie RP2040. While holding the button, connect the other end of the USB cable to the
Cookie board. This will cause Cookie to load his bootloader. You should see RPI-RP2 appearing
as a new drive on your computer.
Drag (or copy and paste) the melopero_cookie_
rp2040_micropython.uf2 le to RPI-RP2.
The RPI-RP2 drive will disappear and you’ll be ready
to write your micropython code using Thonny (see
next chapter).
6.1 Download MicroPython

Getting started with Melopero Cookie RP2040
Version 1.0.3 - 20 October 2022
Thonny is a Python code editor for beginner programmers and it’s the recommended editor for
programming in RP2040 based boards with MicroPython.
It’s available for Windows, Mac and Linux at the following address:
https://thonny.org
The rst time you’ll run Thonny editor, you should set MicroPython on Raspberry Pi Pico and
select the right port fo your connected device.
Go to Preferences (should be options/settings on windows), click “Interpreter” tab and then select
Micropython (Raspberry Pi Pico) and the right port from the port menu (your board must be con-
nected and with MicroPython already installed)
If you are using Thonny in simple mode, you can access the interpreter conguration panel cli-
cking on the lower right corner of Thonny window (circled in red below).
6.2 Install Thonny editor
Getting started with Melopero Cookie RP2040
Version 1.0.3 - 20 October 2022
6.3 Thonny quick start
6.4 The REPL
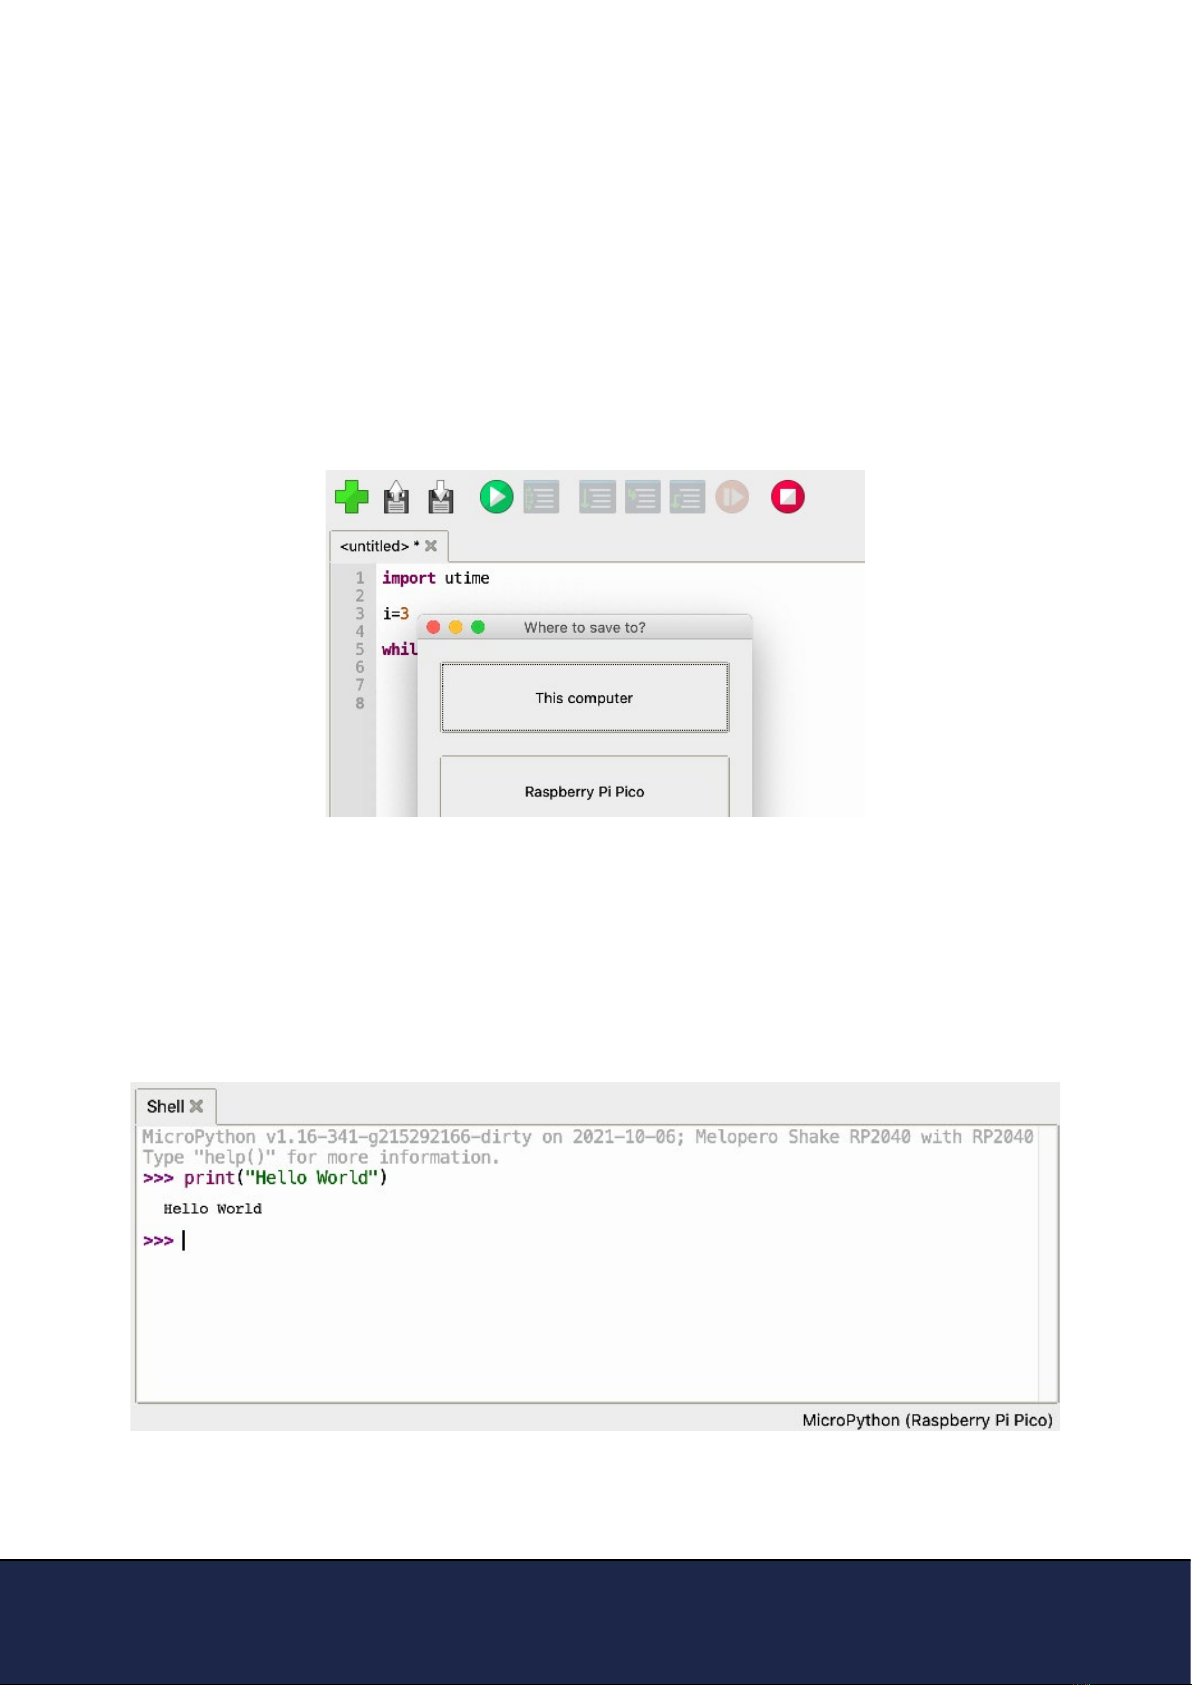
Write some code in the script area of Thonny or copy and paste the micropython demo code
included in the Cookie Software pack (see chapter 3 to download the software pack).
When ready, you can click RUN or SAVE, Thonny will promt you to select where you want to run or
save the script: select “Raspberry Pi Pico”. In case you are saving the le, give it a name including
the .py extension, for example myle.py . If you save the le as main.py, your code will be execu-
ted automatically when powering the Cookie.
Now that your le has been saved, execute your program clicking on RUN (green PLAY button).
If your code includes some prints, you’ll see them in the Shell.
Before saving a new le, remember to click on the “stop/restart“ button if your Cookie is already
running a program.
The REPL, Read-Evaluate-Print-Loop, allows you to execute lines of code directly in the console
and get an immediate result.
In the Shell, try to run the command print(“hello world“) and press enter.
The REPL will interpret the line of code and get you the result, in this case it’ll print “hello world”.
Getting started with Melopero Cookie RP2040
Version 1.0.3 - 20 October 2022
7. Setting up Arduino IDE
7.1 Download the Arduino IDE
7.2 Add Cookie RP2040 to Arduino IDE
To download the Arduino IDE for your favourit OS go to:
https://www.arduino.cc/en/software
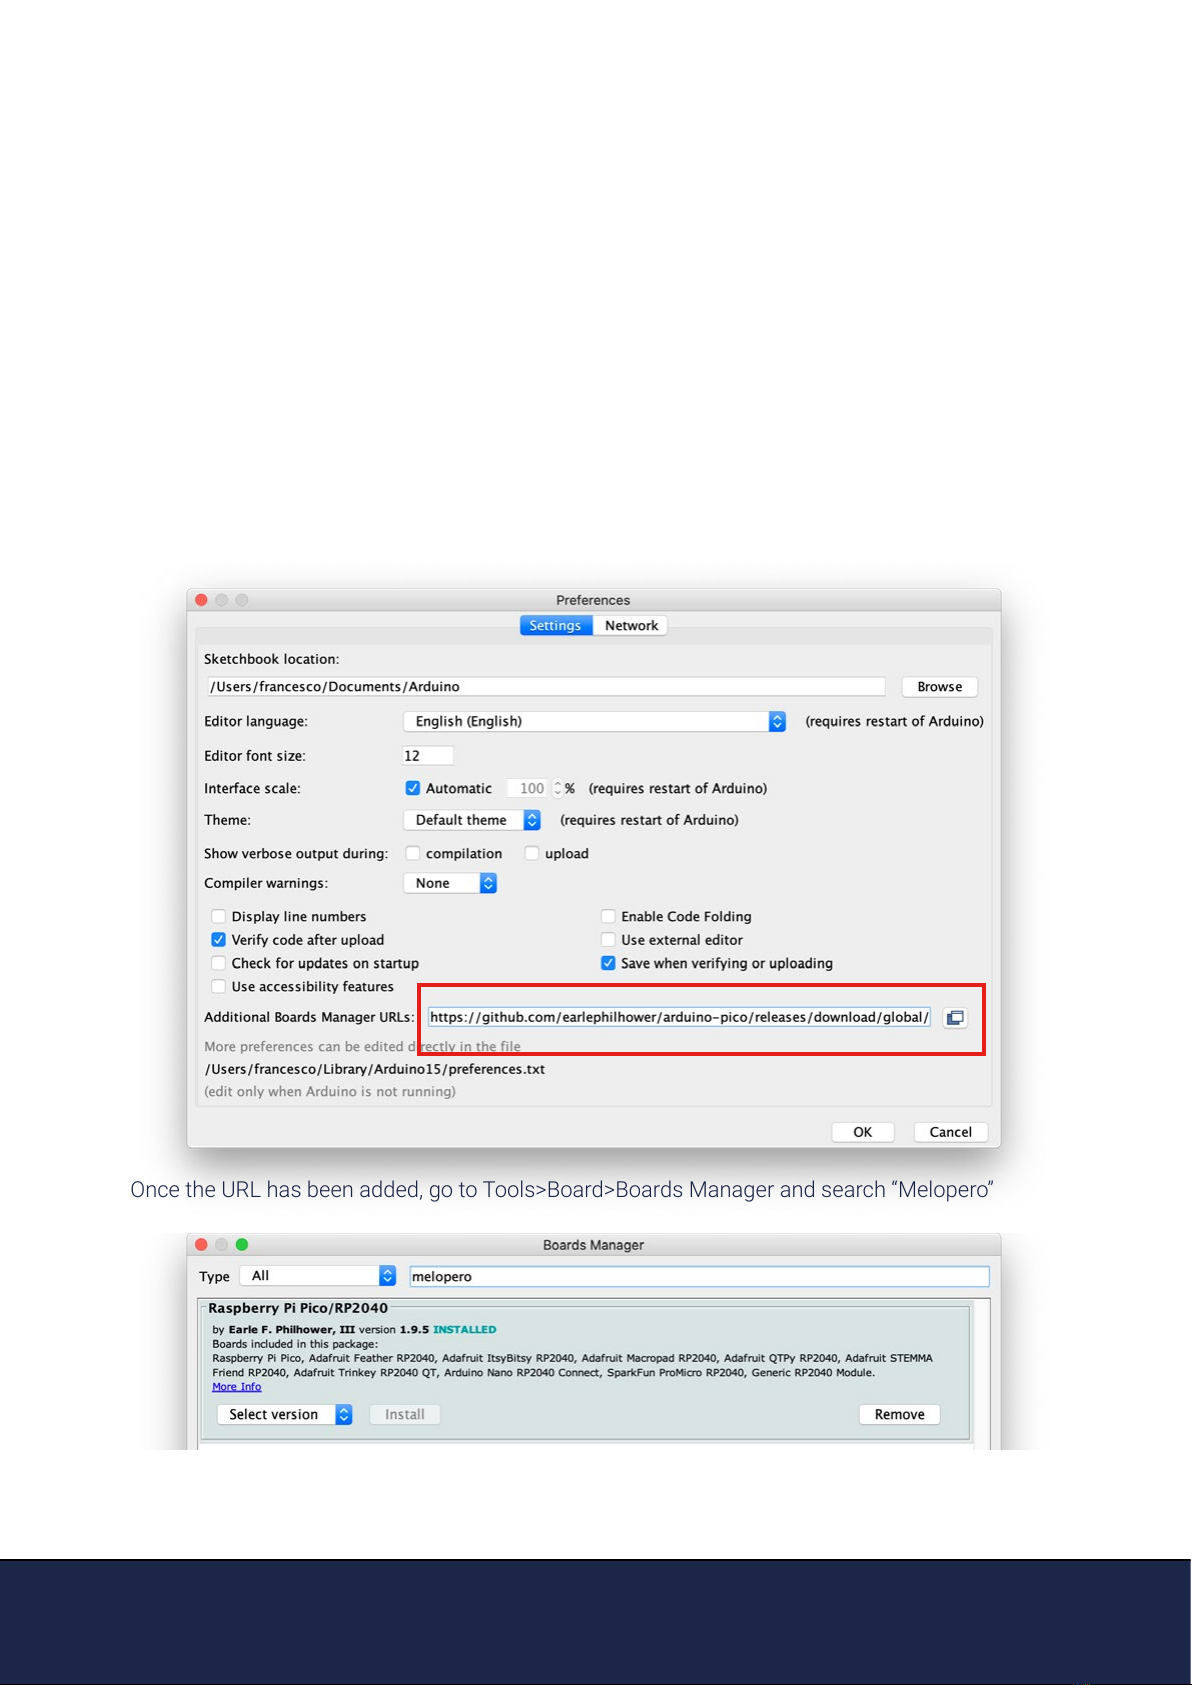
We use the port of the RP2040 developed by Earle F. Philhower, III (earlephilhower on GitHub)
Go to File>Preferences and enter the following URL in the “Additional Boards Manager URLs”
eld:
https://github.com/earlephilhower/arduino-pico/releases/download/global/package_rp2040_index.json
Once the URL has been added, go to Tools>Board>Boards Manager and search “Melopero”
After the installation, you’ll be able to select Melopero Cookie RP2040,
going to Tools>Board>Raspberry Pi RP2040 boards>Melopero Cookie RP2040

Getting started with Melopero Cookie RP2040
Version 1.0.3 - 20 October 2022
7.3 Uploading an Arduino Sketch
In order to upload a sketch from the Arduino IDE, the Cookie must be in bootloader mode.
To activate the bootloader mode, when the Cookie is already connected to your computer’s USB
port, press and hold the BOOT / BT button (circled in red in the image below), then press and
release the reset button (circled in green). Continue holding the BOOT / BOOTSEL button until the
RPI-RP2 drive appears.
After using the Cookie with Arduino IDE, if you want to go back programming it with MicroPython
or CircuitPython, a ash memory reset is necessary, see section 8.
Getting started with Melopero Cookie RP2040
Version 1.0.3 - 20 October 2022
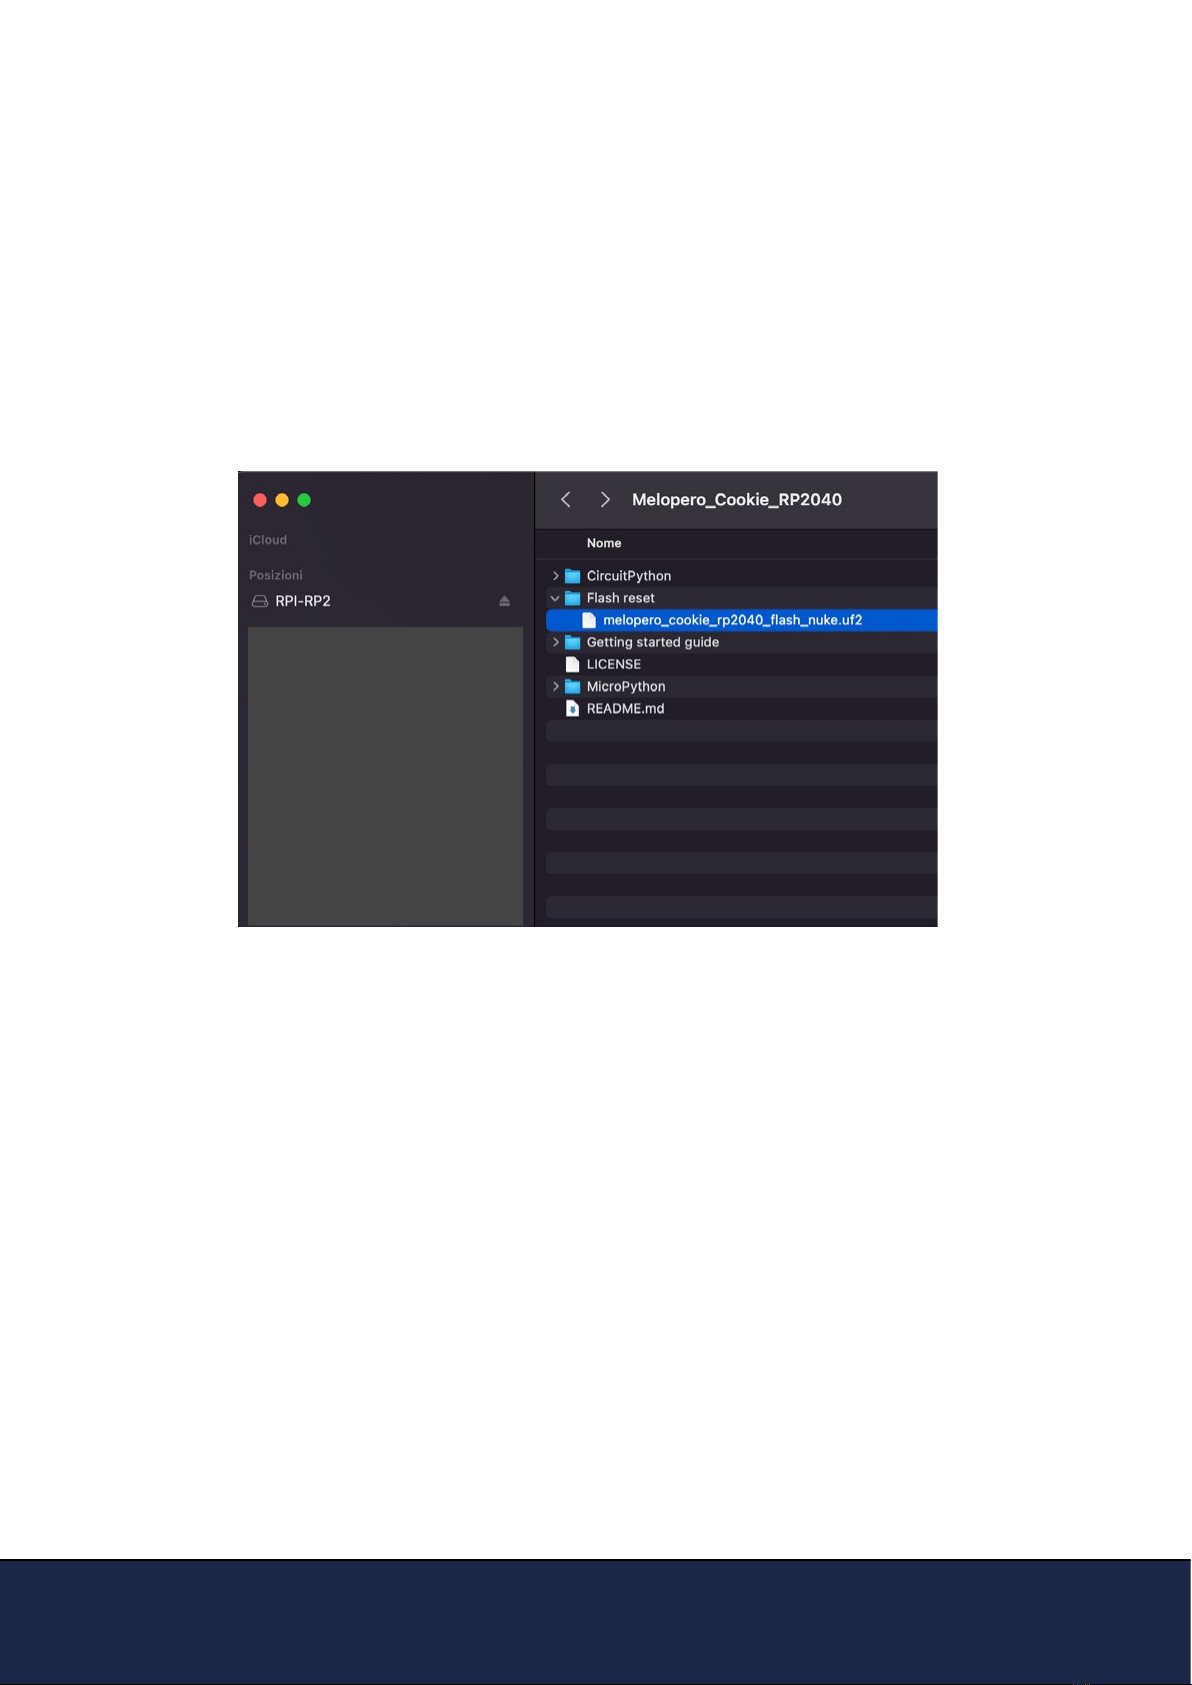
8. Clear the Flash memory
If you need to do a deep clean of the ash memory, active the bootloader mode on the Co-
okie and drag and drop (or copy and paste) the ash nuke le available in the Cookie Software
pack (see chapter 3 to downalod it) onto the RPI-RP2 drive as you did for CircuitPython or Mi-
croPython (see sections 5.1 and 4):
To activate the bootloader mode, when the Cookie is already connected to your computer’s USB
port, press and hold the BOOT / BT button (circled in red in the image below), then press and
release the reset button (circled in green). Continue holding the BOOT / BOOTSEL button until the
RPI-RP2 drive appears.
Table of contents
Other Melopero Motherboard manuals


