Meto PrintEasy User manual
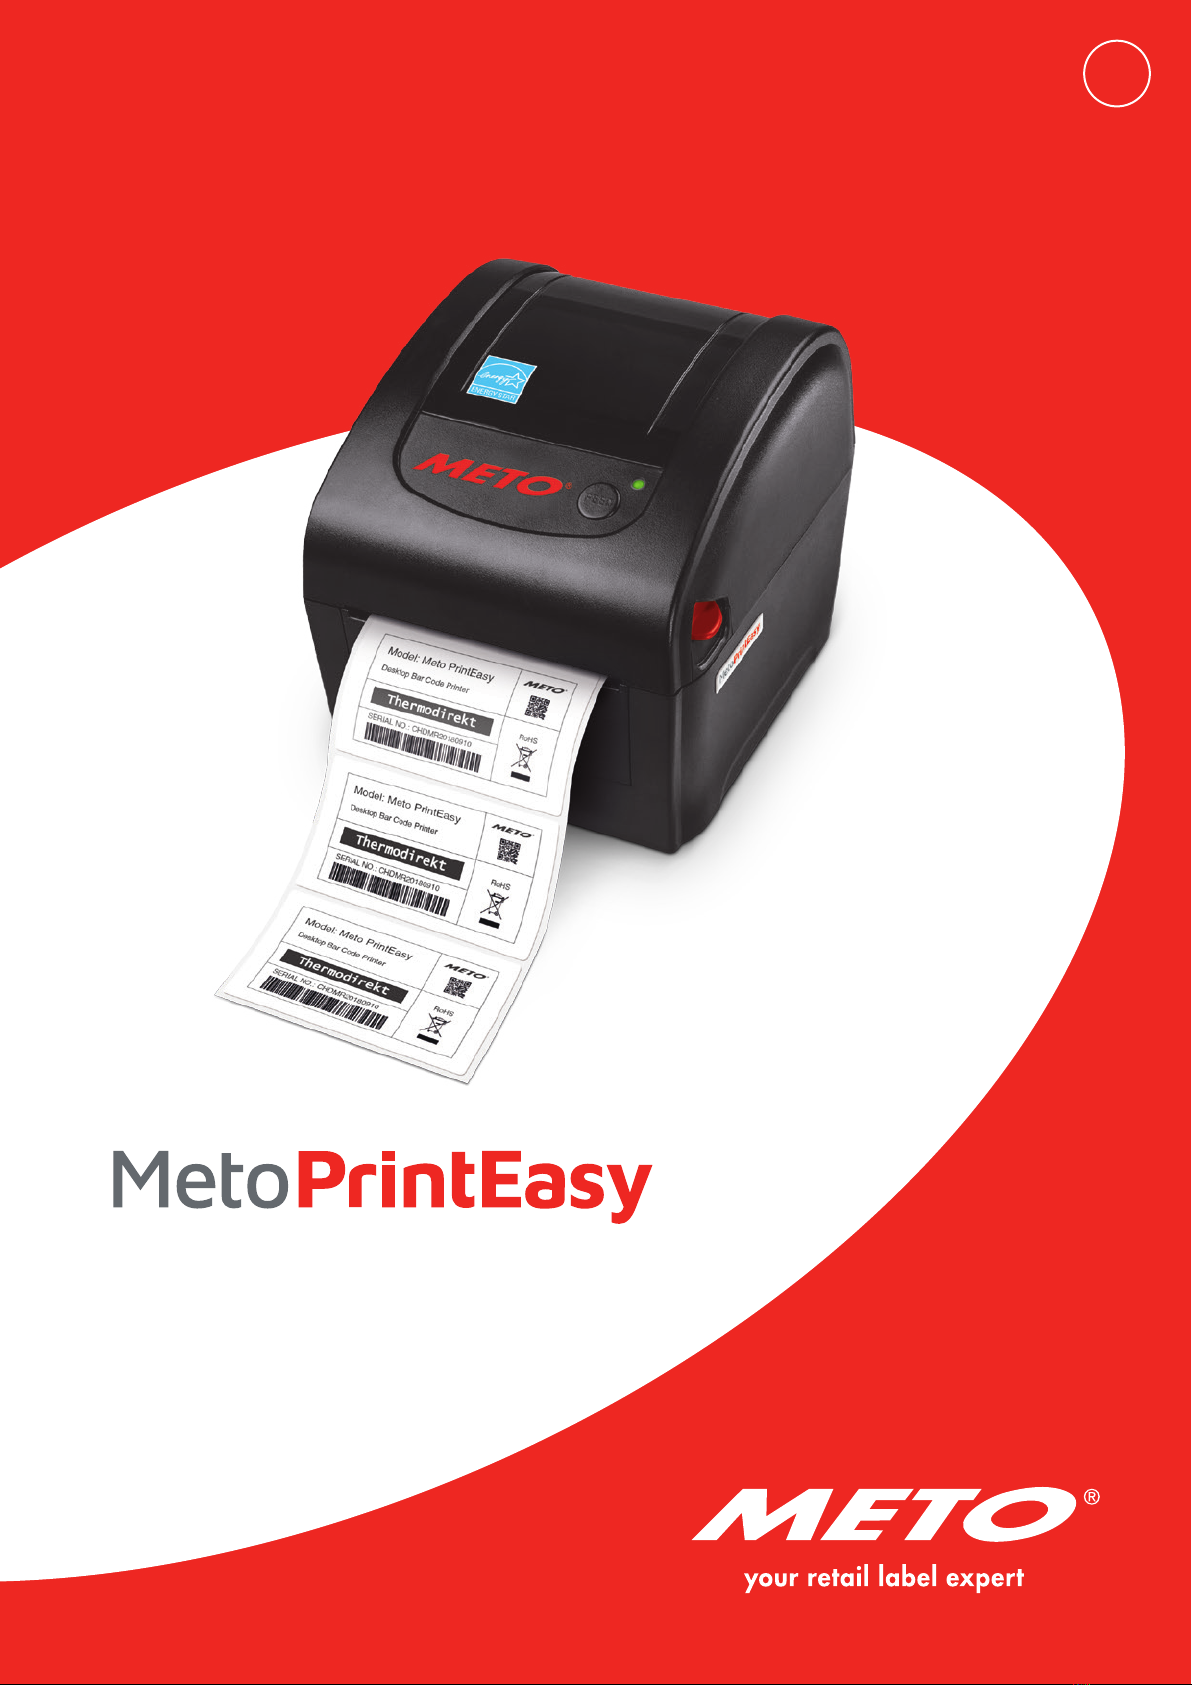
USER’S MANUAL
Direct thermal printing
EN

CONTENTS
1. Agency Compliance and Approvals ......................................................................................................................................................4
2. Introduction......................................................................................................................................................................................................5
2.1 Product Introduction .............................................................................................................................................................................5
2.2 Product Features.....................................................................................................................................................................................6
2.3 General Specifications.........................................................................................................................................................................7
2.4 Print Specifications................................................................................................................................................................................8
2.5 Media Specifications.............................................................................................................................................................................8
3. Operations Overview....................................................................................................................................................................................9
3.1 Unpacking and Inspection..................................................................................................................................................................9
3.2 Printer Overview....................................................................................................................................................................................10
3.2.1 Front & rear....................................................................................................................................................................................10
3.2.2 Interior View..................................................................................................................................................................................10
3.3 LED and Button Function.................................................................................................................................................................. 11
3.3.1 LED Indication............................................................................................................................................................................... 11
3.3.2 Regular Button Function......................................................................................................................................................... 11
4. Setup..................................................................................................................................................................................................................12
4.1 Setting up the Printer..........................................................................................................................................................................12
4.2 Loading the Media ...............................................................................................................................................................................13
4.2.1 Loading the Roll Labels ...........................................................................................................................................................13
4.2.2 Loading External Media...........................................................................................................................................................15
4.3 Install the Adapter for 1.5” Paper Core .....................................................................................................................................17
5. Power-on Utilities........................................................................................................................................................................................18
5.1 Gap/Black Mark Sensor Calibration.............................................................................................................................................19
5.2 Gap/Black Mark Calibration, Self-test and Dump Mode..................................................................................................20
5.2.1 Self-test............................................................................................................................................................................................21
5.2.2 Dump mode ..................................................................................................................................................................................23
5.3 Printer Initialization.............................................................................................................................................................................24
5.4 Set Black Mark Sensor as Media Sensor and Calibrate the Black Mark Sensor....................................................25
5.5 Set Gap Sensor as Media Sensor and Calibrate the Gap Sensor .................................................................................25
5.6 Skip AUTO.BAS........................................................................................................................................................................................26

6. Diagnostic Tool..............................................................................................................................................................................................27
6.1 Start the Diagnostic Tool...................................................................................................................................................................27
6.2 Printer Function.................................................................................................................................................................................... 28
6.3 Setting Ethernet by Diagnostic Tool .........................................................................................................................................29
6.3.1 Using USB interface to setup Ethernet interface........................................................................................................29
6.3.2 Using RS-232 interface to setup Ethernet interface.................................................................................................30
6.3.3 Using Ethernet interface to setup Ethernet interface..............................................................................................31
7. Troubleshooting............................................................................................................................................................................................33
7.1 LED Status..................................................................................................................................................................................................33
7.2 Print Problem..........................................................................................................................................................................................34
8. Maintenance...................................................................................................................................................................................................35
Copyright Information................................................................................................................................................................................... 36
CONTENTS

4
1. AGENCY COMPLIANCE AND APPROVALS
EN 55032, Class A
EN 55024
EN 60950-1; EN 61000-3-2; EN 61000-3-3
This is a class A product. In a domestic environment this product may cause radio interfer-
ence in which case the user may be required to take adequate measures.
Energy Star for Imaging Equipment Version 2.0
Important safety instructions:
1. Read all of these instructions and keep them for later use.
2. Follow all warnings and instructions on the product.
3. Disconnect the power plug from the AC outlet before cleaning or if fault happened.
Do not use liquid or aerosol cleaners. Using a damp cloth is suitable for cleaning.
4. The mains socket shall be installed near the equipment and easily accessible.
5. The unit must be protected against moisture.
6. Ensure the stability when installing the device, Tipping or dropping could cause damage.
7. Make sure to follow the correct power rating and power type indicated on marking label
provided by manufacturer.
8. Please refer to user manual for maximum operation ambient temperature.
Caution (battery for RTC function: CR2032 [3V]Lithium):
Risk of explosion if battery is replaced by an incorrect type.
Dispose of used batteries according to the instructions.
Caution:
The printhead may be hot and could cause severe burns.
Allow the printhead to cool.
Caution:
Risk of explosion if the battery is replaced improperly. Replace only with the same or a similar type
recommended by the manufacturer. Disposal of used batteries according to manufacturer‘s instructions.
Caution:
Any changes or modifications not expressly approved by the grantee of this device could void the user‘s
authority to operate the equipment.
Caution:
Hazardous moving parts, keep fingers and other body parts away.

5
2. INTRODUCTION
2.1 Product Introduction
Congratulations on your purchase of a Meto Print printer.
Buying this printer allows you access to other top-quality Meto Print products. All Meto Print components
– labels, printing ribbons and templates – are fully compatible with each other. And of course, the compre-
hensive Meto Print service package is at your disposal.
You will also receive a 2-year warranty on your Meto Print printer – you can find all the details, as well as
information about service, at www.meto.com/metoprint.
Meto Print desktop printers are suitable for numerous applications and fields of work, for example retail,
identification/labelling of products, stock-taking and inventory control, document printing, patient identifi-
cation, labelling in the healthcare sector and logistics.
Meto Print printers are a popular choice thanks to their high print speeds, plenty of connection options, RTC
functions, and a design that’s both dependable and durable.
Meto Print printers use the TSPL-EZ™ printer language, which is fully compatible with printer languages
including TSC and at the same time supports TPLE (Translation Printer Language Eltron®) as well as TPLZ
(Translation Printer Language Zebra®).
To print labels, please refer to the instructions supplied with your label printing software.
For self-authored programs please refer to the TSPL/TSPL2 programming manual, which you can find at
www.meto.com/metoprint.
Applications
• Retail
• Point of Sale (POS)
• Identification/Labelling of products
• Stock-taking & inventory control
• Document printing
• Labelling within healthcare application
• Logistics
™ TSC Auto ID Technology Co., Ltd.
6
2.2 Product Features
The printer offers the following standard features.
Product standard feature
Direct thermal printing
Gap transmissive sensor (Fixed, center of offset to right 4 mm from center)
Black mark reflective sensor (Fixed, center of offset to right 4 mm from center)
Head open sensor
1 operation button
1 LED with 3 colors
USB 2.0 + USB host + RS-232 + Ethernet ports
32-bit RISC high performance processor
64 MB DRAM memory
128 MB Flash memory
Eltron® EPL, Zebra® ZPL and Datamax® DPL emulation languages support
Internal 8 alpha-numeric bitmap fonts
One Monotype Imaging® CG Triumvirate Bold Condensed scalable font
Built-in Monotype True Type Font engine
Fonts and bar codes can be printed in any one of the four directions (0, 90,180, 270 degree)
Downloadable fonts from PC to printer memory
Downloadable firmware upgrades
Bar code, graphics/image printing
Supported bar code Supported image
1D bar code 2D bar code BITMAP, BMP, PCX (Max. 256
colors graphics)
Code128 subsets A.B.C,
Code128UCC, EAN128, Interleave
2 of 5, Code 39, Code 93, EAN-13,
EAN-8, Codabar, POSTNET, UPC-A,
UPC-E, EAN and UPC 2(5) digits,
MSI, PLESSEY, China Post, ITF14,
EAN14, Code 11, TELPEN, PLANET,
Code 49, Deutsche Post Ident-
code, Deutsche Post Leitcode,
LOGMARS
CODABLOCK F mode, DataMa-
trix, Maxicode, PDF-417, Aztec,
MicroPDF417, QR code, RSS Bar-
code (GS1 Databar)

7
Code page
• Codepage 437 (English - US)
• Codepage 737 (Greek)
• Codepage 850 (Latin-1)
• Codepage 852 (Latin-2)
• Codepage 855 (Cyrillic)
• Codepage 857 (Turkish)
• Codepage 860 (Portuguese)
• Codepage 861 (Icelandic)
• Codepage 862 (Hebrew)
• Codepage 863 (French Canadian)
• Codepage 864 (Arabic)
• Codepage 865 (Nordic)
• Codepage 866 (Russian)
• Codepage 869 (Greek 2)
• Codepage 950 (Traditional Chinese)
• Codepage 936 (Simplified Chinese)
• Codepage 932 (Japanese)
• Codepage 949 (Korean)
• Codepage 1250 (Latin-2)
• Codepage 1251 (Cyrillic)
• Codepage 1252 (Latin-1)
• Codepage 1253 (Greek)
• Codepage 1254 (Turkish)
• Codepage 1255 (Hebrew)
• Codepage 1256 (Arabic)
• Codepage 1257 (Baltic)
• Codepage 1258 (Vietnam)
• ISO-8859-1: Latin-1 (Western European)
• ISO-8859-2: Latin-2 (Central European)
• ISO-8859-3: Latin-3 (South European)
• ISO-8859-4: Latin-4 (North European)
• ISO-8859-5: Cyrillic
• ISO-8859-6: Arabic
• ISO-8859-7: Greek
• ISO-8859-8: Hebrew
• ISO-8859-9: Turkish
• ISO-8859-10: Nordic
• ISO-8859-15: Latin-9
• UTF-8
2.3 General Specifications
General Specifications
Physical dimensions 172 mm (W) x 165 mm (H) x 195 mm (D)
Mechanism Plastic with double-walled clamshell design
Weight 1.5 kg
Power External universal switching power supply
Input: AC 100-240V, 50-60Hz
Output: DC 24V, 2.5A, 60W
Environmental condition Operation: 5 ~ 40 ˚C, 25~85 % non-condensing
Note: Peeler mode : 40 ˚C/45 %
Storage: -40 ~ 60 ˚C, 10~90 % non-condensing
Environmental concern Comply with RoHS, WEEE

8
2.4 Print Specifications
Print Specifications
Print head resolution (dots per inch/mm) 203 dots/inch (8 dots/mm)
Printing method Direct thermal
Dot size (width x length) 0.125 x 0.125 mm (1 mm = 8 dots)
Max. print speed (inches per second) 152.4 mm (6”)
Max. print width 108 mm (4.25”)
Max. print length 25,400 mm (1000”)
Printout bias Vertical: max. 1 mm, horizontal: max. 1 mm
2.5 Media Specifications
Media Specifications
Media roll capacity 127 mm (5”) OD
Media core diameter 1” (1.5”) ID core
Note: 1.5’’ adapter (option)
Media type Continuous, die-cut, black mark, External fan-fold,
receipt
Media wound type Outside wound
Media width 19 mm ~ 114 mm (0.7”~ 4.5”)
Media thickness 0.055 mm ~ 0.19 mm (2.16 ~ 7.48 mil)
Label length 10 ~ 25,400 mm (0.39” ~ 1000”)
Gap height Min. 2 mm
Black mark height Min. 2 mm
Black mark width Min. 16 mm
9
3. OPERATIONS OVERVIEW
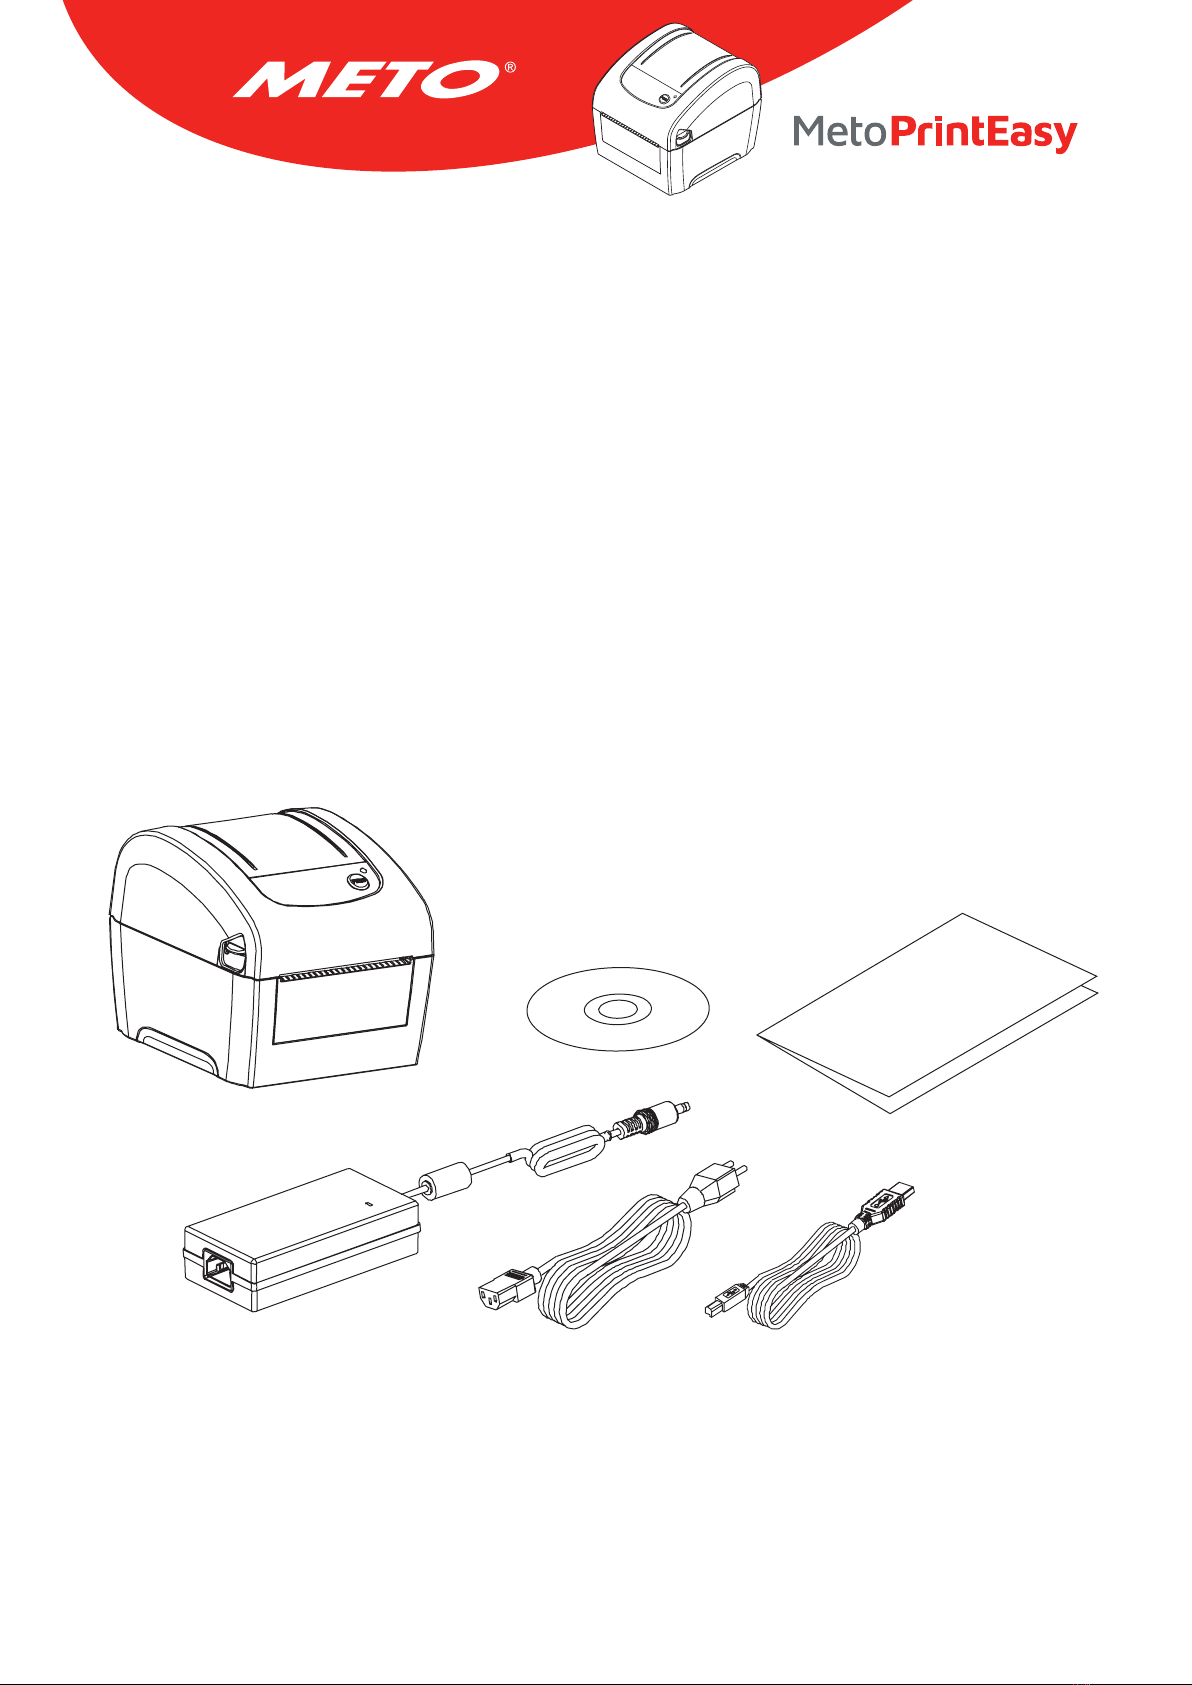
3.1 Unpacking and Inspection
This printer has been specially packaged to withstand damage during shipping. Please carefully inspect the
packaging and printer upon receiving the bar code printer. Please retain the packaging materials in case you
need to reship the printer.
Unpacking the printer, the following items are included in the carton. If any parts are missing, please
contact the Customer Service Department of your purchased reseller or distributor.
• Printer unit
• Windows labeling software/Windows driver CD disk
• Quick installation guide
• USB port cable
• Power cord
• Power supply
10
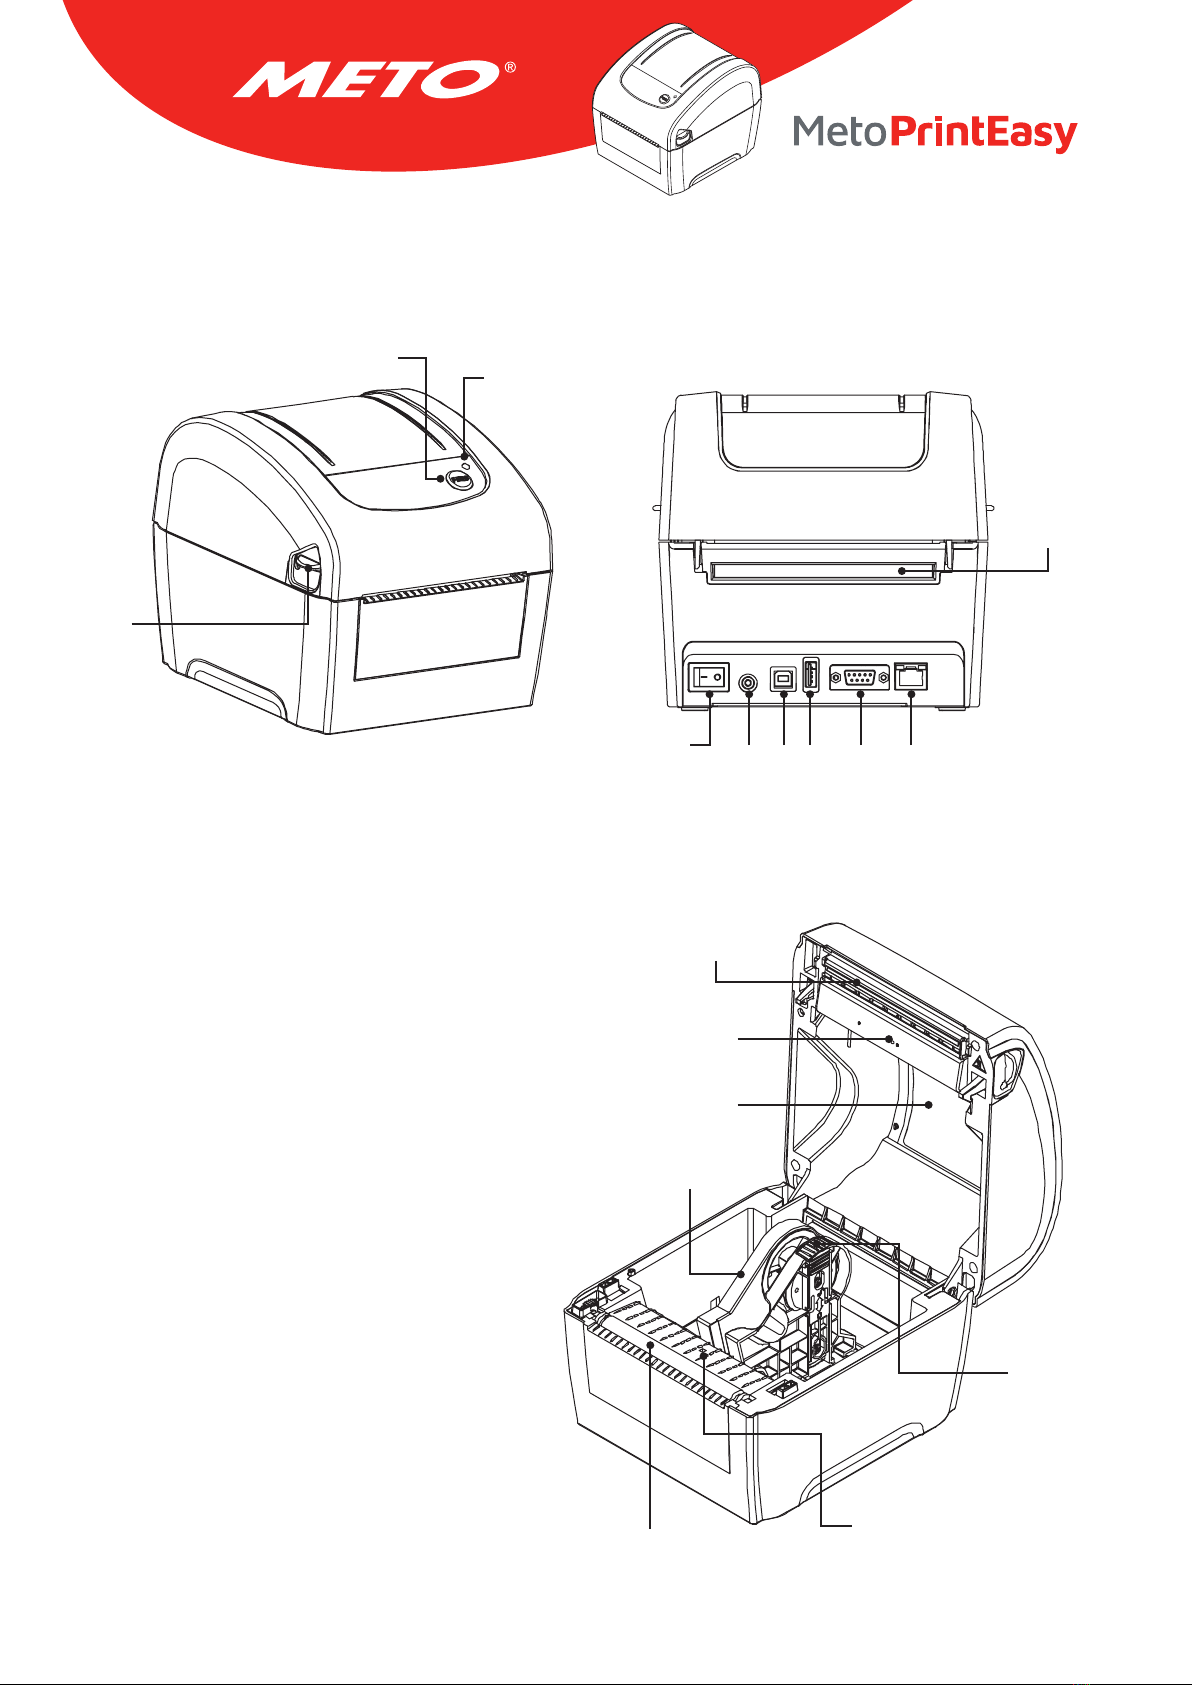
3.2 Printer Overview
3.2.1 Front & rear
3.2.2 Interior View
1. Feed/Pause button
2. LED indicators
3. Top cover open lever
4. External label entrance chute
5. Power switch
6. Power jack socket
7. USB interface
8. USB host
9. RS-232C interface
10. Ethernet interface
11. Print head
12. Gap sensor (transmitter)
13. Media viewer
14. Media holder
15. Platen roller
16. Black mark sensor/
Gap sensor (receiver)
17. Media holder lock switch
4
56 7 8 9 10
12
3
11
12
13
14
15 16
17

11
3.3 LED and Button Function
This printer has one button and one three-color LED indicator. By indicating the LED with different color and
pressing the button, printer can feed labels, pause the printing job, select and calibrate the media sensor,
print printer self-test report, reset printer to defaults (initialization). Please refer to the button operation
below and “Power-on Utilities” section for different functions.
3.3.1 LED Indication
LED Color Description
Green/Solid This illuminates that the power is on and the device is ready to use.
Green/Flash This illuminates that the system is downloading data from PC to memory or the printer is paused.
Amber This illuminates that the system is clearing data from printer.
Red/Solid This illuminates printer head open, cutter error.
Red/Flash This illuminates a printing error, such as head open, paper empty, paper jam, or memory error etc.
3.3.2 Regular Button Function
1. Feed labels
When printer is ready, use the feed/pause button to feed next label to printing position.
2. Pause the printing job
While the printer is running, use the feed/pause button to stop the current print job. The LED flashes green
while the printer is stopped. Press the button again to resume the print job.

12
4. SETUP
4.1 Setting up the Printer
1
2
3
4
Note:
Please switch OFF (O) printer power switch prior to plug in the power cord to printer power jack.
Place the printer on a flat, secure surface.
Make sure the power switch is off.
Connect the printer to the computer with the provided USB cable.
Plug the power cord into the AC power cord socket at the rear of the printer, and then plug the
power cord into a properly grounded power outlet.
Plug
Power switch
USB interface
Power supply

13
4.2 Loading the Media
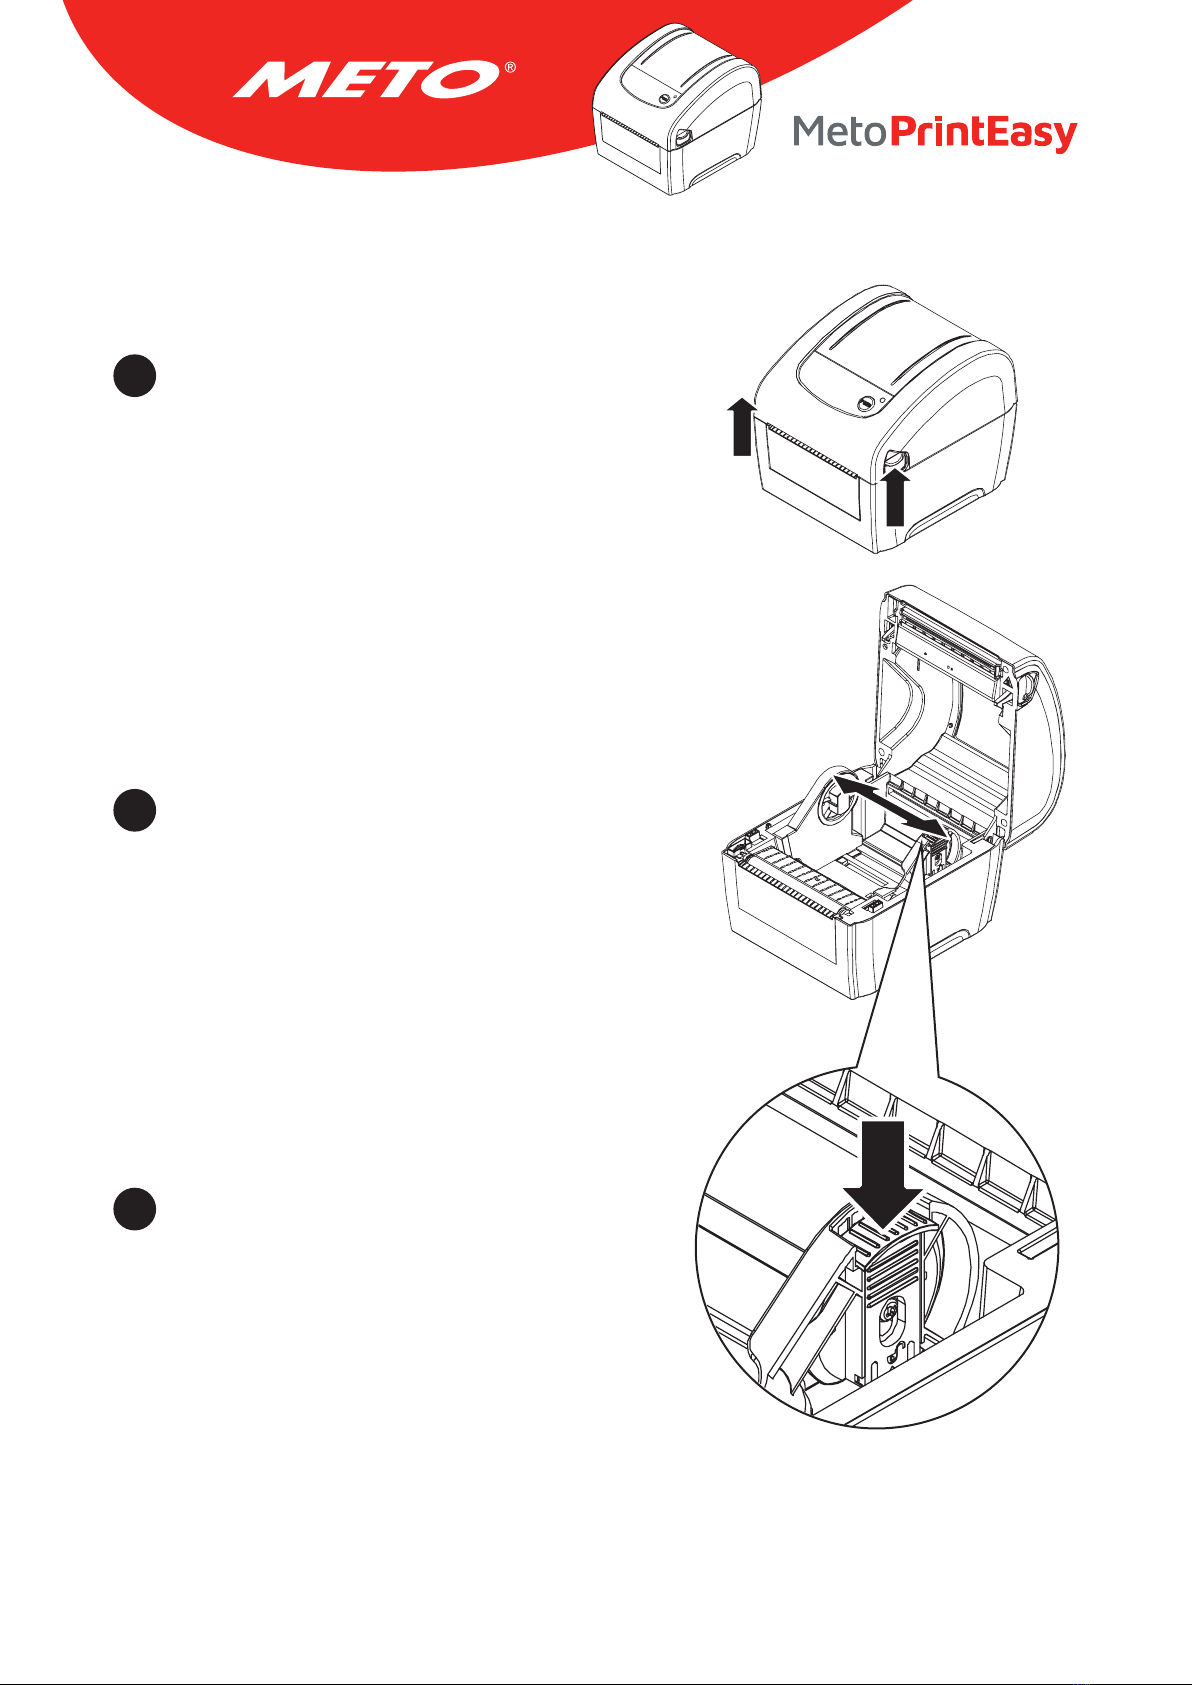
4.2.1 Loading the Roll Labels
Open the printer top cover by pressing up the top cover
open tabs located on each side of the printer.
Separate the media holders to the label roll width.
Place the roll between the holders and close them onto
the core.
1
2
3

14
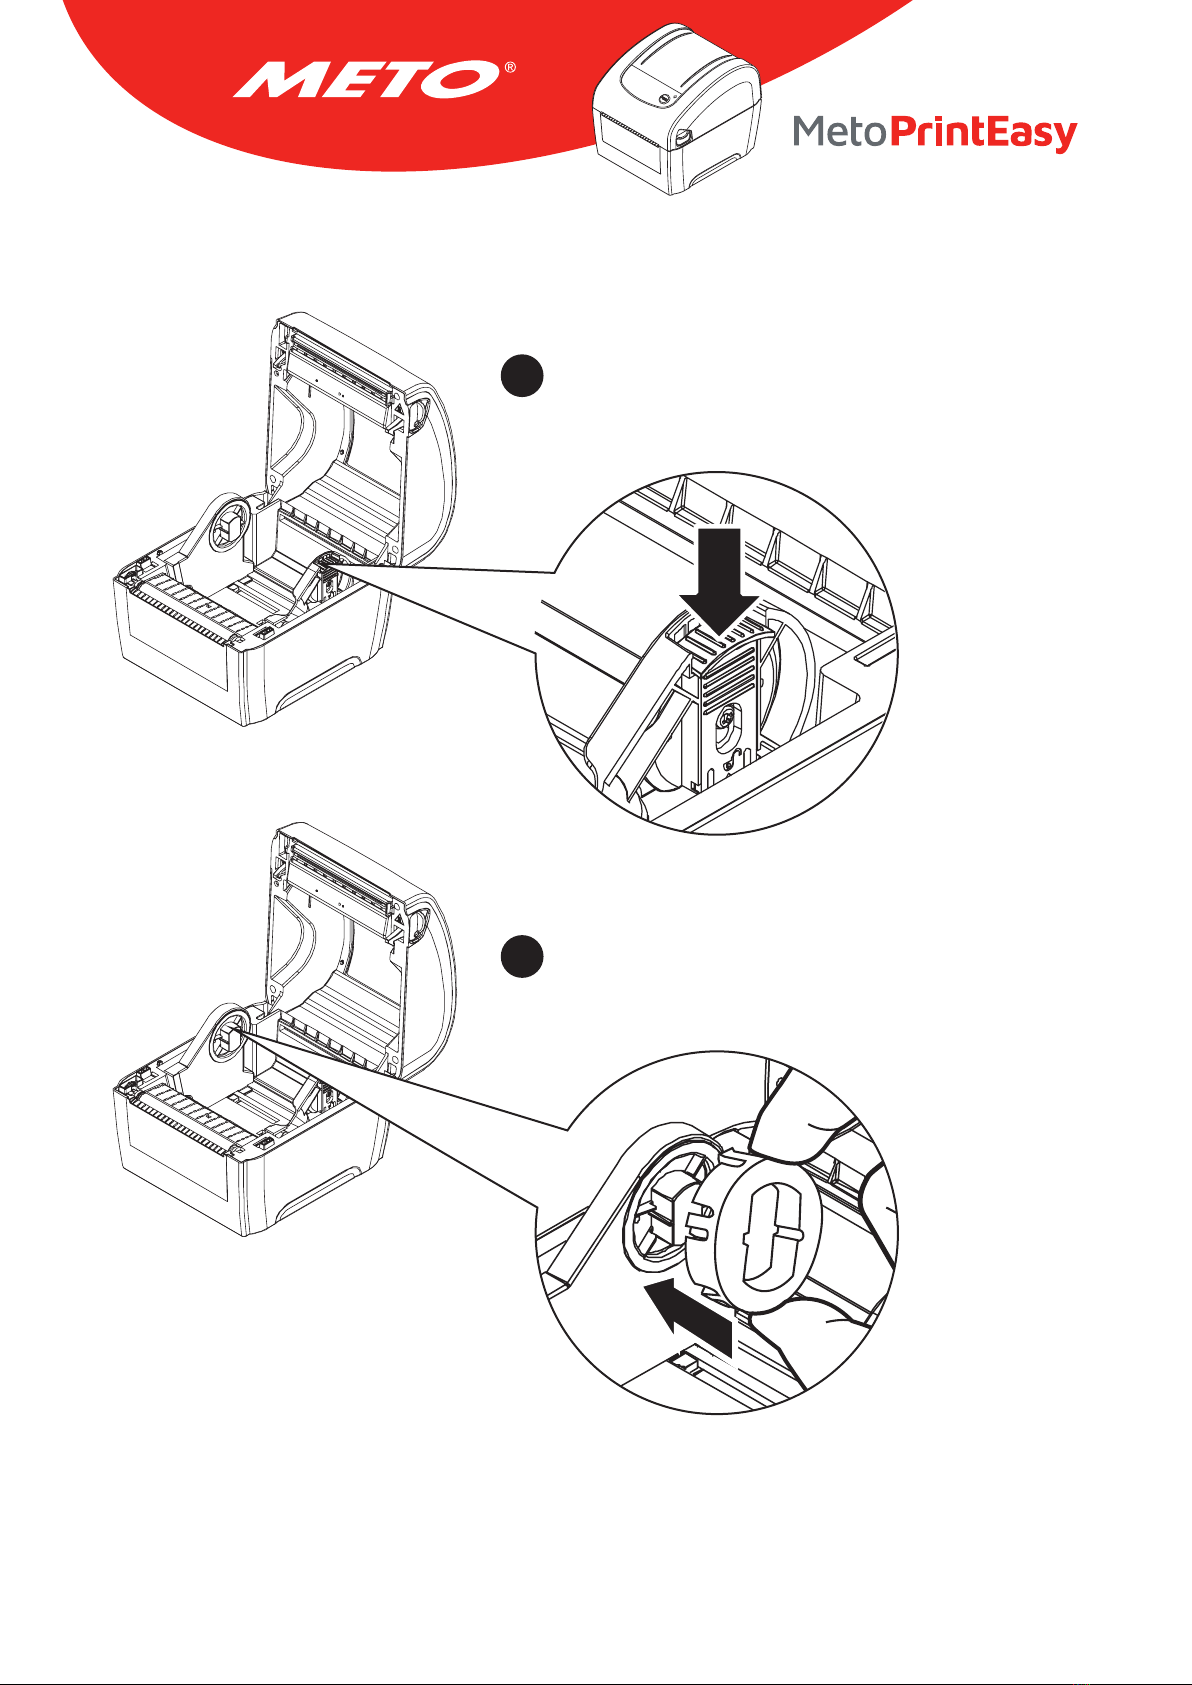
Place the label leading edge onto the platen roller
(printing side face up).
Close the top cover gently and make sure the cover
latches securely.
Use “Diagnostic Tool” to set the media sensor type and
calibrate the selected sensor. (Start the “Diagnostic
tool” → Select the “Printer Configuration” tab → Click
the “Calibrate Sensor” button)
4
5
6
Note: Please calibrate the gap/black mark sensor when changing media.
15
4.2.2 Loading External Media
Open the printer top cover by pressing up the top cover
open tabs located on each side of the printer.
Separate the media holders to the label width.
Press down the media holder lock switch to fix the
media holder.
1
2
3

16
Feed the media through the rear external label en-
trance chute (printing side face up). Place the label
leading edge onto the platen roller.
Close the top cover gently and make sure the cover
latches securely.
Use “Diagnostic Tool” to set the media sensor type
and calibrate the selected sensor. (Start the “Diag-
nostic tool” → Select the “Printer Configuration” tab
→ Click the “Calibrate Sensor” button)
Note: Please calibrate the gap/black mark sensor when changing media.
4
5
6
17
1
2
4.3 Install the Adapter for 1.5” Paper Core
Please refer to section 4.2.2 to fix the media holders for
installing the 1.5” adapters.
Press 1.5” adapters into both media holders for using 1.5“
core media roll.
18
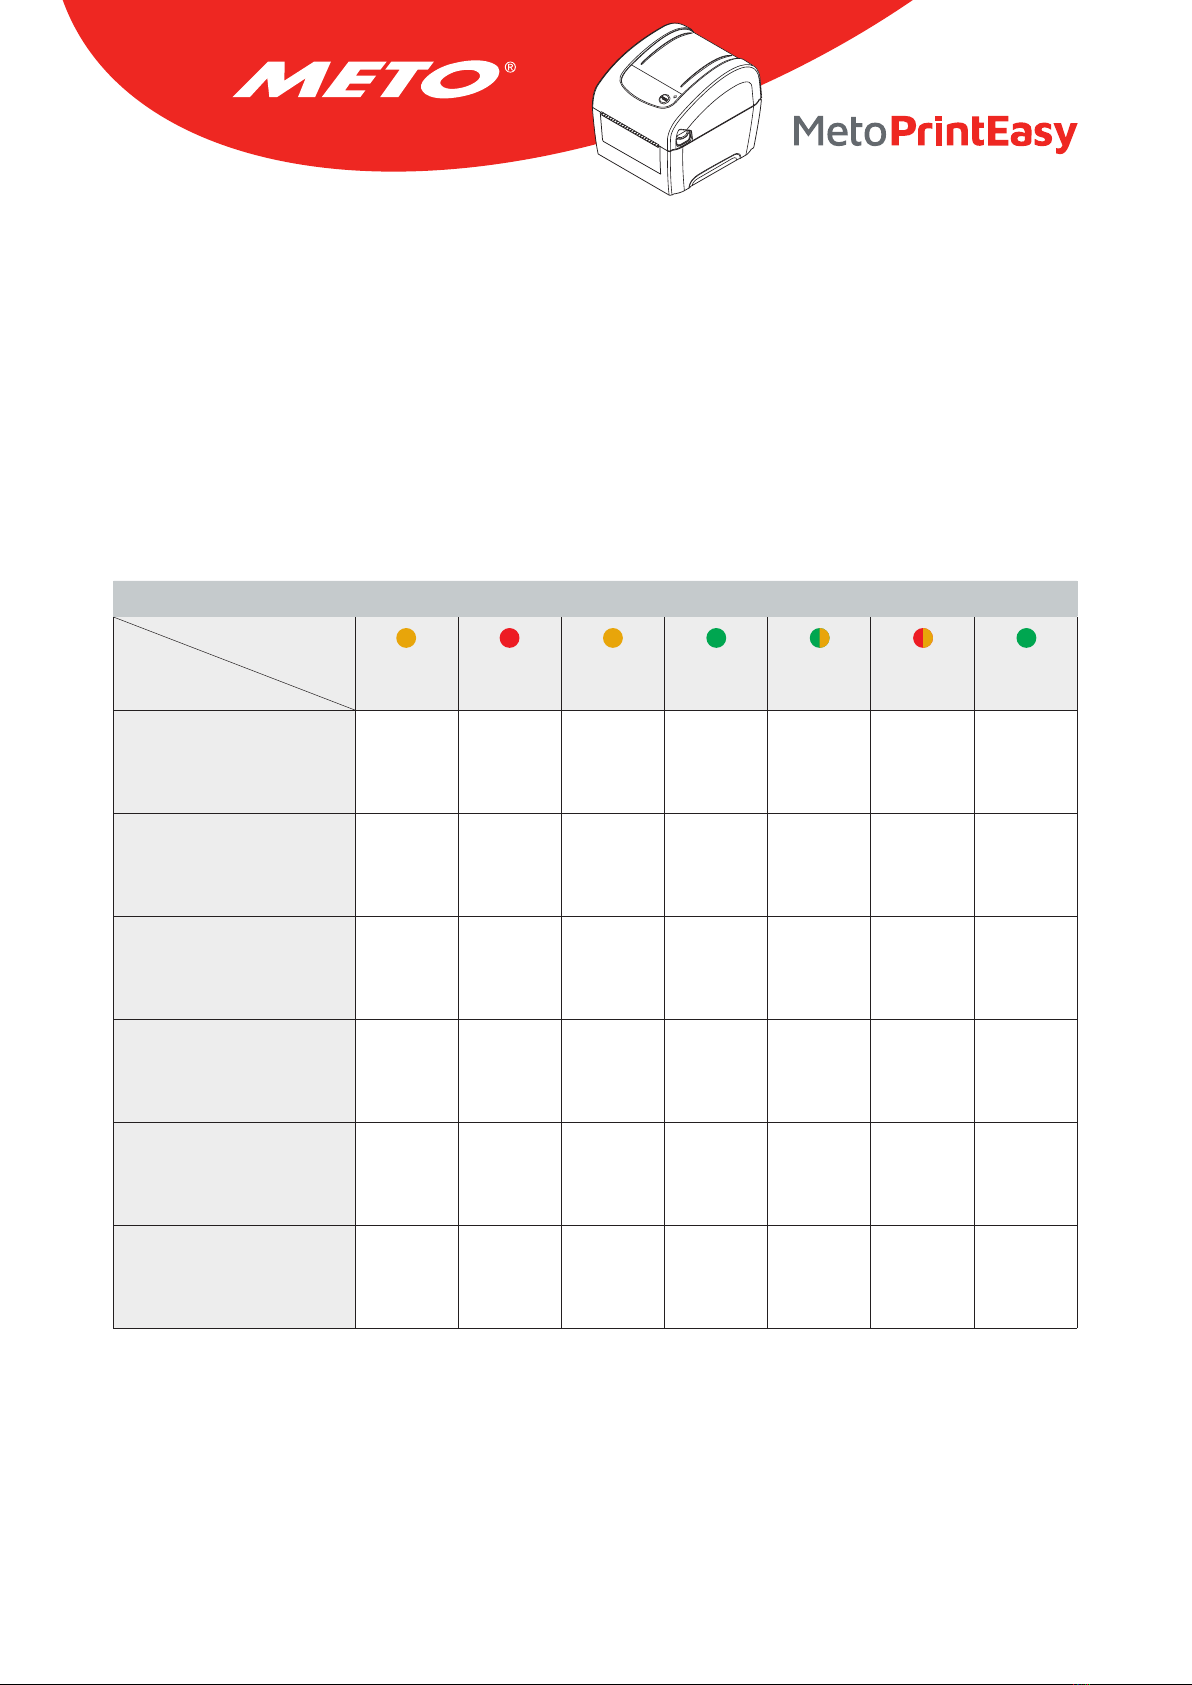
5. Power-on Utilities
There are six power-on utilities to set up and test printer hardware. These utilities are activated by pressing
FEED button then turning on the printer power simultaneously and release the button at different color of
LED.
Please follow the steps below for different power-on utilities:
1. Turn off the power switch.
2. Hold on the button then turn on the power switch.
3. Release the button when LED indicates with different color for different functions.
Power on utilities The LED color will be changed as following pattern:
Amber Red
(5 blinks)
Amber
(5 blinks)
Green
(5 blinks)
Green/Amber
(5 blinks)
Red/Amber
(5 blinks)
Green
solid
1. Gap/black mark sensor
calibration Release
2. Gap/black mark sensor
calibration, Self-test and
enter dump mode
Release
3. Printer initialization Release
4. Set black mark sensor as
media sensor and calibrate
the black mark sensor
Release
5. Set gap sensor as media
sensor and calibrate the
gap sensor
Release
6. Skip AUTO.BAS Release
LED color
Functions

19
5.1 Gap/Black Mark Sensor Calibration
Gap/black mark sensor sensitivity should be calibrated at the following conditions:
1. A brand new printer.
2. Change label stock.
3. Printer initialization.
Please follow the steps below to calibrate the gap/black mark sensor.
1. Turn off the power switch.
2. Hold on the button then turn on the power switch.
3. Release the button when LED becomes red and blinking. (Any red will do during the 5 blinks).
• It will calibrate the gap/black mark sensor sensitivity.
• The LED color will be changed as following order: Amber → red (5 blinks) → amber (5 blinks)
→ green (5 blinks) → green/amber (5 blinks) → red/amber (5 blinks) → solid green
Note:
• Sensor calibration can be done by Diagnostic Tool or by power on utility.
Please refer to “Diagnostic Tool” section for more information.
• Please select gap or black mark sensor type prior to calibrate the sensor.
Release button
1 5 5 5 5 5 S

20
5.2 Gap/Black Mark Calibration, Self-test and Dump Mode
While calibrate the gap/black mark sensor, printer will measure the label length, print the internal config-
uration (self-test) on label and then enter the dump mode. To calibrate gap or black mark sensor, depends
on the sensor setting in the last print job.
Please follow the steps below to calibrate the sensor.
1. Turn off the power switch.
2. Hold on the button then turn on the power switch.
3. Release the button when LED becomes amber and blinking. (Any amber will do during the 5 blinks).
• The LED color will be changed as following order: Amber → red (5 blinks) → amber (5 blinks)
→ green (5 blinks) → green/amber (5 blinks) → red/amber (5 blinks) → solid green
4. It calibrates the sensor and measures the label length and prints internal settings then enter the dump
mode.
Note:
• Sensor calibration can be done by Diagnostic Tool or by power on utility. Please refer to “Diagnostic
Tool” section for more information.
• Please select gap or black mark sensor type prior to calibrate the sensor.
Release button
1 5 5 5 5 5 S
Table of contents
Other Meto Printer manuals


