Metrik Mobile Electronics MCD-476 User manual

MCD-476
MCD-476
AM/FM RADIO
CD PLAYER WITH ESP ANTI-SHOCK,
4 CHANNEL HIGH POWER CAR AUDIO SYSTEM
LIMITED ONE YEAR WARRANTY
This warranty shall be in effect for a period of one year from the date of the first
consumer purchase. This warranty is valid during the warranty period providing that proof
of date of purchase from an authorized dealer is presented whenever warranty service is
required.
To receive service for this product return it to the Metrik dealer from whom it was
purchased and such dealer will arrange for service. If shipment of the product is required,
it should be packed securely. The original dated bill of sale, or a legible copy, must be
included with the product as proof of warranty coverage.
Metrik will pay for all labor and material expenses required to repair the product, only.
Labor expense for the removal and installation of the product is the sole responsibility of
the consumer. If the product is shipped, the consumer must prepay the initial shipping
charge to us; Metrik will pay the return shipping charges to the consumer.
Except as otherwise specified, this warranty covers all defects in material and
workmanship. The following are not covered: damage resulting from accident, misuse,
abuse, neglect, product modification, improper installation, incorrect line voltage,
unauthorized repair or failure to follow instructions supplied with the product, damage
occurring during shipment (claims must be filed with the carrier), elimination of car static
or other electrical interferences, any product purchased outside of North America or on
which the serial number has been defaced, modified or removed.
All implied or statutory warranties and conditions, including warranties or conditions of
merchantability, fitness for particular purposes and non-infringement are limited in
duration to the length of this warranty.
Metrik's liability is limited to the repair or replacement, at our option, of any defective
product and shall not include incidental or consequential economic damages of any kind.
Some states or provinces have differing limitations. This warranty gives you specific rights
and you may also have other rights, which vary depending of the state or province in which
you reside.
METRIK MOBILE ELECTRONICS
a division of SAMSON ELECTRONICS, INC.
3400 E. SLAUSON AVE.; MAYWOOD, CA 90270
TOLL FREE: 866-572-6766

CONTENTS
1
INSTALLATION GUIDE
HANDLING COMPACT DISCS
2
WIRING INSTRUCTION
3
CONTROL LOCATIONS
4
BUTTON FUNCTIONS
8
6~7
5
WIRING DIAGRAM AND SPECIFICATIONS
TROUBLESHOOTING
1
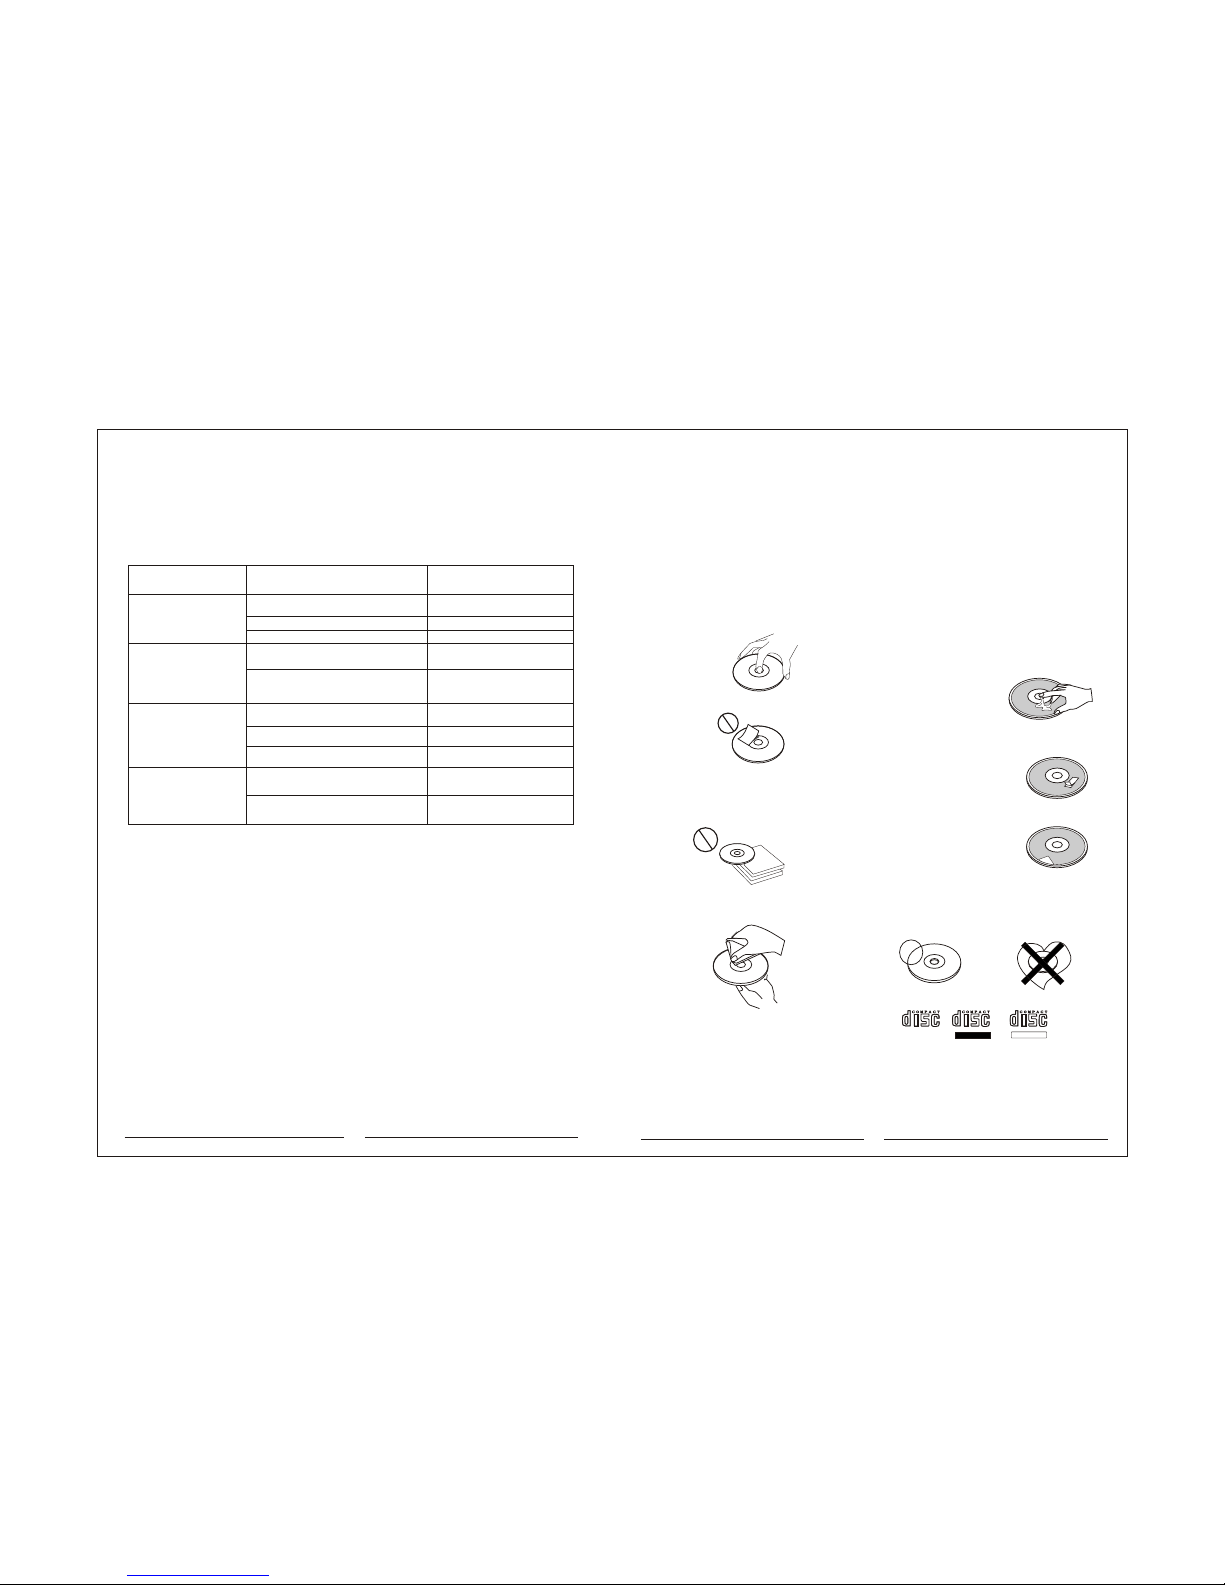
HANDLING COMPACT DISCS
NOTES ON CDS
MOISTURE CONDENSATION
DIGITALAUDIODIGITALAUDIO DIGITALAUDIODIGITALAUDIO DIGITALAUDIODIGITALAUDIO
RECORDABLE RECORDABLE
On a rainyday or ina very damparea, moisture maycondense on thelenses inside the unit.
Should this occur, the unit will not operate properly. In such a case, remove the disc and wait
for about anhour until themoisture has evaporated.
1. Adirty or defectivedisc may cause sound
dropouts while playing.Toenjoy optimum
sound, handle thedisc as follows.
Handle the discby its edge.Tokeep the disc
clean, do nottouch the surface(P.1)
2. Do notstick paper ortape on thedisc (P.2)
3. Do notexpose the discsto direct sunlightor
heat sources suchas hot air-ducts,or leave
them in acar parked indirect sunlight where
there can bea considerable risein
temperature inside thecar (P.3).
4. Before playing,clean the discswith an
optional cleaning cloth.Wipe each disc from
the centre out(P.4).
5. Do notuse solvents suchas benzine,
thinner, commerciallyavailable cleaners, or
antistatic spray intendedfor analog discs.
CD-Rs and CD-RWswhich have not undergone finalization processing cannot be played.
(For more informationon finalization processing, refer to the manual for your CD-R/
CD-RW writing softwareor CD-R/CD-RW recorder.) Addition software or depending on
the recording status,it may proveimpossible to playcertain Cds record on CD-R or CD-RW.
Only for thisunit.
Be Sure to use Cds with disc mark
Be sure touse round shapeCds only for
this unit anddo not useany special shape
Cds. Use ofspecial shape Cdsmay cause
the unit tomalfunction.(P.8).
Do Not UseSpecial Shape Cds
Labels are attached(P.7).
Do not useyour Cds withlabels or stickers
attached.
Do not userental Cds withold labels that
are beginning topeel off.
If you usethe discs explainedbelow, the
sticky residue cancause the CDto stop
spinning and maycause malfunction or ruin
your discs.
Do not usesecond-hand or rentalCds that
have a stickyresidue on thesurface (for
example, from peeled-offstickers or from
ink, or glueleaking from underthe stickers).
Stickers that arebeginning
to peel away, leaving a
sticky residue (P.6).
There are pasteresidue.
Ink is sticky(P.5).
NOTES ON DISCS
P.1
P.5
P.6
P.7
P.8
P.2
P.3
P.4
8
Yellow wire not connected or incorrect voltage
Red wire not connected or incorrect voltage
Black wire not connected
Fuse blown
Speaker wires not connected
One or more speaker wires touching each
other or touching chassis ground
Yellow or red wire touching chassis ground
Speaker wires touching chassis ground
Incorrect fuse rating
Unit is not mounted correctly or back strap is
not secure
Physical defect in media(CD)
Unit will not turn on
(no power)
Unit has power
(but no sound)
Unit blows fuses
Excessive skipping
Check connections for proper voltage
(11-14.4VDC)
Check connection to ground
Replace fuse
Check connections at speakers
Insulate all bare speaker wires from
each other and chassis ground
Check for pinched wire
Check for pinched wire
Use fuse with correct rating
Check mounting sleeve and back strap
support
Check media for scratches
Problem Cause Action
TROUBLESHOOTING

2
Preparation
Please read entiremanual before installation.
Before You Start
Disconnect negative batteryterminal.(consult a qualifiedtechnician for instructions)
Avoid installing theunit where it would be subject to high temperatures, such as from
direct sunlight, orwhere it wouldbe subject todust, dirt orexcessive vibration.
Getting Started
Remove 2 transitscrews located
on top ofthe unit.
Insert the suppliedkeys into the
slots as shown,and slide theunit
out of themounting sleeve.
Install mounting sleeveinto
Opening, bending tabsto secure.
Connect wiring harnessand
antenna.(consult a qualified
technician if youare unsure)
Certain vehicles mayrequire an
installation kit and/orwiring
harness adapter(sold separately).
Testfor correct operationand slide
into mounting sleeveto secure.
Snap trim ringinto place.
HEX BOLT
MOUNTING SLEEVE
MOUNTING STRAP
TAPPING SCREW
SPRING WASHER
PLAIN WASHER
HEX NUT
SECURITY
LED
KEYS
INSTALLATION GUIDE
When is onradio mode, rotatethe TUNE buttonleft/right to turn the station.
TUNE
T-UP/DOWN
7
BUTTON FUNCTION
Press EJ toreject a CDfrom the cartridge,the CD cartridgewill automatically close once we
push the cartridgeor wait for10 seconds. Long press EJ force to reject theCD from all modes.
EJECT
Press the OPEN to allow the front panel to detachable panel.
OPEN
Press“ ”go tonext song, press“ ”go to previous song.
Long press “ ” fast forward,long press “ ” fast backward.
When no trackis playing, press“RDM” to shuffle,the word “RND” will displays on LCD screen
and blinking. Press selects a track. Press STOP cancels the shuffle and stop playing a
track.
When no trackis playing, press“PRO” to setupa play list, while “O” is blinking on LCD, press
navigates to thedesired track andpress “PRO” againto save that track into the play list. Then
the screen backto blinking, keeprepeating previous procedureto save the desired track into
the play list. Aplay list maximumcan save 20tracks. Once a play list reachesthe maximum,
the screen displays“ -- ”. Press “STOP” tostop programming play list. Press “PRO” again,
back to theplay list, navigatesto the desiredtrack; press “MOD” or “PWR” to deletes the track
from the playlist. Press “PLAY” to play the play list. While playing a play list, press “REP” to
play a trackrepeatedly.
RDM
PRO
CD Switch Between Modes
The product hastwo modes: CDmode and Radiomode. Switch between two modes as follow:
A: Switch from Radio Mode to CD Mode
1)Under Radio Modeinsert CD
2)Press MOD, switchto CD Mode
3)Start reading CD,displays total numberof tracks inLCD
4)Press PLAY, start to play
B: Switch from CD Mode to Radio Mode
Under CD Modepress MOD toswitch to RadioMode
Remarks: Must PressPLAY to play the track

3
Speakers Connection
This unit canmate with 4as well as8 speakers .Makesure
Power is off before connecting.
Caution:
Do Not Shortspeaker wires tochassis ground .It may cause severe
damage.
Ground Connection
Connect Black Wire to Ground terminal.If not found,connect it to
the chassis instead.
Power Connection
First connect thered Wire (w/3Amp fuse ACC) to ignition output.
battery power. Make sure no other device, such as switch, in between.
Then connect orange Wire(w/1 Amp fuse block) directly to +12v
Antenna Connection
Insert coaxial connector to antenna socket.
Caution:
If a fuse is blown , only replace it with one of the sam e rating.
Other wise may cause severe damage . Repeated blown fuse indicates
potential problem(s) exists.A thorough inspection is recommended.
WIRING INSTRUCTION
BAND
REP
PLAY
POWER ON/OFF
When is onradio/CDP mode, turnthe VOL button clockwise toincrease the volume,turn
anticlockwise to decreasethe volume.
VOLUME
MODE
BUTTON FUNCTION
6
Press BAND buttonto switch betweenFM/AM.
Press DISP buttonto display time, long press the DISP button to setup the time.
When the timeblinks, press H/Mbutton to sethour/minute; hold H/Mto increase H/M
sequentially.
DISP
1) Press DISPto display clock.
Long press DISPto setup the time, while it is blinking, press H/M press to adjust the time.
It will displaythe time, ifyou press DISPbutton again or left it for 5 seconds .
2) Press “H”once to increaseone hour,long press toincrease sequentially.
3) Press “M”once to increaseone minute, longpress to increasesequentially.
CLOCK
Press PWR toturn on/off thepower.
Press MOD toswitch to CDmode. If no CD inside the cartridge, the LCD shows “__”.
When you inserta CD intothe cartridge, itreads the CDautomatically, and displays
number of trackson LCD (Ifa CD isnot readable, itdisplays “E”).
Press PLAYto play first tracks from CD. While it is playing a track, press PLAYto pause/
resume the track,the word “PLAY” will displays on the screen and blinking.
STOP
Press STOP to stop playing a track.
Press REP playsa track repeatedly; long press REP play all tracks repeatedly.

4
WIRING DIAGRAM
5
1HOUR
2
3
4
5
T-DOWN
6
7
8
9
10
11
12
13
14
15
16
RDM
PRO
MODE
VOLUME
POWER
STOP
OPEN
17
CONTROL LOCATIONS
Superior disc readingability: Ableto read CD
PLAY
DISP
BAND
MINUTE
REP
TUN
EJECT
1
2
16
14
13
12
11
10
9
8
7
6
3
4
5
15
17
T-UP
Design and specificationssubject to changewithout notice
Frequency response:10HZ-20KHZ
Channel separation @1KHZ:>65dB
D/A converter:1Bit
S/N: 60dB
Tuning range:87.5MHZ-108MHZ
Usable sensitivity:20dBu
Stereo separation @1KHZ:30dB
Frequency response:50HZ-10KHZ
Tuning range:520KHZ-1600KHZ
Usable sensitivity:40dBu
Frequency response:50Hz-3KHz
Power output:7W 4 @ 4 ohms,14.4 VDC
Operating voltage:11-14.4VDC, negative ground
Speaker output impedance:4~8ohms
Line output voltage:200mv-400mv
Dimensions:7 ” 7 ” 2 ” (178 178 51mm)
AM TUNER
FM TUNER
GENERAL
CD PLAYER
SPECIFICATIONS
CONNECTIONS
ANTENNA
SOCKET
WHITE
R
L
RCA OUT
RED
GRAY
BLUE
ANTENNA
POWER
RED
YELLOW
BLACK
GND
ACC
B+
AB
2
4
6
8
1
3
5
7
2
4
6
8
1
3
5
7
A4:RED ACC
A5:BLUE ANTENNA
A7:YELLOW B+
A8:BLACK GND
B1:VIOLET + (RR)
B2:VIOLET/BLACK - (RR)
B3:GRAY + (RF)
B4:GRAY/BLACK - (RF)
B5:WHITE + (LF)
B6:WHITE/BLACK - (LF)
B7:GREEN + (LR)
B8:GREEN/BLACK - (LR)
Right Front
Gray/Black(-)
Gray(+)
Left Front
White/Black(-)
White(+)
Right Rear
Violet/Black(-)
Violet(+)
Left Rear
Green/Black(-)
Green(+)
3A
1A
Other Metrik Mobile Electronics Car Receiver manuals


