MHP OCOLB User manual

www.mhpgrills.com | 1
OCOLB
Installation Manual
SCAN THE
QR CODE FOR
ASSEMBLY VIDEO English
OCOLBOMN
OCOLBOMP
OCOLBOPN
OCOLBOPP
OCOLBOCN
OCOLBOCP
2 | www.mhpgrills.com
DANGER: IF YOU SMELL GAS
1. Shut off gas to the appliance
2. Extinguish any open ame
3. Open lid
4. If odor continues, keep away from the
appliance and immediately call your gas
supplier or your re department. Failure to
follow these instructions could result in re or
explosion which could cause property damage,
personal injury or death.
WARNING: FOR YOUR SAFETY
1. Do not store or use gasoline or other ammable
liquids or vapors in the vicinity of this or any other
appliance
2. An LP cylinder not connected for use shall not be
stored in the vicinity of this or any other appliance.
3. Follow all leak-test procedures in your owner’s
manual (included with your grill head) carefully
before using. Do this even if the grill was dealer
assembled. Do not try to light this appliance
without reading the “Lighting” instructions.
The appliance is FOR OUTDOOR USE ONLY. It is not to be used inside a garage, other
building or any type of enclosed area.
WARNING:
• All MHP Grill Heads may be mounted on the column.
• The gas supply may be either LP or Natural
• The grill head should not be attached to the column until the column and base have been completely
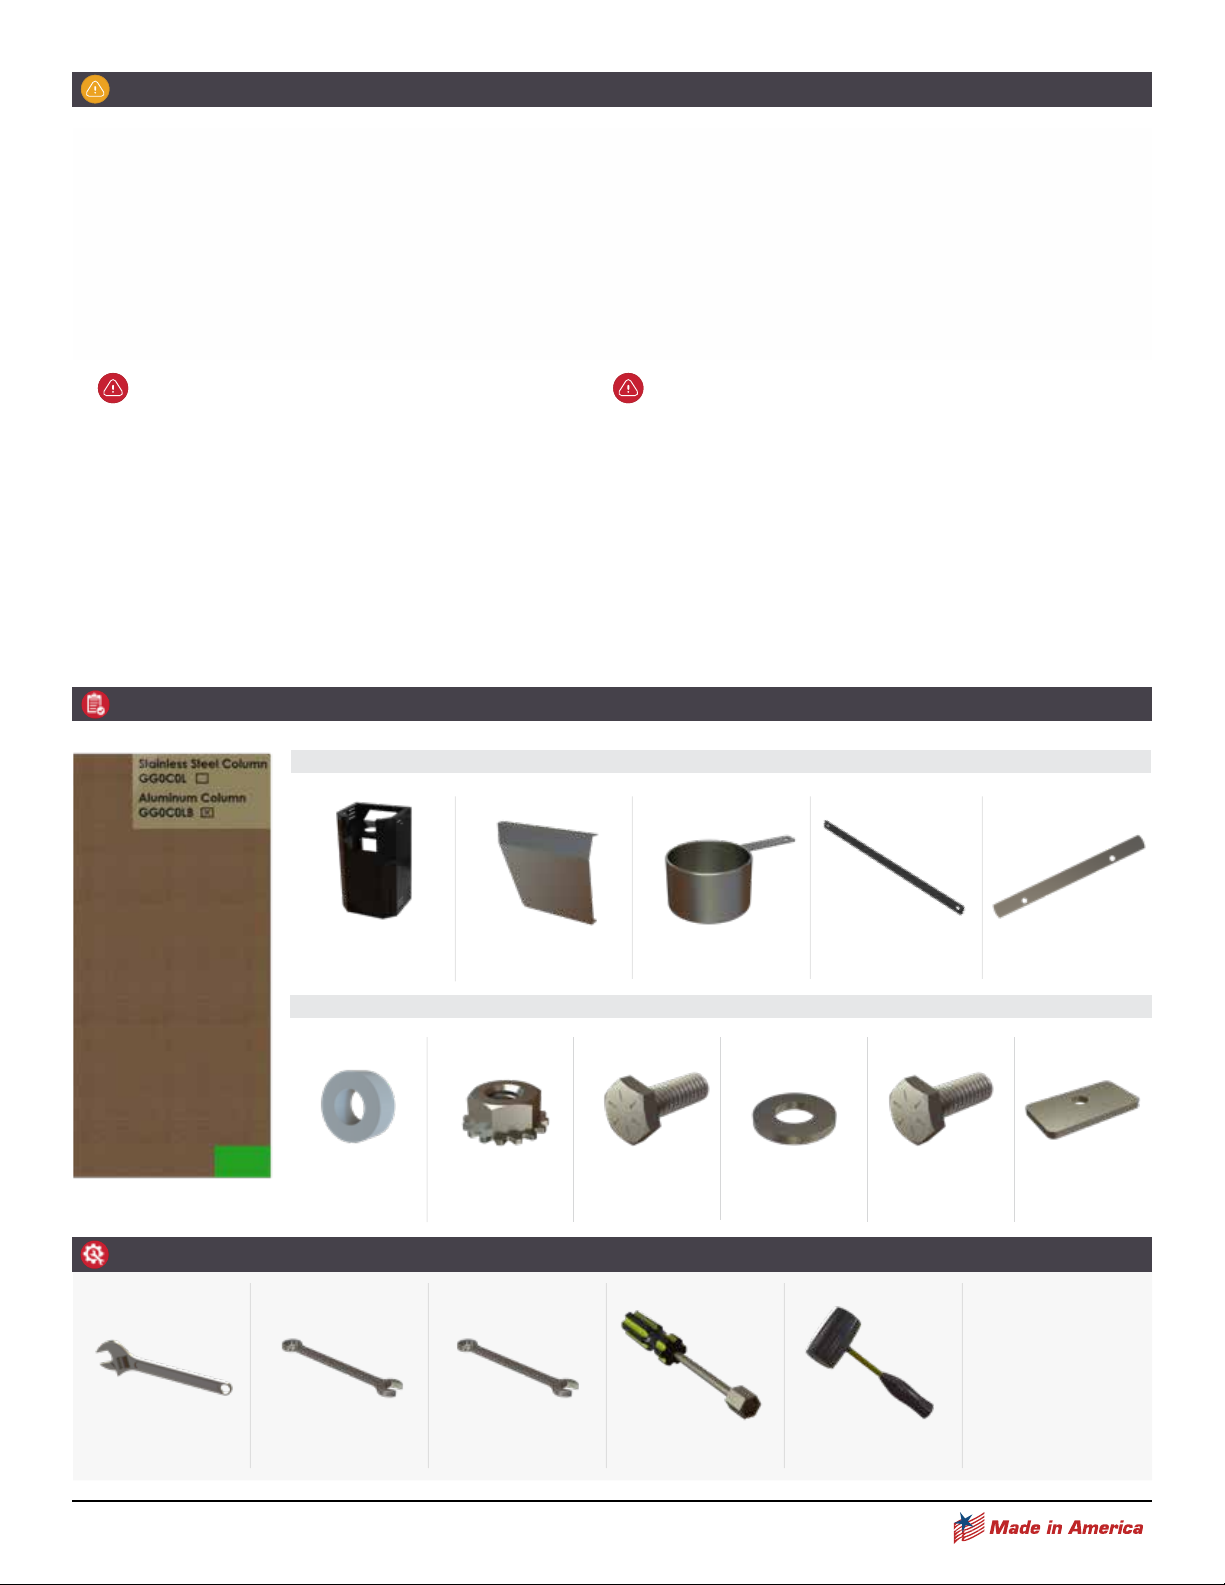
PARTS LIST:
IMPORTANT SAFETY WARNINGS
OCOLB ALUMINUM COLUMN BOX
TOOLS LIST:
ADJUSTABLE WRENCH 3/4" OPEN END
WRENCH 7/16" OPEN END
WRENCH
GGOTB
TANK LOCK BAR
GGOGC
STAINLESS STEEL
GREASE CUP
GGOCOLRB
ALUMINUM
COLUMN
GGAC
STAINLESS STEEL
FRONT ACCESS COVER
HARDWARE KIT
GGM11
STAINLESS STEEL
WASHERS (QTY. 10)
GGOTBS
NYLON TANK BAR
SPACERS (QTY. 2)
GGM4
KEP NUTS
(QTY. 12)
GGM6
1/4 X 20" X 3/4"
HEX BOLTS (QTY. 8)
GGM14
1/4 X 20" X 1-1/4"
HEX BOLTS (QTY. 4)
GGM15
RECTANGULAR
WAHSERS (QTY. 4)
7/16" NUT DRIVER RUBBER MALLET
GGOSB
ALUMINUM
REINFORCING BAR (QTY. 2)

www.mhpgrills.com | 3
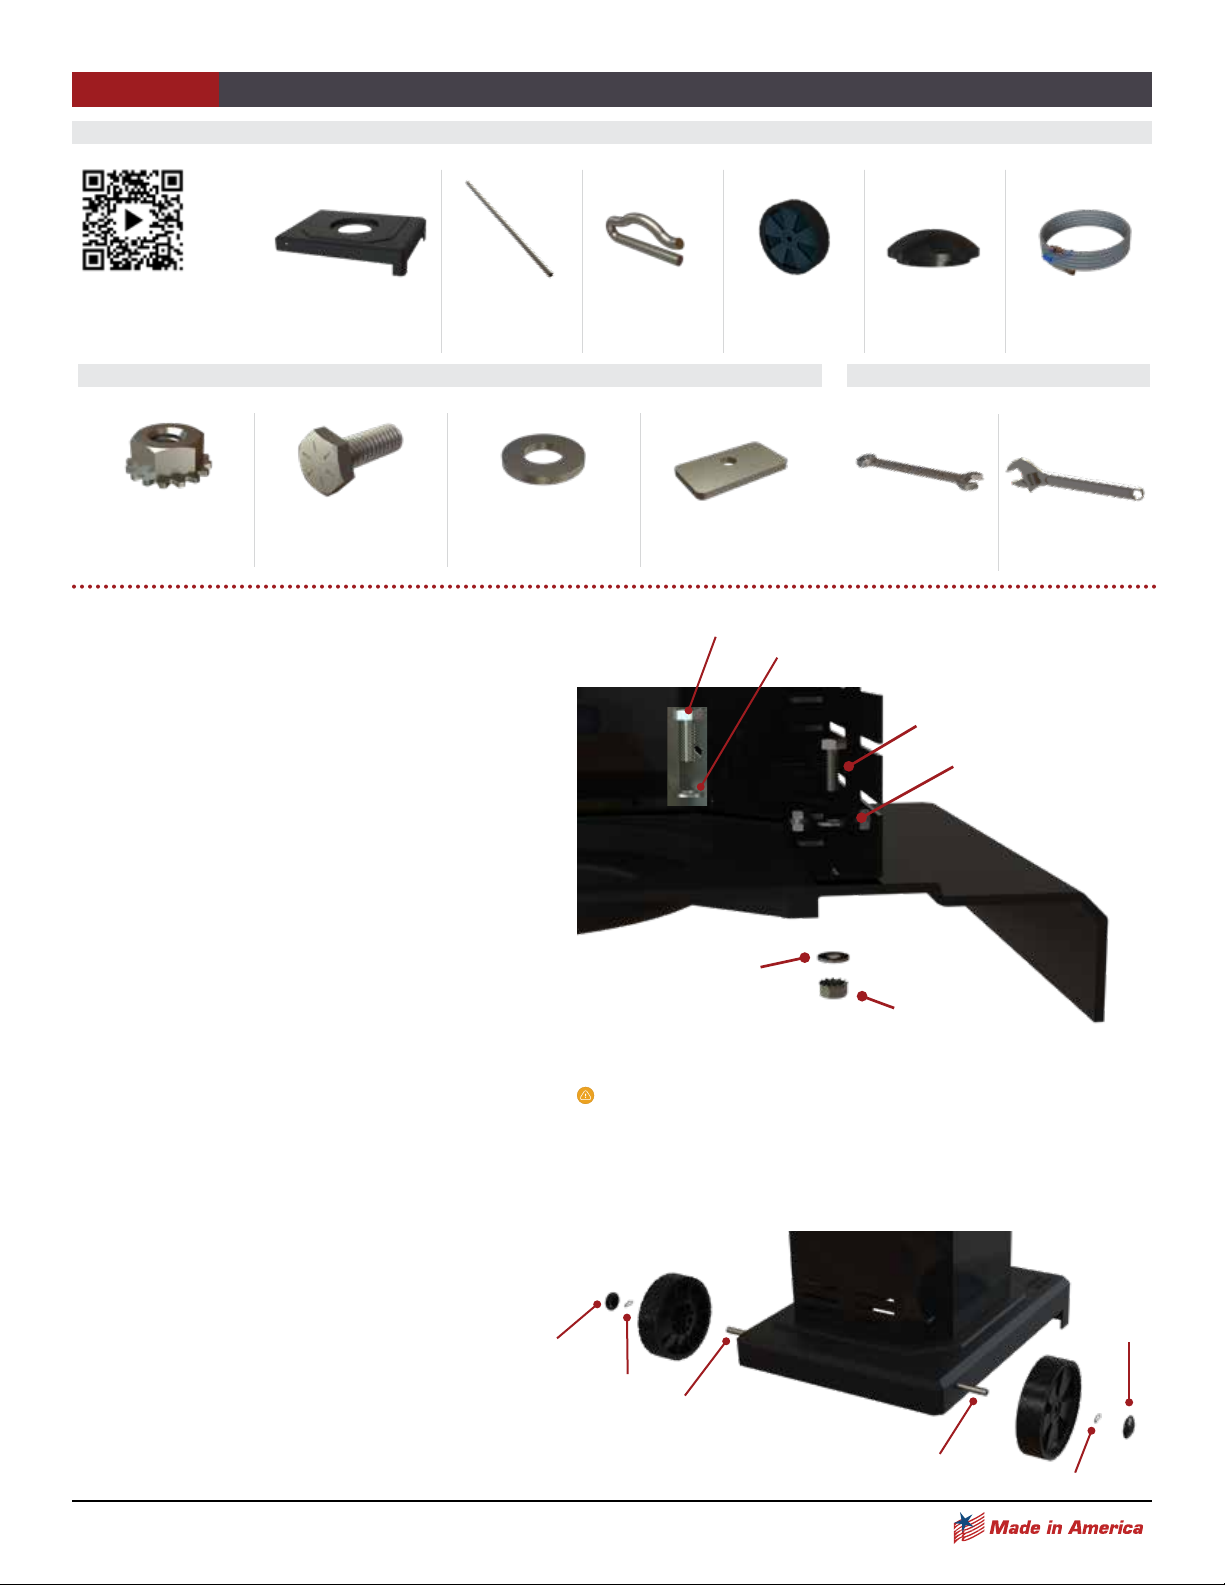
Locate the Tank Lock Bar from the OCOLB Box
•Align the holes on the bar to the pre-drilled holes on the column.
• Use the 1/4 x 20" x 3/4" Hex Bolt, Nylon Lock Bar Spacer, and a
Kep Nut on each side to fasten the Tank Lock Bar in place. This
spreads and holds the correct spacing at the back of the column.
• Use 7/16" open end wrench to hold the Kep Nut while using
the second open end wrench to tighthen the Bolt.
After connecting the tank lock bar you will then attach the base, the grill head and the gas line.
FOLLOW THE STEPS FOR YOUR SPECIFIC BASE.
HEX BOLT
NYLON LOCK BAR SPACER
PRE-DRILLED HOLES
KEP NUT
OP BASE
Step 2C-OP Page 7-8
Step 3 Page 9
Step 4C-OP Page 12-13
Step 5 Page 14
OM BASE
Step 2B-OM Page 5-6
Step 3 Page 9
Step 4B-OM Page 11
Step 5 Page 14
OC BASE
Step 2A-OC Page 4
Step 3 Page 9
Step 4A-OC Page 10
Step 5 Page 14
CONNECTING THE TANK LOCK BAR
STEP 1
PARTS NEEDED TOOLS NEEDED
GGOTB
TANK LOCK BAR
GGOCOLRB
STAINLESS STEEL
COLUMN
HARDWARE NEEDED
GGM6
1/4 X 20" X 3/4"
HEX BOLTS (2)
GGM4
KEP NUTS (2)
7/16" OPEN END GGOTBS
NYLON TANK
BAR SPACERS
4 | www.mhpgrills.com
ATTACH THE BASE TO THE COLUMN (OC BASE)
STEP 2A-OC
PARTS NEEDED FROM OC BOX
OC
CAST ALUMINUM BASE
GGAXL
AXLE
GGGC
AXLE CLIPS (2)
GGWL1
6" WHEELS (2)
OCOL
HUB CAPS (2)
ASPCL1
12' NATURAL
GAS HOSE
(Quick Disconnect)
HARDWARE NEEDED
GGM4
KEP NUTS
(QTY. 6)
GGM15
RECTANGULAR WASHERS
(QTY. 4)
GGM6
1/4 X 20" X 3/4"
HEX BOLTS (QTY. 6)
GGM11
STAINLESS STEEL
WASHERS (QTY. 10)
TOOLS NEEDED
ADJUSTABLE
WRENCH
7/16" OPEN
END WRENCH
ATTACH WHEELS
• For accessibility, lay the column on it's side.
•Attach the wheels by slipping the axle
through the pre-drilled holes in the
base, slide the wheels onto the axle
and secure with the axle clips.
•Finish by snapping the hub caps on
before standing the unit upright. AXLE CLIP
AXLE
AXLE
AXLE CLIP
HUBCAP
HUBCAP
Included with natural
gas bases only
SCAN THE
QR CODE FOR
ASSEMBLY VIDEO
Attach the Column to the Base
•Attaching the column to the base will
be easier to handle by laying the column face
down and matching the holes on
the column lip to the holes on the base.
•On the left and right sides of the column—
Locate the two pre-drilled holes on either side
of the column lip. Slide a 1/4 x 20" x 3/4" Hex
bolt down through a rectangular washer to
underside of the base through the
pre-drilled hole on the column and secure
using a Kep Nut.
•On the front side of the column—
Locate the two pre-drilled holes on the
front side of the column lip. Slide a
1/4 x 20" x 3/4" Hex bolt down through
a round washer to underside of the base
through the pre-drilled hole on the column
and secure using a Kep Nut.
•Use a 7/16" wrench to hold the Kep Nut
while using a second adjustable wrench
to tighten the bolt. There are a total
of six pre-drilled holes which should
be secured.
IMPORTANT: The large rectangular washers are used on
the top of the pedestal column lip. The round washers and
Kep Nuts are used under the base. Tighten securely and
stand unit upright.
HEX BOLT
HEX BOLT
RECTANGULAR
WASHER
ROUND WASHER
HEX BOLT
ROUND
WASHER

www.mhpgrills.com | 5
PARTS NEEDED FROM OM BOX
OM
CAST ALUMINUM BASE
GGAXL
AXLE
GGGC
AXLE CLIPS (2)
GGWL
8" WHEELS (2)
OCOL
HUB CAPS (2)
ASPCL1
12' NATURAL
GAS HOSE
(Quick Disconnect)
KKWL
CASTERS (2)
ATTACH THE BASE TO THE COLUMN (OM BASE)
STEP 2B-OM
Included with natural
gas bases only
SCAN THE
QR CODE FOR
ASSEMBLY VIDEO
HARDWARE NEEDED
GGM4
KEP NUTS
(QTY. 6)
GGM6
1/4 X 20" X 3/4" HEX BOLTS
(QTY. 6)
GGM11
STAINLESS STEEL WASHERS
(QTY. 12)
TOOLS NEEDED
ADJUSTABLE
WRENCH
7/16" OPEN
END WRENCH RUBBER
MALLET
Attach the Column to the Base
•Attaching the column to the base will
be easier to handle by laying the column
face down and matching the holes on
the column lip to the holes on the base.
•On the left and right sides of the
column—Locate the two pre-drilled
holes on either side of the column lip.
Slide a 1/4 x 20" x 3/4" Hex bolt down
through a rectangular washer to
underside of the base through the
pre-drilled hole on the column and
secure using a Kep Nut.
•On the front side of the column—
Locate the two pre-drilled holes on the
front side of the column lip. Slide a 1/4
x 20" x 3/4" Hex bolt down through a
round washer to underside of the base
through the pre-drilled hole on the
column and secure using a Kep Nut.
•Use a 7/16" wrench to hold the Kep Nut
while using a second adjustable wrench
to tighten the bolt. There are a total
of six pre-drilled holes which should
be secured.
IMPORTANT: The large rectangular washers are used on
the top of the pedestal column lip. The round washers
and Kep Nuts are used under the base. Tighten securely
and stand unit upright.
HEX BOLT
HEX BOLT
RECTANGULAR
WASHER
ROUND WASHER
HEX BOLT
ROUND
WASHER
GGM15
RECTANGULAR WASHERS
(QTY. 4)
This manual suits for next models
6
Table of contents
Other MHP Grill Accessories manuals


