MI Amplification Megalith Gamma User manual

1
MI Amplification
Owner’s Manual
1. Welcome
Hi there! I’d like to take this opportunity to thank you for purchasing the MI Amplification Megalith
Gamma vacuum tube guitar amplifier. The journey of creating the Megalith series of amps has
been the most challenging and rewarding one to date. I created the Megalith amps based on the
requests of customers and retailers who were searching for a definitive high gain tone.
Since the release of the Beta two years ago, perhaps one of the most satisfying things for me has
been the fact that the Megalith design has taken on a life of its own. With the weight of 60 years of
guitar amplification history on our shoulders, it can often be a daunting task for a designer to go out
on a limb and create something new. It’s so exciting for me to be contacted by musicians who want
to get their hands on a Megalith, not because it sounds like “X” or “Y”, but because it’s an amplifier
that sounds and feels like nothing they’ve heard before.
I guess if you’re reading this, you’ll already be familiar with the Gamma’s big brother, the Megalith
Beta. My idea with the Gamma was to take the design of the Beta, and to simplify the control set,
to create a deceptively simple and ‘classic’ high gain amplifier layout. But the most important
things, like the award-winning tone and high quality construction of the big fella are part-and-parcel
of the Gamma’s DNA.
For those of you not familiar with the Megalith story, here’s a quick recap.
What started out as a relatively standard high gain design quickly evolved into something quite
different. Whilst not many designers would be willing to admit it, the vast majority of amps rely on
old formula. I must confess that the earliest incarnations of the Megalith followed the same
principle. However, it became quickly apparent to me that the ‘old’ ingredients just wouldn’t do, and
wouldn’t lead to something ‘new’. So, the off-the-shelf building blocks were abandoned. Starting
with a clean sheet of paper, virtually every element of the amplifier was redesigned for ultimate
performance.
By the same token, I wasn’t interested in creating an amplifier which could only be used as a high
gain behemoth. I wanted the Megalith to have a genuinely great clean channel, and to have an
overdrive channel which could also be used in low gain mode for great light breakup tones, for
more traditional guitars, styles and tunings. The Megalith is not only a cutting edge high gain
amplifier, but can also be used for more traditional tones, and as a high headroom, clean amp for
running with a pedal rig.

2
It is my hope that the resulting amplifier delivers for you unparalleled tone and performance. I’m
very delighted at how this pint-sized pugilist turned out, and hope you also enjoy using this creative
tool as much as I do!
Michael Ibrahim
MI Amplification
2. Precautions
In order to get the most out of the Megalith Gamma, please make sure that you follow the points:
•Make sure that the power outlet is the correct rating as stated on the amplifier
•Make sure that if a fuse blows, you replace it with the same type and rating only. Do not
substitute. Do not change any fuse while the amp is still plugged in. If your amp continues
to blow fuses, get it checked out by a qualified technician.
•Make sure that the amplifier is properly ventilated, both from front and rear.
•Do not get the amp wet. Do not expose the amp to rain, moisture, or any water or liquid.
•Keep the amp away from any flammable objects, as the amplifier can generate quite a bit of
heat.
•Do no expose the amplifier to direct sunlight or extreme heat.
•Make sure that you leave the amplifier standby in “Warm” for at least one minute after
turning the power on in order to allow the power tubes to warm up properly before turning
on the high voltage.
•Do not touch the tubes! They are VERY hot.
•Always make sure that the amplifier is connected to the correct load before operating.
•Always make sure that the amplifier is properly grounded by using a three-pin mains plug.
Do not use a modified two-pin plug.
•Unplug the amplifier when it is not in use.
•Do not remove the back grill.
•Do not open the amplifier, as there are no user serviceable parts inside.
•Do not adjust the bias of the amplifier. This is for qualified technicians only.
•Always replace the power tubes with a good quality matched quad.
•Use hearing protection at all times if exposed to high sound pressure levels.
3
3. Amp Overview
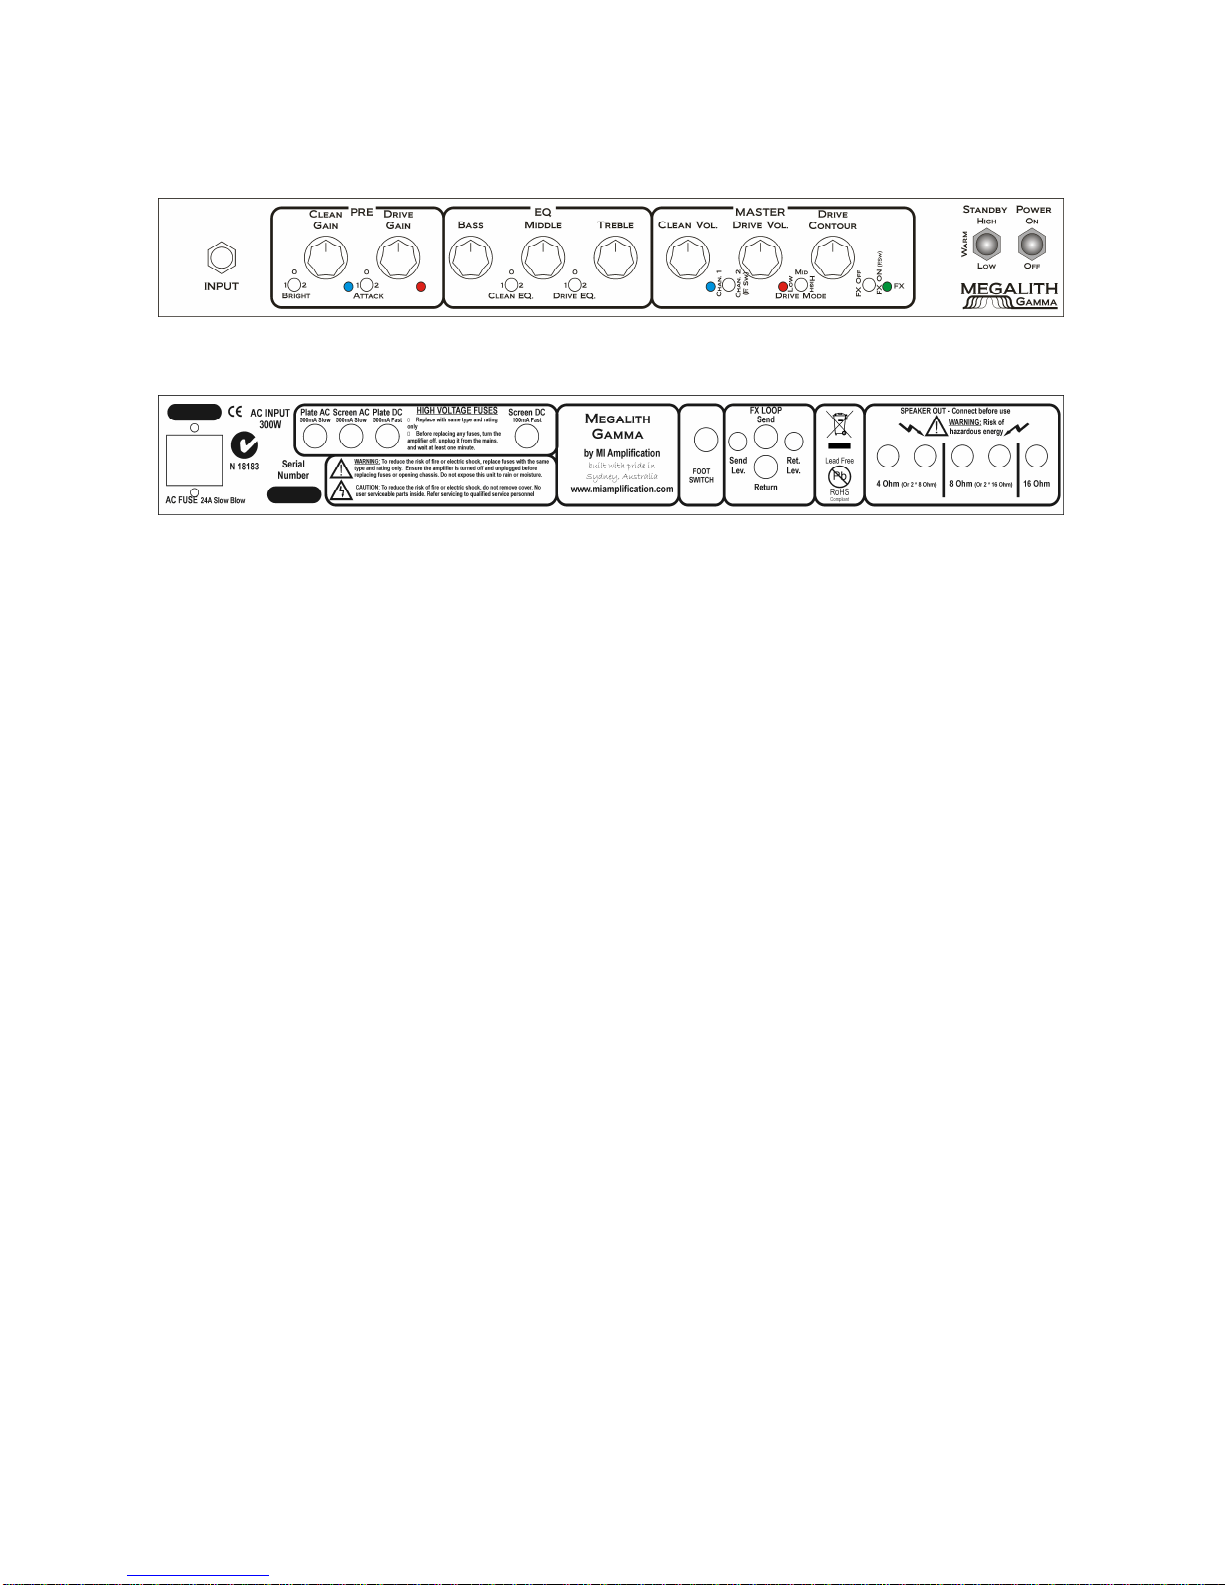
Figure 3-1 Front Panel
Figure 3-2 Rear Panel
3.1. Preamp
•The Megalith Gamma features 2 channels with shared, BASS, MIDDLE, TREBLE,
controls.
•Each Channel has its own GAIN and VOLUME controls, as well as independent EQ SHIFT
switches for voicing the EQ for each channel.
•The overdrive channel’s CONTOUR control is a unique tone shaping tool, which works in
the phase inverter to change the frequency response and feel of the amplifier, from fat and
punchy tone, to tight and controlled.
•The clean channel’s BRIGHT switch allows control over the channel’s sparkle, while the 3
position ATTACK switch on the overdrive channel adjusts the tightness and response of
the overdrive channel.
•Finally, the overdrive channel features a 3 position MODE switch to choose between low,
medium and high gain voicings.
3.2. Power Amp
•The unique power amp found in the Megalith Gamma features a pair of power tubes in
push-pull. The power amplifier can take KT120, KT100, KT90, KT88, KT77, 6550, EL34
and 6CA7, producing anywhere from 80W to 100W output power.
•The power amplifier also features a low power mode, which cuts the output power to 40%
•4, 8 and 16 Ohm outputs.
3.3. FX Loop
•The FX Loop in the Megalith Gamma is a high voltage buffered FX loop with send and
return level controls. When the loop is turned off, the whole of the active circuitry is
switched out to retain as pure a signal-chain as possible.

4
4. Getting Started
•Unpack the amplifier head and make sure that you remove ALL packing material.
•Connect an appropriate speaker to the correct speaker output.
•Connect the power plug into the amplifier.
•Plug your guitar into the amplifier.
•Turn the amp on and leave the amp’s standby in “Warm” for at least two minutes after
turning the power on in order to allow the power tubes to warm up properly before turning
on the high voltage.
•Turn the channel volumes down.
•Select Channel 1, with all channel controls to 50%.
•Switch the standby switch to “low”, and slowly turn up the clean volume. You should start to
hear a clean tone.
•Have fun!
•After the warm-up period, if you’re going to use high power, I’d suggest putting the standby
switch to low first, then after 10 seconds or so, you can switch to high. This will ease the
load on the power tubes.
5. The Channels
5.1. Channel 1
The Megalith’s clean channel is a rather interesting beast. Firstly, it should be noted that in order to
achieve absolute high gain control with the overdrive channel, it was necessary to make the power
amplifier very ‘fast’ and ‘direct’ in its response. My first iteration of a clean channel with this power
amplifier yielded a very unforgiving clean channel. So, going back to the drawing board, I created a
new clean channel design, with a softened response. The resulting clean sound is surprisingly,…
nice! If you dig in hard, it won’t take your head off.
Selecting the Clean Channel
There are two ways to activate the clean channel:
1. Switch the channel select switch on the front panel to “Chan. 1”.
2. Switch the channel select switch on the front panel to “Chan. 2/F Sw.” and activate the
clean channel from the footswitch. When the clean channel is activated, the Channel Led
on the footswitch should be off.
When the clean channel is selected, the 2 blue LEDs under the Gain and Volume controls will light
up, showing you which controls are active.
Gain Control
The clean channel’s gain range was designed to take you from sparking clean, to a slightly pushed
breakup, and with high output pickups. It is very sensitive to picking dynamics and pickup output.
So the point at which breakup occurs varies from guitar to guitar. With typical single coil pickups,
the signal will clip with the gain control set to 2 to 3 O’clock. With average humbuckers this
happens at around 1 O’clock, and with high output humbuckers, around 11 O’clock.

5
Bright Switch
The three position bright switch can be used to add a subtle shimmer, or a more pronounces high
boost to the tone. In the middle position, the bright switch is off. This is a good choice for brighter
pickups. The first position “1” adds a slight shimmer to the top end, and works like a bright switch
you’d find on a tradition American style of amplifier. I use this for my normal bright sound. The last
setting “2” is VERY bright. It’s not a traditional bright, as such, but more of a top end boost. At first,
this may seem excessive. However, my reason for adding this setting was two fold:
1. To help tighten up the overdriven sound of the channel. This works great with humbucking
pickups, particularly going for a classic rock tone.
2. To help keep the amp tight if you’re wanting to overdrive the power amp.
Tone Note: The higher the gain is set, the less effective the bright switch becomes.
Bass, Middle, Treble and EQ Shift
The first thing to note about the passive EQ on the Megalith is that each control has a wider sweep
than your typical guitar tone stack. Small changes to these controls can have a large impact on the
tone. They are also highly interactive.
Tone Note: A tip for live playing is to use only as much bass as you need. Going easy on the bass
will help keep your tone tight, and by keeping a healthy amount of mids and treble, you’ll sit better
in the mix.
The three position EQ shift is a unique feature of the Megalith’s tone controls. This switch shifts the
EQ’s bands, allowing you to control different frequencies. Each position has a particular signature
tone, and is useful for different things. The middle position “0” shifts the midrange up, and adds
quite a bit of low-mids to the sound. This is great for really fattening up the tone, and works
particularly well with gain pedals. Position “1” voices the tone stack closer to a traditional British
voicing. There’s still a good amount of midrange in the tone, but the tone is more balanced.
Position “2” is more of a traditional American voicing, with a more scooped and shifted midrange.
This is a great choice for a more ‘pristine’ clean tone.
With the wide ranging tone controls, the 3 voicings and the contour control (discussed below), the
Megalith offers an amazing amount of control over the clean channel’s voicing.
Volume Control
This is a post preamp volume control, and is self explanatory.
5.2. Channel 2
Let’s get down to the business end,… channel 2. The Megalith’s overdrive channel is unlike any
other high gain overdrive you’ve ever heard. It’s not a sound based on any other amplifier, and as
such, it’s important to understand the way this channel works in order to get the most out of it.
There are a few things to note about this channel:
1. It’s naturally a very tight and focused tone. It will reproduce exactly what you put in. Some
amps are designed to mask playing and tone, by superimposing their own tone on top. The
Megalith is not one of these amps.
2. Each guitar’s tone and characteristics are retained, regardless of how much gain is dialled
in. So it’s very important to choose the right guitar for the job. So for example, don’t expect
to create sonic annihilation with a vintage tele,… and don’t expect to do authentic blues
with a baritone 8 sting guitar with active pickups!
3. The three gain modes, whilst related to each other, are designed to do slightly different
things. There is sufficient overlap between all three such that it’s possible to achieve the
same levels of saturation, with different tonal emphasis. This adds an extra level of
flexibility.

6
4. The Megalith has been designed with more gain than I can ever imagine anyone ever
using. With gain (especially live), always remember the golden rule: LESS IS (more often
than not) MORE.
Now that we’ve dispensed with the formalities, lets sink our teeth in.
Selecting the OD Channel
There are two ways to activate the OD channel:
1. Switch the channel select switch on the front panel to “Chan. 2/F Sw”, with no footswitch
plugged in.
2. Switch the channel select switch on the front panel to “Chan. 2/F Sw.” and activate the OD
channel from the footswitch. The Red light on the footswitch should be on for the OD
channel.
When the OD channel is selected, the 3 red LEDs under the Gain, EQ and contour controls will
light up, showing you which controls are active.
Gain Control and Gain Modes
As mentioned, the Megalith’s Overdrive channel features three gain modes. Each of these modes
is voiced differently, and will be suitable to different applications. These gain modes are selected
using the MODE switch located to the right of the OD channel’s VOLUME control.
•LOW: This mode is the closest to a standard overdrive sound. It is voiced with a fairly tight
attack, with a lot of high end detail. To hear the characteristics of this mode, set the
ATTACK switch to “0”. In the low region of the GAIN control, the sound is virtually clean,
with a fat midrange. As the GAIN is increased the natural OD tone comes in. With the GAIN
all the way up, and using high output pickups, there’s a serious amount of crunch available.
This is a great mode if you want to use the Megalith like a traditional guitar amplifier, with
lower output guitars. For this application, just remember to keep the CONTOUR control
high. I’d also suggest leaving the ATTACK switch on ‘0’, unless your pickups are
particularly dark, as this mode already has ample high end definition.
•MID: The mid gain mode not only adds a considerable amount of gain, but also fattens up
the low mids quite a bit. This is the Megalith’s thickest tone. This is a great mode for getting
the punchiest rhythm sounds. It’s also great for getting a slightly woollier tone, by leaving
the ATTACK switch on “0”, and winding the GAIN up. The lower mid emphasis can be
further accentuated by setting the EQ SHIFT switch to “0”, and running the CONTOUR
high. Alternatively, if you like the tone of the mid gain mode, but want to reduce the lower
mids, try setting the EQ SHIFT switch to “1” or “2”, and running the CONTOUR lower.
•HIGH: This mode adds more gain, but also tightens the amp’s response up considerably,
with more of an upper mid emphasis. There is so much gain with this mode, that I urge you
to use the gain judiciously. If you want an even faster response, set the ATTACK switch to
“2” with the GAIN turned down below 12 O’clock.
Attack Switch
The ATTACK switch on the OD channel is technically the same as the BRIGHT switch on the
clean channel. The reason it’s labelled differently is that for the OD channel, it doesn’t affect the
high end content as much as it affects the response of that channel. Like the BRIGHT switch on
the clean channel, it has less effect the high the GAIN control is turned up. As a general rule, to
tighten the response of the OD channel, set the ATTACK switch to “1” or “2”, and turn the GAIN
control down. To loosen the response of the OD channel, set the ATTACK switch to “0” and turn
up the GAIN control.

7
Bass, Middle, Treble and EQ Shift
The EQ on the OD channel of the Megalith is voiced similarly to the EQ on the clean channel. The
only exception is a slight increase in the low end and low/mids to suit the voicing of that channel.
Contour Control
The contour control is another unique feature of the Megalith. It’s a design which affects the
frequency response of the phase inverter in the power amp. Fully clock-wise, it’s fat and midrangy,
with a slightly rolled off top end. As the control is turned down, the mids start to scoop out, and the
sub-bass frequencies tighten up. This is a great control for further refinement of the amp’s tone.
You can also think of this as an alternate midrange control. Try running the preamp mid control
high and the contour low (also adjusting the EQ shift), and visa versa for a huge range of tones.
Please note that the contour control is only active for the overdrive channel.
Tone Note: For the OD channel, it’s a good idea to start with everything at 12 O’clock, with the EQ
Shift set to “1”. From there, follow this sequence:
•set the MODE to achieve the gain level you want.
•set the ATTACK switch to change the response of the OD channel, in conjunction with the
GAIN control to fine tune the gain level.
•If you require more low mids, set the EQ shift to “0”. If you need less, set it to “2”.
•Adjust the Contour control to adjust the body of the tone.
•Finally, use the EQ to fine tune the tone.
This sequence will help you to quickly zero in on the tone you want. But feel free to experiment
with different approaches.
5.3. A Quick Guide to EQing the Megalith Gamma.
At first glance, it may appear that the shared EQ for the clean and overdrive channels will limit or
compromise the voicing of the two channels. However, a great deal of thought has gone into
design of this EQ in order to make it flexible enough to meet the needs of both channels. Keep in
mind that:
•Each channel has its own EQ shift switch, which is a very effective way of voicing the EQ.
•The overdrive channel has a dedicated contour control, which is itself a very powerful tool
for shaping the response of the overdrive channel.
To give you an idea of how this is used, here’s the process I like to follow to set the amp up:
•Select the clean channel with all EQ controls set to 50%, and with the gain, volume and
bright switches set to the desired settings.
•Select the EQ shift setting which brings you as close as possible to your desired EQ.
•Next, select the overdrive channel, with the gain, attack, volume and mode all set to the
desired settings.
•Set the contour control to 50%. Then set the overdrive channel’s EQ shift to get as close as
possible to your desired tone.
•Now use the contour control as fine-tune the response of the overdrive channel.

8
•From here, you can toggle back and forth between the two channels making slight
adjustments to the EQ (and to the contour on the OD channel) to get an EQ setting which
works with both channels.
Alternatively, you can ‘prioritise’ the EQ setting for the channel you want to use as your ‘main’
channel, and then get as close as possible with the other channel.
6. Other Preamp/FX Features
6.1. FX Loop
The Megalith Gamma’s series FX loop is a buffer, high voltage design, with very low output
impedance, and very high input impedance. It also features send and return levels, which mean
that you can use any type of effects in the loop. To use the loop:
•Connect the input of the effects unit to the Send Jack on the back of the amp.
•Connect the output of the effects unit to the Return Jack on the back of the amp.
•Set the send level to maximum, and the return level to minimum.
•Switch on the loop using the front panel switch.
•If a footswitch is connect, you can now switch the loop on and off via the footswitch.
•If your effects unit has a level indicator, adjust the send level so that there is no clipping
with both the clean and overdrive channel. If there is no level indicator, adjust the send
level so that there is not unwanted distortion, compression or tone loss.
•Finally, adjust the return level so that you have the desired volume when the FX loop is on.
Due to the fact that the loop features both send and return levels, it means that you can adjust the
loop so that (for example), you have an automatic volume boost when the loop is engaged (e.g. for
your solo sound).
Also, with no effects unit connected to the loop, you can use the loop as a volume boost. I suggest
in this scenario, set the send level to maximum, and use the return level to adjust the volume
boost. This will give you the best noise performance.
7. Speaker outputs, Slave Output
The Megalith features a full suite of speaker outputs. The Megalith can drive 16Ohm, 8Ohm, and
4Ohm total load.
Please note: The Megalith is a high performance vacuum tube amplifier, which is designed to
extract optimal performance from the power tubes. This means that it is imperative that you use the
correct load connected to the speaker outputs.
Very important!!! YOU MUST ALWAYS HAVE A SPEAKER LOAD CONNECTED TO THE
AMPLIFIER. Failure to do so will almost certainly result in damage to the amplifier.
The available configurations can be summaries are follows:
•To connect one 16 Ohm cab, connect it to the 16 Ohm speaker output.
•To connect two 16 Ohm cabs, connect them to two 8 Ohm speaker outputs.

9
•To connect one 8 Ohm cab, connect it to the 8 Ohm speaker output.
•To connect two 8 Ohm cabs, connect them to two 4 Ohm speaker outputs.
•To connect one 4 Ohm cab, connect it to the 4 Ohm speaker output.
8. For Your Amp Tech
The Megalith is designed to use vacuum tubes with a plate dissipation rating of 25W or greater,
and to handle plate voltages of 700V or greater. The most common valves which fit these criteria
are EL34, 6CA7, KT77, KT88, KT90, KT100, KT120 and 6550.
Dues to the high plate voltages, it is recommended that the maximum idle bias current for
EL34/6CA7 should be 20mA per tube. For the other valves in this list, 30mA is the maximum idle
current. Our preference for at the workshop is for 6550’s, with 25mA bias current per tube. Please
note that the bias current should be set in high power mode.
WARNING: Biasing the Megalith should only be done by an experienced tech, as all the bias
adjustments and measurements are done inside the chassis. The high voltages at which the
Megalith operates makes it potentially lethal to anyone who is unqualified or careless.
Table of contents
Popular Musical Instrument Amplifier manuals by other brands


YORKVILLE
YORKVILLE Traynor Bassmaster YBA100 Service manual

Blackheart
Blackheart BH1H Killer Ant user guide

Peavey
Peavey KB4/KB5 owner's manual

Mesa/Boogie
Mesa/Boogie Three Channel Dual & Triple Rectifier Solo... Owner operating instructions

Blackheart
Blackheart Little Giant 5 user guide

FAME
FAME ML-30R owner's manual