Micca OriGen G2 User manual

Copyright © 2009-2019 Micca. All rights reserved. V190605
OriGen G2 USB DAC and Preamplifier
Owner’s Manual
Got a Question or Need Help?
Email our technical support team at: support@miccatron.com for personalized
assistance with the setup and use of this product. Please visit our product
information website www.miccatron.com for the following:
- Firmware Updates
- User’s Manuals
- roubleshooting Wizard
- echnical Support Request
When contacting technical support, be sure to include your order information,
product model, and serial number from the bottom of the player.
Copyright ©
2009
-
201
9
Micca
. All rights reserved.
his manual may not be reproduced in whole or in part without
permission for any purpose other than personal use.

Copyright © 2009-2019 Micca. All rights reserved. Page | 1
1 Introduction
Thank you for your purchase! The OriGen USB audio DAC and preamplifier is a studio master
grade digital audio playback device that supports high resolution PCM audio up to 24bit/192kHz.
Use the OriGen to bypass your computer's soundcard and unlock the full potential of your
music.
1.1 Features
1.1.1 Input and Output
Asynchronous USB 2.0 input for use with Windows XP/7/8/8.1/10, and MAC OSX.
Optical S/PDIF digital input. Switch selectable between USB or Optical input.
Front 3.5mm and 1/4” stereo headphone outputs. Powerful built-in headphone amp supports
16-600 Ωheadphones. Switch selectable between headphone or rear analog stereo output.
Rear 3.5mm analog stereo and combination optical S/PDIF digital output.
1.1.2 Digital Stream Formats
PCM audio up to 24-bit/192kHz over USB and Optical inputs.
ASIO support over USB input
WASAPI Push/Event support over USB input
1.1.3 Key Components
C-MEDIA CM6631A USB 2.0 High Speed 480Mbps audio controller
Wolfson WM8740 High Performance Stereo D/A Converter
JRC NJM4556 operational amplifier
1.1.4 What’s Included
Micca OriGen unit
USB cable
3.5mm to RCA audio cable
User’s Manual
Note: All the information contained in this manual was correct at the time of publication.
However, as our engineers are always updating and improving the product, your device’s
software may have a slightly different appearance or modified functionality than presented in
this manual.

Copyright © 2009-2019 Micca. All rights reserved. Page | 4
2 Product Overview
2.1 Connections and Controls
Name
Description
1 Audio Info Display LED grid for indicating USB audio sampling rate, playback
volume, and power indicator. Sampling rate info for USB only
and not
Optical.
2
Volume, On/Off Switch
Combination power on
/off switch and volume control.
3 3.5mm Headphone Jack Output jack for connecting 3.5mm headphones. If using low
impedance or high sensitivity headphones, be sure to set the
gain switch to
-
10dB.
4 6.3mm (1/4”)
Headphone Jack
Output jack for connecting 6.3mm (1/4”) headphones. If using
low impedance or high sensitivity headphones, be sure to set
the gain switch to
-
10dB.
5
Output
Selector
Switch
Selects between headphone or
rear analog stereo
output
.
6 Gain Switch Selects normal or -10dB gain. The -10dB gain should be
used for low impedance or sensitive headphones, such as
IEMs. Always start with the
-
10dB gain setting.
7
USB Jack
Digital audio input interfac
e
from a computer
’
s USB host port.
8
Input Selector Switch
Selects between USB or Optical input.
9
S/PDIF Optical Input
Digital audio input from an optical output source.
10 DC 5V Required to provide power to the OriGen when used with an
Android device via USB OTG. Power adapter not included.
11 Analog Stereo and
S/PDIF Optical Output
Two-in-one analog stereo output and S/PDIF optical digital
output. The analog stereo output is volume controlled by the
volume knob and g
ain switch.
Copyright © 2009-2019 Micca. All rights reserved. Page | 5
3 Setup and Installation
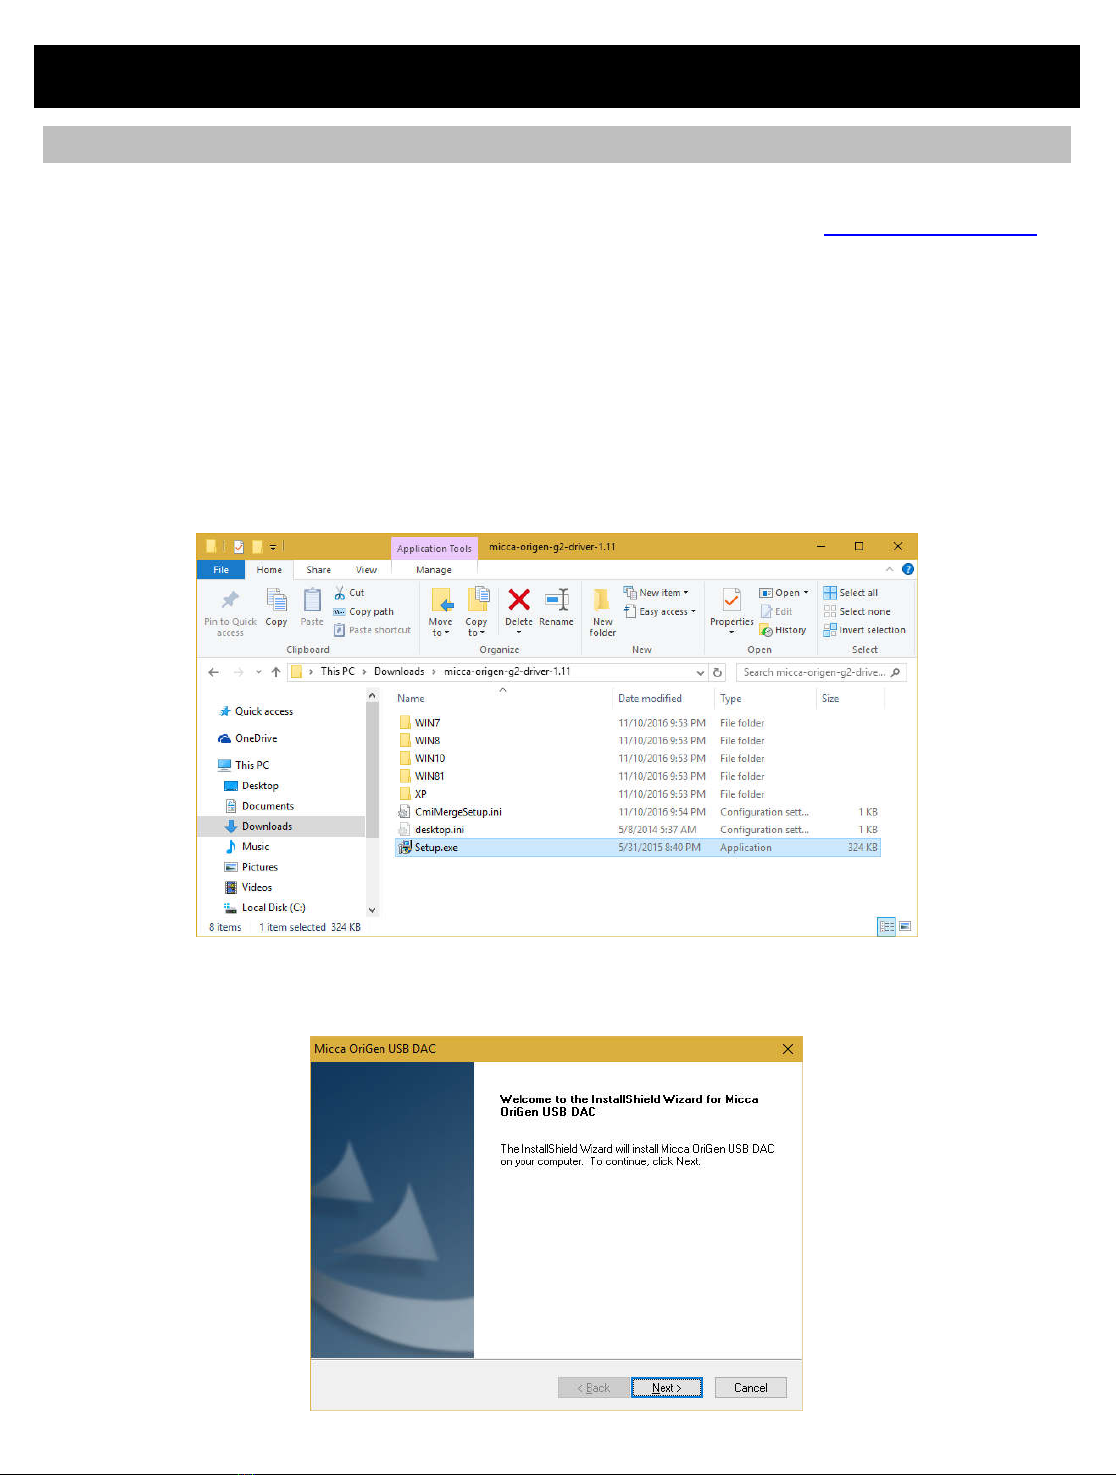
3.1 Driver Installation
The OriGen is not shipped with a driver disk. Windows 10, current MacOS, and Linux do not
require drivers. Download the latest Windows XP, 7/8/8.1/10 drivers from www.miccatron.com.
Windows Vista is not supported.
1) Connect the OriGen G2 to your computer and turn it on. The power LED should green.
Set the rear input switch to “USB”.
2) Decompress the ZIP file to a folder on your computer. Close all programs on your
computer – the computer will be restarted as part of the installation.
3) Navigate to the driver folder and double click on SETUP.EXE to begin installation. If an
“unknown publisher” warning is displayed, click “Yes” to continue.
4) The driver installation wizard will start. Click “Next”, accept the licensing agreement
terms, and click on the “Install” button.

Copyright © 2009-2019 Micca. All rights reserved. Page | 6
5) Once the install is finished, the installer will prompt to restart the computer. Select “Yes, I
want to restart my computer now”, and click “Finish”
6) Once the computer has restarted, the OriGen is ready to use. To confirm that it is set as
the default playback device, right click on the
audio tray icon and select “Playback
Devices”
7) On the playback devices screen, the OriGen will be added to the list as “OriGen G2”. If it
is not already the default device, right click on it and select “Set as Default Device”.

Copyright © 2009-2019 Micca. All rights reserved. Page | 7
3.2 Installation Troubleshooting
The OriGen is ready for use as soon as the driver installation is complete. The computer should
now be playing sounds through the OriGen. If there is no sound, try the following
troubleshooting steps:
•Connect the OriGen to a USB jack on the computer. If using a desktop computer, use one
of the rear USB jacks. Set the input selector switch to use the USB input.
•Use the USB cable that came with the OriGen. It’s not a special cable, but it is a good
quality cable that works well.
•Turn on the OriGen, check that the power indicator light turns green.
•Right click on the
audio tray icon and select “Playback Devices”. In the “Playback” tab,
make sure that “OriGen G2” is found.
•Right click on “OriGen G2” and select “Set as Default Device”. There should now be a
green checkmark on this device.
•Connect a pair of headphones to the OriGen, set the gain switch to -10dB, set the volume
knob to the 9 o’clock position, and set the output selector switch to headphones.
•Open a web browser to your favorite video site and play a video. The audio should play.
Things to try if you encounter errors in any of the above steps:
•Try a different USB port on your computer.
•Turn your computer off and back on again. :3
•Uninstall and reinstall the driver package.
•Make sure that the sound on your computer is not muted. In Windows 7 it is possible to
mute a particular application even though the system volume is not muted. To check this,
click on the
audio tray icon - all current applications with sound playback capability will
be listed individually along with their volume/mute controls.
If after the above steps you still have difficulty getting the OriGen to work with your computer,
3.3 Advanced Configuration
Advanced users may wish to make adjustments to the default operating parameters based on
the guidelines in this section.
3.3.1 Playback Device Setting
•From the list of playback devices, right click on “OriGen G2” and select “Properties”.
•In the Levels tab, make sure it is set to maximum of 100. Use the volume knob on the

Copyright © 2009-2019 Micca. All rights reserved. Page | 8
OriGen to set playback volume.
•In the Levels tab, make sure it is set to maximum of 100. Use the volume knob on the
OriGen to set playback volume.
•In the Advanced tab, select any Default Format desired, such as 24 bit 192000 Hz.
•Click “Apply” when done.
3.4 More Advanced Configuration
This section provides certain setting recommendations for use with certain popular music
playback software such as Foobar2000 and JRiver Media Center.
3.4.1 Foobar2000 Playback Settings
The OriGen supports all of the different methods that Foobar2000 can output audio. To access
these output options, select File -> Preferences and go to the Playback -> Output configuration
menu. In the Devices drop down box, the following output options are available for the OriGen:
•DS: Primary Sound Driver – Foobar2000 will output sound to the OriGen using the
Windows DirectSound component. The OriGen must be set as the default audio playback
device for this setting to work. In addition to Foobar2000, all other system and application
sounds will also be played through the OriGen.
•DS: Speakers (OriGen G2) – Foobar2000 will always use the OriGen to output sound.
This is useful if the OriGen is not set as the default audio playback device and all other
system and application sounds use a different audio playback device, so that your music
isn’t interrupted by beeps, dings, and other computer system sounds.
•ASIO: ASIO for USB Device – Only available if the optional ASIO component for
Foobar2000 is installed. When using the ASIO interface, Foobar2000 requires exclusive
access to the OriGen such that other programs will not play sound through the OriGen at
the same time. It is important to set another audio device as the default audio
playback device prior to using the ASIO interface with OriGen. Otherwise, conflicts
with other programs may result in locked sound output requiring a system restart.
•WASAPI (event/push): Speakers (OriGen G2) – Only available if the optional WASAPI
component for Foobar2000 is installed. Both event and push methods are supported.
When using the WASAPI interface, Foobar2000 requires exclusive access to the OriGen
such that other programs will not play sound through the OriGen at the same time. It is
important to set another audio device as the default audio playback device prior to
using the WASAPI interface with OriGen. Otherwise, conflicts with other programs may
result in locked sound output requiring a system restart.

Copyright © 2009-2019 Micca. All rights reserved. Page | 9
3.4.2 JRiver Media Center Playback Settings
The OriGen supports all of the different methods that JRiver Media Center can output audio. To
access these output options, select Tools -> Options and select the Audio configuration menu. In
the Audio Devices drop down box, the following output options are available for the OriGen:
•Default Audio Device (Direct Sound) – JRiver will output sound to the OriGen using the
Windows DirectSound component. The OriGen must be set as the default audio playback
device for this setting to work. In addition to JRiver, all other system and application
sounds will also be played through the OriGen.
•DS: Speakers (OriGen G2) – Foobar2000 will always use the OriGen to output sound.
This is useful if the OriGen is not set as the default audio playback device and all other
system and application sounds use a different audio playback device, so that your music
isn’t interrupted by beeps, dings, and other computer system sounds.
•ASIO for USB Device (ASIO) – When using the ASIO interface, JRiver requires exclusive
access to the OriGen such that other programs will not play sound through the OriGen at
the same time. It is important to set another audio device as the default audio
playback device prior to using the ASIO interface with OriGen. Otherwise, conflicts
with other programs may result in locked sound output requiring a system restart.
•DS: Speakers (OriGen G2) (WASAPI) – When using the WASAPI interface, JRiver
requires exclusive access to the OriGen such that other programs will not play sound
through the OriGen at the same time. It is important to set another audio device as
the default audio playback device prior to using the WASAPI interface with OriGen.
Otherwise, conflicts with other programs may result in locked sound output requiring a
system restart.

Copyright © 2009-2019 Micca. All rights reserved. Page | 10
4 Usage
Basic operation of the OriGen is simple, just turn on the OriGen and adjust the volume knob to
the desired playback volume. This section describes the features of the OriGen in additional
detail, along with recommendations on how to maximize performance and listening enjoyment.
4.1 Signal Display Grid
To help indicate the current operating status, the OriGen has a grid of 10 display lights above
the volume control knob. The following describes the information conveyed by each status light.
Label
Description
44.1
-
192
Group of six lights indicate the sampling rate of the current
USB input audio signal, including 44.1kHz, 48kHz, 88.2kHz,
96kHz, 176.4kHz, and 192kHz.
No display for
optical input.
Volume level indicator light. This light has a blue and a red
component, corresponding to the left and right channels. When
both channels have a signal, the light will be purple. At
relatively low playback volumes, the light may not appear to
turn on at all.
Power indicator. Turns green when a valid USB connection is
establis
hed, red if not
.
No light when turned off.
4.2 Knobs and Switches
4.2.1 Volume Control
The volume knob on the OriGen is also the power on/off switch. Always start each use with the
volume knob no higher than the 9 o’clock position. Adjust to the desired listening level. If you
switch output devices or headphones during use, remember to lower the volume to the 9 o’clock
position first.
The OriGen does not need to be turned off when not in use. Some computers will continue to
supply power to the USB port when shut down. In this case, the LED indicator lights on the
OriGen will continue to be illuminated even when the computer is off. This is normal and will not
cause any issues.
4.2.2 Input Selector Switch
The input selector switch toggles between USB and the Optical S/PDIF input. Both inputs can
be connected at the same time, though only one will be selected for use as the input signal.
4.2.3 Output Selector Switch
The output selector switch is used to output signal to either the rear analog stereo output, or the
front headphone jacks. Both cannot be used at the same time. If there is a need to output signal
to a downstream amplifier and a pair of headphones at the same time, this can be accomplished
by connecting both the amplifier and headphones to the front headphone jacks.

Copyright © 2009-2019 Micca. All rights reserved. Page | 11
4.2.4 Gain Switch
The gain switch adjusts the output level of the OriGen as needed to properly drive the attached
device or headphones. The maximum output signal level corresponding to the gain switch
setting is as follows:
Setting
Output Levels
0dB
5.3
Vrms
for all analog outputs
-
10dB
1.6
Vrms for all analog outputs
The 0dB setting is suitable for driving amplifiers with low input sensitivity, or headphones with
low efficiency and/or high impedance. Always start with the gain switch in the -10dB setting and
the volume control at the 9 o’clock position. Switch to the 0dB position only when needed.
4.3 Inputs
4.3.1 USB Input
The micro USB input jack is used to connect the OriGen to a computer’s USB connector. Make
sure that the OriGen is connected to a USB jack on the computer. If using a desktop computer,
make sure to use one of the rear USB jacks. Use only the USB cable that came with the
OriGen. It’s not a magical cable, but it is a good quality cable that we know works. Set the input
selector switch to USB when using USB as the signal input.
The USB input also functions when used with compatible mobile devices that support OTG USB
Audio. Since support for OTG USB Audio is not universal, this functionality is dependent on the
specific mobile device and is therefore provide only on an as-is basis. Because the USB port on
most mobile devices does not provide power output, a separate 5V DC power adapter (not
included) will be needed for this functionality.
4.3.2 Optical S/PDIF Input
The OriGen Optical S/PDIF input accepts PCM signals up to 24-bit/192kHz from devices such
as computers, DVD players, TVs, and etc. Set the input selector switch to Optical when using
Optical as the signal input.
When using the Optical S/PDIF input, the OriGen must be powered either through the USB jack,
or the DC input jack. Any USB power source, such as a computer USB port, or USB phone
charger is acceptable.
Please note that the LED indicators for bit rate only show information for the USB input and
therefore will not display information for the Optical S/PDIF input.
4.3.3 DC Input Jack
The DC input jack accepts 5 volt DC power adapters (not included) for use when the OriGen is
attached to a compatible mobile device through an OTG USB Audio connection. While it is
possible to use the DC input jack to power the OriGen when using the Optical input, it’s more
convenient to use the USB port for power instead.

Copyright © 2009-2019 Micca. All rights reserved. Page | 12
4.4 Outputs
4.4.1 Rear Analog Stereo Output
The 3.5mm rear output jack provides analog stereo audio output that can be used to drive a
downstream device such as an amplifier or powered speakers. The output signal level is
adjustable based on the volume control as well as the gain switch. Be sure to start with the gain
switch setting at the -10dB position and switch to 0dB only if additional output signal amplitude
is needed.
4.4.2 Optical S/PDIF Output
Also built into to the 3.5mm rear output jack is also an optical output that accepts mini optical
jacks for connection to an outboard DAC. When used this way, the OriGen functions as a USB-
to-S/PDIF transport and does not perform any signal decoding or volume control function. This
is useful for providing high quality digital audio signal to an audio system that otherwise does not
have an USB interface of its own.
4.4.3 Headphone Outputs
The OriGen is equipped with two headphone jacks for connecting headphones with 3.5mm or
6.3mm (1/4”) headphone jacks. The headphone output signal level is adjustable based on the
volume control as well as the gain switch. Be sure to start with the gain switch setting at the -
10dB position and switch to 0dB only if additional output volume is needed.
The two headphone output jacks are in parallel, so two pairs of headphones can be connected
in parallel. The minimum recommended impedance for headphones used with the OriGen is 16
Ω. If using two pairs of headphones in parallel, the minimum recommended impedance is 32 Ω
per headphone.

Copyright © 2009-2019 Micca. All rights reserved. Page | 13
5 Specification
5.1 General
PCM Formats: ································· PCM (44.1/48/88.2/96/176.4/192kHz, 16/24bit)
USB Interface: ································· USB 2.0, Asynchronous Transfer Mode
Audio Controller: ······························ C-MEDIA CM6631A
DAC IC: ·········································· Wolfson WM8740
Output Op-amp: ······························· JRC NJM4556
Channel Imbalance: ·························· < 0.5dB
Optical S/PDIF Format: ······················ PCM Only
Power Source: ································· 5V/500mA
Dimensions: ···································· 4.6 x 1.5 x 1.9 Inch (116mm x 38mm x 47mm)
Weight: ··········································· 6 Oz (170g)
5.2 Line Output
Frequency Response: ······················· 20Hz ~ 20kHz +/- 0.1dB
THD+N: ·········································· <0.02% (1kHz, A-wt.)
Signal to Noise Ratio: ························ >108dB (1kHz, A-wt.)
Crosstalk: ······································· -74dB (1kHz)
Output Voltage: ································ 5.3Vrms Gain: 0dB); 1.6Vrms (Gain: -10dB)
5.3 Headphone Output
Frequency Response: ······················· 20Hz ~ 20kHz +/- 0.1dB
THD+N: ·········································· <0.02% (1kHz, A-wt.)
Signal to Noise Ratio: ························ >108dB (1kHz, A-wt.)
Crosstalk: ······································· -93dB (1kHz)
Output Voltage: ································ 5.3Vrms Gain: 0dB); 1.6Vrms (Gain: -10dB)
Output Current: ································ 70mA Nominal); 100mA Max)
Output Impedance: ··························· 0.5 Ω
Load Impedance: ······························ 16 ~ 600 Ω
Table of contents


