MICILE Sidewinder User manual

MICILE Sidewinder Tablet
User Guide
For Software Version E8

2
MICILE User Guide E08.V01.140814
Table of Contents
4 Chapter 1: MICILE Sidewinder Tablet at a glance
5 MICILE Sidewinder Tablet
5 Overview
6 Chapter 2: Getting Started
6 Inserting the micro SD card:
7 Powering on MICILE Tablet
8 Conguring WIFI
12 Tethering the MICILE tablet to your PC:
13 Bringing up the ide browser
14 Chapter 3: Understanding Projects
14 Uploading a sample project
16 The Code Editing Screen
17 Running a project
18 Stopping a project
19 Chapter 4: Writing Simple Programs
19 Creating a New Project
21 Writing a simple print statement in the Debug window
24 Printing Hello World to the MICILE Tablet
27 Chapter 5: Understanding the Core MICILE EZ
27 Libraries
29 Setting screen Color
31 Set Text size
32 draw text

3
MICILE User Guide E08.V01.140814
33 Drawing Simple shapes
35 More Shapes
36 Chapter 6: Using Other Libraries
36 Using EZ_Camera Library
39 Chapter 7: Running other applications
41 Apps for exercises:
41 Apps for SD card:

4
MICILE User Guide E08.V01.140814
Category: Tablet PC
Model: Sidewinder
Function: Front and rear facing cameras, 802.11 n WIFI, speaker, microphone
Display: 7 inch, 800 x 480, capacitive multi-touch
Bundled Items: AC charger, 4 GB micro SD card preloaded with MICILE Operating System
Processor Brand: AllWinner A20 dual core
Chapter 1: MICILE Sidewinder Tablet at a glance

5
MICILE User Guide E08.V01.140814
MICILE Sidewinder Tablet
OVERVIEW
The MICILE OS contains a built-in Integrated Development Environment (IDE)
which allows you to write applications for the MICILE Tablet using a Chrome web
browser.
Volume down
Volume up
Host USB port
Speaker
Microphone
Mini USB port
Mini HDMI port
Headphone Jack
Micro SD
card with
MICILE OS
Charging
port
Micro SD
card slot

6
MICILE User Guide E08.V01.140814
INSERTING THE MICRO SD CARD:
Before powering on your MICILE Tablet, insert provided micro SD card as shown
with the writing face up. You will hear the card click into place. The provided micro
SD card contains the MICILE OS. The MICILE Tablet will not work properly unless
the micro SD card is securely in place before the tablet is turned on.
Chapter 2: Getting Started
Insert micro SD
card with the gold
ngers facing
down before starting the
MICILE Tablet.

7
MICILE User Guide E08.V01.140814
POWERING ON MICILE TABLET
Once the micro SD card is inserted in the MICILE Tablet, you are ready to power
the tablet on. Hold the power button down for ve seconds and then release the
button. It may be helpful to use a watch or clock with a second hand to
help determine the correct amount of time to depress the power button until you
are more familiar with the system. A couple seconds after releasing the power
button, you will notice the LCD screen starting to glow as the back-light turns on
followed shortly by the MICILE start screen.
Hold the power
button down for 5
seconds and release
the button.
If the tablet does not turn on, hold down the power button for ten seconds to force
it to turn off. Wait a few seconds. Hold down the power button for ve seconds and
release
WIFI Conguration button
Battery Meter
MICILE OS
Version

8
MICILE User Guide E08.V01.140814
CONFIGURING WIFI
Once you see the above screen you are ready to congure the WIFI. Be sure your
laptop or desktop computer is connected to the same WIFI connection that you will
be connecting the MICILE Tablet to.
1. Click on the button that
says “CONFIGURE WIFI”
2. A list of detected
networks will show up on
the left side of the WIFI
Conguration screen as in.
Click the “Congure” button
that corresponds to the
name of the WIFI network
you’re using.

9
MICILE User Guide E08.V01.140814
3. The WIFI Conguration
screen will show up. A
white text box will appear.
Touch in this text box to
bring up the keyboard.
4. Using the keyboard,
enter the correct passkey
for the WIFI network (there
is no cursor, just tap the
box and a keypad will
appear).
10
MICILE User Guide E08.V01.140814
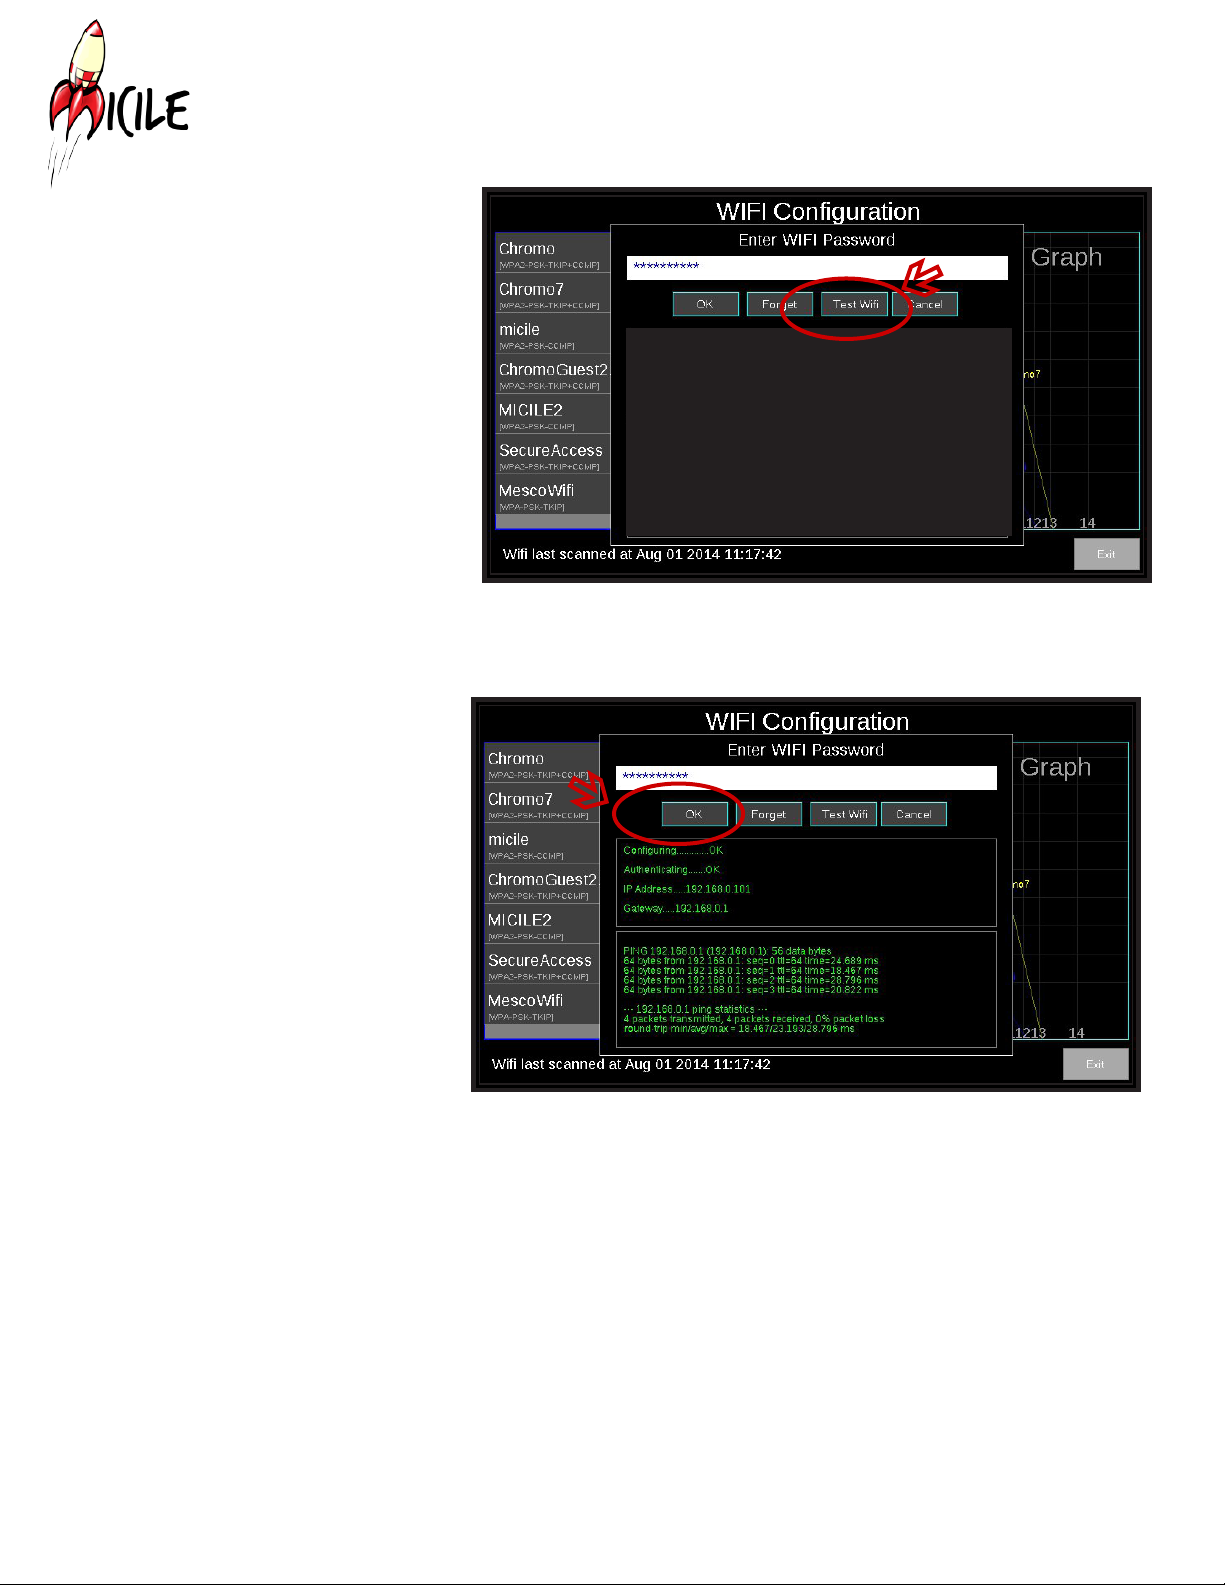
5. Once you have
entered the correct
password, click the
“Test WIFI” button. If the
screen says “probably
bad password”, check
that you are on the
correct router and that
you have the correct
password.
6. You should see
a screen with green
text that looks like this
image. Click the “OK”
button.

11
MICILE User Guide E08.V01.140814
7. You will see a WIFI
conguration screen
with all routers listed.
The one you just set
up will say “Edit”,
the others will say
“Congure”.
8. Press “Exit”. You will
see the start screen,
but now it will have a
URL and router name
listed. Congratulations!
You have connected to
the WIFI.
URL and router name

12
MICILE User Guide E08.V01.140814
TETHERING THE MICILE TABLET TO YOUR PC:
1. Power the MICILE Tablet on.
2. Wait until the home screen shows. In the bottom left corner of the MICILE Tablet,
it will say USB TETHER NOT PLUGGED IN.
3. Plug the USB side of the cable into the Host USB Port of your computer, and the
mini USB side into the MICILE Tablet.
4. Unplug the USB cable from your computer, wait ve seconds, and plug it back
in. This will wake up the USB port. If it doesn’t tether, unplug the cable, wait 5 more
seconds, then replug the cable.
5. Click on the "Show hidden icons" drop down menu.
6. You will get a message that says "Installing device driver software.
7. Look at your MICILE Tablet. Now it will say "USB TETHER: 192.168.88.1
8. Keep the cable plugged in the entire time you are working with the MICILE
Tablet. You will not be able to connect to a Chrome web browser unless you are
tethered to the computer.

13
MICILE User Guide E08.V01.140814
You will see the MICILE Browser IDE. Now you are ready to open a sample
project.
BRINGING UP THE IDE BROWSER
From a computer on the same WIFI network as the tablet, start the Chrome
web browser. (Unfortunately at this time, we do not support Internet Explorer.
Please do not try to complete the remaining procedures in this User Guide
using Internet Explorer, as the IDE will not work properly.) To begin, type in the
IP address of the MICILE Tablet (located at the bottom left corner of the start
screen as shown above) into the URL bar of the Chrome web browser and click
the “enter” button.
Type the
assigned
IP address
into the Chrome web
browser.
14
MICILE User Guide E08.V01.140814
UPLOADING A SAMPLE PROJECT
Once the MICILE Browser IDE is open, you are ready to upload a sample project.
The MICILE sd card comes preloaded with ve applications. However, for the
purposes of this exercise, you are going to download an app from the MICILE
website.
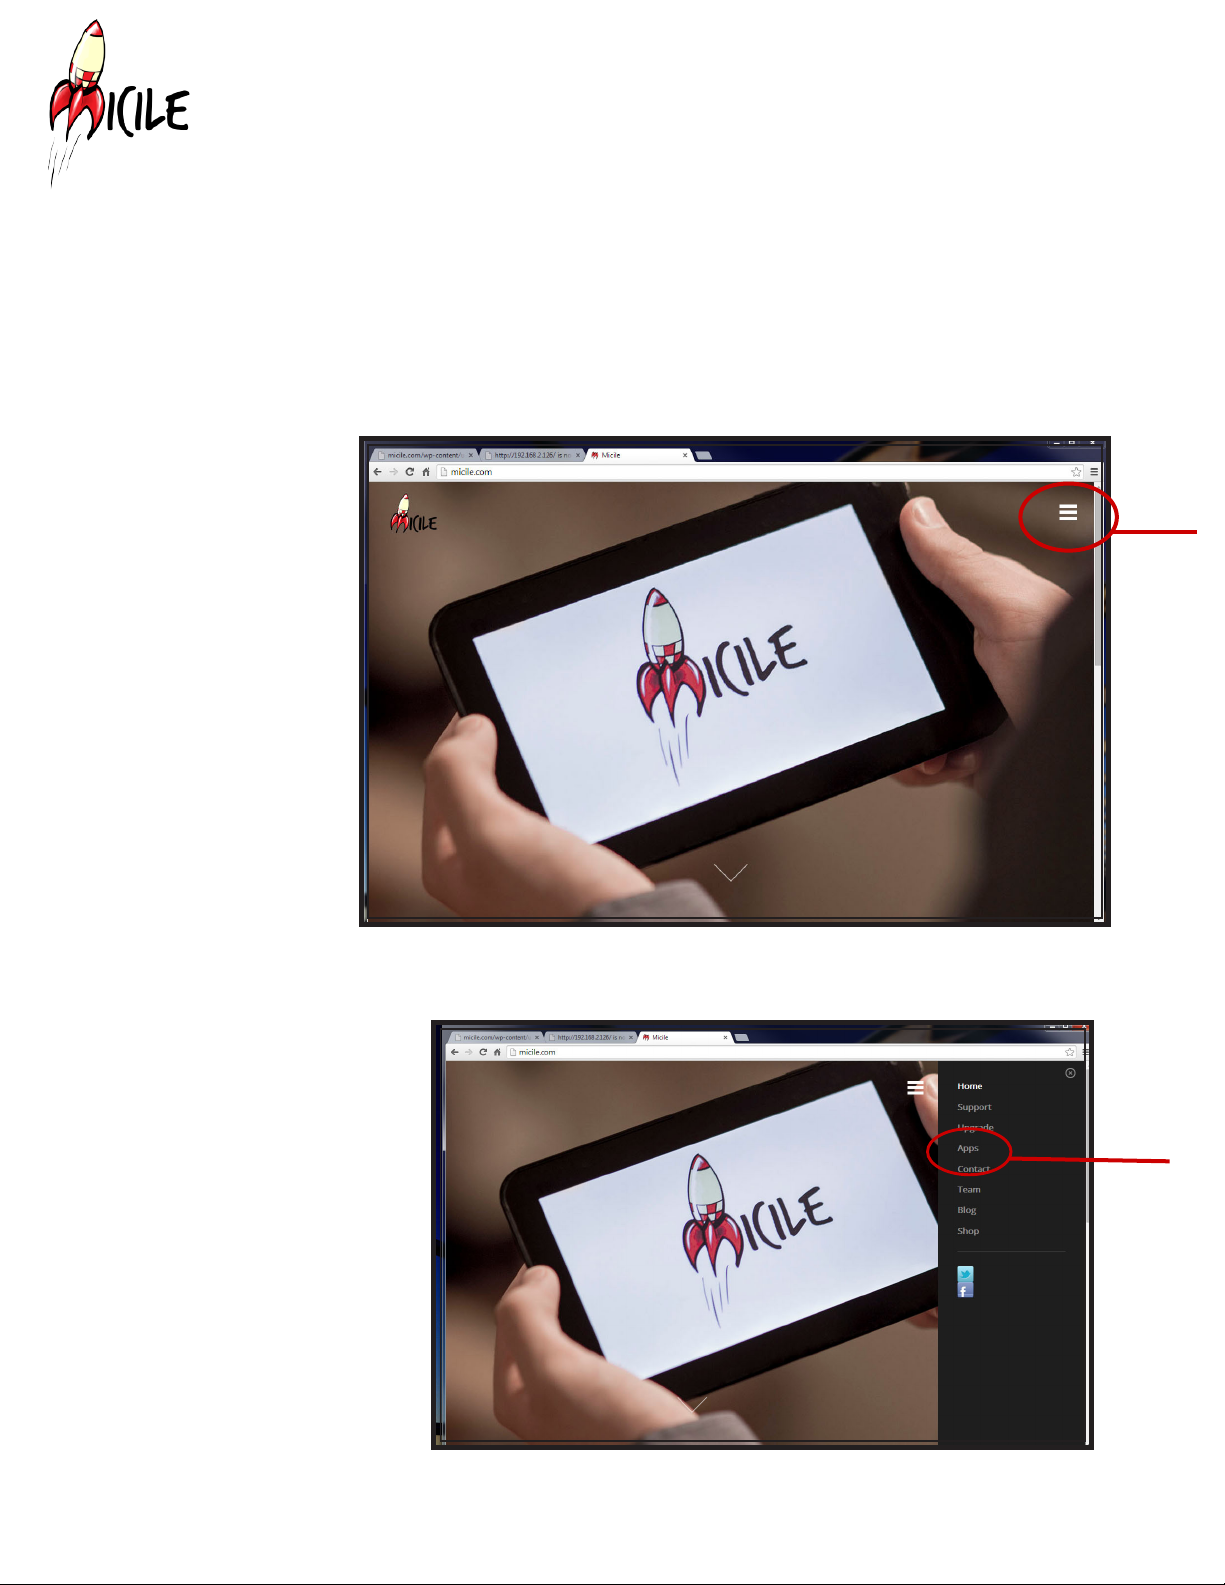
Menu
Button
App Button
2. Click on the menu
item titled “Apps”.
1. Go to the
MICILE website
www.micile.com
Chapter 3: Understanding Projects

15
MICILE User Guide E08.V01.140814
6. Select the Apple_
Scrolling zip le you just
downloaded from your
downloads folder. Click the
“Open” button.
7. Your projects section will now
list Apple_Scrolling as one of the
projects.
3. Scroll down the page until
you nd the Apple_Scrolling
app.
4. Download the zip le.
5. Go back to the
MICILE Browser
and click on “Upload
Project”.

16
MICILE User Guide E08.V01.140814
THE CODE EDITING SCREEN
When you open, you will see the Code Editing Screen. Before we move on, it is
important that you understand all of the parts of the Code Editing Screen.
The Code Editing Screen is the screen in the IDE used to edit the code of an
application. There are four areas of the Code Editing Screen. The “File Explorer
Pane”, “Main Toolbar”, “Editor Pane”, and the “Output Pane”.
File Explorer Pane
Editor Pane
Main Toolbar

17
MICILE User Guide E08.V01.140814
Figure 3.x
3. Click “run” and you will
see the application open
on your MICILE Tablet.
2. You will see the code in
the Editor Pane.
2. When you open the
Aplle_Scrolling project,
you will see this screen,
the Code Editor Pane.

18
MICILE User Guide E08.V01.140814
STOPPING A PROJECT
When you are ready to stop the app, click the “stop” button in the upper right corner of the
main screen.
4. You will see this
image scroll across
the MICILE Tablet.

19
MICILE User Guide E08.V01.140814
2. The New Project Name pane will pop up. Name the project. Remember to add an
underscore between each word. Example “Hello_World” and press “OK”.
1. Click on the “Create New Project” button.
Chapter 4: Writing Simple Programs
Now you are familiar with the MICILE Code Editing Screen and the MICILE IDE
Browser and you have used most of the buttons. You are ready to write a simple
debug program in the Code Editing Screen.
1. Press “Create New
Project” button.
2. Name the project.
3. Highlight the project
and press “open”.
4. Press “New File”
5. Name the le with .py
le name.
CREATING A NEW PROJECT

20
MICILE User Guide E08.V01.140814
5. In a few seconds, you will see the new le
appear in the File Explorer Pane. The Editor
Pane will also update. Now you are ready to
write code.
4. Press the “New File” button in the
File Explorer Pane. Name the le Hello_
World.py - Be sure to use an underscore
between each word and the “.py”
extension
3. Highlight the project you just named and press “open”. You will see the screen
shown below.
New File
Table of contents


