MicroNet TREQR Series User manual

Because the Journey is just as important as
the Final Destination
Driving-safety and fleet management
technology has reached a new level of
sustainable safety, risk reduction and
operational cost savings. TREQr-5, by
Microent-inc Technology Solutions,
dramatically changes unsafe driving
behaviors and prevents crashes in an
easy-to-implement,
easy-to-manage fleet safety solution—
delivering immediate and dramatic results for fleets of all sizes.
TREQr-5 was developed to make driving safety simple and
affordable for all companies through a combination of real-time
verbal, in-cab mentoring along with instant, exception-based
reporting detailing driver performance and trends. Now equipped
with Wi-Fi and 3G technologies, fleet managers can utilize mobile
device technology and the expansive world of apps to stay
connected to their drivers and vehicles.
Safeguard your drivers and increase fleet efficiency and
compliance with the most effective telematics solution on the
market, TREQr-5.
•The only real-time safety solution
based on in-cab verbal coaching.
Typical results include:
∙90% Reduction in Accidents
∙89% Reduction in Aggressive Driving
∙86% Reduction in Speeding
∙88% Reduction in Seat Belt Violations
•Comprehensive Fleet Data/Metrics
•Fuel Use and MPG Tracking
•Idle Mentoring and Alerts
•State Mileage and IFTA Tax Reporting
•Crash Detection and Reporting
•Fleet Visibility / GPS Tracking
Safety | efficiency | compliance
TREQr-5

SAFETY
EFFICIENCY
COMPLIANCE

This installation reference guide outlines the steps required to install and set
up your TREQr-5 device. For more detailed instructions and specifications,
refer to the complete TREQr-5 Installation Manual available at Micronet-inc.
Figure 1: TREQr-5 device installed on vehicle
windshield
Unpack & Verify Package contents
•TREQr-5 Device
•2-Part Liquid Adhesive (Qty:1)
•Cable Ties (Qty: 3)
•6/9-Pin Adapter Cable (Optional)
•Alcohol Wipes (Qty:1)
•2-Wire Adapter Cable (Optional)
6/9 Pin Cable (Optional) Cable ties, Alcohol wipe, Liquid Adhesive
Create new Vehicle Profile:
c. Navigate to admin > Vehicles > add Vehicle.
d. Complete the add Vehicle form by entering information in the required fields
(indicated by red (*) asterisk).
Important: The vehicle VIN# is required to download the vehicle-specific
firmware file later in the installation process. Be sure that the VIN# is entered
accurately.
e. Click save when finished.
Update the TREQr-5 Device > Vehicle assignment:
f. Navigate to admin > Devices.
g. Locate the TREQr-5 device in the list, and click edit.
h. Under the Device Assignment section, click the show vehicles for assignment
link. A vehicle list will display.
i. Use the “Search” tool or scroll through the list until you locate the vehicle you
are installing the device in. Select the vehicle by clicking the radio button next
to the Vehicle ID.
j. Click save.
k. The TREQr-5 device is now assigned to the vehicle and the unit can be installed
in the vehicle.
Prepare Installation location:
a. Identify the desired installation location on the vehicle windshield. We
recommend installing in the upper-left or lower-left (driver side) corner of the
windshield.
b. Clear windshield mounting location of any labels, stickers, or debris. You may
need to use a solvent such as acetone or lacquer thinner to clean the area of
any debris.

c. Using a clean, dry towel, thoroughly wipe the installation area, making sure
the surface is clean and dry.
d. Use the provided alcohol wipe and thoroughly clean the installation area.
e. Again, using a clean, dry towel, thoroughly wipe the installation area, making
sure the surface is clean and dry.
Prepare & Mix 2-Part adhesive
Before mounting the TREQr-5 device to the vehicle windshield, the 2-part
liquid adhesive must first be prepared. Follow these instructions precisely.
Prepare & Mix 2-Part adhesive:
a. Locate the 2-Part liquid adhesive included in the Installation Kit.
b. Mix the adhesive as follows:
•If the two halves of the packet are separated by a mechanical clip,
remove the clip to mix the adhesive. If the packet is separated by a
bonded strip, squeeze on one side until liquid bursts through to the
other side.
•Thoroughly mix the two adhesive parts by squeezing all of the liquid
from one end to the other, while kneading the packet. Do this several
times to ensure a thorough mixing, paying particular attention to the
corners of the packet.
Important note:
The total amount of time between mixing the adhesive and mounting
the TREQr-5 device on the vehicle windshield should be approximately
five (5) minutes or less.
Install TREQr-5 Device
After completing previous steps, the TREQr-5 device can be installed on the
vehicle windshield. Note: Windshield and device must be at least room
temperature before attempting to install the unit. Heat the windshield if
necessary.
Mount TREQr-5 Unit to Vehicle windshield:
a. Remove the adhesive backing (red dots) protecting the adhering surfaces of
the adhesive pads on the TREQr-5 unit.
b. Cut the corner of the adhesive packet, creating a small opening to squeeze the
adhesive from, then waste a small amount of the adhesive on a towel before
applying to the unit.
c. Apply approximately one (1) drop of the mixed adhesive to the center of the
upper-left, and lower-right adhesive pads.
Important: Only apply adhesive to the upper-left and lower right adhesive
pads on the TREQr-5 device.
Apply 1 drop of the mixed adhesive to the center of 2 diagonal pads
on the TREQr-5 unit
d. Install TREQr-5 in predefined area. Apply sufficient pressure to adequately
secure the device in place. Hold firmly in place for approximately 60 seconds.
Be careful to not press the green button while mounting the unit.
Important: The TREQr-5 unit must be installed so that the device cable points
downward from the device for correct orientation.
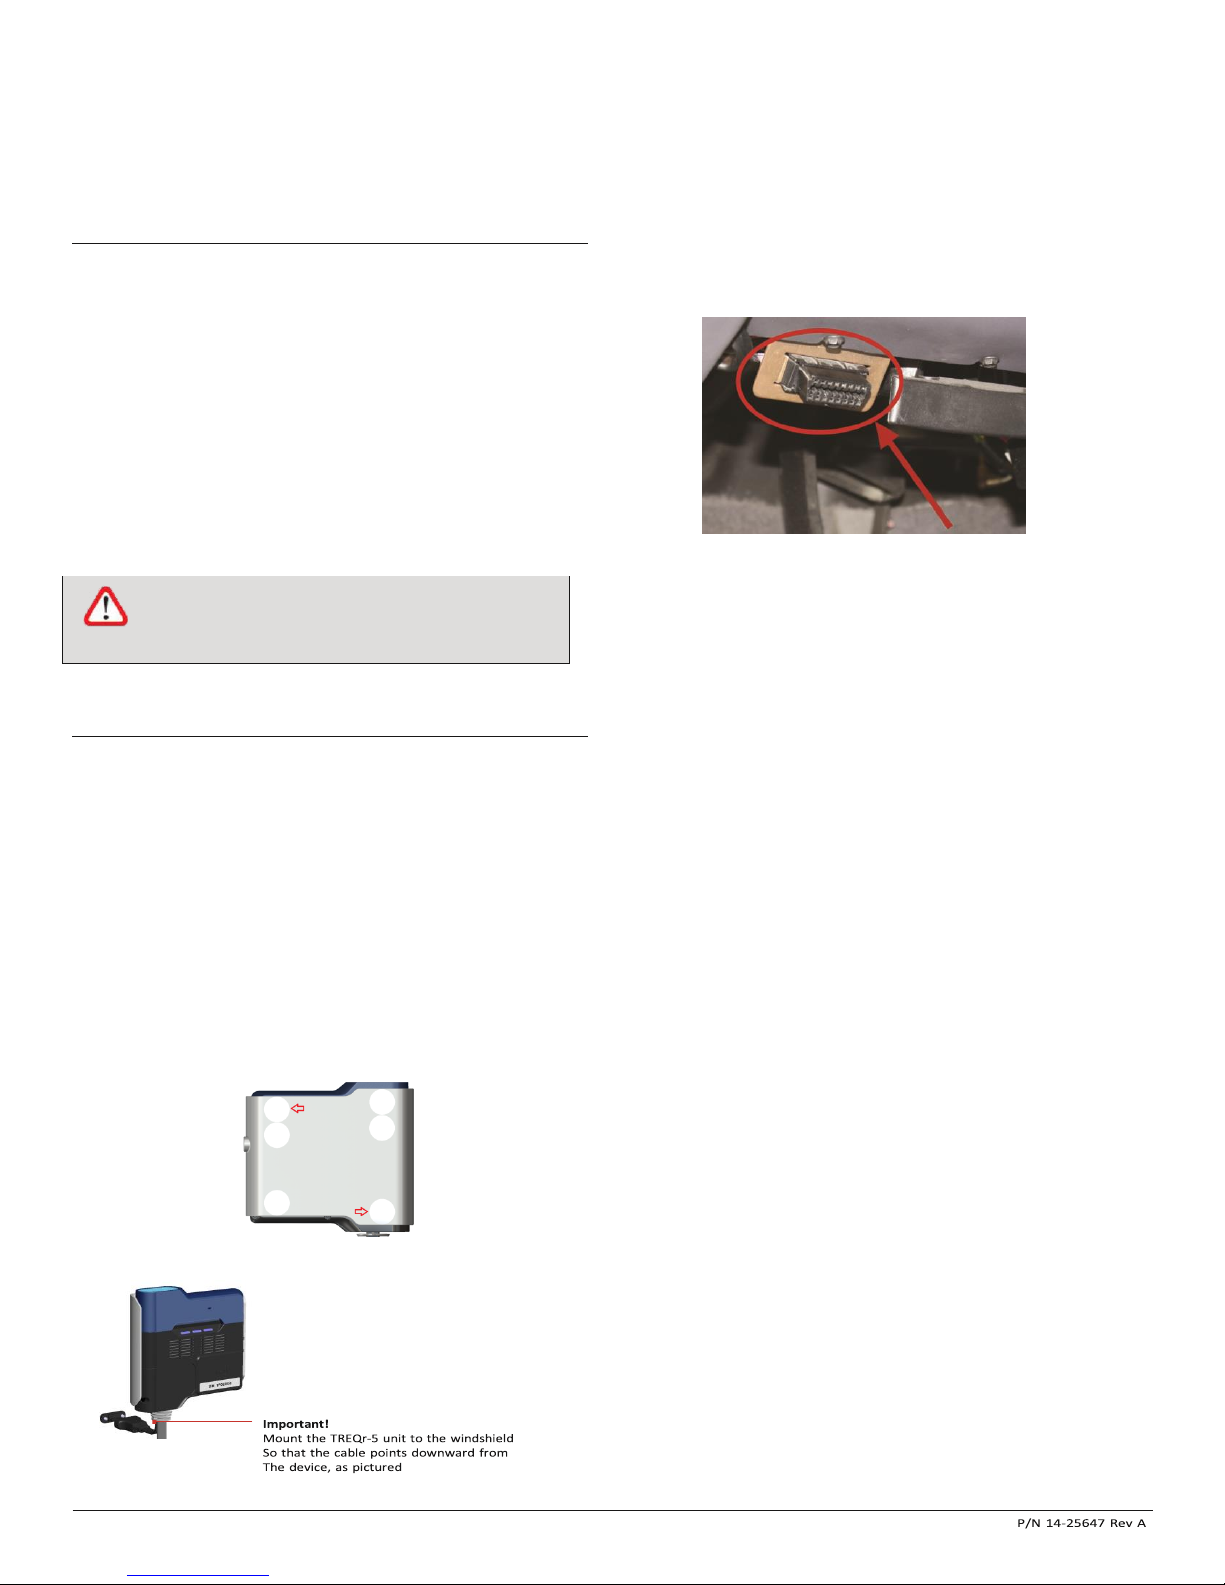
e. Locate the vehicle diagnostic port (OBD-II or 6/9-Pin), typically located
underneath dash on driver side. If unable to locate, refer to the vehicle’s
owner manual.
f. Route the TREQr-5 cable to the vehicle diagnostic port using the most efficient
route possible, keeping in mind Micronet’s standard for quality, professional
workmanship.
g. Securely plug TREQr-5 cable into the vehicle diagnostic port.
h. Secure excess cable as needed, using provided cable ties, in a location that will
not interfere with normal operation of the vehicle.
,

FCC Statement
1. This device complies with Part 15 of the FCC Rules. Operation is subject to the following two
conditions:
(1) This device may not cause harmful interference.
(2) This device must accept any interference received, including interference that may cause
undesired operation.
2. Changes or modifications not expressly approved by the party responsible for compliance could
void the user's authority to operate the equipment.
NOTE:
This equipment has been tested and found to comply with the limits for a Class B digital device,
pursuant to Part 15 of the FCC Rules. These limits are designed to provide reasonable protection
against harmful interference in a residential installation.
This equipment generates uses and can radiate radio frequency energy and, if not installed and
used in accordance with the instructions, may cause harmful interference to radio communications.
However, there is no guarantee that interference will not occur in a particular installation. If this
equipment does cause harmful interference to radio or television reception, which can be
determined by turning the equipment off and on, the user is encouraged to try to correct the
interference by one or more of the following measures:
Reorient or relocate the receiving antenna.
Increase the separation between the equipment and receiver.
Connect the equipment into an outlet on a circuit different from that to which the receiver is
connected.
Consult the dealer or an experienced radio/TV technician for help.
RF Exposure Information
This device complies with FCC radiation exposure limits set forth for an uncontrolled
environment. In order to avoid the possibility of exceeding the FCC radio frequency exposure
limits, human proximity to the antenna shall not be less than 20cm (8 inches) during normal
operation.
This manual suits for next models
1
Table of contents