Miicstar MS62 User manual

Shanghai Multak Technology Development Co.,Ltd.
Tel: 021-54261328
Add: 5F,No.25,69 GuiQin Rd. Shanghai China
Post Code:200233
www.multak.com
multak.taobao.com
Miicstar MS62
DUAL WIRELESS
Microphone

Product Operation
Download & Update
Pairing Code
Trouble Shooting
Product Specification & Maintenance
Product Warranty
Chcek List
Installation
Basic Operation
Function & Setting
01
02
04
05
07
16
17
18
19
Receiver Microphones
Adaptor A/V Cable
Controller USB Cable
HDMI CableInstruction
01
CONTENT Check List

How to Connect to Power Amplifier
How to Change Batteries
How to Download from PC
How to Connect to TV
DCMICAV OUT HDMI
HDMI
USB
Video Audio
Wired mic
Adaptor
Wireless mic
HDMI
wired mic
VideoAudio
Adaptor
Wireless mic DCMICAV OUT HDMIUSB
USB Connect
This side up
No Adaptor
DCMICAV OUT HDMIUSB
0302
Installation Installation
Figure1-1 Figure1-3
Figure1-2 Figure1-4

Back of the receiver
DCMICAV OUT HDMIUSB
Side of the receiver
Microphone
Front of the receiver
Connect A/V cable or HDMI cable to TV and
receiver(Figure1-1).If using power amplifier,
connect it with the receiver as well(Figure1-2).
Connect Adaptor to the receiver.
Turn on the TV and set the channel to Video
(External A/V port) or HDMI.
Press the power button on controller or receiver to
switch the receiver on, when the power indicator is
green means the machine is working.
Insert two AA batteries into the back of the
microphone(Figure1-3).
Turn the microphone’s power button on. when
the power indicator is on means the microphone
is working.
Please read the Product Operation for more
information.
1.
2.
3.
4.
5.
6.
Notice:1. Scanning takes around 5 minutes to change
the SD card.
2. We advise using the card reader to add
songs for higher speed.
0504
Function & Setting
Basic Operation
SD Card
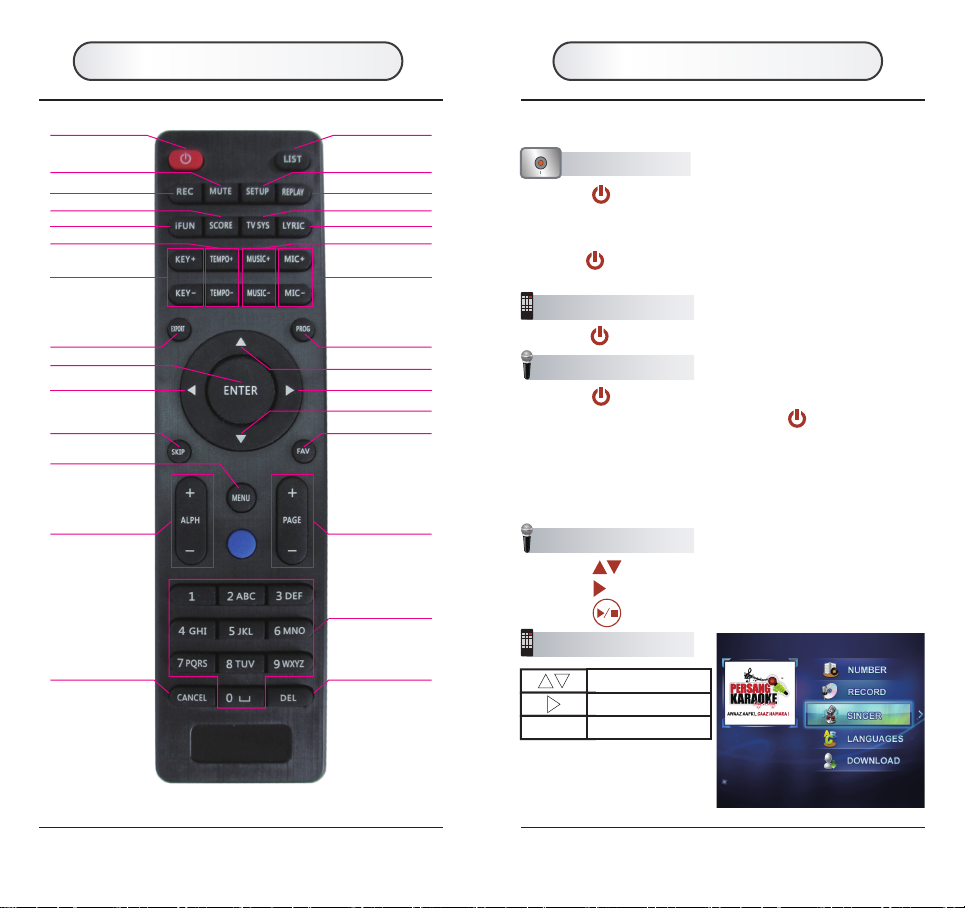
1. Power On/Off
Receiver Operation
Press to turn on/off the receiver.1.1
1.1
1.2
1.3
Press until the indicator on to turn on the microphone.
After turning on the microphone, hold for 2 seconds, to
switch it off.
The microphone will be turned off automatically if no
operation for 3 minutes.
Press to turn on the system. The karaoke home page
will be displayed after the system video. (It will take around
15 seconds for loading)
Hold for 2 seconds until the indicator be red, to switch
receiver off.
1.1
1.2
Press to select the items.
Press to select the next page.
Press to enter the next page.
2.1
2.2
2.3
Mute
Power
Record
iFUN
Score
Key
Tempo
Setup
Primary Menu
Replay
TV System
Music Volume
Mic Volume
Program
Enter/Play Record
Fade On/Off
Pause
Skip Interlude
Record Export
Favorite
PageUp/
PageDown
Numbers
Alphabet Page
Cancel Delete
Lyric
Adjusting Button
Search a song
with half screen
Controller Buttons
2. Karaoke Home Page
Select the items
Select the next page
ENTER Enter to the next page
0706
Microphone Operation
Controller Operation
Microphone Operation
Controller Operation
Function & Setting Product Operation

4. Singer List
Select the items
Select the next page or back to the singer list
ENTER Enter to the next page
0-9 Input the numbers and alphabets to search the singers
DEL Delete the alphabet from the last one
Delete all
Singer list page
CANCEL
ALPHA+/-
PAGE+/-
Select by the first alphabet of singers’ name
4.1 Press to select the items.
4.2 Press select the next page or back to home page.
4.3 Press enter to the next page.
5.1 Press select back to home page.
5.2 Press enter to the next page or back to the home page.
5.3 Press is number cycling.
5. Search the song by song number
Play/Stop the song
Enter the song number
Play/Stop
0-9
DEL Delete the song number from the last one
CANCEL Delete all
Number cycling
0908
Select the items
ENTER Enter to the next page
Select the next page
or back to home page
Notice: Useful song number
can be reserved and
added to favorite.
Microphone Operation
Controller Operation
Controller Operation
Microphone Operation
Controller Operation
Microphone Operation
3. Song List
3.1 Press to select the items.
3.2 Press select the next page or back to home page.
3.3 Press enter to the next page.
Product Operation Product Operation
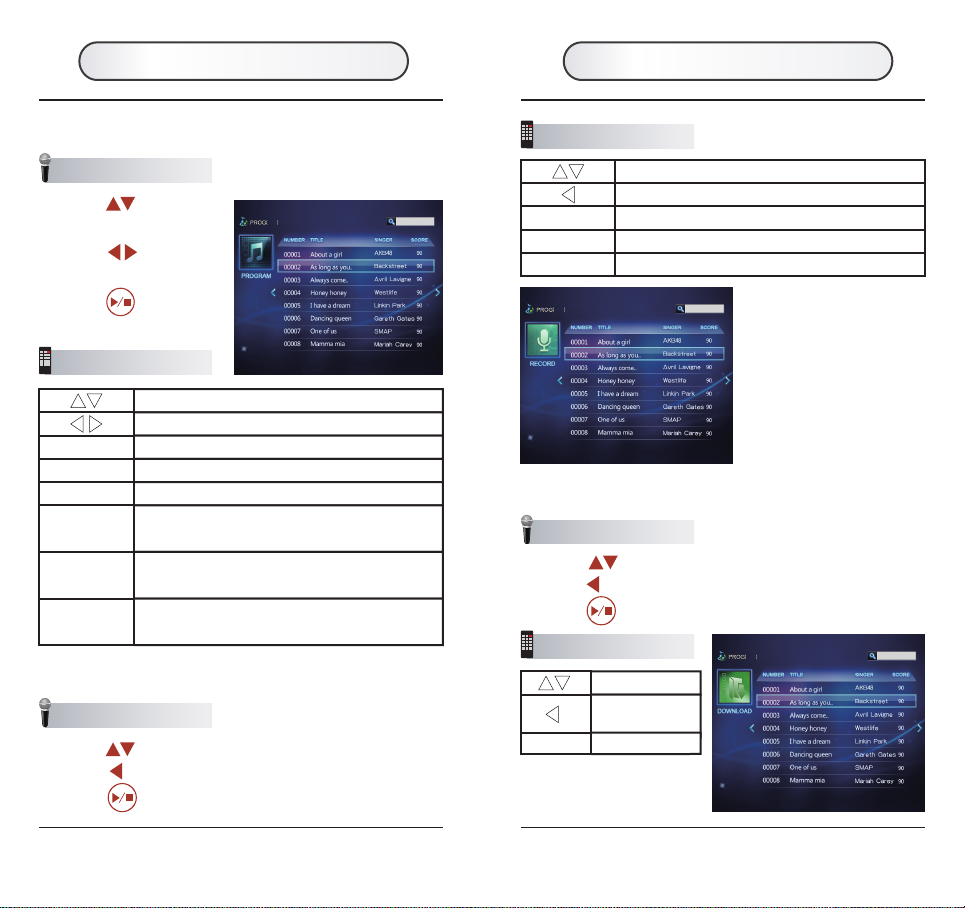
7. Record Songs List
7.1 Press to select the items.
7.2 Press select to the previous page.
7.3 Press to play.
Select the items
Select to the previous page
ENTER Play/Stop
DEL Delete the reserved or collected songs
EXPORT Export the record songs to SD card
8. My Download List
8.1 Press to select the items.
8.2 Press select to the previous page.
8.3 Press to play.
1110
Microphone Operation
Microphone Operation
Controller Operation
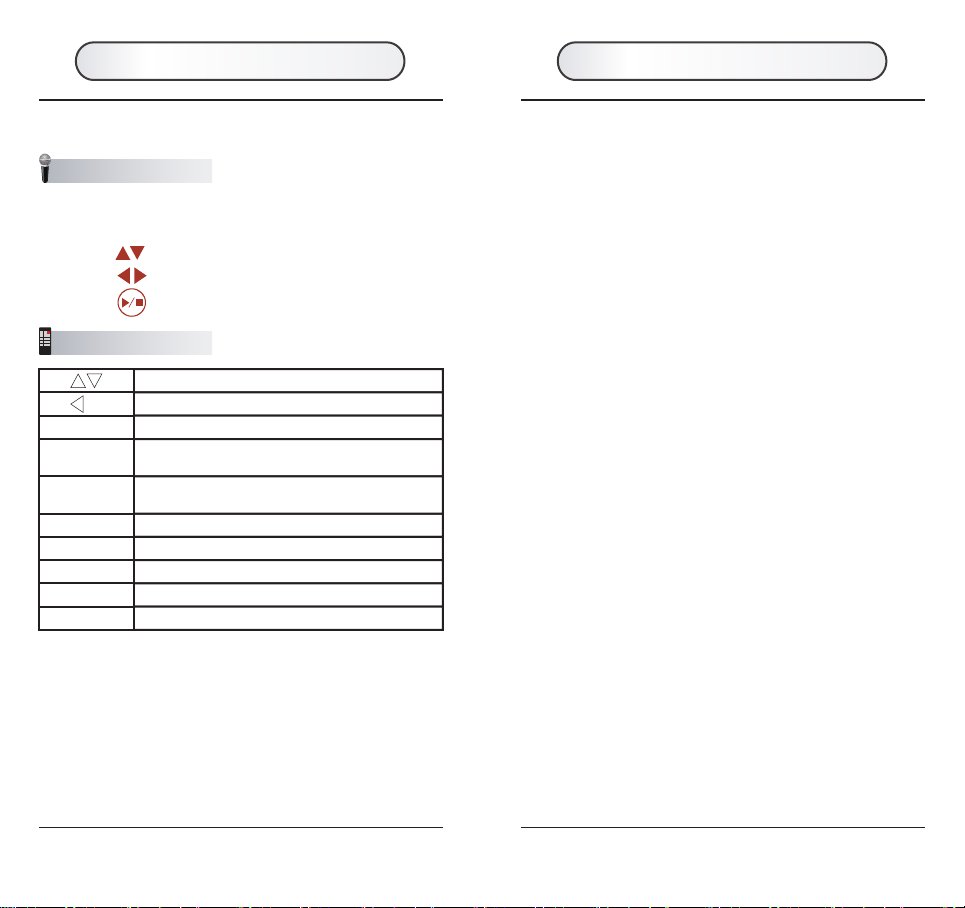
Select the items
Select to the
previous page
ENTER Play/Stop
Controller Operation
Notice: DEL invalid
(Can not delete)
Select the items
Select to the previous page
ENTER Play/stop
DEL Delete reservation or collection
PAGE+/- Song list page
ALPHA+/- Skip by the first alphabet of the singers’ name
(reservation list invalid/favorite list invalid)
Add the songs to the reservation list, cancel reservation
for the reserved songs(reservation list invalid)
Add the songs to the collection list, cancel collection for
the collected songs(favorite list invalid)
PROGRAM
FAVORITE
Microphone Operation
Controller Operation
6. Song(Reservation/Collection) List
6.1 Press to select the
items.
6.2 Press select to the
previous page.
6.3 Press to play.
Product Operation Product Operation

1312
Controller Operation
Microphone Operation
9. Play
9.1 Press to switch the record on/off.
9.2 Press to stop/play.
9.3 Press to switch the vocal on/off.
9.4 Press to see the adjusting platform.
Adjusting items:
Accompany volume:adjust the accompany volume
Microphone volume: adjust the microphone volume
Echo:adjust the echo
Tempo:adjust the tempo
Key:adjust the key
Press right and left button to switch the items,press up
and down to adjust the value.
The adjusting platform will be returned after 5 minutes no
operation.
9.5 Press to stop playing.
9.6 Save the record
①. switch the items, is for confirmation.
②. Save:save the record song into the SD card.
③. Replay:replay the record songs.
④. Exit: do not save the record song, back to song list.
SKIP Skip the Interlude
PROG Can reserve the songs working along with the number
buttons to use the useful song number until see the songs
FAV Can favorite the songs working along with the number
buttons to use the useful song number until see the songs
0-9 Play the number reserved songs and favorite songs
PROG Delete all the numbers
DEL
CANCEL
Delete the numbers from the last one
MENU Half screen song list interface
PROG Search by the first alphabet in the half screen song list
interface
PAGE+-
ALPH+-
Skip the page in the half screen song list interface
MIC+- Microphone Volume up/down
MUSIC+- Music Volume up/down
REPLAY Replay the song
iFUN Turn on/off the SCORE and IFUN function
SCORE Turn on/off the score
LYRIC Display/hide the lyric
PROG KEY up/down
TEMPO+-
KEY+-
TEMPO up/down
Switch record on/off
Stop/play
Switch vocal on/off
REC
See the adjusting platform
Turn on/off the record
ENTER Stop playing
MUTE Turn on/off the mute
Product Operation Product Operation
11. Special Function
11.1 iFUN Function
iFUN function is a huge set of intelligent scoring system, it can
judge whether the singers’ voice is identical to the songs at real
time, display it by staff mode, very clear, meanwhile scoring at
real time, to see the singing level clearly.
Can easily control the iFUN display on/off by using iFUN button
on the controller.
11.2 Volume Adjusting Function
Using KEY+/KEY- button on the controller to adjust the key of
the playing songs.(only for MIDI songs)
11.3 Tempo Adjusting Function
Using the TEMPO+/TEMPO- button on the controller to adjust the
tempo of the playing songs.(only for MIDI songs)
11.4 Accompany Volume Adjusting Function
Using the MUSIC+/MUSIC- button on the controller to adjust the
music volume of the playing songs.
11.5 Microphone Volume Adjusting Function
Using MIC+/MIC- button on the controller to adjust the
microphone volume.
1514
Select the items
Switch the ordering type
ENTER Stop playing, play the cursor searched songs
0-9 Input the alphabets to search the songs and singers
DEL Delete the input alphabets from the last one
CANCEL Delete all input
Song list page
Skip the page by first alphabet searching
PROG Add the songs to the reserved song list,cancel the
reservation for the reserved songs
FAV Add the songs to the collected song list,cancel the
collection for the collected songs
PAGE+/-
ALPHA+/-
10. Search the song when playing
Microphone Operation
10.1 Press to select the items.
10.2 Press to switch the ordering type.
10.3 Press play the searched songs.
Notice:Press the MENU button to turn on/off the half screen
interface when playing the songs.
Controller Operation
Product Operation Product Operation
Pairing code means match the receiver with the wireless
microphones. The receiver and microphones are finished the
pairing code when ex factory.
When to pairing?
When the communication between the receiver and
microphones is invalid or not good.
How to pairing?
Step 1: When the receiver power off, hold the power button
of the receiver to turn it on, until the pairing code interface on.
Step 2: When one microphone is power off, hold the power
button until the indicator flash for the first time, release the
power button, then pairing code successfully, another
microphone with the same operation.
Notice: If press the power button of the first microphone after
pairing code successfully, then exit pairing code, the
pairing code interface will be disappeared, then only
the first microphone can be working with receiver.
Step 3: If both of the microphones are pairing code
successfully, the red indicators of both microphones will flash
for two times after the second microphone pairing code
successfully, the receiver will exit pairing code automatically,
pairing code interface will disappeared. Both of the
microphones can work with the receiver.
1716
1. SD Card
KARAOKE content:for saving the karaoke songs data.
KARAOKE/DOWNLOAD content: for saving the user voice,
video file, will display in the menu of “MY DOWNLOAD”.
KARAOKE/BGV content:for saving the users’ picture files,
will used for karaoke playing background or MP3 playing
background, saving the video files, used for karaoke playing
background video.
(notice:MP3 playing can only use the picture for
background, can not use the video for background)
KARAOKE/UPDATE content: for saving the updated
karaoke songs.
1)
2)
3)
4)
2. SD Card Connection Mode
Insert the SD card into the card reader, connect it to
computer.
Insert the SD card into the receiver, connect it to computer
by the USB cable(figure1-4)
The founded Removable storage disk in the computer is the
SD card.
1)
2)
3. Add the Songs、Background
Add the songs by MUK: Copy the new MUK songs to the
SD card/KARAOKE/UPDATE content.
Update my download: Copy the audio、video file to the
SD card/KARAOKE/DOWNLOAD content. (MS62 support
the mostly popular audio、video format)
Update the background file:copy the video file/picture to
the SD card/KARAOKE/BGV content.
1)
2)
3)
DOWNLOAD & UPDATE Pairing Code
1.Do not store in a very high temperature or humid place.
2.Do not drop or avoid heavy hit on it.
3.Do not use sharp object on the keypad.
4.Do not diassemble the product.
5.Remove the batteries inside the battery compartment (if any)
when not in use for a period of time.
Product Color
Dimensions
Weight
Frequency Range
TV Output
Resolution
Language
Song Language
Song Quantity
Background
Pictures Quantity
Input Method
ROM
Multimedia Card
Data Interface
A/V Socket
External Mic socket
Multimedia
Audio Format
Video Format
Silver
151mm×115mm×24mm(Receiver)
41mm×41mm×273mm(Microphone)
164g(Receiver)
131g(Microphone)
2400-2483MHz
HDMI/CVBS
1280×720,720×576(PAL)
English/Chinese
Chinese/English/Japanese/Korean/Spanish/
Russian/Hindi/Indonesian
Maximum 20000pcs, Record 50pcs, Reservation
100pcs,Favorite 100pcs, My download 100pcs
Built-in 50pcs,User 100pcs
Microphone/Remoter control
2 GB
SD Card/ Maximum 32GB
Micro USB
3.5mm
3.5mm
video display/MP3 playback/picture play
WAV/MP3/OGG/WMA/AAC
MKV/MP4/AVI/MPG/WMV/MOV/FLV/RM/VOB
BMP/JPG/GIF/PNGPicture Play Format
1918
1. NO POWER:
Make sure that your local AC power source is within
the operating voltage range of the AC adaptor.
Check if the adaptor is already connected correctly.
Make sure that (+ -) of the batteries in the correct
direction.
Check if battery wear out.
2. NO SOUND:
Check the HDMI or AV cable connection if correctly
connected with TV or receiver.
Check the volume controls on the Mic and TV set.
Check if the TV is already in the video or HDMI mode.
3. NO PICTURE:
Check the HDMI or AV cable connection if correctly
connected.
Check if the TV set is in A/V or HDMI mode.
Check for power adaptor.
4. WIRELESS MICROPHONE NO SOUND:
Check the batteries.If the batteries run out of power,the
LED under the power button will blink.
Set the pairing code again.
5. USB DOWNLOAD DOESN’T WORK:
Check the connection of USB cable.
Check if SD card is inserted properly.
Try to connect receiver to another USB plot.
Trouble Shooting Product Specification
Product Maintenance
Table of contents


