MINOLTA-QMS PageScope Quick start guide

3DJH6FRSH
$GPLQLVWUDWRU¶V
*XLGH
$

ii
Foreword
Welcome
PageScope is utility software that provides central control over
printers, copiers, and other devices on a network. With PageScope, you
can use a Web browser to check the current status of each device on the
network, and to change the configuration of the network and printer.
PageScope uses SNMP protocol, which is the standard for network
management. This means it can be used for management of a wide
range of devices, including printers and copiers, as well as other makes
of network printers and other devices that support standard Printer-
MIB. PageScope is implemented based on Java 2 technologies,
enabling functions and operations that are equivalent to those found on
a most platforms that support Java.
Trademark Acknowledgements
QMS and the MINOLTA-QMS logo are registered trademarks of
MINOLTA-QMS, Inc. Minolta and PageScope are trademarks or
registered trademarks of Minolta Co., Ltd. All other trademarks are the
property of their respective owners.
Copyright © 2001 by MINOLTA-QMS, Inc..
The information contained in this manual is subject to change
without notice.

i
Foreword
Contents
1 System Requirements ................................ 1
Network Environment .......................................1
Server ..............................................................1
Client ................................................................2
2 Installing and Starting Up the Server ........ 3
2.1 Installing the Server ......................................3
Windows 95/98/Me/2000/NT 4.0 Platform .......3
Solaris Platform ...............................................3
Linux Platform ..................................................3
2.2 Upgrading PageScope ...................................4
Windows 95/98/Me/2000/NT 4.0 Platform .......4
Solaris Platform ...............................................5
Linux Platform ..................................................5
2.3 Starting Up the Server ...................................6
Windows 95/98/Me Platform ............................6
Windows NT 4.0/2000 Platform .......................6
Solaris Platform ...............................................6
Linux Platform ..................................................7
2.4 Shutting Down the Server .............................7
Windows95/98/Me Platform .............................7
Windows NT 4.0/2000 Platform .......................7

ii
Foreword
Solaris Platform ...............................................8
Linux Platform ..................................................8
2.5 Uninstalling the Server ..................................8
Windows 95/98/Me/2000/NT 4.0 Platform .......8
Solaris Platform ...............................................9
Linux Platform ..................................................9
3 Using PageScope Client ........................... 10
3.1 Starting Up Client ........................................10
3.2 Logging Into PageScope .............................11
3.3 Specifying the Search Range .....................13
4 Device Management .................................. 15
4.1 Displaying the Device Management and
Configuration Screen ..................................16
4.2 Screen Layout ..............................................18
4.3 Functions ......................................................19
4.4 Using Multi-Setting ......................................20
5 Configuring PageScope ........................... 22
5.1 PageScope Preferences ..............................22
Displaying the Setup Screen ..........................22
To Configure PageScope Preferences ...........23

iii
Foreword
5.2 Initializing the PageScope Configuration ..24
Displaying the Setup Screen ..........................24
To Initialize the PageScope Configuration .....24
5.3 Selecting a Device for Management ...........26
Displaying the Setup Screen ..........................26
To Select a Device for Management ..............26
5.4 Specifying the Search Range .....................28
Displaying the Setup Screen ..........................28
To Add a Network to the Search Range .........29
To Remove a Network from the Search Range 31
5.5 Adding a Device to List Manager ...............32
Displaying the Setup Screen ..........................32
To Add a Device to List Manager ...................32
5.6 Removing a Device from List Manager ......33
Displaying the Setup Screen ..........................33
To Remove a Device from List Manager ........34
5.7 Assigning an IP Address to a Device .........35
Displaying the Setup Screen ..........................35
To Assign an IP Address to a Device .............36
5.8 Registering and Unregistering Users ........37
Displaying the Setup Screen ..........................37
To Register a User .........................................38
To Change User Setup Parameters ...............39
To Delete a User ............................................39

iv
Foreword
5.9 Configuring a Custom Group .....................40
Displaying the Setup Screen ..........................40
To Create a Group .........................................41
To Delete a Group ..........................................43
To Change the Name of a Group ...................43
To Copy a Group Setup ..................................44
To View a Group Setup (HTML mode only) ...45
5.10 Configuring E-mail Settings ........................46
Displaying the Setup Screen ..........................46
To Configure a Mail Account and Notification
Contents .........................................................47
To Specify Notification Mail Recipients ..........48
E-mail Notification ..........................................50
5.11 Configuring Registered User Settings .......51
Displaying the Setup Screen ..........................51
To Configure Registered User Settings ..........52
5.12 Configuring My Printers Settings ...............53
Displaying the Setup Screen ..........................53
To Configure My Printer’s Settings .................53

1 System Requirements
1
1 System Requirements
The minimum system configuration detailed below is required to run
PageScope.
Network Environment
Server
Note
LAN Type Protocol
Ethernet (10/100BaseT) TCP/IP
Token Ring (4/16 Mbps)
Operating System Hardware (Recommended)
Windows 95/98/Me/2000/
NT 4.0 (Intel) Service
Pack 3 or higher
CPU: Pentium 200 MHz or higher
RAM: 64MB minimum
Solaris 2.5.1/2.6/7 SPARC Station
RAM: 128MB minimum
Linux (x86, glibc 2.1) CPU: Pentium 200 MHz or higher
RAM: 64MB minimum
• The Windows version of PageScope includes a NetWare Setup
function. To use NetWare Setup, you must have NetWare Client 32
installed on the system running the PageScope server.

1 System Requirements
2
Client
Java Mode
HTML Mode
Operating System Web Browser Java
Environment
Windows 95/98/Me/2000/
NT 4.0 (Intel) Service
Pack 3 or higher
Microsoft Internet Explorer
4.x or higher
Netscape Navigator 4.x or
higher
Java Plug-in 1.2
or higher
(JavaPlug-in1.3
recommended)
Solaris 2.5.1/2.6/7 Netscape Navigator 4.x or
higher
Linux (x86, glibc 2.1)
Operating System Web Browser
Windows 95/98/Me/2000/
NT 4.0 (Intel) Service
Pack 3 or higher
Microsoft Internet Explorer 4.x or higher
Netscape Navigator 4.x or higher
Solaris 2.5.1/2.6/7 Netscape Navigator 4.x or higher
Linux (x86, glibc 2.1)
MacOS Microsoft Internet Explorer 4.5 or higher
Netscape Navigator 4.x or higher

2 Installing and Starting Up the Server
3
2 Installing and Starting Up the Server
2.1 Installing the Server
Windows 95/98/Me/2000/NT 4.0 Platform
1. Open the PageScope self-extracting archive. This automatically
starts the installer.
2. Follow the instructions that appear on the screen to complete the
installation.
Solaris Platform
Note
1. Extract the PageScope tar archive, which was compressed with
gzip, into the directory you want. This creates a directory named
PageScope.
2. Execute the install.sh script, which is located in the PageScope
directory.
Linux Platform
Note
1. Extract the PageScope tar archive, which was compressed with
gzip, into the directory you want. This creates a directory named
PageScope.
2. Execute the install.sh script, which is located in the PageScope
directory. In the case of SuSE Linux, execute the install.suse.sh
script, which is located in the PageScope directory.
• PageScope server starts up as a daemon process, so we recommend that
you install the package in the root partition.
• Perform the following operation under root privileges.
• PageScope server starts up as a daemon process, so we recommend that
you install the package in the root partition.
• Perform the following operation under root privileges.

2 Installing and Starting Up the Server
4
2.2 Upgrading PageScope
For Windows Platform and Solaris Platform
• Upgrading from PageScope 2.1 and subsequent versions under
Windows 95/98/Me/2000/NT 4.0 or Solaris performs an overwrite
install, leaving device status data and logs intact.
• When upgrading from PageScope 2.0 or lower versions, you must
uninstall your old version of PageScope and delete the PageScope
folder, and then install the new version. In this case, the existing
PageScope server database cannot be used as the new installation.
For a new installation under Windows 95/98/Me/2000/NT 4.0, the
PageScope folder is created inside the Program Files folder by
default. In the case of Solaris, the PageScope folder is created in the
location where the PageScope tar archive is extracted.
For Linux Platform
• When upgrading from PageScope 3.0 and subsequent versions under
Linux, upgrading is performed by overwriting the older version with
the new one, leaving device status data and logs intact.
• PageScope 2.1 and previous versions are not compatible with
PageScope 3.0 and subsequent versions due to differences in glibc
versions.
Important!
Windows 95/98/Me/2000/NT 4.0 Platform
1. Run the PageScope installer, and follow the instructions that
appear on the screen to perform the upgrade.
2. Some time during the upgrade procedure a confirmation dialog
box will appear asking if you really want to rewrite your existing
version of PageScope with the new one. Click the Yes button to
proceed with the upgrade.
• Make sure the PageScope server is shut down (not running) before you
try to upgrade it. See 2.4 Shutting Down the Server for more
information.

2 Installing and Starting Up the Server
5
Solaris Platform
Note
1. Execute the command below to shut down the PageScope server.
# /etc/init.d/pagescope stop
2. Run the uninstall.sh script, which is located in the PageScope
directory, to uninstall the old version of PageScope.
3. Extract the tar archive for the new version of PageScope into the
same directory where the previous version is located.
4. Execute the install.sh script and install the new version of
PageScope.
Linux Platform
Note
1. Execute the command below to shut down the PageScope server.
# /etc/rc.d/init.d/pagescope stop
2. Execute the uninstall.sh script, which is located in the
PageScope directory, to uninstall the old version of PageScope.
3. Extract the tar archive for the new version of PageScope into the
same directory where the previous version is located.
4. Execute the install.sh script and install the new version of
PageScope. (In the case of SuSE Linux, execute the
install.suse.sh script.)
• Perform the following operation under root privileges.
• Perform the following operation under root privileges.

2 Installing and Starting Up the Server
6
2.3 Starting Up the Server
Windows 95/98/Me Platform
Click Start →Programs →Minolta PageScope →Start Server.
Note that when installing PageScope, you can configure the PageScope
server to start up automatically whenever the system is booted.
Windows NT 4.0/2000 Platform
1. Click Start →Settings →Control Panel.
2. Double-click the Services icon. In the case of Windows 2000, the
Services icon is located inside the Administrative Tools folder.
3. Select Minolta PageScope Service from the list of services, and
then click the Start button. In the case of Windows 2000, select
Minolta PageScope Service, and then select Start on the Action
menu.
Solaris Platform
Note
PageScope starts up automatically after you install it. You can use the
following command to start it up manually when necessary.
# /etc/init.d/pagescope start
Execute the following command when PageScope is already running,
and you want to momentarily shut it down and restart it.
# /etc/init.d/pagescope restart
• Perform the following operation under root privileges.

2 Installing and Starting Up the Server
7
Linux Platform
Note
PageScope starts up automatically after you install it. You can use the
following command to start it up manually when necessary.
# /etc/rc.d/init.d/pagescope start
Execute the following command when PageScope is already running,
and you want to momentarily shut it down and restart it.
# /etc/rc.d/init.d/pagescope restart
2.4 Shutting Down the Server
Windows95/98/Me Platform
1. Click Start → Programs →Minolta PageScope →Stop
Server.
2. In response to the Web browser confirmation screen that appears,
click the Shut Down button.
You can also shut down the server by clicking the PageScope icon in
the task tray, and then clicking the Yes button on the confirmation
dialog box that appears.
Windows NT 4.0/2000 Platform
1. Click Start →Settings →Control Panel.
2. Double-click the Services icon. In the case of Windows 2000, the
Services icon is located inside the Administrative Tools folder.
3. Select Minolta PageScope Service from the list of services, and
then click the Stop button. In the Case of Windows 2000, select
Minolta PageScope Service, and then select Stop on the Action
menu.
4. In the case of Windows NT 4.0, click Yes on the
confirmation dialog box that appears.
• Perform the following operation under root privileges.

2 Installing and Starting Up the Server
8
Solaris Platform
Note
Execute the command shown below.
# /etc/init.d/pagescope stop
Linux Platform
Note
Execute the command shown below.
# /etc/rc.d/init.d/pagescope stop
2.5 Uninstalling the Server
Important!
Windows 95/98/Me/2000/NT 4.0 Platform
1. Click Start →Settings →Control Panel.
2. Double-click the Add/Remove Programs icon.
3. On the Add/Remove Programs Properties dialog box, select
Minolta PageScope in the list of programs, and then click the
Add/Remove button (Windows 95/98/Me/NT 4.0) or the Change/
Remove button (Windows 2000).
4. Follow the instructions that appear on the screen to complete the
uninstall procedure.
• Perform the following operation under root privileges.
• Perform the following operation under root privileges.
• Make sure the PageScope server is shut down (not running) before you
try to uninstall it. See 2.4 Shutting Down the Server for more
information.

2 Installing and Starting Up the Server
9
Solaris Platform
Note
1. Execute the command below to shut down the PageScope server.
# /etc/init.d/pagescope stop
2. Run the uninstall.sh script, which is located in the PageScope
directory.
Linux Platform
Note
1. Execute the command below to shut down the PageScope server.
# /etc/rc.d/init.d/pagescope stop
2. Run the uninstall.sh script, which is located in the PageScope
directory.
• Perform the following operation under root privileges.
• Perform the following operation under root privileges.
3 Using PageScope Client
10
3 Using PageScope Client
3.1 Starting Up Client
Start up your Web browser and access the URL shown below.
http://
server_name
:9090/
In place of server_name in the above URL, type in the name or IP
address of the host that is running the PageScope server.
Example: When the IP address of the PageScope server is 192.9.200.200
http://192.9.200.200:9090/
This accesses the PageScope server and displays the PageScope login
screen.

3 Using PageScope Client
11
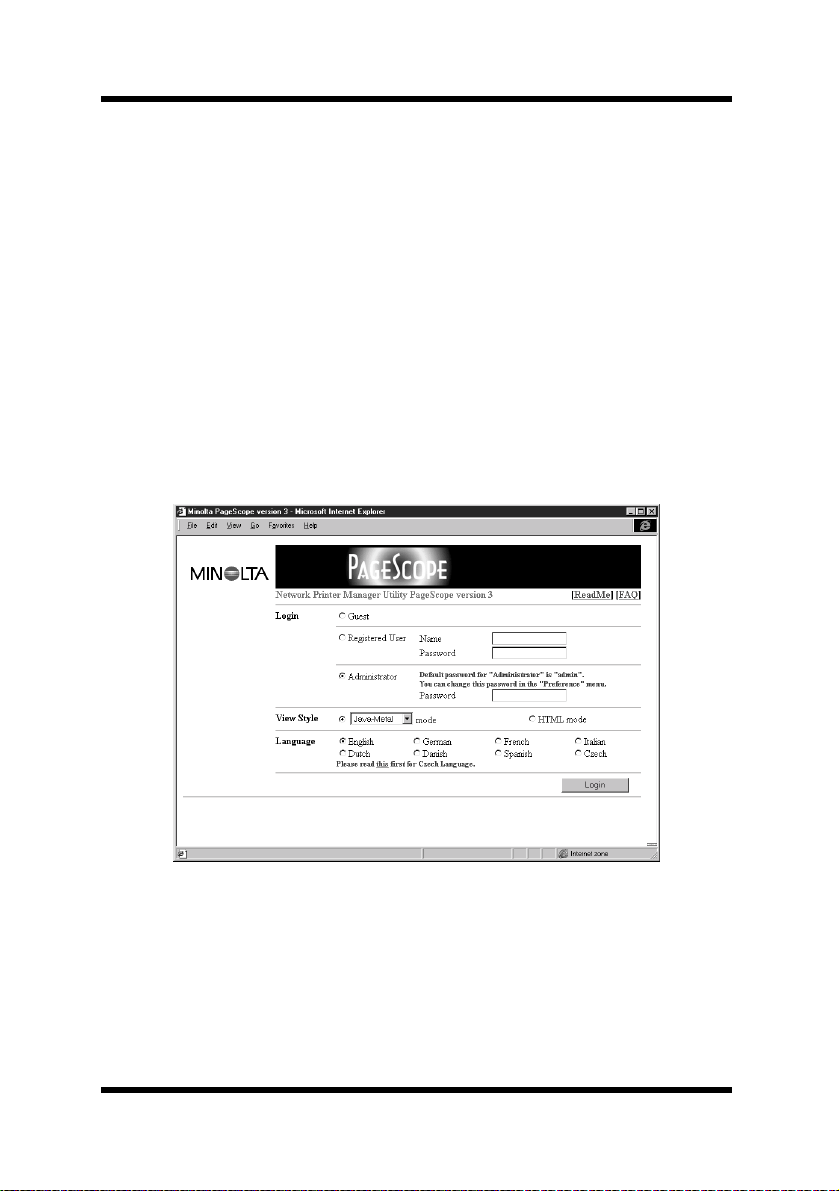
3.2 Logging Into PageScope
1. In the Login section, select the appropriate login privileges.
•Administrator While logged in as Administrator, you can
manage and change the configuration of
network devices and the PageScope server.
You must be able to input the proper
administrator password to log in as
Administrator. The initial default
administrator password is admin.
•Registered User You can manage and change the configuration
of network devices, but you cannot change
PageScope server settings while logged in as
Registered User. Each registered user has a
pre-defined name and password, which the
user must input in order to log in.
•Guest Guest can view the status and settings of each
device. Input of a password is not required
when logging in as Guest.
2. In the View Style section, select the style you want to use for the
PageScope screen. Select either Java mode or HTML mode. If you
select the Java mode, you can also select an appearance option
from among the following.
• Java-Metal
• Java-Motif
•Java-System
Note
• The HTML version is recommended for faster performance on low-end
servers.

3 Using PageScope Client
12
Note
3. In the Language section, select the language you want to use for
PageScope text. You can choose from among the following
languages.
• English
• German
•French
• Italian
•Dutch
• Danish
• Spanish
• Czech
4. After all the settings are the way you want, click the Login button.
Logging in while in the Java mode on a client where the Java plug-in is not
installed displays a message asking if you want to install the Java Plug-in.
What happens after you agree depends on the browser you are using, as
described below.
• Internet Explorer: The Java plug-in is downloaded automatically
from the Internet.
• Netscape Navigator: Your browser automatically accesses an Internet
site where the Java plug-in is available for
download. You must perform the required
operation to and download it manually.
3 Using PageScope Client
13
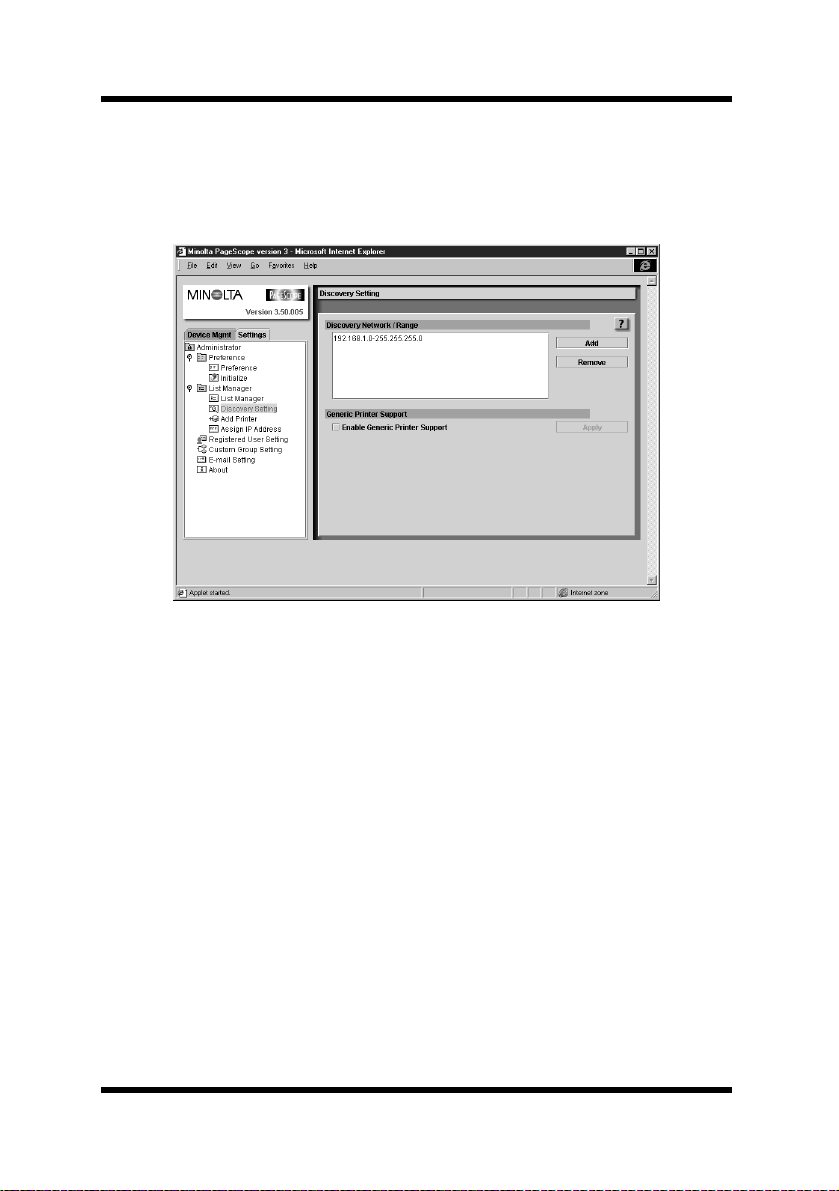
3.3 Specifying the Search Range
You can use the following procedure to search for a specific device on
the network.
1. Log into PageScope as Administrator. See 3.2 Logging Into
PageScope.
2. Click the Settings tab on the left side of the window.
3. In the tree of setting items that appears, select Discovery Setting.
Double-click if you are using the Java mode, single-click when
using the HTML mode. This causes the Discovery Setting screen
to appear on the right side of the window.
If you are using the Java mode and the icon you want does not
appear on the screen, double-click the Administrator →List
Manager →Discovery Setting icons to open up the tree.
4. The Discovery Network/Range list shows the local network
associated with the PageScope server. Whenever PageScope starts
up, it automatically adds the local network associated with the
server to the search range list. If network discovery fails for some
reason or if you want to add other networks, click the Add button.

3 Using PageScope Client
14
Note
5. If you input a network address and subnet mask, PageScope
automatically calculates and displays the appropriate search IP
address range. After everything is the way you want, click the
Apply button.
6. To remove a network from the Discovery Network/Range list,
select it in the list and then click the Remove button. In response
to the confirmation dialog box that appears, click OK.
7. If you also want the search to find non-Minolta RFC-1759
Printer-MIB compatible devices, put a checkmark inside the box
next to the Enable Generic Printer Support option in the
Generic Printer Support section. Then click the Apply button.
• The local network may not be discovered when PageScope is started up
while an SNMP agent is operating on the server where PageScope is
installed. If this happens, disable the SNMP agent or add the local
network manually to the search range.
Table of contents
Other MINOLTA-QMS Software manuals


Popular Software manuals by other brands

Blackbe;rry
Blackbe;rry INTERNET SERVICE user guide

Smart Technologies
Smart Technologies Smart Board user guide

Qlogic
Qlogic SANsurfer iSCSI HBA Manager user guide

Qlogic
Qlogic Fibre Channel NPIV Storage Networking Guide manual

Tripp Lite
Tripp Lite WEXT3-INTERNET specification

intertel
intertel 8602 user guide

Data Video
Data Video CG-100 user manual

Blackbe;rry
Blackbe;rry NEWS FEEDS - V1.0 user guide

Corsair
Corsair CM3X2GSD1066 How to use

Blackbe;rry
Blackbe;rry CLIENT FOR USE WITH MICROSOFT OFFICE COMMUNICATIONS SERVER... user guide

I-GO
I-GO IGO - quick start guide

Blackbe;rry
Blackbe;rry CLIENT FOR IBM LOTUS QUICKR - AUTRE KNOWN ISSUES... user guide


