manuals.online logo
Brands
  1. Home
  2. •
  3. Brands
  4. •
  5. Mircom
  6. •
  7. Digital Signage
  8. •
  9. Mircom TX3-T-KIOSK User manual

Mircom TX3-T-KIOSK User manual

Mircom 2014
Printed in Canada
Subject to change without prior notice
LT-6097 rev 0
The stand mounts to the  oor inside the building near the entrance, close
to the building power source and telephone infrastructure. Access for
the power and communication cables is provided through a cutout in the
base plate.
Note: Avoid placing the Touch Screen in direct sunlight.
The kit includes:
1 stand
1 base plate
8 screws for attaching the stand to the base plate
8 screw covers
8 screw cover bases
6 nuts for attaching the Touch Screen to the stand
You will need:
4 bolts to attach the base plate to the  oor. The bolts need to  t holes that
are 0.406” in diameter.
ATTACH THE BASE PLATE TO THE FLOOR
ASSEMBLING TX3-T-KIOSK
A complete library of product
information is available at:
www.mircom.com/tx3
Figure 1: 22” Touch Screen Kiosk Dimensions (inches)
18.20
53.35
18.00
30°
15.19
21.23
Figure 2: 15” Touch Screen Kiosk Dimensions (inches) Figure 3: Components of the Kiosk stand
1. Ensure that the base plate is aligned with the electrical conduit.
2. Using the base plate as a template, trace an opening on the  oor for
the cutout and mark the 4 base plate mounting hole locations as
shown in Figure 4.
3. Cut an opening in the  oor for the electrical and communication
cables.
4. Run the wires through the base plate opening.
5. Secure the base plate to the  oor using 4 bolts through the base plate
mounting holes shown in Figure 4. The holes are 0.406” in diameter.
Figure 4: Base plate mounting holes
Figure 5: Base plate dimensions (inches)
10.300
14.244
2.500
2.450
2.107
 







 












 


 






 








 







 


 


18.20
19.00
51.06
15.19
30°
19.42
Mircom 2014
Printed in Canada
Subject to change without prior notice
LT-6097 rev 0
FIT THE STAND ON THE BASE PLATE
1. Run the wires through the stand and out the hole at the top.
2. Fit the back lip of the stand into the notches in the baseplate, and tilt
the stand forwards so that it rests on top of the base plate.
3. Secure the stand onto the base plate using the screw cover bases,
screws, and screw covers as show in Figure 8.
Figure 7: Fit the stand on the base
plate (from below)
Figure 8: Attach the stand to the base plate
1. Make sure that the power is o .
2. Locate the power and ground terminals.
On the 22” Touch Screen, they are behind the door shown in Figure 9.
On the 15” Touch Screen, they are in the middle of the chassis as shown
in Figure 10.
GROUNDING AND POWER
Mircom technical support: 1-888-647-2665
Figure 6: Fit the stand on the
base plate
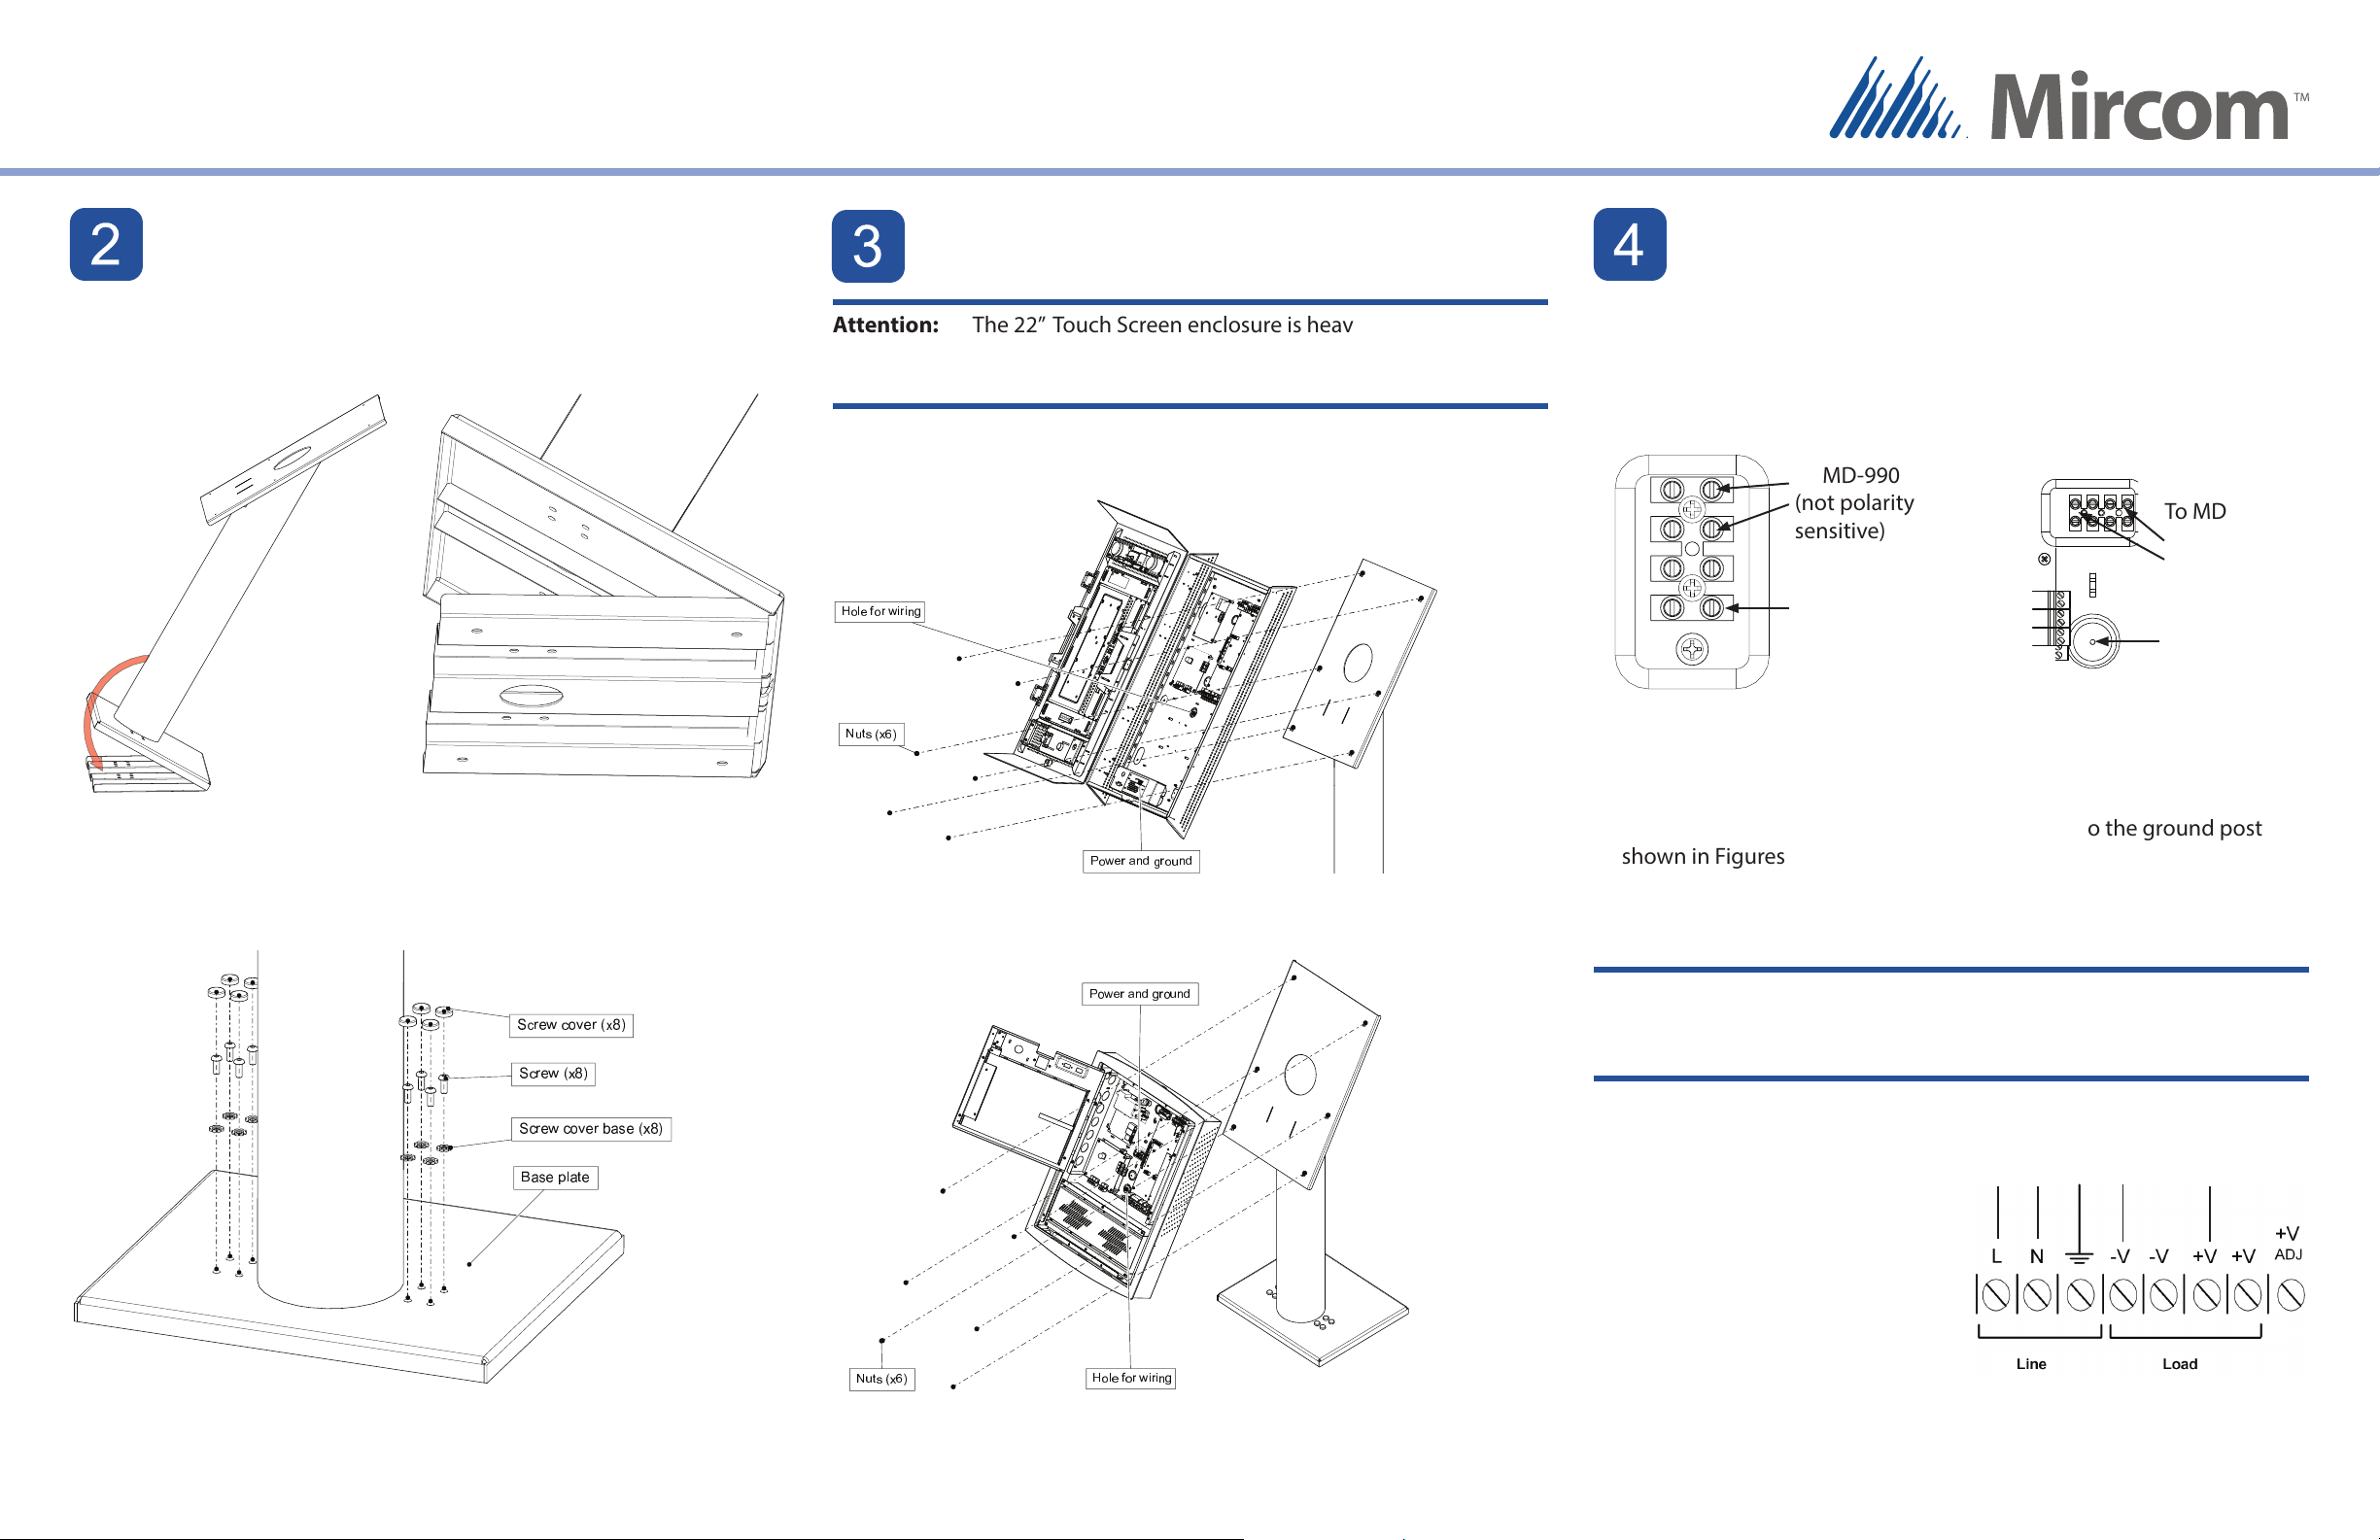
ATTACH THE TOUCH SCREEN TO THE STAND
 



 


 

!

"
#

$


% &
'
(
 

!
% &
'
(


!

"
#

% &
'
(
Attention: The 22” Touch Screen enclosure is heavy. Never attempt to
lift this product by yourself. At least two people should lift
it together.
1. Fit the Touch Screen on the six studs on the stand.
2. Attach the six included screws to the studs.
Figure 10: Attach the 15” Touch Screen to the stand
Figure 9: Attach the 22” Touch Screen to the stand
) *
+ ,
-
*
.
/
0
.
0 1
2
3 4
5
6
7
8
9
: ;
7
4
<
9
:
=
<
> ?
@ A
B
C
3. Attach one end of the supplied 16 gauge cable to the ground post
shown in Figures 11 and 12 and connect the other end to the site
ground.
4. Connect the RS-485, input and output wires as described in LT-6073 .
For more details, see LT-969 on the Mircom website and the USB disk.
WARNING: The MD-990 voltage selectable switch is factory set to
115V. If you are not in Canada or the USA, consult LT-1094
for instructions on setting the voltage.
5. Mount the MD-990 separately from
the Touch Screen.
6. Connect the MD-990 load power
supply wires to the Touch Screen
terminal screws as shown in Figures
11, 12 and 13.
7. Connect the building power supply
wires to the MD-990 line terminal
screws as shown in Figure 13.
8. Connect the other end of the
building power supply wires the
line voltage terminals.
9. Turn the power on.
Figure 11: Power supply and
ground terminals on the 22” Touch
Screen
Figure 13: MD-990 Terminal Block
Wiring
To building
power To Touch Screen
{
{
D E
F G
H I
J
K
L M
N
O
P
Q
R
S T
P
M
E
R
S
U V
W X
Y
V
Z
[
\
Z
\ ]
^
Figure 12: Power supply and
ground terminals on the 15” Touch
Screen
Ground
(16AWG)
To MD-990
(not polarity
sensitive) To MD-990
(not polarity
sensitive)
Ground
(16AWG)
ASSEMBLING TX3-T-KIOSK

Popular Digital Signage manuals by other brands

Source Technologies 10 Series installation guide

Source Technologies

Source Technologies 10 Series installation guide

Enoch Systems DisplayVue A15 user manual

Enoch Systems

Enoch Systems DisplayVue A15 user manual

LG L14 user guide

LG

LG L14 user guide

LG LDAA012-MD owner's manual

LG

LG LDAA012-MD owner's manual

LG 49VL5PF manual

LG

LG 49VL5PF manual

LG 65TR3BF-B installation guide

LG

LG 65TR3BF-B installation guide

Philips SignageSolutions 49BDL5055P/11 user manual

Philips

Philips SignageSolutions 49BDL5055P/11 user manual

LG 55LV35A5BC owner's manual

LG

LG 55LV35A5BC owner's manual

All Traffic Solutions InstAlert 18 quick start guide

All Traffic Solutions

All Traffic Solutions InstAlert 18 quick start guide

LG 98UH5E Easy setup guide

LG

LG 98UH5E Easy setup guide

LG 65SM5KB-B.AAU owner's manual

LG

LG 65SM5KB-B.AAU owner's manual

Absen KL II Series user manual

Absen

Absen KL II Series user manual

LG LSAB009-M12 owner's manual

LG

LG LSAB009-M12 owner's manual

LG LSAB009-M3 owner's manual

LG

LG LSAB009-M3 owner's manual

LG 43UL3G installation guide

LG

LG 43UL3G installation guide

LG 55XS2C quick start guide

LG

LG 55XS2C quick start guide

LG 55VM5B-A.AAU owner's manual

LG

LG 55VM5B-A.AAU owner's manual

Source Technologies 10 Series manual

Source Technologies

Source Technologies 10 Series manual

manuals.online logo
manuals.online logoBrands
  • About & Mission
  • Contact us
  • Privacy Policy
  • Terms and Conditions

Copyright 2025 Manuals.Online. All Rights Reserved.