Mistral MBF-140SS User manual

140 Litre
Stainless Steel
Bar Fridge
MBF-140SS

2
3
Important Safeguards
When using electrical appliances, in order to reduce the risk of re, electric shock and/or injury,
these basic safety precautions should always be followed:
Features of your 140 Litre Stainless Steel Bar Fridge
1
Freezer Compartment Door
2
Ice Cube Tray
3
Freezer Compartment
4
Drip Tray
5
Removable Wire Shelves
6
Adjustable Legs
7
Recessed Handle
8
Temperature Control Knob
9
Internal Light
10
Bottle Racks
1
2
3
4
5
6
7
8
10
9
For Your Safety
Read all instructions carefully, even if you feel
that you are familiar with the appliance.
•
Water contained in food or getting into the air
inside the bar fridge may form a layer of frost
inside. It will weaken the performance of the bar
fridge when the frost is thick, when it is more
than 2mm thick it is recommended to defrost.
•
Defrosting in the freezer chamber is operated
manually. Before defrosting, take the food,
ice tray and the shelf out into the cold storing
chamber temporarily, then set the knob of the
thermostat regulator to position “0” (where the
compressor will stop working). Leave the door
open until the ice and frost dissolve thoroughly
and wipe off the water deposited at the bottom
of the freezer tray with a soft cloth. To speed up
defrosting, you can put a bowl of warm water
(about 50
o
C) into the freezer chamber.
•
Be sure to set the knob of temperature
regulator to the original position when nished.
•
It is inadvisable to heat the freezer chamber
directly with hot water (or by any other method
of defrosting) to prevent deformation of the
inner case.
•
It is also inadvisable to scrape off ice and frost
or separate food from the containers which
have been congealed together with a sharp tool
or wooden object, as this may damage the inner
casing or the surface of the evaporator.
•
Do not use electrical appliances inside the food
storage compartments of the appliance, unless
they are of the type recommended by the
manufacturer.
•
If the supply cord is damaged, it must be
replaced by the manufacturer or its service
agent or a similarly quali ed person in order to
avoid hazard.
MAINTENANCE
•
The bar fridge should be cleaned and
maintained once a month.
•
When performing maintenance, make sure that
the power plug is rst disconnected from the
power outlet.
•
Wipe the inner and outer surface of the bar
fridge and its accessories with a wet cloth.
If they are too dirty, scrub the surface with a
neutral detergent and rinse clean with water
and dry with a clean cloth. After this, a small
quantity of glass wax is recommended to polish
the bar fridge surface.
•
For cleaning do not use hot water, solvents,
petrol, alcohol, kerosene, washing powder,
cleanser, alkaline detergent, acid, chemical
cloths, etc. These products may damage
the lacquer coat and plastics, It is not
recommended to directly spray the bar fridge
with water as it may cause rust or weaken
insulation.
•
Be careful to upkeep the rubber seals of the
doors. They should always be cleaned.
•
If the plastic parts in the bar fridge remain
contaminated for a long time by oil (animal or
vegetable), they will be easily aged and possibly
crack. The drip tray gets dirty very easily if
not cleaned regularly, and bad odours will be
produced. It is recommended to clean this pan
regularly.
COMPULSORY WARNING
If the supply cord is damaged it must be replaced by
the manufacturer or its service agent or a similarly
quali ed person to avoid a hazard.
The appliance is not intended for use by young
children or in rm persons without supervision.
Young children should be supervised to ensure they
do not play with the appliance.
This product has not been designed for any uses
other than those speci ed in this booklet.
Save These Instructions

5
4
The control has seven settings from 0-8 (eight being
the coldest setting - it should only be used if the
temperature is below 10
o
C).
Starting Your New Bar fridge
1.
Clean the bar fridge thoroughly. Wipe the
outside with a dry cloth, and the inside with a
damp cloth.
2.
Set the thermostat control.
3.
Connect the power supply cord.
How to Operate
Thermostat Control
The thermostat controls the temperature
automatically.
The thermostat control inside the bar fridge
controls the degree of cooling.
To Control the Temperature
Many factors may in uence the internal temperature
of the bar fridge and freezer compartments.
•
The temperature and humidity of the
surrounding environment.
•
The opening frequency of the doors, and the
amount of warm food placed in the bar fridge.
•
The combination of food and containers stored
in the bar fridge. For these reasons, you may
want to adjust the control to suit the season
and your needs.
Reversing the Door
This bar fridge has been built with the door hinges
on the right. If you wish to change the opening
direction, follow the instructions below:
1.
Remove the two screws (1) that hold the lower
hinge (2) (right side) to the frame. Also, remove
the screw-type adjustable front right leg (3).
2.
Remove the front left adjustable leg (4) and
transfer it to the right side.
3.
Lift the door and place it on a padded surface to
prevent scratching it. Make sure to remove the
spring (5) located inside the upper right hole of
the door and the upper right side pin (6).
4.
Remove the plug (7) from the upper left hole of the
door and transfer it to the uncovered hole on the
right side. Be sure to press the plug rmly into the
hole.
5.
Insert the spring (5) previously removed (in step
3) inside the upper left side hole of the door.
6.
Insert the upper pin (6) previously removed
from the right side (step 3) and transfer it to
the other hole at the left side at the top of the
frame.
7.
Set the door to its place making sure the pin (6)
enters the hole located under the top frame.
8.
While holding the door in the closed position,
secure the lower left hinge (2) previously
removed in step 1. Before placing this lower
hinge, remove the upper bolt pin (8) and reverse
the direction of the hinge.
9.
Insert the bolt pin (8) and do not tighten until
the top of the door is leveled with the counter
top.
10.
Insert the two screws (1) previously removed in
step 1 and tighten them.
11.
Insert the screw type adjustable legs (3) on the
hinge (left side).
Positioning of components
prior to reversal
Positioning of components
after reversal
Methods of Safe
Installation
Safe Installation Location For Your
Bar fridge
•
Place the bar fridge on a strong and level oor.
Unstable installation can produce noise and
vibration.
•
Place your bar fridge where there is no heat
source nearby. High atmosphere temperatures
will lower cooling ef ciency.
•
Place the bar fridge in an area where the
humidity level is low. Splashing water in the bar
fridge or installing the unit in a humid area may
cause a short circuit and rust.
•
Avoid places that are exposed to coal, gas or
smoke as discolouring may occur on the bar
fridge.
•
For good ventilation keep enough space
between the side walls and your bar fridge. Its
back needs to be at least 100mm away from the
wall, its sides at least 100mm separately and the
height from over its top is not less than 200mm.
A clear space should be left to open the door to
160
0
.
•
Placing the bar fridge on carpet may cause a
temperature rise, and result in discolouration of
the carpet. In such a case, place a hard wooden
board or rubber mat between the carpet and
the unit.
Installation Steps
•
Select a safe place to install your bar fridge.
•
Level the bar fridge by using the adjustable legs.
•
Install the parts in their correct position.
•
Check if the door is completely closed.
•
Wait for about an hour before plugging the
power cord in the outlet.

6
When condensation forms on the
outside of the bar fridge:
•
Condensation may form on the outside when the
humidity is high, such as during a wet season.
This is the same result as the condensation
formed when chilled water is poured into a glass.
It does not, therefore, indicate a malfunction.
Wipe dry with a dry cloth.
When you hear a sound like water
owing:
•
A sound like water owing is the refrigerant
owing. It does not indicate a malfunction.
•
The cord should neither be lengthened nor
folded into a coil during operation. It is not
recommended that the cord is kept close to
the compressor at the back of the bar fridge,
as the surface temperature is quite high when
operating. Making contact with the two would
de-activate the insulation or cause leakage of
electricity.
•
Put food in the bar fridge after running the bar
fridge for 2-3 hours.
What You Need To Know Before Moving
Or Relocating The Bar fridge
•
Unplug the power cord.
•
Take the food out of the bar fridge.
•
Fasten the interior components with adhesive
tape.
•
Have two people carry the bar fridge to move
safely.
•
Fasten the doors with adhesive tape to prevent
door from opening while moving.
•
When xed or moved, the bar fridge can not be
set horizontally or declined more than 45
o
or
placed upside down.
Troubleshooting
When the bar fridge does not work:
•
Check if there is a power failure.
•
Check if the power plug is plugged into the
power outlet.
•
Check that the fuse has not blown.
When the bar fridge is cooling
excessively:
•
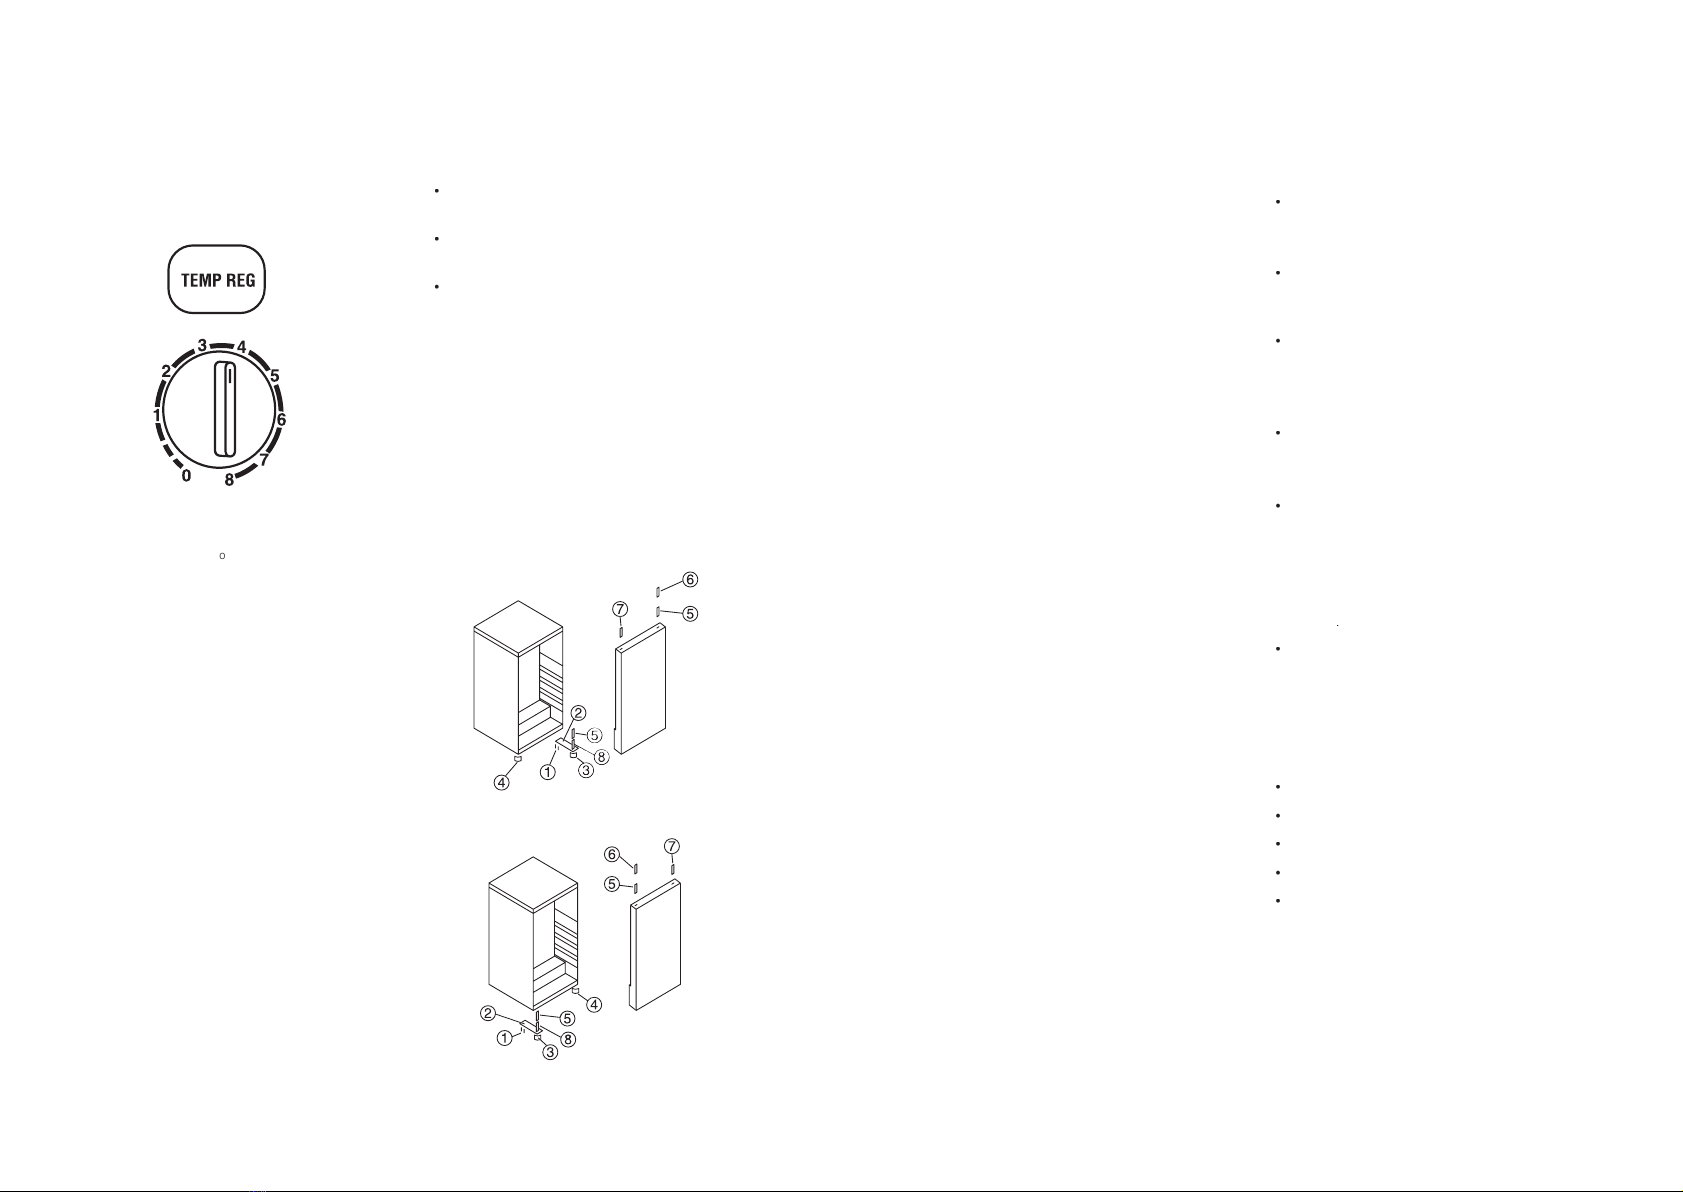
The thermostat control dial may be set too high.
•
If you place foodstuff containing a lot of
moisture directly under the cool air outlets,
they will freeze easily. This does not indicate a
malfunction.
When the bar fridge is not cooling
suf ciently:
•
The food may be packed too tightly together
which will block the ow of cool air.
•
You may have put something hot or a lot of
foodstuff into the bar fridge .
•
The door may not have been closed properly.
•
The door gaskets may be damaged.
•
The bar fridge may not be ventilated.
•
There may be insuf cient clearance between
the bar fridge and the surfaces immediately
above and beside the fridge.
•
The thermostat control dial may not be set
properly.
When defrosted water over ows inside
the bar fridge and onto the oor:
•
Check that the drain pipe and the drain hose are
not clogged.
•
Check that the drain pan is housed properly.
When the bar fridge’s cabinet front
heats up:
•
In order to safeguard against condensation,
there is an anti-condensation pipe which heats
up the cabinet front when the bar fridge is
on. A warm cabinet front does not indicate a
malfunction.
Cleaning Your Bar fridge
•
Before cleaning the bar fridge, unplug the
power cord. To clean, use a soft cloth. Wash
with warm soapy water, rinse and dry.
•
The bar fridge may smell during the initial
operation, but the odour will fade away when
the bar fridge is cooled suf ciently.
•
Use a soft cloth for cleaning the interior and
exterior of the bar fridge.
•
Do not sprinkle water directly onto the bar
fridge.
•
Place parts back in their original positions after
cleaning.
Classi cation of climate
T
Protective classi cation of electric shock resistance
1
Capacity
140 L gross, 110 L net
Rated voltage
220 - 240V ~
Rated input power
90W
Rated frequency
50Hz
Volume of power consumption
0.52 kWh/24hr
Refrigerant charge volume
R134a, 70g
Ice making capacity
0.8kg/24hr
Net weight
26kg
Overall dimensions
504 x 490 x 865mm
THERMOSTAT
TEMPERATURE
% RUNNING TIME
1
8.8
46.7%
4
4.3
71.7%
8
0.2
100%
PERCENTAGE RUNNING TIME
FOR COMPRESSOR
Technical Speci cations
When the cabinet’s side panel heats up:
•
The side panel of the cabinet will heat up when
the door is opened or closed frequently, when
starting the unit and when the unit operates in
summer with high ambient outside temperature.
In such cases, do not touch the panel. It results
from the dissipation of the heat from inside the
cabinet, and it does not mean that something is
wrong with the bar fridge.
7

The bene ts conferred by this warranty are in
addition to all implied warranties, other rights
and remedies in respect of the product which the
consumer has under the Trade Practices Act and
similar State and Territory Laws.
The original purchaser of this Mistral product is
provided with the following warranty, subject to
the following conditions.
Mistral International Pty Ltd warrant this product for
a period of 3 years from the date of purchase for all
parts defective in workmanship or materials. The
product or defective parts will be replaced free of
charge.
WARRANTY CONDITIONS
1.
This warranty is only valid for appliances used
according to the manufacturer’s instructions.
2.
This appliance must not be modi ed or changed
in any way.
3.
Connection must be to the voltage requirements
as speci ed in the ratings label located on the
product.
4.
The manufacturer does not accept liability for
any direct or consequential damage, loss or
other expense arising from misuse or incorrect
installation and operation of the appliance.
5.
Warranty will only be given where proof of
purchase is provided, e.g. original invoice.
6.
Not designed or warranted for industrial
or commercial use.
DO NOT SEND IN THIS WARRANTY
Fill out the following details and le with your
purchase invoice.
RETAIN & FILE WITH YOUR RECEIPT.
Your Purchase Receipt/Invoice is proof of date of
purchase. You must be able to present it at the place
of purchase to obtain a replacement or service
under warranty.
Mistral International Pty Ltd reserves the right to
discontinue items, modify designs and change
speci cations without incurring obligation. Whilst
every effort is made to ensure that descriptions,
speci cations and other information in this publication
is correct, no warranty is given in respect thereof and
the company shall not be liable for any errors therein
.
Purchased from:
Co. Name:
Address:
Date of Purchase:
NOTE: Consistent with our continuing product
development policy, improvements may have
been made which render the contents of this
package slightly different to that shown.
Cat. No. MBF-140SS
July 2003
8
Warranty
Product of Mistral International Pty Ltd
ABN 25 006 680 315
324 Frankston-Dandenong Road
Dandenong South, Victoria, Australia 3175
Telephone
1300 654 488
Facsimile
+61 3 9212 1340
RINGGRIP (NZ) Pty Ltd
ACN 006 771 922
PO Box 33672, Takapuna, Auckland, New Zealand
Telephone
0800 328 280
Mistral is a registered trademark of Mistral International Pty Ltd
© 2003
Table of contents
Other Mistral Refrigerator manuals