Avem quirks Medisafe User manual

Avem Quirks
National Service Support Line: 1800 658 120
User Guide

Avem Quirks
National Service Support Line: 1800 658 120
Acknowledgement
Thank you for purchasing this Avem Quirks Medisafe Refrigerator. This refrigerator is purpose-built,
for the storage of medical vaccines. We recommend that you read this user guide before operating the
Medisafe refrigerator and retain it for futurereference.
Contact Information
Should you require assistance, guidance or technical support, please contact:
Avem Quirks Australia Pty Ltd. (Head
Office) 9 Business park drive,
Lynbrook VIC 3975
Phone: 1800 658 120 (Mon-Fri, 8:00am –5:00pm AEST)
Fax: (03) 9771 4477
Email: servicedesk @Avemquirks.com.au
Medisafe Warranty
Your new Medisafe vaccine refrigerator is covered by a 24 month warranty on parts and labour
(excluding data logger). Avem Quirks Australia will repair or replace, at our discretion, any component
found to be faulty in workmanship or operation for a period of 24 months from the time of installation.
Avem Quirks Australia would like to stress the importance of reading all provided documentation and
instructions PRIOR to the storage of any vaccine or product stock.
Full instructions on the safe and appropriate operation of your unit, along with telephone support, are
available in order to ensure that your new Medisafe refrigerator operates efficiently and to its capacity.
Failure to follow instructions, especially involving setting of cabinets and start up, may result in the loss
of or damage to valuable stock through incorrect operation of the unit.
Avem Quirks Australia cannot be held responsible for the loss of or damage to stock.
Please refer to the National Vaccine Storage Guidelines: Strive for 5 (available from the Department of
Health at http://www.immunise.health.gov.au/internet/immunise/publishing.nsf/Content/provider-
store) for further information about vaccine storage management, or contact your local State/Territory
health authority (contacts provided on Page 16).

Avem Quirks
National Service Support Line: 1800 658 120
Contents
Acknowledgement, Contact and Warranty Information ......................................................................... i
Avem Quirks Medisafe Quick Start Checklist......................................................................................iii
Getting Started ....................................................................................................................................... 1
Installation.............................................................................................................................................. 1
Basic Operation...................................................................................................................................... 1
Stocking the Medisafe Refrigerator ....................................................................................................... 2
Silencing the alarm................................................................................................................................. 2
Avem Quirks Medisafe Control and Monitoring System
Temperature Control System ............................................................................................................ 3
Min-Max Temperature Display......................................................................................................... 4
Auto-Dialler ...................................................................................................................................... 5
LogTag Temperature Recorder......................................................................................................... 6
Using the LogTag Recorder
Step 1 - Installing the LogTag Analyser Software on your PC......................................................... 7
Step 2 - Starting the LogTagAnalyser Software............................................................................... 7
Step 3 - Connecting the USB Interface ............................................................................................. 8
Step 4 - Using the LogTag withUSB Interface................................................................................. 8
Step 5 - Configuring the LogTag Recorder....................................................................................... 8
Step 6 - Recording using the LogTag.............................................................................................. 11
Step 7 - Retrieving data from the LogTag Recorder ....................................................................... 11
Troubleshooting ................................................................................................................................... 13
State and Territory Health Department contact details ........................................................................ 16

Quick Start Checklist
1. Place the Medisafe refrigerator in alocation with a flat, level surface,with reasonable
clearance from walls, and not in directsunlight.
2. Before plugging the refrigerator in, please allow it to stand in position for a minimum
of 3 hours after shipping, so the oil in the compressor will have time to settle.
3. Ensure that a 220-240V, 50Hz power source is available. Connect the Medisafe
refrigerator to the power point, and mark the power point with appropriate signs to
ensure the refrigerator will not be accidentally unplugged or switchedoff.
4. When the refrigerator is first plugged in, it will display a flashing “PF” alert on the
Min-Max temperature display, to inform the operator there has been a loss of power.
To acknowledge this alert, press the red set button on the Min-Max temperature
display.
5. It is recommended to run the Medisafe refrigerator for at least 6 hours, prior to
stocking with vaccines. The refrigerator may take time to reach the desired
temperature range, resulting in an alarm condition. To silence the alarm, press the
set/mute button on the electroniccontroller.
6. Install the LogTag Analyser software on your computer, following instructions on
Pages 7-11 of the User Guide to configure and start the LogTag recorder for the first
time.
7. Configure the LogTag recorder, using the Wizard, and immediately connect the
LogTag recorder to the Medisafe refrigerator by plugging the white cable, located at
the rear of the data control box, into the outlet on the side of the logger. Press Start
to begin recording temperatures (The OK and ALERT lights will flash
simultaneously, to acknowledge the logger has startedrecording).
8. Before stocking the refrigerator, perform one (1) download of the LogTag, following
the procedure on Page 6 of the User Guide. Please check that the LogTag is
recording temperature correctly.
9. Press and hold the red set button on the Min-Max temperature display to reset all
values (the display will show “rE” to acknowledge the values have beenreset).
10. Ensure the temperature inside the refrigerator is stable, within the safe range of
+2°C to +8°C. You may now stock the refrigerator with vaccines. Take care to allow
for sufficient air flow throughout the refrigerator. Minimise door openings to
maintain a stable temperature while the refrigerator is being stocked.
11. If your Medisafe refrigerator is fitted with an Auto-Dialler, you may now connect it
to the wall socket, using the standard telephone cable provided. Follow the Steps on
Page 5 of the User Guide to program and test your auto-dialler.
iii

Avem Quirks
National Service Support Line: 1800 658 120
1
Getting Started
If the vaccine cabinet was shipped to you, please wait at least three hours prior to turning it
on. This will allow the oil in the compressor time to settle aftershipping.
Avem Quirks Medisafe refrigerators are powered by electric current, which can cause
seriousinjury.Anyinstallation,cleaning,ortroubleshootingmust beconductedwiththeelectrical
power source disconnected from the unit.
The following precautions should be taken while the unit is in operation:
Ensure the appropriate power is supplied to the unit. Note: Avem Quirks Medisafe units are
designed to operate at 220-240V, 50Hz.
Do not plug several appliances into the same multiplereceptacle
Electrical components should not come into contact withwater
Ensure the power cord is not damaged. If the cord becomes damaged, it must be replaced by
the manufacturer, a certified service agent or qualified serviceprofessional.
It is strongly recommended that any servicing of the unit be performed by Avem Quirks
Australia.
Installation
Place the Medisafe refrigerator in a location with a flat surface that is approximately level, with
reasonable clearance from any walls, and without exposure to directsunlight.
Allow clearance to the right, left, back and top. This will reduce power consumption and allow
the internal cooling system to function correctly. The unit is not to be placed in confined areas
where air flow and heat dissipation arerestricted.
Ensure that the appropriate power is supplied to the unit. Note: Avem Quirks Medisafe
refrigerators are designed to operate at 220-240V, 50Hz. National and local codes provide
specific electrical and mechanical installation requirements and recommendations covering
equipment and equipment wiring.
Plug in and turn on the power to the Medisafe refrigerator. Ensure the power point is secure,
that the refrigerator cannot be accidentally unplugged or switchedoff.
When the power is first turned on, the Min-Max temperature display will show an alert “PF”
flashing on the display. This informs the operator there has been a loss of power, and can be
acknowledged by pressing the red “set” button on the Min-Max display.
Basic Operation
The power failure alert “PF” should be acknowledged by pressing the red “set” button on the
Min-Max temperature display.
The Medisafe refrigerator is pre-set for operation. No buttons on the controller are to be touched
except the red “set/mute” button, used to silence the audible alarm.
It is recommended to run the Medisafe refrigerator for 6 hours prior to loading with
vaccines.

Avem Quirks
National Service Support Line: 1800 658 120
2
alarm mute button
Stocking the Medisafe Refrigerator
The Medisafe vaccine refrigerator is designed to maintain a uniform temperature inside the cabinet. To
do so, sufficient air flow is required to prevent “cold spots” from forming. Thus, it is important that an
appropriate level of care be taken in stocking therefrigerator.
Cool the vaccine refrigerator before stocking with vaccine. Avem Quirks Australia
recommends allowing the refrigerator to run for at least 6 hours prior to loading with
vaccines.
Distribute stock evenly throughout therefrigerator.
Ensure vaccines with the shortest expiry are stored at the front of therefrigerator.
DO NOT place stock directly against the evaporator plate, at the rear of the refrigerator. This
could cause the stock to freeze.
DO NOT place large cartons inside the refrigerator (i.e. at the bottom of the cabinet).
Remove smaller boxes from the carton, and place them evenly spaced on theshelves.
Some vaccines are sensitive to ultraviolet (UV) light. Please check the specific vaccine
storage guidelines before removing vaccines from their boxes.
If trays are used, ensure they are made of plastic, with holes to allow for sufficient air flow,
and spaced evenly on the shelves.
DO NOT overstock the refrigerator.
If very few vaccines are stocked, thermal mass (such as cooled water bottles) should be
added to the refrigerator in areas of open space.
Silencing the alarm
The cooling system of the Medisafe refrigerator is controlled by an electronic controller, incorporating
an audible and visual alarm, should the cabinet temperature fall or rise outside the specified range(+2
to +8°C). This is likely to occur during the first cooling cycle, and may occur if the door is left open for
an extended period oftime.
To silence the alarm: press the set/mute button on the electronic
controller.
When you first turn the cabinet on, if it does not reach a temperature below 8 degrees within
10 minutes, it will alarm. This is a normal function. All the operator is required to do is press the
set/mute button to silence the alarm and restart the coolingprocess.

Avem Quirks
National Service Support Line: 1800 658 120
3
alarm mute button
Control and Monitoring System
Temperature Control System:
This highly accurate electronic control, located in the top right of the control panel (pictured below),
incorporates a temperature probe and thermostat.
A temperature probe measures the air temperature in thecabinet.
The electronic controller is programmed to the required temperature parameters (+2 to+8°C).
The controller cycles the refrigeration system to maintain the air temperature inside the
cabinet, within the required parameters.
Should the temperature of the cabinet fall or rise outside the set parameters, the controller will trigger
both an audible and visual alarm (the digital display will flash –“LO” for below set parameter or “HI”
for above set parameter).
A suitable delay (5-10 min.) is programmed into the system to prevent unnecessary false alarms (such
as door being open for extended periods).
If an alarm condition occurs, press the
alarm mute button to silence the audible alarm.
The electronic controller is pre-programmed, during the manufacturing process.
The only button the operator is required to press is the set/mute button. If the cabinet alarms, you can
press this to silence it. Any reprogramming of the controller must be done by a person approved by
Avem Quirks Australia.
When the cabinet is first powered on, if it does not reach a temperature below +8 °C within 10 minutes,
it will alarm. This is a normal function. All the operator is required to do is press the set/mute button
to silence the alarm and restart the coolingprocess
If an alarm condition has occurred, please allow 10-15 minutes for recovery.
Should you experience any issues with the Medisafe refrigerator maintaining temperature within the set
parameters, please contact Avem Quirks Australia.
.

Avem Quirks
National Service Support Line: 1800 658 120
4
Min-Max Temperature Display:
The top left display (pictured to the right) is the minimum and
maximum temperature recorder. This displays the current air
temperature inside the cabinet, and also provides the user with the
minimum and maximum air temperatures reached inside the
refrigerator since the last reset.
To display the minimum air temperature the cabinet has reached, since the last reset, press the min
button on the Min-Max display, identified with a ‘down’ arrow. The temperature will flash for several
seconds, then the display will return to the current air temperature inside the cabinet.
Similarly, to display the maximum air temperature the cabinet has reached, since the last reset, press
the max button on the Min-Max display, identified with an ‘up’ arrow. The temperature will flash for
several seconds, then the display will return to the current air temperature inside the cabinet.
Please Note: The maximum temperature will rise if the door is left open for an extended period of time.
To reset the Min-Max display, press and hold the red set button for approximately 5 seconds. The
display will show the number of hours that have been logged since the last reset, then “rE” will be
shown on the display to confirm all values have been reset.
It is essential that the reset button is pressed before leaving the premises to ensure a true
reading is viewed the following morning.
(Some regulations governing vaccine storage may require you to reset the display more frequently than
once daily, please check with your State/Territory health authority for further information).
The current temperature before pressing the re-set button should be between the required
temperatures of +2°C to +8°C.
The Min-Max Temperature Display is to be used as a guide only, providing an early indication of
developing conditions inside the refrigerator. Always refer to your LogTag for an accurate record
of vaccine core temperature.
Reset Min/Max values

Avem Quirks
National Service Support Line: 1800 658 120
5
Auto-Dialler:
The auto-dialler is an additional remote monitoring device that may be installed as an option with your
Avem Quirks Medisafe refrigerator. It is contained within the control panel, and connected to a
dedicated analogue telephone line (it cannot be connected to digital or PABX systems). In the event of
a power failure or extended alarm condition, the auto-dialler will dial up to eight (8) pre-programmed
phone numbers, in sequence, until the alarm is acknowledged. This will provide specified persons with
notification that alternate vaccine storage arrangements are required to prevent loss ofstock.
Setup:
1. Call the phone number to which the auto-dialler is connected, using another line (i.e.mobile)
2. Enter PIN number: 1234
3. To program the first phone number:
a. dial *21
b. enter the 10-digit phone number (i.e. ##-####-####)
c. Dial #, wait for the acknowledgment tone
4. Altogether, eight (8) numbers can be programmed from sequence *21 to *28 by repeating
Step (3)
5. Always wait for the acknowledgment after each number beingprogrammed
6. To erase any of the programmed phone numbers: follow Steps (1) to (2) and dial the sequence
number starting with # (i.e. to erase the first number, dial #21#, wait for the acknowledgment
tone) –note: programming of new telephone numbers will overwrite existing numbers
Acknowledgement of Auto-Dialler notification:
1. To test the auto-dialler, simulate an alarm condition by turning the power off at the wall.
2. The auto-dialler will start calling the programmed numbers in the sequence they were
programmed, *21 to *28
3. When you receive an alarm call you have three (3) options:
a. Answer and acknowledge alarm, enter 00.
b. Answer and forward to the next sequenced number, enter ##.
c. Do not answer, call is forwarded to the next sequenced number.
4. The alarm call will continue to call out until someone acknowledges it by entering 00 on their
phone keypad or until the fridge returns to the normal operating temperature (i.e. power is
restored).
Please Note: The auto-dialler is intended to be used with a dedicated analogue telephone line. It will
not function correctly with digital or PABX systems, and should not be used on lines shared with fax
machines, as the auto-answer feature (which allows the user to program the auto-dialler) will interfere
with the fax machine operation.

Avem Quirks
National Service Support Line: 1800 658 120
6
LogTag Temperature Recorder:
The LogTag temperature recorder (pictured to the right) records vaccine
temperature data over time
Temperature is recorded from a probe inside the refrigerator cabinet,
surrounded by transfer gel, providing a simulated vaccine core
temperature.
Temperature information is downloaded to a PC, usingthe
LogTag Analyser software provided (see Setting up the LogTag on
Page 7).
This information can be used in regulatory audits and insurance
claims, to provide an accurate representation of vaccine core temperature inside the
Medisafe refrigerator, during its operation.
Temperature patterns are recorded over time, providing indication of damaged seals,
or changes in operatingtemperature.
The LogTag recorder must be connected to the PC immediately after it has been removed
from the Medisafe for downloading, and reconnected to the Medisafe prior to starting, otherwise
false readings will result!
DO NOT USE vaccines exposed to temperatures below +2°C or above +8°C, as recorded by
your LogTag, without obtaining further advice. Do not discard these vaccines. Isolate vaccines
and contact the State/Territory health authorities for advice on the National Immunisation
Program vaccines and the manufacturer/supplier for privately purchased vaccines.
Recommendations for the discarding of vaccines may differ between health authorities and
manufacturers. Do not discard any vaccines until you discuss the necessaryactions.
Avem Quirks
National Service Support Line: 1800 658 120
7
Using the LogTag Recorder
The LogTag Analyser software is designed for use with Windows 2000/XP, Windows Vista, and
Windows 7. Please contact Avem Quirks Australia if your operating system is not supported.
Step 1. Installing the LogTag Analyser Software on your PC
i. It is strongly recommended that you close down all other applications prior to the
installation of your new LogTag Analyser software. Note: You must be logged in as an
administrator on your computer to install the LogTag Analysersoftware.
ii. Insert the CD in your computer’s optical disc drive. The installation program should
start automatically. If it does not, navigate to the optical drive in My Computer and
double-click on Setup.exe to launch the LogTag Analyser Installer.
iii. The installation process will guide you through the relevant stepsto install the software.
To proceed through each step of the installation process, click the "Next" button. If you
want to change a previous step you can click the "Back" button. When the process is
ready to be completed, clicking the "Finish" button, when it appears, will finish the
installation process. If you want to stop installing the software, click the "Cancel"
button.
Please note:
-All options should be left to their default setting, especially if you are unsure of what option to
select or what the actual implications are if the option was to bechanged.
-The drivers requiredto operate your USB interface areinstalled as part of the main installation
process. From time to time updated drivers may be released by LogTag Recorders. If you are
operating on Windows XP or Windows Vista these drivers will be available through the
Microsoft Windows ® Update feature, as an optional hardwareupdate.
Step 2. Starting the LogTag Analyser software
At the conclusion of the installation process, the final screen will provide you with an
option to immediately start the LogTag Analyser software.
The installation of the LogTag Analyser software will also provide you with two simple
methods to start the LogTag Analyser at a later time:
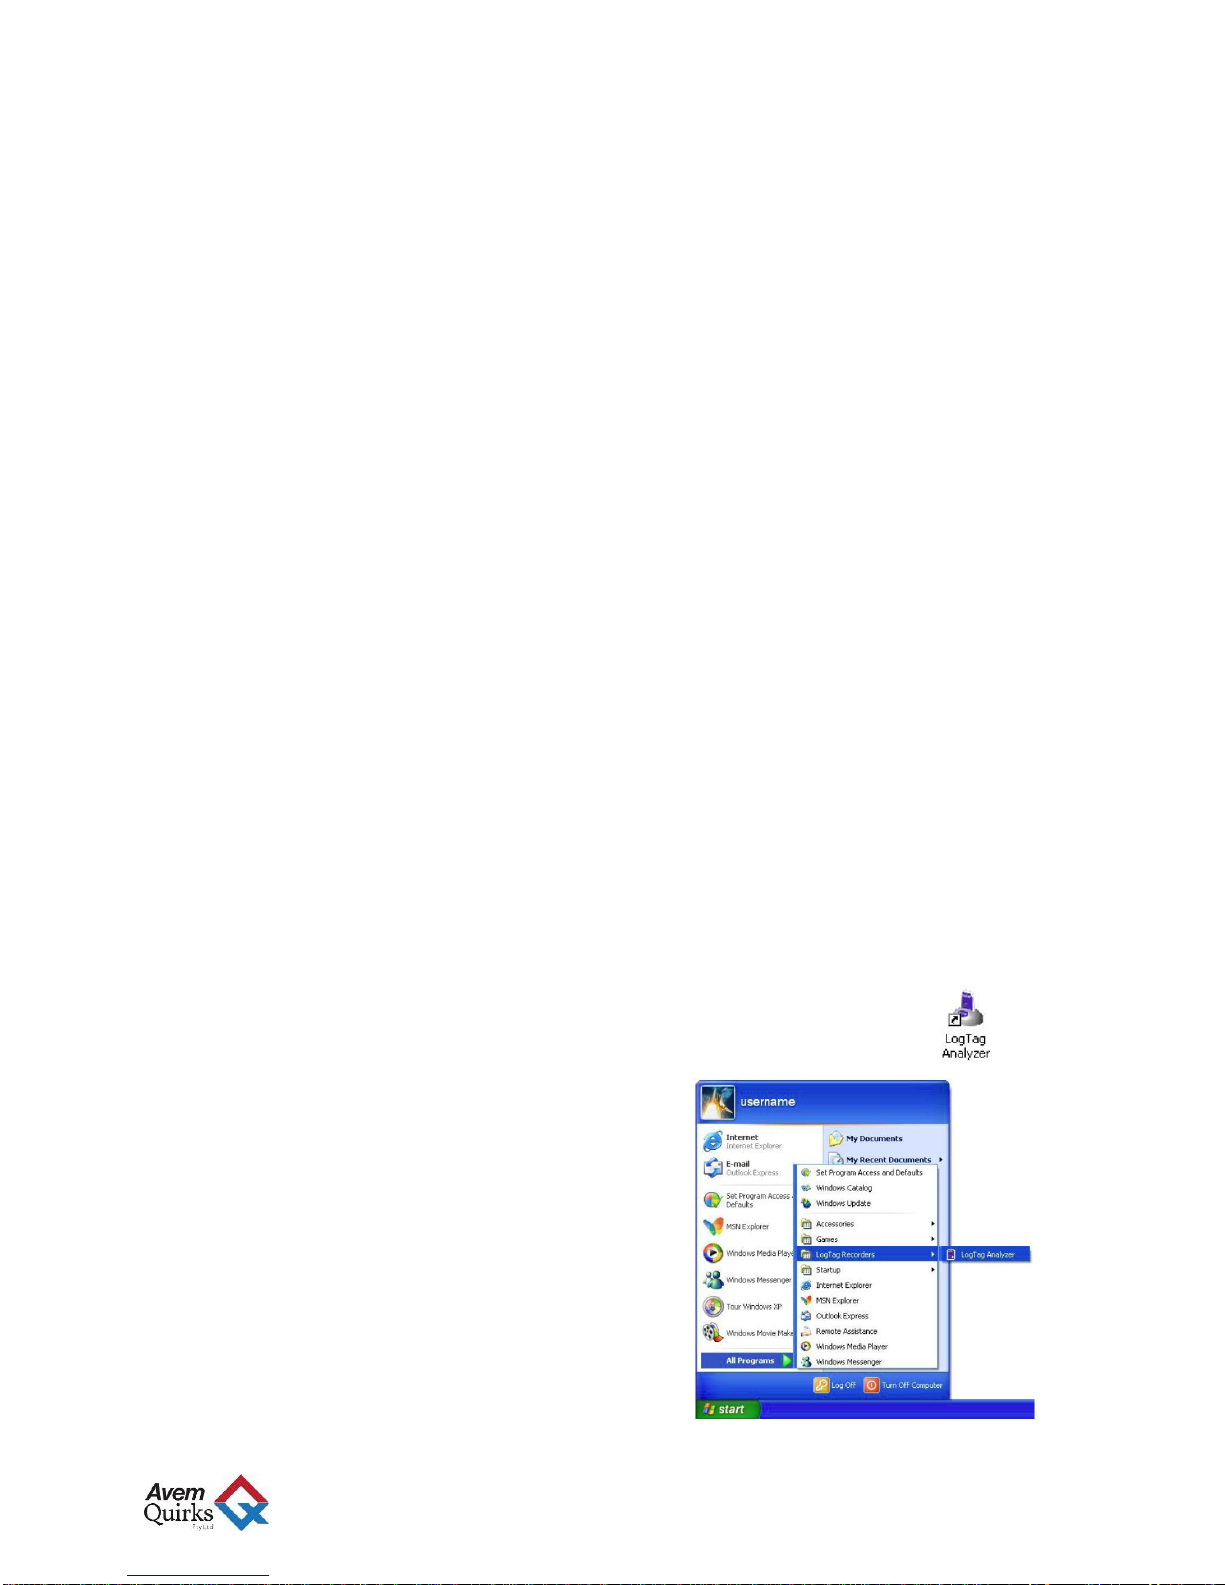
i. A shortcut on the desktop, which you can double click to start thesoftware.
ii. A shortcut from the Start Menu, located in
All Programs LogTag Recorders

Avem Quirks
National Service Support Line: 1800 658 120
8
Step 3. Connecting the USB interface
The sockets for the USB communication ports are typically located at the rear of the computer.
Please ensure that the software has been installed prior to connecting the USB Interface Cradle
to the computer, as the software installation also installs the drivers required to successfully
connect and use the USB Interface Cradle.
Step 4. Using the LogTag with USB interface
The LogTag recorder fits into the Interface Cradle slot with the front
of the LogTag facing towards the front label of the Interface Cradle
with the contacts on the reverse side, as shown in the picture to the
right.
When placing the LogTag into the Interface Cradle slot, you should be
able to feel a very slight resistance as the contacts "grab" the LogTag.
This is normal. Removal of the LogTag will cause a slight clicking
noise as the contacts snap back into their "unloaded position".
Please note: If the LogTag recorder has readings stored
within its memory, the software will automatically start
to download the data and will also display an animated
picture during the download process, similar to the
following picture (please ensure the LogTag Analyser
software is open before inserting the LogTag recorder
in the USB interface).
The download process can be stopped by clicking on
the "Cancel" button below the download animation or by pressing the "Esc" key.
Step 5. Configuring the LogTag Recorder
i. From the Menu Bar, locate “LogTag” sub-menu and then click and select Wizard.
ii. A window will open with actions list, welcoming you to the LogTag Access Wizard.
(This will assist you in setting up your LogTag, particularly for the first time.) Please
note that the LogTag Interface must be plugged in to the PCs USB Port and that the
LogTag must be completely inserted into theinterface.
iii. Click the Next button at the bottom of the window.
Avem Quirks
National Service Support Line: 1800 658 120
9
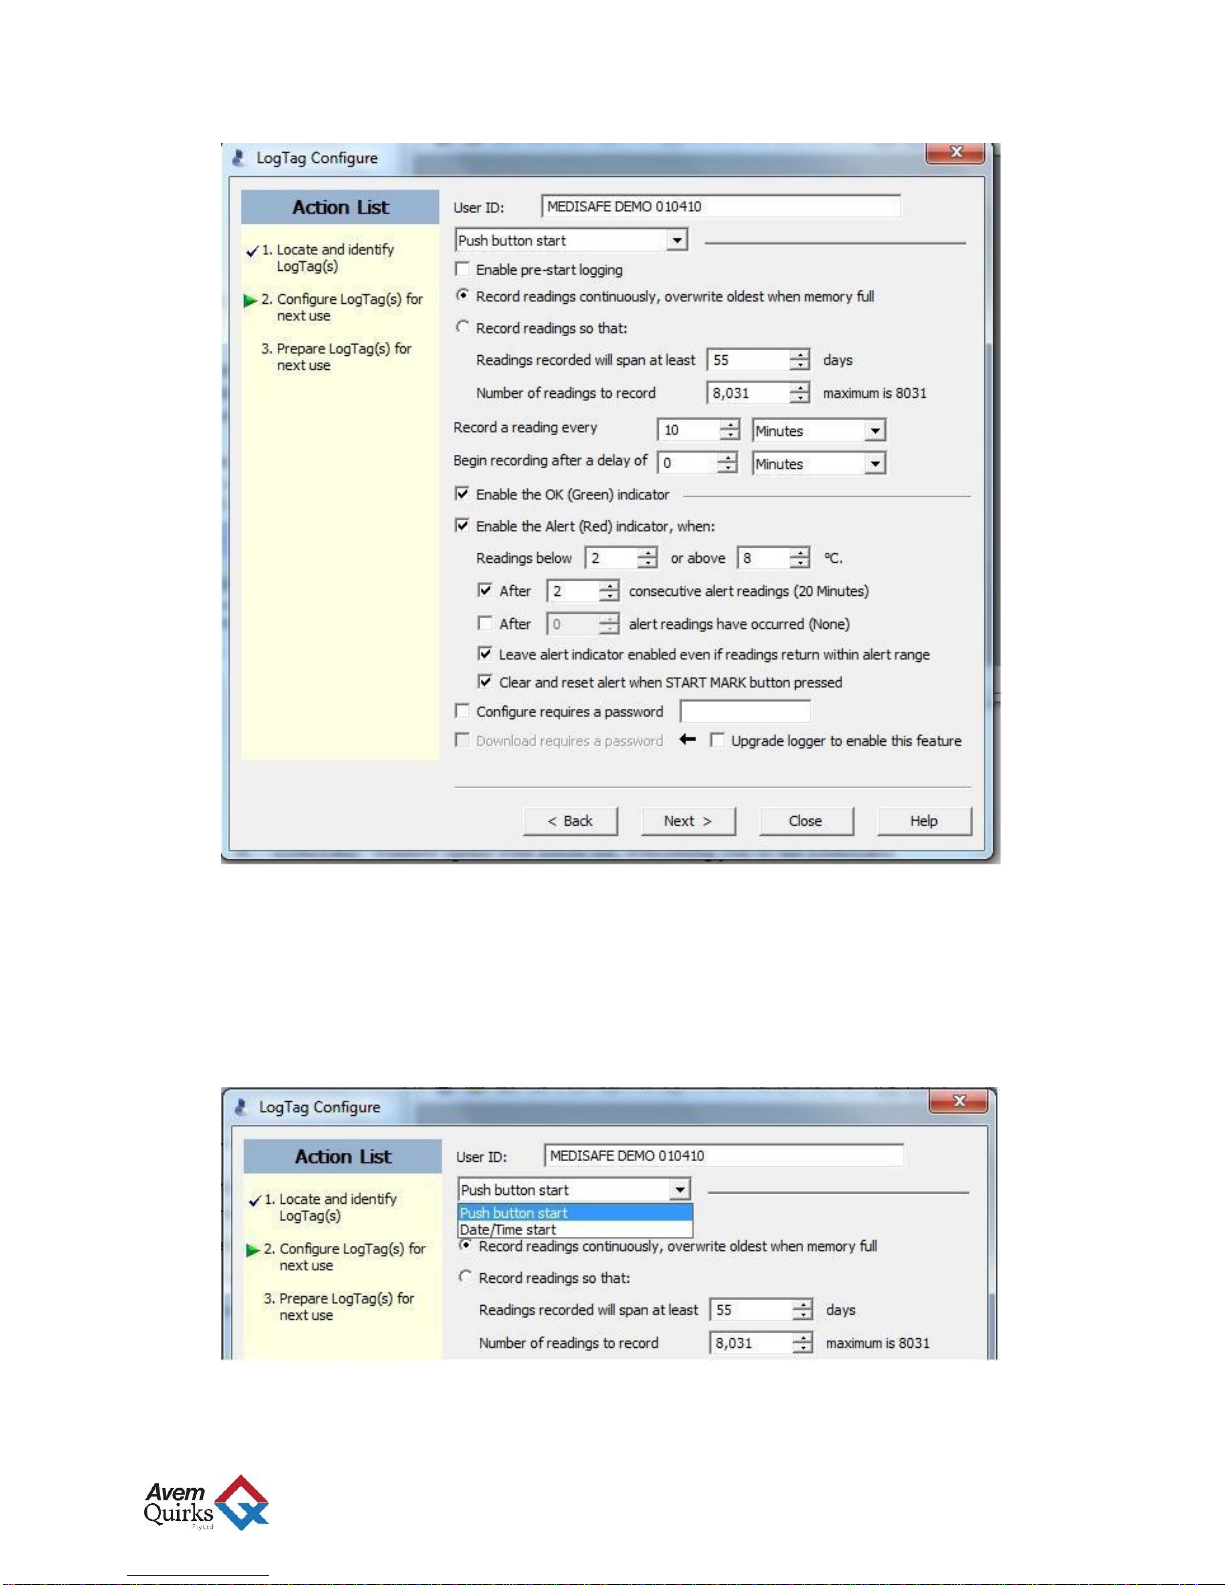
iv. The LogTag Configure window will appear on the screen (as shownbelow).
LogTag Configure Window
v. In the User ID field, please record your business name. It is also recommended that the
location of the Medisafe unit be added to the description, as this will appear on all
reports, etc.
vi. The LogTag may be configured to start recording at a specific date/time, or using the
Start button (recommended). This option can be selected from the drop-down menu in
the LogTag Configure window, as shown below.
vii. Select the Record readings continuouslyoption.
Avem Quirks
National Service Support Line: 1800 658 120
1
0
viii. Set the logging interval to Record a reading every 3-5 minutes. (The interval may be
adjusted to suit regulatory/insurance requirements).
ix. Set the logger to Begin recording after a delay of 0 minutes, to ensure the logger
begins recording temperatures immediately.
x. Enable the OK (Green) and Alert (Red) indicators, ticking bothboxes
i. The Alert (Red) indicator should be enabled when readings are below 2 or
above 8 °C. This will provide an additional alert to the operator, in the event
of a cold chain breach.
ii. Tick the box to enable the Alert (Red) indicator after 2 consecutivereadings
iii. Tick the box to Leave alert indicator enabled even if readings return
within alert range.
iv. Tick the box to Clear and reset alert when START MARK button pressed.
xi. Leave the password fields blank, unless additional security is required for your recorder
configuration.
xii. At the bottom of the window, click the NEXT button to progress to the next stage,
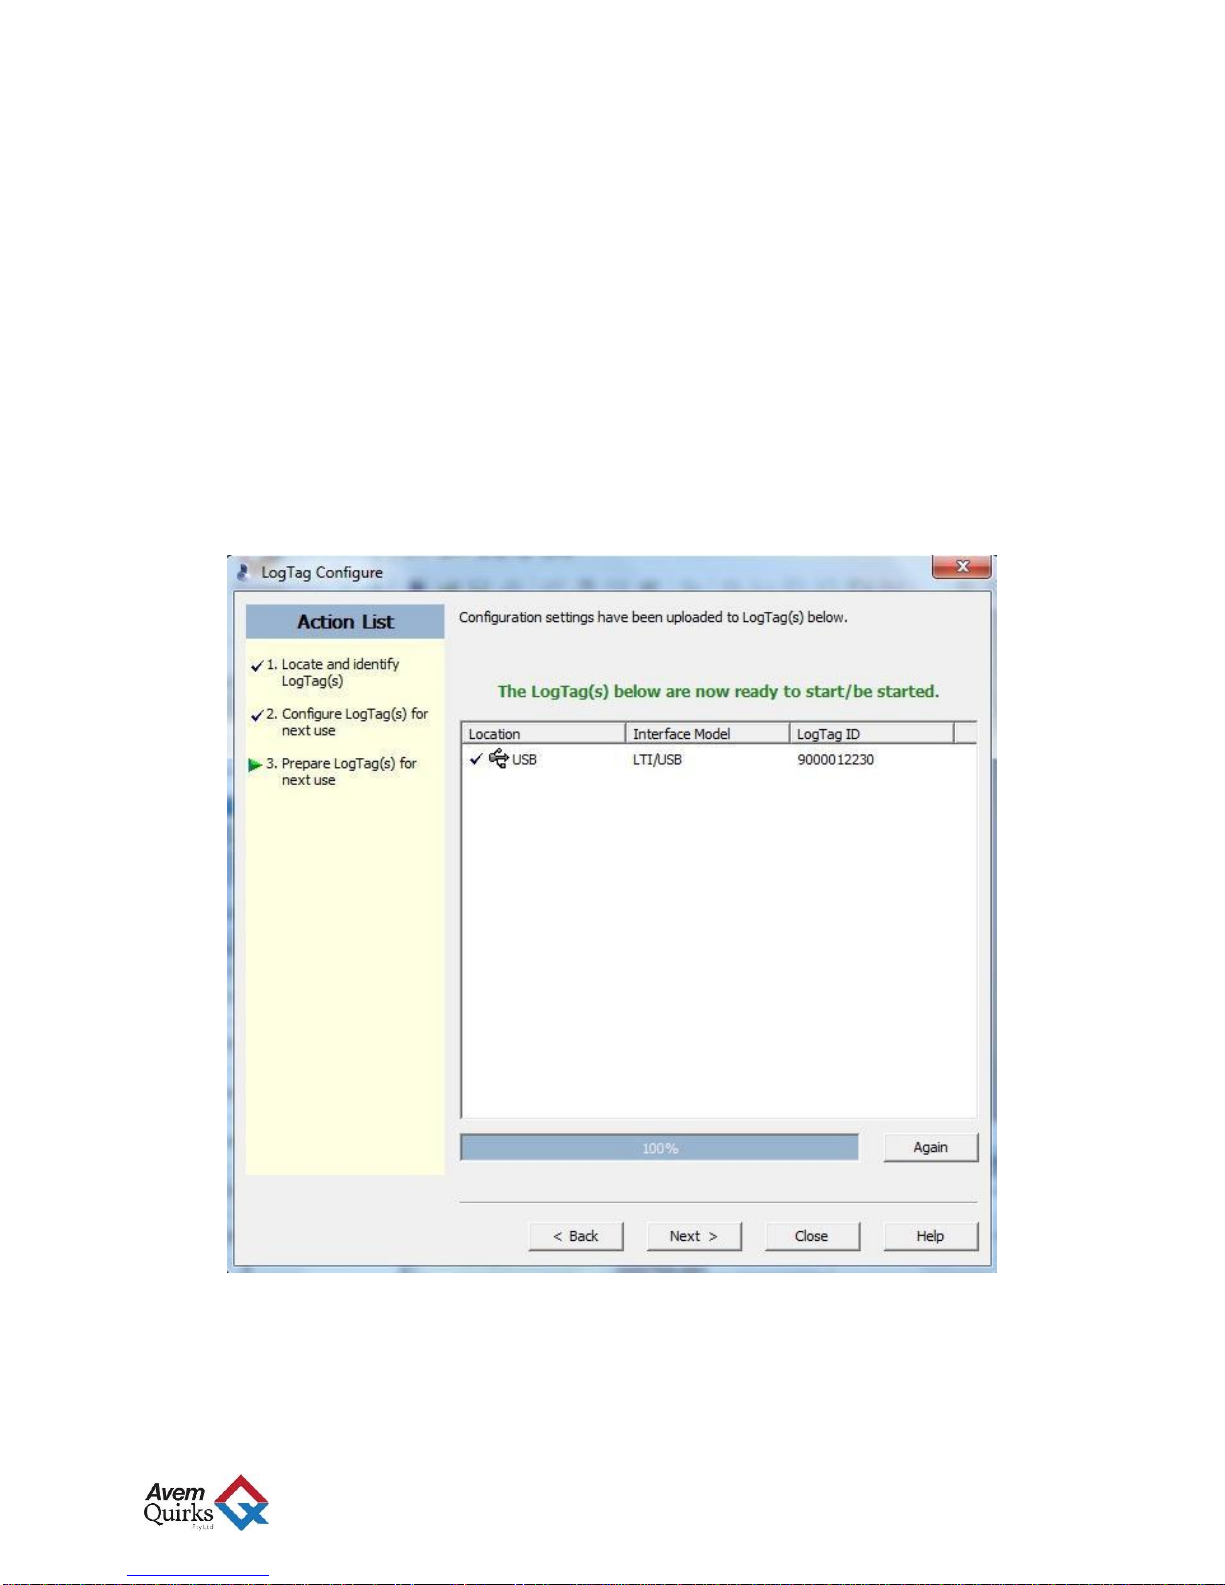
which will confirmthe LogTag recorder is ready to be started. A confirmation message
(shown below in green) will be displayed onscreen.
LogTag status confirmation

Avem Quirks
National Service Support Line: 1800 658 120
1
1
Step 6. Recording using the LogTag
i. Once you have completed the Wizard, and
received confirmation the LogTag is ready to
be started, remove the LogTag recorder from
the USB interface and plug the recorder into
the white temperature probe lead (located at the
rear of the control panel).
ii. Press Start on the LogTag, to begin recording.
The Alert and OK indicators should flash
simultaneously to confirm the LogTag has
started recording.
iii. During recording, the OK indicator will flash every 5 seconds. Should the temperature
reach a value below +2°C or above +8°C, the ALERT indicator will flash every 5
seconds, until acknowledged.
Please note: When the door is left open, such as when the refrigerator is being stocked, the
temperature inside the refrigerator will rise. The operator may wish to indicate this specific
event in the temperature log, which can be done by pressing Mark on the LogTag recorder (this
will be clear the Alert indicator and display a red point in the temperature log).
Step 7. Retrieving data from the LogTag Recorder
i. Before disconnecting the LogTag recorder from the refrigerator, press the “START
MARK” button on the recorder (this will mark on the data the point at which the
recorder was disconnected).
ii. Ensure the USB interface is connected to the PC USB port, as shown in Step 3 on
Page 8 (Connecting the USB Interface).
iii. Open the LogTag Analyser software, using the desktop shortcut or navigating to the
LogTag Recorders folder from the Start Menu (refer to Step 2 on Page 7 if you are
experiencing difficulty finding the LogTag Analyser software on yourPC).
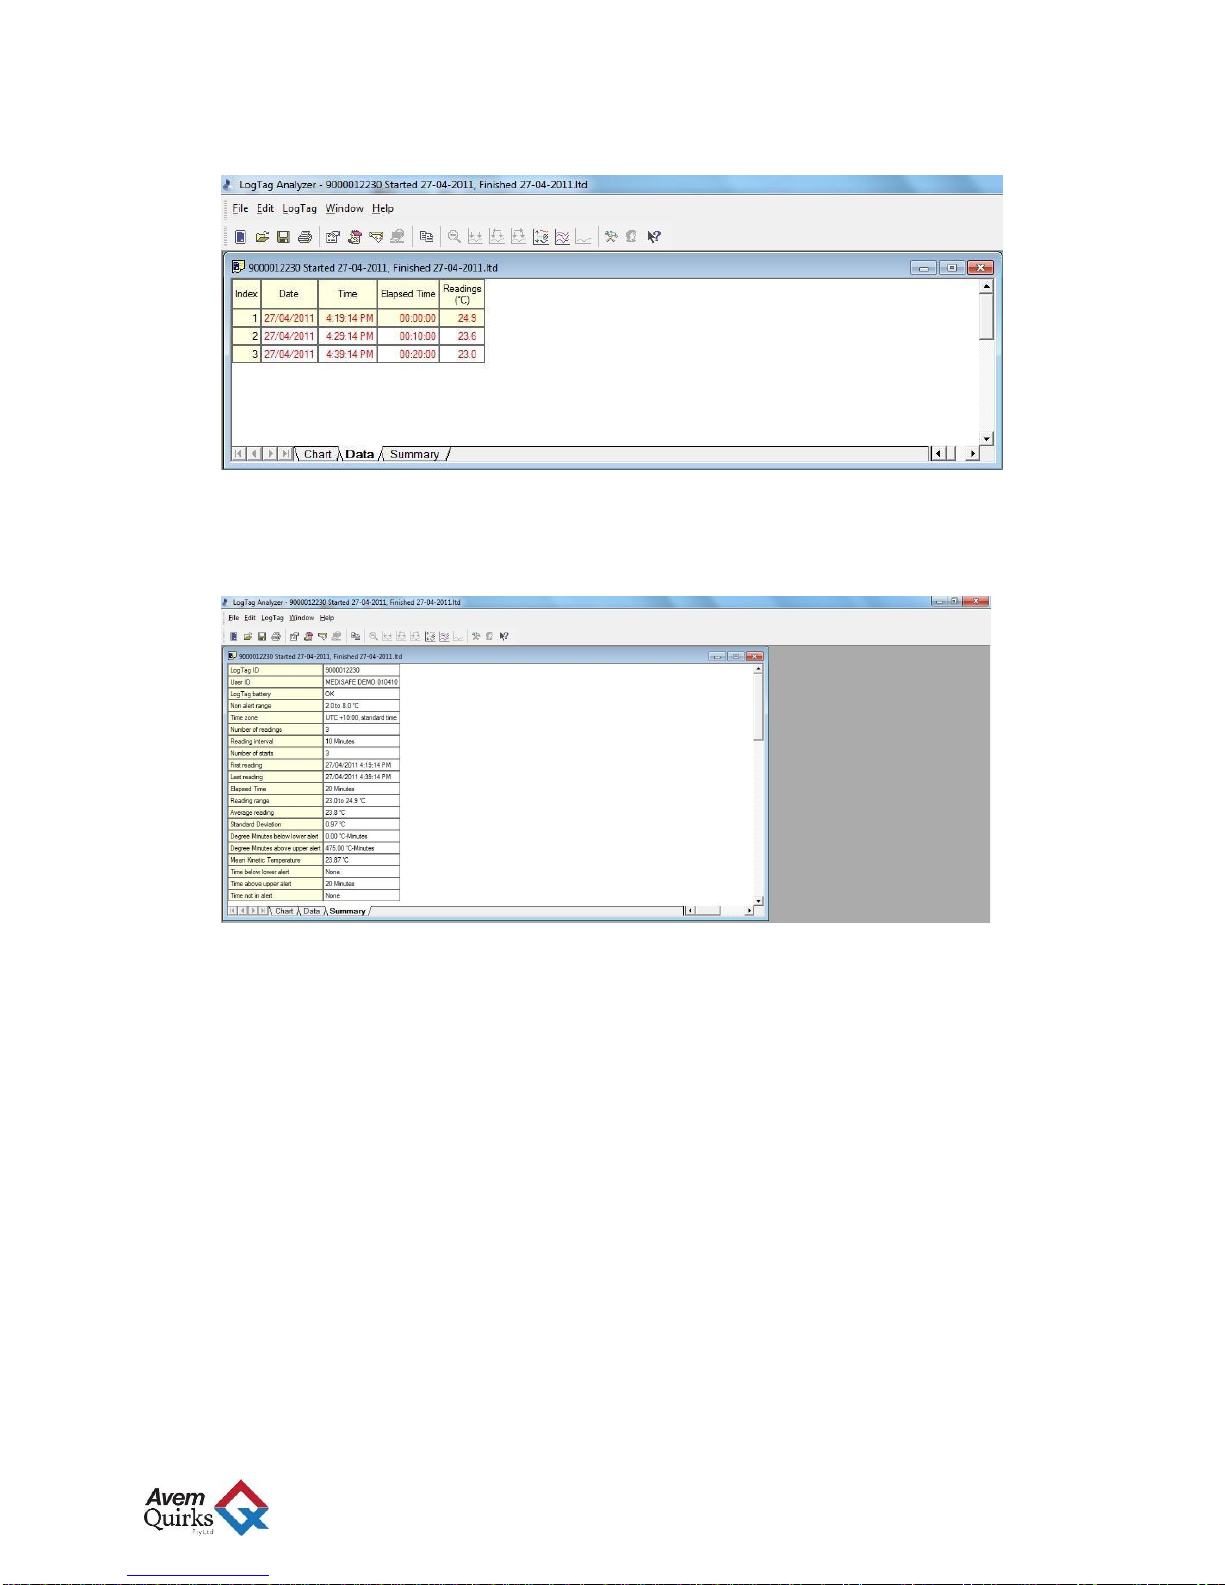
iv. With the LogTag Analyser software open, insert the LogTag recorder into the USB
interface, as pictured below. The software will download the data and open a graph of
the temperature data (LogTag data will be downloaded and automatically saved in My
Documents My LogTag Data).
Avem Quirks
National Service Support Line: 1800 658 120
1
2
v. Temperature readings can also be displayed in a table format, by clicking the Data tab
at the bottom of the window. Note: if Alert limits were set, temperatures outside the
specified range will be displayed in red text.
vi. A summary table may also be displayed, by selecting the Summary tab at the bottom
of the window. The summary displays Number of Readings, Average temperature, etc,
providing a useful snapshot of elapsed recording.
vii. Once you are finished reviewing the data, you may reconfigure the LogTag recorder
for its next use, following Step 5 Configuring the LogTag Recorder on Page 8 and
Recording using the LogTag (Step 6).
Please note: LogTag data is automatically downloaded and saved in My Documents
My LogTag
Data, for future reference.

Avem Quirks
National Service Support Line: 1800 658 120
1
3
Troubleshooting
Caution: Service should be performed only by qualified maintenance or refrigeration
mechanics. For assistance, please contact Avem QuirksAustralia.
Issue
Possible Cause
Further Information / Action to be taken
Refrigerator will not run
No power
Check that appropriate power is supplied to the
unit. Before turning on check to see if it is safe!
Check fuses from main power supply.
Temperature is too low
Operating
conditions
Check that there is sufficient air flow inside the
refrigerator cabinet; that there are no large
boxes or trays, stock is evenly distributed
throughout the shelves, and there is space
between stock and the evaporator plate at the
rear of the cabinet.
Temperature is too high
Operating
conditions
Ensure that the unit is not located in direct
sunlight, or in an area where the ambient
temperature is above 30°C.
Check the condenser coil (located at the back
of the unit) to ensure it is clean and not located
in a confined space, so that air flow and heat
dissipation are notrestricted.
Check that the door has not been left open.
Check that the seal has not been damaged,
allowing cold air to escape from the
refrigerated cabinet. If a new seal is required,
please contact Avem Quirks Australia.
System operating
with low or high
refrigerant
pressures
If system is operating with pressure lower or
higher than design refrigerant pressures. It will
have less cooling capacity.
High pressure can be the result of service issues
such as dirty condenser coils, failed condenser
fans, non condensables in the refrigeration
system, system over-charge, or high ambient
conditions. A qualified refrigeration technician
should be called to determine the problem and
repair as required.
Low pressure problems can be the result of a
low refrigerant charge, dirty evaporator,
plugged refrigerant filter dryer, damaged
capillary valve, high superheat adjustment, or
failed evaporator fan. A qualified refrigeration
technician should be called to determine the
problem and repair as required.
Compressor
problem
Compressor has internal damage, causing less
cooling capacity.

Avem Quirks
National Service Support Line: 1800 658 120
1
4
Issue
Possible Cause
Further Information / Action to be taken
Min-Max Temperature
Display flashing “PF”
Power failure has
occurred
Press the red set button on the display to
acknowledge the alert. Refer to the LogTag
temperature data, to ensure the vaccines have
not been compromised.
Min-Max Temperature
values did not reset
Reset was not
acknowledged by
Min-Max display
Press and hold the red set button until “rE” is
displayed, to confirmthe Min-Max values have
been reset. (Note: the Min-Max display will
first show the number of hours since the last
reset, before displaying the “rE” confirmation).
Min-Max Display shows a
different temperature than
the Electronic Controller
Variation in Air
temperature
The Min-Max Display and Electronic
Controller operate using two separate
temperature probes, reading the air temperature
inside the refrigerator. Air temperature can
vary, given the movement of air and amount of
stock inside the cabinet. A normal acceptable
variance is from0.1-0.3°C.
If the variance of temperature readings on the
displays is consistently more than 0.4°C, please
contact Avem Quirks Australia to arrange an
inspection and calibration.
Please refer to LogTag recorded temperature
data for the most accurate readings of
simulated vaccine core temperature.
Probe fault
A temperature probe fault will generally result
in an error message displayed on the controller
or Min-Max temperature display. It may also
result in an exceedingly high or low
temperature, or simply a blank display.
LogTag not recording
(OK and/or ALERT
indicators do not flash)
Not connected
When recording, ensure the temperature probe
(white cable at the back of the control unit) is
connected to the LogTag recorder.
When downloading, ensure the LogTag is
connected to the computer using the USB
interface cradle provided. Recorded data is
downloaded and saved automatically.
LogTag not
configured
Ensure the LogTag has been configured,
following the process in Step 5 Configuring
the LogTag Recorder on Page 8.
LogTag not
started
Ensure the Start button is pushed to begin
recording, acknowledged by flashing of the
OK and ALERT indicators.

Avem Quirks
National Service Support Line: 1800 658 120
1
5
Issue
Possible Cause
Further Information / Action to be taken
LogTag not recording
(OK and/or ALERT
indicators do not flash)
Battery needs
replacement
LogTag batteries are not user replaceable
(Battery status is indicated in the LogTag
configuration window. Please contact Avem
Quirks Australia for more information, or to
order a new LogTag Recorder.
LogTag Analyser software
cannot communicate with
my LogTag recorder
(Internal error $1)
LogTag Analyser
software is out-
of-date
Please ensure that you are using the most
recent software release, by visiting
http://www.logtagrecorders.com/software/
(available as a free download)
Open the LogTag Analyser software
Place the LogTag recorder in the USB
interface, connected to your PC
Configure the LogTag recorder following the
process in Step 5 Configuring the LogTag
Recorder on Page 8
LogTag Analyser displays
erroneous readings or
temperature data is
missing
(“<-40°C” temperatures
recorded in Data table,
and/or average/mean kinetic
temperatures displayed as
“**”)
Temperatures
recorded while
LogTag was not
connected
The LogTag recorder must be placed in the
USB interface immediately after it has been
disconnected from the Medisafe for
downloading, and reconnected to the Medisafe
prior to starting, otherwise false readings will
result
While the LogTag recorder is disconnected
from the refrigerator, it will continueto record.
Any data points recorded while the unit is
disconnected will be displayed as “<-40°C” in
the data table.
Before disconnecting the LogTag recorder
from the refrigerator, press the “START
MARK” button on the recorder (this will mark
on the data the point at which the recorder was
disconnected, providing a summary interval
for the LogTag Analyser software).

Avem Quirks
National Service Support Line: 1800 658 120
1
6
For further information regarding vaccine storage and handling, please refer to the National Vaccine
Storage Guidelines: Strive for 5 (available from the Department of Health and Ageing, at
http://www.immunise.health.gov.au/internet/immunise/publishing.nsf/Content/provider-store), or
contact one of the following:
National Immunisation Infoline 1800 671 811
State and Territory Health Department
telephone contact details for immunisation
Australian Capital Territory 02 6205 2300
ACT Health
New South Wales 02 9391 9000 (Switchboard)
Department of Health Contact your local Public Health Unit (look under
"Health" in the White pages) for region-specific
information
Northern Territory 09 8922 8315
Department of Health and Families
Queensland 07 3328 9888
Queensland Health
South Australia 08 8226 7177
Department of Health
Tasmania 1300 135 513
Department of Health and Human Services
Victoria 1300 882 008
Department of Human Services
Western Australia 08 9388 4878
Department of Health
Table of contents
Other Avem quirks Refrigerator manuals

Popular Refrigerator manuals by other brands


GE
GE Profile PDS22SFSLSS Dimensions and installation information

Frigidaire
Frigidaire FRT21QRJZ3 user guide

Onyx
Onyx 160 RE Operating and installation instructions

KitchenAid
KitchenAid Architect Series II KBRS20EVMS user guide

Carrier TRANSICOLD
Carrier TRANSICOLD Supra 560 owner's manual

Zanussi
Zanussi OZ User instructions