Mistral MWM710FL User manual

Thank you.
Thank you for choosing a quality Mistral appliance. Mistral prides itself on‘affordable living making sure there is nocompromise in your favourite room.... The Kitchen. This product comes with a 2 Year in home warranty,be sure to retain your user manual and receipt. For all warranty and technical queries please phone: 1300 373 199 AUST0800 764 912 NZGSM Retail Australia Pty Ltd ABN: 53 007 582 475 For Warranty and technical queries: 1300 373 199 Aust Or 0800 764 912 NZModel: MWM710FL

Contents
Safety instructions & warnings....................... 4-5Parts & Features .......................................... 6Installation ................................................ 7-9Operation................................................... 10-12How to Use ................................................ 13-15Maintenance & Cleaning................................ 1 6Troubleshooting .......................................... 1 7Parameters ................................................ 1 8Electric Diagram ......................................... 1 9Warranty ......... ......................................... 20-21GSM Retail Australia Pty Ltd ABN: 53 007 582 475 For Warranty and technical queries: 1300 373 199 Aust Or 0800 764 912 NZModel: MWM710FL

Safety InstructionsYour safety is of the utmost importance to our company. Please make sure that you read this instruction booklet before attempting to install or use the appliance. If you are unsure of any of the information contained in this booklet, please contact the Consumer service support hotline.4
Read and understand thoroughly these safety instructions before use. The items indicated here are very important safety precautions, which must be followed. We cannot be held liable for damage caused by non-compliance with the warning and safety instructions or resulting from incorrect use or operation. Cleaning and user maintenance shall not be made by children without supervision. Children of less than 3 years should be kept away unless continuously supervised. The new hose-sets supplied with the appliance are to be used and the old hose-sets should not be reused. WARNINGThis appliance is not intended for use by persons (including children) with reduced physical, sensory or mental capabilities, or lack of experience and knowledge, unless they have been given supervision or instruction concerning use of the appliance by a person responsible for their safety. Children should be supervised to ensure that they do not play with the appliance. This appliance can be used by children aged from 8 years and above and persons with reduced physical,sensory or mental capabilities or lack of knowledge if they have been given supervision or instruction concerning use of the appliance in a safe way and under stand the hazards involved.Children shall not play with the appliance.Cleaning and user maintenance shall not be made by children without supervision.This appliance is intended to be used in household and similar applications such as: -staff kitchen areas in shops, offices and other working environments;-farm houses;-by clients in hotels, motels and other residential type environments;-bed and breakfasts type environments;-areas for communal use in blocks of flats or in launderettes.For washing machines having ventilation openings on the base, the washing machines cannot be washing on the carpet. Before setting the washing machine, check it for any externally visible damage. Do not install or use a damaged washing machine. Before connceting the washing machine, ensure that the connection data on the plate(voltage and current)match the electricity supply. If in any doubt, consult a qualifiled electrician. The electrical safety of this washing machine can only be guaranteed when continuity is complete between it and an effective earthing system which complies with current local and national safety regulations. It is most important that this basic safety requirement is present and regularly tested, and where there is any doubt the household wiring system should be inspected by a qualified electrician. The manufacturer cannot be held liable for the consequences of an inadequate earthing system. Do not connect the washing machine to the mains electricity supply by an extension lead. Extension leads do not guarantee the required safety of the appliance.Unauthorized repairs could result in unforeseen dangers for the user, for which manufacturer can not accept liability. Repairs should only be undertaken by an approved service technician.Ensure current is not supplied to the machine until after maintenance of repair work has been carried out.

GSM Retail Australia Pty Ltd ABN: 53 007 582 475
For Warranty and technical queries: 1300 373 199 Aust
www.belliniappliances.com.au Model: BPI1200 Fineline Aus Portable Induction Cooker
GSM Retail Australia Pty Ltd ABN: 53 007 582 475
For Warranty and technical queries: 1300 373 199 Aust
www.belliniappliances.com.au Model: BPI1200 Fineline Aus Portable Induction Cooker
5
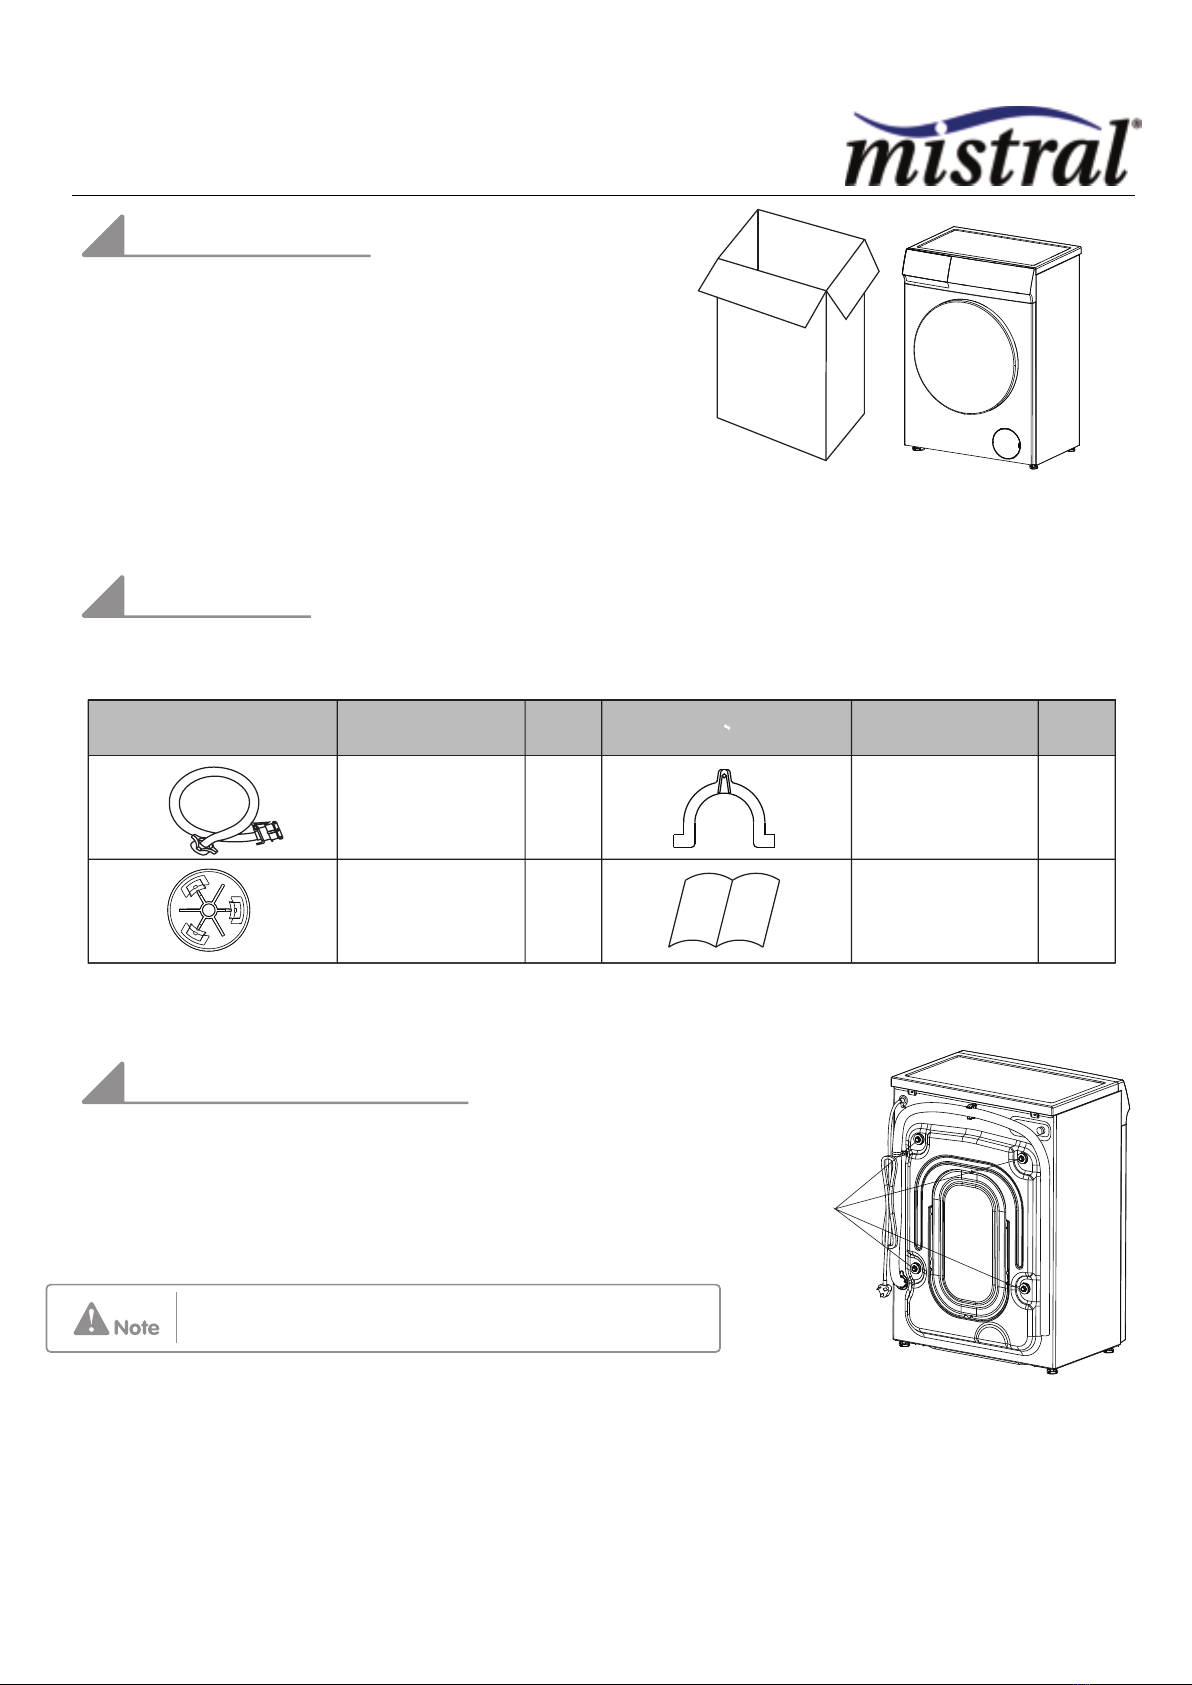
If the connection cable is damaged or broken, it must only be replaced by an approved service technician to protect the user from danger. Faulty components must only be replaced by genuine manufacturer original spare parts. Only when these parts are fitted the safety standards of the machine can be guaranteed.THIS WASHING MACHINE MUST BE EARTHED.•To avoid the risk of personal injury or damage to the washingmachine, do not install it in place where it is damp and whereit suffers from rainfall.• Do not install the washing machine in place where it suffersfrom the sun directly, in which plastic or components will bedamaged. It will be shortened the life of your washing machine.• Do not install the washing machine in place where temperaturesbelow freezing may occur. Frozen hoses may burst or split. Thereliability of the electronic control unit may be impaired attemperatures below freezing point.• Do not shoot the washing machine with water when you clean it.• Keep the washing machine away from fire or heat sources.• Before using the washing machine for the first time, make sure that the transit bolts at the rear of themachine have been removed. During spinning, transit bolts which is still in place may result in damage to both the machine and adjacent furniture or appliances.• Turn off the tap if the machine is to be left for any length of time (e.g. holiday), especially if there is nofloor drain (gully) in the immediate vicinity.• Take care to ensure that foreign objects (e.g. nails, pins, coins, paper clips) do not find their way into themachine with the laundry. These may damage components of the machine (e.g. drum), which in turn can result in damage to the laundry.• Do not wash water-repellent things(e.g. raincoats) with washing machine.• Only remove laundry from the washing machine once the drum has stopped turning. Reaching into amoving drum is extremely dangerous and could result in injury.Correct useSafety with children• Keep children away from the washing machine at all times. To avoid therisk of injury do not allow children to play on or near it or toplay with its controls. Supervise children whilst you are using it. • Older children may only use the washing machine if its operation hasbeen clearly explained to them and they are able to use it safely, recognising the dangers of misuse.• For machines with a 'porthole' door, remember that the porthole glasswill be hot when washing at very high temperatures. Do not let children touch it.

6
Parts and FeaturesCordTransit boltsBack coverwater inlet valveDoor glassTop Cover Control Panel CabinetGasketDrain Hose Adjustable Feet Drain pump filter Door Drawer(for detergent or fabric softener)Drain pump cover The drawing of machine in the manual is only used for instruction. It may be vary from the mode you buy.Unscrew the drain pump filter to let water run out when the machine is not used for a long time.Before Use

7
Installation:Backout packing• Remove all the packing(including the foam base) orthe vibration and noise may occur.• Dispose all the wrappage safety and keep them out ofthe reach of children. Danger of suffocation!• It is normal that water drops appear on the packingplastic bag and the door glass, which are resulted from the water left in the tub for checking out.AccessoriesMake sure that you have received all of the items shown below.AccessoriesNameQty.AccessoriesNameQty.Inlet hosetransit bolts caps14“U” piece1Manual1Removing transit bolts• Remove all the transit bolts at the back of the machine with tools.• Plug the holes with the transit bolts caps supplied.• Keep the transit bolts for future transportation. Whenever the machine is transported, the transit boltsmust be refitted.Transit bolts Strong vibration, noise or failures may occur if the transit bolts are not removed.Before Use

8
Installation:Installation place requirement•A concrete floor is the most suitable installation surface for awashing machine, being far less prone to vibration during the spin cycle than wooden floorboards or carpeted surface.•The machine must be level and securely positioned. Thedistance between the machine and wall must be more than 10 cm .•To avoid vibrations during spinning. the machine should notbe installed on soft floor coverings.Level adjustmentThe machine must stand perfectly level on all four feet to ensure safe and proper operation. Incorrect installation may cause vibrationsand noise and may cause the machine to move about.To do these when the machine is not level: •Using the spanner turn locknut in a clockwisedirection. Then turn locknuts together with adjust feet to unscrew.•Hold adjust feet securely with a pipe wrench. Turnlocknut again using the spanner until it sits firmly up against the housing.Vibration and noise may occur if the locknuts do not sit firmly up against the houses.Drain hose connection1.Direct into a sinkIf the outlet spigot has not been used before, remove any blanking plug that maybe in place.Push the drain hose onto the spigot and secure with a clip if required, ensure aloop is formed in the drain hose to prevent waste from the sink entering thewashing machine.If required,the drain hose can be extended to a length of 4 m.LocknutsAdjustable feet Use process

9
Installation:2.Connected securely to a standpipeFirstly form a hook in the end of the drain hose using the “U” piece supplied.Place the drain hose into your standpipe, which should have an internal diameter of approximately 30mmthus ensuring there is an air break between the drain hose and standpipe.When discharging into a standpipe ensure that the top fo the standpipe is no more than 90cm and no lessthan 60cm above floor level.Water inlet connectionConnect the inlet hose supplied with the machine to a tap with a 3/4" thread.Do not use previously employed hoses.Installation should comply with local water authority and building regulations ‘ requirements.When there is a inlet valve at the back of the machine, it must be connected to a cold water supply. If there are two inlet valve, one is connected to a cold water supply and the otheris connected to a hot water supply. Follow the indication of the picture below to complete the connection.inlet valve for cold waterinlet hose for cold water with a white nutUse process

10
Use process
Control PanelTempMixedEco 40-60SyntheticsDelicates/silkDrum CleanSpinRinse+Spin20℃Super QuickDelayRinse+Press for 3"to reloadAnti-AllergyProgramSpeed
12131
Programmes: Page 9Display: Page 7
2
Buttons: Page 8
3
Digital display: This icon shows the time, speed, rinse times, Error codes. DisplayThe display shows the current settings, options or relevant information.The digital display can show:Delay time: the light under this icon will be lighting once the display shows the delay time.Child lock: the light under this icon will be lighting once child lock function is selected.Washing phase: the light above this icon will flicker during the washing phase.Spin and drain phase: the light above this icon will flicker during the spin and drain phase.Door lock: the light under this icon will be lighting when door lock is working.Rinse phase: the light above this icon will flicker during the rinse phase.Programme duration (e.g.1:20)Speed (e.g.1:20, on behalf of 1200 rpm)Temp (e.g.20,on behalf of 20℃)Rinse times (e.g. 2) Delay time (e.g.12h)Error codes (e.g. E01)

11
Control PanelUse process
For your safety, Do not press the “ ” button and get out clothes while the machine is running. Because the temperature of water may be high and it may scald you. The door lock will open automatically at the end of a wash cycle while the temperature of the drum is cool down.ButtonsThe following is the instruction of the buttons and their setting options.Start/pause ( )2.1.Power ( )Press this button to turn the machine on or off.3.SpeedPress this button repeatedly to change the spin speed.4.TempPress this button repeatedly to change the wash temperature.5.Rinse+Press this button repeatedly to change the rinse times.6.DelayPress this button repeatedly to change the delay time.8.Child lock (“Program”+“Speed”)When the machine starts, press the “ Program ” and “ Speed ” buttons at the same time for a few seconds and the light under the icon “ ” is lighting, then the function works. Press the same buttons a few seconds to cancel this function .When the function works, all buttons are not available.Press this button to start or pause a wash cycle. To reload the laundry during a wash cycle, press this button for 3 seconds, and the machine will drain if the water level is too high. The reload function is unavailable if the temperature of the water is too high.7.PromgramPress this button repeatedly to choose different program.

12
Use process
Control PanelProgramsOptions and functions for programsProgramMax Temp (℃)Mixed Super QuickAnti-AllergyDrum CleanSpinRinse+SpinDelicates/SilkSynthetics20℃Max.LoadEco 40-60Max Spin speed(rpm)Type of Wash and RecommendationsWashingSymbolSmall loads of items which require freshening up and which can be washed in a Cotton program.Lightly to normally soiled robust laundry made of cotton, linen, artificial fibers and their blends.Only wash similar colors together in one wash load.Cottons, linens or cotton mix fabricsNormally soiled cotton laundry. Most favorable program in terms of com-bined water and energy consumption. Basis for the values indicated on the Energy Label.This program may help for sterilization and disinfection.Synthetic or mixed fabrics, underwear, colored garments, non-shrink z-shirtsFine laundry made of delicate fabrics or silk, which needs gentle treatmentThis program is used to clean the drum. Do not put any clothes into the drum while running this program.This program can be used for rinsing garments . Do not add any detergent.Separate spin for cotton and linen items.

13
How to use washer1. Sort the laundry by color and by care label. Most garments have atextile care label in the collar or side seam.2. Make sure all the pockets are empty, Foreign objects (e.g. nails, coins,paper clips, etc.) can cause damage to garments and components in themachine.3. Close any zips, fasten hooks and eyes etc before washing.4. Dark textiles often contain excess dye and should be washed separatelyseveral times before being included in a mixed load. Always wash whitesand coloureds separately.5. Badly soiled areas, stains etc. should be pre-treated with liquid detergent,stain removers etc.6.Turn over the clothes which pill easily and is with woolen surface beforeputting them into the machine.Unfold the laundry and load loosely in the drum. Mixing both large and small items gives better wash results and also helps distribute the load evenly during spinning. The most efficient use of energy and water is achieved when a full load is washed. However, do not overload as this causes creases and reduces cleaning efficiency.Make sure that no garments are nipped between the door and the seal.It can remove the water out which left in the tub because of manufacturer’s checking out.Before washing clothes for the first time, you must run a complete cycle without clothes. To do these:Connect the power and turn on the tap.1.2.Press the button “ ” to turn on the machine and choose the program “ 20℃ ” .3.Press the button “Start/Pause” .Washing preparation1.Connect the inlet hose well and turn on the tap.2.After making sure the power socket is grounded reliably, insert the power plug into the power socket.3.Place the drain hose well.Preparation of clothesDiagram 1Diagram 2Diagram 3Put clothes into the washerUse process

14
How to use washer1.Open the drawer and add adequate detergent into main wash compartment marked “ ” or “ ”.2. Add the fabric softener into compartment marked “ ” or “ ” . Do not exceed the maximum level mark.3. Close the drawer.Using the detergent drawerThe right amount to dispenser will depend on the following:The quantity of laundryThe soiling level of the laundry - Lightly soiledNo visible dirt or stains. Possibly slight body odour. - Normally soiledVisibly dirty and/or just a few slight stains. - Heavily soiledVisible dirt and stains and/or dried on soiling. The water hardness level.It is recommended to use low foaming powder for all washing temperature programs.Washing steps1.Turn on the water tap, and connect the power.2.Open the door, and put the cloth into the drum one by one.3.Close the door, and put suitable amount of detergent and fabric softener into the dispenser,then close the drawer.4.Choose a program you need .5.Press “ Start/Pause” button to start the washing machine.6.When the cycle is finished, there is a warning tone sound.When washing cycle is finished, the machine will change into standby mode. And the machine will be sleeping after 10 minutes without any control on the control panel.Main wash compartmentFabric softener compartmentPre-wash compartmentThe machine is fitted with a balance control device, which ensures the machine is stable during the spin. To protect the machine, it will cut in if the laundry is not evenly distributed in the drum. The laundry is redistributed by reverse rotation of the drum. This may happen several times before the unbalance disappears and normal spinning can resume. If, after about 20 minutes, the laundry is still not evenly distributed in the drum, the machine will not spin. In this case, redistributed the load manually and reselect the spin program. Use process

How to use washerWhen the machine is started , the door lock is locked When the temperature inside the durm is above 60℃, the door lock is locked. When the water is above a certain level, the door lock is locked. When the washing cycle is finished, the door lock is unlocked.Door lockImportant:Do not try to open the door when the washing cycle is not finished or power supply is cut off during the washing cycle, because the temperature may be high and you may be scalded.Use processCleanness and MaintenanceDisconnect the machine from the mains electricity supply and withdraw the plug from the socket before cleaning the machine.The washing machine must not be hosed down.Cleaning the exterior Clean the exterior with a mild non-abrasive cleaning agent or soap and water using a well wrung-out cloth. Wipe dry with a soft cloth.Do not use solvents, abrasive cleaners, glass cleaners or all-purpose cleaning agents. These might damage plastic surfaces and other components because of the chemicals they contain.The washing drumClean the drum every 3 months by using the “Drum Clean” programme.Cleaning the drawerRemove detergent residues regularly. Clear the drawer following these:•Pull out the drawer until a resistance is felt. Press down the release catch and at the same time pullthe drawer right out of the machine.•Remove the siphon from compartment and clean it.•Clean the dispenser using a brush and warm water.Use process
15

Maintenance and CleaningUse pointed nose pliers to withdraw the plastic filter. Clean, put back secure. These filter should be checked every 6 months or so, or more often if there are frequent interruptions to the water supply.Cleaning the drawer housing Use a bottle brush to remove detergent residues inside the drawer housing.Cleaning the water inlet filterImportant:If the machine is exposed to temperatures below 0°C, certain precautionsshould be taken.1 Disconnect the machine from the mains electricity supply and open the lower cover with a screwdriver. Place a container under the pump. Unscrew and remove the filter.2 Clean the filter carefully3The filter must be put back in place after cleaning.The filter should be cleaned every 2 months or when there is fault that the “ ” is on the screen.16

Troubleshooting Guide1. Check the connection and ensure it is secure.
2. Change the temperature sensor.
1.The connection between thetemperature sensor and wire isnot secure.
2.The temperature sensor is damaged.
1. Check the connection and ensureit is secure.2. Change the heater.1.The connection between theheater and wire is not secure.2.The heater is damaged.1. Check the connection and ensureit is secure.
2. Check if the machine is overloaded.Switch off the machine, and retrywhen the motor becomes cool.
3. Change the motor.1.The connection between themotor and wire is not secure.2.The motor is protected becauseof over-heat.3.The motor is damaged.1. Change the water inlet.2. Check the connection and ensureit is secure.3. Change the water sensor.1.The water inlet valve is damaged.2.The connection between thewater sensor and wire is not secure.3.The water sensor is damaged.Possible CauseThe water of machine fills overtime.There is a Doorlock alarm.1. Water tap is not open.2. Drain hose is put down.3. Water inlet valve is damaged.1. Open the water tap.2. Hook up the hose.3. Change the water inlet valve.ProblemError Code
The machinedrains overtime.
Water overflowsthe machine./ Water sensorworks abnormal.
The motor doesnot work.
There is a heater fault.There is atemperaturesensor fault.1. Check the drain hose.2. Clean the filter.Check the drainage system3.and clean it.1.The drain hose is squashedor kinked.2.The drain pump filter is block.3.The drainage system pipes areblocked.Lock the door well.1.2. Put the garment into the drum.Change the door lock.3.1.The door is not locked well.2.Garments is caught between thedoor and seal.3. Door lock is damaged.17

Parameters Power Rated Power Water Pressure220-240V~,50Hz2100W0.02-0.8MpaNet Weight /Gross WeightOuter dimension (WxDxH)mm52kg/56kg595x410x845ModelEnergy-efficient test program entrance guide: Choose the program “ Eco 40-60 ”, select the temperature to 60 ℃ and rinse times to 3 times. Data can vary from the nominal values given depending on water pressure,water hardness,water inlet temperature,room temperature,type and volume of load,fluctuations in the electricity supply and any extra options selected.MWM710FL18

Electric Diagram Important:If the machine is exposed to temperatures below 0°C, certain precautions should be taken.1.Turn off the water tap.2.Unscrew the inlet hose.3.Unhook the drain hose from the rear support and position the end of this hose and that ofthe inlet hose in a bowl. Run the spin programme.4.Disconnect the appliance.5.Screw the inlet hose and reposition the drain hose.6.When you intend to start the machine up again, make sure that the room temperature isabove 0°C.S7NS1-2lockcloseThis symbol on the product, or in its packaging. indicates that this product may not be treated as household waste. Instead, it should be taken to the appropriate waste collection point for the recycling of electrical and electronic equipment, By ensuring this product is disposed of correctly. you will help prevent potential negative consequences for the environment and human health, which could otherwise be caused by the inappropriate waste handing of this product, For more detailed information about the recycling of this product, please contact your local council, your household waste disposal service, or the shop where you purchased the product.S1-1
LDO
N1234567
5V GNDGND
coil5V
Heater
FilterEarthS1-4S1-3123456789S5N
GND
TO MCU
NTC
DPHot ValvePre ValveMain Valve45123
Pump
S2L’L’N N N
45123
Display BoardCN1CN6Main Board12345678910MH/LTS612S8
GND
TO MCUNMotor23
GND
TO MCU1CN2Water SensorRY2RY11419

WARRANTY
1.1
In this wa rra nty:
1.1.1
Austra lia n C o nsume r La w m e a ns the la w a s se t o ut in Sc he d ule 2 o f the C o mp e titio n a nd
C o nsum e r Ac t 2010;
1.1.2
C o mp a ny me a ns G SM Re ta il Austra lia Pty Ltd ABN 53 007 682 475 o f 142-144 Fulla rto n Ro a d , Ro se Pa rk
SA 5067. Te le p ho ne 1300 373 199. Ema il a d m in@ g sm re ta ilgroup.c o m;
1.1.3
C o nsume r me a ns a “ c o nsum e r” a s tha t te rm is d e fine d in Se c tio n 3 o f the Austra lia n C o nsum e r
La w a s the o rig ina l p urc ha se r o f a Mistral p ro d uc t;
1.1.4
C o nsume r G ua ra nte e s me a ns the g ua ra nte e s und e r the Austra lia n C o nsume r La w;
1.1.5
Yo u m e a ns the C o nsume r.
1.2
No thing in this wa rra nty a ffe c ts a ny p e rso n’ s rig hts und e r the Austra lia n C o nsume r La w. The b e ne fits to
a ny Co nsume r und e r this wa rra nty a re in a d d itio n to the rig hts a nd re m e d ie s a va ila b le und e r a ny
C o nsume r G ua ra nte e s.
1.3
Sub je c t to the o the r c la use s o f this w a rra nty, the C o m p a ny wa rra nts to the C o nsume r tha t the Mistral product will
be free of manufacturing defects and will perform to the Company’s specifications.
1.4
The b e ne fit o f this wa rra nty e xte nd s o nly to the C o nsum e r a s o rig ina l p urc ha se r o f a Mistral p ro d uc t
whic h is installed in a domectic household area.
*The wa rra nty d o e s no t a p p ly to C o mm e rc ia l a nd o r ind ustria l usa g e . *Ple a se Se e 1.7.7 fo r additional
information
1.5
This product comes with a 2 Year in home warranty, be sure to retain your user manual and receipt.
1.6 If within the Warranty Period a manufacturing defect is discovered in the Mistral product or it fails to
perform to the C o mp a ny’ s sp e c ific a tio ns a s a re sult o f so me d e fe c t in ma te ria ls, c o mp o ne nts o r wo rkma nship
(De fe c t) the n the C o mp a ny will, a t its o p tio n, re p a ir the Mistral p ro d uc t o r sup p ly a re p la c e me nt Mistral p ro d uc t
fre e o f c ha rg e . A re p la c e me nt Mistral p ro d uc t ma y d iffe r fro m the o rig ina l p ro d uc t p urc ha se d b y the C o nsum e r.
1.7
This wa rra nty will no t a p p ly to a ny Mistral p ro d uc t:
1.7.1
Insta lle d b y a ny p e rso n o the r tha n a q ua lifie d tra d e sp e rso n; o r
1.7.2
Sub je c te d to misuse , ne g le c t, ne g lig e nc e o r a c c id e nta l d a ma g e ; o r
1.7.3
O p e ra te d in a ny wa y c o ntra ry to a ny o p e ra ting o r m a inte na nc e instruc tio ns; o r
1.7.4
Imp ro p e rly ha nd le d , insta lle d o r ma inta ine d ; o r
1.7.5
Alte re d o r mo d ifie d p rio r to o r a fte r insta lla tio n; o r
1.7.6
Da ma g e d d ire c tly o r ind ire c tly b y p o we r surg e s, e le c tric a l sto rm d a ma g e o r c o nne c tio n to
inc o rre c t p o we r sup p ly
1.7.7
Ind ustria l a nd o r C o mme rc ia l usa g e is inc lusive o f sta ff a re a s in o ffic e / sho p e nviro nme nts, ho te l/
mo te l o r o the r simila r a c c o mmo d a tio n o r re nta l typ e p ro p e rtie s inc lud ing Be d a nd Bre a kfa st
e sta b lishme nts.
1.8
Yo u must p ro vid e p ro o f o f yo ur p urc ha se o f the Mistral p ro d uc t a nd the d a te o f p urc ha se in o rd e r to o b ta in
the benefit of this warranty.
1.9 Mistral p ro d uc t b y the C o m p a ny (whe the r it is the o rig ina l o r a re p a ire d a nd / o r a re p la c e m e nt Mistral
p ro d uc t) a nd fo r a ny o the r e xp e nse s yo u inc ur in c la iming und e r this wa rra nty.
GSM Retail Australia Pty Ltd ABN: 53 007 582 475 For Warranty and technical queries: 1300 373 199 Aust Or 0800 764 912 NZModel: MWM710FL
Table of contents
Other Mistral Washer manuals