Mobile Create Eyelog MCG-W150 User manual


Eyelog User's Manual
-1 -

Getting Started____________________________________________________________________
●Introduction
So many things regarded impossible come true by innovative growth of IT technology. User become able to get
information they want in anytime and anywhere by coming true of Ubiquitous technology. And many new products
having new concept and idea can be developed by dramatic growth of each components technology. IT industrial
world can recognize “New Product” can be from another assembling way of now developed components, and it
t
b
f
bi
td
f
ft
dli
“S it ”
dt
f
th
tt
f
bi
h
b
l
mus
t
b
eoneo
f
bi
g
t
ren
d
so
f
f
u
t
ure
d
eve
l
op
i
ng.
“S
ecur
it
y
”
pro
d
uc
t
s
f
or
th
es
t
a
t
eo
f
b
e
i
ng secure
h
ave
b
een a
l
so
developed a lot according to Ubiquitous technology. But most of users are not satisfied with the security system
with high price, difficulty of setup and handling, limited area, etc. Mobile Create Inc. was founded for creating new
products users want based on users’ recognizing against undesirable trespassing or invaders in real time
anytime and anywhere, and easy changing and setup.
● Applications
With functions for detecting change of environment and movement of people as well as for transmitting requested
information, the device can be installed very conveniently at all places where the user want to check for security.
The device also records every situational development
The device ensures security by detecting intruders when there is no one at home
Th d i it i t b ki i th t l ffi t
Th
e
d
ev
i
ce ensures secur
it
y aga
i
ns
t
b
rea
ki
ng
i
n
th
e s
t
ore, persona
l
o
ffi
ce, e
t
c.
The device can be installed inside a car to prevent vehicle theft or operation of the vehicle by an unwanted person
The device provides security against intruders in the garden or other private places
The device can be installed in front of a safe or an apparatus which can be operated by a specialist
The device can be used in front of a desk or a place where you do not want the presence of person or in which yo
u want to kee
p
a record
p
Only the monitoring function can be used in places where you need to check the situation at designated intervals
including a playroom
The device provides a monitoring function to check the safety of all locations
-2 -

bl f
Ta
bl
e o
f
Contents
Chapter 1. Setup Guide
-------------------------------------------------------------
6
Chapter
1.
Setup
Guide
6
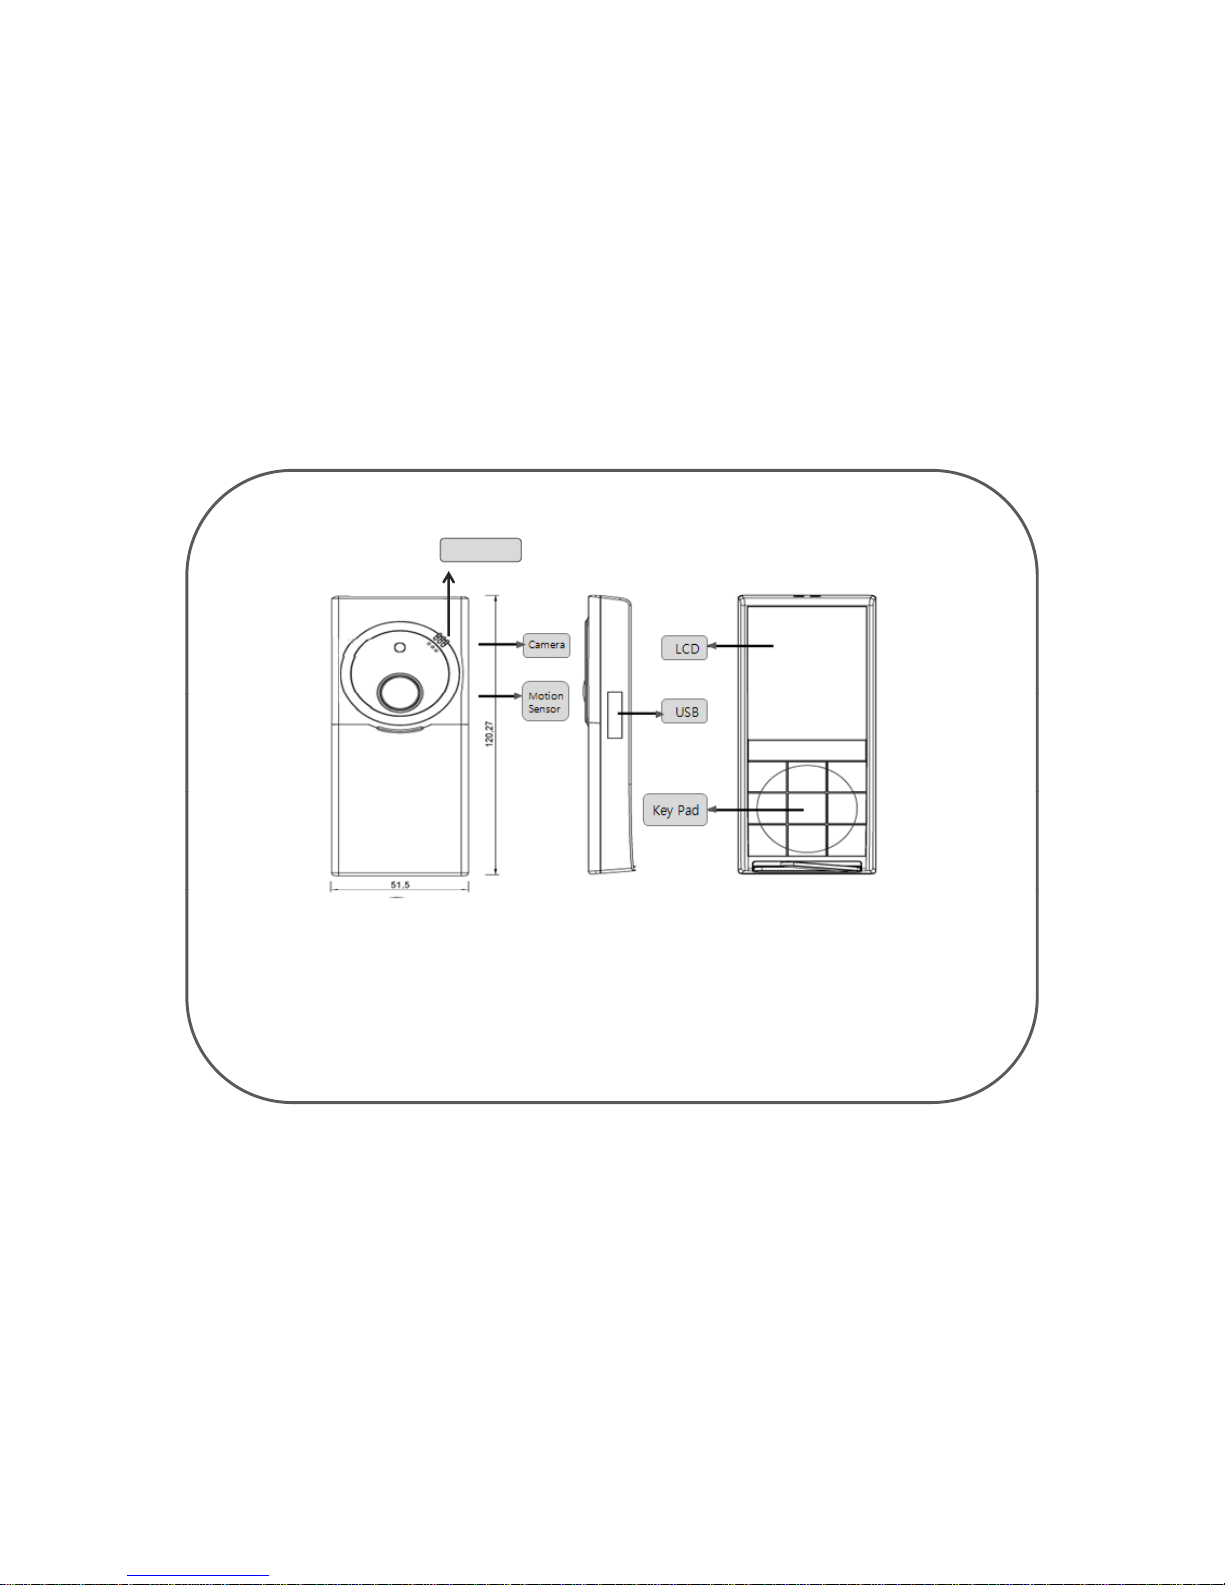
1. Prepare the Parts ---------------------------------------------------- 7
1.1 Functions of Keypads -------------------------------------------8
1.2 LCD Icons --------------------------------------------------------9
2. Insert SIM Card ------------------------------------------------------10
3. Insert Battery ------------------------ ------------------------------- 11
4Sithi thDi O
12
4
.
S
w
it
c
hi
ng
th
e
D
ev
i
ce
O
n --------------------------------------------
12
5. User Registration ----------------------------------------------------13
5.1 Mobile Number -------------------------------------------------14
5.2 E-Mail Address --------------------------------------------------15
5.3 Permit Exception ------------------------------------------------16
6. Settin
g
----------------------------------------------------------------18
g
6.1 Camera -----------------------------------------------------------19
6.2 Video -------------------------------------------------------------20
6.3 Network Setting -------------------------------------------------21
7. The Way to Install ----------------------------------------------------29
8. USB cable connect ---------------------------------------------------30
9 The range & angle of the sensor
------------------------------------
31
9
.
The
range
&
angle
of
the
sensor
------------------------------------
31
Chapter 2. The Rest Functions----------------------------------------------------- 32
1. Album -------------------------------------------------------------------32
1.1 Photo -------------------------------------------------------------- 32
1.2 Video -------------------------------------------------------------- 33
2V i If
34
2
.
V
ers
i
on
I
n
f
o. ------------------------------------------------------------
34
3. Motion function ----------------------------------------------------- ---34
Chapter 3. Remote Control Operation-------------------------------------------- 35
1. How to use remote control by cell-phone ---------------------------36
2. For the Error Reason Code --------------------------------------------37
-3 -

PRECAUTIONS
Warnings
Please carefully read the device instruction and safety precautions booklet included with this product before
using your Eyelog MCG-W150. This booklet contains important device manual and safety information.
Cautions
1. Handle the battery with care.
Do not use excessive force or sharp objects when handling the battery.
Do not heat it or keep it on the heated surfaces.
Do not expose it to moisture
Keep it out of the reach of children or pets to prevent accidental poisoning
Keep
it
out
of
the
reach
of
children
or
pets
to
prevent
accidental
poisoning
.
Ensure that no metal objects come into contact with the + and – terminal of the battery.
2. Do not touch the terminals of the battery or AC adaptor with wet hands.
It may cause electric shock.
3. Do not disassemble or repair the device.
you may not get warranty service if you disassemble or repair the device by yourself.
4. Do not place the device, battery, or the charger in areas near heat such as heaters or microwaves.
This might cause fire, explosion, or injury.
5. Use the supplied battery and accessories from Mobile Create.
Use with any other battery or accessories might cause explosion or injury.
6. Do not connect PC USB port without battery in Eyelog.
Your PC USB port could be damaged
by electric current.
Your
PC
USB
port
could
be
damaged
by
electric
current.
※ Mobile Create is not responsible for items being stolen or accidents by invaders.
Important Notice
Setu
p
is eas
y
with followin
g
direction methodicall
y
. So
g
o throu
g
h it ste
p
b
y
ste
p
with
y
our device connected to
py g yg g pypy
your mobile phone. Referring to several features that this software offers, remember to save your information
often.
The client mobile have to support the following for using Eyelog device
● Client mobile have to support receiving MMS2.0
●
Cli t bil h t t i i i d d li i f ti
ns
●
Cli
en
t
mo
bil
e
h
ave
t
o suppor
t
rece
i
v
i
ng, answer
i
ng an
d
d
e
li
ver
i
ng
f
unc
ti
o
ns
-4 -

Package contents
② Batter
y
③ TA Adapter
①Eyelog Device ④ Data Cable
•It is separate way to purchase the IR LED Dongle.
It will included in your package if you purchase IR LED Dongle.
-5 -

Chapter 1 Setup Guide
Quick starting to make device
“
Guard on
”
Chapter
1
.
Setup
Guide
Quick
starting
to
make
device
Guard
on
1. Make sure you had inserted the SIM card in device and your cell-phone
2. Put battery on and press power key to turn on the power
3. Press (menu) key and put your cell-phone SIM card number in Mobile Number
option
4. Make sure device and your cell-
p
hone has to be in same communication networ
k
(Network MMS Server Profile select communication network your
using)
5. Input the SMS message by your cell phone right below or in page 31.
Unable to set “Guard On” if Eyelog connected with USB of your computer. Set User Number
SMS message function of the device
#help Help for user
#goff Guard off
#gon
Guard on
Summary of SMS message
#gon
Guard
on
#pic (Picture) take picture and transmit
#vid (Video) take video and transmit
#son Siren on
#soff Siren off
#picre#ⓝm
(i t)
Input of the time (10≤Ⓝ≤600) automatically enables
t k di MMS t bil
Ⓝ
it
Set MMS server Profile
(
m
i
nu
t
e
)
t
o
k
eep sen
di
ng
MMS
t
o your mo
bil
e every
Ⓝ
m
i
nu
t
e.
#vidur#ⓝs
(second)
Input of the time (1≤Ⓝ≤15) automatically enables to
keep sending MMS to your mobile every Ⓝsecond.
You can input the time you want to.
Put 0 for cancellation of the automatic sending
Ⓝ
-6 -

1. Prepare the Parts
Speaker
Camera LCD
Motion
Sensor USB
Key Pad
●Speaker : Melody and alarm
● LCD(Liquid Crystal Display) : Display the screen
●
Mi S
Shiid
●
M
ot
i
on
S
ensor :
S
ense t
h
e mot
i
on or
i
ntru
d
er
●USB: Charge the battery , PC interface
●Key Pad: Control manual
-7 -

11F ti fk d
1
.
1
F
unc
ti
ons o
f
k
eypa
d
s
; Save the selected menu function(Menu & Save Key)
; Scroll up to select menus numbers or letters
(Up Key)
KEY PAD
;
Scroll
up
to
select
menus
,
numbers
or
letters
(Up
Key)
; Cancel the selected menus, numbers, or letters(Cancel Key)
; Scroll to the right to select menus, numbers or letters(Right Key , Next menu)
; Select a menu function or store user-input information such as names or numbers(OK Key)
; Scroll to the left to select menus, numbers or letters(Left Key , previous menu)
; Switch your guard function (On/Off)
; Scroll down to select menus, numbers or letters(Down Key)
; Switch your device on/off. (POWER KEY)
-8 -

Functions of the icons at the top of the stand-by mode
1.2 LCD Icon
;
Received si
g
nal stren
g
th in the network covera
g
e area.
; Guard function is on.
; Picture resolution is set at high
;
gg g
; Guard function is off.
;
Picture
resolution
is
set
at
high
.
; Picture resolution is set at middle.
;Picture resolution is set at low
;
SILENT is set for sound.
;
; TAKING PICTURE SOUND is set for sound.
; WARNING SOUND is set for sound
; Battery level. The bar indicates the available battery charge
-9 -

2. Insert SIM Card
SIM Card
SIM
Card
1. Make sure you had inserted the SIM card in your device
properly unless screen displays “Insert SIM Guard Off”.
2. Verify that there is no SIM card enabled (The device must
not ask for a
“
Insert SIM
”
when switched on with SIM
If SIM is not properly
input
Input & Removal of SIM Card
not
ask
for
a
Insert
SIM
when
switched
on
with
SIM
card inside).
Make sure to insert SIM Card available for MMS Service
Input
&
Removal
of
SIM
Card
•This is the way to insert and take out your SIM card in your device.
2
Remove
the SIM Card
2
Insert the SIM Card
Input Removal
2
.
Remove
the
SIM
Card
as it below
2
.
Insert
the
SIM
Card
as it below
1. Remove the battery
cover and battery
1. Remove the battery
cover and battery
- 10 -

3. Insert Battery
Input & Removal of the Battery
•This is the way to input and take out your battery from your device.
2. Remove the battery as
it below
2. Stick up your battery
first and put it down
Input Removal
1. Remove the battery
cover from the set
1. Remove the battery
cover from the set
Charging the Battery
Uncover the USB jack and connect the cable of the authorized charging device from Eyelog.
●
Recharge the battery time
●
Recharge
the
battery
time
▷ Battery Capacity : 1100 mAh
▷ TA Capacity : 600 mAh (It can recharge 600 mAh for 1 hour)
▷ It takes about 2hours to full charge
●Using time
▷ In sleep system : about 500 hours
▷ In guard system : about 100 hours
It could be less than 100 hours in action,
- 11 -

4. Switching the Device On
Press and hold the power on/off Key to switch your device on/off.
Power ON mode
Stand
by
mode
Stand
-
by
-
mode
2Press Keyonstand
-
by mode to enter the menu mode
1.Make sure you have to check the signal strength bar until it displays in your
device LCD
2
.
Press
Key
on
stand
-
by
mode
to
enter
the
menu
mode
- 12 -

5U R it ti
5
.
U
ser
R
eg
i
s
t
ra
ti
on
Mobile Number
On main menu press Key and select Client Setting.
By using Key, move the cursor to one Mobile
Number. User Registration page
By using Key, Select the person’s phone number.
press Key to save or press Key to erase.
• This function allows you to register three cell phone
numbers of any selected person whom will get the picture
transformed when the invasion is sensed.
Mobile Number page
• Enter the number of the selected person's cell phone number,
using Key in the keypads and press Key to register
the number. To change the number, move the cursor, to the
number
y
ou want to chan
g
e and
p
ress Ke
y
. Press Ke
y
ygpyy
to store the corrected number.
you have to input Mobile Number correctly
unless SMS and MMS message will not send properly
USER TELNUM page
-13 -

51U R i t ti
User Registration(Option)
5
.
1
U
ser
R
eg
i
s
t
ra
ti
on
On main menu press Key and select Client Setting.
By using Key, move the cursor to one Mobile Number.
Press option Key, to Select the Option.
press Key to change the Owner Property.
Mobile Option page
•
This function allows you to decide whether you transmit
This
function
allows
you
to
decide
whether
you
transmit
the MMS when the invasion is sensed.
•You can choose whether you will receive MMS or not for all
three Mobile Number you’ve already registered.
Owner Property
By using Key to select Accept MMS on or off
Press Key to save or press Key to cancel
- 14 -

52E
MilAdd
•
This function allows you to register three E
-
Mail address to get
E-Mail Address
5
.
2
E
-
M
a
il
Add
ress
•
This
function
allows
you
to
register
three
E
-
Mail
address
to
get
transformed SMS MSG and photo to your E-Mail when the invasion
is sensed.
On main menu press Key and select Client Setting. E-Mail Address page
By using Key, move the cursor to Email Address.
By using Key, Select the person’s E-Mail Address.
p
ress Ke
y
to save or
p
ress Ke
y
to erase.
pypy
•using Key in the keypads and press Key to register
the address. To change the address, move the cursor, to the
letter or number you want to change and press Key.
Press Ke
y
to store the corrected address. USER E-Mail page
y
You have to input Email address correctly unless SMS
message or picture will not send properly to your Email
•Save
p
a
g
e will come u
p
when the Ke
y
is
p
ressed once.
pg p y p
Press the Key again to store the address. Done mode will
come up when the address is saved. You can press Key
to cancel the address.
•Press the Key to exit menu. Save page
- 15 -

53P itE ti
Permit Exception
5
.
3
P
erm
it
E
xcep
ti
on
This will allow you to manage the the Eyelog
You can select Permission or Change PIN
On main menu press Key select Pin Code.
dlth dUi K
Permit exception page
an
d
se
l
ec
t
c
h
ange co
d
e
U
s
i
ng
K
ey,
move the cursor select the Option and press Key to save.
Permission
Permission page
•This will allow you to change the user Registered User
or All user.
•Registered User is to use the Eyelog whom Registered,
and All User can use Eyelog for all people
•Press Key to choose the option
Change Code
•This will allow you to change the PIN of the Eyelog
Change Code page
•Press Key to choose the number you wants
to select
- 16 -

54AllCl
5
.
4
All
Cl
ear
All Clear
•It will allow you to reset the User Registration
On main menu press Key select User Registration.
HTTP selected page
and select All Clear menu
- 17 -

6 Settings
6
.
Settings
Time/Date
•This will allow you to set the current time and date.
•TIME/DATE : You can set the current time.
On TIMER mode, using Keys,
move the cursor to 1st menu bar and press Key.
In the Main Menu press Key select setting menu
and Set Time/Date TIME/DATE page
Select date or time by using Key. Select the number by using Key
and press Key to set the time or date
and
press
Key
to
set
the
time
or
date
.
Press the Key to exit the menu.
•Siren: You've set the sound alarming when a picture is taken
automatically on any invasions, which will be followed
by siren.
Siren
Siren page
- 18 -

Shooting mode
• It will allow you to choose video or Camera to
send to your cell-phone
• Camera activate Is taking by photo
• Video activate Is played by Video
• Edit Is option to change the Size, Sound and
M lti Shot (Video can change the recording time)
Shooting mode Select Shooting mode
M
u
lti
Shot
(Video
can
change
the
recording
time)
6.1 Camera Edit
Size •You ma
y
choose small
,
middle
,
or lar
g
e for the resolution
y,,g
of the picture.
•On main menu, using Keys, move the cursor to
Activate and press Key.
•Go to the resolution you want by using Keys and
press Key to register it. Option
•Press Key to exit the menu.
Sound
CSd
Yh tthhtt dh it i
•
C
amera
S
oun
d
:
Y
ou
h
ave se
t
th
e s
h
u
tt
er soun
d
w
h
en a p
i
c
t
ure
i
s
taken.
•Camera Sound off : non-sound
Camera Size & Sound page
- 19 -
Table of contents