Mobile Crossing COMPACTFLASH GPS User manual

CompactFlash
CompactFlashCompactFlash
GP
GPGPS
SS
Us er ’s Guid e
Us er ’s Guid eUs er ’s Guid e
Ma y 2 004
Ma y 2 004Ma y 2 004
CompactFlash
GPS
User’s Guide
May 2004
All manuals and user guides at all-guides.com
all-guides.com

Table of
Table ofTable of Contents
ContentsContents
Table of Contents
Trademarks 3
Welcome ........................................................................................4
In the Box ..................................................................................4
Getting Started...............................................................................4
Installation and Setup................................................................5
PD users 5
Laptop and Tablet PC users 6
Using the GPS for the first time.................................................6
Tips............................................................................................7
GPS Information ............................................................................9
Setup .........................................................................................9
GPS Info ..................................................................................10
GPS Technical Specifications......................................................12
Regulatory Notice ........................................................................13
FCC Notice ..............................................................................13
Modifications 13
European Union Notice ...........................................................13
Safety Instructions...................................................................14
You can find additional product and support information at the
following website: http://www.mobilecrossing.com or contact:
Mobile Crossing
1230 Oakmead Parkway, Suite 304
Sunnyvale, C 94085
(408) 738-8816
(800) 605-8198
Fax 408.738.8806
email: support@mobilecrossing.com
All manuals and user guides at all-guides.com

Trademar s
Trademar sTrademar s
© 2004 Mobile Crossing - ll rights reserved
Trademar s
CompactFlash is a trademark on SanDisk Corporation.
Pocket PC is a trademark of Microsoft Corporation
ll other trademarks are the property of their respective owners.
Company / product names may be trademarks or registered
trademarks of their respective holders and are used here for
identification purposes only.
3
All manuals and user guides at all-guides.com

Welcome
WelcomeWelcome
In the Box
In the BoxIn the Box
Getting Started
Getting StartedGetting Started
Welcome
Thank you for your purchase of the Mobile Crossing CompactFlash
GPS receiver. This GPS receiver will work world wide to compute
your position wherever you are. It outputs standard NME sentences
and will work with just about every navigation program available. The
unit plugs into a CF slot in your PD or laptop and uses power from
this connection so no separate power is required. Laptops with a
pcmcia slot can use a simple adapter to support this unit. Laptop
users will need the driver included on the CDROM, but PD users
will generally find that the drivers are already included in their device.
In the Box
The Box contains:
•The CompactFlash GPS Receiver
• CDROM containing Test Programs & Drivers
•This Manual
Getting Started
.
The GPS Receiver has a built-in GPS antenna. It supports an
external antenna as well using an MMCX connector. There is one
lamp that indicates power is being received by the unit. When a fix is
available on the GPS receiver the lamp will blink.
4
All manuals and user guides at all-guides.com

Installation and Setup
Installation and SetupInstallation and Setup
PDA users
PDA usersPDA users
Installation and Setup
PDA users
Plug the unit into your PD CF slot and you’re done with the
installation. The label side of the GPS should face the front of the
PD .
n application is needed to take advantage of the GPS signal. The
included CDROM contains a test program called GPSInfo that can
be used to verify operation on a pocket pc. There is a description of
GPSInfo on page 9 later in this manual. In most cases you will need
to configure the software to tell it where the GPS is plugged in. Some
software does have the ability to search for the GPS in automatic
mode but otherwise you will need to determine the COM port
5
All manuals and user guides at all-guides.com

Laptop and Tablet PC users
Laptop and Tablet PC usersLaptop and Tablet PC users
Using the GPS for the first time
Using the GPS for the first timeUsing the GPS for the first time
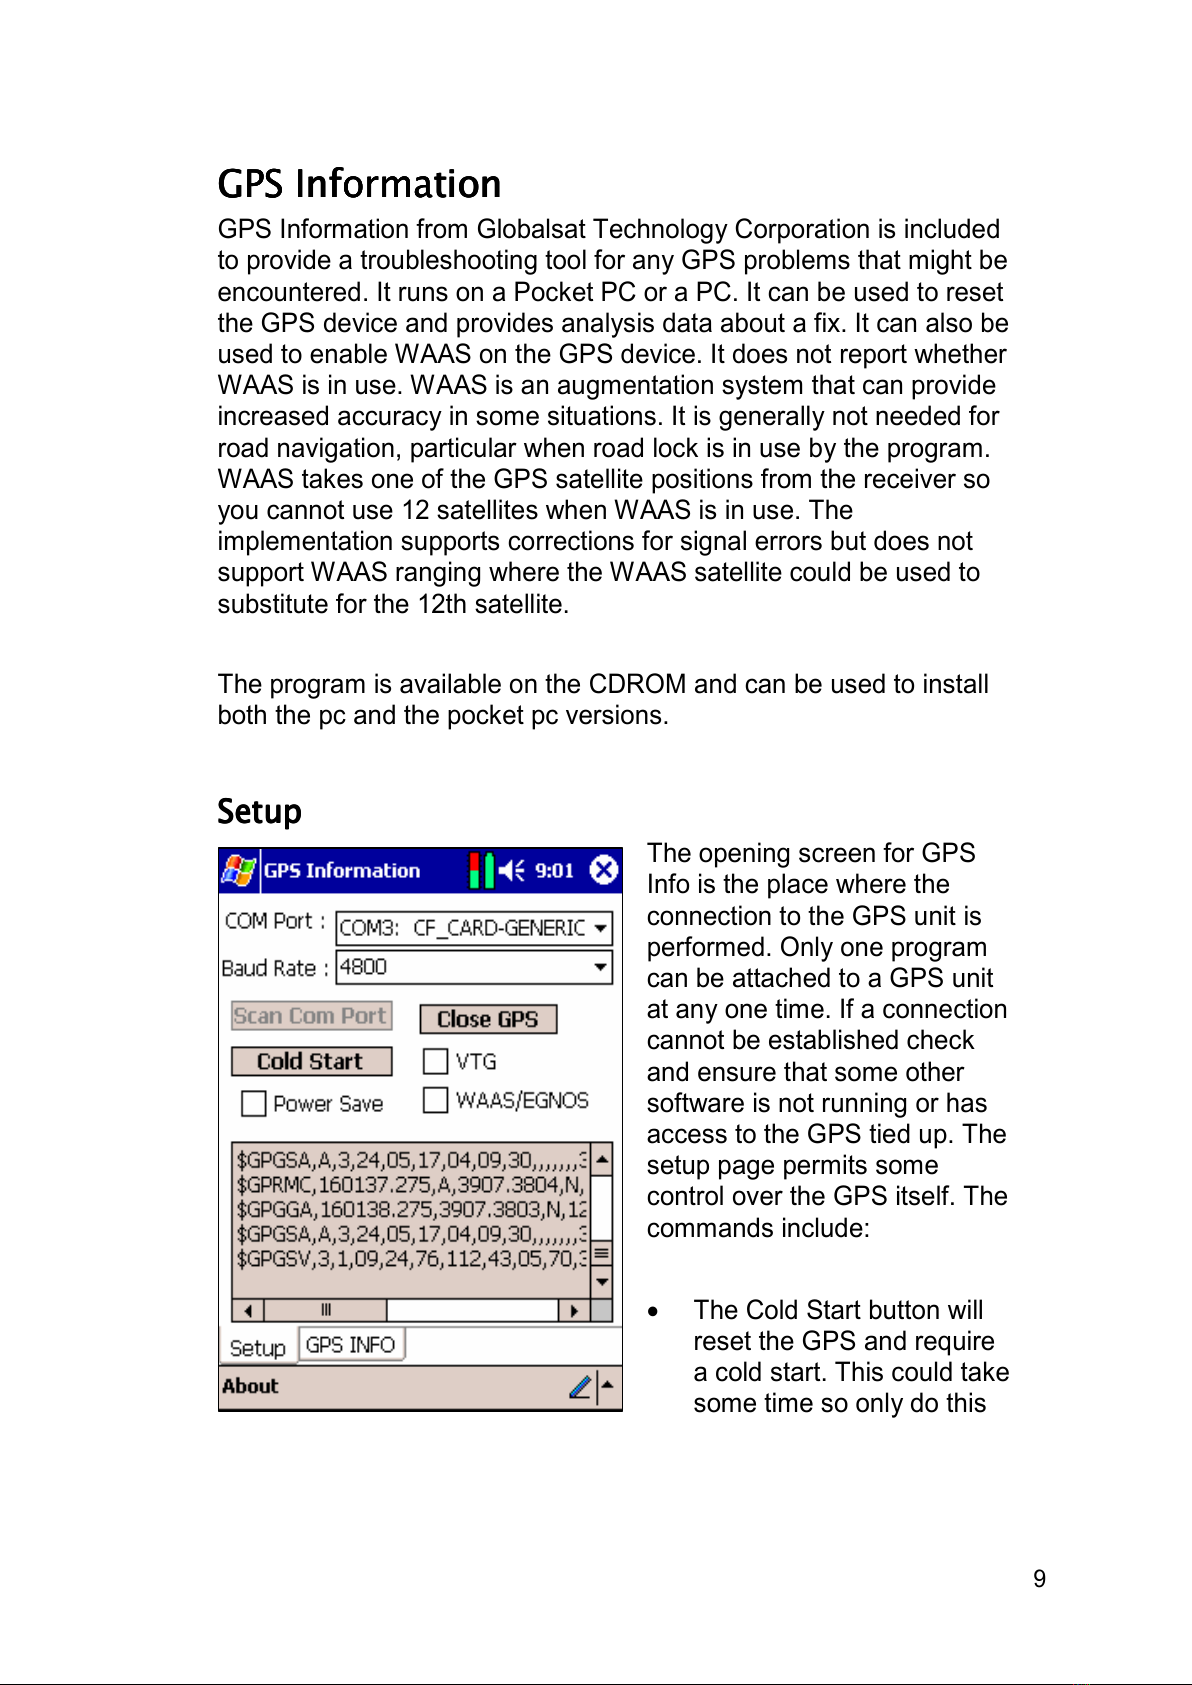
manually. The GPSInfo program can be used to establish the COM
port number with its Scan Com Port command. Once the COM port
number is determined it will remain the same for all programs. The
Baud rate should be set to 4800.
This unit requires power from the PD and will shorten the time that
the battery lasts. The user will need to monitor battery use. External
power is recommended for vehicle use.
Laptop and Tablet PC users
Laptop and Tablet PC users can plug the unit into a CF slot if they
have one or a CF to PCMCI adapter can be used. The GPS should
be plugged into the adapter and then the assembly should be
inserted into the unit. The labels on both the GPS and the adapter
should be pointing up. You will then need to install the supplied
driver for Win98, 2000, or XP systems.
When the hardware wizard starts up to install the driver select the
CDROM containing the driver setup software.
n application is needed to take advantage of the GPS signals. The
application will need to be told the number of the COM port selected
by the driver when it was installed. The Baud rate will need to be set
to 4800. The GPS information program described later can be used
on a pc as well.
laptop in a car is often placed where the GPS cannot get a good
view of the sky. For this reason, it is often a good idea to add an
external antenna to the GPS receiver and then place the antenna
where it can get a good sky view. Good places for the antenna
include well forward on the dash next to the window or on the roof.
External antennas often come with a magnetic base to facilitate roof
top mounting.
Using the GPS for the first time
The very first time a GPS is used in a totally new area it will take a
little longer than usual to get a location fix. ny GPS aware
6
All manuals and user guides at all-guides.com
all-guides.com

Tips
TipsTips
application can be used to perform this initialization, but it is best if
the application has some sort of GPS status display. Pocket PC
users will find the included GPSInfo command perfect for this task.
The following steps can be used:
1. Be sure the computer battery is fully charged.
2. Take the assembled unit outside and select a location with a
good sky view.
3. Run the application and select the GPS receiver.
4. The lamp on the left side of the receiver will light whenever
power is applied to the unit. It will immediately attempt to
acquire satellite signals.
5. Observe the display in the application to determine if the
receiver is able to communicate to the application and is
able to see some satellites.
6. Wait! receiver in a totally new location can take 5 to 10
minutes to determine its first location. In some cases it could
even take longer.
7. When a location fix has been obtained the lamp on the
receiver will begin to flash and the application should report
that that the position has been obtained.
8. The unit is now ready and can be used as desired.
Tips
Do not cover the internal antenna with anything. The GPS signals
are easily blocked.
7
All manuals and user guides at all-guides.com

The GPS will attempt to get a lock anytime it has power. Remove it
from the PD or turn off power to it when inside to avoid long lock
times later due to the GPS giving up and thinking it has to initialize
itself.
Get a position lock before driving off or entering the woods where
reception may be more difficult. The GPS can hang onto a lock
easier than it can get one.
Only one program can talk to the GPS at a time. If you have trouble
connecting to the GPS, be sure that some other program is not using
it.
Try to find a mounting position that permits angling the GPS
backward with the display pointing slightly up. This will improve the
ability of the GPS to maintain a lock.
When hiking, hold the unit horizontally with the antenna away from
you. If you put the unit in your pocket, be sure that the antenna is
faced out. The body blocks all GPS signals.
When removed from the PD , the information in the GPS is
preserved with a supercap. Use the unit at least once a week to
keep the data intact. Otherwise expect a longer initial lock time.
Some cars have a metalized sunscreen embedded in the windshield
which blocks the GPS signals. n external antenna placed on the
outside of the car will solve this problem. Suitable locations include
the roof, the hood, the trunk area, or the top of the fenders. The
antenna lead in wire can usually be routed into the car via spaces
between the parts on the car such as within a door jamb or trunk lid.
Most external antennas have a magnet in their base to permit
attachment to the desired location. This GPS unit requires an
antenna with an MMCX connector and is designed to work on 2.5
Volts.
8
All manuals and user guides at all-guides.com

GPS
GPSGPS Info
InfoInformation
rmationrmation
Setup
SetupSetup
GPS Information
GPS Information from Globalsat Technology Corporation is included
to provide a troubleshooting tool for any GPS problems that might be
encountered. It runs on a Pocket PC or a PC. It can be used to reset
the GPS device and provides analysis data about a fix. It can also be
used to enable W S on the GPS device. It does not report whether
W S is in use. W S is an augmentation system that can provide
increased accuracy in some situations. It is generally not needed for
road navigation, particular when road lock is in use by the program.
W S takes one of the GPS satellite positions from the receiver so
you cannot use 12 satellites when W S is in use. The
implementation supports corrections for signal errors but does not
support W S ranging where the W S satellite could be used to
substitute for the 12th satellite.
The program is available on the CDROM and can be used to install
both the pc and the pocket pc versions.
Setup
The opening screen for GPS
Info is the place where the
connection to the GPS unit is
performed. Only one program
can be attached to a GPS unit
at any one time. If a connection
cannot be established check
and ensure that some other
software is not running or has
access to the GPS tied up. The
setup page permits some
control over the GPS itself. The
commands include:
• The Cold Start button will
reset the GPS and require
a cold start. This could take
some time so only do this
9
All manuals and user guides at all-guides.com

GPS Info
GPS InfoGPS Info
when you have a clear sky view and are willing to wait until a
new GPS fix is obtained.
• VTG checked with add this message to the NME strings of
data. You should not do this unless a program specifically needs
it.
• Power Save and save significant amounts of battery power but
at a cost in performance. Use this at your own discretion, but it is
not recommend under difficult reception conditions.
The W S switch can be used to toggle the differential correction
capability on or off. Using W S ties up one of the receiver channels
and is not needed for use with road navigation software.
The bottom of the screen shows NME messages as they appear.
Its primary purpose is to demonstrate that the GPS is actively send
data and the PD can receive it.
GPS Info
Tapping the GPS Info tab
brings up the information
display. This screen shows
a map of the current satellite
positions with the current
reception signal strength for
each satellite shown below
the map. The text data
about the fix surrounds the
map. It is primarily about the
GPS PVT solution. ll GPS
receivers compute PVT,
Position, Velocity, and Time
as the full GPS solution. t
the top is the GPS
computed UTC date,
followed with the UTC time.
GPS solutions are usually
computed with respect to
Universal Time Coordinated
10
All manuals and user guides at all-guides.com

(UTC) which used to be called GMT (Greenwich Mean Time). The
time is computed at longitude 0 which passes through England.
California is 8 hours later than UTC (7 hours during DST).
The other information shown includes the Velocity (Speed and
Direction) and the Position (Latitude and Longitude) except that
altitude is missing.
The rest of the text is concerned with the quality of the fix itself. The
Status reports that the GPS has a 3D solution which means it is
computing a solution in all three axes which requires at least 4
satellites. In addition it is showing a HDOP, Horizontal Dilution of
Position and a PDOP (Point DOP). Dilution of Position is a unitless
number that represents how good the solution is based on the
current satellite positions. For horizontal DOP any number less than
2.0 is very good. PDOP provides a number that includes both
horizontal and vertical accuracy and 3.0 as shown above is a good
number for this. This computation is based strictly on the
arrangement of satellites as shown on the screen. Numbers above
6.0 would indicate a poor arrangement that might not lead to very
accurate results.
The bar chart at the bottom of the screen shows the S/N ratio of
each satellite (signal strength) and the blue bar indicates the
satellites that are contributing to the current solution. The numbers at
the bottom of the bar are the same numbers as the one on the map
so that the two charts can be tied together. The receiver is getting a
signal from satellite 6 but does not have the data yet to use it as part
of the solution.
By the way, the map of the earth shown on the upper chart is bogus
since the satellite view is looking up, not down with the center of the
circle representing the current location and North at the top. The
map itself is only a graphic and provides only misinformation but
looks nice.
11
All manuals and user guides at all-guides.com
all-guides.com

GPS Technical Specifications
GPS Technical SpecificationsGPS Technical Specifications
GPS Technical Specifications
ccuracy 15 meters 2D RMS
Datum WGS 84
Hot Start 8 sec. verage
Warm Start 38 sec. verage
Cold Start 48 sec. verage
Reacquisition 100 ms. verage
GPS output data GG , GS , GSV, RMC, VTG, GLL
Transfer Rate 4800, 8, n,1
Update Rate 1 Hz
Operating Temperature -10° - 70° C
Storage Temperature -40° - 85° C
Power 90m @ 3.3V
External ntenna MMCX connector
Dimensions 3.75” x 1.88” x 0.75”
ll specifications are subject to change without notice. Some
specifications are dependent on the US Government maintaining the
system to meet its current capabilities as of the printing of this
document.
12
All manuals and user guides at all-guides.com

Regulatory Notice
Regulatory NoticeRegulatory Notice
FCC Notice
FCC NoticeFCC Notice
Modifications
ModificationsModifications
European Union
European UnionEuropean Union Notice
NoticeNotice
Regulatory Notice
FCC Notice
This equipment has been tested and found to comply with the limits
for a Class B digital device, pursuant to Part 15 of the FCC Rules.
These limits are designed to provide reasonable protection against
harmful interference in a residential installation. This equipment
generates, uses, and can radiate radio frequency energy, and if not
installed and used in accordance with the instructions, may cause
harmful interference to radio communications. However, there is no
guarantee that interference will not occur in a particular installation. If
this equipment does cause harmful interference to radio or television
reception (which can be determined by turning the equipment off and
on), the user is advised to take one or more of the following
measures:
• Reorient or relocate the antenna of the unit receiving the
interference.
• Increase the distance between the equipment and the
receiver.
• Connect the equipment into an outlet on a circuit different
from that to which to receiver is connected.
• Consult your dealer or an experienced radio/TV technician
for help.
Modifications
The FCC requires the user to be notified that any changes or
modifications made to this device that are not expressly approved by
MOBILE CROSSING. Making modifications may void the reference
authority to operate the equipment.
European Union Notice
Products bearing the CE marking comply with both the EMC
Directive (89/336/EEC) and the Low Voltage Directive (73/23/EEC)
13
All manuals and user guides at all-guides.com

Safety Instructions
Safety InstructionsSafety Instructions
issued by the Commission of the European Community and if this
product has telecommunication functionality, the R&TTE directive
(1995/5/EC). Compliance with these directives implies conformity to
the following European Norms (in parentheses are the equivalent
international standards and regulations):
•EN55022 (CISPR 22) - Electromagnetic Interference
• EN55024 (IEC61000-4-2, 3, 4, 5, 6, 8, 11) – Electromagnetic
Immunity
•EN61000-3-3 (IE61000-3-3) - Power Line Flicker
•EN 60950 (IEC60950) - Product Safety
Safety Instructions
This product has been tested for conformance to international safety
regulations. Like any electrical device, however, it should be used
with care. To protect yourself from possible injury and to minimize
the risk of damage to the product, it is important that you follow these
safety instructions.
1. Do not attempt to service the product yourself. Refer servicing to
qualified personnel.
2. Do not use the product near water. Never spill liquid of any kind
on the product.
3. Do not bend the circuit board or place stress on the interface
board while inserted into the PD .
14
All manuals and user guides at all-guides.com
Other manuals for COMPACTFLASH GPS
1
Table of contents
Other Mobile Crossing GPS manuals