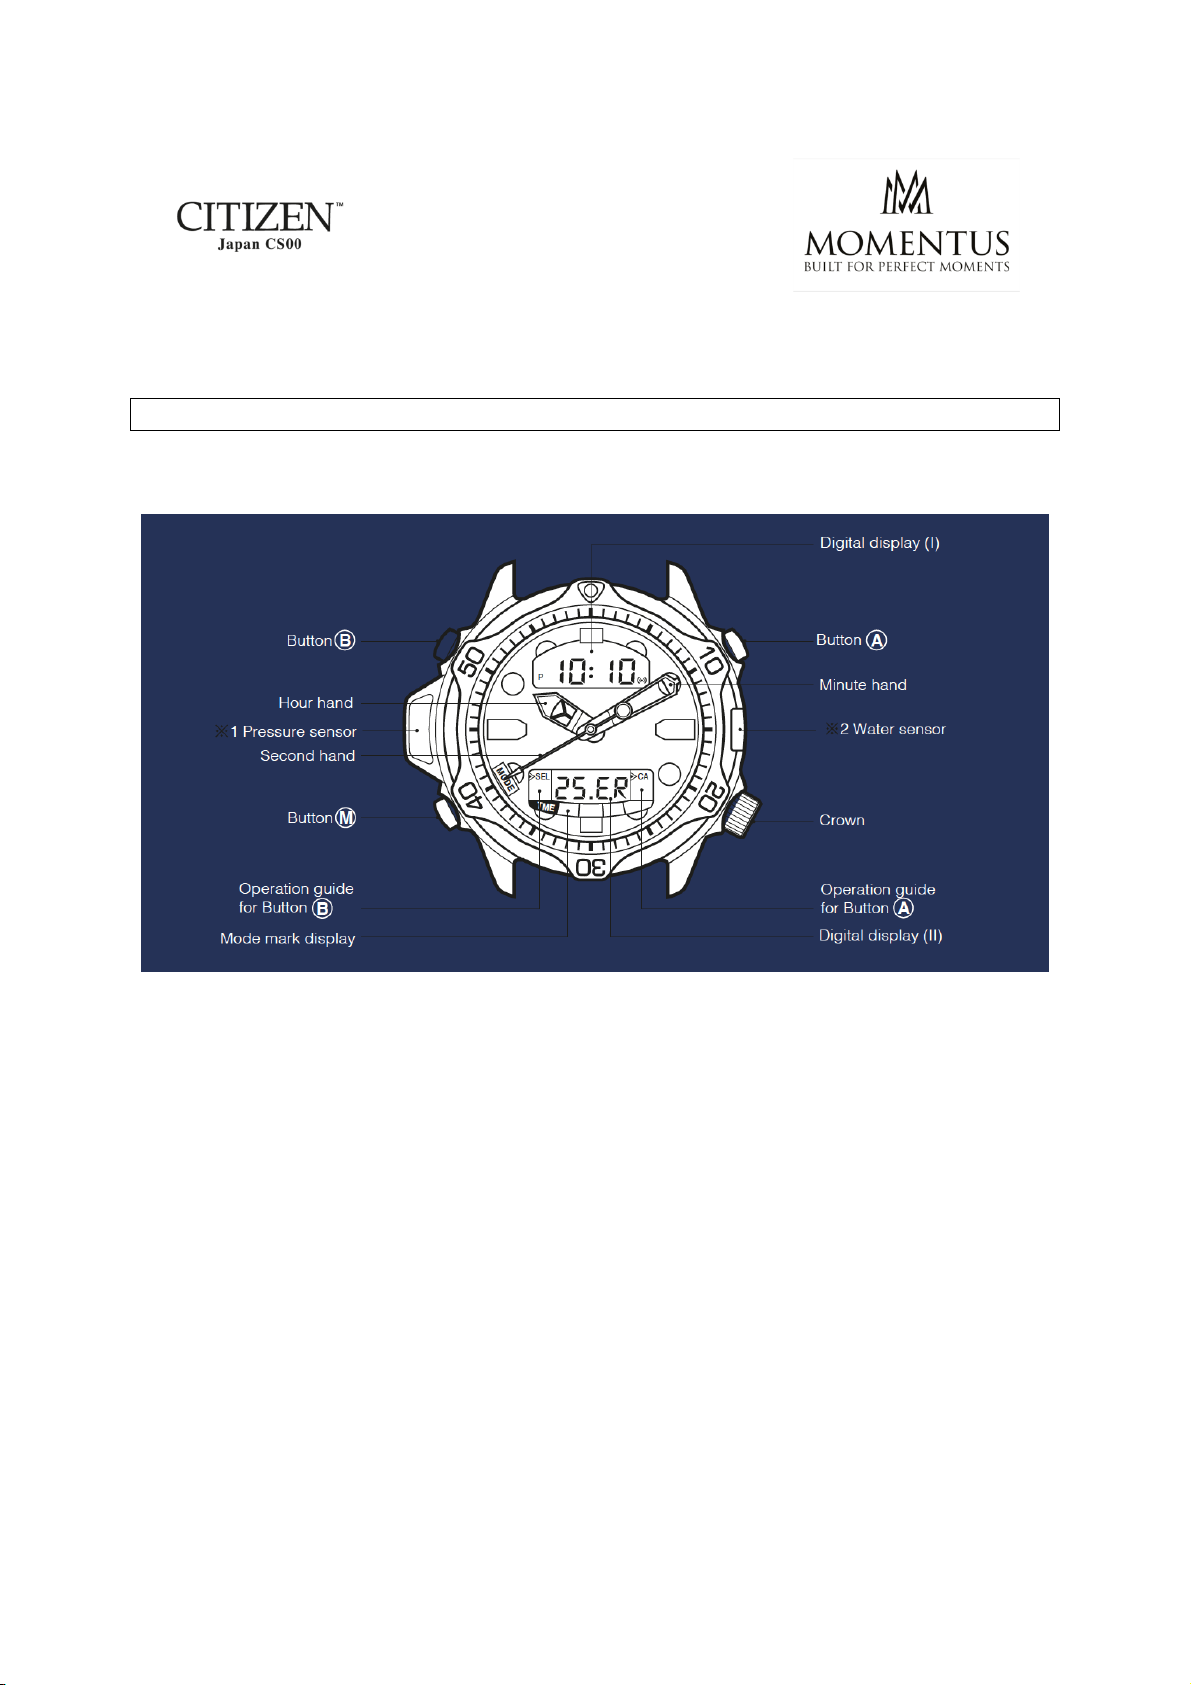
Momentus Japon Citizen CS00 User manual


KULLANIM KILAVUZU - Japon Citizen CS00
Momentus AT500 Modellerinde Geçerlidir.
A) EKRAN GÖRÜNTÜSÜ
B) SAATİN AYARLANMASI
Dijital II’nin ayarlanması:
1) (A) dğmesine basarak ay, gn veya saniyeyi seçin.
2) (A) dğmesine 2 veya daha fazla saniye basılı tutarsanız sıcaklık/ısı derecesi görlecektir.
* Sıcaklık/ısı derecesi her 10 saniyede bir alınır ve 3 dakika görlr.
* Tepenin kullanımı esnasında:
1) Saatinizi ayarladıktan sonra tepeyi iterek kilitlemeyi unutmayın.
2) Tepe açıkken hiçbir dğmeye basmayın.
3) Saat ıslakken tepeyi açmayın veya çevirmeyin. Aksi taktirde su içeri sızabilir ve arızalara
sebep olabilir.
Not: Her zaman dijital ayarları önce, analog ayarları sonra yapınız.

Dijital kısmın ayarlanması:
1) Saat modundayken (B) dğmesine 2 saniye veya daha fazla basılı tutarsanız, saniye yanıp
sönecektir.
2) Saniye yanıp sönerken (A) dğmesine basarsanız saniyeyi sıfırlayabilirsiniz.
3) Saniye yanıp sönerken (B) dğmesine basarak ayarlanacak birimler seçilir. Bunlar sırasıyla
saniye, dakika, saat, ay, gn, sene, 12/24 saat sistemidir.
4) Yanıp sönen her birimi (A) dğmesine basarak ayarlayabilirsiniz.
* (A) dğmesini devamlı basılı tutarsanız rakamlar hızlı hareket edecektir.
* 12/24 saat ayarını yapmayı unutmayın.
* Eğer saat ayarlama yapılırken 3 dakika veya daha fazla hiçbir değişiklik yapılmadan
bırakılırsa, otomatik olarak kendiliğinden zaman moduna geçer.
* Saat ayarlama durumundayken (M) dğmesine basılırsa normal gösterge durumuna geçer.
* Otomatik takvim olduğundan ay sonunda herhangi bir tarih ayarlanmasına ihtiyaç yoktur.
Analog saatin ayarlanması:
1) Tepeyi çevirerek kilitli durumdan çıkarın ve saniye 0’ın stne geldiğinde çekin.
2) Tepeyi çevirerek istenilen saati ayarlayın.
3) Dijital kısımda saniye 0’a gelince tepeyi iterek kilitleyin. Böylece dijital ve analog saat
aynı zamanı gösterecektir.
C) ALARM FONKSİYONU
* Alarm göstergesi ‘ON’ olunca alarm gnde bir defa 15 saniye çalar.
Not: Alarm, dalma modundayken devre dışıdır.
1) Alarm modundayken (B) dğmesine iki saniye veya daha fazla basılı tutun. Saat dilimi
yanıp sönecek ve alarm otomatik olarak ‘ON’ gösterecektir.
2) Saat dilimi yanıp sönerken (A) dğmesine basarak alarm saatini kurun.
3) (B) dğmesine basarak yanıp sönen saati, dakikaya getirin.
4) Tekrar (A) dğmesine basarak dakikayı ayarlayın.
* (A) dğmesini basılı tutarsanız saat ve dakika hızlı ilerliyecektir.
5) (B) veya (M) dğmesine basarak kurma işlemini bitirin.
* Alarm 12/24 saat/takvim ayarına göre çalacaktır.
D) KRONOMETRE FONKSİYONU
1) Kronometre 24 saatte 1/100 saniye aralıkla ölçm yapar.
2) Kronometre otomatik olarak 00’a gelip, durur.
Standart ölçmler:
* 10 saniye sonra otomatik olarak geçer.
* Dğmesine bir kez daha basıldığında ölçlmş diğer zamanlar görlr.
Not: Kronometre çalışırken başka bir moda geçilemez. Mod seçimi yapabilmek için
kronometreyi durdurmanız veya sıfırlamanız gerekir.
Ek özellikler:
* Kronometre sıfırlanmış durumda 3 dakikadan fazla kalırsa saat otomatik olarak saat/tarih
moduna geçer.
* Farklı zamanların ölçmlerinde, başlangıçtan sonra geçen sre her zaman ayırma
operasyonunda gösterilir.

E) SEYİR DEFTERİ FONKSİYONU
1) (M) dğmesine basarak kronometre modundan seyir defteri moduna geçin.
2) Bu fonksiyon son 4 dalışın bilgilerini hafızasında tutmaya yarar.
* Hafızadaki bilgileri (son 4 dalış) görmek için (B) dğmesine basın. (B) dğmesine her
basışta dalışlar yeniden eskiye doğru sırasıyla ekranda görlr.
* Eğer saati seyir defteri modunda 3 veya daha fazla dakika bırakırsanız, otomatik olarak saat/
tarih moduna dönecektir.
* Dalış yaptığınız zaman en eski dalış bilgileri otomatik olarak kendiliğinden silinecektir.
Ölçm değerlerininin görntlenmesi:
Her dalışta 8 ayrı ölçm çeşidi saatin hafızasına işlenir. Bunlar (I), (II), (III), (IV) sırasıyla
hafızadan çağrılıp görlebilir.
* Saat kronometre modundan seyir defteri moduna (M) dğmesine basılarak geçildiğinde (I)
numaralı ölçm çeşidine gelir ve aşağıdaki sıra takip edilir.
* (A) dğmesine her basışta ölçm değerleri sırasıyla değişecektir (I), (II), (III), (IV) gibi.
* Herhangi bir sebepten dolayı sensörn zerine su gelirse saat otomatik olarak dalış moduna
geçecektir. Bu durumda ölçm değeri (I), ölçm değeri (II)’ye otomatik olarak geçmeyebilir.
(A) dğmesine basarsanız diğer ölçm değerlerine çevirebilirsiniz.
* Sadece ölçm değeri (I)’deyken 2 saniye sonra, otomatik olarak (A) dğmesine basmadan
ölçm değeri (II) ye geçer.
1) Dalış adedi: Aynı gn içerisinde gerçekleşen dalış sayısıdır. En çok 9 dalışa kadar sayılır
ve gnlktr.
2) Dalış ayı ve tarihi: Dalışın yapıldığı gn ve aydır.
3) Maksimum derinlik: Bir dalış sırasında inilen maksimum derinliktir.
4) Dalış sresi: Dalgıcın 1m’den daha derinde kaldığı zamanın toplamıdır. Eğer 1m stne
çıkıp 10 dakika içerisinde 1m altına tekrar dalarsanız ölçmn durduğu yerden sre
eklenmeye devam eder. Zaman ölçmnn en ufak dilimi saniye ve azami 100 dakikadır.
Maksimum zamana geldiğinde ölçm 0’dan başlar.
5) Dalışa başlanan zaman: 1m’nin altına dalındığı zamandır.
6) Dalışın bitiş zamanı: 1m’nin stne çıkıldığı zamandır.
7) Ortalama derinlik: Bir dalıştaki derinliklerin toplamının ortalamasıdır.
8) En dşk sıcaklık: Bir dalışta ölçlen en dşk sıcaklıktır.
* Bu ölçmler (I), (II), (III) (IV) sırası ile birbirinden ayrı olarak gösterilir.
Hafızadaki tm bilgileri silmek için: (A) ve (B) dğmeleriine aynı anda 2 saniye ve daha fazla
basarsanız hafızadaki bilgiler silinecektir.
Derinlik göstergesi yanıp sönerse: Seyir defterinde bir hata var demektir.
Ekranda ER (hata) gözkrse: Seyir defterinde bir hata var demektir.
F) DALIŞ ALARMI FONKSİYONU
Not: Alarmın dutulması sudaki grltye ve saatin takıldığı yere bağlı olarak gçleşebilir. Bu
konuya dikkat edilmelidir.
1) Derinlik Alarmı: Ayarladığınız derinliğe inildiğinde alarm 15 saniye çalar. Derinlik
alarmının ayar sınırları 1m ile 80m arasıdır. Ayarladığınız derinlikten daha derinlere dalmaya
devam ettiğiniz taktirde her dakika alarm çalarak sizi uyaracaktır. Alarmın aktif hale geçiş
sayısı 0 ile 5 veya her dakika şeklinde seçilebilir. Alarmın çalma sayısı sabittir.
2) Dalış Zaman: İstenilen dalış sresine ulaşıldığında alarm 15 saniye çalar. Bu alarm tek bir
kere çalma özelliğine sahiptir tekrarlanamaz. Eğer çıkış hızı 10 saniyede 1.5m (5 ft) zerine
çıkarsa alarm 10 saniye çalmaya başlayacaktır.

Derinlik ve dalış zamanı alarmlarının ayarlanması:
1) (B) dğmesine yaklaşık 2 saniye veya daha fazla basarak dalış alarmı ayarlama
fonksiyonuna geçiniz. Daha önceden verilmiş değer yanıp sönmeye başlayacaktır. Bu sırada
dijital gösterge (II) dalış zamanı alarmı fonksiyonundan çıkarak alarmın kaç defa aktif hale
geçeceğini göstermeye başlayacaktır.
2) İstediğiniz dalış derinliğini (A) dğmesiyle ayarlayınız. Bu dğmeye her basışta derinlik
ayarı 1m’lik artışlarla maksimum 80m’ye kadar yapılabilir. Maksimum derinlikten sonra
tekrar gösterge 1m’ye döner.
* (A) dğmesine devamlı basarsanız rakamlar hızlı hareket edecektir.
3) (B) dğmesine basılarak dijital gösterge (II) geçilir. Alarmın çalış sayısı yanıp sönmeye
başlar.
1) (A) dğmesine basarak alarmın kaç kez çalacağını ayarlayınız. Ayardaki değişim sırası
ON, OFF,1,2,3,4,5.
ON: Derinlik alarmı, ayarlanan derinliğin altına inildiğinde her dakika çalar.
OFF: Derinlik alarmı devre dışı demektir.
5) (B) dğmesine basarak dijital gösterge (II)’ yi dalış zamanı alarmı moduna geçiriniz. Bu
durumda dalış zamanı yanıp sönmeye başlayacaktır.
6. (A) dğmesine basarak dalış zamanı alarmını ayarlayabilirsiniz. Göstergenin değişim sırası:
05, 10, 15, ..... , 95, .... şeklindedir.
- Göstergede ‘----’ nin görlmesi dalış zamanı alarmının devre dışı olduğunu gösterir.
7. (B) veya (M) dğmesine basarak ayarlama işlemini bitirebilirsiniz.
Dalış alarmının test edilmesi:
(A) dğmesine basılı tutarak 4 sn’lik aralıklarla sırasıyla derinlik alarmı, dalış zamanı alarmı,
hızlı çıkış alarmı çaldırılabilir.
G) DALIŞ FONKSİYONU
Saat herhangi bir modda iken (M) dğmesine yaklaşık 2 saniye veya daha fazla basılırsa
göstergelerin hazır olduğu (ready display) dalış moduna geçer. Dalışa geçilmediği taktirde
saat 60 dakika sresince bu durumda kalabilir. Srenin sonunda ise saat daha önce bulunduğu
moda geri döner. Dalış modunda, göstergeler aşağıdaki ç durumdan birinde olabilir.
1) Dalışa başladıktan sonra 1m (4 ft) derinliğe gelindiğinde göstergeler otomatik olarak
derinlik ölçmleri moduna geçer.
2) 1m’den yukarıya çıkıldığında göstergeler derinlik ölçmlerinden sonra 0 m ölçmne
geçer.
3) Eğer yaklaşık 2saniye sreyle (M) dğmesine basılırsa dalıştan sonra 0 m ölçmleri
modundan saat/takvim moduna geçer.
* Dalıştan sonra 0m ölçmleri modunda 10 dakika veya daha fazla kalınırsa saat otomatik
olarak saat/takvim moduna geçer. Dalgıç bu 10 dakika içerisinde tekrar dalarsa dalış zamanı
kaldığı yerden devam eder.

Su sensörözelliği:
Bu saate su sensörbulunmaktadır. Su, sensöre temas ettiğinde saat otomatik olarak dalış
moduna geçer ve ölçme hazır olur. Kronometre ölçmleri sırasına mod değişimi mmkn
değildir. Su ile temas kesildiğinde saat ölçme hazır halden çıkar.
1) Derinlik ölçmleri: Derinlik her saniyede ölçlr ve ekranda gözkr. Derinlik ölçmleri
0.1m (1 ft) arayla olur ve sınırları da 1m ile 80m arasındadır. (4 ft –260 ft). Derinlik 1m’den
az ise 00.0m okunur. Eğer 80m’yi geçerse ekranda --, -m gözkr. ER (hata) yazısı yanıp
sönerse derinlik ölçmlerinde bir hata olduğu anlaşılır.
2) Dalış zamanının ölçm: Dalış derinliği 1m (4 ft)’ye ulaştığında dalış zamanı ölçm
başlar ve 1m zerine çıkıldığında durur. Eğer 10 dakika içinde 1m derinliğe tekrar inilirse
dalış zamanı ölçmleri kaldığı yerden devam eder.
3) Su sıcaklığının ölçm: Su sıcaklığı ölçm1m (4 ft) altına inildikten 1 dakika sonra
başlar ve ölçmher dakika yenilenir. Ölçm 0.1 santigrat derece aralıkla ilerler ve sınırları
da –5 ile +40 santigrat derecedir. Ölçm yapılmadan evvel ve sıcaklık bu sınırlar dışındaysa
ekranda --,- santigrat gözkr.
* (A) dğmesine dalış zamanı gösterilirken basılı tutulursa göstergede dalış zamanı yerine su
sıcaklığı okunur.

USER GUIDE - Japon Citizen CS00
Applies to AT500 Momentus Models.
A) DISPLAYS AND BUTTONS
B) SETTING THE TIME
Switching in the digital display (II)
1. Press button A and select month/date or seconds.
2. Press button A two seconds or more, temperature measurement will be displayed.
Temperature measurements are taken and displayed every 10 seconds for 3 minutes.
* The temperature measurement range is from –5°C to +40°C (23°F to 104°F). If the watch is
worn on the wrist during temperature measurment, the body temperature affects the
measurement. For accurate temperature measurement, take the watch off and leave it in the
measuring environment for a while.
When manipulating the crown...
About the screw lock
1. Always return the crown to its original position and lock it when finished setting the watch.
2. Do not press any of buttons while the crown is pulled out.
3. Do not pull out or turn the crown when it is wet.
Doing so may allow water to seep inside the watch and cause a malfunction.
Setting the time and calendar
1) Always perform the Digital setting first, then the Analog setting.
2) Digital setting

Setting the time
1) While in the time mode, press button B for two seconds or more, second will flash, and
switch to correcting state.
2) While second flashes, press button A to reset the second to “00” then second starts again.
3) When in the seconds correcting state (second flashes), press button B, the flashing digits
will change in the order of second minute hour month date year 12/24 hour system. Select the
digit to correct.
4) Correct the flashing digit by pressing button A. (Press and hold down button A to quick
advance the flashing digit.)
* Press button A, the 12 hour/24 hour will switch alternately.
* If the watch is left in any correcting state for 3 minutes or more without changing the digits,
the correcting mode is reset and the watch will automatically return to normal time display
mode.
* Pressing button M while in the time correcting state, the watch will return to normal display
mode. (Manual return)
* Due to the autocalendar, no correction at the end of the month is required.
Analog setting
1) Unscrew the crown and pull it out to stop the second hand at “0” position.
2) Turn the crown and position the hour and minute hands 1 minute in advance of the digital
time.
3) Press the crown into place when the seconds display of digital time has just come to 0 to
start the second hand.
C) ALARM FUNCTION
1) When the alarm indicator is ON, the alarm will sound for 15 seconds at the alarm set time,
once a day.
Note:
The alarm is disabled during the diving mode, so take care. Setting the alarm
1) While in the alarm mode, press button B for two seconds or more, hour will flash and
alarm will indicate ON automatically.
2) While hour flashes, press button A to set the hours.
3) Press button B, the flashing digit will change in this order: hour minutes.
4) Press button A to set the minute.
* Press and hold down button A to quick advance the flashing digit.
5) Press button B or M to finalize setting.
Alarm 12 hours/24 hours is set in synchronized with the time/calendar mode.
D) USING THE CHRONOGRAPH
1) The chronograph can measure up to 24 hours in 1/100 seconds.
2) The chronograph display automatically returns to 00 and stops.
* Automatically switched after 10 seconds.
* When the button B is pressed again during the display of a split time, the next split time is
displayed.
Note:
1) Changeover to another mode is disabled during the chronograph measurement.
To change the mode to another mode, make the chronograph measurement stop or reset.

Additional feature
1) If the chronograph reset state remains for 3 minutes or more, the watch is automatically
switched to the time/calendar mode.
Split time: The time elapsed from the start is displayed whenever the split operation is
performed.
E) LOG FUNCTION
By pressing button M, change the mode from chronograph to log mode.
The dive log data can be retained in the watch, counting the last 4 dives.
1) To recall the log data for the last 4 dives, press button B. Each time button B is pressed, the
log data is displayed in the order going back from the latest one.
2) If the watch is left in the log mode with any data being displayed for 3 minutes or more, it
is automatically switched to the time/calendar mode (auto-return).
* When you begin a dive, the oldest log data (Forth last log data) is erased automatically.
It is recommended to record the data on a log book, etc.
Changing the Log Display
Every dive makes the watch memorize the following 8 types of log data automatically, which
can be recalled in the order of (I), (II), (III) and (IV) as shown below.
1) When the watch is switched from the chronograph mode to the log mode by pressing
button M, log (I) is displayed.
2) Each time button A is pressed, the log display is changed to the next in the order of(I), (II),
(III) and (IV).
3) Only when log (I) is displayed, the display is automatically changed to log (II) after 2
second without pressing button A. On rare occasions, even if the water sensor senses traces of
water and the watch is switched to the dive mode (dive ready state), however, log (I) display
may fail to chage to log (II) display automatically. In case this happens, press button A to
change the display.
1) Number of dives: The number of dives performed in a particular day. A maximum of 9
dives can be counted. Counting is initiated day by day.
2) Dive month and date: Date and month when diving is performed.
3) Maximum depth: The maximum depth that was reached in one diving.
4) Dive time: total time when the diver remains deeper than the depth of one meter
(4ft). If the diver goes again into the water deeper than 1m (4ft) within 10 minutes after the
diving depth becomes shallower than 1m (4ft), the dive time counting resumes at the time
when the measurement is stopped and the accumulative time is recorded successively.
Measurement is taken in units of seconds and up to 100 minutes at maximum.
When the maximum is reached, the measurement starts again with zero.
5) Dive start time: The time when a dive depth reaches 1m (4ft).
6) Dive end time: The time when the dive depth becomes shallower than 1m (4ft).
7) Average depth: Average depth in one dive.
8) Minimum temperature: The minimum temperature recorded in one dive.
These data are displayed as log (I), (II), (III) and (IV) separately.
To delete all log data;
Depress button A and button B together for seconds or more and all log data will be deleted.
In case the depth indication flashes; This signifies that the log data is faulty.
In case ER (error) is shown; This signifies that the log data is faulty.
Note:
The alarms may be hard to hear depending on the surroundings (such as the sound of air
bubbles) and the watch wearing conditions, so take care in using the alarm.
The following two alarm functions are provided as dive alarms used in this watch.

F. DEPTH ALARM FUNCTION:
When the set depth is reached during a dive, the alarm will beep for 15 seconds.
The depth alarm setting range is 1m to 80m/4ft to 260ft (units of 1m/4ft). If you continue to
dive deeper than the set depth alarm, every minutes the alarm can be activated repeatedly.
The number of times the alarm will be activated can be chosen from 0 to 5 or every minutes.
* The number of times the alarm will sound during one dive is preset on the watch.
For example, if you set the number of times at “1”, the alarm sounds only once during one
dive.
Dive time alarm function:
When the set time comes after starting a dive, the alarm will beep for 15 seconds.
This alarm will not be repeated.
* If the ascending speed is over 1.5m (5ft) for 10 seconds during a dive, the ascending speed
alarm will beep for the duration of at least 10 seconds to alert the diver of overspeed.
Setting the depth alarm/ dive time alarm
1) Press button B for 2 seconds or more to switch to the DIVE ALARM correcting mode (the
preset depth value starts flashing). At this time, the digital display (II) changes from the dive
time alarm display to the display for the number of times the alarm will be activated.
2) Set a diving depth at which you want the alarm to sound by pressing button A. Each time
button A is pressed, the depth setting becomes deeper by 1m (4ft). A maximum setting is 80m
(260ft). With the maximum exceeded, the setting is returned to 1m (4ft).
* Rapid advance of settings is made by pressing and holding down the button A.
3) Press button B to switch to the number of times of alarm occurrences correcting mode (the
preset number of times starts flashing).
4) Change and set the alarm frequency is changed and cycled in the following order: ON OFF
1 2 3 4 5.
ON: The depth alarm will beep every minute when the diving depth is deeper than the set
depth.
OFF: Depth alarm is disabled.
5) Press button B to switch the dive time alarm display to the correcting mode (the preset
value for the dive time alarm starts flashing).
6) Change and set the dive time alarm time by pressing button A. The display for dive time
alarm is changed and cycled in the following order: ––05 10
15 ...... 95 ––.
* With the display of “– –”, the dive time alarm is disabled.
7) Press button B or M to finish the setting procedure.
Dive alarm monitor
By keeping button A depressed, repetitive alarm monitoring at 4 seconds intervals Can be
performed in the following oder: depth alarm dive time alarm rapid ascent warning alarm.

G) DIVING FUNCTION
When in any other mode, the watch will enter the diving mode with the display
Changing to [Ready display] by pressing button M for 2 seconds or more. If [Ready display]
put in this way is allowed to stand for about 60 minutes, the display automatically returns to
the preceding mode.
Water sensing function
This watch is provided with a water sensor. Whenever this sensor senses traces of water in
any other mode display, the watch automatically enters the diving mode with [Ready display].
* During the chronograph measurement, however, the mode change is disabled.
When the moisture is removed, the watch is released from the [Ready display] state.
1) When a depth of 1m (4ft) is reached after you begin diving with the watch displaying
[Ready display], the display will automatically change to [Depth
Measurement Readings].
2) When the diving depth becomes less than 1m (4ft), the display will automatically change to
[0m (0ft) Reading after Depth Measurement].
3) If button M is pressed for 2 seconds or longer with the display of [0m (0ft)
Reading after Depth Measurement], then the watch returns to the time/calendar mode.
* If the display of [0m (0ft) Reading after Depth Measurement] is allowed to stand for
10 minutes or longer, the watch automatically enters the time/ calendar mode.
If the diver dives again deeper than 1m (4ft) within 10 minutes, the dive time counting
resumes.
This manual suits for next models
1
Table of contents
Languages:
Other Momentus Watch manuals

Momentus
Momentus Heritage 34 See-Through CW280 Installation instructions manual

Momentus
Momentus Heritage 42 Date Installation guide

Momentus
Momentus Heritage 46 Big Date Chronograph Installation instructions manual

Momentus
Momentus Heritage 46 Small Second Installation guide

Momentus
Momentus Heritage 34 Date Installation guide

Momentus
Momentus Heritage 30 Date Installation guide