manuals.online logo
Brands
  1. Home
  2. •
  3. Brands
  4. •
  5. Monacor
  6. •
  7. Car Stereo System
  8. •
  9. Monacor CARPOWER CAP-10HQ User manual

Monacor CARPOWER CAP-10HQ User manual

Power Capacitor
1Applications
The power capacitor is used in motor vehicles for stabilizing
the 12V supply voltage for audio power amplifiers and equali-
zes the load of the car voltage in case of especially powerful,
low bass frequencies. This results in a higher power of the
amplifier and in a considerable sound improvement.
2Safety Notes
The capacitor corresponds to the directive for motor ve-
hicles and was tested under the number e13 021286.
●The connection of the capacitor to the 12V mains must be
made by qualified, skilled personnel only. Special care
must be taken when connecting the capacitor. In case of
short circuits there may be dangerously high currents.
●The capacitor must be mounted to a mechanically stable
place in the car. It must be skilfully fixed so that it does not
get loose and turn into a dangerous projectile.
●Protect the capacitor against humidity and heat (admissi-
ble ambient temperature range
-
20°C to +60°C).
●For cleaning only use a dry, soft cloth, by no means chem-
icals or water.
●No guaranteee claims for the unit and no liability for any
resulting personal or material damage will be accepted if
the capacitor is used for purposes other than originally
intended, if it is not correctly connected or not repaired in
an expert way.
3Mounting and Connection
The cables between the capacitor and the power amplifier
should be as short as possible and show a large cross
section*. Lay the cables so that their insulation will not be
damaged.
1) Tightly screw the capacitor with the supplied brackets as
close as possible to the power amplifier at a mechanical-
ly stable place.
2) The connection is shown in fig. 2. Connect the negative
terminal of the capacitor via a cable to the ground of the
12V mains. To prevent a ground loop, choose the same
place where also the power amplifier is grounded.
3) Connect a cable with a sufficient cross section* to the
positive pole of the car battery.
After the charging which takes some seconds, connect
the positive cable of the battery directly to the positive
terminal of the capacitor. Lay another cable from the
positive terminal of the capacitor to the supply voltage
connection of the power amplifier.
4Indicating Elements
1The LEDs show blue if the capacitor is charged or
discharged.
2The digital voltmeter shows the applied voltage as from
approx. 8V. To prevent gradual discharge of the battery
by the illumination of the display, the CAP-10HQ is
equipped with an automatic switching-off control. The
capacitor is switched off if there has not been any fluc-
tuation of the car voltage for some minutes and is imme-
diately switched on again as soon as a voltage fluctua-
tion occurs.
3The buzzer sounds in case of undervoltage or if the posi-
tive and negative terminals at the capacitor have been
mixed up. ➪Connect the capacitor correctly.
Warning! Never connect the terminals in the opposite
way out of curiosity. The resulting short circuit current will
be dangerously high!
5Specifications
Capacitance: . . . . . . . . . . . 1.0F
Electric strength: . . . . . . . . 20V
Dimensions: . . . . . . . . . . . . Ø 75mm x 265mm
Weight: . . . . . . . . . . . . . . . 1400g
Subject to technical modifications.
*see mounting instructions for the power amplifier
Important!
Always insert a fuse* close to the battery as a protec-
tion against short circuits (see fig. 2).
For the first charging, connect in any case the positive
cable of the battery and the positive pole of the capaci-
tor via the supplied incandescent lamp to prevent
damage due to excessive current peaks.
If the capacitor is to be put out of operation de-
finitively, it must be taken to a local recycling
plant for a disposal which is not harmful to the
environment.
Power-Kondensator
1Verwendungsmöglichkeiten
Der Power-Kondensator wird in Kraftfahrzeugen zur Stabili-
sierung der 12-V-Versorgungsspannung für Audioleistungs-
verstärker (Endstufen) eingesetzt und gleicht die Belastung
der Bordspannung bei besonders kräftigen, tiefen Bässen
aus. Dadurch ergibt sich eine höhere Verstärkerleistung und
eine deutliche Klangverbesserung.
2Sicherheitshinweise
Der Kondensator entspricht der Kfz-Richtlinie und ist unter
der Nummer e13 021286 geprüft worden.
●Der Anschluss des Kondensators an das 12-V-Netz darf
nur durch qualifiziertes Fachpersonal erfolgen. Dabei ist
besondere Sorgfalt geboten. Bei Kurzschlüssen können
gefährlich hohe Ströme fließen.
●Der Kondensator muss fest und fachgerecht an einer
mechanisch stabilen Stelle montiert werden, damit er sich
nicht löst und zu einem gefährlichen Geschoss wird.
●Schützen Sie den Kondensator vor Feuchtigkeit und Hitze
(zulässiger Einsatztemperaturbereich
-
20°C bis +60°C).
●
Für die Reinigung nur ein weiches, trockenes Tuch ver-
wenden, auf keinen Fall Chemikalien oder Wasser.
●Wird der Kondensator zweckentfremdet, nicht richtig an-
geschlossen oder nicht fachgerecht repariert, kann keine
Garantie für den Kondensator und keine Haftung für dar-
aus resultierende Sach- oder Personenschäden über-
nommen werden.
3Montage und Anschluss
Die Kabel zwischen dem Kondensator und der Endstufe
sollten möglichst kurz sein und einen großen Querschnitt*
aufweisen. Die Kabel so verlegen, dass deren Isolierung
nicht beschädigt werden kann.
1) Den Kondensator möglichst nahe der Endstufe mit den
beiliegenden Haltern an einer mechanisch stabilen Stel-
le fest anschrauben.
2) DerAnschluss ist inAbb. 2 dargestellt. Die Minusklemme
des Kondensators über ein Kabel mit der Masse des
12-V-Netzes verbinden. Zur Vermeidung einer Masse-
schleife die gleiche Stelle wählen, an der auch die End-
stufe an Masse liegt.
3) An den Pluspol der Batterie ein Kabel mit ausreichend
großem Querschnitt* anschließen.
Nach dem Aufladevorgang von einigen Sekunden das
Pluskabel der Batterie direkt an die Plusklemme des
Kondensators anschließen. Von der Plusklemme des
Kondensators ein weiteres Kabel zum Versorgungs-
spannungsanschluss der Endstufe führen.
4Anzeigeelemente
1LEDs leuchten blau, wenn der Kondensator geladen
oder entladen wird.
2Digital-Voltmeter zeigt die anliegende Spannung ab ca.
8Van. Damit durch das Leuchten des Displays die Bat-
terie nicht langsam entladen wird, ist der CAP-10HQ mit
einer Ausschaltautomatik ausgestattet. Der Kondensa-
tor schaltet sich ab, wenn die Bordspannung einige
Minuten nicht mehr schwankt und schaltet sofort wieder
ein, sobald eine Spannungsschwankung auftritt.
3Summer ertönt bei Unterspannung oder, wenn die Plus-
und Minusklemmen am Kondensator vertauscht wurden.
➪Kondensator richtig anschließen.
Warnung! Auf keinen Fall interessehalber die Klemmen
vertauscht anschließen. Es fließt dabei ein gefährlich
hoher Kurzschlussstrom!
5Technische Daten
Kapazität: . . . . . . . . . . . . . 1,0F
Spannungsfestigkeit: . . . . . 20V
Abmessungen: . . . . . . . . . Ø 75mm x 265mm
Gewicht: . . . . . . . . . . . . . . 1400g
Änderungen vorbehalten.
* siehe Montageanleitung für die Endstufe
Wichtig!
Zum Schutz gegen Kurzschlüsse unbedingt eine Siche-
rung* in Nähe der Batterie zwischenschalten (siehe
Abb. 2).
Beim ersten Aufladen das Pluskabel der Batterie und
den Pluspol des Kondensators unbedingt über die bei-
liegende Glühlampe verbinden, um Beschädigung
durch zu hohe Stromspitzen zu vermeiden.
Soll der Kondensator endgültig aus dem Betrieb
genommen werden, übergeben Sie ihn zur
umweltgerechten Entsorgung einem örtlichen
Recyclingbetrieb.
–+
2
1
➀
POWER
GROUND BATTERY REMOTE
SPEAKER OUTPUT
R
F
Masse
ground
Sicherung
fuse
Batterie
battery
Masse
ground
Endstufe
power amplifier
max.
20 cm
!
CAP-10HQ
➁
3
4
HIGH QUALITY
POWER CAPACITOR CAP-10HQ
Best.-Nr. 14.2090
Copyright©by MONACOR INTERNATIONAL GmbH & Co. KG, Bremen, Germany. All rights reserved. www.carpower.com A-0002.99.03.08.2005
®
D A CH
GB
Condensatore di potenza
1Possibilità d’impiego
Il condensatore di potenza viene utilizzato in autoveicoli per
stabilizzare la tensione d’alimentazione di 12V per amplifi-
catori audio di potenza (stadi finali), e nello stesso tempo
compensa il carico sulla tensione di bordo durante i bassi
particolarmente forti e profondi. Ne risulta una maggiore
potenza del finale e un chiaro miglioramento del suono. Il
condensatore è corredato di un circuito di protezione contro
l’inversione di polarità.
2Avvertenze di sicurezza
Il condensatore è conforme alla direttiva per autovetture ed
è stato sottoposto a prove con il numero e13 021286.
●Il collegamento del condensatore con la rete 12V deve
essere eseguito solo da personale qualificato e con parti-
colare cura. Nel caso di cortocircuiti, si possono avere
delle correnti pericolosamente alte.
●Il condensatore deve essere montato bene ed a regola
d’arte in un posto meccanicamente stabile per escludere
che si possa staccare diventando un proiettile pericoloso.
●Proteggere il condensatore dall’umidità e dal calore (tem-
peratura d’impiego ammessa fra
-
20° e +60°C).
●Per la pulizia usare solo un panno morbido, asciutto; non
impiegare in nessun caso prodotti chimici o acqua.
●Nel caso d’uso improprio, di collegamenti sbagliati o di
riparazione scorretta non si assume nessuna responsabi-
lità per eventuali danni consequenziali a persone o a cose
e non si assume nessuna garanzia per il condensatore.
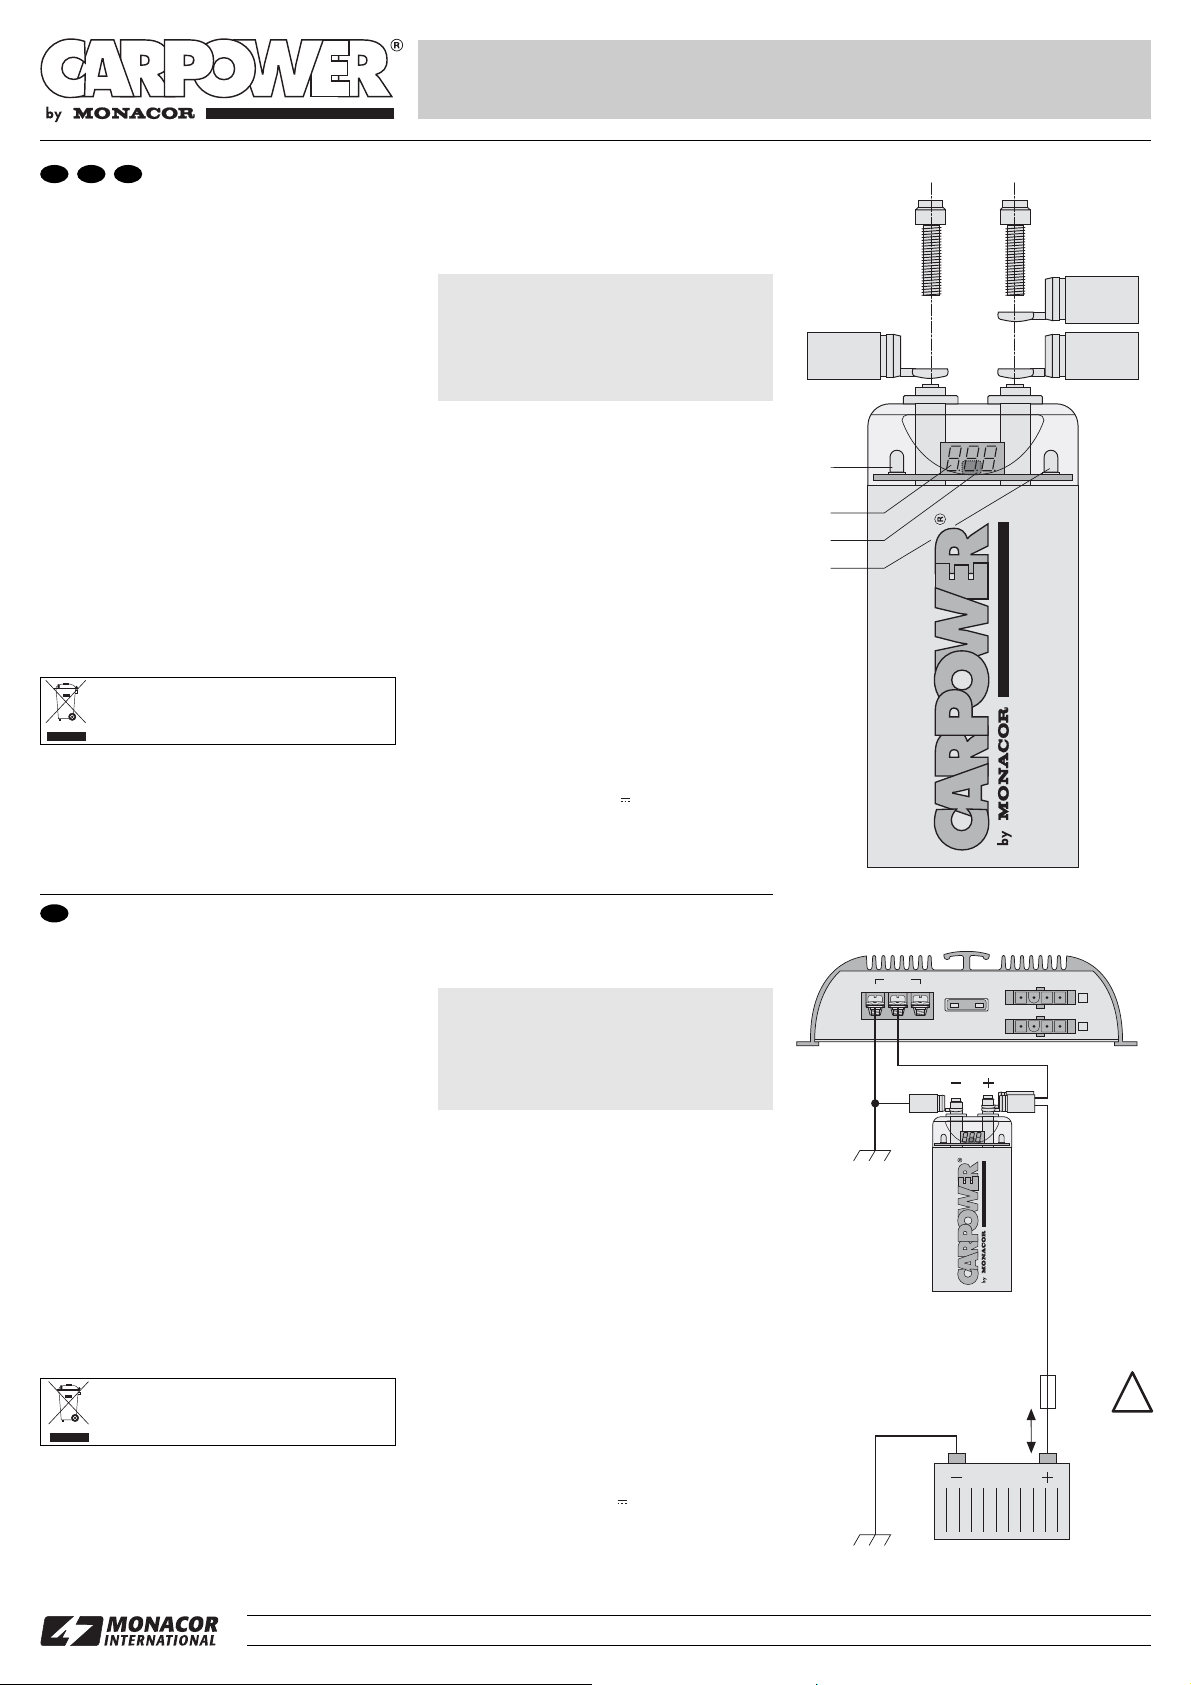
3Montaggio e collegamento
I cavi fra il condensatore e lo stadio finale dovrebbero esse-
re i più corti possibili e di grande sezione*. Sistemare i cavi
in modo tale da non danneggiare l’isolamento.
1) Avvitare il condensatore il più vicino possibile allo stadio
finale e in un punto meccanicamente stabile, servendosi
dei supporti in dotazione.
2) La figura 2 illustra il collegamento. Collegare il morsetto
negativo del condensatore per mezzo di un cavo con la
massa della rete 12V. Per evitare anelli di terra sceglie-
re lo stesso punto in cui anche lo stadio finale è collega-
to con la massa.
3) Collegare al positivo della batteria un cavo di sezione
sufficientemente grande*.
Dopo la carica di pochi secondi, collegare il cavo positivo
della batteria direttamente con il positivo del condensa-
tore. Dal positivo del condensatore portare un altro cavo
al contatto della tensione d’alimentazione del finale.
4Elementi di visualizzazione
1I LED si accendono di colore blu mentre il condensatore
viene caricato o scaricato.
2Il voltmetro digitale indica la tensione presente a partire da
8Vca. Per evitare che per via dell’accensione del display
la batterie si scarichi lentamente, il CAP-10HQ è equipag-
giato con un dispositivo di spegnimento automatico. Il
condensatore si stacca se la tensione a bordo non oscilla
più per alcuni minuti, e si inserisce subito di nuovo non
appena si manifesta un’oscillazione della tensione.
3Il buzzer emette un suono in caso di sottotensione oppure
se i morsetti positivo e negativo al condensatore sono stati
scambiati. ➪Collegare il condensatore correttamente.
Avvertimento! In nessun caso, neanche per curiosità,
montare i morsetti invertiti. Si presenta in questo caso
una corrente di cortocircuito pericolosamente alta!
5Dati tecnici
Capacità: . . . . . . . . . . . . . . 1,0F
Rigidità dielettrica: . . . . . . . 20V
Dimensioni: . . . . . . . . . . . . Ø 75 mm x 265mm
Peso: . . . . . . . . . . . . . . . . . 1400g
Con riserva di modifiche tecniche.
* vedi le istruzioni per il montaggio del finale
Importante!
Come protezione contro i cortocircuiti inserire assoluta-
mente un fusibile* vicino alla batteria (vedi fig. 2).
Durante la prima carica collegare assolutamente il cavo
positivo della batteria e il positivo del condensatore per
mezzo della lampadina in dotazione per escludere
danni in seguito a picchi troppo alti della corrente.
Se si desidera eliminare il condensatore definiti-
vamente, consegnarlo per lo smaltimento ad
un’istituzione locale per il riciclaggio.
Condensateur de puissance
1Possibilités d’utilisation
Le condensateur de puissance est utilisé dans des véhicu-
les pour stabiliser la tension d’alimentation 12V pour des
amplificateurs audio de puissance (étages finaux) ; il com-
pense la charge de la tension dans le véhicule dans le cas
de graves particulièrement puissants. On obtient ainsi une
puissance d’amplificateur plus importante et une améliora-
tion sensible du son.
2Conseils d’utilisation et de sécurité
Le condensateur répond à la directive relative aux véhicules
et a été vérifié sous le numéro e13 021286.
●Le branchement du condensateur à la tension d’alimenta-
tion 12V du véhicule ne doit être effectué que par un tech-
nicien habilité. Il convient d’être particulièrement prudent
lors des branchements. En cas de courts-circuits, des
courants élevés peuvent circuler et être dangereux.
●Le condensateur doit être monté de manière fixe, par un
technicien habilité, dans un endroit mécaniquement sta-
ble dans le véhicule pour éviter qu’il ne se désolidarise de
son support et ne se transforme en projectile dangereux.
●Protégez le condensateur de l’humidité et de la chaleur
(plage de température de fonctionnement autorisée :
-
20°C à +60°C).
●Pour le nettoyer, utilisez uniquement un chiffon sec et
doux, en aucun cas de produits chimiques ou d’eau.
●Nous déclinons toute responsabilité en cas de dommages
matérielsoucorporels si le condensateurestutilisé dans un
but autre que celui pour lequel il a été conçu, s’il n’est pas
correctement branché ou s’il n’est pas réparé par une per-
sonne habilitée ; en outre, la garantie deviendrait caduque.
3Montage et branchement
Les cordons entre le condensateur et l’amplificateur de-
vraient être le plus court possible et d’une grande section*.
Placez les cordons de telle sorte que leur isolation ne puis-
se en aucun cas être endommagée.
1) Avec les supports fournis, vissez fermement le conden-
sateur le plus près possible de l’amplificateur à un en-
droit mécaniquement stable.
2) Le branchement est décrit sur le schéma 2. Connectez la
borne moins du condensateur via un câble, à la masse
du réseau 12V. Pour éviter tout bouclage de masse,
choisissez le même endroit que celui où se trouve la
masse de l’amplificateur.
3) Reliez un câble avec une section* suffisamment grande
au pôle plus de la batterie du véhicule.
Après le processus de charge de quelques secondes,
reliez le câble plus de la batterie directement à la borne
plus du condensateur. Tirez un autre câble de la borne
plus du condensateur vers le branchement de tension
d’alimentation de l’amplificateur.
4Témoins
1Les LEDs brillent en bleu lorsque le condensateur est
chargé ou déchargé.
2Le voltmètre digital indique la tension présente à partir de
8V environ. Afin que la batterie ne soit pas lentement
déchargée par l’éclairage de l’affichage, le CAP-10HQ est
doté d’un circuit automatique de coupure. Le conden-
sateur se coupe lorsque la tension à bord du véhicule ne
fluctue plus quelques minutes et se remet immédiatement
en marche dès qu’une fluctuation de tension apparaît.
3Le buzzer émet un signal sonore en cas de tension
inférieure ou si les lorsque les bornes plus et moins sur
le condensateur sont interverties.
➪Connectez correctement le condensateur.
Avertissement ! Ne branchez jamais les bornes dans le
sens contraire, par volonté de curiosité. Le courant de
court-circuit résultant est élevé et dangereux !
5Caractéristiques techniques
Capacité : . . . . . . . . . . . . . 1,0F
Tenue en tension : . . . . . . . 20V
Dimensions : . . . . . . . . . . . Ø 75 mm x 265mm
Poids : . . . . . . . . . . . . . . . . 1400g
Tout droit de modification réservé.
* Voir la notice de montage de l’amplificateur
Important !
Pour le protéger des courts-circuits, un fusible* doit être
intercalé à proximité de la batterie (voir schéma 2).
Lors de la première charge, reliez impérativement le
câble plus de la batterie et le pôle plus du condensateur
via la lampe à incandescence fournie : vous éviterez
ainsi tout dommage causé par des pointes de courant
trop importantes.
Lorsque le condensateur est définitivement
retiré du service, vous devez le déposer dans
une usine de recyclage de proximité pour contri-
buer à son élimination non polluante.
–+
2
1
➀
POWER
GROUND BATTERY REMOTE
SPEAKER OUTPUT
R
F
masse
massa
fusible
fusibile
batterie
batteria
masse
massa
amplificateur
amplificatore
max.
20 cm
!
CAP-10HQ
➁
3
4
HIGH QUALITY
POWER CAPACITOR CAP-10HQ
Best.-Nr. 14.2090
Copyright©by MONACOR INTERNATIONAL GmbH & Co. KG, Bremen, Germany. All rights reserved. www.carpower.com A-0002.99.03.08.2005
®
F B CH
I
Kondensator mocy
1Zastosowanie
Kondensator mocy CAP-10HQ służy do stabilizacji
napięcia zasilającego (12 V) samochodowych wzmacnia-
czy audio oraz do wyrównywania spadków napięcia
instalacji samochodu spowodowanych odtwarzeniem nis-
kich częstotliwości. Efektem jest wyższa moc wzmacnia-
cza oraz znaczna poprawa jakości dźwięku.
2Bezpieczeństwo użytkowania
Kondensator odpowiada normom dla pojazdów mecha-
nicznych, test nr e13 021286.
●Podłączenie kondensatora do sieci zasilającej 12V
może zostać przeprowadzone jedynie przez wykwalifi-
kowanego specjalistę. Należy zachować szczególną
ostrożność podczas podłączania kondensatora. W przy-
padku zwarcia istnieje ryzyko wyładowania elektryczne-
go o niebezpiecznie wysokim natężeniu.
●Kondensator należy zamontować w miejscu, które jest
mechanicznie stabilne w pojeździe. Należy umiejętnie
przymocować kondensator, aby uniknąć poluzowania
oraz związanego z tym zagrożenia.
●Należy chronić kondensator przed działaniem wilgoci
oraz wysokiej temperatury (dopuszczalna temperatura
otoczenia
-
20 °C do +60 °C).
●Do czyszczenia kondensatora należy używać suchej,
miękkiej szmatki; w żadnym wypadku nie stosować
wody ani środków czyszczących.
●Producent ani dostawca nie ponoszą odpowiedzialności
za wynikłe szkody (uszkodzenie sprzętu lub obrażenia
użytkownika) jeśli urządzenie było używane niezgodnie z
przeznaczeniem, lub jeśli zostało nieodpowiednio zain-
stalowane, podłączone, użytkowane lub poddawane
nieautoryzowanym naprawom.
3Montaż i podłączenie
Przewody łączące kondensator i wzmacniacz mocy
powinny być jak najkrótsze oraz powinny mieć duży prze-
krój*. Należy przymocować przewody w taki sposób, aby
izolacja nie uległa zniszczeniu.
1) Należy mocno przykręcić kondensator (uchwyty w
zestawie) jak najbliżej wzmacniacza mocy, w miejscu,
które jest mechanicznie stabilne.
2) Prawidłowe podłączenie jest pokazane na rys. 2.
Należy podłączyć ujemną końcówkę kondensatora
przewodem do uziemienia 12 V sieci. W celu uniknięcia
powstania pętli masy, należy uziemić kondensator w
tym samym miejscu co wzmacniacz.
3) Należy podłączyć przewód o odpowiednim przekroju*
do bieguna dodatniego akumulatora.
Po kilku sekundach ładowania należy połączyć prze-
wód dodatni akumulatora z końcówką dodatnią kon-
densatora. Następnie należy podłączyć kolejny prze-
wód z końcówki dodatniej kondensatora do złącza
zasilania wzmacniacza mocy.
4Wskaźniki
1niebieskie diody wskazują czy kondensator jest nałado-
wany.
2Cyfrowy woltomierz wskazuje wysokość napięcia do-
prowadzonego od około 8 V.
CAP-10HQ jest wyposażony w funkcję automaty-
cznego wyłączania w celu uniknięcia stopniowego rozła-
dowania akumulatora w wyniku iluminacji wyświetlacza.
Kondensator zostaje wyłączony jeśli przez kilka minut
nie występują wahania napięcia w pojeździe i zostaje au-
tomatycznie włączony jeśli pojawi się wahanie napięcia.
3Sygnalizacja dźwiękowa włącza się przy dużym spadku
napięcia, lub gdy końcówka dodatnia i ujemna konden-
satora zostały pomieszane. Należy podłączyć ➪kon-
densator we wskazany sposób.
Uwaga! Nigdy nie należy z ciekawości podłączać
końcówek w odwrotny sposób. Powstały prąd zwarcio-
wy byłby niebezpiecznie wysoki!
5Dane techniczne
Pojemność: . . . . . . . . . . . . 1,0 F
Wytrzymałość elektryczna: 20 V
Wymiary: . . . . . . . . . . . . . . Ø 75 mm x 265 mm
Waga: . . . . . . . . . . . . . . . . . 1400 g
Wartości rzeczywiste mogą się różnić.
*patrz: instrukcja montażu wzmacniacza mocy
Uwaga!
Należy umieścić bezpiecznik* blisko akumulatora w
celu zabezpieczenia przed zwarciem (rys. 2).
Przy pierwszym ładowaniu należy połączyć przewód
dodatni akumulatora i biegun dodatni kondensatora
przez żarówkę (w zestawie) w celu uniknięcia uszkod-
zenia w wyniku nadmiernej wartości szczytowej prądu.
Jeśli kondensator ma zostać ostatecznie
wycofany z użycia, należy go przekazać do
punktu utylizacji odpadów aby uniknąć
zanieczyszczenia środowiska.
Capacitador de potencia
1Aplicaciones
El capacitador de potencia se utiliza en vehículos de motor
para estabilizar el voltaje de 12V para amplificadores de
potencia audio y ecualiza la carga del voltaje del coche en
caso de bajas frecuencias de grave de especial potencia.
Esto ofrece una mayor potencia del amplificador y una
mejora considerable del sonido.
2Notas de seguridad
El capacitador cumple con la normativa para vehículos de
motor y ha estado probado con el número e13 021286.
●La conexión del capacitador a 12V debe hacerse única-
mente por personal calificado. Debe prestar especial
atención cuando conecte el capacitador. En caso de cor-
tocircuito puede haber corrientes peligrosas.
●El capacitador debe montarse en un lugar mecánicamen-
te estable del coche. Debe fijarse con seguridad y de
manera experta para que no pueda convertirse en un
proyectil peligroso.
●Proteja el capacitador contra la humedad y el calor (tem-
peratura de ambiente admisible
-
20°C to +60°C).
●Para limpiarlo utilice únicamente un trapo seco y suave,
no utilice productos químicos o agua.
●El capacitador carecería de todo tipo de garantía en caso
de daños personales o materiales resultantes de una utili-
zacióndelcapacitador con otrofindel que le espropio, si no
está correctamente conectado o reparado por un experto.
3Montaje y conexión
Los cables entre el capacitador y el amplificador deben ser
lo más cortos posible y presentar una amplia sección trans-
versal*. Ponga los cables de manera que su material aislan-
te no resulte dañado.
1) Atornille bien el capacitador con los soportes entregados
tan cerca como pueda del amplificador en un lugar
mecánicamente estable.
2) La conexión se muestra en el esquema 2. Conecte la ter-
minal negativa del capacitador a través de un cable a la
masa de la red 12V. Para prevenir un bucle de masa,
escoja el mismo lugar donde está conectado en masa el
amplificador.
3) Conecte un cable con suficiente sección transversal* al
polo positivo de la batería del coche.
Después de la carga que lleva algunos segundos,
conecte el cable positivo de la batería directamente a la
terminal positiva del capacitador. Conecte otro cable de
la terminal positiva del capacitador a la conexión de co-
rriente del amplificador.
4Elementos indicadores
1Los LEDs son azul si el capacitador está cargado o des-
cargado.
2El voltímetro digital muestra el voltaje aplicado desde a
partir de 8V apróx. Para prevenir la descarga gradual de
la batería con la iluminación de la pantalla, el CAP-10HQ
está equipado con un control de apagado automático.
El capacitador está apagado si no hay ninguna fluctua-
ción del voltaje del coche durante unos minutos y se
enciende automáticamente otra vez cuando ocurre una
fluctuación de corriente.
3La alarma suena en caso de corriente baja o si las termi-
nales positiva y negativa del capacitador se han mezcla-
do ➪Conecte el capacitador correctamente.
¡Atención! No conecte nunca las terminales al revés.
Esto causaría un cortocircuito altamente peligroso!
5Especificaciones
Capacidad: . . . . . . . . . . . . 1,0F
Rigidez dieléctrica: . . . . . . 20V
Dimensiones: . . . . . . . . . . . Ø 75mm x 265mm
Peso: . . . . . . . . . . . . . . . . . 1400g
Sujeto a modificaciones técnicas.
* vea las instrucciones de montaje del amplificador
¡Importante!
Inserte siempre un fusible* cerca de la batería como
protección contra cortocircuitos (vea esquema 2).
Para la primera carga, conecte siempre el cable positi-
vo de la batería y el polo positivo del capacitador a tra-
vés de la lámpara incandescente entregada para pre-
venir daños debidos a corriente excesiva.
Si el capacitador está definitivamente retirado
de servicio, debe llevarlo a una planta de re-
ciclaje próxima para contribuir a su eliminación
no contaminante.
–+
2
1
➀
3
4
HIGH QUALITY
POWER CAPACITOR CAP-10HQ
Best.-Nr. 14.2090
Copyright©by MONACOR INTERNATIONAL GmbH & Co. KG, Bremen, Germany. All rights reserved. www.carpower.com A-0002.99.03.08.2005
®
POWER
GROUND BATTERY REMOTE
SPEAKER OUTPUT
R
F
masa
fusible
bezpie-
cznik
bateria
akumulator
masa
amplificador
wzmacniacz mocy
max.
20 cm
!
CAP-10HQ
E
PL

This manual suits for next models

1

Popular Car Stereo System manuals by other brands

Discount Car Stereo A2D-VOL Quick start installation guide

Discount Car Stereo

Discount Car Stereo A2D-VOL Quick start installation guide

Becker Online Pro 7800 operating guide

Becker

Becker Online Pro 7800 operating guide

JVC KD-T915BTS instruction manual

JVC

JVC KD-T915BTS instruction manual

Clarion VRX8271 Owner's guide and installation manual

Clarion

Clarion VRX8271 Owner's guide and installation manual

Muse M-199 DAB user manual

Muse

Muse M-199 DAB user manual

Hyundai Soundmax SM-CMD2039 instruction manual

Hyundai

Hyundai Soundmax SM-CMD2039 instruction manual

Eclipse CD8454 owner's manual

Eclipse

Eclipse CD8454 owner's manual

JVC EXAD KD-AV7001 Installation & connection manual

JVC

JVC EXAD KD-AV7001 Installation & connection manual

Autotek AWK10 installation guide

Autotek

Autotek AWK10 installation guide

Eonon Car Stereo System Product instructions

Eonon

Eonon Car Stereo System Product instructions

Elta 7537N1 instruction manual

Elta

Elta 7537N1 instruction manual

Audiotec Fischer BRAX MX4 instruction manual

Audiotec Fischer

Audiotec Fischer BRAX MX4 instruction manual

Caliber RMD 046 manual

Caliber

Caliber RMD 046 manual

Jensen CR225X Installation

Jensen

Jensen CR225X Installation

Sony MEXBT2700 - CD Receiver With Bluetooth... operating instructions

Sony

Sony MEXBT2700 - CD Receiver With Bluetooth... operating instructions

Pioneer DEH-P680MP/XN/UC Service manual

Pioneer

Pioneer DEH-P680MP/XN/UC Service manual

Hyundai ACB10G6GN instructions

Hyundai

Hyundai ACB10G6GN instructions

Sony XR-CA300 - Fm-am Cassette Car Stereo operating instructions

Sony

Sony XR-CA300 - Fm-am Cassette Car Stereo operating instructions

manuals.online logo
manuals.online logoBrands
  • About & Mission
  • Contact us
  • Privacy Policy
  • Terms and Conditions

Copyright 2025 Manuals.Online. All Rights Reserved.