Montgomery Ward 769168 User manual

Instruction Manual
ITEM: 769168
Wards.com 1•888•557•3848
Montgomery Ward Customer Service
3650 Milwaukee Street, Madison, WI 53714
8:00 am to Midnight, Monday through Friday
Wards.com 1•888•557•3848
Corded Convertible Chain/Pole Saw
Overgrown
trees
ahead!
®
®

Thank you for purchasing your Montgomery Ward Convertible
Chain Saw/Pole Saw. Put through the paces by the experts, we
guarantee that it will perform to the highest standard,
time after time, with all the convenience, easy cleanup and
durability you rely on from Wards.
3
Important Safeguards .............. 3–4
Electrical Safety ...............................4
Specications.................................... 4
Parts & Features............................... 5
Assembly.........................................6–7
How to Use................................... 8–15
Cleaning & Care........................ 16–18
Troubleshooting .............................19
Return Information ...................... 20
Warranty..............................................21
Thank you
for your
purchase!
Table of Contents
21•888•557•3848
Wards.com
Important Safeguards
READ CAREFULLY BEFORE USING AND SAVE THESE INSTRUCTIONS!
• Failure to follow the warnings and instructions may result in electrical shock,
re and/or serious injury.
• Keep work area clean and well lit. Cluttered or dark areas invite accidents.
• DO NOT operate power tools in the presence of ammable liquids, gases or
dust. Power tools create sparks which may ignite dust or fumes.
• DO NOT use this saw for other than its intended use. DO NOT use for cutting
plastic, masonry or non-wood building materials.
• Remove all packaging materials before rst use. Dispose of the packaging
materials via the appropriate recycling system. DO NOT allow children to play
with packaging materials. DO NOT remove safety labels.
• While operating this tool, avoid body contact with earthed or grounded
surfaces, such as pipes, radiators or appliances. There is an increased risk of
electrical shock if your body is earthed or grounded.
• DO NOT expose power tools to rain or wet conditions. DO NOT use near water.
If operating a power tool in a damp location is unavoidable, use a ground fault
circuit interrupter (GFCI) protected outlet.
• DO NOT use the cord for carrying, pulling or unplugging the power tool. Keep
cord away from heat, oil, sharp edges or moving parts. Damaged or entangled
cords increase the risk of electrical shock. DO NOT cover the cord with a rug.
• The extension cord must be rated for outdoor use (SW-A, SOW-A, STW-A,
SJW-A, or SJTW-A) and must have a marked electrical rating at least as great
as the electrical rating of this tool.
• CLOSE SUPERVISION IS NECESSARY WHEN USING THIS APPLIANCE NEAR
CHILDREN, BYSTANDERS OR ANIMALS. KEEP AT LEAST 50 FT. AWAY.
• DO NOT use an accessory or attachment not recommended by Wards, as this
may cause injury, or damage the tool.
• Stay alert, watch what you are doing and use common sense when operating
a power tool. DO NOT use a power tool while you are tired or under the
inuence of drugs, alcohol or medication.
• DO NOT wear loose clothing or jewelry. Keep your hair, clothing and gloves
away from moving parts.
• DO NOT rely exclusively upon the safety devices built into the saw. Take steps
to keep your cutting jobs free from accident or injury.
• Always wear eye protection. Protective equipment (dust mask, safety shoes,
hard hat, or hearing protection) for appropriate conditions will reduce injuries.
• Keep all parts of the body and clothing away from the saw chain when the
chain saw is operating.
• Ensure the switch is off before plugging in, picking up or carrying the tool.
®

Parts & Features
Specications
Electrical Safety
41•888•557•3848
Wards.com
45
This appliance is equipped with a polarized plug in which one prong is wider
than the other. This is a safety feature to reduce the risk of electrical shock. Attach
an extension cord to the tool before connecting to an electrical outlet. The plug will
t only one way. If you are unable to attach the cord, try reversing it. If it still does
not t, contact a qualied electrician. Do not attempt to modify the plug in any
way. Double insulation eliminates the need for the usual 3-prong grounded power
cord. All exposed metal parts are isolated from the internal metal motor
components with protecting insulation. Double insulated tools DO NOT need to be
grounded. Wards cannot accept any liability for damage or injury resulting from
failure to observe these safety procedures.
POWER RATING 120V, 60Hz, 7A
SPEED 12m/s, 6000 rpm
BAR LENGTH 10"
DIMENSIONS chain saw only 26"W x 6½"H x 8¾"D
EXTENDED POLE LENGTH 96"
WEIGHT 10.27 lbs.
MODEL CVPS43010MW
Important Safeguards (cont.)
• This saw is not designed to fell large (over 10") diameter tree tops or trunks.
• Never stand under the limb being trimmed. Position yourself out of the way of
falling debris.
• DO NOT overreach and DO NOT cut above chest height.
• Keep handles dry, clean, and free from oil and grease.
• Follow instructions for lubricating, chain tensioning and changing accessories.
• DO NOT USE A TOOL WITH A DAMAGED SWITCH, CORD OR PLUG, OR AFTER
IT MALFUNCTIONS, OR HAS BEEN DAMAGED IN ANY MANNER.
• Store idle power tools out of the reach of children and DO NOT allow persons
unfamiliar with it or these instructions to operate the power tool.
• Old tools contain valuable materials that can be recycled. Dispose of your old
tools using appropriate collection systems, in accordance with local and federal
regulations.
Note: Tie the extension cord and power cord in a knot to
prevent them from disconnecting during use. Make the
knot as shown, then connect the plug end of the power
cord into the receptacle end of the extension cord.
Telescoping Pole
Rear Handle
Cutting Head

1•888•557•3848
Wards.com 7
6
Assembly (cont.)
Assembly
CONVERTING FROM CHAIN SAW TO POLE SAW
1. Disconnect the saw from the power supply. Lift the quick release button. Pull to
remove the handle from the cutting head.
Quick Release
2. Insert the pole into the cutting head. Press down the quick release button.
Make sure the release button snaps rmly to lock the parts securely.
Quick
Release
Pole
3. Insert the rear handle into the end of the pole. Press down the quick release
button and ensure it snaps rmly into position to lock the handle securely.
CONVERTING FROM POLE SAW TO CHAIN SAW
1. Disconnect the saw from the power supply. Disconnect rear handle and cutting
head from ends of pole by lifting the quick release buttons and pulling straight
out.
2. Insert the rear handle directly into the cutting head. When fully inserted, press
down the quick release button and ensure it snaps in rmly and securely,
locking the parts together.
ADJUSTING THE LENGTH OF THE TELESCOPING POLE
1. Disconnect the saw from the power supply. Rotate the collar counterclockwise
to loosen. Extend the pole to the desired length.
Note: Only extend the pole to minimum length required to reach the limb or
shrub to be cut.
2. Lock the pole in position by turning the collar clockwise rmly to secure.
FAILURE TO LOCK THE COLLAR AS DIRECTED COULD RESULT IN
PERSONAL INJURY!

BEFORE 1ST USE, ll oil well with new quality bar and chain oil. Unused SAE30
weight motor oil may be substituted, if necessary.
STARTING THE SAW
Plug in the saw. Push the safety button in with your thumb and then squeeze the
trigger with your ngers. Once the saw is running, you can release the safety. To
turn off, release the trigger. BE AWARE THAT THE CHAIN WILL COAST WHEN
TURNED OFF.
1•888•557•3848
Wards.com
89
How to Use How to Use (cont.)
WARNINGS:
• Before you start the saw, make sure the saw chain is not contacting anything.
• ALWAYS HOLD THE CHAIN SAW WITH YOUR RIGHT HAND ON THE REAR
HANDLE WHETHER YOU ARE RIGHT OR LEFT HANDED. Wrap the ngers of
your left hand over and around the front handle when using the saw, or around
the pole shaft when using the pole saw. Use a rm grip and position the handle
against your body to maintain control of the saw. DO NOT reverse hands.
• Hold by insulated gripping surfaces only. Saw chains contacting a live wire
may make exposed metal parts of the power tool live and could cause
electrical shock. Maintain a distance of 50 ft. away from all electrical lines.
• DO NOT operate a chain saw while up in a tree or on a ladder.
• Operate the chain saw only when standing on a xed, secure and level surface.
• When cutting a limb that is under tension, be alert for spring back. When the
tension in the wood ber is released, the limb may strike the operator and/or
throw the chain saw out of control.
• Use extreme caution when cutting brush and saplings. Slender material may
catch the saw chain and be whipped toward you or pull you off balance.
• DO NOT use saw to cut vines or small underbrush.
• Carry the chain saw by the front handle with the chain saw switched off and
away from your body. Always attach the bar cover when transporting.
• Check for damaged parts before using this tool. Check for alignment of
moving parts, binding of moving parts, breakage and any other defect.
• Keep the cord away from the chain. Be careful not to trip over the cord.
Trigger
Safety
BRAKE
To immediately stop the saw, use the back of your left hand to push the hand
guard forward.
ADJUSTING THE ANGLE OF HEAD ON POLE SAW
1. Disconnect the saw from the power supply. Press the angle adjustment button.
2. Turn the saw to the desired angle.
3. The angle can be adjusted between -20 and 60 degrees.
PROPER CUTTING STANCE
1. Weight should be balanced with both feet on solid ground.
2. Keep left arm with elbow locked in a “straight arm” position to withstand any
kickback force when using saw. Your right hand should be gripping the handle
and positioned rmly against body for added support.
3. Your body should always be to the left of the chain.
BASIC CUTTING PROCEDURES
1. Practice cutting a few small limbs using the following steps to get the feel of
using the saw before beginning a larger project.
a. Take the proper stance in front of the wood with the saw off.
b. Squeeze the trigger and let the chain accelerate to full speed before
starting the cut.

Wards.com
10 11
How to Use (cont.)
Wards.com
Wards.com 1•888•557•3848 11
10
How to Use (cont.)
c. Keep the saw running the entire time you are cutting and maintain a
steady speed.
d. Allow the chain to do the cutting. Exert only light downward pressure.
Forcing the cut can damage the bar, chain or saw, or can result in
serious injury.
e. DO NOT put pressure on the saw at the end of the cut.
2. Small trees up to 6–7" in diameter are usually cut in a single cut. Larger trees
(10" maximum diameter) require notch cuts. Closely monitor the top of the tree
to ensure it will fall in the desired direction.
WARNING: If the tree starts to fall in the wrong direction, or if the saw
gets caught or hung up during the fall, leave the saw and save
yourself.
FELLING A TREE
1. Trees should not be felled in a manner that would endanger any person, strike
any utility line or cause any property damage. IF A TREE MAKES CONTACT
WITH A UTILITY LINE, NOTIFY THE UTILITY COMPANY IMMEDIATELY.
2. When felling a small tree, keep everyone a safe distance from the cutting area.
A safe distance is at lease twice the height of the largest trees in the area.
3. Check the tree for damaged or dead branches that could fall during felling.
4. Before any cuts are started, pick your escape route (or routes in case
the intended route is blocked); clear the immediate area around the tree and
make sure there are no obstructions in your planned path of retreat. A clear
path of safe retreat is approximately 135 degrees from planned line of fall. The
retreat path should extend back and diagonally to the rear of the expected line
of fall.
5. Consider the force and direction of the wind, the lean and balance of the tree,
and the location of large limbs. These things inuence the direction in which
the tree will fall.
6. The saw operator should stay on the uphill side of the terrain, as the tree is
likely to roll or slide downhill after it is down.
7. Remove dirt, stones, loose bark, nails, staples and wire from the tree where cuts
are to be made.
8. Notched Undercut: Cut a notch about ⅓diameter of the tree, perpendicular to
the direction of the fall. Make the cuts of the notch so they intersect at a right
angle to the line of fall. This notch should be cleaned out to leave a straight line.
To keep the weight of the wood off the saw, always make the lower cut of the
notch before the upper cut.
9. Back-Cut: This cut is always made level and horizontal, and at a minimum of 2"
above the horizontal cut of the notch. Never cut through to the notch. This is
called “ hinge” or “hinge wood.” It controls the fall of the tree and prevents
slipping or twisting of the tree off the stump.
WARNINGS:
• DO NOT cut down trees having an extreme lean or large trees that have
rotten limbs, loose bark or hollow trunks.
• DO NOT try to fell a tree along a line other than its natural line of fall.
• DO NOT fell trees during periods of high wind or heavy precipitation.
Hinge
Back-Cut
Notch

Wards.com 1•888•557•3848 13
12
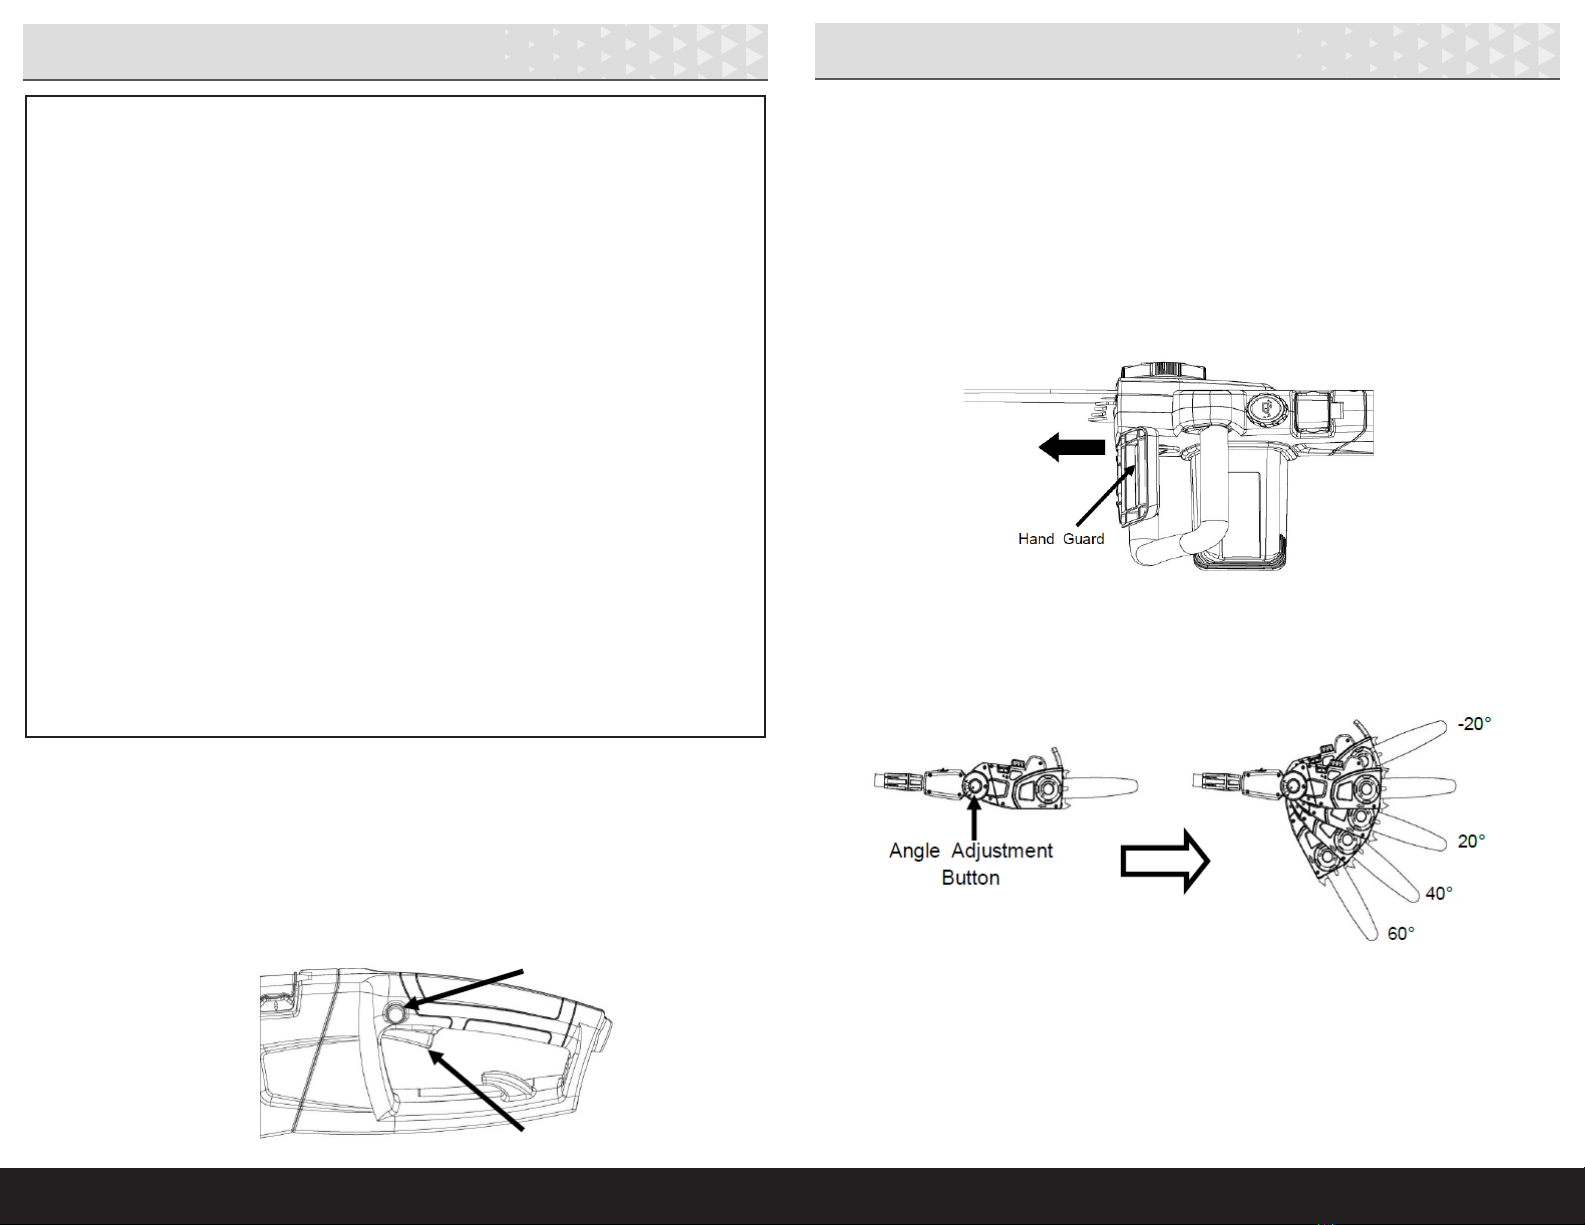
How to Use (cont.)How to Use (cont.)
WARNING:
Kickback is when the bar of the saw is driven rapidly up and back toward the
operator while cutting and may cause loss of control of the saw. It is usually
caused by Incorrect operating procedures or poor conditions.
• Decreasing the depth gauge height can lead to increased kickback. The depth
gauge should be maintained at a clearance of .025 in. (0.6 mm). Use a depth
gauge tool for checking the depth gauge clearances or have a qualied service
person check it.
• Kickback may occur when the tip of the bar touches an object, or when the
wood pinches the chain in the cut.
• Pinching the saw chain along the top of the bar may cause kickback.
• Ensure the area in which you are cutting is free from obstructions.
• Always cut with the saw running at full speed. Fully squeeze the trigger and
maintain a steady cutting speed.
• Wear nonslip gloves for maximum grip protection.
• Cut lower branches rst to allow the top branches more room to fall.
• Maintain a rm grip, with thumbs and ngers encircling the chain saw handles.
Keep both hands on the saw and position your body and arms to allow you to
resist kickback forces. DO NOT let go of the chain saw.
BUCKING is cutting a fallen tree to the desired log length.
1. Overbucking: Begin on the top side of the log with the bottom of the saw
against the log; exert light pressure downward. Note that the saw will tend to
pull away from you. When a log is supported along its entire length, use
overbucking.
2. Underbucking: Begin on the under side of the log with the top of the saw
against the log; exert light pressure upward. During underbucking, the saw will
tend to push back at you. When a log is supported on one end, cut ⅓diameter
from the underside (underbucking) and make the nishing cut by overbucking
to meet the rst cut.
3. Always make sure your footing is secure and your weight is distributed evenly
on both feet.
4. Cut only one log at a time. Support small logs on a saw horse or another log
while bucking.
5. Keep a clear cutting area. Make sure that no objects can contact the bar tip
or chain during cutting.
6. When bucking on a slope, stand on the uphill side of the log.
7. When cutting through, release the cutting pressure near the end of the cut
without relaxing your grip on the handles. DO NOT let the chain contact the
ground.
8. After completing the cut, wait for the chain to stop before you move the saw.
Always stop the motor before moving from tree to tree.
LIMBING is removing branches from a fallen tree.
1. Work slowly, keeping both hands on the saw with a rm grip.
2. Always make sure your footing is secure and your weight is distributed evenly
on both feet.
3. Leave the larger limbs under the tree to keep the tree off the ground while
cutting.
4. Cut 1 limb at a time and remove the cut limbs from the area often to keep the
work area clean and safe.
5. Branches under tension should be cut from the bottom up to avoid binding the
saw.
6. Keep the tree between you and the saw while limbing. Cut from the side of the
tree opposite the branch you are cutting.
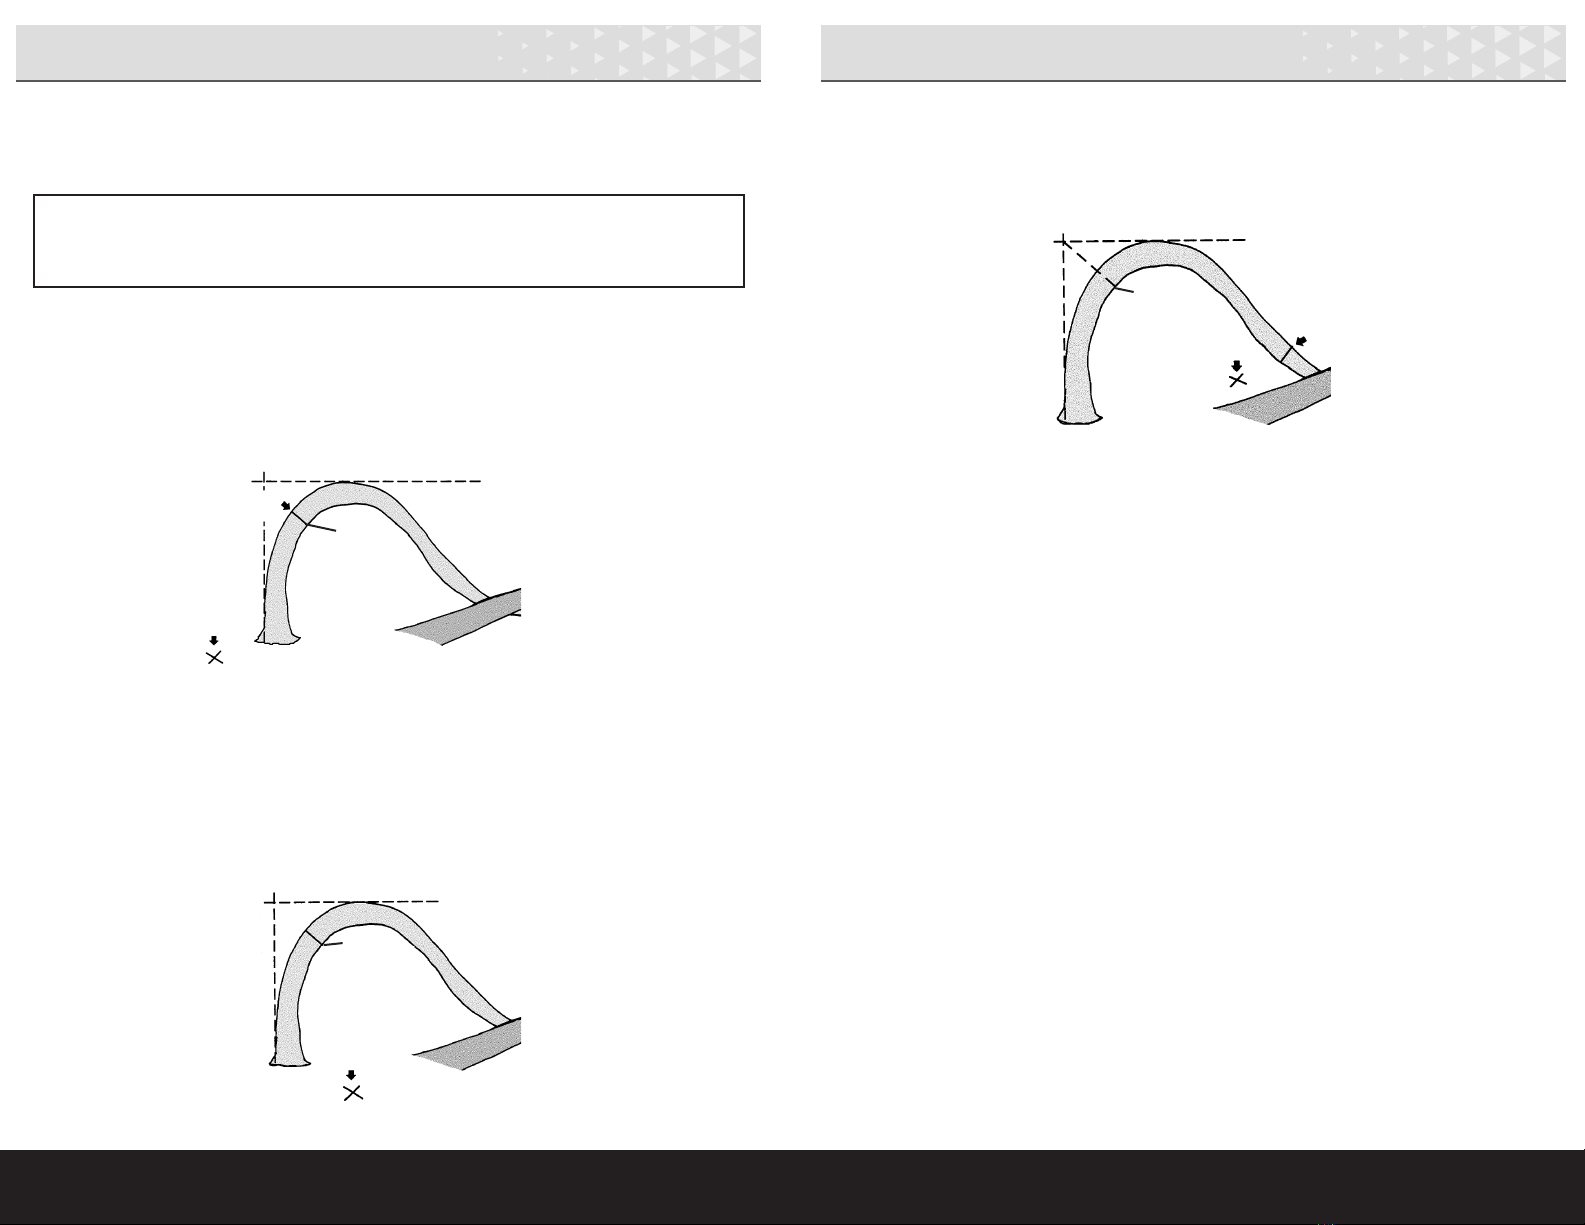
PRUNING is trimming limbs from a standing tree.
1. Work slowly, keep both hands on the pole saw with a rm grip and the handle
positioned rmly against your body for added control and ease of handling.
2. Always make sure your footing is secure and your weight is distributed evenly
on both feet.
3. When pruning trees, it is important not to make the nishing cut next to the
main limb or trunk until you have cut off the limb further out to reduce the
weight. This prevents stripping the bark from the main limb or trunk.
4. Make the 1st cut 6" from the tree trunk on underside of limb. Cut ⅓through
diameter of limb.
5. Make the 2nd cut from above the limb, 2–4" farther
out. Cut through the limb.
6. Make the 3rd cut as close to tree trunk as possible
on underside of limb stub. Cut ⅓through diameter
of stub.
7. Make the 4th cut directly above third cut. Cut
down to meet the 3rd cut and remove limb stub.
1st
2nd
3rd
4th

14 15
1•888•557•3848
Wards.com
How to Use (cont.)
How to Use (cont.)
SPRING POLES are branches or saplings which are bent under tension by other
wood. A spring pole will spring back if the spring pole, or the wood holding it, is
cut or removed.
1. Spring poles may be cut from the top. To cut a spring pole from the top, you
must stand at 45 degrees to avoid being hit by the spring pole if the tension
is released suddenly. From this position, the chain saw can be used to make a
succession of small cuts at the maximum point of tension until the bers begin
to break by themselves. At this time, you should move away from the tree and
let the pressure release itself.
2. Spring poles may also be released from underneath. To do this, stand at 90
degrees to the spring pole and use the chain saw to shave wood off the
underside of the spring pole at the maximum point of tension. DO NOT
cut into the spring pole as the compression of the wood will pinch the saw.
After enough wood is shaved, the bers will begin to break by themselves and
you can stand aside and let the spring pole release its tension naturally.
WARNING: Spring poles are dangerous and cutting them could result in
severe or fatal injury.
Cut here
Stand
here
Stand
here
Shave
here
3. If the point of maximum tension on the spring pole is higher than your
shoulders, the spring pole should be released from the top. Stand under the
spring pole, trim any branches that may be in the way and then release the
spring pole by cutting off the top. When released, the spring pole should y
up and away from you.
Cut here
Stand here
Max
tension
Max
tension

CHAIN TENSION
After a period of usage, the chain may get loose.
1. Disconnect the saw from the power supply. Unlock the tension knob by turning
counterclockwise.
2. Turn the tension knob clockwise to increase tension on the chain.
Note: A chain tensioned while warm, may be too tight upon cooling. Check the
cold tension before next use.
16 17
1•888•557•3848
Wards.com
Cleaning & Care (cont.)Cleaning & Care
4. The chain must be tightened whenever the ats on the drive links hang out
of the bar groove.
5. When the tension knob is fully tightened, the chain is the tightest. If the chain
is too tight, it will not rotate. To make minor adjustments to the chain tension,
loosen the tension knob by turning it counterclockwise slightly until the chain
is correctly tensioned.
Note: A new chain tends to stretch. Check chain tension frequently and adjust,
as needed.
.
CHAIN MAINTENANCE
1. Properly maintained cutting tools with sharp cutting edges are less likely to
bind and are easier to control. Sharpening is needed when the wood chips are
small and powdery, the chain must be forced through the wood during cutting,
or the chain cuts to one side. Contact a qualied service person or hardware
store for chain sharpening or replacement, as needed. FAILURE TO REPLACE
OR REPAIR A DAMAGED CHAIN CAN CAUSE SERIOUS INJURY.
2. If the chain comes in contact with hard objects, such as nails or stones, or if it
has been abraded by mud or sand on the wood, have the chain checked by a
qualied service person.
LUBRICATION
1. Disconnect the saw from the power supply and add oil, as needed, to the
oil well. The chain is automatically lubricated by the oil from the oil well. Check
oil level before each use and rell the oil well if less than ¼full.
2. Use only a good quality bar and chain oil or, if not available, unused SAE 30
weight motor oil may be substituted. One minute of use will consume about
0.15 . oz. (5ml) of oil.
3. FAILURE TO LUBRICATE THE CHAIN WILL CAUSE DAMAGE TO THE BAR AND
CHAIN.
WARNING: Never touch or adjust the chain while the motor is running.
The chain is very sharp; always wear protective gloves when
performing maintenance.
3. During normal saw operation, the temperature of the chain will increase. The
drive links of a correctly tensioned warm chain will hang approximately .050"
(1.25mm) out of the bar groove. A cold chain will be correctly tensioned when
there is no slack on the underside of the bar, the chain is snug, but it can be
turned by hand without binding.
Tension is loose
Correct tension
WARNING: To assure product safety and reliability, repairs and
maintenance should be performed by a qualied service
person using identical replacement parts only!

18 19
1•888•557•3848
Wards.com
Troubleshooting
Cleaning & Care (cont.)
Problem Possible Cause Possible Solution
Unit does
not run
Extension cord not connected to the
saw
Cord not connected to power
Trigger switch not fully operated
Check extension cord is
fully connected to tool
Check extension cord is
fully connected to a live
outlet
Check that safety button
is fully depressed prior to
moving trigger
Bar and
chain
running hot
or smoking
Chain tension too tight
Oil tank empty
Chain installed in wrong direction
Adjust chain tension
Add oil
See a qualied service
person to reverse
Motor runs
but chain is
not rotating
Chain tension too tight
Check guide bar and chain for
damage
Adjust chain tension
See a qualied service
person to replace
damaged bar and chain
with identical replacement
parts
Note: It is normal for oil to seep from the chain saw cutting head when not in
use. To prevent seepage, empty the oil tank after each use. When storing
the unit for a long period of time (1 month or longer), be sure the chain
is lightly lubricated; this will prevent rust on the chain and bar.
GUIDE BAR
When the guide bar shows signs of wear, it can be reversed to distribute the wear
for maximum bar life. Contact a qualied service person if the bar needs to be
reversed or replaced.
CLEANING
1. DO NOT let brake uids, gasoline, petroleum-based products, etc., come in
contact with plastic parts of this saw, as they contain chemicals that can
damage, weaken or destroy plastic.
2. Disconnect the saw from the power supply before cleaning. Use only mild soap
and a damp cloth to clean the tool. Never let any liquid get inside the tool and
DO NOT IMMERSE ANY PART OF THE TOOL OR ITS CORD INTO A LIQUID.
3. The bar should be cleaned after every day of use and checked for wear and
damage.
4. Ensure the bar cover is in place when storing or transporting the saw.
5. If the saw is not being used for longer than a month, wipe all metal surfaces
with an oil-soaked cloth to protect from corrosion.
6. Store in a dry, clean area.

1•888•557•3848
Wards.com
12 13
If any item, for any reason, does not meet your expectations, just
return it to us. We’ll gladly either:
• Refund your merchandise amount
• Credit your account
• Send a replacement
You can return any unused item in its original packaging within 60
days of its receipt for a full refund of the purchase price (excluding
shipping and handling charges).
Please send returns to:
Montgomery Ward, Inc.
Attn: Customer Returns
2000 Harrison Suite 100
Clinton, IA 52732-6676
When returning an item:
• Use the original packaging and pack it securely.
• Please adequately insure your item in case you need to
make a claim with the carrier you choose for returning your
item.
• Include your order number and reason for return.
• We recommend keeping the receipt for 4 weeks.
Montgomery Ward, Inc. warrants this Chef Tested product
to be free from defects in material and workmanship
for one year from provable date of purchase.
Within this warranty period, Montgomery Ward will repair
or
replace, at its option, defective parts of this Chef Tested
product at no charge, provided the product is returned,
freight prepaid with proof of purchase to
Montgomery Ward.
Allow 2–4 weeks for return shipping.
This warranty does not cover improper installation, misuse,
abuse or neglect on part of the owner. Warranty is also
invalid in any case that the product is taken apart or
serviced by an unauthorized service station.
This warranty gives you specic legal rights and they may
vary from state to state.
THE FOREGOING WARRANTIES ARE IN LIEU OF ALL
OTHER WARRANTIES AND CONDITIONS,
EXPRESS OR IMPLIED, INCLUDING
BUT NOT LIMITED TO THOSE OF MERCHANTIBILITY
OR FITNESS FOR A PARTICULAR PURPOSE.
1 Year Limited Warranty
Montgomery Ward Customer Service
8:00 am to Midnight CST, Monday through Friday
Wards.com 1•888•557•3848
Returns
20 21
1•888•557•3848
Wards.com
®

1514
This manual suits for next models
1
Table of contents
Popular Pole Saw manuals by other brands

Mantis
Mantis Pruner E System Owner's manual and safety instructions

Vito Agro
Vito Agro VIBCTPBSFL20 instruction manual

POWERTEC Garden
POWERTEC Garden GAK 710 TELE Translation of original operating instructions

Makita
Makita DUA301Z instruction manual

Lithium Earthwise
Lithium Earthwise LPS40208 Operator's manual

Poulan Pro
Poulan Pro 115224926 instruction manual