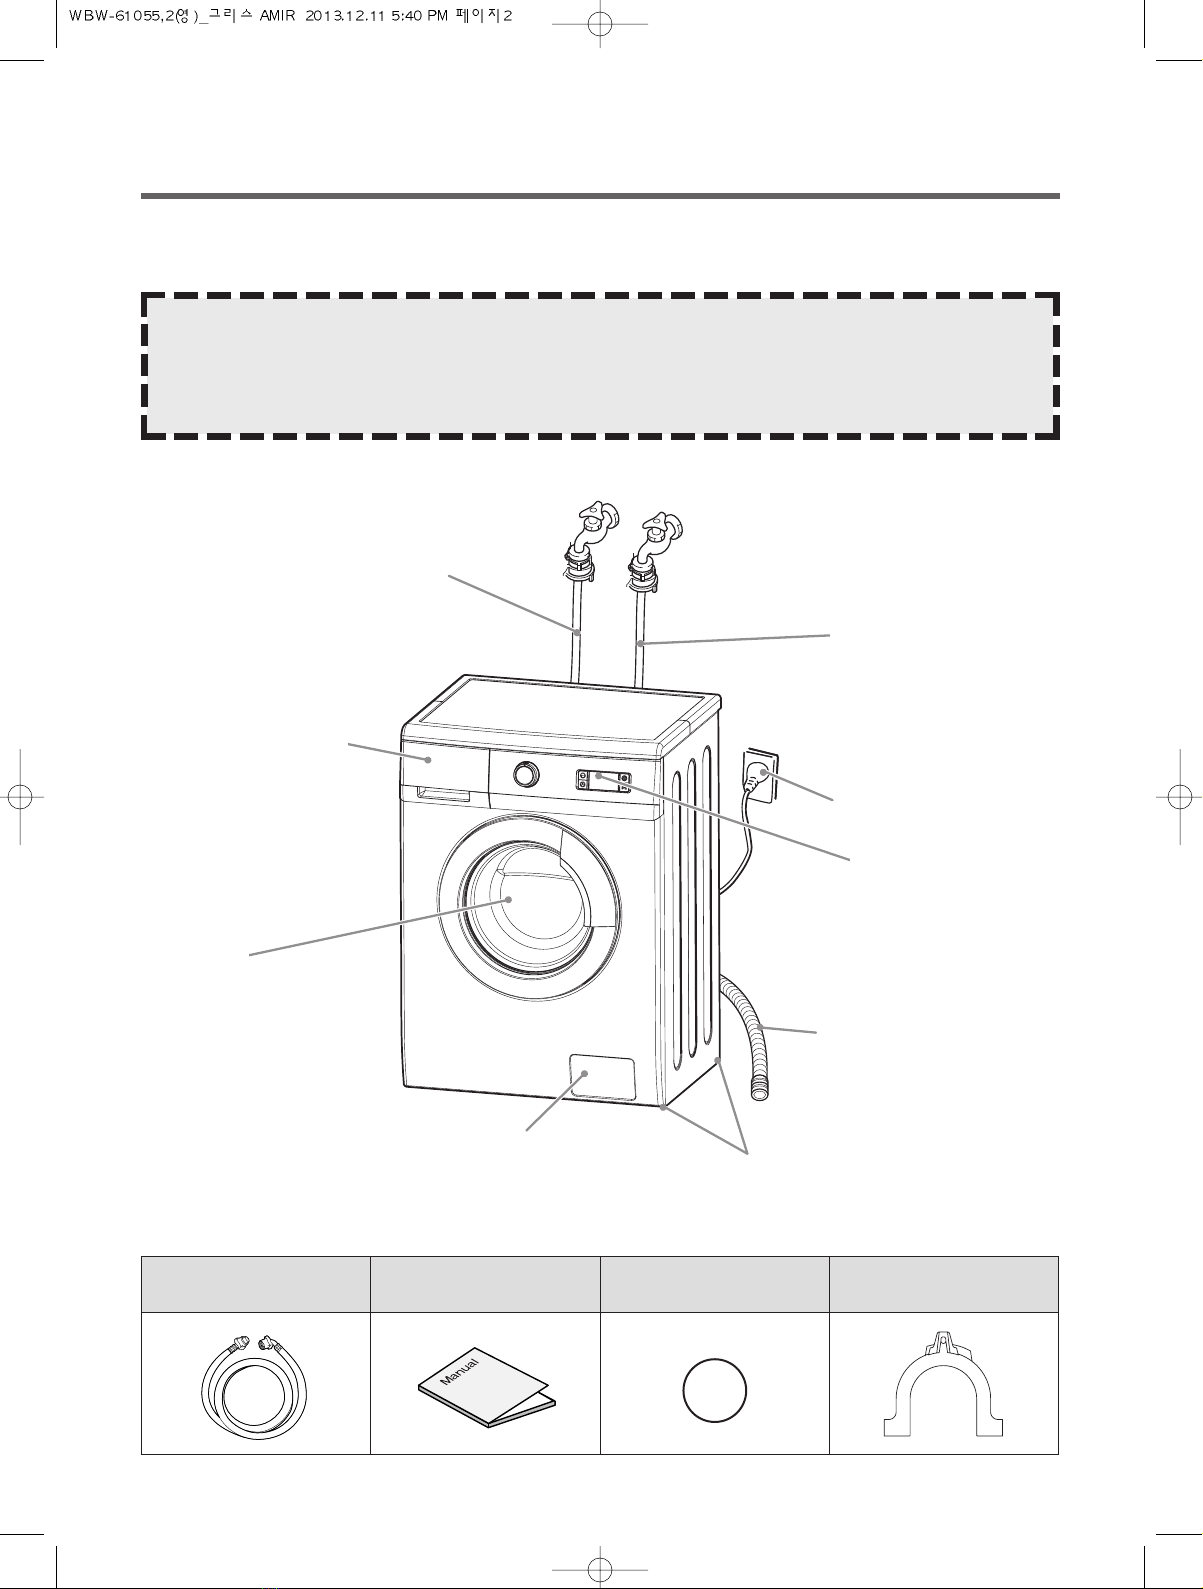
Morris WBW-61055/2 User manual

CONTENTS Page
INSTRUCTION MANUAL
WBW-61055/2
Washing Machine Instruction Manual
A NOTE TO YOU
Thank you for buying a MORRIS appliance.
MORRIS washers are easy to use, save time, and help you manage your home better.
This manual contains valuable information about how to operate and maintain your washer properly and safely.
Please read it carefully.
␊Economic washing system
The washing machine determines the water level and washing time
automatically by sensing the amount of laundry and water temperature
in order to minimize energy and water consumption.
␊Low noise system
The washing machine minimizes the spinning noise level by sensing
the amount of unbalance of laundry.
PARTS AND FEATURES ................................................................................................................2
WASHER SAFETY ..........................................................................................................................3
INSTALLATION INSTRUCTIONS ...................................................................................................5
ELECTRICAL REQUIREMENTS ....................................................................................................7
OPERATING YOUR WASHER .......................................................................................................7
THE FUNCTIONS OF THE CONTROL PANEL ..............................................................................9
PROGRAMS AND FUNCTIONS ...................................................................................................10
WASHING PROCEDURE AND PROGRAM SELECTION ............................................................11
PRODUCT INFORMATION ...........................................................................................................13
MAINTENANCE ............................................................................................................................14
HOW TO CLEAN THE FILTER .....................................................................................................15
REMOVING STAINS .....................................................................................................................16
TROUBLE SHOOTING .................................................................................................................17
SPECIFICATION ...........................................................................................................................18
By 세)생기파트 at 10:05 am, Dec 12, 2013

2
PARTS AND FEATURES
The parts and features of your washer are illustrated on the page.
Become familiar with all parts and features before using your washer.
NOTE
The drawings in the book may vary from your washer model.
They are designed to show the different features of all models coverd by this book.
Your model may not include all features.
ADJUSTABLE LEG
CONTROL PANEL
DOOR
DETERGENT CASE
INLET HOSE(HOT)
(OPTION)
INLET HOSE (COLD)
COVER PUMP
POWER CORD
HOSE DRAIN
Accessories
Inlet hose Manual Sticker holder (3EA) Guide Hose Drain
(Option)

3
WASHER SAFETY
Save these instructions
Your safety is important to us.
To reduce the risk of fire, electrical shock, or injury when using your
washer adhere to the following basic precautions.
• Flammable fluids (dry-cleaning solvents, kerosene, gasoline, etc.)
should not be used or stored in or near your washer.
Do not add flammable fluids to your wash water.These substances
give off vapors that can create a fire hazard or explosion.
• After starting a cycle, do not reach into the washer until all motions
stop.
• Do not tamper with the controls.
• The appliance is not intended for use by young children or infirm
persons without supervision.
• If the supply cord is damaged, it must be replaced by the
manufacturer, or its service agent or a similarly qualified person in
order to avoid a hazard.
• If the appliance is supplied from a cord extension set or electrical
portable outlet device it should be positioned so that it is not
subjected to splashing or ingress of moisture.
Please ...
• Have only a qualified person install, repair, or replace parts on
washer.
• Maintain washer properly.
• Protect washer from the weather and keep it where the temperature
will not fall below freezing.
• Do not install the washer at a place of extremely high humidity. It
could cause an electric shock or a short circuit.
• Connect washer to the correct outlet, electrical supply, water supply,
and drain supply.
Read all instructions before using your washer

4
WASHER SAFETY
Understanding your responsibilities
• Do not use chlorine bleach and ammonia or acid(such as vinegar
or rust remover) in the same wash. Hazardous fumes can form.
• Unplug power supply cord before attempting to service your
washer.
• Do not wash fiberglass material.
Small particles can stick to fabrics washed in following loads and
cause skin irritation.
• Do not spray water on the control panel of the washer.
It could cause fire or an electric shock.
• In case of the dual valve model, if you connect only cold water
inlet valve, while water temperature is selected as hot or warm,
there can be water leakage from unconnected water inlet valve.
• This appliance must be grounded.
To avoid electrical shock, use a metal pipe for the ground
connection.
• This appliance can be used by children aged from 8 years and
above and persons with reduced physical, sensory or metal
capabilities or lack of experience and knowledge if they have
been given supervision or instruction concerning use of the
appliance in a safe way and understand the hazard involved.
• Children shall not play with the appliance.
• Cleaning and user maintenance shall not be made by children
without supervision.
• If you want to obtain user manual, please visit our Web site
"http://www.morris.gr"

5
INSTALLATION INSTRUCTIONS
Removing transit bolts
1. Before operating the washer, remove the transit
bolts(3ea) along with the rubber.
• If the bolts are not removed, it may cause heavy
vibration, noise and malfunction.
2. Unscrew the 3 bolts with the 10mm hex wrench or
spanner or cross-tip screwdriver. Keep the 3 bolts
for a later time.
• When the appliance is transported, transit bolts
will be re-used.
3. Close the holes with sticker holders supplied.
Location of washer
• Check location where the washer will be installed. Make sure you have everything necessary for correct
installation.
• Do not place or store your washer below 0°C (32°F) to avoid any damage from freezing.
• Do not place or store laundry products on top of washer at any times.
• Install the washer on the horizontal solid floor.
If the washer is installed on an unsuitable floor, it could make considerable noise,
vibrate severely and cause a malfunction. If the washer is not level, adjust leg up
or down for horizontal installation.
• Ventilation openings must not be obstructed by carpeting when the washer is
installed on a carpeted floor.
• Leave some space (right & left : 2cm, rear : 10cm).
• In case of built-in installation, the distance between top of the washer and bottom of
upper plate should be at least 3mm.
Inlet hose connection
• The washer should be connected to the water mains using new hose set and old hose sets should not be
reused.
• In case of only one water inlet valve, connect the inlet hose to the cold water tap.
• Periodically check the tightness of the inlet hose.
• Make sure that the inlet hose is not kinked or folded and that it is not crushed.
1. Connect the inlet hose to
the water tap tightly. 2. Connect the inlet
hose to the water
inlet valve tightly.
Washer
approx.
2cm
Drain Hose
Laundry
Tub

6
• When installing the drain hose to tub(sink), secure it tightly with a string.
• Proper securing of the drain hose will protect the floor from damage due to water leakage.
• When the drain hose is too long, do not force it back into the washer.
This will cause abnormal noise.
Level adjustment
1If the washer is installed on an
unsuitable floor, it could make
considerable noise, vibrate and
cause a malfunction.
Drain system
• Never forget to install drain hose before operating your washer.
• Open the packing box, and the drain hose is tied at backside of washer.
• If you use the laundry tub,
Top of laundry tub must be at least 60cm high and no higher than
100cm from bottom of washer.
2Adjust the level of washer using adjustable legs.
• Please check if there is any gap between the
four adjustable legs and the floor.
• Adjust the level of washer by turning
adjustable legs. And make it sure that there is
no swaying of washer.
• After the adjustment is finished, turn the fixing
nuts up tightly so that the washer maintains
the adjustment.
3Make it sure that the washer does not sway when you press
down the four corners of the washer's top plate.
adjustable leg
Fixing Nut
NOTE
There should be no swaying of washer and all the
adjustable legs should stick to the floor closely.
Laundry tub
max. 100 cm
min. 60 cm
ca. 105 cm
Hose
Retainer
Tie
strap
max. 100 cm
min. 60cm
max. 100 cm
min. 60cm

7
OPERATING YOUR WASHER
To obtain the best washing results, you must operate your washer properly.
This section gives you this important information.
ELECTRICAL REQUIREMENTS
• Electrical earth is required on this washer.
• If it does not fit the outlet, have a proper outlet
installed by a qualified electrician.
• Don’t earth to a gas pipe.
• Don’t change the power supply cord plug.
• Check with a qualified electrician if you are not
sure the washer is properly earthed.
For your personal safety, this washer must be earthed.
This washer is equipped with a power supply cord ‘A’ having a earthing plug ‘B’.
To minimize possible shock hazard, the cord must be plugged into a mating
earthing-type wall receptacle ‘C’. If a mating wall receptacle is not available, it is
the personal responsibility and obligation of the customer to have the proper
earthed wall receptacle installed by a qualified electrician.
WARNING Electrical shock hazard : Failure to follow these instructions could result in death
or serious injury.
C
B
A
Recommended earthing method
• Close zippers, snaps, and hooks to avoid
snagging other items.
Remove pin, buckles, and other hard
objects to avoid scratching the washer
interior.
• Empty pockets and pull them inside out.
• Turn down cuffs and turn synthetic knits
inside out to avoid pilling.
• Tie strings and sashes to avoid tangling.
• Treat spots and stains.
(See 'REMOVING STAINS' on page 14)
Preparing clothes for washing

8
• Separate heavily soiled items from lightly soiled ones, even if they would normally be washed together.
• Separate dark colors from light colors, colorfast items from non-colorfast item.
Soil (Heavy, Normal, Light) Separate clothes according to amount of soil.
Color (White, Lights, Darks) Separate white clothes from colored clothes.
Lint (Lint producers, Collectors) Wash lint producers and lint collectors separately.
Sorting
• Drop items into washer loosely. Items should move
easily through wash water for best cleaning and
wrinkle-free results.
• Load washer properly and select correct load size
setting.
Overloading and selecting a setting too small for
the wash load can :
- Cause poor cleaning
- Increase wrinkling
- Create excessive lint
- Wear out items faster (because of pilling)
• Mix large and small items in each load. Load evenly
to maintain washer balance.
An unbalanced load can make the washer vibrate
during spin.
• Reduce wash time when using a small load size
setting. Load with only a few small items needs
less wash time.
• Use a large load size setting to reduce wrinkling
with permanent press clothes and some synthetic
knits. These items should have more room to
move in the water than heavy items. (towels, jeans)
Loading
1Detergent case 2Adding fabric softener
• If desired, add measured liquid fabric
softener to the softener inlet.
• Pour liquid fabric softener into the
dispenser using the amount
recommended on the package.
• Do not exceed the maximum fill line.
Overfilling can cause early dispensing of
the fabric softener which could stain
clothes.
• Do not open the detergent case when
water is supplied.
• Avoid pouring fabric softener directly on
the clothes.
Adding detergent
Main wash Pre wash
Fabric softener
• Please use only the powder detergent for the front loader washing machine.
• Please use the proper amount of detergent in conformity with the instruction of the detergent manufacturer.
• A use of a large amount of detergent more than the recommended amount can cause many soapsuds and
the overload to the motor. In addition to, this will deteriorate the washing and rinse performance.
• If too much detergent used, it can occur that the detergent directly falls down to the inside cavity. In this
case, remove the detergent case and clean the cavity after washing cycle is finished. (See page 13)

9
THE FUNCTIONS OF THE CONTROL PANEL
Program selector
For switching the washing machine on and off and
for selecting the program.
Can be rotated in both direction.
Even if the program selector rotates while the
program is running, the program is not changed
(except for off ) .
(All program is electronically controlled by PCB)
Indicator light
The respective indicator lights up, when the
required program segment runs or ‘Time delay’
is selected.
Time delay
To pre-engage time for washing.
As the button is pressed, the delayed time is
repeated as following;
2hours ➝3hours ➝4hours ➝• • •
➝10hours ➝11hours ➝max 12hours
This option is enabled with COTTON,
COTTON ECO, SYNTHETIC, Quick 15,
Sports wear, Rinse+Spin and Rinse programs.
Spin selector
You can select the spin programs (Spin 1000rpm
and Spin 500rpm) by turning the Program
selector.
500rpm of spin velocity is selected automatically
with WOOL/Hand Wash program in order to
protect damage on laundry.
1000rpm of spin velocity is selected automatically
with COTTON / SYNTHETIC / Quick15' /
Sportswear / Rinse+Spin programs.
*Warning
If value of unbalance is extremely high, spin
speed can't reached that r.p.m of selected by spin
selector.
Start/Hold button
For starting the washing cycle.
(program must have been selected)
Button for options
(in addition to the program if required)
Rinse + Extra rinse cycle.
Rinse Hold No final spin cycle.
• The indicator lamp of the buttons lights up if
options are active.
• Canceling options : Press button again.
Note
The washing time may vary by the amount of laundry, water pressure, water temperature and other
washing conditions. If an unbalanced load is detected the washing time maybe extended. (Maximum
increasing time is about 1 hour.)
By turning right the Program Selector, the program is selected in order of
COTTON COLD ᵎCOTTON 40° ᵎCOTTON 60° ᵎCOTTON 95°/Pre ᵎSYNTHETIC 20° ᵎ
Wool / Hand wash ᵎQuick15 ᵎCOTTON ECO 40° ᵎCOTTON ECO 60° ᵎRinse+Spin ᵎ
Rinse ᵎSpin 500rpm ᵎSpin 1000rpm ᵎDrain ᵎOFF ᵎCOTTON COLD ᵎCOTTON 40°

10
Cold
40°C
60°C
95°C/Pre
20°C
Cold
Cold
Cold
40°C
60°C
Program
Fabric type Proper
Temp. Degree
of soiling Option Max.
Load Remark
Colorfast garments
(shirts, night dresses,
pajamas...) and lightly
soiled white cotton
(underwear...).
Made of polyamide,
acrylic, polyester,
(synthetic or blended
fabrics).
Machine washable wool
and wool-rich textiles or
silk.
‘Hand wash’ marked
delicate and wool
laundry.
Colored laundry.
Lightly soiled fast and
thin laundry.
Colorfast garments
(shirts, night dresses,
pajamas...) and lightly
soiled white cotton
(underwear...).
Lightly
soiled
Normally
to heavily
soiled
Heavily
soiled
Lightly
soiled
Lightly
soiled
Lightly
soiled
Lightly
soiled
Lightly
soiled
Normally to
heavily
soiled
Rinse+
Rinse Hold
Rinse+
Rinse Hold
N/A
Rinse+
Rinse Hold
Rinse+
Rinse Hold
Rinse+
Rinse Hold
Rating
2.5kg
1.0kg
1.0kg
Rating
Rating
First Check if
laundry is
washable.
First Check if
laundry is
washable.
Short program
(Fast washing
time)
First Check if
laundry is
washable.
PROGRAMS AND FUNCTIONS
NOTICE : Set program at COTTON ECO 40˚C and COTTON ECO 60˚C for test in accordance or in
conformity with EN60456 and IEC60456 . This option has longer setting time for
washing.
COTTON
Cotton eco
SYNTHETIC
WOOL
Hand Wash
Quick 15'
Sportswear
Programs and functions

11
WASHING PROCEDURE AND PROGRAM SELECTION
Rinse : Rinse cycle with subsequent spin cycle for rinsing hand-washed items.
Spin : Spin cycle after a program with setting ‘Rinse Hold’ is finished or for spinning hand-washed washing.
Washing and rinsing water is drained before the spin cycle.
Drain : Water is drained after program with setting ‘Rinse Hold’ is finished.
Rinse+ : Additional rinsing of laundry. Program duration and rinsing water is extended accordingly. This help to
remove residuary traces of detergent and recommended in area with very soft water.
Rinse+ option is selectable with all programs except WOOL, Hand Wash and Drain programs.
Rinse Hold : For delicate textiles and net curtains. All program can be carried out without the final spin cycle.
The laundry is left in the final rinsing water. Before the laundry is unloaded, the ‘Drain’ or ‘Spin’
must be run by using program selector.
Rinse Hold option is not selectable with WOOL/Hand Wash, Rinse, Spin 500rpm, Spin 1000rpm
and Drain programs.
Washing Procedure
• Turn the program selector to the desired program.
The indicator light of Start/Hold button is on.
• If required, press the button(s) for option(s).
The indicator light of the selected option button is on.
• Press the Start/Hold button.
The selected program starts and the indicator light of
Start/Hold button twinkle.
Note
If you want to finish washing program during 'Rinse Hold'
process, press the 'Start/Hold' button once. Then the 'Rinse
Hold' process stops and the 'Spin' course selected
automatically. (The indicator light of 'Rinse Hold' button is
not twinkle anymore.) When you press the 'Start/Hold'
button once again, spin sequence begin. You can take out
laundry after spin course finish.

12
• Press the Start/Hold button.
The selected program stops and the indicator light of
Start/Hold button is not twinkle but on.
• Turn the program selector to OFF and reselect
the desired program by using the program selector.
• If required, select the option(s).
And press the Start/Hold button. The newly selected
program starts.
Changing the program
If you have accidentally selected the wrong program, follows next procedure.
• Pressing the ‘Time Delay’ button, select the delayed time.
‘Time delay’ function is not selectable with WOOL/Hand Wash
program.
• Press the ‘Start/Hold’ button.
The indicator light of ‘Start/Hold’ is off and the indicator light
corresponding to the selected time is on.
• The displayed time shows program finishing time.
Using Time delay
Firstly, you select the desired program and option(s).
When the washing is complete, the indicator light of Start/Hold button is not twinkle but on.
• Turn the program selector to OFF .
After washing
❋Canceling Time delay
• Press the ‘Start/Hold’ button.
(Then the indicator light of ‘Start/Hold’ is on.)
• Turn the program selector to OFF.

13
Most efficient programs for cotton laundry
The following programme are suitable for cleaning normally soiled cotton texiles and are the most
efficient with respect to combined energy and water consumption.
The actual water temperature, energy, water, RMC and duration may differ from the declared
value in the following table.
RMC(remaining moisture content) means the amount of moisture contained in the load at the end
of the spinning phase.
PRODUCT INFORMATION
Recommendation for the detergents
Boil washable white washing
made of linen or cotton
Coloured washing made of linen
or cotton
Coloured washing made of easy-
care fibres, synthetic materials
Delicate fine textiles, silk or
viscose
Wool
Washing and type of textile Detergent
The power consumption of the off mode and of the left-on mode
the off mode 0.03 W the left-on mode 0.44 W
Cotton
(Cottons)
Cotton
(Cottons)
Easy-Care
Delicate / Silk
Wool
Washing
programme 20°C - max. 90°C
20°C - max. 60°C
20°C - max. 60°C
20°C - max. 40°C
20°C - max. 40°C
Washing
temperature
Standard detergent containing
bleach and optical brighteners
Colour detergent without bleach
and optical brighteners
Colour/mild deergent without
optical brighteners
Mild detergent
Detergent for woollens
6.0 1.03 46.5 53.4 263
3.0 0.88 38.8 55.9 253
3.0 0.57 37.5 55.2 157
Program
60˚C
40˚C
Cotton
Load
(kg) Energy
(kWh) Water
(L) RMC
(%) Duration
(min)

14
MAINTENANCE
Proper care of your washer can extend its life. This section explains how to care for your washer
properly and safely.
Cleaning your washer
Winter storage or moving care
Install and store your washer where it will not freeze. Because some water may stay in the
hoses, freezing can damage your washer.
If you store or move your washer during freezing weather, winterize it.
Non-use or vacation care
Operate your washer only when you are at home.
If you are on vacation or don’t use your washer for an extended period of time, you should:
• Unplug the power supply cord or turn off eletrical power to the washer.
• Turn off the water supplier to the washer.
This helps avoid accidental flooding (due to a water pressure surge) while you are away.
Wipe up detergent, bleach, and other spills
with a soft, damp cloth or sponge as they
occur. Occasionally wipe the outside of the
washer to keep its looking like new one.
Clean interior with 250ml of chlorine bleach
mixed with 500ml of detergent.
Run washer through a complete cycle.
Repeat this process if necessary.
Exterior Interior
Do not put sharp or metal object in your washer, or they can
damage the finish. Check all pockets for pins, clips, money,
bolts, nuts, etc.
Do not lay these objects in your washer after emptying
pockets.
• Turn off the water tap.
• Disconnect inlet hoses and drain the water
of inlet hoses.
• Run the washer on the drain and spin cycle
setting.
• Unplug the power supply cord.
• Flush water pipes and hoses.
• Reconnect water inlet hoses.
• Turn on water faucet.
• Reconnect power supply cord.
To winterize washer To use washer again

15
Cleaning the detergent case
• In case of residual detergents or fabric softeners have accumulated ;
- It should be cleaned with a jet of running water.
- If necessary, it can be removed completely from the washing machine.
• Detergents can be also accumulate the inside cavity.
In this case, the inside cavity should be cleaned with a brush.
• After cleaning, replace the detergent case and run Rinse cycle without laundry.
HOW TO CLEAN THE FILTER
Cleaning the water inlet filter
• Clean the filter when water leaks from the water inlet.
Cleaning the drain filter
• This drain filter is used to screen the foreign stuffs such as threads, coins, pins, buttons etc..
• If the drain filter is not cleaned at proper time(every 10 times of use), drain problem could be
caused.
CAUTION : Be careful when draining if the water is hot.
1Turn off the water
tap. 2Separate the inlet
hose. 3Pull out the inlet filter.
Clean the inlet filter
with the brush.
4Connect the inlet
hose.
1. Open the cover-pump(1) by
using coin.
Separate the cover-pump(1)
from the washing machine.
2. Install the cover-pump(1) to the
lower frame(2).
Open the pump-filter(3) slowly
and allow the remaining water to
flow into a suitable container.
3. Remove foreign objects from the
pump-filter(3) and clean the
interior.
Close the pump-filter(3) and
replace the cover-pump(1).
12
1
3
1
3
Push point
1Pull-out
2Push and pull again

16
Stained, heavily-soiled, or greasy items may need to be prewashed or soaked for best results.
Soaking helps remove protein-type stains like blood, milk or grass. Prewashing helps loosen soil
before washing.
Stain removal rules
• Use warm water for soaking or prewashing stained laundry. Hot water can set stains.
• Most stains are easier to remove when they are fresh.
• Before treating any stain, find out what kind of stain it is, how old the stain is, what kind of
fabric it is, and whether the fabric is colorfast. (Check the care label)
• Washing and drying can set some stains.
• Start with cold or warm water. Hot water can set some stains.
• When bleach is recommended, use a bleach that is safe for the fabric.
• Put the stained area face down on a paper towel or white cloth. Apply the stain remover to the
back of the stain. This forces the stain off fabric instead of through it.
Stain removal guide
REMOVING STAINS
Blood
Chewing gum
Cocoa, Chocolate
Coffee
Cream/Milk
Ice cream
Deodorant
Egg
Fabric/Softener
Fruit stains
Grass
Grease and oil
Iron or rust
Lipstick
Mildew
Mud
Paint-oil based
Paint-water based
Scorch marks
Rinse immediately in COLD water.
If stain remains, soak in cold water with an enzyme prewash.
Use ice in plastic bag to harden the gum.
Scrape off what you can and the sponge with white spirits.
Sponge with COLD water and soak in an enzyme prewash.
If stains persist, rub in a little detergent and rinse in cold water.
Blot up quickly and rinse out in COLD water.
Rub in a little detergent and wash in the maximum temperature allowed for the
fabric type.
Rinse in COLD water and wash normally.
If stain is still apparent, sponge with white spirits.
Rub affected area with white vinegar and then rinse out in COLD water.
Sponge with white spirits.
Treat stiffened areas with enzyme prewash.
Soak in a COLD enzyme prewash, rinse and wash normally.
Rub affected area with bar soap and wash normally.
Treat as soon as possible by sponging with COLD water.
Rub a little detergent on the stain and wash normally.
Sponge with white spirits.
Rub in an enzyme prewash and wash as normally.
Lay the affected area face down on an absorbent cloth and work from the back.
Sponge with white spirits or dry cleaning fluid. Wash normally.
Apply lemon juice and salt and place in the sun. Wash normally.
Sponge with white methylated spirits and wash normally.
Wash in WARM water and detergent.
Moisten area with lemon juice, dry in the sun and wash normally.
If stain persists and the fabric allows, use a bleach.
Brush off any dry mud. Rinse in cold water.
If stain persists rub in a little detergent and wash normally.
Scrape off any fresh paint and sponge with a non flammable dry cleaning fluid
and wash normally.
Treat while still wet, rinse in WARM water and wash normally.
Dampen a cloth with hydrogen peroxide, lay it over the affected area and press
with a fairly hot iron.
STAIN TO REMOVE

17
The water tap is closed.
The filter of the valve inlet is clogged.
The valve inlet is an inferior product or broke down.
The water level sensor (sensor pressure) is an inferior
product or broke down.
The drain motor works during water supply.
The PCB ASS’Y does not check the water level.
The drain hose is kinked or clogged.
The drain motor is an inferior product.
The valve inlet works during drain.
The water level sensor is an inferior product.
The PCB ASS’Y does not check the water level.
The laundry is concentrated to one side of the drum
during spin.
The Start/Hold button is pressed while the door is
opened.
The switch door lock is an inferior product.
The PCB ASS’Y does not check the door lock.
MESSAGE
ERROR CAUSE SOLUTION
■ DISPLAY ERROR MESSAGE
Most problems are easily solved if you understand the cause.
Check the following list for problem before calling for service.
Program dose not
start.
Water dose not enter
the washing
machine.
Washing machine is
not drain.
Washing machine is
not spin.
Spin result is
unsatisfactory.
Foam come out of
the detergent case.
Serious noise and
vibration.
Problem Cause Solution
TROUBLE SHOOTING
Plug is loose or not plugged in.
Power failure.
Loading door is not closed.
Program is not selected.
Start/Hold button is not pressed.
Water tap is not turned on.
Inlet hose is kinked or folded.
Filters is blocked in water inlet filter.
Drain hose is kinked or clogged.
Pump filter is clogged.
The amount of laundry is too small.
The laundry is unbalanced.
Drain hose is placed over 1m above the
floor.
Too much detergent or unsuitable
detergent used.
Transit bolts are not removed.
Washing machine is installed on uneven
floor.
Washing machine is not leveled.
Insert plug tightly.
An interrupted program will be resumed when the
power return.
Check whether laundry is trapped in door.
Close the loading door. (a click should be heard)
Select the desired program.
Press the Start/Hold button.
Turn the water tap on.
Straighten the inlet hose.
Clean the water inlet filter.
Straighten and clean the drain hose.
Clean the pump filter.
Add the laundry to balance.
And repeat the Spin cycle.
Rearrange the laundry. And repeat the Spin cycle.
If articles of heavy clothing (e.g. bath robe) are
loaded, washing machine may skip or stop the spin
cycle.
Place the drain hose under 1m above the floor.
Repeat the Rinse cycle.
Remove the transit bolts.
Reinstall washing machine on even floor.
Adjust the level of washing machine using adjustable
legs.
IE
OE
UE
LE
WATER
INLET
ERROR
DRAIN
ERROR
UNBALANCE
ERROR
DOOR
OPEN
ERROR
Open the water tap.
Clean the filter of the valve inlet.
Change the valve inlet.
Change the water level sensor
(sensor pressure).
Change the drain motor.
Change the PCB ASS’Y.
Clean and straighten the drain hose.
Change the drain motor.
Change the valve inlet.
Change the water level sensor.
Change the PCB ASS’Y.
Rearrange the laundry.
Close the door.
Change the switch door lock.
Change the PCB ASS’Y.

18
A.C 220-240V/50Hz
2000 W
NET : 595 x 445 x 850 (WxDxH)
6 kg
54(NET) / 57 (GROSS)
42ὀ
500 / 1000
0.03MPA ~ 0.8MPa (0.3kgf/cm2~ 8kgf/cm2)
0.33 W
0.44 W
MODEL WBW-61055/2
Power Source
Power Consumption
Dimension (mm)
Maximum mass of textile (kg)
Unit Weight(kg)
Standard Water Consumption
Spin Speed(RPM)
Operating Water Pressure
Off Mode Power Consumption
Standby Mode Power Consumption
SPECIFICATION

Supplier : MORRIS
Model : WBW-61055/2
Capacity : 6 kg
Energy efficiency class : A+
Energy consumption 190 kwh per year, based on 220 standard washing cycles for cotton
programmes at 60˚C and 40˚C at full and partial load, and the consumption of the
low-power modes. Actual energy consumption will depend on how the appliance is used.
Energy consumption : 0.86 kWh
Power consumption of the off-mode and of the left-on mode : 0.44 W
Water consumption 9240 litres per year, based on 220 standard washing cycles for cotton
programmes at 60˚C and 40˚C at full and partial load. Actual water consumption will
depend on how the appliance is used.
Spin-drying efficiendy class C on a scale from G (least efficient) to A (most efficient)
Maximum spin speed 1000 rpm
The ‘standard 60˚C cotton programme’ and the ‘standard 40˚C cotton programme’ are
the standard washing programmes to which the information in the label and the fiche
relates, that these programmes are suitable to clean normally soiled cotton laundry and that
they are the most efficient programmes in terms of combined energy and water consumption.
Programme time of the standard 60˚C cotton programme : 300 minutes (or)
Programme time of the standard 40˚C cotton programme : 170 minutes
Duration of the left-on mode (if the household washing machine is equipped with a power
management system) : 50 minutes
Airborne acoustical noise emissions : 78 dB(A)
ᵉ
ᵉ
ᵉ
ᵉ
ᵉ
ᵉ
ᵉ
ᵉ
ᵉ
ᵉ
ᵉ
ᵉ
ᵉ
ᵉ
PRODUCT FICHE

DECLARATION OF CONFORMITY
This product complies with the requirement of the following directives
EMC-Directive : 89/36/EEC including 93/68/EEC
Low Voltage Directive : 2006/95/EC
We declare that the WBW-61055/2 is in compliance
with the following norms:
EN 55014-1:2000+A1:2001+A2:2002
EN 55014-2:1997+A1:2001 (Category IV)
EN 61000-3-2:2000
EN 61000-3-3:1995+A1:2001
EN 60335-1:2002; A11; A1; A12
EN 60335-2-4:2002; A1
EN 60335-2-7:2003; A1
EN 50366:2003
NOTICE ABOUT RECYCLING
Your product is designed and manufactured with high quality materials and components
which can be recycled and reused.
This symbol means that electrical and electronic equipment, at their end-of-life, should
be disposed of separately from your household waste.
Please dispose of this equipment at your local community waste collection/recycling centre.
In the European Union there are separate collection systems for used electrical and
electronic products.
Please help us to conserve the environment we live in!
EXCLUSIVE DISTRIBUTOR FOR GREECE AND BALKAN COUNTRIES
Amiridis Savidis S.A.
33, Vas. Olgas Street P.O. 54641 Thessaloniki, Greeco.
Tel: +30 2310-85017, 2310-850108, Fax: +30 2310-867835
45 Akti Posidonos St. O.P. 18344 Moschato, Athens, Greece
Tel: +30 210 9402064, Fax: +30 210 9402137
Table of contents