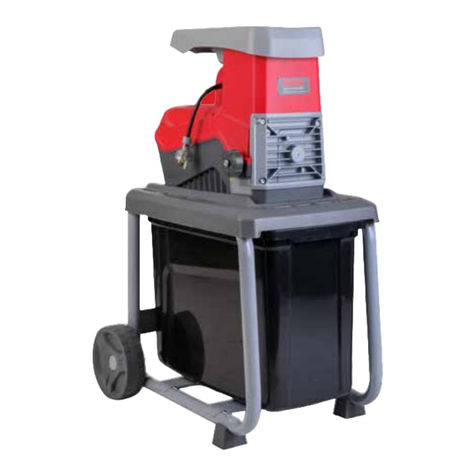
Morrison LSG2503 User manual

554027 - Morrison Electric Quiet Shredder Owner’s Manual - August ‘13 Pantone 1797C
www.morrisonoutdoor.com
Electric Quiet Shredder
2400W
Owner’s Manual
Part No: 554027
Revised August 2013
Important
Please read this Owner’s Manual and the Express Warranty before using this product. The Warranty does not cover
damage due to misuse or failure to follow the operating and assembly instructions.
Keep these instructions in a safe place for future use.

2
Keep the instructions in a safe place for future use.
Do not operate this machine before
it has been assembled correctly
and you have read and understood
these instructions.
These instructions are intended as
a general guide and do not super-
sede national or local codes in any
way. Contact local Authorities for
clarity of laws relating to operation
of this appliance.
Symbols on the Machine
Pictogram illustration and explanation
1.Caution! Read the instruction manual and follow the warn-
ing and safety instructions!
2.Caution! Always wear safety goggles, ear muffs, protective
gloves and heavy-duty work clothes! We recommend use of
headgear.
3.Caution! Do not use the shredder in wet weather conditions!
4.Caution! The blade does not stop immediately after switch-
ing off.
5.Caution! Unplug immediately if the power cord or plug
becomes damaged!
6.Always switch off the shredder, disconnect the power and
wait till the machine comes to a standstill prior to mainte-
nance, cleaning or repair work!
7.Maintain safety distance.
8.Keep by-standers away.
9.Cutting Blade gap adjuster.
1 2 3 6
58 7
4
9
Contents
2enihcamehtnoslobmyS
3launaMrenwOehtnislobmyS
3esureporP
3snoitcurtsnIytefaS
4strapfotsiL
4ylbmessA
5dednetnisaesU
6snoitcurtsnIgnitarepO
T 7gnitoohselbuor
7ecnanetniaM
7snoitacificepS
8margaidgniriW

3
Proper Use
For safety reasons, the Electric Shredder is not to be used by
children, young people under 16 years of age, or any other
persons who are not acquainted with these directions for use.
Specific safety information Please read this
safety information and the directions for use
carefully and be sure to follow the instructions
to the letter.
Safety Instructions
•The shredder must be assembled correctly before use.
Warning!
This appliance must be earthed!
Use only three core extension cables with the earth
wire connected.
For your safety you must use an isolating transformer
or an R.C.D. device between the power supply and
the extension cable.
•Only use extension cables that are approved for outdoor
use and check that they are in good condition before use.
•Protect the cables from damage by heavy mechanical use,
sharp edges, contact with moving parts and corrosive liq-
uids, etc.
•Warning! Do not use an extension cable that shows signs of
damage. Fit a complete new cable - do not undertake any
permanent or temporary repairs. Have the cable replaced
by a qualified technician.
•Before inserting the plug in the mains socket, make sure
that the socket ratings are correct and correspond to those
indicated on the rating label on the shredder.
•Never move the shredder by pulling at the cables.
•Always disconnect the machine from the mains supply
before transporting it to other places.
•Always switch off the shredder before disconnecting any
plug and socket connector or extension cables.
•Never leave the shredder unattended while it is switched
on.
•Before leaving the shredder, switch off the motor and dis-
connect the plug. Do likewise in the event of a power fail-
ure.
•Keep children and pets away. All onlookers should be kept
a safe distance away from the shredder when it is in use.
•Do not allow children or any person who has not read this
instruction leaflet or who is not familiar with the shredder to
Threatened hazard or hazardous situation.
Not observing this instruction can lead to
injuries or cause damage to property.
Important information on proper handling.
Not observing this instruction can lead to faults
in the machine.
User information. This information helps you to
use all the functions correctly.
Symbols in this Owner’s Manual operate it.
•The operator is responsible for third parties while working
with the shredder.
•Only use the shredder for its designed purposes.
•Caution! There is a rotating blade on this machine.
•Caution! Blade does not stop immediately after switching
off.
•Always switch off the shredder, disconnect the plug and
wait until the cutting disc stops before carrying out mainte-
nance or cleaning work.
•Use caution when cleaning or performing maintenance on
the shredder. DANGER! Watch your fingers! Wear gloves!
•Do not move or modify any of the electrical and mechanical
safety devices.
•The shredder has to stand on level and solid ground during
operation.
•Use only in daylight or good artificial light.
•Wear gloves and safety goggles while shredding.
•We recommend the use of ear muffs.
•Caution! The hopper must be fitted and tightened complete-
ly before use.
•Do not put your hands into the feed funnel and ejection slot.
•During operation ensure that no foreign objects (such as
stones, glass, metal, earth, plastics) are fed into the shred-
der; these foreign objects could cause blunting of the blade
and seriously damage the motor. Do not use your shredder
for purposes other than for its intended use.
•If the shredder should start to vibrate abnormally, switch off
the motor and check for the cause immediately. Vibration is
generally a warning of trouble.
•Ensure blade is are secure before shredding. Do not oper-
ate the shredder if the blade is not properly mounted.
•The shredder should be checked carefully before use. You
should only work with a shredder that is in good condition. If
you notice any defect on the machine that may cause dan-
ger to the operator, do not operate the shredder until
defects are rectified.
•Replace worn or damaged parts for safety. Use only original
spare parts. Parts not produced by manufacturer may
cause poor fit and possible injury.
•Use the shredder only in places where it is protected from
water and never use it outdoors in rainy weather.
•Store in a dry secure place out of reach of children.
Warning!
To protect the Rotary Blade from damage during
transit, this blade is positioned away from the
Cutting Plate.This must be set correctly before
any material is processed. Refer to page 6 for
setting.

Assembling
•Remove all parts from package.
•Fix undercarriage to the housing. Figure 2 and 2B, with self
locking nuts using the supplied spanner.
•Mount the wheel axle , Figure 2A, to the undercarriage with
2 bolts M6 x 50 and nuts by using the supplied hex key and
spanner.
•Fit the spacers to the axle. Figure 2C, then slide the wheels
on the axle.
•Fix the wheel in place by hammering the wheel hub into the
axle.
4
1
2
4
3
5
6
7
8
Figure 1
1.Feeding funnel
2.Reset button / overload protector
3.On/Off switch
4.Rotational direction switch
5.Application plug
6.Ventilation slots
7.Undercarriage
8.Ejection slot
Figure 1
List of parts
Figure 2
Figure 2A
Figure 2B
Four attachment
points

Use as intended
This shredder is designed for composting cutting of fibrous
and woody garden waste.
Collection of shredded material
Use a receptacle located under the ejection slot for the
ground material.
Always use the correct supply voltage
The power supply voltage must match the information quoted
on the tool identification plate.
The circuit must be protected by a fuse with at least 10 A.
Warning!
For your safety you must use an isolating transformer
or an R.C.D. device between the power supply and
the extension cable.
An extension cable with a cross section that is too small caus-
es a distinct reduction in the performance capabilities of the
machine. For cables up to 25 m in length, a cross section of
at least 3 x 1.5 mm2is required; for cables more than 25 m in
length, the cross section must be at least 2.5 mm2.
Operation
On/off switch
•Press the green button to switch the shredder on.
•Press the red button to switch off.
Note: The machine is equipped with a safety switch to
prevent it from being switched on again accidentally
after a power failure.
Rotational direction switch.
Important!
The yellow rotational direction switch must only be
operated when the shredder is switched off.
When the switch is depressed toward position “|”
Position “|”
The cutting blade pulls in the material and chops it.
When the switch is depressed toward position “|”
Position “0’’
The cutting blade is operating in reverse direction and
jammed material is released.
Keep the green button of the On/Off switch pressed after set-
ting the rotational direction switch on position “0’’, the cutting
blade will turn in reverse direction. Release the On/Off switch
the shredder will stop automatically. If set between “|” and “0”
the motor will not run.
Tips
•Large objects or woody pieces will be removed after several
operations in both cutting and releasing directions.
•Use a pusher or clearing hook to remove blocked objects
from the feeding funnel and ejection slot.
Caution! Always wait for the shredder to be idle before switch-
ing it on again.
Longer material standing out from the shredder could lash out
when being pulled in by the cutting blade. Please keep at safe
distance!
Overload protection
Overload (e.g. blocking up of the cutting blade) leads to a
standstill of the machine after a few seconds. To protect the
motor from being damaged, the overload switch will cut the
mains automatically.
Wait at least 1 minute before restarting by first pressing the
reset button and then the on/off switch.
In case of blocking cutting blade turn the rotational direction
switch to the left position “1” before switching the shredder on
again.
5
Figure 2C
Wheel hub
Spacer
Axle
Position “|”
Position “0’’
Rotational
direction
switch
Warning!
To protect the Rotary Blade from damage during
transit, this blade is positioned away from the
Cutting Plate.This must be set correctly before
any material is processed. Refer to page 6 for
setting.

Warning!
To protect the Rotary Blade ‘B’ from damage during
transit, this blade is positioned away from the
Cutting Plate ‘A’.This must be set correctly before
any material is processed. Refer to page 6 for
setting.
Operating instructions
Feed the material to be chopped into the right side of the
feeding funnel (anti-clockwise rotation of the cutting blade).
The material is pulled in by the cutting blade automatically.
Warning!
Longer material standing out from the machine could
lash out when being pulled in by the blade! Maintain
safety distance!
Only insert as much material so as to prevent blockage of the
feeding funnel.
To shred garden waste that has been stored for some days
and is wilted and damp feed it in with dry branches.
This prevents the cutting blade from blocking up.
Do not fill soft waste such as kitchen rubbish into the shredder
but compost them.
Widely branched material with leaves must be completely
chopped before new material is fed.
Take care that the chopped material can fall freely from the
ejection slot – danger of backing up!
The ventilation slots must not be covered by the waste bag or
the chopped material.
Adjusting the rotary blade.
Refer to Figure 5, below.
The rotary blade B is set from 0.50 to 1.00 mm from to the
cutting plate A. This distance should be maintained to achieve
effective operation.
There is an adjusting bolt accessible though the right side of
the plastic housing. To adjust the distance, insert the supplied
hex key, though the housing and turn the bolt C clockwise so
that it will move the cutting plate toward to the rotary blade.
Half a turn will advance the cutting plate 0.50 mm closer to
the rotary blade.
Warning!
Ensure that the plate A is not advanced too far or it
may strike the rotary blade and cause damage to the
shredder or even injury.
After adjusting, make cutting tests to check that the adjust-
ments have been effective.
Note: Soft material or wet woody branches can become
trapped around the blade. A worn rotary blade may cause the
same problem.
6
Figure 5
A.
Cutting
Plate.
C
Adjuster
Bolt.
B
Rotary
Blade
0.50~1.00mm

Tips
• Heavy material or branches result in blocking of the cut-
ting blade during continuous cutting.
• Soft materials, such as leaves or stems may block the
feeding opening. Feed the soft material using a pusher
• Always feed the material to be chopped from the right cor-
ner of the feeding funnel.
• Check the material to be chopped carefully. Make sure
there is no contact with stones or nails as these could dam-
age the shredder seriously.
• Check for signs of vibration. Heavy vibration is caused by
damaged or a worn blade. Change the blade if necessary.
Troubleshooting
The motor does not run
• The overload protection has responded
Set the rotational direction switch on position “0” and press
the reset button, keep the on/off switch pressed to switch on
the shredder for a short period. After the blockage has been
removed, reset the rotational direction switch to the position
“|”.
• Power failure
Check the power supply cord, the plug and the house fuse
The material to be chopped is not pulled in
• The cutting blade is running backwards.
Switch over the direction of rotation.
• The material is jammed in the feeding funnel
Set the rotational switch on position “0” and switch the
shredder on. Pull the material from the feed funnel.
Re-feed thick branches such that the blade does not imme-
diately grasp the pre-cut notches again.
• The cutting blade is blocked
Set the rotational switch on position “0” and switch the
shredder on. The cutting blade will now run backwards to
release the blocked up material.
Warning!
Change the direction of rotation to the desired posi-
tion after the shredder has come to a complete stand-
still.
Maintenance
• Take care of your machine and clean it regularly to obtain
long-lasting efficiency and performance.
• Keep the air vents clean and free from dust.
• Use only a warm damp cloth and a soft brush to clean your
machine.
• Never wet or spray water on the machine.
• Do not use detergents or solvents as these could cause
irreparable damage to your machine.
Chemicals can destroy the plastic parts.
• The tightness of the fastening screws of the undercarriage
should be checked from time to time.
• To protect the shredder from corrosion when storing for a
longer period, oil the cutting blade.
Specifications
LSG2503
Mains voltage / frequency: 220-240 V ~ 50 Hz
Rated power: 2400 W
Operating mode: S 6
No-load speed: 40 RPM
Branch diameter: max. 40 mm
W gk62:thgie
Sound power level: 86dB(A)
Sound pressure level: 66dB(A)
The S 6 operation mode (40%) indicates a load profile of 4
min load and 6 min idle time.
The max. diameter of the branch depends on the hardness of
the wood.
7

8
Wiring Diagram
FEMALE
CONNECTOR
MALE
CONNECTOR
SWITCH
ELECTRIC
MOTOR
CAPACITOR
POWER INLET
OVERLOAD
PROTECTOR
ELECTROMAGNETIC
SWITCH
DOUBLE COLOURED WIRE
Blue
Red
Yellow
Green
White
Revised May 2009
Table of contents
Other Morrison Paper Shredder manuals