Movex Track-O Twin-Track 47 User manual

Track-O
«Twin-Track
47 & 66»
OPERATING MANUAL
2011MAY

2
Movex Innovation Inc.
TABLE OF CONTENTS
GETTING STARTED / TWIN-TRACK 66
Connecting the Batteries ............................................................................4
Putting Breaker to «ON» position ..............................................................5
GETTING STARTED / TWIN-TRACK 47..............................................................6
Connecting the Batteries ............................................................................6
Putting Breaker to «ON» position ..............................................................7
CHARGING THE BATTERIES ..............................................................................8
SPECIFICATIONS ...............................................................................................9
ELECTRIC CIRCUIT ...........................................................................................10
ELECTRIC PANEL .............................................................................................11
REMOTE CONTROLS ................................................................................12 - 16
Button Functions.......................................................................................12
Frequency Chart........................................................................................13
Wired Remote Control ..............................................................................14
Wireless Remote Control ...................................................................15 - 16

3
Movex Innovation Inc.
TABLE OF CONTENTS (Continued)
OPERATING INSTRUCTIONS
Prior to using the TRACK-O for the first time ...........................................17
Prior to moving a load with the TRACK-O Twin-Track ......................17 –18
Ambient Operating Air Temperature........................................................19
Ambient Operating Environment..............................................................19
Storing the Track-O ...................................................................................19
Positioning a Load on the Track-O ....................................................20 –21
Utilizing the Anchoring Rings ....................................................................22
Climbing with a Load ........................................................................23 –24
Descending with a Load ....................................................................25 –26
Track-O Spare Parts...................................................................................27
Options......................................................................................................28
REGULAR MAINTENANCE
Tightening of Tracks ...........................................................................29 - 30
Replacing the Tracks .................................................................................31
Cleaning the Interior ..........................................................................32 - 34
Replacing the batteries ......................................................................35 - 37
Disposing the batteries .............................................................................37
4
Movex Innovation Inc.
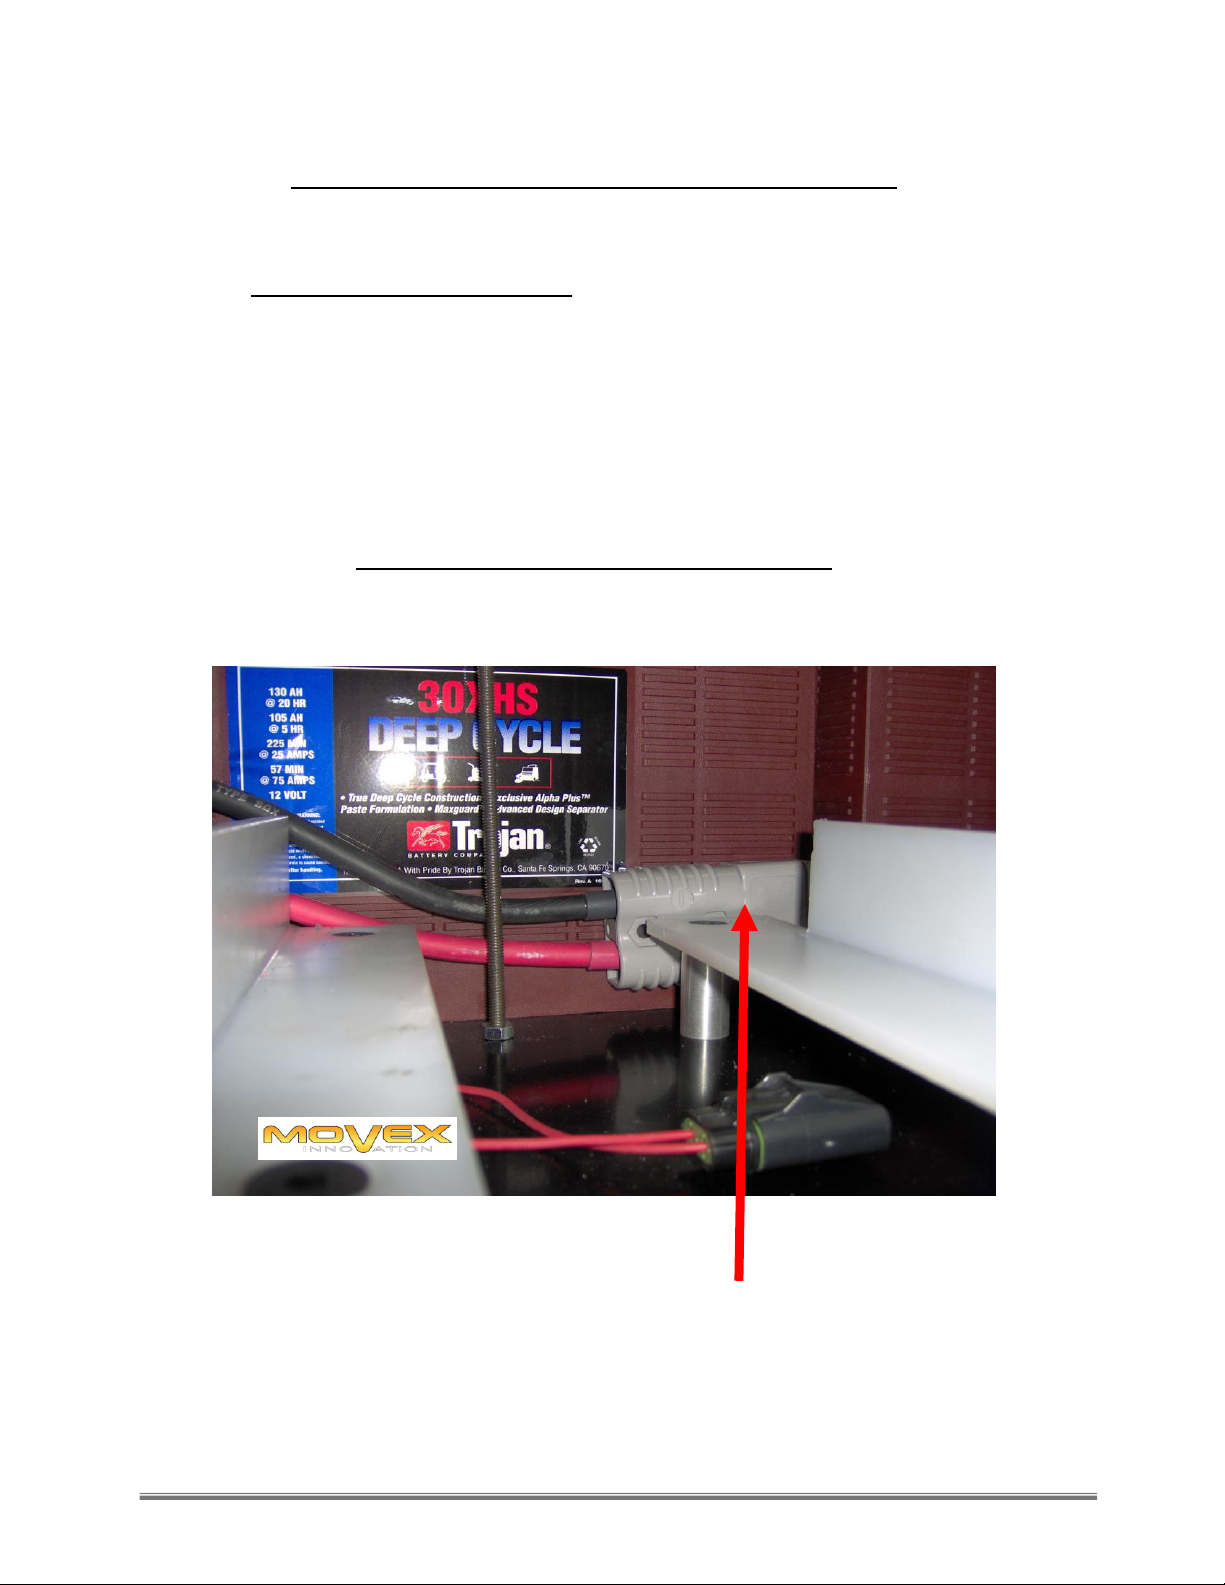
GETTING STARTED / TWIN-TRACK 66
1. CONNECTING THE BATTERIES
Note: DUE TO SHIPPING REGULATIONS, THE BATTERIES ARE UNPLUGGED
DURING DELIVERY
a) Remove drawer located on the left side of the Track-O
VIEW THROUGH DRAWER OPENING
b) Connect grey plugs as shown above.
Note: Before replacing drawer, read next step: Putting Breaker on «ON» position (next
page)
5
Movex Innovation Inc.
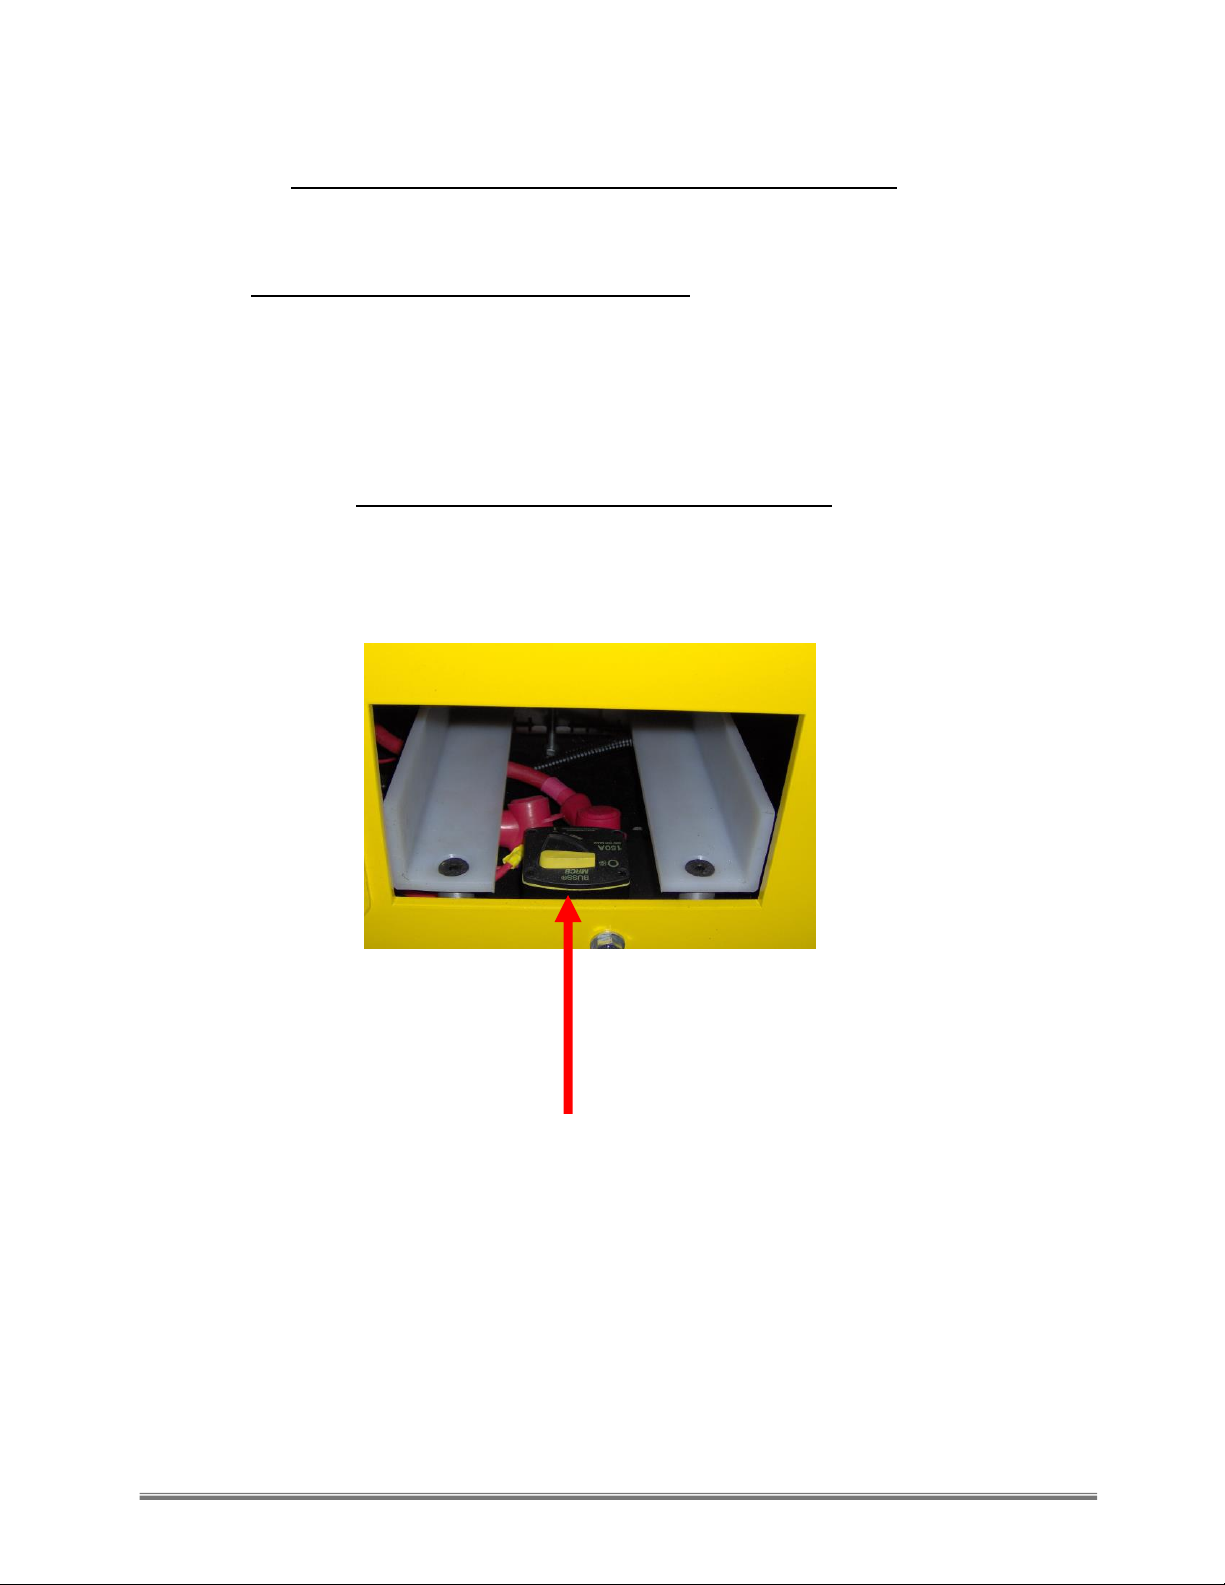
GETTING STARTED / TWIN-TRACK 66
2. PUTTING BREAKER TO «ON» POSITION
a) Remove drawer located on the left side of the Track-O
VIEW THROUGH DRAWER OPENING
b) Turn yellow breaker switch to «ON» position.
c) Replace drawer.
6
Movex Innovation Inc.
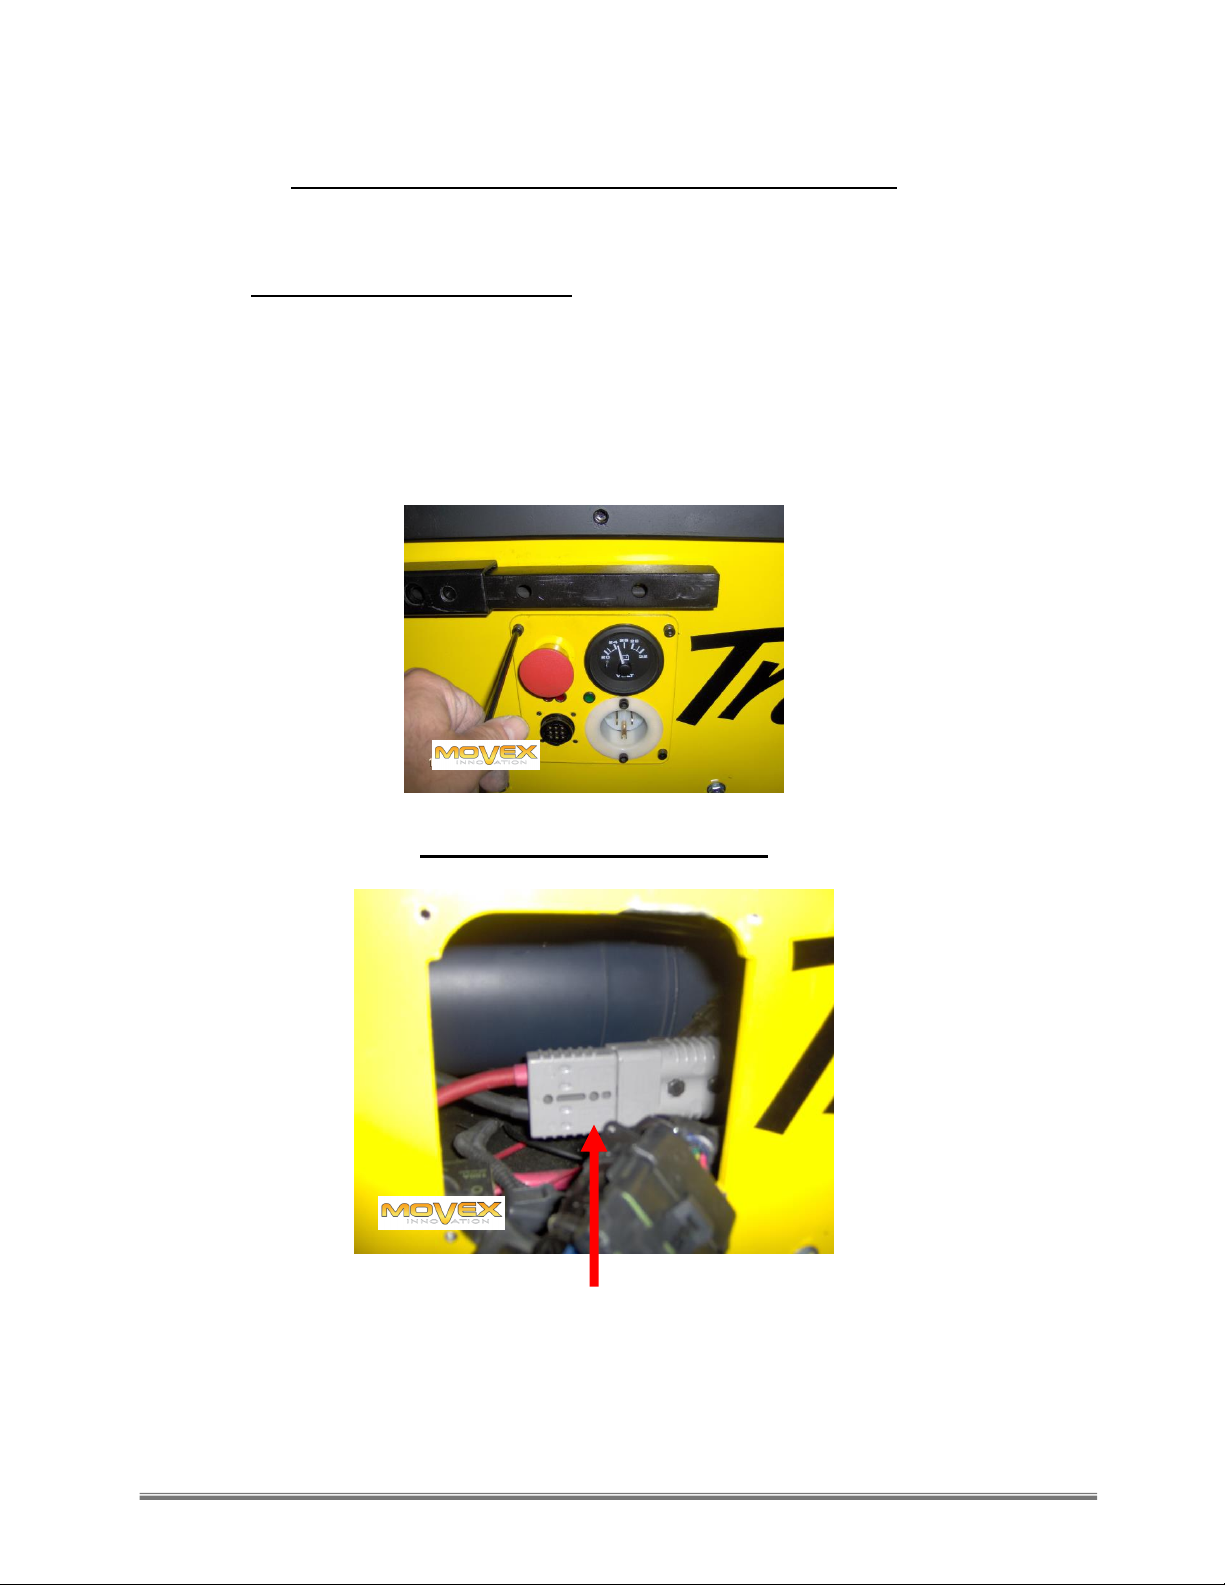
GETTING STARTED / TWIN-TRACK 47
1. CONNECTING THE BATTERIES
Note: DUE TO SHIPPING REGULATIONS, THE BATTERIES ARE UNPLUGGED
DURING DELIVERY
a) Remove the Control Panel situated on the left side of the Track-O.
VIEW THROUGH OPENING
b) Connect grey plugs as shown above.
Note: Before replacing panel, read next step: Putting Breaker on «ON»
position (next page).
7
Movex Innovation Inc.
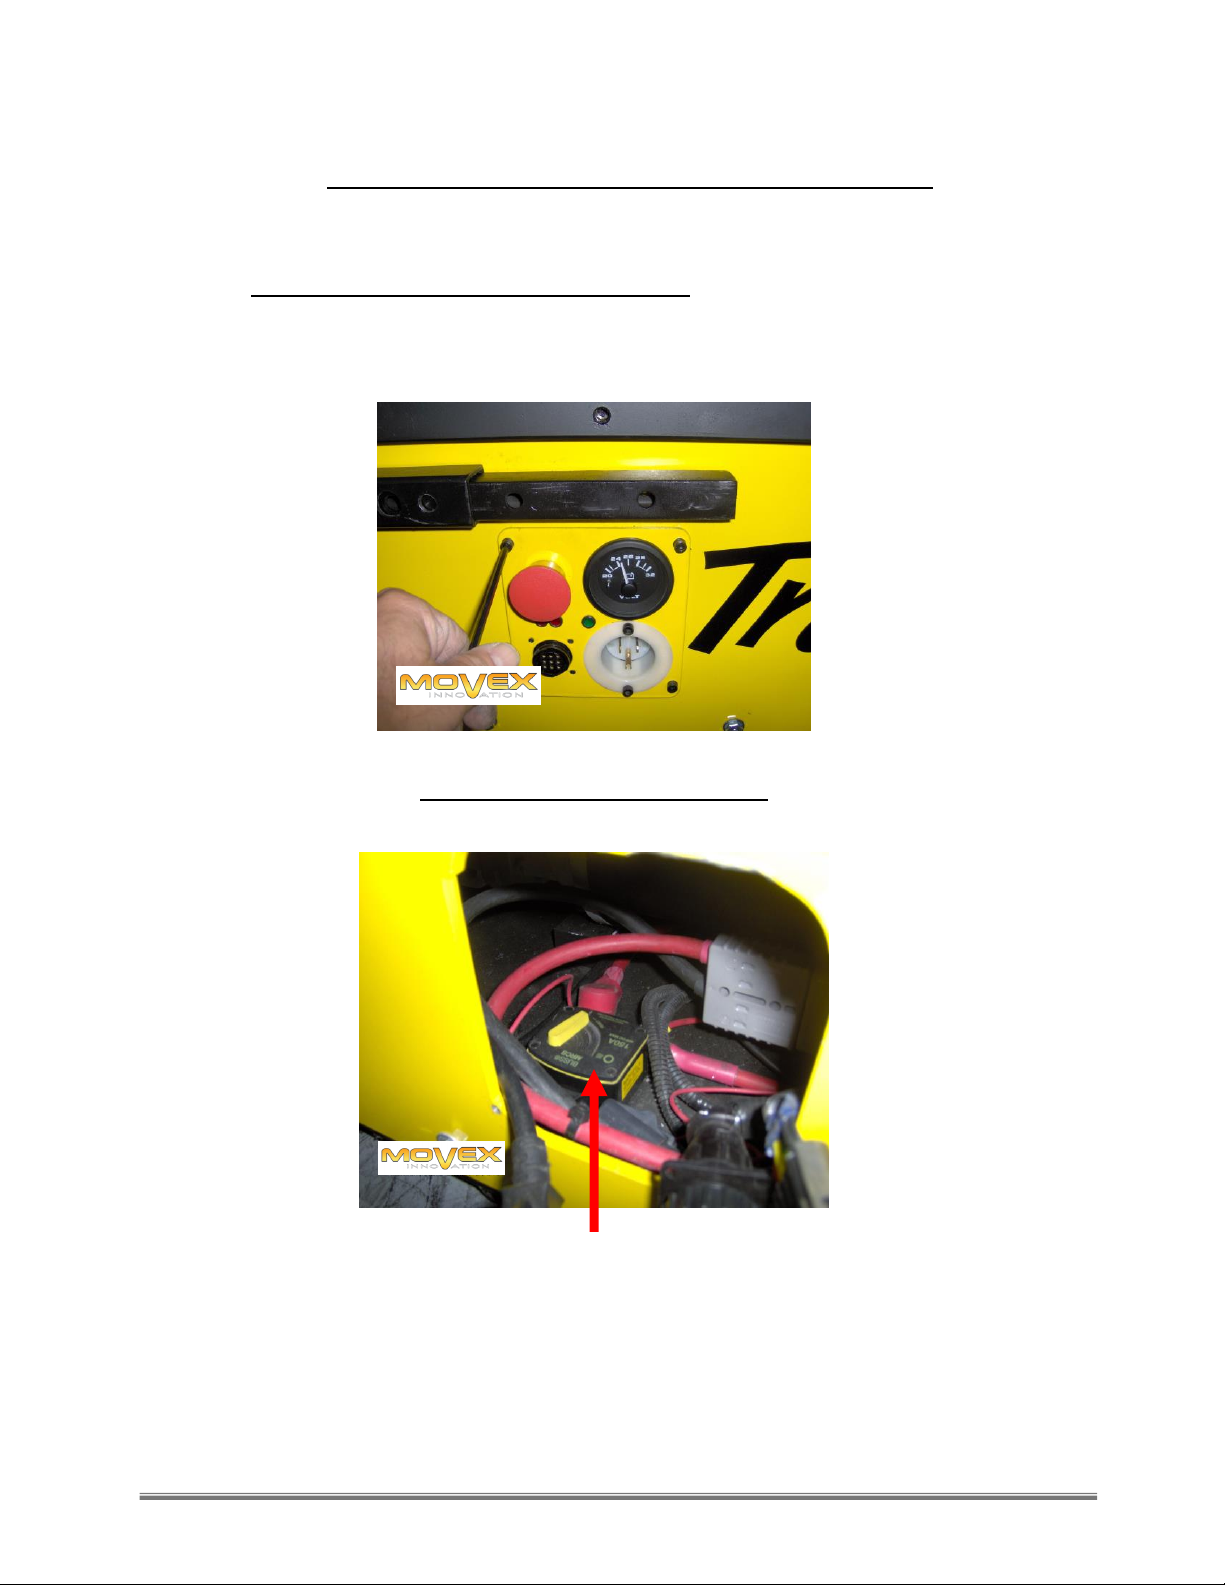
GETTING STARTED / TWIN-TRACK 47
2. PUTTING BREAKER TO «ON» POSITION
a) Remove the Control Panel situated on the left side of the Track-O
VIEW THROUGH OPENING
b) Turn yellow breaker switch to «ON» position.
c) Replace Control Panel.

8
Movex Innovation Inc.
CHARGING THE BATTERIES
a) Plug extension cord to side the side of Track-O and into the wall plug or to a
generator.
b) Once plugged-in, a green LED on the Control Panel indicates current is reaching the
Track-O. After 15 to 30 seconds the Voltmeter should indicate between 25 and 26 V.
c) If, after 15 to 30 seconds, the Voltmeter does not go up to between 25 and 26 V,
disconnect the Track-O, wait 15 minutes and re-start process.
d) If the Voltmeter still does not go up to 25 or 26 V contact Technical Support.
IMPORTANT:
INPUT:110/240 V, 50/60 HZ,12/6 AMPS
OPERATING POWER:24 VDC, 30 AMPS
Prior to shipping the batteries were charged and tested. Therefore, once the battery
is connected and the breaker is in the «ON» position, the Track-O should work.
For a full and even charge, we recommend the Track-O be recharged overnight.
The Batteries can be «topped-off» any time the machine is stopped. The Track-O can
be plugged-in during breaks in the operation.
FOR SAFETY REASONS,DO NOT OPERATE THE TRACK-O WHILE IT IS PLUGGED-IN.
However, in case of an emergency the Track-O can operate while it is plugged-in.
FOR SAFETY REASONS, BEFORE OPERATING THE TRACK-O PLEASE READ THE
OPERATING MANUAL
9
Movex Innovation Inc.
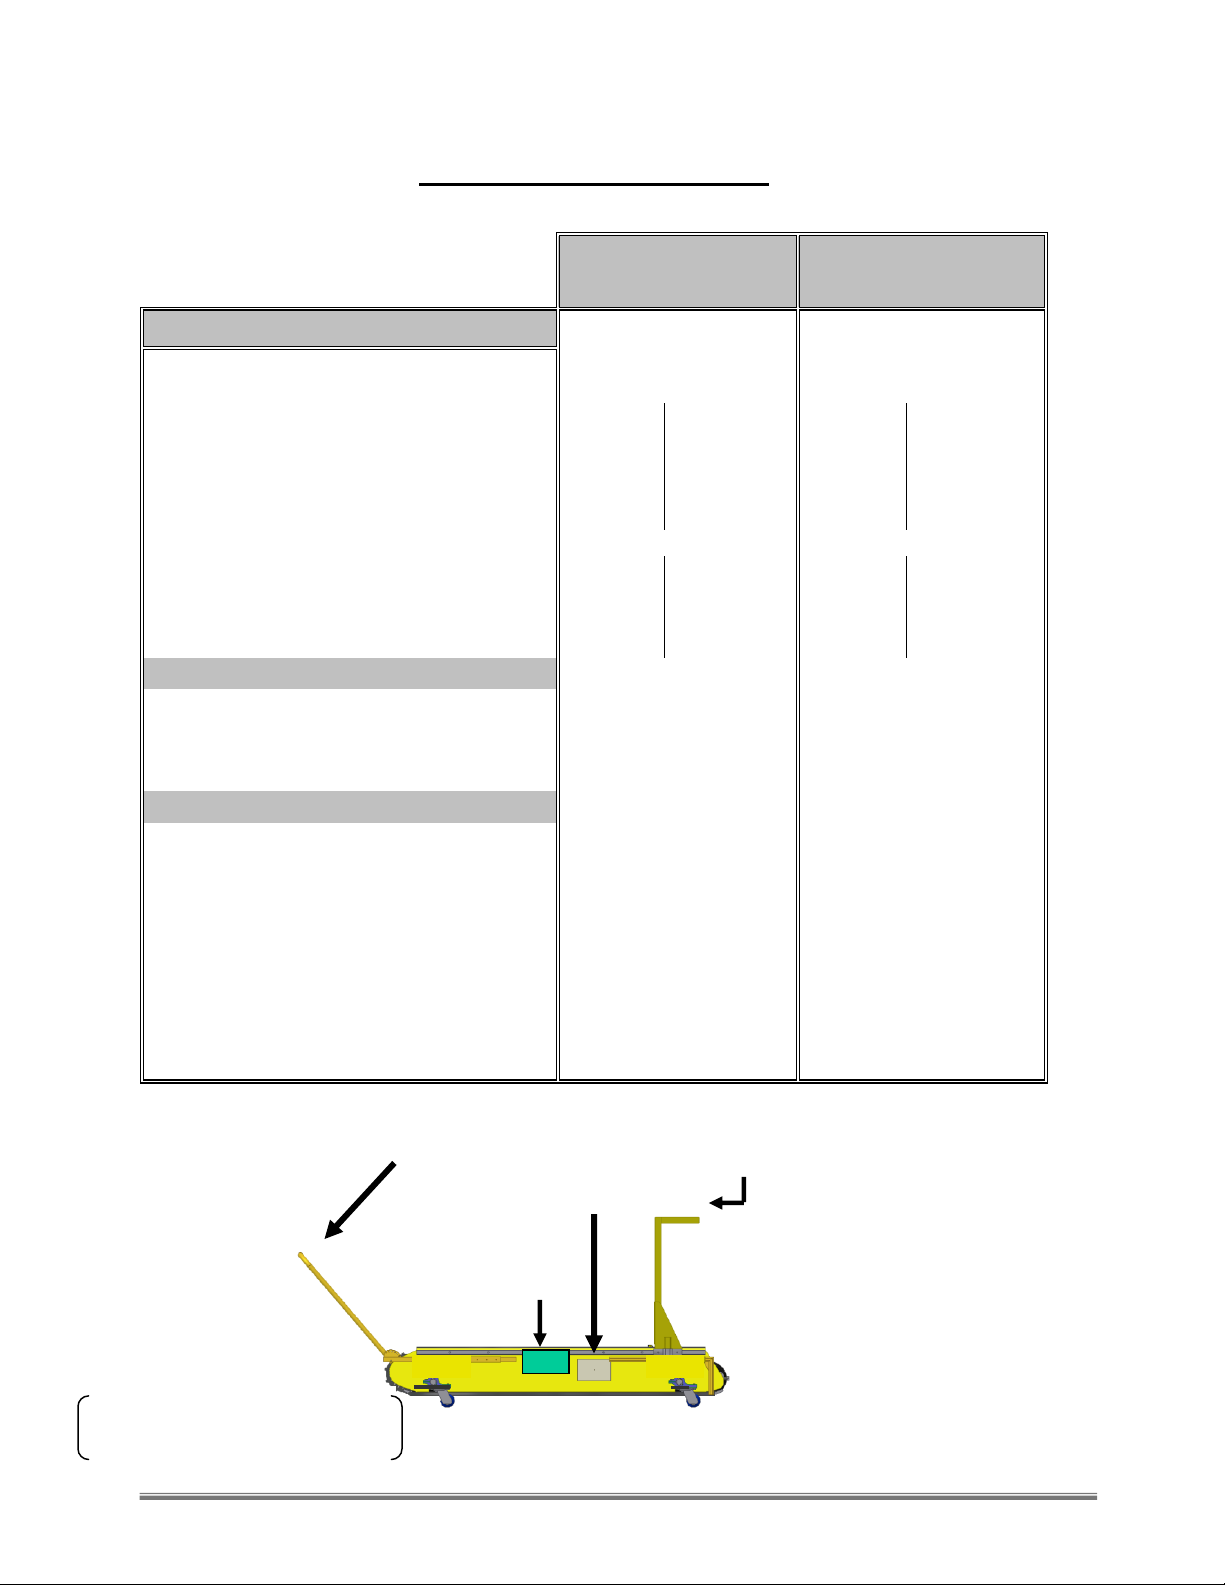
SPECIFICATIONS
Twin-Track 47
Twin-Track 66
Physical Characteristics
Frame
Steel
Steel
Cabinet
Aluminum
Aluminum
Length
47 in
1194 mm
66 in
1676 mm
Width
29.25 in
743 mm
29.5 in
749 mm
Height
14.5 in
368 mm
14.5 in
368 mm
Weight
645 lbs
292.6 Kg
820 lbs
372 Kg
Load Bearing Capacity (inclined)
600 lbs
272 Kg
1100 lbs
500 Kg
Maximum Inclination
40°
40°
Load Bearing Capacity (flat)
2200 lbs
1000 Kg
2200 lbs
1000 Kg
Limear Speed (Dual Speed)
High
44' / min
13.4 m/min
44' / min
13.4 m/min
Low
22' / min
6.7 m/min
22' / min
6.7 m/min
Power
Motor
(2) Industrial
(2) Industrial
Horse Power (HP)
¾ HP / each
¾ HP / each
Horse Power (HP) Upgrade
2 HP / each
2 HP / each
Gearbox
(2) 100:1 / each
(2) 100:1 / each
Power Features
Batteries
2
2
Integrated Universal AC/DC Battery Charger
110 / 240 V
110 / 240 V
Input
110 / 240 V
110 / 240 V
Input
50/60 Hz, 12/6 Amps
50/60 Hz, 12/6 Amps
Battery Amperage
85 Amps (x2)
85 Amps (x2)
Battery Amperage Upgrade
135 Amps (x2)
135 Amps (x2)
Operating Power
24 V DC, 30 Amps
24 V DC, 30 Amps
Full recharge time/battery
360 min.
360 min.
Continuous Run-Time
3 hours
3 hours
Leverage Arm
Storage
Drawer
(Track-O
66 only)
Front
Rear
Control
Panel
Always put Front-end on the
elevated part of an
inclined surface
Adjustable
Retention
Backrest

10
Movex Innovation Inc.
ELECTRIC CIRCUIT
11
Movex Innovation Inc.
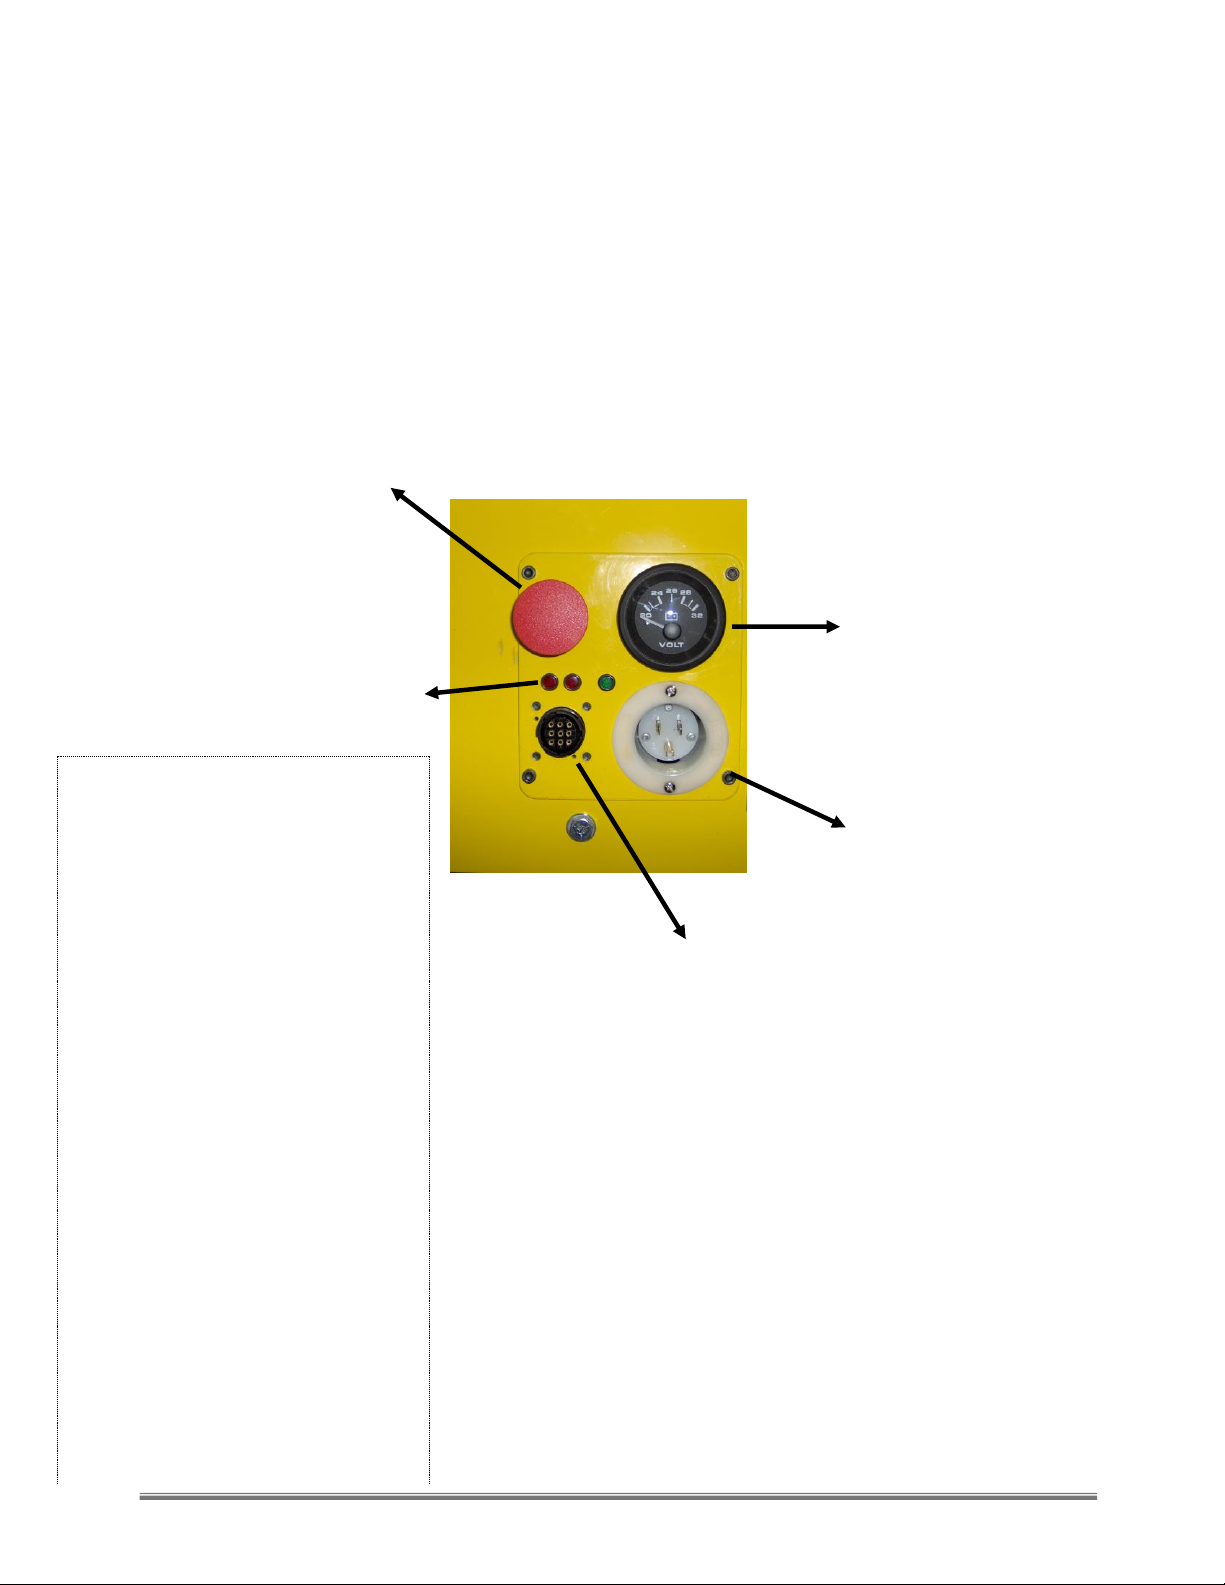
ELECTRIC PANEL
(Located on the Left Side of the Track-O)
VOLTMETER
PLUG FOR EXTENSION
CORD TO CHARGE
BATTERIES
PLUG FOR WIRED
REMOTE CONTROL
EMERGENCY STOP BUTTON
(PUSH TO STOP)
(PULL TO ACTIVATE MACHINE)
GREEN LED INDICATES
BATTERIES ARE CHARGING
----------------------------------------
RED LEDS (2) INDICATES
MACHINE IS « ON »
TWO ILLUMINATED RED LEDS
SIGNIFIES THE TRACK-O IS «ON ».
IF ONE OR BOTH OF THE RED LEDS
IS NOT ILLUMINATED THERE IS
SOME TYPE OF ELECTRIC PROBLEM.
SOLUTIONS :
1. PRESS THE EMERGENCY RED
BUTTON AND THEN RE-
ACTIVATE THE MACHINE BY
PULLING IT INTO THE «ON »
POSITION
2. PRESS THE EMERGENCY RED
BUTTON ON THE WIRELESS
REMOTE CONTROL AND THEN
RE-ACTIVATE THE MACHINE ON
THE WIRELESS REMOTE
CONTROL
3. CHECK THE BATTERIES OF THE
REMOTE CONTROL.
IF THE PROBLEM PERSISTS
OBTAIN TECHNICAL SUPPORT.

12
Movex Innovation Inc.
REMOTE CONTROLS
WIRELESS WIRED
FOR SAFETY REASONS IT IS STRONGLY
RECOMMENDED THAT WHEN THE TRACK-O IS NOT
BEING USED TO MOVE A LOAD THAT THE EMERGENCY
STOP BUTTON BE PRESSED (EITHER ON THE TRACK-O OR ON
THE WIRELESS REMOTE CONTROL OR BOTH).
THIS WILL AVOID AN UNWANTED AND DANGEROUS
MOVEMENT OF THE TRACK-O CAUSED BY AN
ACCIDENTAL PRESSING OF A BUTTON ON THE
WIRELESS REMOTE CONTROL.
FORWARD
(2 Speed Button)
TURN LEFT
(2 Speed Button)
ACTIVATION
BUTTON
(Turn)
Emergency
Stop
(Push)
Turn the button
to
Turn «On»
REVERSE
(2 Speed
Button)
TURN RIGHT
(2 Speed
Button)
FORWARD
REVERSE
TURN RIGHT
TURN LEFT
ACTIVATION
OF
2nd SPEED

13
Movex Innovation Inc.
FREQUENCY TABLE FOR
WIRELESS REMOTE CONTROL
NORTH AMERICA
Channel
Frequency
Channel
Frequency
Channel
Frequency
Channel
Frequency
1
310.0325
11
312.7075
21
315.3825
31
318.0575
2
310.3000
12
312.9750
22
315.6500
32
318.3250
3
310.5675
13
313.2425
23
315.9175
33
318.5925
4
310.8350
14
313.5100
24
316.1850
34
318.8600
5
311.1025
15
313.7775
25
316.4525
35
319.1275
6
311.3700
16
314.0450
26
316.7200
36
319.3950
7
311.6375
17
314.3125
27
316.9875
37
319.6625
8
311.9050
18
314.5800
28
317.2550
38
319.9300
9
312.1725
19
314.8475
29
317.5225
10
312.4400
20
315.1150
30
317.7900
EUROPE
Channel
Frequency
Channel
Frequency
Channel
Frequency
Channel
Frequency
112
428.5350
123
431.4775
134
434.4200
145
437.3625
113
428.8025
124
431.7450
135
434.6875
146
437.6300
114
429.0700
125
432.0125
136
434.9550
147
437.8975
115
429.3375
126
432.2800
137
435.2225
148
438.1650
116
429.6050
127
432.5475
138
435.4900
149
438.4325
117
429.8725
128
432.8150
139
435.7575
118
430.1400
129
433.0825
140
436.0250
119
430.4075
130
433.3500
141
436.2925
120
430.6750
131
433.6175
142
436.5600
121
430.9425
132
433.8850
143
436.8275
122
431.2100
133
434.1525
144
437.0950

14
Movex Innovation Inc.
REMOTE CONTROL OPERATING INSTRUCTIONS
The Twin-Track’s Remote Controls activate five (5) operations: Forward, Reverse, Right
Turn, Left Turn, and speed.
The Twin-Track has two (2) speeds: 22 feet/ minute (6.7 meters/minute) and 44
feet/minute (13.4 meters/ minute).
FUNCTIONS ON THE WIRED REMOTE CONTROL
= FORWARD at slow speed.
+ Turbo = FORWARD at fast speed.
= REVERSE at slow speed.
+ Turbo = REVERSE at fast speed.
= RIGHT TURN (Left track will move forward while Right track is stopped.
+ Turbo = RIGHT TURN on the spot, in a circle (Left track will move Forward while
Right track moves in Reverse).
= LEFT TURN (Right track will move forward while Left track is stopped.
+ Turbo = LEFT TURN on the spot, in a circle (Right track will move Forward while Left
track moves in Reverse).

15
Movex Innovation Inc.
REMOTE CONTROL OPERATING INSTRUCTIONS
FUNCTIONS ON THE WIRELESS REMOTE CONTROL
Emergency Stop = Pressing this button instantly stops the Track-O.
To re-activate the Track-O, turn button to the left until it pops into
the «On» position.
Activation = To activate the Track-O after the Emergency Stop Buttons has been
activated: turn the green Activation button to the right (to «On»
position).
On the Twin-Track Wireless Remote Control, the four (4) control buttons : , , , ,
Left, can be pressed partially or completely giving the following options:
(pressed half way) = Forward at slow speed.
(full pressure) = Forward at fast speed.
(pressed half way) = Reverse at slow speed.
(full pressure) = Reverse at fast speed.
(pressed half way) = Right turn (Left track will move forward while Right track is
stopped).
(full pressure) = Right turn in circle (Left track moves forward and Right track
moves in opposite direction.
(pressed half way) = Left turn (Right track will move forward while Left track is
stopped.
(full pressure) = Left turn in circle (Right track moves forward and Left track
moves in opposite direction).

16
Movex Innovation Inc.
REMOTE CONTROL OPERATING INSTRUCTIONS
FUNCTIONS ON THE WIRELESS REMOTE CONTROL –(CONTINUED)
+ (regardless of pressure) = Gradual RIGHT turn forward (Left track will move
forward at full speed while Right track moves forward
at slow speed.
+ (regardless of pressure) = Gradual LEFT turn forward (Right track will move
forward at fast speed while Left track moves forward
at slow speed.
+ (regardless of pressure) = Gradual RIGHT turn in reverse (Left track will move in
reverse at full speed while Right track moves in
reverse at slow speed.
+ (regardless of pressure) = Gradual LEFT turn in reverse (Right track will move in
reverse at fast speed while Left track moves in reverse
at slow speed.

17
Movex Innovation Inc.
OPERATING INSTRUCTIONS
PRIOR TO USING THE TRACK-O FOR THE FIRST TIME
Read the Operating Manual from cover to cover.
Be able to distinguish the FRONT from the REAR of the TRACK-O.
The «leverage arm» is found at the FRONT of the TRACK-O. The optional
«adjustable back-rest» is found at the back of the TRACK-O. (SEE DIAGRAM AT
BOTTOM OF PAGE 6)
Be able to solidly fasten the tie-down straps to the TRACK-O’s anchoring devices.
Know exactly where the «Emergency Stop Button» is located on the TRACK-O’s
frame.
Know where the wireless remote control is located (the TRACK-O is optionally
equipped with one).
Be able to identify the power inlet cord used to charge the batteries.
PRIOR TO MOVING A LOAD WITH THE TRACK-O TWIN-TRACK
Make sure the tie-down straps and the anchoring devices are in good working
condition at all times and that the Track-O is functioning properly on level
ground prior attempting any manoeuvres on an inclined surface.
The weight of the load to be moved along a horizontal surface must not exceed
2200 lbs/1000 kg (Up to 3,300 lbs / 1.5 tons on a flat incline of 10 degrees).
The weight of the load to be moved up or down an inclined surface or a staircase
must not exceed 1100 lbs/500 kg. The load must not exceed 60 inches in height
on the Track-O.
When moving on stairways, the stairway must be in good condition and capable
of supporting the combined weight of the TRACK-O and the load. The Track-O
«Twin-Track 47» weighs 630 lbs/286 kg and «Twin-Track 66» weighs 820 lbs/ 372
kg.
The batteries must be sufficiently charged (as indicated by the charge level
indicator).

18
Movex Innovation Inc.
PRIOR TO MOVING A LOAD WITH THE TRACK-O TWIN-TRACK
(CONTINUED)
The TRACK-O must not be set in motion while the cord for recharging the battery
is still plugged in.
Only one operator must be in control of either the cabled or the wireless remote
and must absolutely avoid using both remotes simultaneously.
The path where the TRACK-O will be passing must be cleared of any obstacles.
Staff must be posted in strategic locations (for example, the top landing and
bottom of a stairwell) to prohibit access while the TRACK-O is being used. Never
allow anyone to stand at the foot of the stairs.
Dockboard of bridgeplates shall be properly secured before they are driven over.
Dockboard or bridgeplates shall be driven over carefully and slowly and their
rated capacity never exceeded.
Elevators shall be approached slowly, and then entered squarely after the
elevator car is properly levelled. Once on the elevator, the controls shall be
neutralized and turn the power off.
NEVER leave the TRACK-O unattended with the “On-Off” switch at “RUN” (the
apparatus could be set in motion inadvertently).
In order for the Track-O to function properly the surface where the TRACK-O is to
be used must be free of grease, oil and other lubricants that would otherwise
reduce the adherence between the rubberized track and the ground.
When the Track-O is operated on a flat surface, it should not be in movement in
a lateral inclination of more than 7 degrees.
When the apparatus is operated on a longitudinally inclined surface, it shall not
be in movement in a longitudinal inclination of more than 40 degrees.
The Track-O should not be used in environments containing hazardous
concentrations of metal dust, including aluminium, magnesium, and their
commercial alloys, other metals of similarly hazardous characteristics, or in
environments containing black carbon, coal or coke dust.

19
Movex Innovation Inc.
OPERATING INSTRUCTIONS
AMBIENT OPERATING AIR TEMPERATURE
The Track-O will function in temperatures between -25° C and +40° C (-13° F and
+104°F)
IMPORTANT: For working environments with ambient temperatures exceeding
+40° C (+100°F) it is strongly recommended that the Track-O be UPGRADED to
be equipped with 2 HP motors, 125 Amp Drives and 135 Amp batteries.
Working in temperature over +40°C (+100°F) will cause the Electric Drives to
shut down the Track-O functions. The Track-O could become operational again,
once the Electric Drives have been cooled.
Working in temperatures below -25°C (-13F) will result in a reduction in the
Track-O’s speed and carrying capacity and will result in a dramatic reduction in
the batteries’ continuous run-time capacity.
IMPORTANT: Batteries should be fully charged prior to operating the Track-O in
sub 0°C (32°F) conditions. Partially or un-charged batteries exposed to sub 0°C
(32°F) conditions may be permanently damaged.
AMBIENT OPERATING ENVIRONMENT
The Track-O should not be used in environments containing hazardous
concentration of acetylene, tutadiene, ethylene oxide, hydrogen (or gases or
vapors equivalent in hazard to hydrogen, such as manufactured gas), propylene
oxide, acetaldehyde, cyclopropane, diethyl ether, ethylene, isoprene, or
unsymmetrical dimethyl hydrazine (UDMH.
STORING THE TRACK-O
The Track-O should always be stored:
With all emergency buttons on the «OFF» position
In a locale with limited access
Where it is not exposed to rain or snow
In a locale with an ambient temperature between -10° C (14° F) and 30° C (86° F).
20
Movex Innovation Inc.
OPERATING INSTRUCTIONS
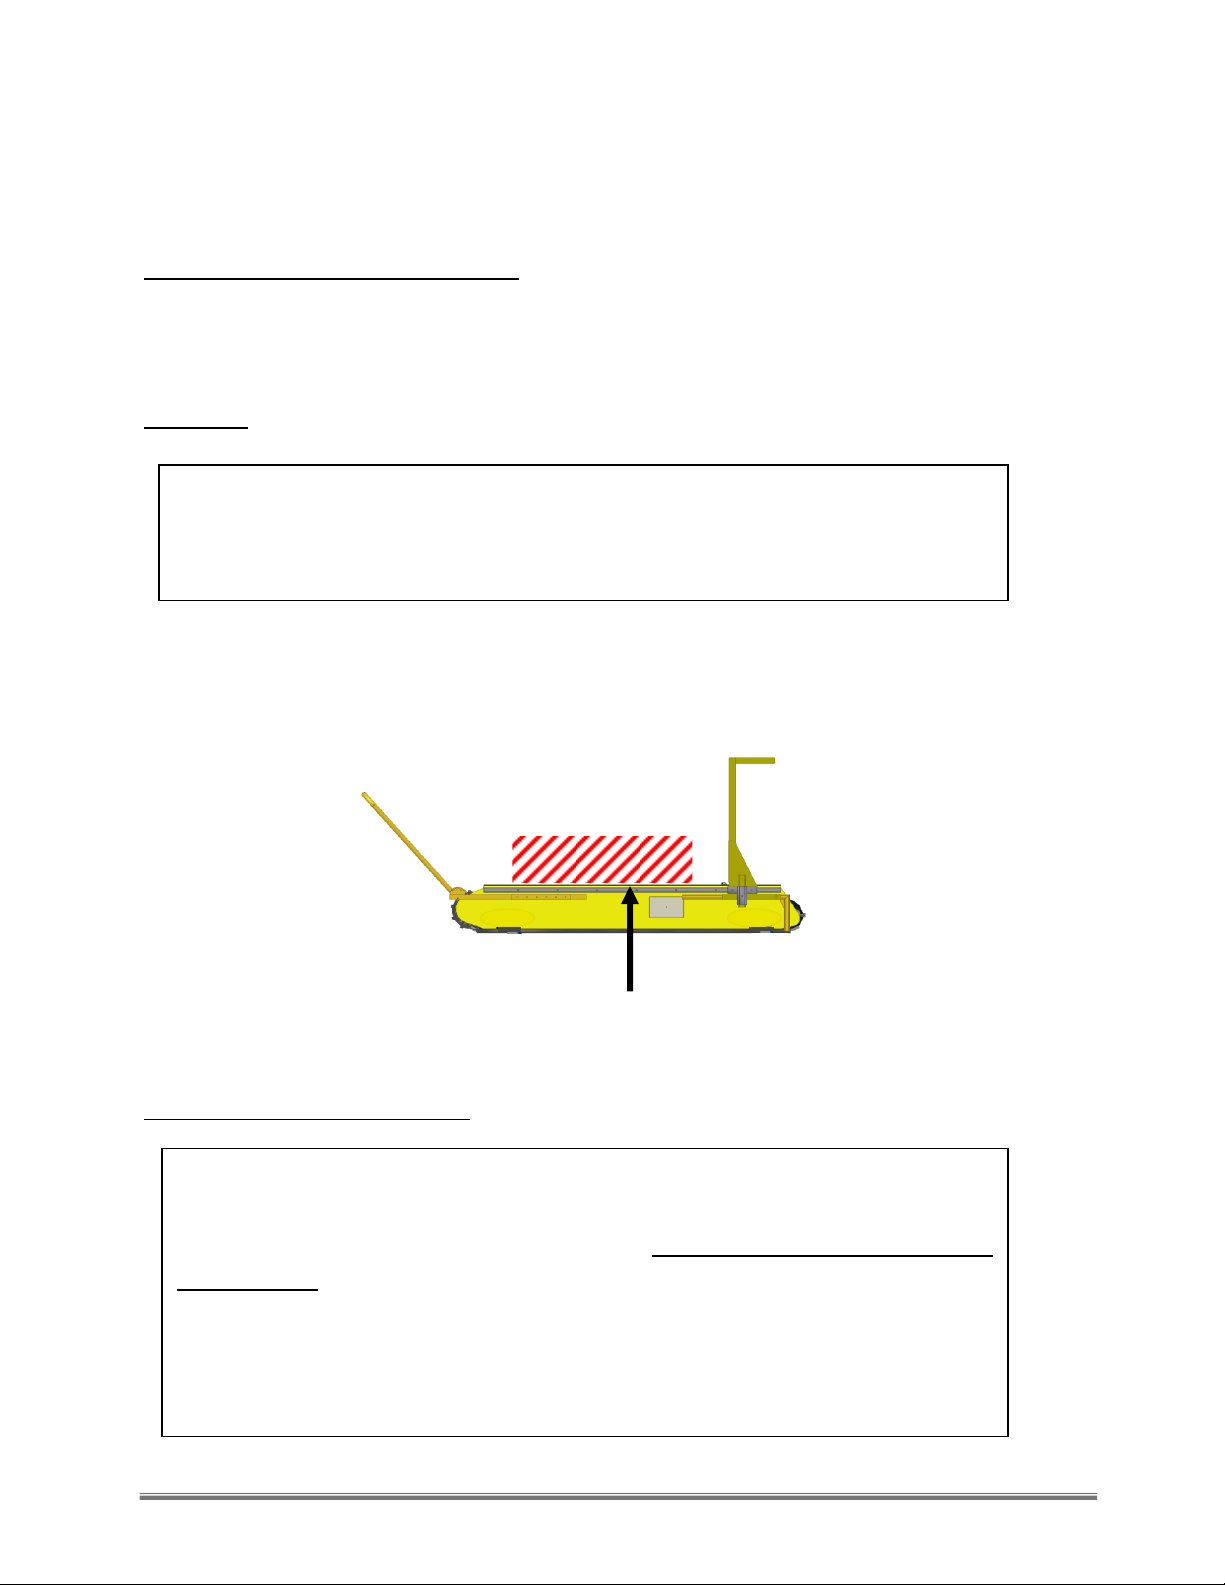
POSITIONING A LOAD ON THE TRACK-O
1. Make sure the “ON-OFF” switch is OFF prior to putting load on the TRACK-O.
ON STAIRS
2. When placing the load on the Twin-Track for climbing and descending stairs, the
center of gravity of the load must be closer to the Front of the machine than the
center of gravity of the Twin-Track (see diagram below). The center of gravity of
the Twin-Track is indicated by a pictogram on the side of the platform.
ON INCLINES (HILLS,GULLIES,ETC)
WHEN CLIMBING STAIRS THE TRACK-O CLIMBS FRONT-END FIRST.WHEN DESCENDING STAIRS,THE
TRACK-O MOVES BACKWARDS:REAR-END FIRST.THIS MEANS THE FRONT-END SHOULD ALWAYS BE
AT THE HIGHER END OF THE STAIRS.
IN CASES WHERE THE TRACK-O CAN BE TURNED SO THAT THE FRONT END IS ALWAYS ON
THE HIGHER END OF THE HILL:THIS MEANS,CLIMBING FRONT-END FIRST AND
DESCENDING REAR-END FIRST (BACKWARDS)–THE INSTRUCTIONS FOR CLIMBING
STAIRS APPLIES.
IN CASES WHERE THE TRACK-O WILL BE MOVING UP AND DOWN IN THE SAME
DIRECTION –FOR EXAMPLE:GOING DOWNHILL FRONT-END FIRST AND THEN GOING UP
HILL FRONT-END FIRST –THE LOAD MUST BE PLACED AT THE CENTRE OF THE TRACK-O.
Front
Rear
TRACK-O
Center of gravity
This manual suits for next models
1
Table of contents
Popular Utility Vehicle manuals by other brands

Kubota
Kubota RTV-X900 Operator's manual

Polaris
Polaris 2015 RZR 900 XC Edition Service manual

Toro
Toro Workman GTX Operator's manual

Carry-On Trailer Corporation
Carry-On Trailer Corporation 7x16CG User's manual - safety guide

Husqvarna
Husqvarna 4210-E owner's manual

Club Car
Club Car Cafe Express Owner's manual supplement

Toro
Toro Workman 07040 Operator's manual

American Sportworks
American Sportworks 7151 150cc Owner's manual / parts guide

Lenoxx
Lenoxx GK260 Owner's manual with assembly instructions

HOGG & DAVIS
HOGG & DAVIS ODP 40 manual

Silver Eagle
Silver Eagle VAST-20W Operation, service & parts manual

Hotsy
Hotsy TRB-3500 Operator's manual


