MP-Man PC39HD User manual

PC39HD

Page of 412
1.PARTS OF THE CAMCORDER 5
2.PREPARING FOR USING 5
INSTALLING THE BATTERY 5
CHARGING THE BATTERY 7
INSERTING THE MEMORY CARD 6
SETTING THE LANGUAGE 8
SETTING THE DATE AND TIME 10
MONITOR SCREEN DISPLAY 11
3.USING THIS CAMCORDER 14
TURNING THE CAMCORDER ON AND OFF 14
CHANGE THE MODE 15
RECORDING A VIDEO CLIP 15
TAKING STILL IMAGES 16
USING THE SELF-TIMER 17
USING THE FLASH 18
RECORDING AUDIO 19
4.USING THE MENU IN RECORD MODE 19
MENU IN CAPTURE MODE 19
MENU IN VIDEO MODE 22

Page of 413
SETUP MENU 23
5.PLAYBACK 25
PLAYING BACK MOVIE CLIPS 25
PLAYBACK STILL IMAGE 26
PLAYING BACK AUDIO FILES 26
OTHER FUNCTION IN PLAYBACK MODE 27
6. MAKING CONNECTIONS 29
CONNECTING THE CAMCORDER TO A TV 29
CONNECTING THE CAMCORDER TO A HDTV 30
CONNECTING THE CAMCORDER TO A PC 32
7. SOFTWARE INSTALLATION 33
INSTALLING THE SOFTWARE 33
8. TROUBLESHOOTING 38
9. TECHNICAL SPECIFICATIONS 39

Page of 414
Thank you for purchasing this product. Please read these operating
instructions carefully in order to use the digital video camera correctly.
Keep the instructions in a safe place after reading so that you can refer to
them later.
Precautions
Before using the camcorder, please ensure that you read and understand
the safety precautions described below.
• Do not try to open the case of the camcorder or attempt to modify this
camcorder in any way. Maintenance and repairs should be carried out
only by authorized service providers.
• Keep the camcorder away from water and other liquids. Do not use the
camcorder with wet hands. Never use the camcorder in the rain or snow.
Moisture creates the danger of electric shock.
• Use only the recommended power accessories. Use of power sources not
expressly recommended for this equipment may lead to overheating,
distortion of the equipment, fire, electrical shock or other hazards.

Page of 415
1. Parts of the camcorder
1: Zoom switch
2: Capture /voice
record button
3: Power button
4: Power LED
5: Video record mode
6: Charging LED
7: Mode dial
8: AV out jack
9: Earphone jack
10: DCinjack
11: USBJack
12: HDMIjack
13:Displaybutton
14: Speaker
15:LCDscreen
16: Menu button

Page of 416
17:Joystick/OKbutton
18: Delete/ Flash button
19:CompensatingLED
20: Flash strobe
21:Microphone
22: Lens
23: Battery cover
24: Tripod socket
2. Preparing for using
Installing the Battery
1. Slide the battery cover.
2. Place the accessory lithium-ion
battery into the compartment. Note
that the metallic contacts must be

Page of 417
aligned with the contacts in the compartment.
3. After the battery is properly installed, replace the battery cover.
Charging the battery
Please charge the battery at least 8 hours for first time use.
a) Power OFF; connect the AC-adaptor to the camcorder DC in jack.
b) Plug the AC-adaptor to the electrical outlet.
c) Charging starts when charging LED turns BLUE. The charge indicator
light turns OFF when charging is
completed.
d) Disconnect the camcorder.
Inserting the Memory Card
This camcorder has an internal memory of
32MB, it can only record a few pictures or
movie clips. If you want record more you have to use a SD or MMC card

Page of 418
(The MAX.SD/MMC card that this camcorder could support is up to
16GB ).Turn off the camcorder before inserting or removing the memory
card. Be sure to orient the card correctly when inserting it. Never try to
force the memory card into the slot when you feel resistance. The memory
card has a write protect switch, which used to protect data from accidental
deletion. Therefore, whenever you want to record, format or delete files in
the SD card, disable the write protection beforehand.
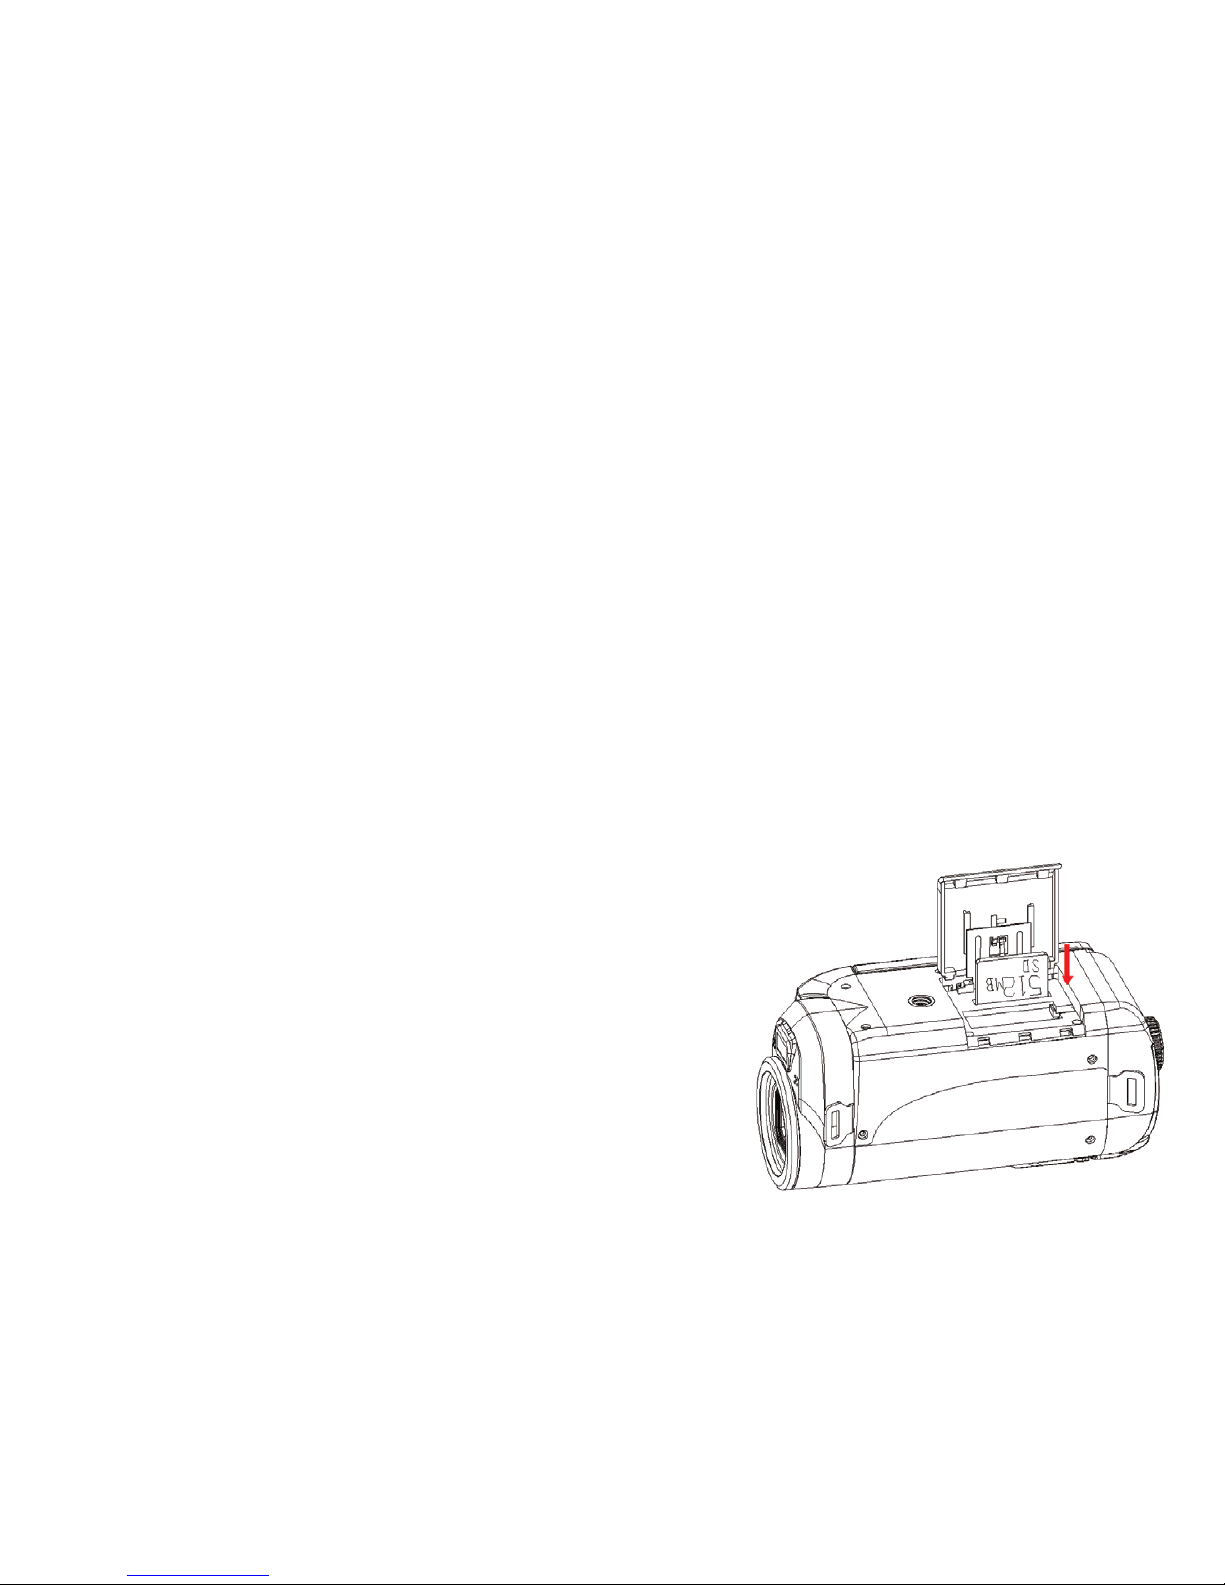
1. Turn off the camcorder.
2. Slide the battery cover and then you will see the SD card slot.
3. Insert the memory card as illustrated.
4. Close the battery cover.
• To release the memory card press the edge of the card gently.
Format the memory card
It is important to format the memory card when it is the first time you use
this camcorder. All data will be deleted including protected files. Be sure to
download important files to your computer before formatting.
1: Turn the power on, and set the camcorder to the Setup Menu.(See the
details on page 22 )

Page of 419
2: Push the joystick upward or downward to select [Format] then push the
joystick rightward to launch the submenu.
3: Push the joystick upward or downward to select the item [YES] and then
press the OK button to erase all data.
Setting the Language
When using the camcorder for the first time after purchasing it, be sure to
choose a language and set the date & time before using the camcorder.
1: Turn the power on, and set the camcorder to the Setup Menu.(See the
details on page 22 )
2: Push the joystick upward or downward to select [Language] then move
the joystick rightward to launch the submenu.
3: Push the joystick upward or downward to select the desired language
and then press the OK button to confirm the setting.
4: Press the MENU button to close the menu.

Page of 4110
Setting the date and time
1: Turn the power on, and set the camcorder to the Setup
Menu. (See the details on page 22)
2: Push the joystick upward or downward to select
[Date/Time] then push the joystick rightward to launch
the submenu: Date Format, Date Setup.
3: Select a date format by using the joystick. And then
select [Date Setup].
4: Push the joystick upward or downward to change the highlighted value.
Push the joystick leftward or rightward to move the cursor between
settings.
5: Press the OK button to confirm the setting.
6: Press the MENU button to close the menu.
• The date and time can be only added to still images by setting the
function [Date Stamp] in capture menu.

Page of 4111
Monitor screen display
Capture

Page of 4112
Video record mode

Page of 4113
Playback mode

Page of 4114
3. Using this camcorder
Turning the Camcorder On and Off
1. Open the LCD panel to power on the camcorder and close the L CD
panel to turn off the camcorder.
2. You can also press the POWER button to turn on the camcorder and
press it again to turn the camcorder off.
To save battery power, the LCD monitor automatically turns off 30 seconds
after the last control accessed (factory-preset setting). Press any button
other than the power button to turn on the LCD monitor. After the power
saving function has been active for the set time, the power will turn off
completely. Press the Power button to power the camera back on. You can
change the power-off time by setting the function [Auto off] in the Setup
menu.

Page of 4115
Change the record mode
There are four record modes in this camcorder.
Rotate the mode dial to set the camcorder to
different mode.
Recording a video clip
1: Turn on the camcorder and set the camcorder to video record mode
( ).
2: Zooming:
Display Title Description
Capture mode For taking still photos.
Video mode For recording movie clips.
Audio mode For recording audio files.
Playback mode For playback record files.

Page of 4116
Moving the Zoom switch rightward or leftward to zoom in or zoom out the
screen. The value of magnification level appears on the LCD monitor.
3: Press the VIDEO RECORD button to start recording.
4: Press the VIDEO RECORD again to end the recording. If the memory is
full the video camera will stop recording automatically.
• On the upper of the LCD monitor displays the recorded time.
• When the light is insufficient press the FLASH/DELETE button to
turn on the compensating LED and when the light is enough press the
FLASH/DELETE button to turn off the compensating LED.
Taking still images
1. Set the camcorder to capture mode, the icon appears on the LCD
screen.
2. Zooming:
Moving the Zoom switch rightward or leftward to zoom in or zoom out
the screen. The value of magnification level appears on the LCD
monitor.
3.Hold the camcorder steady and then press the CAPTURE/VIOCE

Page of 4117
RECORD button down to take a picture.
Using the Self-timer
Use the self-timer to set a delay from the time the shutter button is pressed
to the time the image is shot.
1: Turn the power on, and set the camcorder to the Capture mode.
2: Press the MENU button to display the capture menu.
3: Using the joystick to select the item [Self Timer]. And move the joystick
rightward to launch the submenu:
Disable: Don’t use self-timer.
10 Seconds: The shutter release will delay for 10 seconds.
20 Seconds: The shutter release will delay for 20 seconds.
4: Move the joystick upward or downward to select the self timer.
5: Press the OK button to confirm the setting, and then press the MENU
button to close the menu.
6: Press the CAPTURE/ VIOCE REICORD button to take picture.

Page of 4118
Using the Flash
The flash is not only for taking pictures when there is insufficient light, but
also for when the subject is in shade or with backlight conditions. Pressing
the Delete/flash button cycles your camera through the various flash
modes. The flash will not activate during continuous shooting or movie
recording.
1: Set the camcorder to the Capture mode.
2: Press the FLASH/DELETE button to change the flash mode.
Each time the flash button is pressed, the flash icon changes.
Auto: Automatically turn on/of
Flash on: Force on the flash
Flash off: Force off the flash
3: Press the SHUTTER button to take a picture.
• When the battery level is low the flash strobe will not work.
• The LCD screen is black when the flash is charging. The next image
can be shot only when charging is completed.

Page of 4119
Recording audio
1: Turn the camcorder on and set it to audio record mode.
2: Press the CAPTURE/VIOCE RECORD button to start recording.
3: Press the CAPTURE/VIOCE RECORD again to end the recording. If the
memory is full the video camera will stop recording automatically.
• On the center of the LCD monitor displays the recorded time.
• There is no menu in audio record mode.
4.Using the menu in record mode
When a menu is displayed, the joystick is used to make the desired setting.
The audio record mode doesn’t have a menu.
Menu in capture mode
1: Turn on the camcorder and set it to capture
mode.
2: Press the MENU button to display the menu.
3: Move the joystick upward or downward to select an item.

Page of 4120
4: Push the joystick rightward to enter the submenu.
5: Use the joystick to select the desired item.
6: Press the OK button to confirm the setting.
7: Press the MENU button to close the menu.
Capture menu list
Menu item Function
Resolution There are five options for choice:
[12M]/[8M] /[5M]/[3M]/[0.3M].
Quality Select a lower image quality to decrease the image size in
order to capture more images. There are three options for
choice:[Super] /[Fine] /[Normal].
White
Balance
Adjust the white balance to suit different light sources.
There five items for option: [Auto]/[Daylight]/ [Cloudy] /
[Fluorescent] / [Tungsten].
Color
Effect
Set the color effect to add a color tone to the picture.
[color]: Reflects the true color of the object.
[Sepia]: Adds a sepia color tone to the picture.
Table of contents
Languages:
Other MP-Man Camcorder manuals