Murray 20656x31A Technical manual

F- 98517
Instruction Book Self- Propelled Mower
Model 20656x31A
Manuel de lÕutilisateur Tondeuse autotracte
modle 20656x31A
Read and eep this boo for future reference.
This boo contains important information on
SAFETY, ASSEMBLY, OPERATION, AND
MAINTENANCE
The owner must be certain that all the product
information is included with the unit. This
information includes the INSTRUCTION
BOOKS, the REPLACEMENT PARTS and the
WARRANTIES.This information must be
included to ma e sure state laws and other
laws are followed.
PRODUCT INFORMATION
Lisez- le et conservez- le comme futur ouvrage
de rfrence. Ce manuel contient dÕimportantes
donnes sur LA SECURITE, LA PRPARATION,
LE FONCTIONNEMENT ET LÕENTRETIEN de ce
modle
RENSEIGNEMENTS Ë LÕUSAGE DU PROPRITAIRE
Le propritaire doit tre certain que tous les
renseignements sur le produit sont inclus avec
la tondeuse. Ces renseignements comprennent
les livres dÕinstructions, le livre de pices de
rechange, les garanties et les certificats de
conformit. Ces renseignements doivent tre
inclus pour tre certain que les lois nationales et
autres lois sont observes.

2
F- 98517
34
1
2
5
1
1
23
2
3
4
2
3
5
4
3
1
6
5
4
5
4
3
1
2
78
1
2
9
2
11
10
1
2
1
211 112 13
1
14
1
2
1
2
2
15

3
F- 98517
16
1
2
34
3
5
6
7
8
9
10
11 17
9
12 18
9
13
14
16
15 19
20
1
2
3
4
5
21
1
2
34
522 23
2
1
3
124
2

4
F- 98517
CONTENTS
OWNERÕS INFORMATION 4
SAFE MOWING GUIDE 6
STEPS TO FOLLOW 8
ASSEMBLY 9
OPERATION 9
MAINTENANCE 10
TROUBLE SHOOTING CHART 12
SLOPE GUIDE 1
TWO YEAR LIMITED WARRANTY
Murray, Inc. warrants to the original urchaser
that this unit shall be free from defects in
material and workmanshi under normal use
and service for a eriod of Two (2) Years from
the date of urchase; however, this warranty
does not cover engines, accessories (such as
snow blowers, snow blades, grass baggers and
loughs), transmissions, batteries and Normal
Wear Parts (exce t as noted below) or
transaxles as the com anies that manufacture
these items furnish their own warranties and
rovide service through their authorized field
service facilities. For additional information, see
the warranties covering these articular arts. If
you are uncertain whether your unit contains or
is equi ed with one or more of these arts,
consult your dealer rior to urchase. Subject to
the terms and conditions noted in this Limited
Warranty, we shall, at our o tion, re air or
re lace at no cost to the original urchaser any
art covered by this Limited Warranty during the
a licable warranty eriod.
In the event the battery roves defective within
ninety (90) days from the date of urchase, we
will re lace it without charge. If the battery
roves defective after (90) days but within one
hundred twenty (120) days from the date of
urchase, we will re lace it for a charge of one
half (1/2) of the retail rice of the battery in effect
at the time of return.
Normal Wear Parts are defined as belts, blades,
blade ada ters, neumatic tires, headlights and
seat covers. These arts are warranted to be
free from defects in material and workmanshi
as delivered with the roduct. Any claim for
re air or re lacement of Normal Wear Parts
must be made within thirty (30) days of the date
of urchase. No claims involving damage
caused from material use, abuse or misuse will
be honored.
This Murray, Inc. Two (2) Year Limited
Warranty is your exclusive remedy; however,
this warranty is void or does not a ly to any
unit that has been tam ered with, altered,
misused, abused or used for rental or other
commercial and/or rofessional
(non- homeowner) uses. Your warranty does not
cover minor mechanical adjustments which are
not due to any defect in material or
workmanshi . For assistance in making such
adjustments, consult your Instruction Book.
To make a claim under this Murray, Inc. Two (2)
Year Limited Warranty, return the unit (or if
authorized in advance, the defective art) along
with your roof of urchase to an Authorized
Service Center near you. To locate the nearest
Authorized Service Center, call the Central Parts
Distributor for your area shown in the list
rovided with your unit or check the Yellow Page
listings in your local tele hone directory. If you
return the entire unit, we will re air the unit. If we
authorize the return of the defective art only, we
will either re lace or re air the art. In the case
of a defect in a transmission or differential (as
distinguished from a transaxle), the entire
transmission or differential must be returned
since they do not include user serviceable arts.
This Murray, Inc. Two (2) Year Limited
Warranty gives you s ecific legal rights, and
you may also have other rights which vary from
statetostate. This Limited Warranty is given
in lieu of all other expressed and implied
warranties including the implied warranty of
merchantability and warranty of fitness for a
particular purpose. If you need additional
information on this written warranty or
assistance in obtaining service, write:
MURRAY CANADA, INC., Factory Customer
Service, 1195 Coutney ark Drive East, Missis-
sauga, Ont. L5T- 1R1 (1- 800- 661- 6662)
OWNERÕS INFORMATION
This instruction book is written for a erson with
some mechanical ability. Like most service
books, not all the ste s are described. Ste s on
how to loosen or tighten fasteners are ste s
anyone can follow with some mechanical ability.
Read and follow these instructions before you
use the unit.
Know your product: If you understand the unit
and how the unit o erates, you will get the best
erformance. As you read this manual, com are
the illustrations to the unit. Learn the location
and the function of the controls. To hel revent
an accident, follow the o erating instructions
and the safety rules. Kee this manual for future
reference.
IMPORTANT: Many units are not assembled
and are sold in cartons. It is the res onsibility of
the owner to make sure the assembly instruc-
tions in this manual are exactly followed. Other
units are urchased in an assembled condition.
On assembled units, it is the res onsibility of the
owner to make sure the unit is correctly as-
sembled. The owner must carefully check the
unit according to the instructions in this manual
before it is first used.
WARNING: Look for this symbol to indicate
important safety precautions. This symbol
indicates: ÒAttention! Become Alert! Your
Safety Is At Risk.Ó
Responsibility Of The Owner
The responsibility of the owner is to
follow the instructions below.
1. Carefully read and follow the rules for safe
o eration.
2. Follow all the assembly and re aration
instructions.
3. Ins ect the unit.
4. Make sure that the o erator of the unit
knows how to correctly use all standard
and accessory equi ment.
5. O erate the unit only with guards, shields,
and other safety items in lace and working
correctly.
6. Correctly adjust the unit.
7. Service the unit only with authorized or a -
roved re lacement arts.
8. Com lete all maintenance on the unit.
7Forward

5
F- 98517
Safe Operation Practices for Walk- Behind Mowers.
This cutting machine is ca able of am utating hands and feet and throwing objects. Failure to observe the following safety instructions could result in serious
injury or death.
I. General Operation
1. Read, understand, and follow all instructions
on the machine and in the manual(s). Be
thoroughly familiar with the controls and the
ro er use of the mower before starting.
2. Do not ut hands or feet near or under rotat-
ing arts. Kee clear of the discharge o en-
ing at all times.
3. Only allow res onsible individuals, who are
familiar with the instructions, to o erate the
mower.
4. Thoroughly ins ect the mower and area
where the equi ment is to be used. Clear the
area of objects such as rocks, toys, wire,
bones, sticks etc., which could be icked u
and thrown by the blade.
5. Be sure the area is clear of other eo le be-
fore mowing. Sto mower if anyone enters
the area.
6. Do not o erate the mower when barefoot or
wearing o en sandals. Always wear substan-
tial foot wear.
7. Do not ull mower backwards unless abso-
lutely necessary. Look down and behind be-
fore and while moving backwards.
8. Do not o erate the mower without ro er
guards, lates, grass catcher or other safety
rotective devices in lace.
9. See manufacturerÕs instructions for ro er
o eration and installation of accessories.
Only use accessories a roved by the
manufacturer.
10. Sto the blade(s) when crossing gravel
drives, walks, or roads.
11. Sto the engine (motor) whenever you leave
the equi ment, before cleaning the mower or
unclogging the chute.
12. Shut the engine (motor) off and wait until the
blade comes to com lete sto before remov-
ing grass catcher.
13. Mow only in daylight or good artificial light.
14. Do not o erate the mower while under the
influence of alcohol, drugs or other medica-
tion which can cause drowsiness or affect
your ability to o erate this machine safely.
15. Never o erate mower in wet grass. Always
be sure of your footing; kee a firm hold on
the handle and walk; never run.
16. Disengage the self- ro elled mechanism or
drive clutch on mowers so equi ed before
starting the engine (motor).
17. If the equi ment should start to vibrate ab-
normally, sto the engine (motor) and check
immediately for the cause. Vibration is gener-
ally a warning of trouble such as a blade that
is damaged, a loose blade, or the engine
mounting bolts are loose.
18. Always wear safety goggles or safety
glasses with side shields when o erating
mower to rotect your eyes from foreign ob-
jects which can be thrown from the unit.
19. Plan your mowing attern to avoid discharge
of material toward roads, sidewalks, bystand-
ers and the like.
20. After striking a foreign object, sto the en-
gine. Remove the wire from the s ark lug.
Ins ect the blade and mower for damage. If
damaged, re air before starting and o erat-
ing the mower.
21. Kee any washout orts and other mower
housing service o enings closed when mow-
ing.
II. Slope Operation
Slo es are a major factor related to sli and fall
accidents which can result in severe injury. All
slo es require extra caution. If you feel uneasy
on a slo e, do not mow it.
DO:
Mow across the face of slo es; never u and
down. Do not mow excessively stee slo es
(maximum 15 degrees) or areas where the
ground is very rough. See the ÒGuideÓ in the
back of this manual to check a slo e. Exercise
extreme caution when changing direction on
slo es.
Remove objects such as rocks, tree limbs, etc.
Watch for holes, ruts, or bum s. Tall grass can
hide obstacles.
DO NOT:
Do not mow near dro - offs, ditches, or em-
bankments. The o erator could lose footing or
balance.
Do not mow excessively stee slo es.
Do not mow on wet grass. Reduced footing
could cause sli ing.
III. Children
Tragic accidents can occur if the o erator is not
alert to the resence of children. Children are
often attracted to the mower and the mowing
activity. Never assume that children will remain
where you last saw them.
1. Kee children out of the mowing area and
under the watchful care of a res onsible
adult.
2. Be alert and turn mower oft if children enter
the area.
3. Before and while moving backwards, look
behind and down for small children.
4. Never allow children to o erate the mower.
5. Use extra care when a roaching blind cor-
ners, shrubs, trees, or other objects that may
obscure vision.
IV. Service
*1. Use extra care in handling gasoline and oth-
er fuels. They are flammable and va ors are
ex losive.
a. Use only an a roved container.
b. Never remove gas ca or add fuel with the
engine running. Allow engine to cool before
refueling. Do not smoke.
c. Never refuel the machine indoors.
d. Never store the machine or fuel container
inside where there is an o en flame, such
as a water heater.
*2. Never run an engine indoors or inside a
closed area.
3. Never make adjustments or re airs to items
such as the height adjusters or grass catcher
with the engine (motor) running. Disconnect
the s ark lug wire, and kee the wire away
from the lug to revent accidental starting.
Always wear eye rotection when you make
adjustments or re airs.
4. Kee all nuts and bolts, es ecially blade at-
tachment bolts, tight and kee equi ment in
good condition.
5. Never tam er with safety devices. Check
their ro er o eration regularly.
6. To reduce fire hazard, kee mower free of
grass, leaves, or other debris build- u .
Clean u oil or fuel s illage. Allow mower to
cool before storing.
7. Sto and ins ect the equi ment if you strike
an object. Re air, if necessary, before re-
starting.
8. Never attem t to make wheel height adjust-
ments while the engine (motor) is running.
9. Always disconnect electric mowers (live o -
erated) before cleaning, re airing, or adjust-
ing.
10. Grass catcher com onents are subject to
wear, damage, and deterioration, which
could ex ose moving arts or allow objects
to be thrown. Frequently check com onents
and re lace with manufacturerÕs recom-
mended arts, when necessary. For storage,
always make sure grass catcher is em ty.
11. Mower blades are shar and can cut. Wra
the blade(s) or wear gloves, and use extra
caution when servicing them.
12. Do not change the engine governor setting or
over- s eed the engine.
13. Frequently check the blade for wear or dam-
ages such as cracks and nicks. A blade that
is bent or damaged must be immediately re-
laced with a factory re lacement blade. For
safety and good cutting erformance, re lace
the blade every two years. Frequently check
the blade bolt and the engine mounting bolts.
Re lace damaged bolts and tighten loose
bolts.
14. Use only original equi ment or authorized
re lacement arts.
* Asterisked items do not a ly to electric mowers.

6
F- 98517
SAFE MOWING GUIDE
Every erson who uses ower equi ment must
learn the difference between ro er and
im ro er use, safe and unsafe mowing
ractices. Read the next few pages carefully.
They can help you learn. Too often the mower
user is inex erienced, not ro erly instructed, or
has not read the Instruction Book and
instructions on the unit before using it for the first
time. This can result in unsafe use endangering
the o erator, bystanders, and the equi ment.
Another result can be a oor a earance of the
area mowed.
Read this Instruction Book. Read the
instructions on the unit. O erate the mower
according to the Safe Mowing Guide and other
safety rules and recommendations in this
Instruction Book and on the unit. Make sure
anyone who uses the unit has read the
instructions and has been told how to o erate
the mower safely.
Your mower is designed to rovide good service
and durability in normal residential cutting. If the
mower is not ro erly serviced and maintained
or used on unsuitable terrain or in conditions not
suitable for mowing, roduct erformance and
safety will be reduced.
Pro er attire is an im ortant art of safe
mowing. Safety glasses rotect the eyes from
thrown objects. Safety shoes with steel toes can
rotect a foot from being cut by the blade. Shirts
and ants that cover the arms and legs can sto
or deflect a thrown object.
Practice using the mower before you actually
begin cutting grass. Select a large o en level
area. Learn the location and function of the
controls and how they work. It is im ortant that
the blade can be sto ed quickly in an
emergency. Learn how to cut and how to kee
control of the mower at all times.
Many mowers are started manually. When using
a ull start or ro e start, lace your feet firmly
and away from the blade. Hold the ro e handle
securely, but never wra the ro e around your
arm or fingers for a Òbetter gri Ó.
The mower is designed for use by one erson.
Always mow alone. Never carry assengers.
Carrying a assenger is dangerous for the
assenger and the o erator. A mower is not for
amusement or for carrying objects.
Is the area you are lanning to mow wet? Never
cut a wet lawn. Cutting wet grass can cause an
accident. It can affect mower erformance and
also cause roblems with future lawn growth
and a earance. Wet grass is sli ery and
might cause the o erator to fall or the mower to
sli . Someone could be hurt by touching the
blade. Wet grass tends to clog the mower,
causing oor discharge. Wet cli ings bunch u
on the lawn retarding the growth of grass. A wet
mower can cause arts to rust and reduce the
useful life of the unit.
When you look over the lawn, refresh your
memory about hard, immovable obstacles such
as i es, stum s, and rocks and avoid them.
They can cause damage to the mower or an
accident injuring the o erator or a bystander.
Take a litter bag along and walk over the area to
be cut. Pick u any stones, toys, wire, bones, or
other loose objects. These items can damage
the mower or they can become dangerous flying
objects if the mower blade hits them. The blade
of a ower mower travels very fast. It can throw
rocks and other objects with force over long
distances. Objects thrown by mowers can break
windows, cause bruises, or even ut out an eye.
Often the erson hurt by a thrown object is a
bystander such as a child, another family
member or a neighbor. Kee eo le and ets
com letely away from the mowing area. Direct
the mowerÕs discharge away from areas where
eo le can be. Planning your mowing attern
has a double benefit. It can reduce chances of
an injury and make the clean u after mowing
easier.
Are there ditches, walls,
or major inclines in the
area to be cut? Plan the
mowing attern to avoid
such danger areas.
Inclines and rough
terrain must be mowed
carefully and some
areas must not be cut
with a mower at all. With
walk behind equi ment,
mow across the incline
so that if you or the
mower sli , you wonÕt
run into each other.
Never mow slo es greater than 15 degrees. See
the ÒGuideÓ in the back of this Instruction Book
to check any slo es.
Ready to start cutting? Not yet. Be sure the
mower has been fully assembled according to
directions in the Instruction Book. Even if
assembly was done by a lawn and garden sho
or the store where the unit was urchased, it
must be checked. Are all nuts, bolts and screws
tight? Does the engine have oil? These items
must be checked eriodically throughout the life
of the mower.
Your mower has a gasoline engine. Gas is
dangerous. Store fuel only in a a roved gas
container. Do not store large amounts of gas.
Put out all cigarettes, i es and cigars before
working with gasoline. Store fuel and the mower
itself in a well ventilated area away from any
ossible source of ignition such a ilot light on a
furnace. If the mower is to be stored for an
extended time, remove the gas from the tank.
This minimizes the chance of a fire and kee s
the tank clear of de osits and old gasoline, thus
im roving mower erformance. Move the mower
outside before adding gasoline. Use a funnel
and wi e u any s illed fuel before starting.
Remember, gasoline ex ands when heated so
leave some ex ansion room. Also, most mower
gas ca s are vented to allow for ex ansion.
Always use the ro er ca . Peo le are
needlessly burned by fires, hurt in ex losions,
mowers and other ro erty are damaged
because of failure to follow basic safety rules
related to gasoline and fueling.
Never add gasoline to an engine that is running
or that is hot from recent use, this can cause an
accident. Remove dry grass and other debris
from the mower. Kee ing the mower clean will
im rove the erformance, hel the engine stay
cooler, extend the life of moving arts, and
minimize the danger of fire. Peo le get burned
working with and around their mowers for other
reasons than fire and ex losions. It takes only a
few seconds of o eration for the engine and the
muffler to become hot. Do not touch these arts
when the mower is running. Sto the engine and
let it cool down before servicing the mower.
Remember, exhaust fumes can be dangerous.
Never o erate the engine indoors or in an
enclosed area.
Getting a new mower can be a big event for a
family. Let family members satisfy their curiosity
about the mower and at the same time, tell them
about its dangers. Remember, a mower is not a
toy and is not for use by children or anyone
lacking in age, strength or ex erience.
As with any ower equi ment, a mower can be
dangerous if not assembled, misused, or not
ro erly maintained. The most im ortant rule is
to always use good judgement and common
sense.
Your mower will cut thick grass and heavy lant
stems with ease. Fingers and toes are no more
resistant to the mowerÕs blade. Many eo le are

7
F- 98517
injured because they ÒforgotÓ and reached into
the discharge chute. Always treat your lawn
mower as if the blade is rotating. Never erform
any service or try to make any
adjustment,exce t carburetor, while the engine
is running.
Use only accessories suited for your mower.
Use of im ro er accessories can reduce the
safety designed into both the mower and the
accessory, it can even damage the unit. Read
and follow the instructions which come with the
accessory and the mower.
Use only original equi ment or a roved
substitutions as service arts. If you need
rofessional service, select a sho that is an
Authorized Service Center for your brand of
mower. If you lan to service the unit yourself,
follow directions in the Instruction Book.
As you mow, remember children and ets are
sometimes attracted to the activity. Be es ecially
careful when trimming around shrubbery or
when backing u . If at all ossible, donÕt mow
when moving backwards. It is dangerous
because vision is restricted. Also, blades are
designed to cut while the unit is moving forward
so cutting erformance is reduced when mowing
in reverse.
Never leave the mower running and unattended.
Shut off the engine. Put the mower in a osition
so that it can not roll. If the unit is self- ro elled,
make sure the drive control is disengaged.
When mowing, be aware of your condition and
the weather conditions. After mowing a long
time, you will be tired. This is the time when
reactions slow down, your attention wanders;
the time when you are wide o en for an
accident. Take a short break. If tem eratures are
high, take recautions to avoid becoming
dehydrated. If you are angry, tired, or unable to
give your full attention to mowing, if you have
been consuming alcohol, medicines, or drugs,
do not use your mower or any ty e of ower
equi ment.
If weather conditions become worse while you
are cutting, sto and finish later. Cutting grass in
the rain is no fun and it is dangerous. Always
seek shelter in an electrical storm. In extremely
dry mowing conditions, your safety glasses can
serve a dual ur ose by rotecting your eyes
from dust and thrown objects, also a dust or
ollen mask can be hel ful.
Your mower is equi ed with a number of safety
features which are im ortant to the safety of the
o erator and bystanders and must never be
altered or removed. If a safety feature becomes
ino erable, lost, or damaged, it must be re aired
or re laced before the mower is used.
Engine s eed is a key to safe mowing and a
nice looking lawn. The maximum s eed of the
engine on your mower has been set at the
factory. Do not change the engine governor in
any way.
Select the maximum engine and ground s eed
that is right for the terrain and the height of
grass. You get the best cutting and bagging
erformance when using a grass catcher by
o erating the engine at maximum s eed. Never
walk fast or run just to get the job done sooner.
On inclines, reduce ground s eed and exercise
extreme care.
It is best to mow only during daylight hours;
however, if you must mow in the late afternoon
or evening, make sure there is good artificial
light.
Your mower will require maintenance including
service and adjustments before and after use as
with any machine. The frequency of the
maintenance is generally based on hours of use,
however, the frequency can vary because of
mowing conditions. Check the Instruction Book
for more detailed instructions. Pro er
maintenance rotects your investment in the
mower and hel s insure that it will function
safely and reliably.
Never attem t any
service (with the
ossible exce tion of
carburetor adjustment)
with the engine running.
After turning the engine
off, always disconnect
thes ark lugwireto
revent accidental
restarting while the unit
is being serviced.
While mowing, if you hit a foreign object, sto
the engine. Remove the s ark lug wire.
Carefully and thoroughly ins ect the mower for
damage. Make necessary re airs before
restarting. If the unit starts to vibrate abnormally,
sto the engine immediately and check for the
cause. Vibration is generally a warning of
trouble. Kee all nuts, bolts, and screws tight.
The blade is the most dangerous art of the
mower and also the most im ortant art in
obtaining a nice lawn a earance. Check the
blade and the blade mounting hardware
frequently. Kee it tight. If the blade hits a solid
object, check it thoroughly for deformation or
cracks and re lace if damaged. For
safety,re lace the blade every two years. A
shar blade reduces the work load on the
engine and cuts grass more cleanly, for a better
looking cut with less work. The blade is always
close to the outside of the mower housing. For
best trimming on side discharge mowers, cut
with the left side of the housing toward the area
that needs trimming.
A useful accessory for your mower is a grass
catcher. There are grass catchers available for
most models. For best erformance and safety,
be sure the grass catcher is a roved for use
with your mower. Assemble as directed and
follow o erating and safety instructions with the
catcher and in the Instruction Book.
Before mounting, checking or em tying the
grass catcher, always turn the engine off.
Remember to check the grass catcher before
each use for cracks, wear, or deterioration.
Re lace any art that is damaged with the
manufacturerÕs recommended re lacement art
before using the grass catcher again.
Pro er cutting technique is im ortant if you want
your lawn to look good. Avoid the tem tation to
cut grass too short. Cutting grass too short can
kill the lant, cause grass to turn yellow, or make
the lawn look brown and thatchy. Use the lower
cutting heights in cool months when the grass is
lush. Use the higher cutting heights in extremely
dry eriods. Cutting with a dull blade or low
engine s eed bruises, shreds, and can u root
some grass making the lawn look dull and brown
a few days after cutting. Always ut the throttle
control in FAST osition when mowing and
bagging. When bagging, slower ground s eed
will rovide the best results.
Change the mowing attern slightly each time
you cut. If you always cut the same way, the
grass will develo a ÒsetÓ and cli ings will
accumulate more heavily in some areas more
than in others causing grass to get thinner in
those areas. Do not service your mower over the
grass. S illed oil and gas can kill the grass. In
tall grass or very heavy grass, do not try to cut it
all at once. Raise the height of cut on the first
cutting and lower it for the next cutting the same
day or within a few days. Another way is to cut
only art of the width of the mower and adjust
your ground s eed (not the engine) to move

8
F- 98517
more slowly so the mower can clear itself as it
moves forward.
When cutting with a walk behind mower, always
ush the unit. Do not ull it. Pushing the unit
kee s the o erator behind the mower in the
Òo eratorÕs zoneÓ for better control. Pushing the
unit also gives you a chance to see exactly
where and what you are mowing. There will be
times while you are mowing that you will have to
ull the mower backwards (such as when the
front of the mower has come u against a wall or
fence). If you must back u , make sure your feet
are in the clear. Stand well back from the mower,
lant your feet firmly with each ste and back u
being careful to look behind you. Resume
normal mowing as soon as ossible.
If your unit is self- ro elled, remember that the
drive mechanism is not designed to do all the
work, but the unit can move without your hel .
Always kee your hands on the handle near the
controls when the engine is running. Remember
too that the self- ro elled mechanism can be
dangerous. Kee hands and feet away from
belts and chains. Always turn off the engine
before attem ting to remove anything that
becomes entangled in the self- ro elled
system.
Remember, your mower is a useful tool, but it
can be dangerous. Follow the instructions in this
Instruction Book. Use the mower ro erly and
carefully and it will give you many hours of
trouble free, accident free o erations.
STEPS TO FOLLOW
Before Mowing
DBe sure to dress correctly. Wear hard shoes,
not sandals or tennis shoes.
DExamine the blade. A blade that is bent,
cracked, or damaged must be re laced with
a factory re lacement blade.
DFill the fuel tank outside. Clean off s illed
fuel.
DRead and follow the OwnerÕs Manual, the
instructions with the engine, and the instruc-
tions with any attachments. OwnerÕs Manual
instructions are for your safety and the safety
of others.
DExhaust fumes are dangerous. Start the en-
gine outside.
DMake sure all safety devices are in lace and
working correctly.
DO eration of the mower is only for a erson
that has ex erience.
DWet grass can be dangerous. Let the grass
dry.
DInstruct children and others to kee away
from the work area.
DNever cut the grass without good light.
DPick u loose objects. Remove them from
the mowing area.
While Mowing
DWatch for fixed objects and avoid them. They
can damage the mower or cause injury.
DA hot engine and muffler will cause a burn.
Do not touch.
DInclines and slo es must be carefully
mowed. See the ÒGuideÓ in the back of this
book to check a slo e.
DLack of daylight or good artificial light is
cause to sto mowing.
DExamine the mower, the blade, and other
arts for damage after hitting a foreign object
or if the unit vibrates excessively.
DDo not make adjustments or re airs without
sto ing the engine (exce t for carburetor).
Disconnect the s ark lug wire.
DOn or near roads, watch out for traffic. Direct
discharge away from roads.
DWhen mowing, avoid areas where traction is
unsure. Before and while moving back-
wards, look behind and down for small chil-
dren.
DIn heavy grass, raise the cutting height. Cut
slower. Sto the engine to remove clogged
grass from the mower.
DNever remove any safety related arts.
DDo not our gasoline into a engine that is hot
or running.
After Mowing
DAlways let the mower cool before storing in
an enclosed area.
DForeign material on the mower is dangerous.
Clean off grass, leaves, grease and oil be-
fore storing.
DTighten all loose nuts, bolts and screws be-
fore you use the unit.
DEm ty and clean any grass catcher or other
accessory.
DRemove the key or disconnect the s ark lug
wire to revent unauthorized use.
DMake sure the mower is not ke t near a
source of ignition. Gas fumes can cause an
ex losion.
DOnly original arts or factory a roved sub-
stitutes can be used to service the mower.
DWhen storing the mower for an extended e-
riod, remove the fuel from the fuel tank.
DInstruct children to leave the mower alone. It
is not a toy.
DNever kee gasoline near a source of igni-
tion. Always use an a roved container.
Kee gasoline away from children.
DLubricate according to the Instruction Book.
See ÒLubricationÓ.
IMPORTANT- - Read the Instruction
Book. Keep this book for future use and
reference.

9
F- 98517
ASSEMBLY
NOTE: Illustrations and pictorials begin on
page 2.
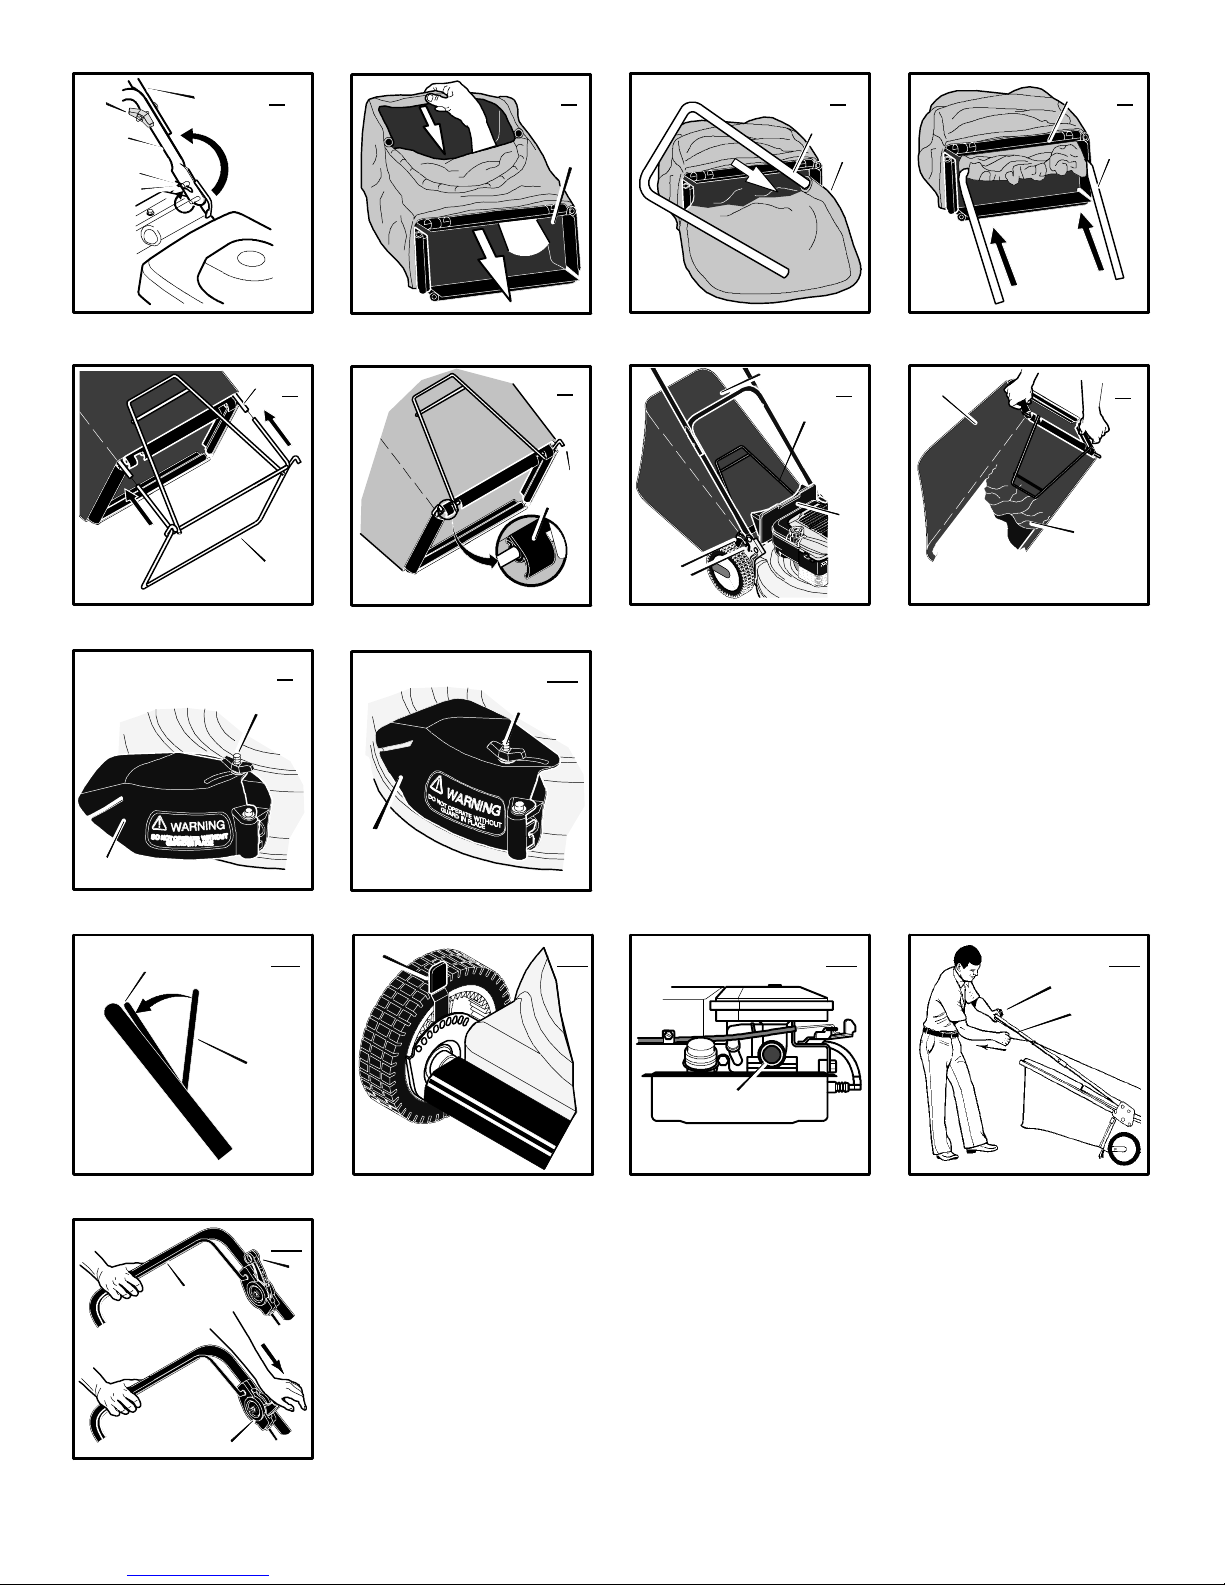
Unpacking instructions (Figure 1)
The mower was fully assembled at the factory.
When the mower was ut in the carton, the
handle was ut in the storage osition. To ut
the handle in the o erating osition, follow the
ste s below.
1. Remove the mower from the carton.
2. Put the lower handle (1) in the o erating
osition.
3. Remove the hair pins (2) from the lower in.
Attach the hair pins (2) to the upper pins
(5).
4. Put the upper handle ( ) in the o erating
osition. Tighten the knobs (4).
5. (Figure 24) To attach the recoil- start grip
(1) to the rope guide (2), twist the ro e
through the rope guide (2) mounted on the
right side of the handle.
NOTE: If you cannot attach the
recoil- start grip because the rope is too
short, hold the engine stop lever against
the handle. Slowly pull the recoil- start
grip.
CAUTION: Be careful when you fold or raise
the handle. Do not damage the cables. A
cable that is bent will not work correctly. Be-
fore you use the unit, replace a bent or dam-
aged cable.
How To Mount The Grass Bag (Figure 7)
1. To mount the grass bag on the mower, raise
the rear door (1). Hold the handle (2) of the
grass bag. Put the grass bag in the o erating
osition. Lower the rear door (1).
IMPORTANT: Make sure the rods, on each
side of the frame assembly, are mounted in
the notches ( ) of the handle brackets (4).
How To Prepare The Engine
Note: Engine does not contain OIL or PET-
ROL.
WARNING: Follow the engine
manufacturerÕs instructions for the
type of petrol and oil to use. Al-
ways use a safety petrol container. Do not
smoke when adding petrol to the engine.
When inside an enclosure, do not fill with
petrol. Before you add petrol, stop the en-
gine. Let the engine cool for several min-
utes.
See the engine manufacturerÕs instructions for
the ty e of etrol and oil to use. Before you use
the unit, read the information on safety,
o eration, maintenance, and storage.
How To Discharge Out The Side (Figure
9)
1. Sto the engine.
2. Loosen the wingnut (1).
3. Move the chute deflector (2) to the o en
SIDE DISCHARGE osition.
4. Tighten the wingnut (1).
5. Remove the grass bag. Make sure the rear
door is com letely closed.
How To Mulch (Figure 10)
1. Sto the engine.
2. Loosen the wingnut (1).
3. Move the chute deflector (2) to the closed
MULCH osition.
4. Tighten the wingnut (1).
5. Remove the grass bag. Make sure the rear
door is com letely closed.
Mulching Tips
Mulching finely cuts the grass so that the grass
can be easily recycled. Because the nutrients
are returned to the soil, the lawn will need less
fertilizer. To correctly mulch the lawn, follow the
ti s below.
SThe grass must be dry. If the grass is wet, it will
be difficult to cut and cause heavy clum s of
grass.
SThe grass must not be too tall. The maximum
height to effectively cut is 4 1/2 inches. Set the
height adjusters so that only the to third of the
grass is cut.
SIf the grass is more than 4 1/2 inches high, two
mowings will be necessary. For the first mow-
ing, set the height adjusters in the highest osi-
tion. Then, lower the height adjusters for the
second mowing.
SKee a shar edge on the blade. A blade that
is not shar will cause the ends of the grass to
become brown.
SClean the underside of the mower housing.
Grass and other debris can kee the mower
from working correctly.
If the quality of cut is marginal, try the follow-
ing:
SSet the height adjusters at a higher cutting
height.
SCut the grass more frequently.
SO erate the mower at a slower ground s eed.
SOverla the cutting swaths instead of cutting a
full swath with each ass.
SMow across the marginal areas a second time.
OPERATION
NOTE: Illustrations and pictorials begin on
page 2.
Engine Stop Lever (Figure 11)
Release the engine stop lever (1) and the
engine and the blade will automatically sto . To
run the engine, hold the engine stop lever (1) in
the Operating position (2)
Before you start the engine, o erate the engine
stop lever (1) several times. Make sure the
cable moves easily.
How To Stop The Engine (Figure 11)
To sto the engine, release the engine stop
lever (1). Disconnect the wire from the s ark
lug to revent the engine from starting.
If the engine will not sto , hold a screwdriver
against the s ark lug and against the engine
cooling fins. The s ark will go to ground and the
engine will sto . Before you start the engine,
check the engine sto cable. Make sure the
engine sto cable is assembled correctly. Before
you o erate the unit, re lace a bent or damaged
engine sto cable.
Front Wheel Drive System (Figure 15)
The mower has a front wheel drive system.
O erate the drive system as follows.
1. Hold the engine stop lever (1) in the OPER-
ATING osition.
2. Push the drive lever (2) com letely forward.
When the drive lever (2) clicks, release the
drive lever (2). The drive system is now en-
gaged.
NOTE: To stop the engine, release the en-
gine stop lever.
3. To disengage the drive system and sto the
engine, com letely release the engine stop
lever (1).
4. To disengage only the drive system, release
the engine stop lever (1) a roximately two
inches. The drive system will disengage but
the engine will continue to run.
NOTE: When the drive system is disengaged
on a new unit, it is possible for the front
wheels to rotate if lifted off the ground. This
is normal with a new belt and will stop after
one or two hours of operation.
WARNING: For safe operation, the
drive system must immediately dis-
engage when the drive lever is re-
leased. If the drive system does not disen-
gage correctly, do not operate the mower
until the drive system is adjusted or re-
paired by an authorized service centre.
How To Start The Engine
WARNING: The blade will rotate
when the engine runs.
NOTE: A two speed throttle control is located
on the engine. Set the throttle control in the
FAST position for cutting grass, bagging
grass, and for extended engine life.
1. Check the oil.
2. Fill the fuel tank with regular unleaded etrol.
See ÒHow To Pre are The EngineÓ.
3. Move the throttle control, located on the en-
gine, to the FAST osition.
4. Make sure the s ark lug wire is connected
to the s ark lug.
5. (Figure 15) Make sure the drive lever (2) is
in the DISENGAGED osition.
6. (Figure 13) Some models have a primer
button (1) on the front or side of the engine.
Push the primer button (1).. Every time you
ush the primer button (1),waittwosec-
onds. For the number of times required to
ush the primer button (1), see the engine
manufacturerÕs instructions.
NOTE: Do not use the primer button to
start a warm engine.
7. (Figure 14) Stand behind the mower. Use
one hand to hold the engine stop lever (1)
in the o erating osition as shown. Use the
other hand to hold the recoil- start grip (2).
8. Ra idly ull the recoil- start grip (2). Slowly
return the recoil- start grip (2).
9. If the engine does not start in 5 or 6 tries,
See the ÒTrouble Shooting ChartÓ Instruc-
tions.
How To Operate The Mower
WARNING: Check the condition of
the grass bag for wear or deteriora-
tion. If worn or damaged, replace
the parts only with approved factory re-
placement parts. For replacement parts,
see the parts list in this book.

10
F- 98517
To com letely fill the grass bag, o erate the
engine with the throttle control in the FAST
osition.
How To Empty The Grass Bag (Figure 7)
WARNING: Before you remove the
grass bag, stop the engine. Before
you remove any grass from the
mower housing, disconnect the wire from
the spark plug.
1. (Figure 7) Raise the door (1) toavertical
osition.
2. Lift the frame assembly (2) over the two
handle notches ( ).
3. (Figure 8) O en the top cover (5). Em ty
the grass from the bag.
4. (Figure 7)To mount the grass bag on the
mower, raise the door (1). Put the two rods
of the frame assembly into the two notches
( ).
5. Lower the door (1).
MAINTENANCE
NOTE: Illustrations and pictorials begin on
page 2.
Use the following maintenance section to kee
your unit in good o erating condition. All the
maintenance information for the engine is in the
engine manufacturerÕs instructions. Before you
start the engine, read this book.
WARNING: Before you make an in-
spection, adjustment (except
carburettor), or repair, disconnect
thewirefromthesparkplug.
Lubrication
1. For maximum erformance, lubricate the
wheels and all ivot oints with engine oil
every 25 hours.
2. To lubricate the engine, refer to the engine
manufacturerÕs instructions.
NOTE: Do not lubricate the engine stop
cable. Lubricants will damage the cable and
prevent the cable from moving freely. Re-
place the cable if bent or damaged.
How To Clean The Mower Housing
WARNING: The blade will rotate
when the engine runs. Before you
clean the mower housing, stop the
engine and disconnect the wire from the
spark plug.
Grass and other debris can kee the mower
from working correctly. After you mow, clean the
mower housing as follows.
1. Sto the engine.
2. Disconnect the wire from the s ark lug.
3. Clean the to and the bottom of the mower
housing.
How To Check The Drive System
(Figure 16)
Grass and other debris can kee the drive
system from working correctly. Check the front
wheels as follows.
1. Sto the engine.
2. Disconnect the wire from the s ark lug.
3. Check the front wheels (2).Thefront
wheels (2) must turn freely. If the front
wheels (2) do not turn freely, remove the
front wheels (2).
4. Remove any grass or debris from the front
drive wheels (2) and the pinion gears (6).
5. Remove the belt cover (1).Useaflatblade
screwdriver and remove any grass or debris
from under the belt cover (1).
6. Assemble the belt cover (1) and the front
wheels (2).
7. Check the front wheels (2). Make sure the
front wheels (2) turn freely. If the drive sys-
tem does not disengage correctly, do not o -
erate the mower until the drive system is
adjusted or re aired by an authorized service
center.
How To Adjust The Height Of Cut
WARNING: The blade will rotate
when the engine runs. Before you
change the height of cut, discon-
nect the wire to the spark plug.
Models With Quick Type Adjusters
(Figure 12)
To change the height of cut, move the osition of
the adjuster arm (1) at each wheel. Make sure
each adjuster arm (1) is in the same osition so
that the mower will cut level.
1. Disengage the adjuster arm (1).
2. Move the adjuster arm (1) to another osi-
tion.
How To Remove The Drive Belt
To remove the drive belt, follow the ste s below.
WARNING: Before you remove the
belt, disconnect the wire from the
spark plug.
1. (Figure 16) Remove the belt cover (1).
2. Remove the front wheels (2).
3. (Figure 17) Remove the retainer ring ( )
and the spring pin (4).
4. Remove the dust cover (5) and pinion
gear (6).
5. Remove the hair pin (7) from the axle (8).
6. Slide the axle (8) as shown until the drive
belt (9) can be removed from the drive
pulley (10).
7. Remove the drive belt (9) from the engine
pulley (11).
8. (Figure 18) Remove the drive belt (9) from
the idler bracket (12).
NOTE: Make sure you replace the drive
belt only with a replacement belt from the
factory.
9. To assemble the drive belt (9), reverse the
above ste s.
10. (Figure 19) Note the three assembly holes
(1 ) for the idler ulley. To install a new belt,
use the hole marked with a ÒBÓ for Briggs and
Stratton engines and use the hole marked
with a ÒTÓ for Tecumseh engines.
11. If the drive belt (9) is excessively worn, the
idler arm (14) will move to the to of the slot
in the idler bracket (15).Iftheidler arm (14)
is at the to of the slot, the drive belt (9) will
be loose and sli . If the drive belt (9) is
worn, move the shoulder bolt (16) forward
to the next assembly hole.
12. Before you begin to mow, make sure the
drive system will correctly disengage and
that the mower will sto . If the drive system
will not disengage, take the mower to an au-
thorized service center before you o erate
the mower.
Mulching Blade Replacement
A mulching mower is equi ed with a s ecial
mulching blade. If the mulching blade becomes
worn or damaged, re lace with an original
equi ment mulching blade. A standard blade will
not cut correctly and could cause an accident.
Blade Service
WARNING: Before you inspect the
blade or the blade adapter, discon-
nect the wire to the spark plug. If
the blade hits an object, stop the engine.
Disconnect the wire to the spark plug.
Check the unit for damage.
Frequently check the blade for wear or damage
such as cracks. Frequently check the bolt that
holds the blade. Kee the bolt tight. If the blade
hits an object, sto the engine. Disconnect the
wire to the s ark lug. Check the blade ada ter
for damage. Check for a bent or damaged blade,
a badly worn blade, or other damage. Before
you o erate the unit, damaged arts must be
re laced with factory re lacement arts. For
safety, re lace the blade every two years. Kee
a shar edge on the blade. A blade that is not
shar will cause the ends of the grass to
become brown. Remove the blade as follows.
How To Remove The Blade (Figure 20
and Figure 21)
WARNING: Before you remove the
blade, disconnect the wire to the
spark plug. The blade has sharp
edges. When you hold the blade, use
gloves or cloth material to protect your
hands.
1. Drain the fuel tank.
2. Lift the side of the mower that has the muffler
or s ark lug.
3. Use a iece of wood to kee the blade from
rotating.
4. Remove the bolt (1) that holds the blade (2).
5. Check the blade according to the ÒBlade Ser-
viceÓ instructions. Re lace a badly worn or
damaged blade with a factory re lacement
blade.
6. Mount the blade with the curved edges to-
ward the housing. If the blade is u side
down, the blade will not cut correctly and can
cause an accident.
7. Fasten the blade 2) with the original wash-
ers ( and 4) and bolt (1). Make sure the
outside rims of the Belleville washers (4)
are toward the blade (2).
8. Tighten the bolt (1) that holds the blade (2)
to a torque of 30 foot ounds.
WARNING: Always keep the bolt
(1) that holds the blade (2) tight. A
loose bolt (1) or blade (2) can
cause an accident.

11
F- 98517
Check The Level Of Cut
Test the unit in a small area. If the height of cut
is not level or if the cut grass is not discharged,
the cause can be: (1) the blade is bent or
damaged, (2) the blade is not shar , (3) a worn
blade, (4) or a broken blade ada ter. Before you
use the unit, correct the roblem.
Folding Handle Storage (Figure 22 and
Figure 23)
CAUTION: Be careful when you fold or raise
the handle. Do not damage the cables. A
cable that is bent will not work correctly. Be-
fore you use the unit, replace a bent or dam-
aged cable.
How To Fold The Handle
1. (Figure 22) Loosen the fasteners that hold
the u er art of the handle to the lower art
of the handle. As you fold the handle, make
sure the cables are not around the loose fas-
teners and do not become damaged. Rotate
the u er art of the handle toward the back
of the unit.
2. (Figure 23) Remove the hair pins ( ) from
the lower handle (1). Push in on the ends of
the lower handle (1). Move the ends of the
lower handle (1) ast the locking pins (2)
or locking tabs (2).
3. Rotate the handle forward over the engine.
Make sure the cables are not damaged.
How To Raise The Handle
1. Pull the handle back until the ends of the
lower handle (1) lock into osition.
2. Lift the u er art of the handle into the o er-
atorÕs osition. Tighten the fasteners that
hold the handle.
How To Prepare The Mower For Storage
WARNING: Do not remove petrol
while inside a building, near a fire,
or while you smoke. Petrol fumes
can cause an explosion or a fire.
1. Drain the fuel tank.
2. Let the engine run until it is out of etrol.
3. Drain the oil from the warm engine. Fill the
engine crankcase with new oil.
4. Remove the s ark lug from the cylinder.
Pour one ounce of oil into the cylinder. Slow-
ly ull the recoil- start gri so that the oil will
rotect the cylinder. Install a new s ark lug
in the cylinder.
5. Clean the dirt and debris from the cylinder
cooling fins and the engine housing.
6. Clean the bottom of the mower housing.
7. Com letely clean the mower to rotect the
aint.
8. Put the unit in a building that has good ven-
tilation.
9. Make sure the grass bag is em ty of grass.
Grass remaining in the bag during storage
will damage the bag.
How To Order Replacement Parts
The re lacement arts are shown either on the
back ages of this Instruction Book or in a
se arate Parts List Book.
Use only manufacturerÕs authorized or a roved
re lacement arts. The letter laced on the end
of the art number denotes the ty e of finish for
the art, C for chrome, Z for zinc, a PA for
urchased assembly. It is im ortant that you
include this when ordering a art. Do not use
attachments or accessories not s ecifically
recommended for this unit. In order to obtain
ro er re lacement arts you must su ly the
model number of your mower (see name late).
Re lacement arts, exce t for the engine,
transmission, transaxle or differential, are
available from the store where the mower was
urchased or a service sho recommended by
the store.
If you are unable to obtain arts or service in the
manner outlined above, then contact: MURRAY
CANADA, INC., Factory Customer Service,
1195 Coutney ark Drive East, Mississauga, Ont.
L5T- 1R1 (1- 800- 661- 6662)
Re lacement arts for the engine, transaxle, or
transmission, are available from the
manufacturerÕs authorized service centre found
in the commercial ages of the tele hone
directory. Also, see the individual engine or
transmission warranties to order re lacement
arts.
When ordering the following information is
required:
(1) The Model Number
(2) Serial Number
(3) Part Number
(4) Quantity

12
F- 98517
TROUBLE SHOOTING CHART
The Engine will not start.
1. Make sure the fuel tank is filled with clean
etrol. Do not use old etrol.
2. On a cold engine, ush the rimer button
(o tional on some models) five times.
3. Make sure the wire for the s ark lug is con-
nected to the s ark lug.
4. Adjust the carburettor. See the engine
manufacturerÕs instructions.
5. There is too much etrol in the engine cylin-
der. Remove and dry the s ark lug. Pull the
recoil- start gri several times. Install the
s ark lug. Connect the wire to the s ark
lug. Start the engine.
6. The engine is difficult to start in heavy or high
grass. Move the mower to a clean dry sur-
face.
7. Make sure the engine sto lever is in the o -
erating osition.
8. Make sure the fuel valve is in the ON osi-
tion. See the engine manufacturerÕs instruc-
tions.
The Engine will not stop.
1. Release the engine sto lever.
2. Check the engine sto cable. Re lace the
cable if bent or damaged.
The Engine performance is bad.
1. Check the height of cut settings. Raise the
height of cut if the grass is high.
2. Check the bottom of the blade housing.
Clean the blade housing of grass and other
debris.
3. Check the wire to the s ark lug. Make sure
the wire is connected.
4. Clean the engine cooling fins of grass and
other debris.
5. Check the carburettor adjustments. See the
engine manufacturerÕs instructions.
6. Check the s ark lug ga . Set the s ark lug
ga at 0.030Ó.
7. Check the amount of oil in the engine. Fill
with oil if necessary.
8. Check the engine air cleaner. See the engine
manufacturerÕs instructions.
9. The etrol is bad. Drain and clean the fuel
tank. Fill the fuel tank with clean etrol.
Excessive Vibration.
1. Remove the blade. Check the blade and bal-
ance if necessary. See the blade mainte-
nance instructions.
2. Check for a bent or broken blade. A DAM-
AGED BLADE IS DANGEROUS AND MUST
BE REPLACED.
3. Check the blade ada ter. REPLACE A BRO-
KEN BLADE ADAPTER.
4. If the vibration continues, take the mower to
an Authorized Service Centre.
The grass will not discharge correctly.
1. Clean the bottom of the mower housing.
2. Check for a badly worn blade. Remove and
shar en the blade. For safety, re lace the
blade every two years with a factory re lace-
ment blade.
The grass is not cut even.
1. Check the height adjustment at each wheel.
The height adjustment must be the same for
each wheel.
2. Make sure the blade is shar .
3. Check for a bent or broken blade. A DAM-
AGED BLADE IS DANGEROUS AND MUST
BE REPLACED.
4. Check for a broken blade ada ter. REPLACE
A BROKEN BLADE ADAPTER.

13
F- 98517

14
F- 98517
TABLE DES MATIéRES
INFORMATIONS GNRALES 14
CONSIGNES DE SCURIT POUR
TONDRE SANS DANGER 17
RéGLES Ë OBSERVER 19
MONTAGE 21
FONCTIONNEMENT 21
ENTRETIEN 22
TABLE DES DEPANNAGES 24
PENTE GUIDE 25
GARANTIE DE MURRAY, INC.
LIMITEDEDEUXANS
Murray, Inc., garantit au remier acheteur que
cet a areil ne rsentera as de dfauts de
matire et de fabrication dans les conditions nor-
males dÕutilisation et dÕentretien endant une
riode de deux (2) ans com terdeladatede
lÕachat; toutefois, la rsente garantie ne couvre
as les moteurs, les accessoires (tels que les
chasse-neige rotatifs, les lames chasse-neige,
les bacs herbe et les charrues neige), les
transmissions, les batteries et les ices dÕusure
normale (sauf celles notes ci-dessous) ou les
botes- onts uisque les fabricants de ces
ices fournissent leurs ro res garanties ainsi
que le service a rs-vente dans leurs centres de
r aration agrs. Pour de lus am les ren-
seignements, consultez les garanties couvrant
ces ices. Dans le cas o vous ne sauriez as
si votre a areil contient ou est qui dÕune ou
lusieurs de ces ices, consultez votre conces-
sionnaire avant lÕachat. CÕest arce que nous
sommes lis aux modalits et conditions notes
dans la rsente garantie limite, que nous r-
arerons ou rem lacerons, notre guise, sans
frais our le remier acheteur, toute ice couv-
erte ar la rsente garantie limite endant la
riode de garantie a licable.
Au cas o la batterie sÕavrerait dfectueuse
dans les quatre-vingt-dix (90) jours qui suivent la
date de lÕachat, nous la rem lacerons sans frais.
Si la batterie sÕavre dfectueuse a rs (90)
jours mais dans les cent vingt (120) jours
com ter de la date de lÕachat, nous la rem lac-
erons jusquÕ concurrence de la moiti (1/2) du
rix de dtail de la batterie en vigueur au mo-
ment du retour.
Les ices dÕusure normale sont les suivantes :
courroies, lames, ada tateurs de lames, neus,
hares et housses de sige. Ces ices sont
garanties comme tant exem tes de dfauts de
matire et de main dÕoeuvre telles quÕelles sont
livres avec le roduit. Toute rclamation rela-
tive une r aration ou un rem lacement de
ices dÕusure normale doit tre faite dans les
trente (30) jours de la date de lÕachat. Aucune
rclamation mettant en jeu des dommages-in-
trts causs ar lÕusure, lÕabus et le mauvais
usage ne sera rise en considration.
La rsente garantie de Murray limite de
deux (2) ans est votre seul recours; toutefois, la
rsente garantie ne sera as valide et ne sÕa -
liquera aucun a areil qui a t altr,
abm, dont il a t fait un mauvais usage, un
abus ou utilis our la location ou autres usages
commerciaux et/ou rofessionnels (autres que
domestiques). Votre garantie ne couvre as les
etits rglages mcaniques qui ne sont as dus
un dfaut quelconque de matire ou de fab-
rication. Pour de tels ajustements, consultez
votre manuel de lÕutilisateur.
Pour rsenter une rclamation en vertu de la
rsente garantie de Murray limite de deux
(2) ans, retournez lÕa areil (ou la ice dfec-
tueuse, si vous avez t autoris au ralable)
avec la reuve de votre achat au centre de r-
arations a rs-vente agr le lus roche de
chez vous. Pour trouver votre centre de service
a rs-vente agr le lus roche, tl honez au
distributeur central de ices de rechange de
votre zone indiqu dans la liste fournie avec
votre a areil ou consultez les Pages Jaunes de
votre annuaire tl honique local. Si vous re-
tournez lÕa areil tout entier, nous r arerons
lÕa areil. Si nous autorisons le retour de la
ice dfectueuse seulement, nous rem lacer-
ons ou r arerons la ice. En cas de dfaut de
la transmission ou du diffrentiel ( distinguer de
la bote- ont), la transmission ou le diffrentiel
tout entier doit tre retourn tant donn quÕils
ne contiennent as de ices r arables ar
lÕutilisateur.
La rsente garantie de Murray limite de
deux (2) ans vous donne des droits s cifiques,
et vous ourriez galement en dis oser
dÕautres. Cette garantie limite est promul-
gue expressment la place de toute autre
forme de garantie explicite ou implicite, no-
tamment de garantie implicite de valeur mar-
chande et dÕaptitude un usage particulier
que vous en feriez. Pour de lus am les
informations au sujet de la rsente garantie
limite, ou our le service a rs-vente, crivez
:
MURRAY CANADA, INC., Factory Customer
Service, 1195 Coutney ark Drive East, Missis-
sauga, Ont. L5T- 1R1 (1- 800- 661- 6662)
INFORMATIONS GNRALES
Ce manuel se dirige aux ersonnes familiarises
avec ce genre de mani ulations mcaniques. La
lu art des ouvrages de maintenance ne men-
tionnent as toutes les ta es, et cet ouvrage ne
fait as exce tion. Serrer ou dserrer des at-
taches sont des mani ulations que tout le
monde eut effectuer avec une certaine ra-
tique. Lisez et suivez ces instructions avant dÕu-
tiliser la tondeuse.
Apprenez matriser lÕappareil : si vous com-
renez le fonctionnement de ce modle, vous en
obtiendrez les meilleures erformances. Au fur
et mesure que vous lisez le manuel, re ortez-
vous aux illustrations. Sachez re rer lÕem lace-
ment des commandes et leur fonction. Afin de
rvenir tout risque dÕaccident, observez les in-
structions de fonctionnement et les rgles de
scurit. Conservez ce manuel our future rfr-
ence.
REMARQUE IMPORTANTE : la lu art des
modles sont vendus dsassembls et sont
vendus dans un emballage carton. Il est de la
res onsabilit de lÕutilisateur de sÕassurer que
les instructions de montage donnes dans ce
manuel sont exactement suivies. DÕautres
modles euvent tre achets dj monts. L
aussi, il est de la res onsabilit de lÕutilisateur
de sÕassurer que la tondeuse est correctement
monte. LÕutilisateur doit ins ecter lÕa areil
avec soin, toujours selon les instructions, avant
sa remire utilisation.
AVERTISSEMENT : reprez ce symbole qui
vous indiquera les prcautions de scurit
importantes. Ce symbole signifie : ÒAtten-
tion! Soyez prudent! Vous encourrez des
risques.Ó
Responsabilit de lÕutilisateur
La responsabilit de lÕutilisateur est de
suivre les instructions ci- dessous.
1. Lire soigneusement ce manuel et suivre les
rgles rsentes our un usage de la ton-
deuse en toute scurit.
2. Suivre les instructions de montage et de
r aration.
3. Ins ecter la tondeuse.
4. SÕassurer que lÕutilisateur de la tondeuse
sait bien utiliser les qui ements standard
et accessoires.
5. NÕutiliser la tondeuse quÕavec des lments
de rotection, des crans et autres dis osi-
tifs de scurit bien en lace et en bon tat
de marche.
6. Procder aux rglages ncessaires.
7. Entretenir la tondeuse avec les ices de
rechange autorises ou a rouves.
8. Veiller ce quÕun entretien com let soit ef-
fectu sur la tondeuse.
7 Avant

15
F- 98517
Rgles de scurit respecter pour les tondeuses pousses.
Cette machine lame cou ante eut rojeter des dbris et am uter une main ou un ied. Res ectez les rgles de scurit suivantes our viter des
blessures graves ou mortelles.
I. Utilisation courante
1. Lisez, assimilez et suivez toutes les instruc-
tions donnes sur la tondeuse ou dans se(s)
manuel(s). Avant toute utilisation, familiari-
sez- vous avec les commandes et le fonc-
tionnement de la machine.
2. Ne lacez as vos mains ou vos ieds sous
les ices tournantes ou roximit de ces
dernires. Tenez vous toujours distance de
lÕouverture de dcharge.
3. NÕautorisez que des adultes res onsables et
connaissant les instructions du manuel uti-
liser la machine.
4. Ins ectez soigneusement la machine et la
zone tondre avant de commencer votre
travail. Dgagez le terrain de tout objet tra-
nant sur le sol tels que ierres, jouets, c-
bles, os et btons, qui ourraient tre
accrochs et rojets ar la lame.
5. Avant de commencer tondre, assurez-
vous que ersonne ne soit situ dans votre
zone de travail. Arrtez la machine si quicon-
que ntre dans cette zone.
6. NÕutilisez as la tondeuse si vous tes ieds
nus ou si vous avez des sandales. Portez au
contraire des chaussures rotgeant bien
vos ieds.
7. Ne tirez as la tondeuse vers lÕarrire
moins dÕy tre vraiment oblig. Avant et du-
rant une telle manÏuvre, regardez le sol et
derrire vous.
8. Ne vous servez as de la tondeuse si tous
ses accessoires rotecteurs et son sac
herbe ne sont as en lace..
9. Re ortez- vous aux instructions fournies ar
le fabriquant des accessoires our savoir
comment les installer et les utiliser correcte-
ment. NÕutilisez que des accessoires homo-
logus ar le constructeur.
10. Sto ez la rotation de la lame au moment de
la traverse dÕalles en gravier, de chemins
ou de routes.
11. Cou ez le moteur ds que vous quittez la
machine ou quand vous voulez la nettoyer
ou dboucher le dversoir dÕherbe.
12. Avant de retirer le sac herbe, cou ez le
moteur et attendez que la lame de cou e soit
immobilise.
13. Ne tondez jamais quÕ la lumire du jour ou
avec une lumire artificielle suffisante.
14. NÕutilisez as la machine quand vous tes
trs fatigu ou si vous tes sous lÕeffet de
boissons alcoolises, de mdicaments ou de
drogues ayant un effet somnolent et dimi-
nuant votre ca acit o rer la tondeuse en
toute scurit.
15. Ne vous servez jamais de la tondeuse si
lÕherbe est mouille. Ayez toujours une bon-
ne rise au sol, gardez la oigne de la ma-
chinebienenmainetnecourezjamais
quand vous tondez.
16. Sur les tondeuses qui es dÕun systme
dÕentranement des roues, dsembrayez ce
mcanisme avant de dmarrer le moteur.
17. Si la machine se met vibrer de manire
anormale, cou ez le moteur et recherchez
immdiatement la cause du roblme. Le
lus souvent, une vibration anormale corres-
ond une lame endommage ou une
mauvaise fixation de la lame ou du moteur
dont les boulons sont desserrs.
18. Quand vous utilisez la machine, ortez tou-
jours des lunettes masques ou des lunettes
avec coques latrales our rotger vos
yeux dÕune ossible rojection de cor s
trangers ar la lame.
19. Faites attention au ct duquel lÕherbe se
dcharge. Ne la rojetez as en direction de
la chausse, dÕalles ou vers un endroit o
des ersonnes ourraient se trouver.
20. Sto ez le moteur ds que vous avez heurt
un objet. Dbranchez le cble de la bougie.
Ins ectez la lame et la tondeuse. Si nces-
saire, effectuez la r aration avant de red-
marrer et de vous servir nouveau de la
machine.
21. Quand vous tondez, assurez- vous que tou-
tes les oints de vidange ainsi que les autres
ouvertures et orifices utiliss our la mainte-
nance soient bien obturs.
II. Conduite en pente
Les terrains en ente sont une des causes
majeures de glissades ou de chutes ouvant
sÕaccom agner de graves blessures. Tous les
ty es de ente doivent tre abords avec une
rcaution articulire. Si vous vous sentez mal
assur, ne tondez as le terrain.
PRATIQUES RECOMMANDES:
Tondez toujours en descendant ou en re-
montant directement une ente, jamais er-
endiculairement celle- ci. Ne tondez as
les terrains accidents ou tro inclins ( ente
de 15 degrs au maximum). Re ortez- vous
au guide situ en fin de ce manuel our sa-
voir comment valuer lÕinclinaison dÕun ter-
rain. Soyez articulirement rudent quand
vous changez de direction.
Dgagez le terrain de tout obstacle comme
les cailloux, les branches, etc....
Faites attention aux trous, aux ornires et
aux bosses. Une herbe haute eut dissimuler
des obstacles.
PRATIQUES INTERDITES:
Ne tondez pas rs de dfoncements, de
fosss ou de surlvations, qui euvent faire
erdre lÕutilisateur sa rise au sol ou son
quilibre.
Ne tondez pas un terrain tro inclin.
Ne tondez pas une herbe mouille. Elle eut
faire dra er lÕutilisateur.
III. Prcautions vis- - vis des enfants
De tragiques accidents euvent survenir si
lÕutilisateur nÕa as conscience de la rsence
ossible dÕenfants, qui sont souvent attirs ar
la machine et ar son fonctionnement.
NÕimaginez jamais que les enfants resteront
immobiles dans la osition o vous venez de les
voir.
1. Maintenez les enfants loigns de votre zone
de travail et confiez- les la vigilance dÕun
adulte res onsable.
2. Restez sur vos gardes et cou ez le moteur si
des enfants entrent dans votre zone de tra-
vail.
3. Avant et endant une marche arrire, regar-
dez bien le sol derrire vous our tre sr
que le terrain soit libre de jeunes enfants.
4. NÕautorisez jamais un enfant se servir de la
machine.
5. Soyez articulirement rudent quand vous
a rochez un angle aveugle, un buisson, un
arbre ou tout autre obstacle ouvant gner
votre visibilit.
IV. Entretien
*1. Soyez trs rudent quand vous mani ulez de
lÕessence ou dÕautres carburants. Ceux- ci
euvent sÕenflammer et leurs va eurs sont
ex losives.
a. NÕem loyez quÕun jerrycan homologu.
b. Ne retirez jamais le bouchon du rservoir et
ne versez jamais le carburant quand le mo-
teur tourne. Laissez celui- ci refroidir avant
de commencer le rem lissage. Ne fumez
as.
c. Ne rem lissez jamais le rservoir lÕint-
rieur dÕun local.
d. Ne stockez jamais la machine ou un jerry-
can rem li de carburant dans un local dans
lequel il existe une source dÕinflammation,
comme ar exem le la flamme vive dÕun
chauffe- eau.
*2. Ne dmarrez as et ne laissez as tourner
un moteur dans un endroit clos.
3. Tant que le moteur tourne, nÕeffectuez ni r-
aration ni rglage, comme celui de la hau-
teur de cou e ou du sac herbe.
Dbranchez le cble de la bougie et mainte-
nez ce cble loign de la bougie our viter
tout dmarrage accidentel. Portez toujours
des lunettes de rotection avant de r arer
ou de rgler la machine.
4. Assurez- vous que tous les crous et les
boulons, notamment ceux de fixation de la
lame de cou e, soient bien serrs. Mainte-
nez la machine en bon tat.
5. Ne tentez jamais dÕaltrer les dis ositifs de
scurit. Vrifiez rgulirement leur bon
fonctionnement.
6. Pour rduire le risque dÕincendie, dbarras-
sez la machine de toute accumulation dÕher-
be, de feuilles ou dÕautres dbris. Essuyez
les coulures dÕhuile et de carburant. Laissez
la machine refroidir avant de la ranger.

16
F- 98517
7. Sto ez et ins ectez le matriel ds que
vous avez heurt un objet. Si ncessaire,
effectuez la r aration avant de redmarrer.
8. Ne tentez jamais de rgler les ajusteurs de
hauteur de cou e des roues tant que le mo-
teur tourne.
9. Si votre tondeuse est lectrique, dbranchez
toujours son alimentation avant de nettoyer,
de r arer ou de rgler la machine.
10. Les com osants du bac herbe sont sujets
lÕusure et la dtrioration, ce qui eut en-
traner la mise dcouvert de arties mobi-
les de la machine ou la rojection de dbris.
Vrifiez frquemment lÕtat de ces com o-
sants et, si besoin est, rem lacez- les avec
des ices homologues ar le constructeur.
Au moment du rangement, assurez- vous
que le sac soit bien vid de son herbe.
11. Les lames de tondeuse sont tranchantes.
Quand vous les mani ulez, envelo ez- les
ou rotgez- vous avec des gants et soyez
articulirement rudent.
12. Ne modifiez as les rglages du rgulateur
du moteur et ne forcez as le rgime de ce
dernier.
13. Ins ectez frquemment la lame our voir si
elle est use ou endommage (fissures ou
brchures ar exem le). Une lame fausse
ou endommage doit tre rem lace imm-
diatement avec une ice dÕorigine. Par r-
caution ou our garantir lÕefficacit de la
cou e, changez la lame tous les deux ans.
Vrifiez souvent le boulon de fixation de la
lame ainsi que ceux du moteur. Rem lacez
tout boulon endommag et revissez ceux qui
sont desserrs.
14. NÕutilisez que des ices dÕorigine ou homo-
logues ar le constructeur.
* Ces oints ne concernent as les tondeuses lectriques.

17
F- 98517
CONSIGNES DE SCURIT
POUR TONDRE SANS DANGER
Toute ersonne utilisant un qui ement motoris
doit a rendre discerner la bonne et la
mauvaise faon de sÕen servir, les mthodes
sres et celles qui sont dangereuses. Lisez
attentivement les quelques pages qui
suivent. Elles pourront vous aider
discerner ces diffrences. Tro souvent
lÕusager manque dÕex rience, nÕa as t bien
inform, ou encore nÕa as lu le Manuel
dÕutilisation et les indications se trouvant sur
lÕa areil avant de sÕen servir la remire fois.
Ceci eut entraner des dangers our lÕusager,
les ersonnes roximit et lÕendommagement
du matriel. Cela eut galement entraner une
cou e dÕas ect mdiocre.
Lisez ce Manuel dÕutilisation. Lisez les
indications concernant lÕa areil. Lorsque vous
vous servez de la tondeuse, suivez les
consignes de scurit ainsi que les rgles et
recommandations se trouvant sur lÕa areil
mme. Assurez- vous que tout autre ersonne
utilisant la tondeuse a ralablement lu les
indications et a t inform de la mthode
dÕutilisation sre.
Votre tondeuse est concue afin de vous a orter
satisfaction endant longtem s, dans des
conditions normales dÕem loi domestique. Si
votre tondeuse nÕest as entretenue ou si elle
ne reoit as les r arations adquates, ou si
elle est utilise sur des terrains ina ro ris ou
dans des conditions dfavorables, sa
erformance et sa scurit dÕem loi en seront
rduites.
Il est im ortant de sÕhabiller de manire
adquate lors de lÕutilisation de la tondeuse. Il
est recommand de orter des lunettes de
scurit afin de se rotger les yeux des objets
jects. Le ort de souliers bout mtallique
ermet dÕviter les cou ures aux ieds dues
la lame. Les jambes de antalon et les manches
de chemise euvent galement sto er ou faire
dvier un rojectile.
Faites un essai de la tondeuse avant de
commencer tondre our de bon. La remire
fois, choisissez une grande surface lane sans
obstacle. Familiarisez- vous avec les
commandes, leur em lacement, leur
fonctionnement et leur action. La ra idit avec
laquelle vous ouvez arrter la lame sera
im ortante en cas dÕurgence. A renez tondre
et bien contrler la tondeuse tout moment.
La lu art des tondeuses sont mises en marche
manuellement. Dans le cas dÕun dmarreur fil
ou levier, lacez- vous solidement, les ieds
lÕcart de la lame. Sur les tondeuses
automotrices, on indique dÕhabitude un
em lacement our le ied endant le
dmarrage. Tenez bien la oigne au bout du fil
mais nÕenroulez jamais le fil autour du bras ou
des doigts our ÒlÕavoir mieux en mainÓ.
La tondeuse est concue our tre em loye ar
une seule ersonne. Il faut toujours tondre seul.
Ne trans ortez jamais de ersonnes sur votre
tondeuse. Le trans ort de ersonnes est
dangereux our la ersonne trans orte et le
conducteur. Une tondeuse nÕest as un jouet et
ne doit as tre utilise our trans orter quoi
que ce soit.
Le terrain est- il mouill? Ne cou ez jamais un
gazon mouill. Cou er de lÕherbe mouille eut
causer un accident, diminuer les erformances
de la tondeuse, entraner des roblmes de
ousse et altrer la qualit de la elouse.
LÕherbe mouille est glissante: le conducteur
ourrait tomber et la tondeuse dra er ; on eut
se blesser au contact de la lame. LÕherbe
mouille a tendance bloquer la dcharge de la
tondeuse. Les brins dÕherbe mouille
sÕaccumulent sur le gazon en etits tas, ce qui
em che lÕherbe de ousser. En outre,
IÕhumidit eut faire rouiller certaines ices de
la tondeuse, ce qui rduit sa dure de vie.
Connaissez bien votre terrain, les obstacles
fixes et durs, tels les tuyaux, les souches et les
grosses ierres. Evitez- les, car ils euvent
rovoquer des accidents entranant des
blessures au conducteur ou aux ersonnes
roximit. Parcourez ied le terrain tondre
et, lÕaide dÕun sac en lastique, ramassez les
ierres, les jouets, les fils de fer, les os et tout
autre objet se trouvant sur le assage. Ces
objets euvent endommager la tondeuse et
mme devenir de dangereux rojectiles, si la
lame de la tondeuse les heurte. La lame dÕune
tondeuse moteur tournant trs vite, elle eut
rojeter des ierres ou autres objets avec force
et de grandes distances. Les objets ainsi
jects euvent casser des vitres, blesser et
mme crever un oeil. Il arrive souvent que la
ersonne blesse ar un tel rojectile soit un
enfant, un membre de la famille ou un voisin.
Dgagez donc le terrain tondre. Assurez- vous
que les gens et les animaux sont bien lÕcart
de la surface tondre. Dirigez la dcharge de la
tondeuse du ct o il ne se trouve ersonne.
La lanification de la cou e est doublement
salutaire du fait quÕelle eut rduire les risques
dÕaccident et faciliter le nettoyage a rs la
cou e.
Est- ce que il y a des fos-
ss, des murs, ou des en-
tes abru tes dans la zone
tondre? Etablissez un lan
de cou e afin dÕviter les
endroits dangereux. Les
entes abru tes et terrains
ingaux doivent tre tondus
rudemment et certains en-
droits ne devraient jamais
tre tondus avec une ton-
deuse. Si vous utilisez une
tondeuse ousse, tondez
en travers de la ente de
sorte viter un accident si
vous, ou la tondeuse, glis-
sez.
Ne tondez jamais une ente de lus de 15
degrs. Consultez le Guide la fin de ce
manuel, afin dÕvaluer la ente du terrain
tondre.
Etes- vous rt tondre? Pas encore.
Assurez- vous que la tondeuse a t
entirement monte selon les indications
contenues dans le Manuel dÕutilisation. Mme si
elle a t monte dans un centre de jardinage
ou dans le magasin o la tondeuse a t
achete, il faut nanmoins faire cette
vrification. Les boulons, les vis et les crous
sont- ils bien serrs? Le niveau dÕhuile est- il
adquat? La batterie est- elle charge? Tout
cela est vrifier rgulirement.
Votre tondeuse est munie dÕun moteur
essence. LÕessence est un roduit dangereux.
Rangez votre rserve de carburant dans un
bidon conu cet effet. Ne conservez jamais de
lÕessence en grande quantit. Eteignez toute
cigarette, i e et cigare avant de verser ou
transvaser de lÕessence. Entre osez le
carburant et la tondeuse dans un endroit bien
ar, lÕcart de tout danger de combustion tel
la veilleuse dÕune fournaise. Si la tondeuse doit
tre entre ose our un certain tem s, videz le
rservoir dÕessence. Cela ermet de rduire les
risques dÕincendie et dÕem cher lÕaccumulation
de d ts dÕessence dans le rservoir,
ermettant ainsi dÕamliorer le fonctionnement
de la tondeuse. Sortez la tondeuse avant
dÕajouter de lÕessence. Servez- vous dÕun
entonnoir et essuyez lÕessence r andue avant
de mettre le moteur en marche. NÕoubliez as
que lÕessence se dilate la chaleur; ar
consquent, ne rem lissez as le rservoir
jusquÕau bord. En outre, les bouchons de
rservoir de la lu art des tondeuses sont munis
dÕun trou dÕaration. Em loyez toujours un
bouchon adquat. Si ces consignes
fondamentales de scurit concernant lÕessence
et lÕalimentation en combustible ne sont as
suivies, vous risquez dÕtre brl lors dÕun
incendie ou bless lors dÕune ex losion, ou
risquez dÕendommager la tondeuse et autres
objets.
NÕajoutez jamais dÕessence un moteur qui
tourne ou est encore chaud a rs usage, cela
ourrait dclencher un feu ou une ex losion.
Nettoyez la tondeuse de toute accumulation
dÕherbe et autres dbris. La ro ret de la
tondeuse amliorera son rendement,
em chera le moteur de surchauffer, retardera
lÕusure de ses arties mcaniques et rduira les
risques dÕincendie. Le feu et les ex losions ne
sont as les seules causes de brlures lorsque

18
F- 98517
lÕon travaille avec, ou roximit dÕune
tondeuse. Il suffit que le moteur tourne quelques
secondes our quÕil devienne trs chaud ; il en
est de mme our le ot dÕcha ement. Ne
touchez jamais ces lments lorsque la
tondeuse est en marche. Cou ez le moteur et
laissez- le refroidir avant de rocder son
entretien. NÕoubliez as que les gaz
dÕcha ement euvent tre dangereux. Ne
faites jamais tourner le moteur lÕintrieur dÕun
btiment ou dans tout autre endroit clos.
LÕachat dÕune nouvelle tondeuse eut
re rsenter un grand vnement our une
famille. Laissez les membres de la famille
satisfaire leur curiosit au sujet de la tondeuse
et, en mme tem s, avertissez- les des dangers
quÕelle re rsente. NÕoubliez as quÕune
tondeuse nÕest as un jouet et quÕelle nÕest as
conue lÕusage des enfants, ni de toute
ersonne dont la force hysique ou lÕex rience
est insuffisante.
Une tondeuse, comme tout a areil moteur,
eut tre dangereuse si elle nÕest as monte
ou entretenue comme il faut ou si elle est mal
em loye. LorsquÕil sÕagit de lÕentretien de votre
tondeuse, la raison et le bon sens sont les
rgles les lus im ortantes.
Votre tondeuse cou e aisment lÕherbe aisse
et les grosses tiges de lantes. Les doigts et les
orteils ne rsisteront as davantage la lame de
la tondeuse, cela est vident. Nanmoins, bien
des gens se sont retrouvs dans un salle
dÕurgences dÕun h ital arce quÕils ont ÒoubliÓ
et mis la main dans le dflecteur afin de
dbloquer le assage. Traitez toujours votre
tondeuse comme si la lame tournait. Ne
rocdez aucun entretien, et ne tentez de faire
aucun rglage, sauf au carburateur, tant que le
moteur tourne.
Ne vous servez que dÕaccessoires ada ts
votre tondeuse. LÕusage de tout autre accessoire
risque de rduire la scurit dÕem loi de la
tondeuse et des accessoires ; cela eut mme
endommager lÕa areil. Lisez et suivez les
consignes fournies avec la tondeuse et
lÕaccessoire.
Ne vous servez que de matriel dÕorigine ou de
ices a rouves comme ices de rechange.
Si vous devez avoir recours un rofessionnel
our la r aration ou lÕajustement de votre
tondeuse, adressez- vous un Centre de
Service a rs- vente agr our votre tondeuse.
Si vous avez lÕintention de r arer vous- mme
votre a areil, suivez les indications du Manuel
dÕutilisation et dÕentretien.
Lors de lÕutilisation de votre tondeuse,
souvenez- vous que les enfants et les animaux
sont souvent attirs ar cette activit. Soyez
attentif, surtout lorsque vous tondez autour des
arbustes, ou lorsque vous reculez. Regardez
toujours bien autour des arbustes avant de
tondre. Regardez derrire vous avant de asser
en marche arrire. Evitez le lus ossible de
tondre en marche arrire. Cette mthode est
dangereuse uisque la vue est limite. En outre,
la lame est concue our cou er quand la
tondeuse se d lace vers lÕavant, la lame
cou e donc moins bien en marche arrire.
Ne laissez jamais sans surveillance une
tondeuse en marche. Cou ez le moteur. Placez
la tondeuse dans une osition telle quÕelle ne
uisse as rouler. Si la tondeuse est
automotrice, assurez- vous que la commande de
la transmission est en osition dsengage.
Lorsque vous tondez, soyez conscient de votre
tat hysique et des conditions atmos hriques.
A rs avoir tondu longtem s, vous serez
fatigu. CÕest le moment o les rflexes
ralentissent, o vous tes moins attentif, o
vous vous ex osez aux accidents. Faites une
courte ause. SÕil fait chaud, faites attention de
ne as vous dshydrater. Si vous tes fatigu,
mais que vous ne ouvez as vous arrter,
redoublez de rudence. Si vous tes fch,
fatigu ou inca able dÕaccorder toute votre
attention la tche, si vous avez consomm
une boisson alcoolique, si vous avez ris des
mdicaments ou des drogues, ne vous servez ni
de votre tondeuse ni dÕaucun a areil moteur.
Si les conditions atmos hriques se dtriorent
endant que vous tondez, arrtez- vous et
terminez lus tard. Tondre le gazon sous la luie
nÕest as amusant et cÕest dangereux.
Abritez- vous toujours endant un orage.
LorsquÕil fait trs sec, vos lunettes de sret
vous seront doublement utiles; elles rotgeront
vos yeux de la oussire et des rojectiles; un
masque eut aussi servir contre la oussire et
le ollen.
Votre tondeuse est munie dÕun certain nombre
dÕlments de scurit im ortants our la
rotection de lÕusager et des ersonnes
rsentes; ils ne devraient jamais tre enlevs
ni modifis. Si lÕun de ces lments est erdu,
endommag ou sÕil devient inefficace,
rem lacez- le ou r arez- le avant de vous servir
de la tondeuse.
La scurit de la cou e et lÕas ect du gazon
sont fonctions du rgime du moteur de votre
tondeuse qui est rgl ar le fabricant. Ne
modifiez en aucune faon le rgulateur du
moteur.
Choisissez un rgime qui convient au terrain et
la hauteur du gazon. Souvenez- vous que lÕon
obtient les meilleurs rsultats lein rgime,
avec un bac herbe. Ne jamais marcher trs
vite ou courir our achever la tche lus tt. En
ente, ralentissez et soyez trs rudent.
Il vaut mieux tondre la lumire du jour;
ce endant, si vous devez tondre en fin
dÕa rs- midi ou le soir, assurez- vous que
lÕclairage artificiel est dÕintensit suffisante.
Votre tondeuse, comme toute autre machine,
ncessitera un certain entretien et des rglages
avant et a rs usage. La frquence de
lÕentretien d end du nombre dÕheures endant
lesquelles la tondeuse a servi; ce endant, elle
eut aussi varier selon les conditions de la
cou e. Consultez le Manuel dÕutilisation our de
lus am les informations ce sujet. Un
entretien adquat rotge votre tondeuse et
ermet dÕassurer un fonctionnement sr et
efficace.
Ne tentez jamais dÕeffectuer lÕentretien de votre
tondeuse ( lÕexce tion du rglage du
carburateur) tant que le moteur tourne. A rs
avoir cou le contact, dbranchez toujours la
bougie our viter que le moteur se remette en
marche s ontanment endant lÕentretien. Si
vous heurtez un objet quelconque en tondant,
cou ez le contact.
Dbranchez la bougie. Exa-
minez soigneusement la
tondeuse our vrifier sÕil y
a des dgts. Faites les r-
arations ncessaires avant
de redmarrer. Si lÕa areil
vibre de faon anormale,
cou ez immdiatement le
moteur et vrifiez la cause.
Les vibrations signalent g-
nralement des ennuis. V-
rifiez bien le serrage des
boulons, vis et crous.
La lame est lÕlment le lus dangereux de la
tondeuse et aussi celui dont d end le lus
directement lÕas ect de votre elouse. Vrifiez
souvent les ices de montage de la lame.
Assurez- vous quÕelles soient toujours bien
serres. Si la lame heurte un objet dur,
assurez- vous quÕelle nÕest as tordue, brche
ou fle et rem lacez- la si elle est
endommage. Pour votre scurit, rem lacez la
lame tous les deux ans. Une lame bien aiguise

19
F- 98517
facilite le travail du moteur et cou e lÕherbe lus
nettement. La lame est toujours roche des
cts du carter. Pour tondre dans les recoins
avec une tondeuse dcharge latrale, tondez
toujours le ct gauche de la tondeuse vers
lÕendroit tondre.
Le receveur herbe est un accessoire utile. Il en
existe our resque tous les modles de
tondeuses. Pour une qualit de cou e
su rieure et en toute scurit, lors de
lÕutilisation dÕun receveur herbe, assurez- vous
quÕil est a rouv our lÕutilisation avec votre
tondeuse. Montez- le selon les indications et
suivez les consignes de scurit et dÕem loi
fournies avec le receveur ainsi que celles du
Manuel dÕutilisation.
Avant de monter, dÕexaminer ou de vider le
receveur herbe, cou ez toujours le moteur.
NÕoubliez as de vrifier si le receveur herbe
est endommag ou us et ce, avant chaque
usage. Si besoin est, rem lacez toute ice
endommage ar une ice de rechange
recommande ar le fabricant avant dÕutiliser
nouveau le receveur herbe.
Si vous dsirez soigner lÕas ect de votre
elouse, il est im ortant que vous ado tiez une
bonne technique our tondre. Ne succombez
as la tentation de cou er lÕherbe tro courte.
Une cou e tro courte eut tuer la lante, faire
jaunir votre elouse, ou la faire tourner la
couleur bruntre. Cou ez lus court endant la
saison frache quand lÕherbe est luxuriante,
cou ez lus haut endant les riodes sches.
Une lame mousse et un rgime rduit du
moteur blesse et dchire lÕherbe et eut mme
la draciner, ce qui brunit et ternit le gazon
quelques jours a rs la cou e. Placez toujours
la commande de la manette des gaz en osition
RAPIDE ou ÒFASTÓ. Lorsque vous tondez et
mettez en sac, vous obtiendrez de meilleurs
rsultats si vous oussez la tondeuse lus
lentement.
Changez un eu le trac de la cou e chaque
fois que vous tondez. Si vous tondez toujours de
la mme faon, lÕherbe oussera toujours de la
mme faon et des brins dÕherbe cou s
sÕaccumuleront certains endroits, as
dÕautres, crant des zones o lÕherbe sera lus
clairseme. Ne rocdez aucun entretien de la
tondeuse sur lÕherbe. LÕhuile et lÕessence
r andues euvent tuer lÕherbe. Si lÕherbe est
haute ou trs aisse, nÕessayer as de la
cou er en une seule fois. Relevez la lame our
le remier assage et baissez- la au assage
suivant le mme jour ou quelques jours tard. Un
autre moyen est de cou er seulement sur une
ortion de la largeur de la tondeuse la fois et
dÕajuster votre vitesse ( as celle de la lame)
our aller lus lentement de sorte que la
tondeuse uisse se dgager mesure quÕelle
avance.
Lors de lÕutilisation dÕune tondeuse ousse, il
faut toujours aller de lÕavant, et ne jamais la tirer.
Lorsque la tondeuse est ousse, le conducteur
se trouve derrire la tondeuse our mieux la
contrler. En oussant la tondeuse le
conducteur eut voir exactement ce quÕil fait et
o il va. Ce endant, il est ossible que vous
deviez tirer la tondeuse vers lÕarrire (comme
ar exem le lorsque lÕavant de la tondeuse se
trouve devant un mur ou une clture). Dans ce
cas, assurez- vous que vos ieds sont lÕcart
de la tondeuse. Tenez vos distances lÕarrire
de la tondeuse, reculez dÕun ied sr et en
regardant rudemment derrire vous.
Si votre tondeuse est tracte, nÕoubliez as que
le mcanisme de transmission nÕest as conu
our faire tout le travail, mme si la tondeuse
eut se d lacer sans votre aide. Gardez
toujours vos mains sur la oigne rs des
commandes quand le moteur est en marche.
Souvenez- vous aussi que le mcanisme
automoteur eut tre dangereux. Tenez vos
mains et vos ieds lÕcart des courroies et des
chanes. Cou ez toujours le moteur avant
dÕenlever tout lment enchevtr dans le
mcanisme automoteur.
Votre tondeuse est un instrument utile, mais
nÕoubliez as quÕelle eut tre dangereuse. Si
vous suivez les indications de ce Manuel
dÕutilisation et si vous utilisez la tondeuse
rudemment, elle vous servira longtem s, et ne
causera aucun ennui ni aucun accident.
RéGLES Ë OBSERVER
AVANT DE TONDRE
DHabillez- vous de faon a ro rie. Portez
des chaussures aisses et vitez les san-
dales ou les chaussures de tennis.
DExaminez la lame. Une lame fausse, fissu-
re ou endommage devra tre rem lace
ar une ice dÕorigine.
DFaites le lein lÕextrieur. Essuyez toute
trace de carburant sur la machine.
DLisez et res ectez les consignes donnes
dans le Manuel de lÕUsager ainsi que celles
que vous trouverez dans celui du moteur ou
des blocs accessoires. Ces consignes sont
destines garantir votre scurit et celle de
votre entourage.
DLes gaz dÕcha ement sont dangereux. D-
marrez le moteur lÕextrieur.
DAssurez- vous que tous les dis ositifs de
rotection sont bien en lace et en tat de
fonctionnement.
DNe confiez lÕutilisation de la tondeuse quÕ
une ersonne ex rimente.
DUne herbe humide eut se rvler dangereu-
se. Attendez quÕelle sche avant de tondre.
DDites aux enfants et aux autres ersonnes
de se tenir loigns de votre zone de travail.
DNe tondez jamais sans une lumire suffisan-
te.
DRamassez tous les objets qui tranent et net-
toyez le terrain tondre avant de commen-
cer.
DURANT LA COUPE
DFaites attention aux obstacles fixes et vi-
tez- les. Ils ourraient endommager la ton-
deuse ou rovoquer un accident.
DAttention ne as vous brler avec le mo-
teur, le ot dÕcha ement ou la transmis-
sion quand ces arties sont chaudes. Evitez
tout contact avec la eau.
DLes d ressions et les entes doivent tre
tondues avec rudence. Re ortez- vous au
ÒGuideÒ situ en fin de ce manuel our a -
rendre valuer lÕinclinaison dÕun terrain.
DSi la lumire naturelle ou artificielle est insuf-
fisante, arrtez- vous de tondre.
DSi vous heurtez un obstacle ou si la machine
vibre de faon excessive, examinez la ton-
deuse, sa lame et les autres lments our
valuer les dommages ventuels.
DNÕeffectuez as de rglages ou de r aration
sur une machine dont le moteur tourne. D-
connectez le cble de la bougie.
DQuand vous travaillez rs dÕune route,
soyez attentif au trafic. Ne rojetez as lÕher-
be cou e en direction de la chausse.
DEvitez de tondre dans les arties nÕoffrant
que eu de rise de roues. Regardez derri-
re vous quand vous changez de sens de
marche.
DSi lÕherbe est aisse, augmentez votre hau-
teur de cou e. Travaillez lus lentement.
Sto ez de tem s autre le moteur our
ouvoir retirer les bouchons dÕherbe.
DNe retirez jamais les lments ayant une
fonction de rotection.
DNe rem lissez jamais le rservoir dÕessence
dÕune tondeuse dont le moteur tourne ou si
ce dernier est encore tro chaud.
APRES LA COUPE
DLaissez toujours la tondeuse se refroidir
avant de la ranger.
DNettoyez la machine de tous les dbris qui
euvent la recouvrir, et retirez notamment
lÕherbe, les feuilles ainsi que les traces dÕhui-
le et de graisse avant de lÕentre oser.
DResserrez toutes les ices de fixation qui
ont du jeu avant toute utilisation.
DVidez et nettoyez tout receveur herbe et
tout autre accessoire.

20
F- 98517
DRetirez la cl de contact ou dconnectez le
cble de la bougie our rvenir tout usage
non autoris.
DAssurez- vous que la tondeuse nÕest as
entre ose rs dÕune source de chaleur.
Les va eurs dÕessence euvent tre lÕorigi-
ne dÕune ex losion.
DNÕutilisez que des ices de rechange dÕori-
gine ou homologues our lÕentretien de vo-
tre machine.
DEn cas dÕentre osage rolong, vidangez le
rservoir dÕessence.
DA renez aux enfants ne as toucher la
tondeuse. Ce nÕest as un jouet.
DNe stockez jamais lÕessence rs dÕune
source de feu. Conservez- la dans un jerry-
can s cialement rvu our cela. Gardez-
la hors de orte des enfants.
DLubrifiez votre tondeuse en res ectant les
instructions du manuel. Voyez la artie intitu-
le ÒLubrificationÒ.
REMARQUE IMPORTANTE- - Il est im-
portant que vous lisiez ce Manuel et
que vous le conserviez pour de futures
consultations.
Table of contents
Languages:
Other Murray Lawn Mower manuals

Murray
Murray 42583X9A User manual

Murray
Murray 385048X51 User manual

Murray
Murray 405000x8C User manual

Murray
Murray 309008x99B User manual

Murray
Murray 30902992NA Series User manual

Murray
Murray 22" Push User manual

Murray
Murray 465307X51A User manual

Murray
Murray EMT155420H User manual

Murray
Murray 312006x51A User manual

Murray
Murray EQ2-500X User manual

Murray
Murray 7800889 User manual

Murray
Murray 309008x92B User manual

Murray
Murray 22406X9A User manual

Murray
Murray MP22675HW User manual

Murray
Murray 42514x8A Guide

Murray
Murray MB1842LT User manual

Murray
Murray MP450 User manual

Murray
Murray 425620x92B User manual

Murray
Murray YARD KING ELT155420GF User manual

Murray
Murray MP2265FC User manual