7
Assembly
All fasteners are in the parts bag. Do not discard any parts or
material until the unit is assembled.
WARNING: Before doing any assembly or
maintenance to the mower, remove the wire from
the spark plug.
NOTE: In this instruction book, left and right describe the
location of a part with the operator on the seat.
NOTE: Illustrations and pictorials begin on page 1.
NOTE: To assemble the following loose parts, use the
fasteners shown at full size in Figure 3.
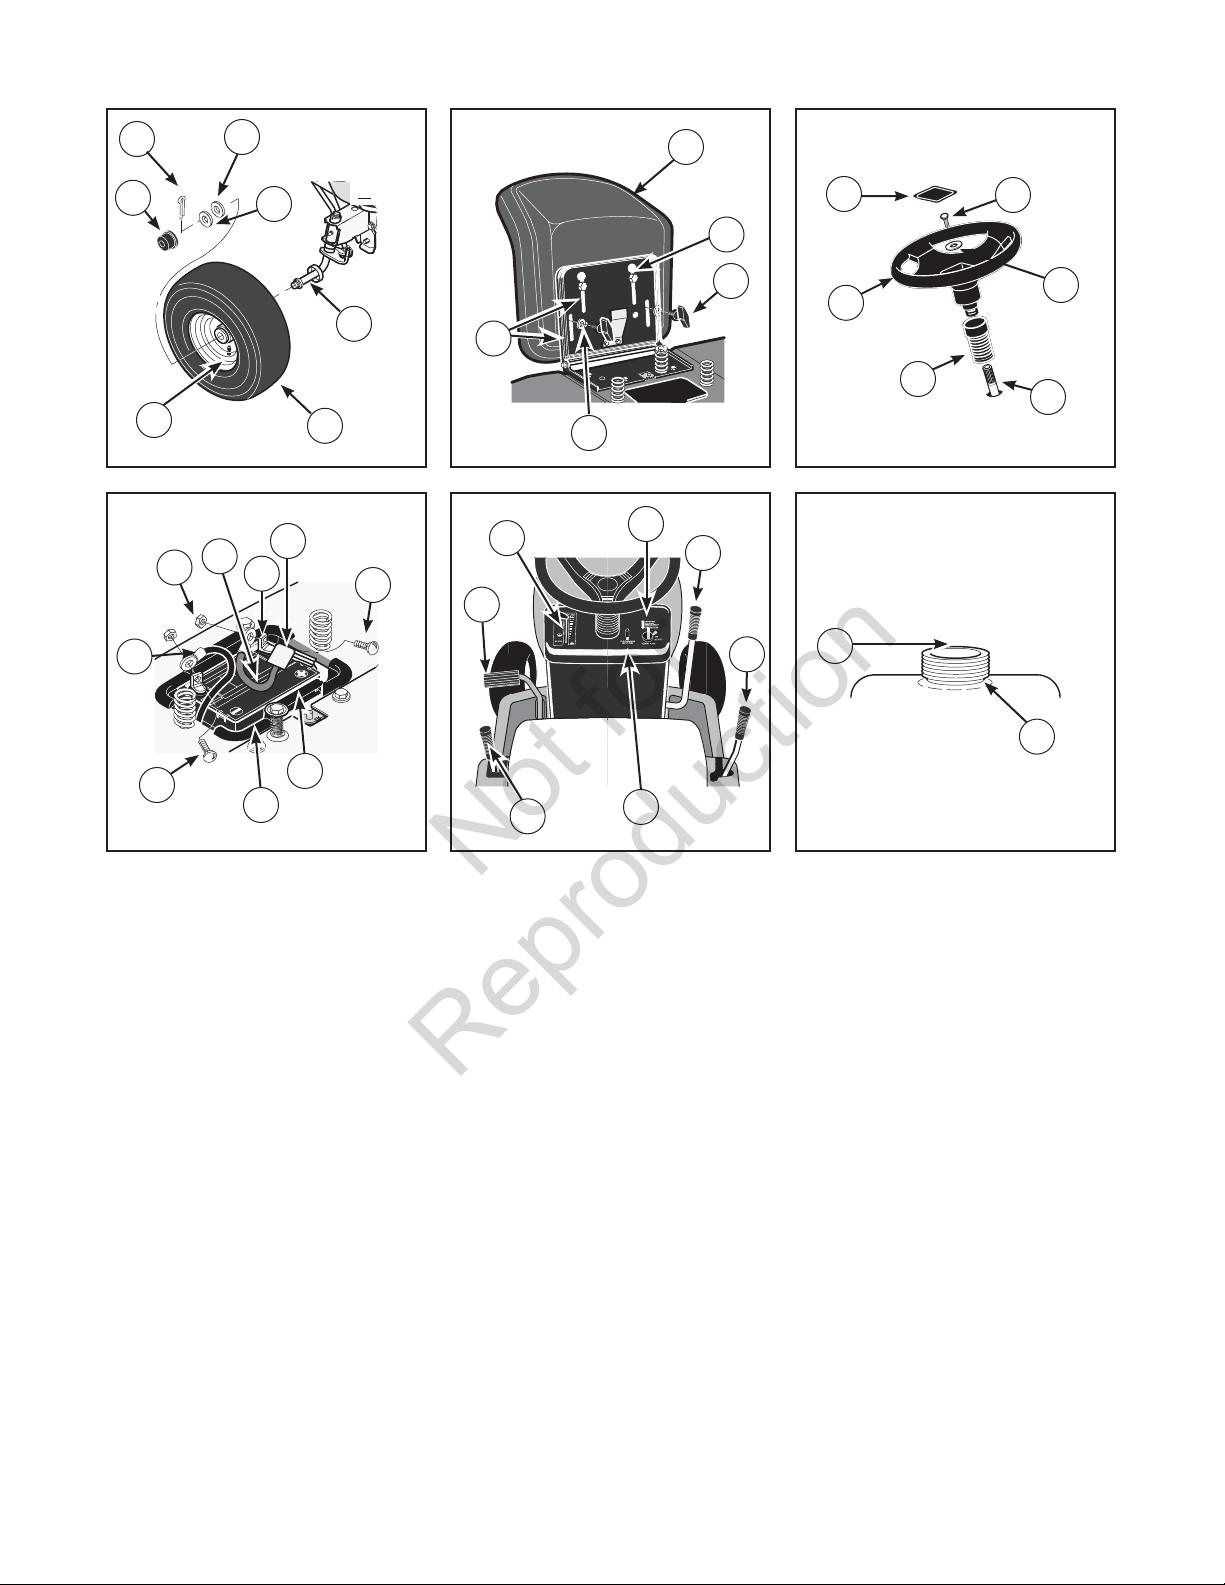
Install the Front Wheels
Use a knife and cut the four sides of the container. Install the
front wheels (A) in the container (see Figure 4).
NOTE: Use a piece of wood about 4 feet (1.25 meters) long
to raise the front of the tractor. If a piece of wood cannot be
found, get another person to help lift the tractor. Be careful,
do not let the tractor fall.
Raise the front of the tractor. Set a support (block of1.
wood) under the tractor.
Make sure the2. valve stem (B) is to the outside of the
tractor. Slide the front wheel (A) on the spindle (C).
Fasten each front wheel with3. washer (D), washer (G)
and cotter pin (E). Bend the ends of the cotter pin apart
to keep the front wheel on the spindle.
After the front wheels are installed, lift the tractor from4.
the support. Roll the tractor off of the container.
If your tractor has5. hub caps (F), install the hub caps.
Make sure the washers hold the hub caps in place.
Install the Seat
Carefully remove the plastic bag from the seat.1.
Align the holes in the2. seat hinge (B) to the holes in
the seat (A) (see Figure 5). Fasten the seat to the seat
hinge with the fasteners (D) and (E).
Check the operating position of the seat. If the seat3.
needs to be adjusted, loosen the two wing bolts (E).
Slide the seat forward or backward along the seat
adjusting holes (C). Tighten the wing bolts.
Assemble the Steering Wheel
Make sure the front wheels point forward.1.
Slide the2. cover (C) over the steering post (B) (see
Figure 6). Make sure the collar of the cover is on top.
Slide the3. steering wheel (A) onto the steering post.
Attach the steering wheel to the steering post with4. screw (D) and washer (E).
Some models have an5. optional insert (F) in the parts
bag. Attach the insert to the center of the steering
wheel.
Maintenance Free Battery
IMPORTANT: Before you attach the battery cables to the
battery, check the battery date. The battery date tells if the
battery must be charged.
(Figure 7) Check the top of the1. battery (A) for the
location of the battery date.
If the2. battery (A) is put into service before the battery
date, the battery cables can be attached without
charging the battery (A). See “Install The Battery
Cables”.
If the3. battery (A) is put into service after the battery
date, the battery (A) must be charged. See “Charge The
Battery”.
Charge The Battery (Figure 7)
WARNING: When you charge the battery, do not
smoke. Keep the battery away from any sparks. The
fumes from the battery acid can cause an
explosion.
Remove the1. battery (A) and battery tray (C).
Remove the protective cap from the battery terminal.2.
Use a 12 volt battery charger to charge the3. battery (A).
Charge at a rate of 6 amperes for one hour. If you do
not have a battery charger, have an authorized service
centre charge the battery.
Install the4. battery (A) and battery tray (C). Make sure
the positive (+) terminal (D) is on the left side.