Muvi Veho K-series User manual

User Manual

2 3
1. Introduction
Thank you for purchasing the Veho K-Series HD camcorder. Its small size, integrated
design and easy to use funcons mean that you can record and photograph anyme,
anywhere using high-denion and dynamic photography, so that you can share
your videos and photos with your family members and friends.
This manual covers detailed instrucons on use, operaon, installaon and technical
specicaons of the K-Series HD camcorder. Please read this manual carefully before
use and retain for future reference.
Index
Introducon 2
Precauons 3
Tour of your Muvi K-Series 4
Descripon of LED indicators 6
Geng Started 8
Accessing Muvi K-Series Sengs 10
General camcorder sengs 11
Switching between modes 13
Video Recording 15
G-Sensor 17
Photo capture 18
Download and install app 20
Turning on the WiFi and connecng to the app 21
Guide to using the app 24
K-Series Camcorder Specs 35
2. Precautions
When using the K-Series HD camcorder please adhere to the following precauons:
1. Do not drop, knock or shake the camcorder.
2. Do not put the camcorder close to an object that generates strong magnec
eld, such as a magnet or a motor or close to an object that emits powerful
radio waves. A strong magnec eld may cause faults on the camcorder or
damage the video/audio recordings.
3. Do not expose the video camera to high temperatures or direct sunshine.
4. Do not put the microSD card close to an object that generates a strong
magnec eld, such as a television set or a magnet. Do not put the microSD
card in a place where stac electricity is easily generated.
5. If the camcorder overheats or you see or smell smoke whilst it is charging,
immediately disconnect the power supply to stop charging the baery.
6. Keep the camcorder out of reach of children during charging as the power
cable may cause asphyxia or electric shocks.
7. Store the camcorder in a cool, dry and dust-free place.
45
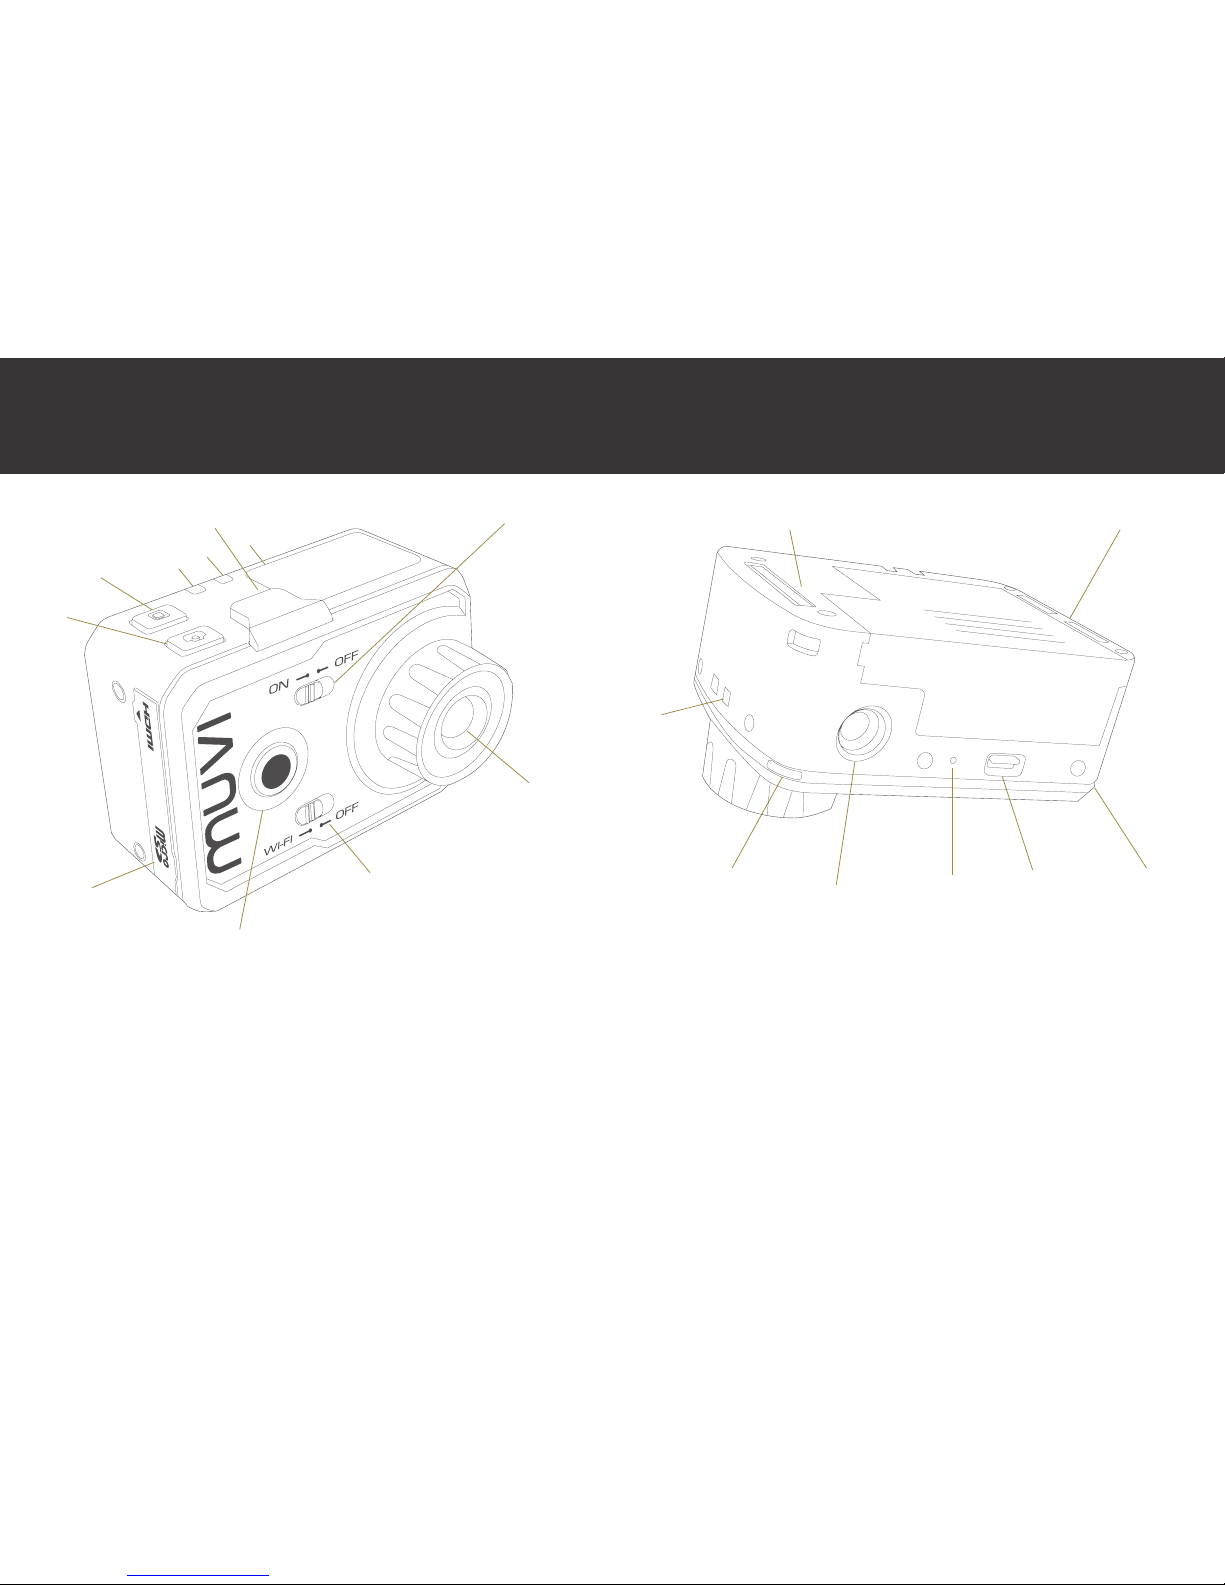
3. Tour of your Muvi K-Series
1. On/O Switch
2. WiFi On/O Switch
3. Start Record Buon
4. Lens
5. Power Indicator (red)
6. Top LED Indicator (blue)
7. LCD Display
8. Stop Record Buon
9. Capture Buon
10. Microphone
11. HDMI Port
Mini USB/AV Out Port
microSD Slot
1
2
3
5
4
8
9
11
6
7
10
14. Baery Lock Switch
15. Microphone
16. Tripod Mount
17. Lanyard Hole
18. Connecons for Oponal LCD Screen
19. Boom LED Indicators
15
16
14
19
17
19
18 18

6 7
4. Description of LED indicators
Status PowerIndicator TopLEDIndicator BoomLED RecordBuon
(Red) (Blue) Indicators(Blue) Indicator
Power On Solid On
Recording Video Flash Slowly Solid On
Recording Audio Flash Slowly Solid On
Capturing Photo Flash Once Flash Once
microSD Card Full Solid On
Charging Flash Slowly
Fully Charged Solid On
Low Baery Flash Fast for 5
seconds and then
auto power o
WiFi On Flash Slowly

89
5. Getting Started
Inserng the baery
Before inserng the baery make sure that the lock switch is in the unlock posion.
Slide the baery into the camcorder, and then move the lock switch into the lock
posion to lock the baery into place.
Charging the Muvi K-Series
To charge the camcorder, connect it to a USB port using the supplied USB cable. The
red LED will ash whilst charging. It will take approximately 3 hours for the camcorder
to fully charge. Once fully charged the red LED will stop ashing and stay on.
Inserng the microSD card
The K-Series camcorder supports microSD and microSDHC cards up to 32GB.
Although any class of card can be used with the camcorder it is recommended that a
class 6 or higher card is used for the best results.
With the camcorder turned o, remove the port cover on the side of the camcorder
and insert the microSD card into the microSD slot. You will hear a click to indicate
that the card has been inserted correctly. To remove the microSD card press the
card into the camcorder to release it. The card will pop out slightly so that you can
remove it.
Turning on the Muvi K-Series
Turn on the camcorder by moving the power switch on the front of the camcorder to
the on posion. The start-up Muvi logo will appear on the LCD display and the power
indicator will turn red. Once the LCD display changes to the informaon display the
camcorder is ready to use. Please note that the camcorder will be become warm
during use.
LCD informaon display
Camcorder mode Video resoluon and frame rate
Remaining video recording
me on microSD card
Baery level

10 11
6. Accessing Muvi K-Series Settings
To enter the sengs menu press and hold
the start record buon for three seconds. The
camcorder symbol will appear on the LCD
display.
Press the stop record buon repeatedly to
navigate through the opons unl you reach
the M symbol. Press the start record buon to
enter the menu.
The following menu will appear.
Use the camera buon and stop record buon to move between the opons. Press
the start record buon to select to enter video sengs, to enter photo
sengs or to enter general camcorder sengs. Move to EXIT and press the start
record buon to exit the sengs menu.
Enter the sengs menu and then select the general camcorder sengs menu. Use
the camera buon and stop record buon to move between the opons. Press the
start record buon to select the opon you want to change.
Set the key tone volume to o, medium or standard.
Turn status LEDs on or o.
Turn the on screen display on or o on oponal LCD screen.
Loop Record – Turn on to connually overwrite les when the
memory becomes full.
Set the auto standby funcon to o, 2, 5 or 10 minutes.
See the TV standard to NTSC or PAL depending on your area.
Changing this seng will also aect the frame rate per second that
you can record at. See page 16
Turn on the central spot exposure mode to on or o.
Turn the G-Sensor mode on or o. For further informaon on the
G-Sensor funcon please see page 17.
Set the language for the camcorder menu. Languages available are:
Simplied Chinese, Tradional Chinese, English, German, French,
Italian, Spanish, Portuguese, Russian or Japanese.
7. General camcorder settings

12 13
Set the date and me. See below for further informaon.
Format the microSD card in the camcorder. Note: Formang will
delete all les, including protected ones.
Restore the camcorder to the factory seng default.
Exit the general sengs menu and return to the main sengs menu.
Seng the date/me
Select the date/me opon from the seng menu. Use the camera and stop record
buons to change the highlighted posion. Aer you have selected the correct
number press the start record buon to move to the next posion.
Once you have changed the minute setup press the start record buon to exit the
date and me setup.
To switch between modes press and hold the start
record buon for three seconds.
Press the stop record buon repeatedly to navigate through the opons .Press the
start record buon to select your preferred opon. For further informaon on each
opon please see below.
Symbol Mode Further Informaon
Video Page 15
Time Lapse Page 15
Auto Video Page 15
Single Shot Page 18
Fast Shot Page 18
Timed Page 18
8. Switching between modes
EXIT

14 15
Make sure that a microSD card is inserted and turn the camcorder on. Select
your preferred video mode and press the start record buon on the front of the
camcorder to start recording. The LEDs around the start record buon will turn solid
blue, the red status LED will turn o and the top LED indicator will ash blue.
To stop recording press the stop record buon on the top of the camcorder. The blue
LEDs will turn o and the red status LED will turn back on.
Video Sengs
Note: To change the video sengs you must be in video mode before you enter the
sengs menu.
Enter the sengs menu and then select the video sengs menu. Use the camera
buon and stop record buon to move between the opons. Press the start record
buon to select the opon you want to change.
Choose between
Video Record video and audio together
Audio Record audio only
Time Lapse Record a me lapse video
Auto Video Video self-mer. Aer pressing the start record buon
the camcorder will start recording aer 5, 10 or 20
seconds.
Audio Page 15
Sengs Page 10
Switching quickly between video and photo
Whilst in video mode press the capture buon once to enter photo mode. Whilst in
photo mode press the start record buon once to enter video mode.
9. Video Recording
16 17
10. G-Sensor
The G-Sensor mode on the K-Series camcorder is a camera movement acvaon
funcon. This means that when the G-Sensor mode is turned on it will acvely
sense a change in gravity, for example if it is knocked, lted or moved, and will start
recording automacally without needing to press the start record buon. If the
camcorder has not sensed any gravity change for 3 minutes it will stop recording.
You can also stop recording by manually pressing the stop record buon.
Please note that this is a video funcon only and if the G-Sensor mode is turned
on whilst in camera mode it will automacally revert to video mode and then start
recording if it senses a change in gravity.
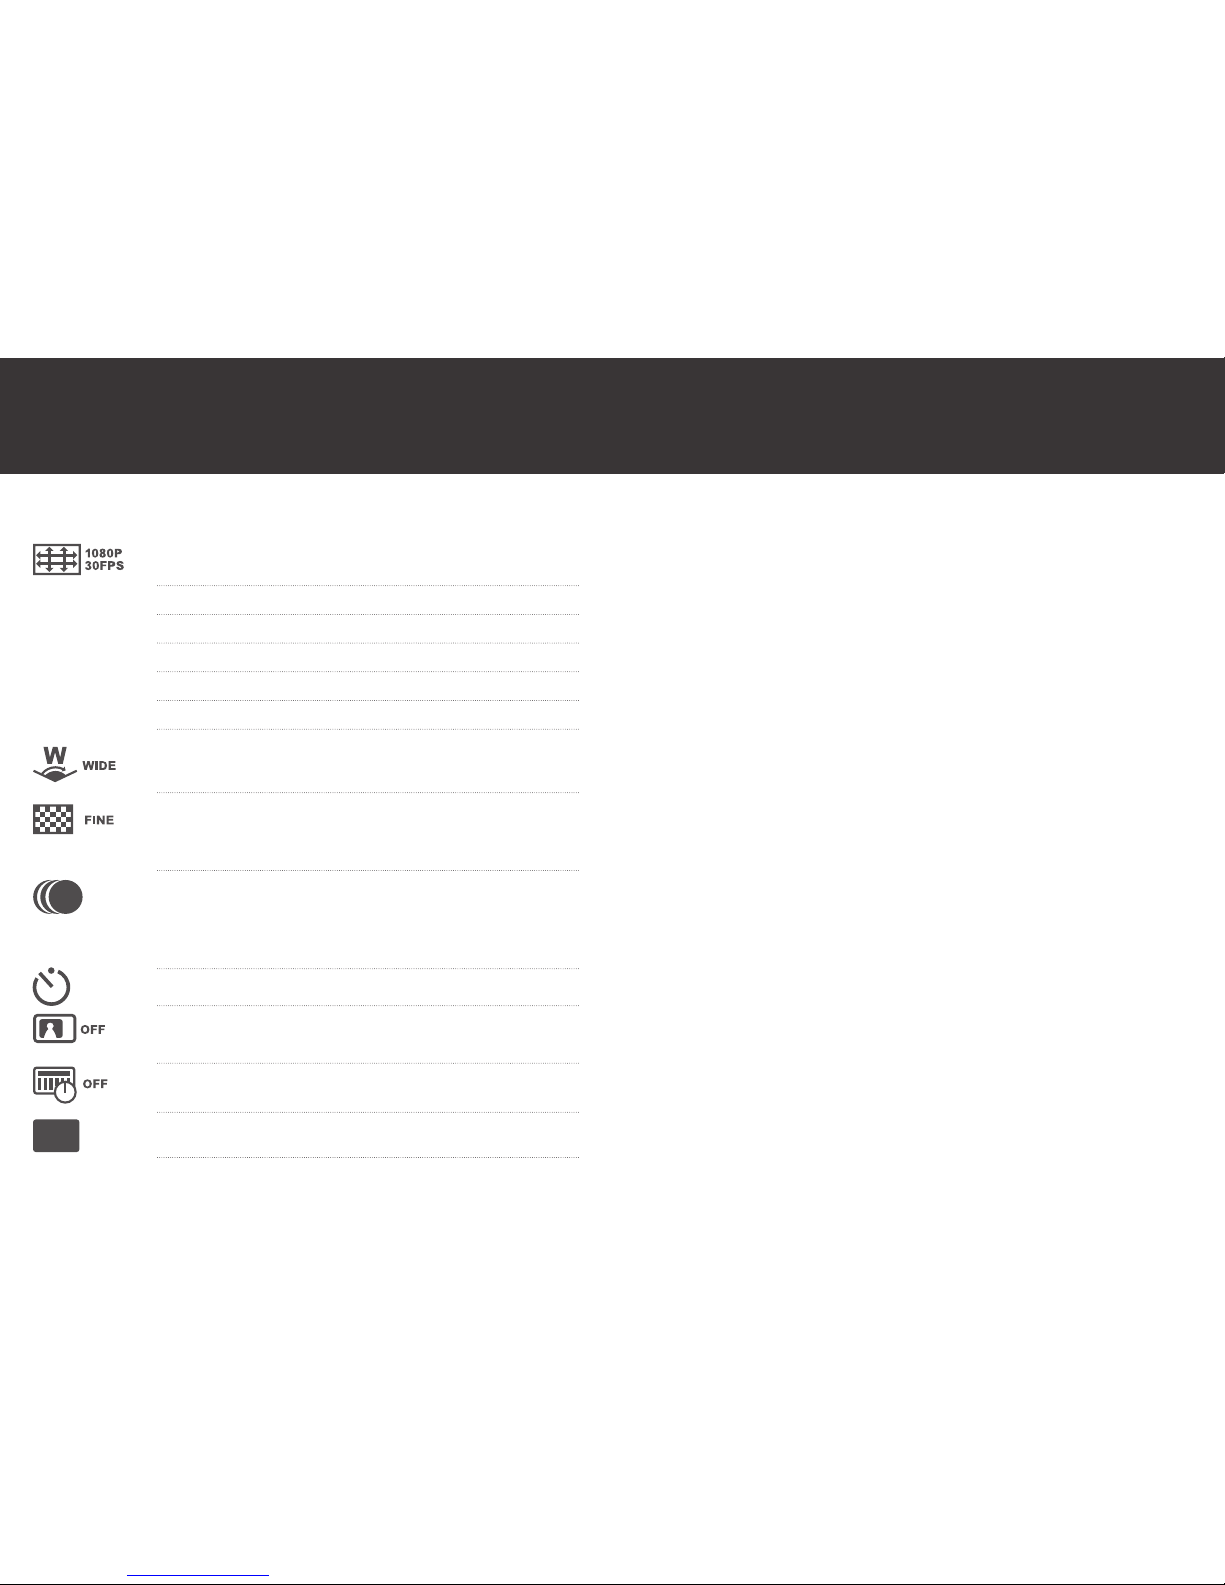
Choose between
PAL (see page 11, NTSC (see page 11,
camcorder sengs) camcorder sengs)
1080I at 50fps 1080I at 60fps
1080p at 25fps 1080p at 30fps
960p at 25fps or 48fps 960p at 30fps or 48fpss
720p at 25fps or 50fps 720p at 30fps or 60fps
480 (WVGA) at 50fps or 100 fps 480 (WVGA) at 60fps or 120 fps
Choose the angle of view for recording between wide (140°), medium
(120°), narrow (100°) and small (80°).
Choose the bit rate for recording videos between ne or normal. The
ne bit rate is higher so you will get a clearer picture with an increased
le size.
Set me lapse to take an image every 0.5, 1, 2, 5, 10 or 30 seconds.
Press the start record buon to start taking images and press the stop
record buon to nish. Camcorder will automacally create a me lapse
video using the images.
Set the video self-mer to 5, 10 or 20 seconds.
180° photo rollover. Turn this opon on to keep your videos upright
when using the camcorder upside down.
Turn the date and me stamp on or o.
Exit the video sengs menu and return to the main sengs menu.
EXIT

18 19
11. Photo capture
Make sure that a microSD card is inserted and turn the camcorder on. Press the
camera buon once on the top of the camcorder to enter photo mode. Select
your preferred photo mode and then press the camera buon on the top of the
camcorder to take a photo.
Photo Sengs
Note: To change the photo sengs you must be in photo mode before you enter the
sengs menu.
Enter the sengs menu and then enter the photo sengs menu. Use the stop record
buon to move between the opons. Press the start record buon to select the
opon you want to change and the camera buon to exit the opon that you are in.
Choose between
Choose between capturing 16, 12 or 8 mega pixel images.
Single Shot Capture a single photo
Fast Shot Choose between capturing 3 photos in 1 second, 6
photos in 1 second or 8 photos in 1 second. When
you press the camera buon the top LED indicator will
ash twice quickly to indicate all photos have been
taken.
Timed Photo self-mer. Aer pressing the camera buon the
camcorder will take a photo aer 3, 5 or 10 seconds.
The top LED indicator will ash blue when the photo
has been taken.
Set Fast Shot to capture 3 photos in 1 second, 6 photos in 1 second or
10 photos in 1 second
Set photo self-mer to take a photo aer 3, 5 or 10 seconds.
Turn the date and me stamp on or o.
Exit the video sengs menu and return to the main sengs menu.
EXIT
Table of contents


