My Pet's Life Pty My Pet Tracker User manual

My Pet Tracker User Manual Page 1
User Manual

My Pet Tracker User Manual Page 2
Contents
1 Summary......................................................................................................................5
2 Applications..................................................................................................................5
3 Description of Hardware...............................................................................................5
3.1 Front Face .............................................................................................................5
3.2 Rear Face..............................................................................................................5
3.3 Side View...............................................................................................................6
3.4 Bottom Face ..........................................................................................................6
3.5 Interior of Device....................................................................................................7
4 Technical Specifications...............................................................................................8
5 Using the Device........................................................................................................10
5.1 Installing the SIM Card ........................................................................................10
5.2 Battery and Charger ............................................................................................11
5.3 Starting the Device ..............................................................................................12
5.4 Initializing the Device...........................................................................................12
5.5 Changing the Password.......................................................................................12
5.6 Authorization........................................................................................................13
5.7 Switch to Link/Text Format..................................................................................14

My Pet Tracker User Manual Page 3
5.8 Real Time Polling.................................................................................................14
5.9 Auto Tracking.......................................................................................................15
5.10 Audio Surveillance.............................................................................................15
5.11 Switching Between Tracker and Monitor ...........................................................16
5.12 Geo-Fence.........................................................................................................16
5.13 Movement Alert..................................................................................................18
5.14 Overspeed Alert.................................................................................................19
5.15 IMEI Checking ...................................................................................................19
5.16 SOS Button........................................................................................................19
5.17 Low Battery Alert ...............................................................................................19
5.18 Hidden Number Tracking...................................................................................20
5.19 GPRS Function..................................................................................................20
5.19.1 Setting Up an IP Address and Port .............................................................20
5.19.2 Set APN ......................................................................................................20
5.19.3 Set APN's Username ..................................................................................21
5.19.4 Set APN's Password...................................................................................21
5.19.5 GPRS Transport Protocols..........................................................................21
6 Cautions.....................................................................................................................22
7 Troubleshooting .........................................................................................................23

My Pet Tracker User Manual Page 4
Preface
Congratulations on your purchase of My Pet Tracker! This manual will give you
instructions on how to use the device correctly. We recommend that you read this entire
manual before using the device for the best possible results.
Please be aware that the specification information for the device and all other
information herein are subject to change without prior notice. If there are changes, they
will be integrated into the latest release of this manual.
The manufacturer assumes no responsibility for any errors or omissions in this
document.
Note: In this document, you will find SMS message instructions formatted with
[brackets]. This means that you are to replace the information within the brackets
with your own password or whatever information is called for. Do not include the
brackets themselves in the SMS. When brackets are used to describe a message
that the tracker will send to you, the content within them will be replaced with
whatever data applies. Spacing in the SMS commands described should be
replicated in the actual SMS messages sent to the device.
Copyright Notice:
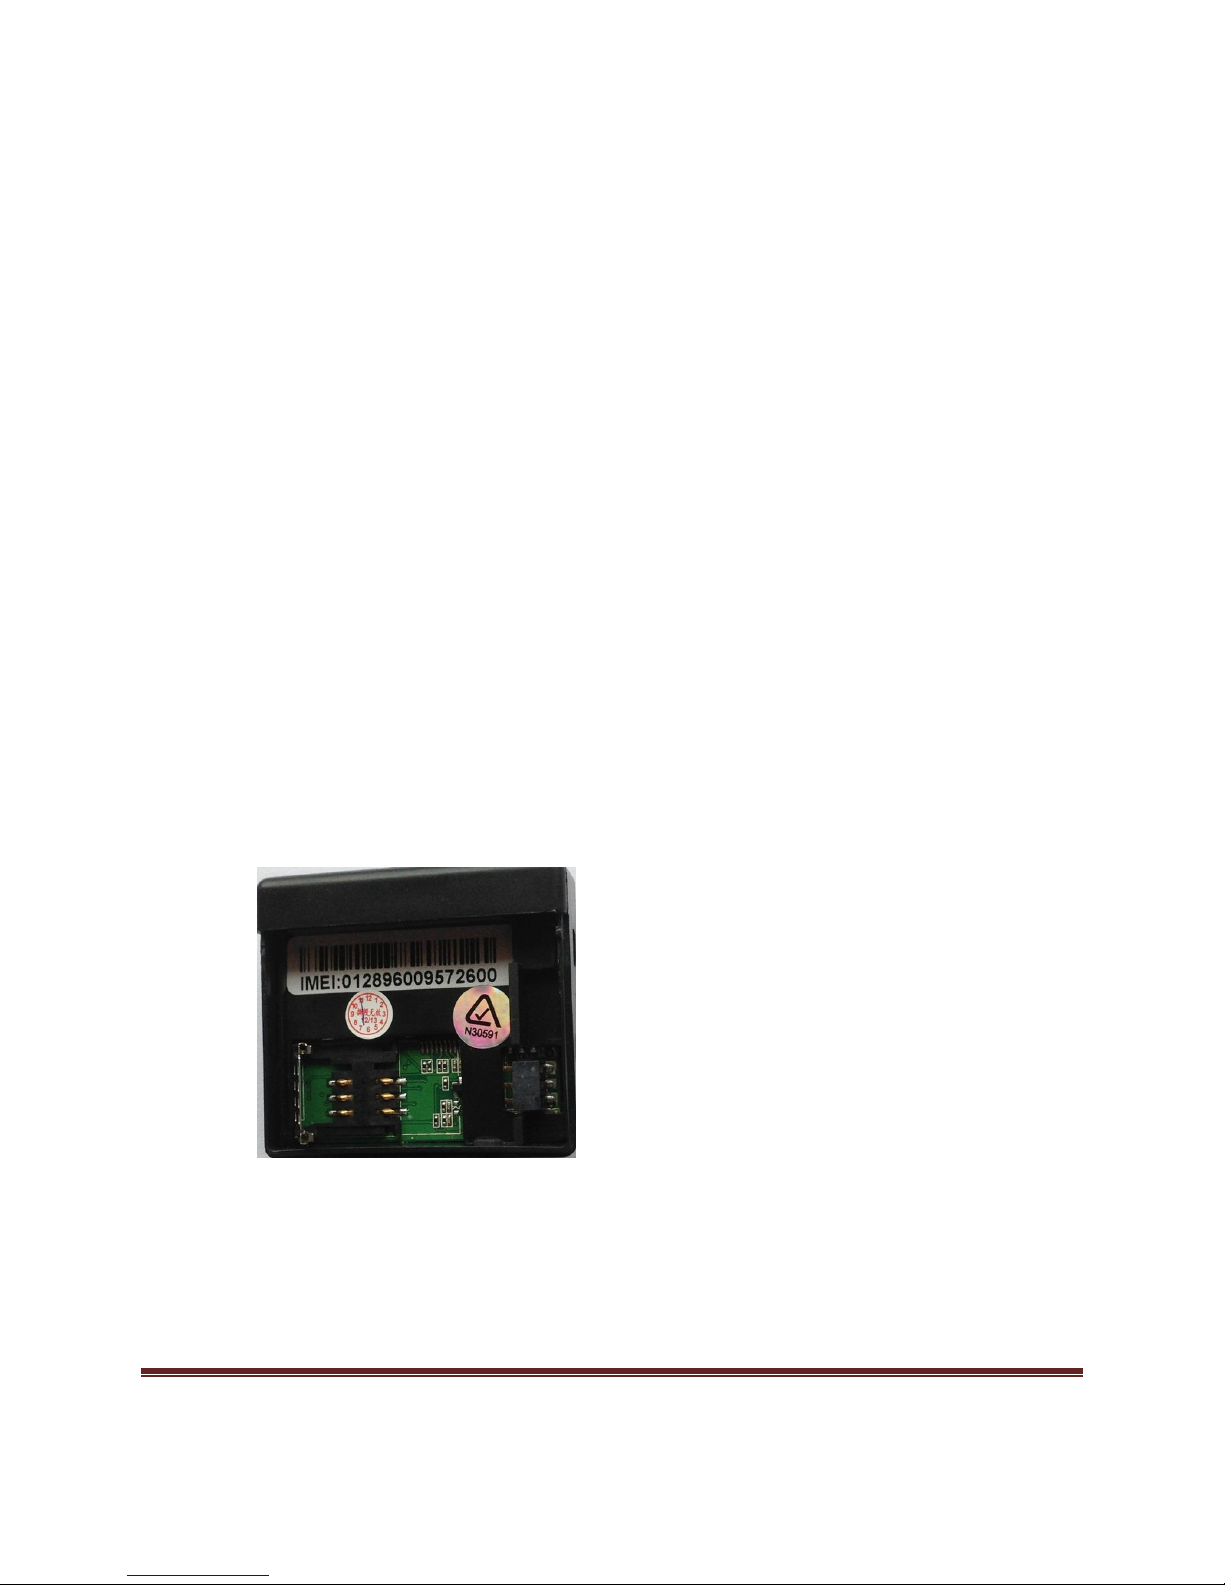
The contents of this manual are the sole property of My Pet's Life Pty Ltd, Perth, WA,
Australia. The product has been approved with the A-Tick and is in compliance with the
Australian Communications and Media Authority (ACMA). The content within this
manual may not be duplicated electronically, physically or by any other means, nor may
it be distributed or used in any manner without the express permission of My Pet's Life
Pty Ltd. For information, comments or questions, email sales@mypettracker.com.au or
visit www.mypettracker.com.au. No guarantees are made that the information in this
manual is correct and all information is subject to change without prior notice.

My Pet Tracker User Manual Page 5
1 Summary
This product can locate and monitor targets via GSM/GPRS and GPS satellites using
SMS or GPRS.
2 Applications
My Pet Tracker is designed to allow you to monitor your pet or to locate your pet if it is
lost.
3 Description of Hardware
3.1 Front Face
3.2 Rear Face

My Pet Tracker User Manual Page 6
3.3 Side View
From Right to Left:
On/Off: Turns the device on or off.
SOS: Press this button for 3 seconds for an emergency
Indicator Light: Indicates signal strength.
MiniUSB Port: Used to charge battery and update software
3.4 Bottom Face
Note the microphone hole in the figure above.

My Pet Tracker User Manual Page 7
3.5 Interior of Device
The Interior of My Pet Tracker. The SIM card goes into the slot labeled.
The above figure shows the interior of the device with correct battery installation.

My Pet Tracker User Manual Page 8
4 Technical Specifications
Dim.
51mm x 46mm x 17mm
Weight
40g
Network
GSM/GPRS
Band
850/900/1800/1900Mhz
GPS chip
SIRF3 chip
GSM/GPRS
module
Simcom900
GPS
sensitivity
-159dBm
GPS accuracy
5m
Time To First
Fix
Cold status 45s
Warm status 35s
Hot status 1s
Car charger
12—24V input
5V output
Battery
3.7V 850mAh Li-ion
Standby
48hours

My Pet Tracker User Manual Page 9
Storage Temp.
-40°C to +85°C
Operation
Temp.
-20°C to +55°C
Humidity
5%--95% non-condensing

My Pet Tracker User Manual Page 10
5 Using the Device
5.1 Installing the SIM Card
It is recommended to buy a SIM card on a 365 day plan and the minimum credit
available to purchase as it will not be used very often to use up your credit, you are able
to top up your credit later when you need it.
For best reception coverage a Telstra SIM card is recommended especially in country
areas or low reception areas.
Before installing the SIM card, be sure that there is no call transfer, call display on,
voicemail on and make sure that the PIN code is off. SMS messages must be sent in
text format, not PDU format.
Open the cover of the device.
Push down and slide the metal SIM card slot and lift up.

My Pet Tracker User Manual Page 11
Slide the SIM card into the holder, and place the SIM card holder down and click it down
into place.
5.2 Battery and Charger
The battery must be charged for 8 to 12 hours before first using the device. There is a
battery and USB cable provided for this. Please use these with the product. The unit
uses a built in Li-ion battery. This battery will function for approximately 48 hours per
charge. The battery can be recharged in 3-5 hours following the initial charging period.
Caution!
Li-ion batteries contain harmful chemicals and can burst. Do not expose the
battery to fire or excessive heat. Do not puncture the battery. Avoid dropping or
otherwise exposing the battery to shock.
Remember to change the battery if it stops functioning normally.

My Pet Tracker User Manual Page 12
5.3 Starting the Device
Place the SIM card in the device according to the instructions above.
The unit will turn on automatically once the battery and SIM card are inserted.
For the first use, initialize the unit and restore its default settings: Instructions are
given in 5.4.
Wait 10-40 seconds. The device will start to acquire the GSM and GPS signals.
When the signals have been established, the indicator will flash every 4 seconds.
If no signals are received, the indicator will stay lit continuously.
Once the GPS signals are established, you may start using the device. Follow
the remaining steps to do so.
5.4 Initializing the Device
The default password will be used to initialize the device.
Send SMS to the unit: begin123456
The tracker will reply: begin ok!
5.5 Changing the Password
Send an SMS to the device with the following text. Do not include the brackets and type
in the new 6 digits, not the word ‘new password’. The tracker will reply: password ok!
password123456 [new password]
eg.password123456 987654

My Pet Tracker User Manual Page 13
Make sure the new password is 6 digits, or else the tracker cannot recognize the
password. Write this password down somewhere where you won't lose it. You'll have to
upload the software to restore the default password if you lose your new password.
5.6 Authorization
You may authorize five mobile numbers with the device. To authorize a mobile number,
call the device 10 times. This will cause the device to automatically authorize that
number.
Setup: Send an SMS with the following to set up an authorized number, after setting the
first authorized number using the method described above, do not include the brackets:
admin[password] [cell number you want authorized]
eg.admin123456 0411228200
The tracker will reply admin ok! in an SMS when the new number is authorized.
Remove a Number: Send an SMS with the following:
noadmin[password] [cell number you want removed]
eg. noadmin123456 0411228200
You have to add your country code ahead of your cell number if you're roaming. As
example, to set 13322221111 as an authorized number, you would send the following
SMS:
admin123456 008613322221111

My Pet Tracker User Manual Page 14
5.7 Switch to Link/Text Format
The device will send you the coordinates of the location by text if you do not change to
link format.
Switch to Link Format - To receive an SMS from your tracker with the location of your
pet through a link to Google Maps.
Setup: Send SMS to your device with the following. Use your numerical password do
not type the word password.
smslinkpassword
eg. smslink123456
Switch to Text Format –To receive an SMS with the coordinates from your tracker
with your pet’s location. You will then have to enter these coordinates into Google Maps
yourself to get the location on the map shown.
Setup: Send SMS to your device with the following, using your own password, do not
type the word password.
smstextpassword
eg.smstext123456
5.8 Real Time Polling
If you haven't set up an authorized number, the unit will send geo information to any
mobile that dials it. If you have set up an authorized number, the device will not reply to
any numbers except those authorized.
When you dial the unit with an authorized number, it will hang up and then report geo
information to the authorized number.

My Pet Tracker User Manual Page 15
5.9 Auto Tracking
You can set the unit up to report geo information automatically at 30-second intervals. It
will send this information to the authorized number 5 times.
Setup:
Send SMS: t030s005n[password]
Eg. t030s005n123456
This will set up the 5 reports at 30-second intervals described above. The format is:
t: interval of reports.
s: number of seconds. You may also use m for minutes and h for hours.
These settings must be 3 digits long. The maximum value allowed is 255. Intervals
may not be shorter than 30 seconds.
Turn Off:
Send an SMS: notn[password]
Eg. notn123456
This will turn autotracking off.
5.10 Audio Surveillance
Send an SMS: monitor[password]
Eg. monitor123456

My Pet Tracker User Manual Page 16
The device will reply monitor ok. You can now dial the tracker and hear whatever is
around it.
5.11 Switching Between Tracker and Monitor
The device defaults to the tracker mode. You can switch to monitor mode by sending
the SMS message: monitor[password]. The unit will reply "monitor ok!"
You can switch back to tracker mode by sending the SMS: tracker[password]. The unit
will reply tracker ok! to verify that it is in tracker mode.
5.12 Geo-Fence
Geo-Fence function sends you an alert if it goes beyond the limits of a predefined area.
When using Geo-Fence the tracker must be always outside and for the best use set
with the auto track or overspeed alert. The signal also needs to be strong in that
location.
Setup: Get the coordinates by calling your MPT device and take those coordinates or
from Google Maps.
See the following table to setup:

My Pet Tracker User Manual Page 17
When you first get your coordinates from tracker they are as follows:
lat: 50.633220N long:003.020886E speed: 000.0 25/03/13 09:41 bat:F signal:F imei:353451045992813
0
5
0
.
6
3
3
2
2
0
0
0
3
.
0
2
0
8
8
6
10000M
1000M
100M
10M
1M
0.1M
metres
if we set 10000 metres geo-fence :
stockade123456 2.920886E,50.533220N;3.120886E,50.733220N
0
5
0
.
5(6-1)
3
3
2
2
0
0
0
2
.
9(0-1)
2
0
8
8
6
10KM
1KM
100M
10M
1M
0.1M
metres
0
5
0
.
7(6+1)
3
3
2
2
0
0
0
3
.
1(0+1)
2
0
8
8
6
10KM
1KM
100M
10M
1M
0.1M
metres
if we set 1KM geo-fence
stockade123456 3.010886E,50.623220N;3.030886E,50.643220N
0
5
0
.
6
2(3-1)
3
2
2
0
0
0
3
.
0
1(2-1)
0
8
8
6
10KM
1KM
100M
10M
1M
0.1M
metres
0
5
0
.
6
4(3+1)
3
2
2
0
0
0
3
.
0
3(2-1)
0
8
8
6
10KM
1KM
100M
10M
1M
0.1M
metres
Please note : you just need to remember after the "." it's 10KM.
We suggest to set the geo-fence about 3KM .
The following picture will show you how it works; the restricted area is defined by the two coordinates you set.

My Pet Tracker User Manual Page 18
Example below of what the tracker sends you:
lat: 50.633220N long:003.020886E speed: 000.0 25/04/13 09:41 bat:F signal:F
imei:353451045992813
The example below is how to convert for 1km, follow from the example in the previous
table. Put the longtitude first then latitude.
3.010886E,50.623220N;3.030886E,50.643220N
After the unit has been immobile for 3-10 minutes, send an SMS with the following:
stockade[password] longitudeE/W,latitudeN/S;longitudeE/W,latitudeN/S
Eg. stockade123456 3.010886E,50.623220N;3.030886E,50.643220N
This will set the restricted area's boundaries. If the tracker goes beyond those
boundaries, it will send an SMS message reading: stockade! and the location. This
message will be sent to authorized numbers.
Latitude and Longitude Settings: The first latitude and longitude coordinates correspond
to the top left corner of the geo-fence. The second set of coordinates—after the ";" in
your setup message—correspond to the bottom right corner.
Turn Off: Send an SMS: nostockade[password]
Eg. nostockade123456
This will turn off the alert function if the device moves outside of the predefined area.
5.13 Movement Alert
To set up movement alert, the device must be immobile for 3-10 minutes.
To activate the movement alert, send an SMS to the unit: move123456
To turn off the movement alert, send an SMS to the unit: nomove123456

My Pet Tracker User Manual Page 19
This alert will be sent to authorized numbers if the tracker moves from its original
position. It will send geo-information along with the alert.
5.14 Over speed Alert
The overspeed alert will send an SMS to authorized numbers when the speed of the
device exceeds a predefined limit.
Set up this feature by sending an SMS to the device: speed123456 080. This will set
the device to alert you if the speed exceeds 80 km/h. It will send one alarm.
To turn this feature off, send an SMS to the device: nospeed123456
Note: This function works best if the device is set with a minimum speed of 50 km/h. It
may not function properly at lower speeds.
5.15 IMEI Checking
Send an SMS: imei[password]
This will return the IMEI number of the device.
5.16 SOS Button
To activate the SOS feature, press the SOS button for 3 seconds. It will send a
message: help me ! [geo information] to the first authorized number only. It will send this
message one time.
5.17 Low Battery Alert
When the device battery drops below 3.7V, it will send the following message: low
battery [geo info].

My Pet Tracker User Manual Page 20
5.18 Hidden Number Tracking
If a hidden authorized number calls the device, the device will reply with an SMS with
the hidden number and geo information to all authorized number.
To set up the hidden number, send an SMS: hide number
To turn off the hidden number: nohide number
5.19 GPRS Function
Contact My Pet Tracker if you would like to use this function as help will be given to set
this up along with a link to an online mapping system to see reports on where your
tracker has been.
To use the GPRS function, you have to set up an IP, port and access point name (APN)
using your cell phone or our PC software.
Some countries and regions will set APNs.
5.19.1 Setting Up an IP Address and Port
Send an SMS: adminip[password] [address space port]
The tracker will respond "adminip ok!" when the setup is successful.
Cancel the IP: Send and SMS: noadminip[password].
5.19.2 Set APN
Send an SMS: apn[password] [apn content].
The tracker will reply "APN ok"
Cancel: Setting up a new APN will cancel the old setting.
Table of contents