manuals.online logo
Brands
  1. Home
  2. •
  3. Brands
  4. •
  5. NANUK
  6. •
  7. Carrying Case
  8. •
  9. NANUK 923 User manual

NANUK 923 User manual

Laptop insert installation instructions
Instructions de montage
Instrucciones de instalación
Each laptop insert contains the followingcomponents:
Contenu :
Contenido:
1x Lid insert with Velcro backing and 2 asssembly screws
1x Boîtier du couvercle avec Velcro au dos et deux vis d’assemblage
1x Inserto de tapa con reverso de Velcro y dos tornillos de montaje
1x Base insert with Velcro backing
1x Boîtier de la base avec Velcro au dos
1x Inserto de base con reverso de Velcro y dos tornillos de montaje
1x Removable laptop sleeve
1x Étui amovible
1x Funda portátil extraíble
1x Aircell shoulder strap
1x Sangle d’épaule Aircell
1x Correa de hombro Aircell
2x Philips screws and washers + Alcohol swab
2x Vis Philips et rondelles d’assemblage + Tampon imbibé d’alcool
2x Tornillos de cabeza Philips con arandelas + Almohadilla con alcohol
Montage du boîtier dans la base
1. Essuyer la surface à l’intérieur de la mallette
aux endroits indiqués, au moyen du tampon
imbibé d’alcool, et laisser sécher.
2. Enlever le ruban de protection blanc au dos
du boîtier pour exposer les bandes Velcro
adhésives.
3. Placer le boîtier dans la base de la mallette.
4. Exercer une pression de chaque côté du
boîtier aux endroits indiqués.
5. Ne pas retirer le boîtier de la base durant 24
heures pour permettre à l’adhésif de coller à
la mallette.
6. Après 24 heures, le boîtier de la base peut
être retiré à des fins de nettoyage, puis
replacé. La partie mâle de la bande Velcro,
plus rigide, demeurera collée à la mallette,
ce qui facilitera la remise en place.
Instalación del inserto de la base
1. Limpie la superficie de la caja con la almohadilla
con alcohol en las áreas indicadas y deje secar.
2. Retire la cinta de respaldo blanca en la parte
inferior del inserto para exponer el adhesivo
de Velcro.
3. Instale el inserto en la base de la maleta.
4. Aplique presión en ambos lados del inserto en
las áreas indicadas.
5. No retire el inserto de la base durante 24 horas
para permitir que el adhesivo se adhiera a la
caja.
6. Después de 24 horas el inserto de la base se
puede quitar si es necesario para limpiarlo y
puede volverse a instalar. El lado macho, más
duro, del Velcro permanecerá pegado al estuche
para facilitar su reinstalación.
Base insert installation
1. Wipe down surface of the case with an
alcohol wipe in the indicated areas and
allows to dry.
2. Remove the adhesive backing on the bottom
of the insert to expose the Velcro adhesive.
3. Install the insert into the base of the case.
4. Apply pressure to both sides of the insert in
the indicated areas.
5. Do not remove the base insert for 24hrs to
allow the adhesive to bond to the case.
6. After 24hrs the base insert can be removed if
necessary for cleaning and reinstalled. The
male portion of the Velcro will remain affixed
to the case for easy reinstallation.
4
923 | LAPTOP
Copyright © 2017 Plasticase inc. All rights reserved.
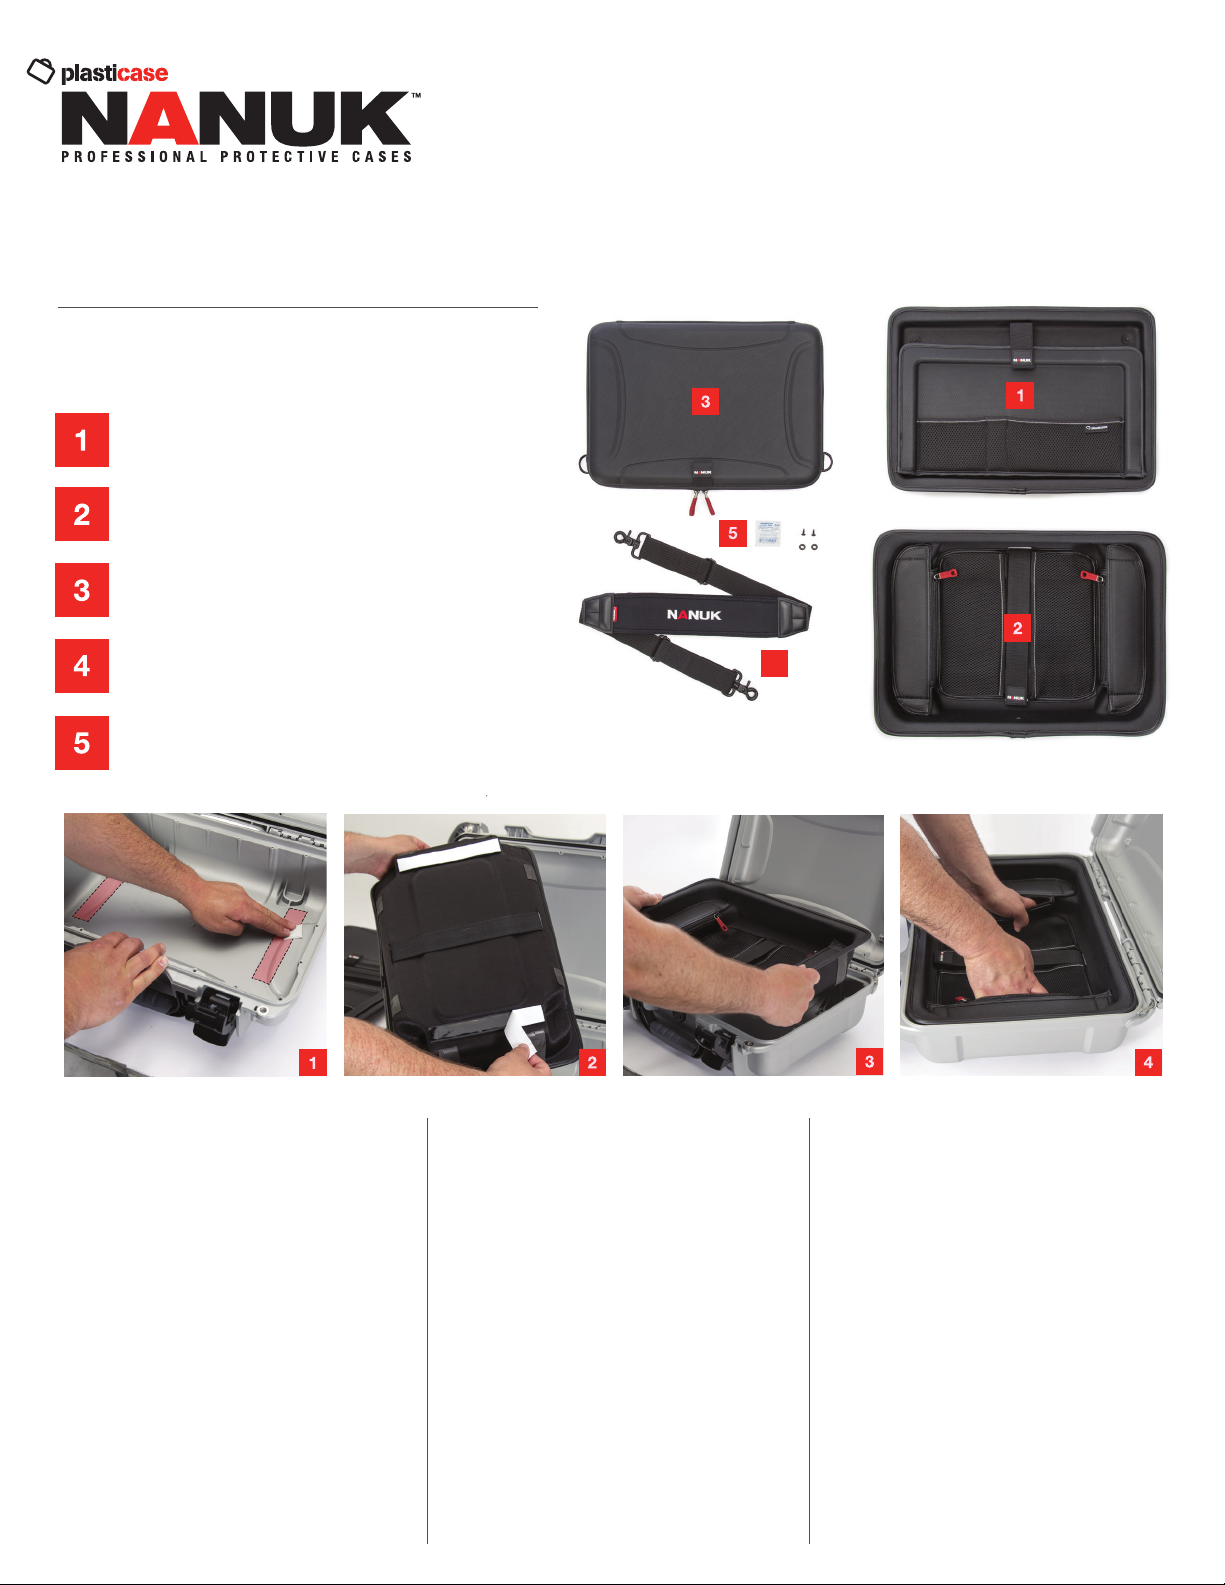
923 | LAPTOP
Montage du boîtier dans le couvercle
1. Essuyer la surface à l’intérieur de la mallette
aux endroits indiqués, au moyen du tampon
imbibé d’alcool, et laisser sécher.
2. Placer le boîtier dans le couvercle de la
mallette.
3. Poser les deux vis et les rondelles d’assem
blage fournies à l’aide d’un tournevis Philips
(non fourni). Serrer les vis jusqu’à ce que
vous sentiez une résistance et que le boîtier
soit bien ajusté contre le couvercle. Ne pas
serrer trop fort.
4. Soulever suffisamment la partie inférieure du
boîtier du couvercle pour y insérer votre main
et retirer le ruban protecteur blanc de la
bande adhésive Velcro.
5. Appliquer une pression sur la partie inférieure
du boîtier en plaçant votre main dans le
compartiment principal.
6. Ne pas retirer le boîtier du couvercle durant
24 heures pour permettre à l’adhésif de
coller à la mallette.
7. Après 24 heures, le boîtier du couvercle peut
être retiré à des fins de nettoyage, puis
remis en place. La partie mâle de la bande
Velcro, plus rigide, demeurera collée à la
mallette.
Instalación del inserto de la tapa
1. Limpie la superficie de la caja con la almohadilla
con alcohol en el área indicada y deje secar.
2. Coloque el inserto en la tapa de la maleta.
3. Instale los dos tornillos incluidos junto con
las arandelas con un destornillador Philips
(no incluido). Apriete los tornillos hasta que
se sienta la resistencia y el inserto de la tapa
está apretado contra la tapa. No lo apriete
demasiado.
4. Tire de la parte inferior del inserto alejándolo
de la maleta lo suficiente para que su mano
pueda quitar la cinta blanca que está al
respaldo de la cinta adhesiva Velcro.
5. Aplique presión en la parte inferior del inserto
de la tapa colocando la mano en el bolsillo
principal.
6. No retire el inserto de la tapa por las próximas
24 horas para permitir que el adhesivo se
adhiera a la caja.
7. Después de 24 horas el inserto de la tapa se
puede quitar si es necesario para limpiarlo y
luego volver a instalarlo. El lado macho, más
duro, del Velcro permanecerá pegado al
estuche.
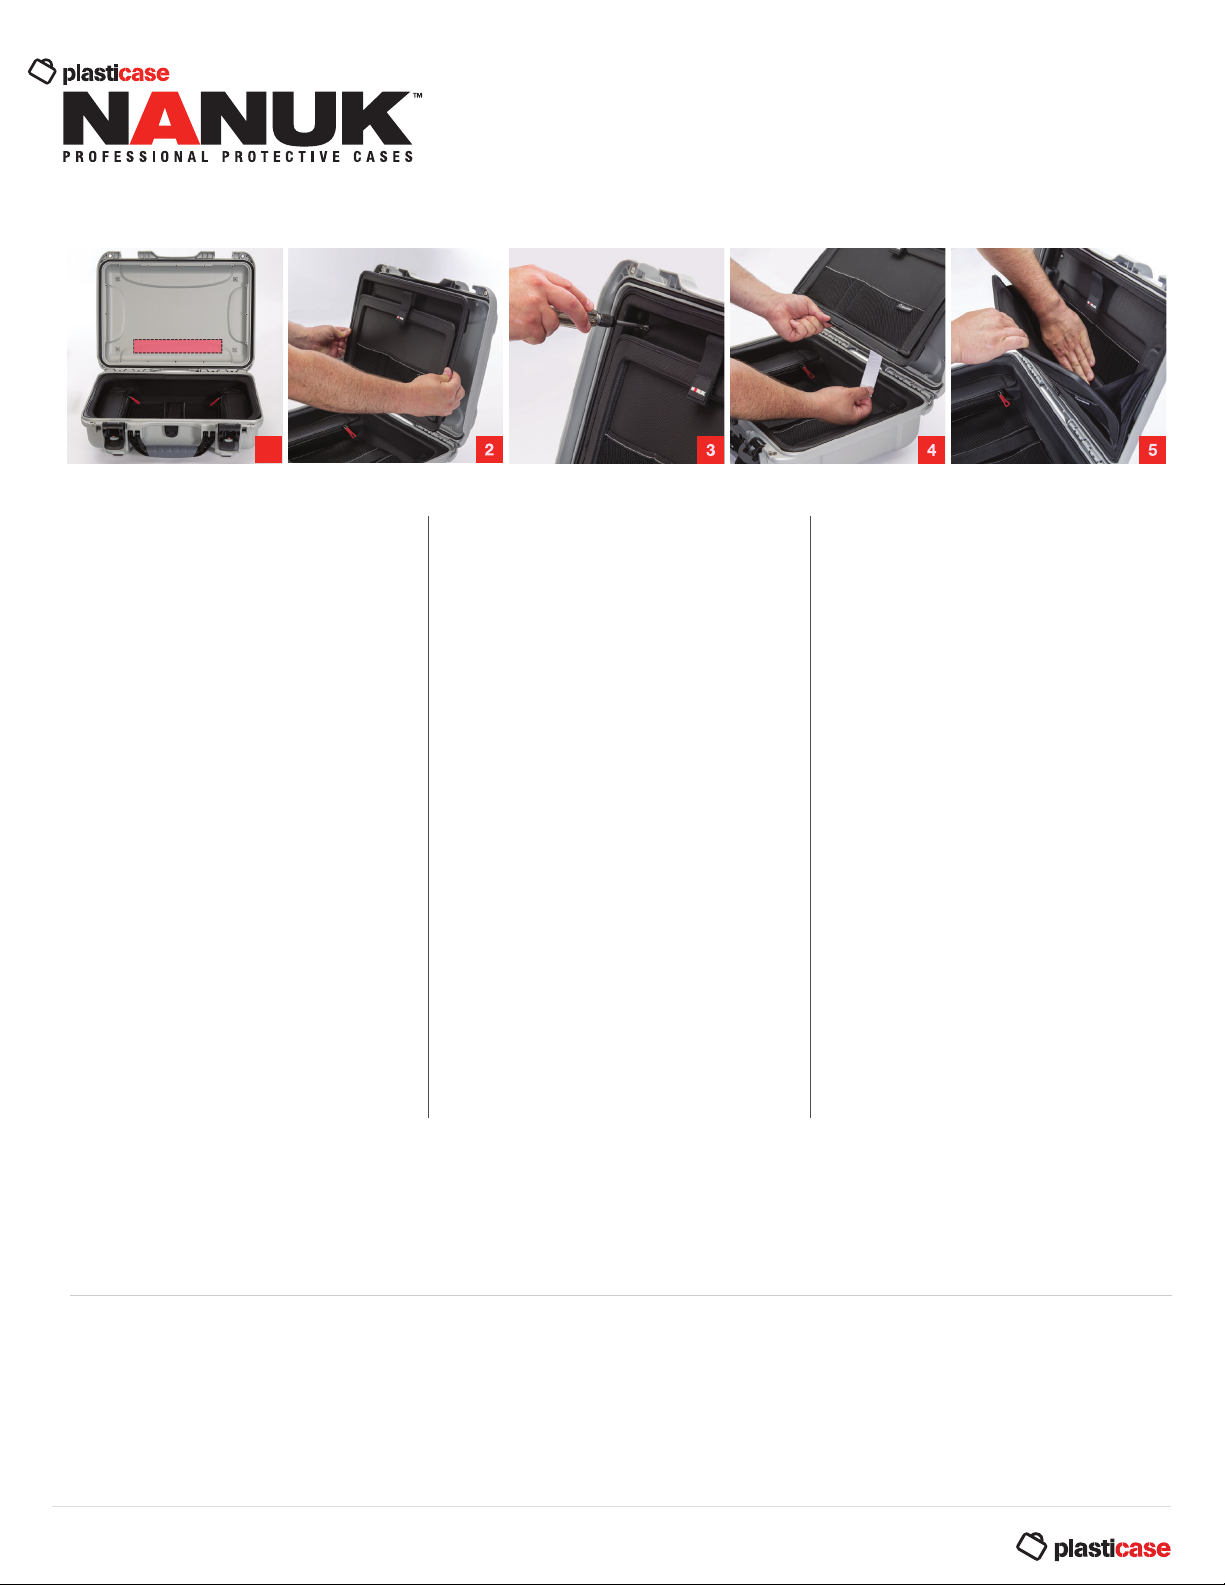
Lid insert installation
1. Wipe down surface of the case with an
alcohol wipe in the indicated area and allow
to dry.
2. Position the insert in the lid of the case.
3. Install the 2 included screws using Philips
head screwdriver (not included). Tighten the
screws until resistance is felt and the lid
insert is pulled tight against the list. Do not
overtightnen.
4. Pull the bottom of the insert away from the
case enough to be able to insert your hand
to remove the adhesive backing film from the
Velcro stip.
5. Apply pressure to the bottom portion of the
lid insert by placing your hand in the main
pocket.
6. Do not remove the lid insert for 24hrs to
allow the adhesive to bond to the case.
7. After 24hrs the lid insert can be removed if
necessary for cleaning and reinstalled. The
male portion of the Velcro will remain affixed
to the case.
Cleaning | Nettoyage | Limpieza
Clean the laptop insert and removable sleeve using only mild soap and water. Avoid using harsh chemicals.
Nettoyer le boîtier du portable et l’étui amovible uniquement à l’aide d’eau et d’un savon doux. Éviter d’utiliser des produits chimiques puissants.
Limpie el inserto y la funda extraíble de su portátil sólo con jabón suave y agua. Evite el uso de productos químicos agresivos.
Warranty | Garantie | Garantía
The laptop insert and all related components are warrantied to be free of manufacturing defects for a period of one year.
The NANUK 923 case is covered by the NANUK lifetime warranty. Refer to NANUK.com\lifetime-guarantee for more details.
Le boîtier pour portable et les composantes connexes sont garantis pour une période d’un an contre tout vice de fabrication.
La mallette NANUK 923 est couverte par la garantie à vie NANUK. Visitez NANUK.com/garantie-a-vie pour plus de détails.
Hay una garantía de un año por el inserto del portátil y sus componentes por cualquier defecto de fabricación.
Su maleta NANUK 923 está cubierto por la garantía de por vida de NANUK. VisiteNANUK.com\garantia-de-por-vidapara obtener más información.
1
nanuk.com/923laptop

Popular Carrying Case manuals by other brands

Dicota Dicota ComfortCase N17898NHY Specifications

Dicota

Dicota Dicota ComfortCase N17898NHY Specifications

Fujitsu Rugged Tablet Case user guide

Fujitsu

Fujitsu Rugged Tablet Case user guide

National Instruments NI PXI Carrying Case installation guide

National Instruments

National Instruments NI PXI Carrying Case installation guide

Dicota N16638LHY Specifications

Dicota

Dicota N16638LHY Specifications

Dicota N12328NHY specification

Dicota

Dicota N12328NHY specification

Castle group KA018 operating manual

Castle group

Castle group KA018 operating manual

PORT DESIGNS MANHATTAN BACKPACK TROLLEY brochure

PORT DESIGNS

PORT DESIGNS MANHATTAN BACKPACK TROLLEY brochure

Elite Vaison Instructions for use

Elite

Elite Vaison Instructions for use

Hypertec base_xx N12228PHY specification

Hypertec

Hypertec base_xx N12228PHY specification

Ergon BX3 Evo User instructions

Ergon

Ergon BX3 Evo User instructions

Dicota N15778NHY specification

Dicota

Dicota N15778NHY specification

Massage Imperial Standard quick start guide

Massage Imperial

Massage Imperial Standard quick start guide

Sony CKM-NWZE430WHI Specifications

Sony

Sony CKM-NWZE430WHI Specifications

PORT DESIGNS EEE.BAGS Features

PORT DESIGNS

PORT DESIGNS EEE.BAGS Features

PORT DESIGNS MANHATTAN TOP LOADING brochure

PORT DESIGNS

PORT DESIGNS MANHATTAN TOP LOADING brochure

H2O Audio SV-iMini S2-1A2 owner's manual

H2O Audio

H2O Audio SV-iMini S2-1A2 owner's manual

PORT DESIGNS ZURICH TROLLEY brochure

PORT DESIGNS

PORT DESIGNS ZURICH TROLLEY brochure

Dicota N14628KHY Specification sheet

Dicota

Dicota N14628KHY Specification sheet

manuals.online logo
manuals.online logoBrands
  • About & Mission
  • Contact us
  • Privacy Policy
  • Terms and Conditions

Copyright 2025 Manuals.Online. All Rights Reserved.