Napoli DVD-4358 GPS User manual

Built-in TV Tuner
GPS Navigation System
DVD-4358 GPS

Prohibition
Class 1 laser product
This car multi-media player is a class 1 laser product. However
This car multi-media player uses a visible/invisible laser beam
which could cause . Hazardous radiation exposure if directed.
Be sure to operate the car multi-media player correctly as
instructed. Use of controls or adjustments or performance of
procedures other than those specified herein may result in
hazardous radiation exposure. Do not open covers and do not
repair yourself. Refer servicing to qualified personnel.
This product incorporates copyright protection technology that
is protected by U.S patents and other intellectual property rights.
Use of this copyright protection technology must be authorized
by Rovi Corporation, and is intended for home and other limited
viewing uses only unless otherwise authorized by Rovi Corpora-
tion. Reverse engineering or disassembly is prohibited.
-1-
PRECAUTION

-2-
Precaution............................................................................................
Content.................................................................................................
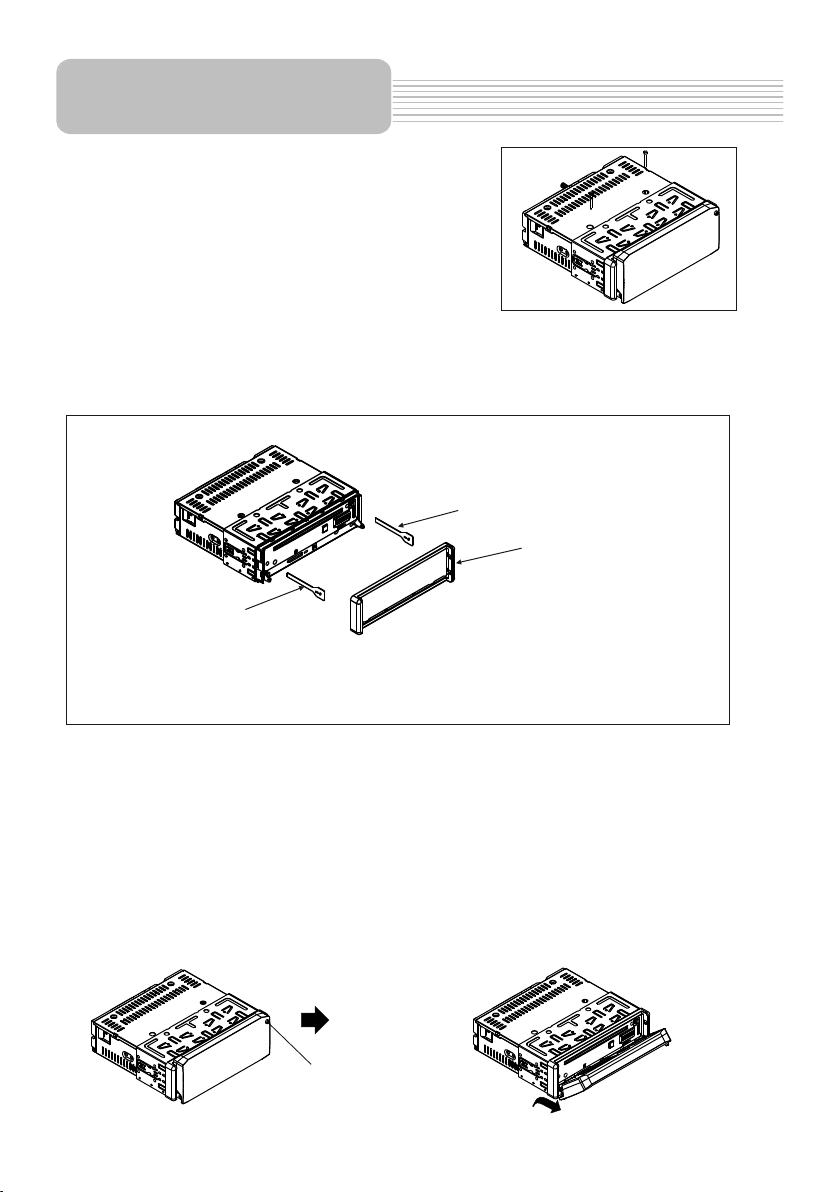
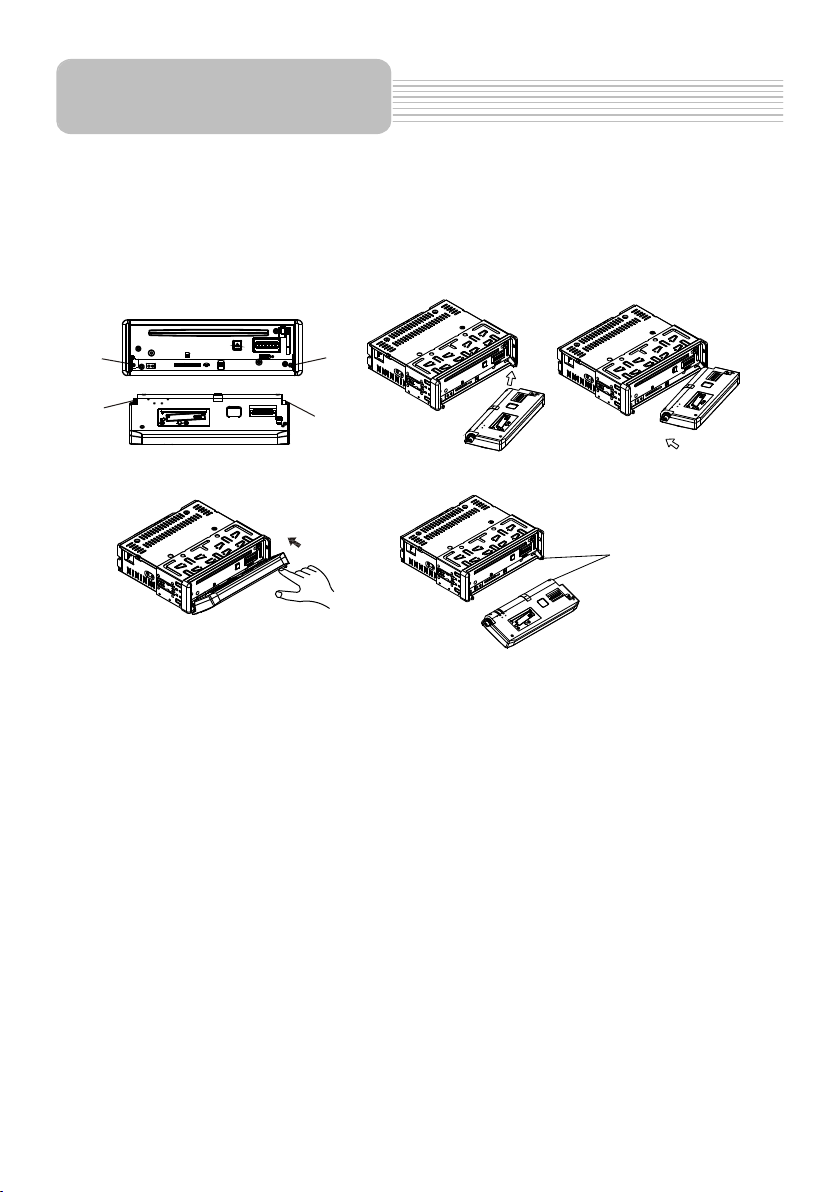
Installation Steps..................................................................................
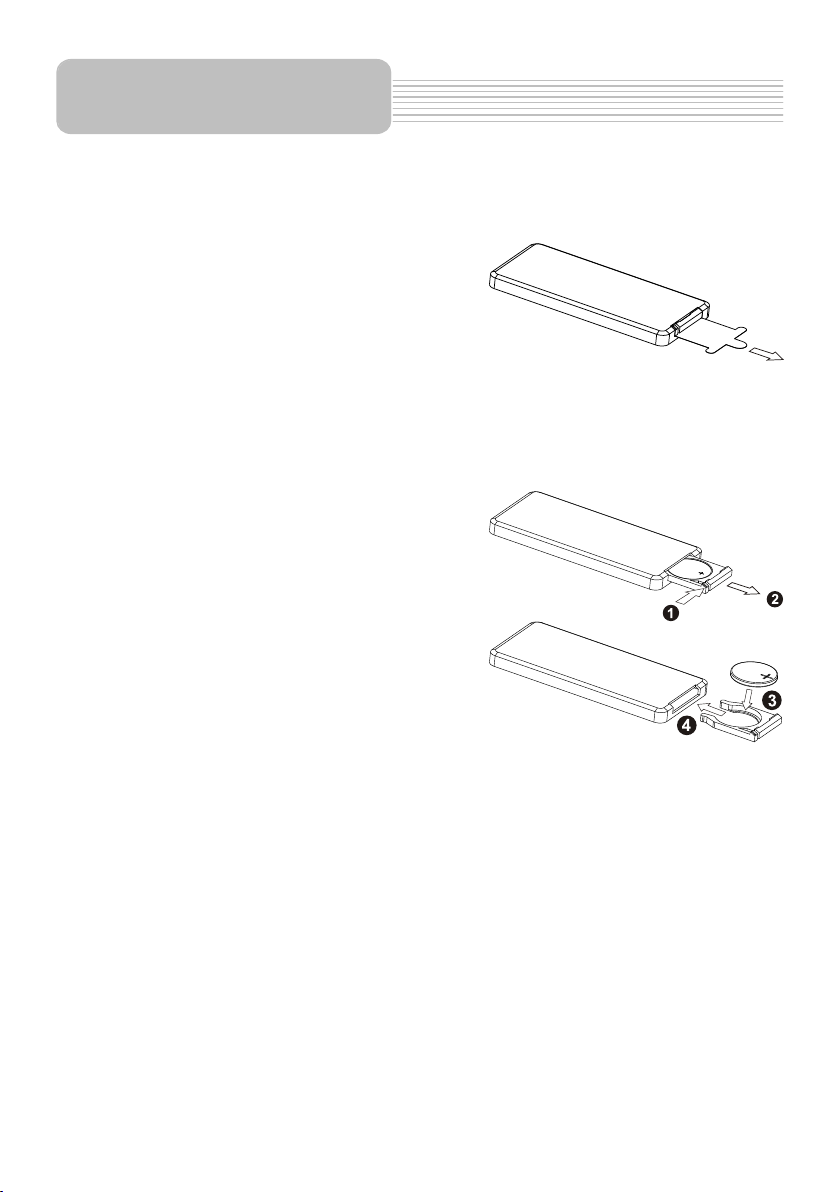
General knowledge about remote control..............................................
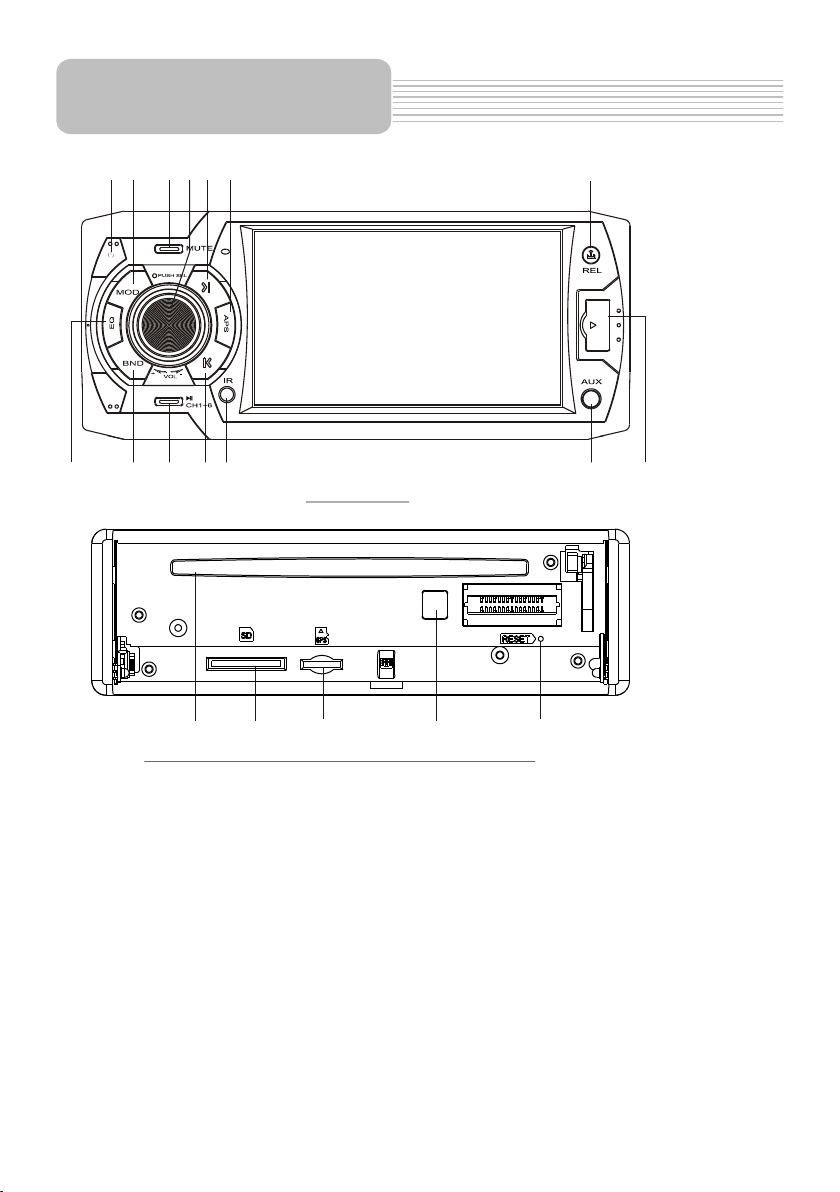
Locations and Names of controls on main unit......................................
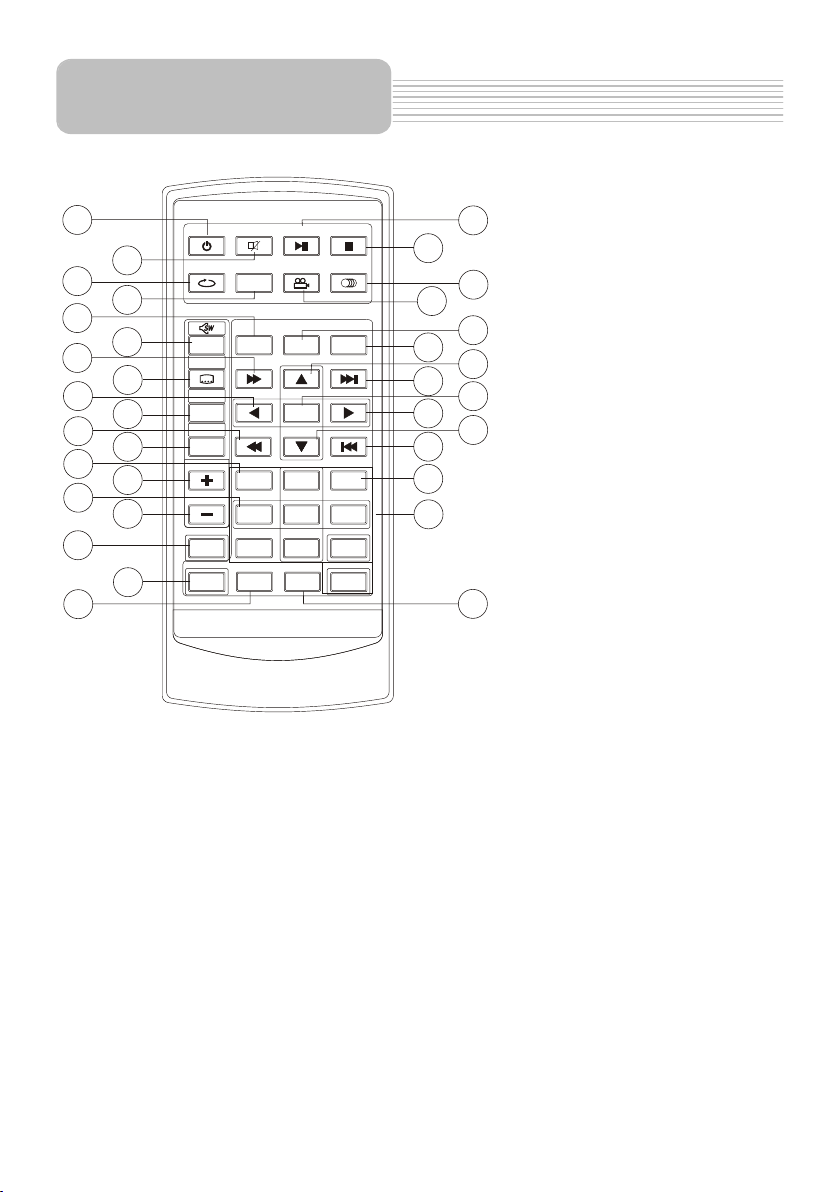
Locations and Names of controls on remote control..............................
Same functions in any work source mode............................................
Radio operation...................................................................................
TV operation........................................................................................
Disc/USB/card operation.....................................................................
1. Loading or unloading a disc, USB or card.......................................
1.1 Loading a disc, USB or card..........................................................
1.2 Unloading a disc, USB or card.......................................................
2. Popping up Function Icons-board..................................................
2.1 Function Icons-board of Digital Video/VCD/MPEG4/Image
/MP3/WMA....................................................................................
2.2 CD interface.................................................................................
3. Function of controls on the touch screen/main unit/remote
control...........................................................................................
* Region Code..................................................................................
* Parental Control.............................................................................
AUX IN operation.................................................................................
Rear View Camera................................................................................
Operation of GPS module....................................................................
1. GPS Navigation...............................................................................
2. MEDIA/PHOTO/VIEWER...................................................................
Media operation...............................................................................
Photo operation..............................................................................
Viewer operation.............................................................................
Calculator and Calendar......................................................................
1. Calculator.......................................................................................
2. Calendar.........................................................................................
GAME..................................................................................................
Troubleshooting..................................................................................
Specification.......................................................................................
1
2
3
7
8
9
10
16
18
19
19
19
20
20
20
21
22
31
32
33
34
35
35
36
36
37
37
39
39
39
40
41
42
Content

-3-
KEY PLATE
PLASTIC FRAME
KEY PLATE
If you want to take CHASSIS out of the SLIDE BRACKET HOUSING , first remove
the PLASTIC FRAME of the both sides away, then insert the two KEY PLATES into
left and right sides of chassis as above illustration.
REL button
PASSOS PARA INSTALAÇÃO
1.Remover os dois parafusos da plataforma
como mostra ao lado direito
2.Alojamento de montagem de suporte slide:
1)remover a moldura plástica do chassi
2) colocar as 2 placas principais para dentro das ranhuras em ambos os lados
do chassis até que clique, em seguida, puxando as duas placas de chave
para remover o chassis a partir do suporte do invólucro deslizante.
3)montar o bracket deslizante na posição de carro sistema de multi-mídia
e dobrar algumas guias de habitação suporte deslizante para corrigi-lo
( ver diagrama de instalação)
3.Conexão dos fios.
1) remover o controle do painel do chassi como segue:
A. pressione o botão REL para deslizar o painel de controle.

1
2
WIRING DIAGRAM
NOTE:
1. Must use 4 ohms impedance of speakers.
2. After connecting parking Line, video on screen of control panel
will be displayed only after
3. Before finishing wiring, do not attach control panel onto chassis.
applying parking brake.
IGNITION SWITCH
RED
WHITE
WHITE/BLACK
GREY
GREY/BLACK
GREEN
GREEN/BLACK
VIOLET
VIOLET/BLACK
YELLOW
CONSTANT 12 VOLTS
BLACK
GROUND(B-)
BLUE
AUTO ANTENNA
FRONT
Lch SPK.
REAR
Lch SPK.
FRONT
Rch SPK.
REAR
Rch SPK.
BROWN
(B-) PARKING BRAKE
PINK
RADIO ANTENNA JACK
(B+) 12V
REAR CAMERA SWITCH
REAR CAMERA INPUT
YELLOW
SUB WOOFER(brown)
AUDIO R OUT (red)
AUDIO L OUT (white)
FUSE
TV ANTENNA IN
GPS ANTENNA IN
-4-
VIDEO OUTPUT (yellow)
PASSOS PARA INSTALAÇÃO
B. Segure o extremo esquerdo do painel de controle para deslizar para a
direita um pouco e puxe-o para frente para remove-lo.
2) Conecte todos os fios de acordo á fiação mostrada no diagrama abaixo:

-5-
Bulge
Hollow
Bulge
Hollow
Connector
PASSOS PARA INSTALAÇÃO
3) Aderir o painel de controle no chassi
A. fazer à oco direito objetivo painel de controle no bojo direito de chassi,
em seguida, pressione e segure para a direita do painel de controle, ao
mesmo tempo, passar a extremidade esquerda do painel de controle
para o chassi para fazer o buraco esquerdo da meta painel de controle à
esquerda do bojo chassis e solte o suporte.
B. virar painel de controle, até ouvir um som de clique para ligar em chassi
* Como limpar conector do painel.
Destacamento freqüente irá deteriorar-se conectores do painel. Para minimizar a
deterioração, limpe periodicamente os conectores do painel com um pano limpo
/ suave / seca.
4) Testá-lo para garantir que ele possa funcionar corretamente.
4. Instalar unidade principal de acordo com o diagrama de instalação
1) inserir o chassis do carro sistema de multimídia na carcaça de metal deslizante
2) utilizar a tira de metal para fixar a parte traseira do chassis
*desinstalar unidade principal.
1) remover tira de metal da unidade principal.
2) remover quadro guarnição de plástico da unidade principal
3) inserir placa chave no lado esquerdo e direito da unidade principal e chamar a
unidade principal de caixa metálica deslizante.

Diagrama de instalação
HEX NUT
SPRING WASHER
PLAIN WASHER
TAPPING SCREW
DASH BOARD
METAL MOUNTING
STRAP
CONSOLE
SLIDE BRACKET
HOUSING
FIXING TAB
HEX BOLT
-6-
PASSOS PARA INSTALAÇÃO

1. Removing insulating sheet
If
)
)
)
.
)
)
)
.
)
)
using remote control for the first time, you
can see an insulating sheet at the bottom
side of remote control as right.
you must remove the insulating sheet as right.
Otherwise, the remote control is disabled.
2. Replace lithium cell
If the electric energy of lithium cell is weak,
replace it.
1 Press and hold the movable block as direction
indicated by arrow 1 as right, at one time pull
cell holder out of remote control as direction
indicated by arrow 2 as right.
2 Replace the old cell by a new one with (+)
polarity side upward as right.
3 Insert the cell holder into remote control again
as right.
3 Note about using remote control
1 You should face the emitting window of remote control towards the sensor
window of the unit.
2 Operation angle for front panel: About 30 degree
3 The distance between the emitting window of remote control and the sensor
window of the unit : < 5M .
4 Warning for lithium cells of remote control
leakage may cause damage to remote control.1 Cell
2 Do not throw cells into fire, it may cause explosion.
.
3.To avoid risk of accident, keep cells out of reach of children.
-7-
GENERAL KNOWLEDGE
ABOUT REMOTE CONTROL

-8-
1. POWER BUTTON
2. >| BUTTON
3. MODE BUTTON
4. MUTE BUTTON
5. IR SENSOR WINDOW
6. REL BUTTON
7. USB PORT AND COVER
8. AUX IN JACK
9. EQ BUTTON
10. BAND BUTTON
11. |< BUTTON
12. SEL BUTTON AND VOL KNOB
13. >|| OR CH1~6 BUTTON
14. DISC SLOT
15. SD/MMC CARD SLOT
16. EJECT BUTTON
17. RESET BUTTON
18. GPS CARD SLOT
19. APS BUTTON
Control Panel
1
8
234
5
6
7
910 11
12
13
Front Facet of Chassis after remo ving Control Panel
14 1617
1518
Locations and Names of
Controls on Main Unit
19

-9-
Locations and Names of
Controls on Remote Control
1
2
6
10
11
3
20
21
33
9
12
17
34
23
4
5
7
8
1314
15 16
18
19
22
24
25 26
27 28
29 30
31
32
16. VOL- BUTTON
17. SEL BUTTON
18. SETUP BUTTON
19. GOTO BUTTON
20. >|| BUTTON
21. STOP BUTTON
22. AUDIO or MO/ST BUTTON
23. ANGLE BUTTON
24. EQ BUTTON
25. CLK BUTTON
29. > or FINE- BUTTON
30. V or CH- BUTTON
31. |<< BUTTON
32. INT BUTTON
33. NUMBER(0~9) BUTTON
34. +10 BUTTON
26. ^ or CH+ BUTTON
27. >>| BUTTON
28. ENTER BUTTON
1. POWER BUTTON
2. MUTE BUTTON
3. REPEAT BUTTON
4. ZOOM BUTTON
5. MODE BUTTON
6. MENU or SW BUTTON
7. >> or SEARCH BUTTON
8. SUBTITLE or LO/DX BUTTON
9. < or FINE+ BUTTON
BAND or OSD
<< or SKIP BUTTON
12. A/PS or TITLE/PBC BUTTON
13. TOP BUTTON
14. VOL+ BUTTON
15. RDM BUTTON
10. BUTTON
11.
MEN UMEN U
SET UP SET UP
ENT ERENT ER
112233
445566
778899
00
VOLVOL
SELSEL
A/PSA/PS
MUT EMU TE STOPSTO P
MO/ STMO/ST
REP EATREP EAT
POW ERPOW ER
CLKCLK
PLAY/PAUS EPLAY/PAUS E
EQEQ
ANG LEANG LE
MOD E MODE
BAN DBAN D
VOLVOL
OSDOSD
TIT LE/PBCTIT LE/PBC
LO/DXLO/ DX
GOT OGOTO +10+10
TOP INT
RDM
ZOO MZOO M
SEA RCHSEA RCH CH+CH+
FIN E-FIN E-FIN E+FINE +
SKI PSKI P CH-CH-

-10-
Same functions in any work source mode
1. POWER button
In power off mode, pressing POWER button on remote control or pressing POWER button on control
panel powers on main unit.
In power on mode, pressing POWER button on control panel or pressing POWER button on remote
control powers off main unit.
2. VOL knob & VOL+/VOL- buttons
To adjust volume level, rotate VOL knob on control panel or press or hold VOL+ or VOL- button on
remote control.
3. SEL button
To switch between TREBLE,BASS,BALANCE, FADER,COLOR,BRIGHTNESS,CONTRAST, TINT and
VOLUME, briefly and repeatedly press SEL button.
After switching on the desired mode above, rotate VOL knob or press VOL+/VOL- buttons to set it.
To switch between LOUD, SWF VOL, SWF FREQ,EQ, DX/LOCAL(in radio mode), STEREO/MONO
(in radio mode), CLOCK FORMAT, CLOCK, BUZZER,FREQ AREA, TV SYSTEM and LED COLOR,
long press SEL button to switch on LOUD, then briefly and repeatedly press SEL button.
After switching on the desired mode above, rotate VOL knob or press VOL+/VOL- buttons to set it.
4. MUTE button
To switch MUTE mode on or off, press MUTE button on remote control or on control panel.
5. EQ button
To select a desired preset EQ mode from JAZZ, CLASSIC, POP, ROCK and USER, press EQ button on
remote control or on control panel continuously.
6. To switch LOUD mode
To switch LOUD mode between LOW, MIDDLE, HIGH and OFF, long press EQ button on remote
control.
7. SW button
To switch SWF FREQ between 80HZ, 120HZ and 160HZ, long press SW button on remote control.
8. CLK button
Press CLK button on remote control to display clock time .
9. MODE button and source menu
To switch work source between RADIO, DISC(after inserting a disc), USB(after inserting a USB storage),
CARD(after inserting a card), TV and AUX IN, press MODE button on remote control or press MODE
button on control panel continuously.
During disc(non-CD)/USB/card playback, touch screen to pop up Function Icons-board and then touch
the icon in the Function Icons-board to enter the display status of the source menu before entering
Disc/USB/Card mode(refer to Disc/USB/Card Operation) .
During AUX or TV playback, touch screen to pop up AUX or TV interface and then touch AUX or TV icon
to enter the display status of the source menu before entering AUX or TV mode(refer to AUX operation
and TV operation).
In radio or CD mode, touch RADIO or DISC icon to enter the display status of the source menu before
entering radio or CD mode(refer to Radio Operation and Disc/USB/Card Operation).
Same functions in any
work source mode

-11-
The source menu displays as follows:
In the top column, clock time displays in the middle of it;
In the bottom column, they are the icons of MAIN, TOOL, GAME, SETUP, RADIO and GPS.
In the middle column, they are the sub-icons of MAIN, TOOL and GAME as follows:
MAIN: AUX, TV, DISC, USB, SD CARD;
TOOL: MEDIA, PHOTO, VIEWER, CAL,DAY;
GAME: MINE, LINK, FIVE CHESS,BW CHESS, MOLE.
Touching any place in the middle column and sliding leftwards or rightwards can make the sub
-icons move leftwards or rightwards and stay at your desired position
Touch one icon in the source menu to enter one work source of RADIO, DISC, USB, CARD,
TV, AUX IN and others.
Source Menu
Same functions in any
work source mode

-12-
10.SETUP icon
In source menu, touch SETUP icon to display page1 of SETTINGS MENU as follows:
In the SETTINGS MENU, the icons on them descript as follows:
: to next page.
: to previous page.
: to source menu.
Setting Items : to enter the setting item.
In the SETTINGS MENU, there are 8 setting items in all. Touch one setting item to enter the
setting item page. The icons on the setting item page descript as follows:
: to next page.
: to previous page.
: to the page that the setting item belongs to.
Setting Items : to set the sub-item.
: to increase the value.
: to decrease the value.
1) SYSTEM SETTING
(1) LED COLOR
It is for setting the color of the buttons illumination and the LCD backlight.
(2) TV SYSTEM
It is for setting the color system for TV.
(3) RESET SYSTEM
It is for restoring all user setting to zero.
Page1 of SETTINGS MENU Page2 of SETTINGS MENU
Page1 of SYSTEM Page2 of SYSTEM
Same functions in any
work source mode

(4) BRIGHT
It is for setting brightness.
(5) CONTRAST
It is for setting contrast.
(6) COLOR
It is for setting color.
(7) TINT
It is for setting tint.
2) SOUND SETTING
(1) RADIO L/D
It is for switching between LOC and DX.
(2) STEREO
It is for switching between MONO and STEREO.
(3) SWF VOL
It is for setting SWF volume.
(4) SWF FREQ
It is for setting SWF frequency.
(5) LOUDNESS
It is for setting LOUDNESS mode.
(6) SOUND EFFECT
It is for setting EQ mode.
(7) TREBLE
It is for setting the value of treble .
(8) BASS
It is for setting the value of bass.
(9) FADE/BAL
After entering the sub-item, it displays as right:
Touching any place in the rectangle except the
middle column sets the value of the balance;
touching any place in the middle column sets
the value of fade.
(10) TOUCH BEEP
It is for switching touch beep ON or OFF.
Page1 of SOUND Page2 of SOUND
Page3 of SOUND
FADE/BALANCE
-13-
Same functions in any
work source mode

3) BACKGROUND SETTING
It is for setting the background of the No Video interface for RADIO, CD, NON-CD DISC
/USB/CARD, AUX IN and TV .
4) GPS PATH SETTING
It is for setting GPS path to enter GPS navigation mode. Please refer to the part of GPS
navigation for detailed GPS path setting operatoin.
5) TIME SETTING
(1) HOUR SET
It is for setting the hour of the clock time.
(2) MINUTE SET
It is for setting the minute of the clock time.
(3) TIME FORMAT
It is for setting the time format of the clock time.
BACKGROUND
GPS PATH
TIME
-14-
Same functions in any
work source mode

6) TOUCH SETTING
It is for calibrating touch screen. Precisely and repeatedly tap the center of the cross cusor till
it exit calibration interface.
7) INFO SETTING
It is for viewing the system information such as: name, version, memory size and free momery.
8) SKIN SETTING
It is for setting the skin color of those immanent interfaces.
11.REL button
Press REL button on control panel to flip down the control panel, then hold the left part of the
control panel to push it rightwards and pull it to you to remove it.
12.RESET button
When LCD displays wrongly or some buttons are not available or sound is distorted, press REL
button to flip down the control panel, then remove it as above, then use the sharp end of a pointed
object to press RESET button to reset the program to zero.
TOUCH SCREEN CALIBRATION
SYSTEM INFO
SKIN
-15-
Same functions in any
work source mode

-16-
Radio Operation
1. To enter RADIO mode(MODE button or RADIO icon)
When you use MODE button or source menu (tapping RADIO icon) to enter RADIO
mode, it will display radio interface as follows:
* Some icons on radio interface correspond with the buttons on remote control or control
panel as follows:
and icons = VOL- and VOL+ buttons = VOL knob
MUTE icon = MUTE button
List icon : to display 1~6 icons interface in the left side of the radio interface.
EQ icon = EQ button
RADIO icon: To enter source menu
SETUP icon : To enter the settings menu
MAP icon : refer to the part of the GPS operation
2. To switch between bands (BAND)
The BAND icon or button can switch between bands of FM1, FM2, FM3, AM1(MW1) and AM2
(MW2), and the word FM1,FM2,FM3,AM1(MW1) or AM2(MW2) will be displayed on screen.
3. To search for a station (<< and >> icons or v and ^ buttons on remote control or |< and >|
buttons on control panel)
1) Long touching << or >> icon or long pressing v or ^ button on remote control or long pressing
|< or >| button can automatically search down or up for an available station beginning from
the current frequency.
2) Briefly touching << or >> icon or briefly pressing v/^ button on remote control or briefly
pressing |< or >| button can manually search down or up for a your desired station beginning
from the current frequency.
4. To preset and scan all memory stations (APS icon/button or A/PS button)
1) When long touching APS icon on touch screen or long pressing A/PS button on remote control
or long pressing APS button on control panel, the radio searches from the lowest frequency
and checks the signal strength level until 1 cycle search is finished, and the 6 strongest stations
are preset to corresponding preset number memory bank for the current band.
The presetting function can be implemented in selected FM or AM(MW) band. (It can presets
3x6 stations for FM and 2x6 stations for AM(MW) in all)
2) When briefly touching APS icon or briefly pressing A/PS button, the radio scans for each
preset station in FM or AM(MW) band from NO.1 bank, each preset station broadcasts for 5
seconds. After finishing a circle of scanning, it will resume broadcasting the station in NO.1
bank.
NOTE: In FM band, FM1,FM2 and FM3 are preset and scaned as one band at a time;
In AM(MW) band, AM1(MW1) and AM2(MW2) are preset and scaned as one band at a time.
Radio interface Radio interface with 1~6 icons interface
Radio Operation

-17-
5. To preset and listen to a memory station(1~6 icons or 1~6 buttons or CH1-6 button )
1) Long touching one of 6 number(1~6) icons or long pressing one of 6 number(1~6)
buttons can preset the current broadcasting station of the current band in the number
memory bank; .
2) Briefly touching one of 6 number(1~6) icons or briefly pressing one of 6 number(1~6)
buttons can listen to the memory station in the current band preset in the number
memory bank.
* CH1-6 button:
1)To preset a station in a memory bank with CH1-6 button, first select a desired
band; then press CH1-6 button to select a desired memory bank; and then search
for a desired station; finally long press CH1-6 button to store the station in the
memory bank.
2)To listen to a preset station with CH1-6 button, first switch on a desired band, then
continuously press CH1-6 button highlight and listen to it.
6. To switch on between stereo and mono mode (MO/ST button)
Press MO/ST button on remote control to select STEREO or MONO mode for FM band.
When the STEREO mode is activated, it can get better audio effect; when the
MONO mode is activated, it can get clearer audio signal.
7. To switch on between local and distance mode (LO/DX button)
Press LO/DX button to turn LOC on to tune for local stations with weak interference;
Press LO/DX button to turn DX on to tune for distance stations with stronger signal.
Radio Operation

-18-
TV Operation
1. To enter TV mode (MODE button or TV icon)
When you use MODE button or source menu(tapping TV icon) to enter TV mode, first it
displays TV interface, and broadcastes program after a while.
During TV broadcasting, touching any place on touch screen can pop up TV interface as
follows:
and icons = VOL- and VOL+ buttons = VOL knob
MUTE icon = MUTE button
NUM icon : to display number/SKIP icons interface in the bottom side of the TV interface.
TV icon: To enter source menu.
SETUP icon : to enter the settings menu
MAP icon : refer to the part of the GPS operation
2. To search and save TV channels(SCAN icon or SEARCH button)
Touching SCAN icon or pressing SEARCH button can search for all available channels from
the lowest frequency to highest frequency. After searching for a circle, it will stop searching
and broadcast the available channel with the lowest frequency and all the available channels
from the lowest frequency to the highest frequency will be saved.
3. To select a desired channel with an available station (<< and >> icon or CH- and CH+ buttons)
Touching << or >> icon or pressing CH+/CH- on remote control can select the channels with
available stations.
4. To select a desired channel (0~9)
Use the 0~9 icons or the 0~9 buttons to directly select the channel.
* the +10 button is not available.
5. To fine tune the current channel(FINE- and FINE+)
Touching FINE- or FINE+ icon or pressing FINE- or FINE+ button to fine fune for better signal.
6. To add or delete a channel(SKIP)
After searching channels automatically, the CH+/CH- buttons and >>/<< icons can select only
the channels with available signal.
1) Add Channels
Use the number buttons or icons to select a channel, then press SKIP button or touch SKIP
icon, the screen will display SAVE, the channel will be available for the CH+/CH- buttons and
>>/<< icons.
2) Skip Available Channels
Use the CH+/CH- buttons or >>/<< icons to select a channel you want to skip for the CH+/CH-
and >>/<< icons, then press SKIP button or touch SKIP icon, the screen will display SKIP, the
channel will be skipped for the CH+/CH- buttons and >>/<< icons.
TV interface TV interface with number/SKIP icons interface
TV Operation

-19-
Disc/USB/Card Operation
1. Loading or unloading a disc, USB or card
1.1 Loading a disc, USB or card
To play files in a disc, press REL button on control panel to flip down the control
panel, then insert a disc with label surface up into disc slot, then flip up the control
panel and attach onto chassis till hear a click sound, finally it will automatically play.
* CAUTION OF USING DISC
1) Handle a disc by its edge, do not touch the surface of play side.
2) Before inserting disc, wipe the disc outwards from the disc
center with a clean, soft, dry, lint-free cloth. Do not use solvents
/thinner such as petrol/benzine, cleaner.
3) After taking a disc out of disc slot, put the disc inside disc case to
keep it clean.
4) Do not stick paper or tape on the disc surface of play side. If
there is glue (or analog) on the disc surface, must wipe it up
before using.
To play files in a USB, firstly open USB port cover, then insert USB storage into
USB port, and then it will play files in the USB automatically.
To play files in a card, firstly press REL button to flip down control panel, then
hold the left part of the control panel to push it rightwards and pull it to you to
remove it, and then insert the card into card slot till hear a click sound, and then
attach the control panel onto chassis again, by now it will play files in the card
automatically .
Label
surface up
Label side
facing upward
Press in till heard a “CLICK”
Disc/USB/Card Operation
Table of contents