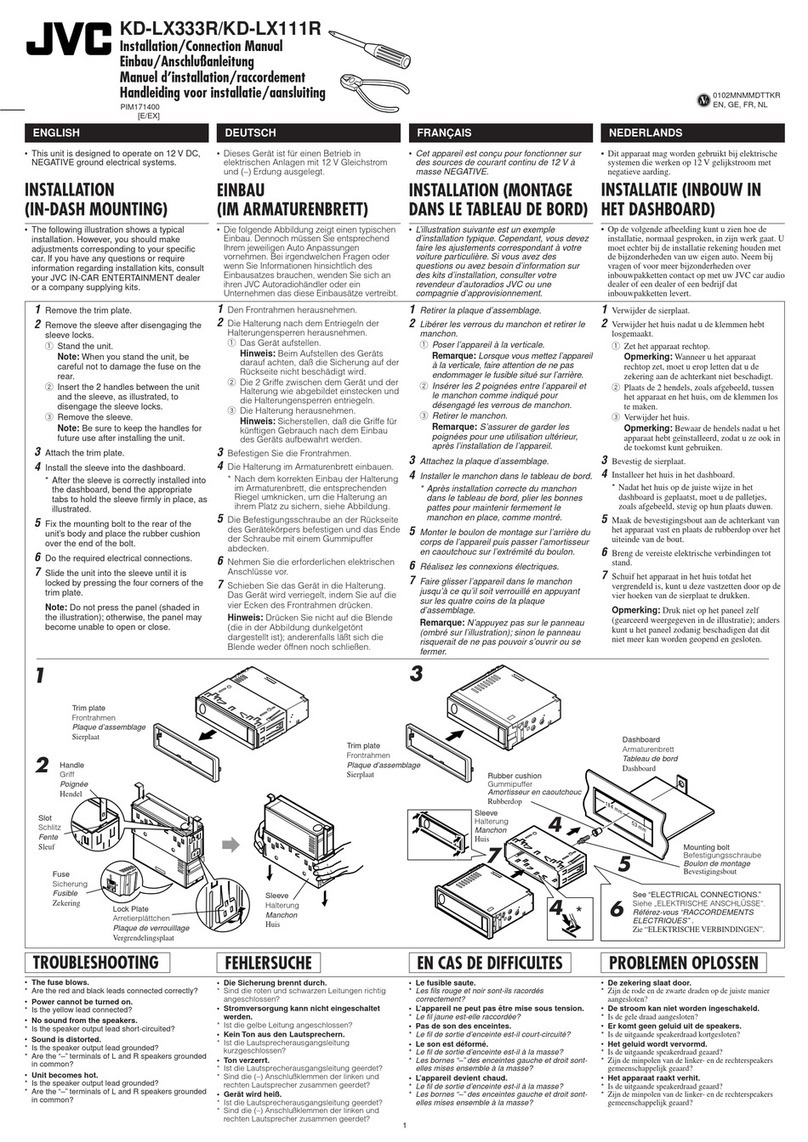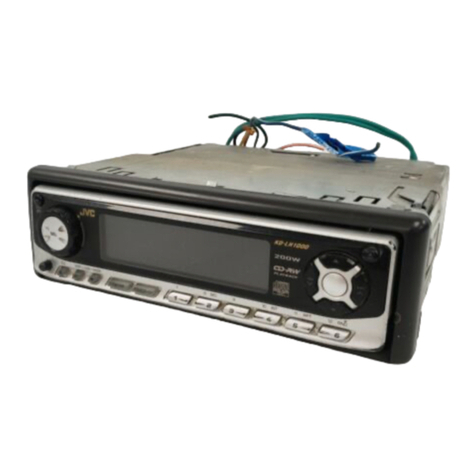
Heat sink
散熱片
ELECTRICAL CONNECTIONS
To prevent short circuits, we recommend that you disconnect the battery’s negative terminal and
make all electrical connections before installing the unit.
• Be sure to ground this unit to the car’s chassis again after installation.
Notes:
• Replace the fuse with one of the specified rating. If the fuse blows frequently, consult your JVC
car audio dealer.
• It is recommended to connect to the speakers with maximum power of more than 70 W (both
at the rear and at the front, with an impedance of 4 Ω to 8 Ω). If the maximum power is less
than 70 W, change “Amp Gain” setting to prevent the speakers from being damaged (see page
39 of the INSTRUCTIONS).
• To prevent short-circuit, cover the terminals of the UNUSED leads with insulating tape.
• The heat sink becomes very hot after use. Be careful not to touch it when removing this unit.
PRECAUTIONS on power supply and speaker connections:
• DO NOT connect the speaker leads of the power cord to the car battery; otherwise,
the unit will be seriously damaged.
• BEFORE connecting the speaker leads of the power cord to the speakers, check the
speaker wiring in your car.
電源和揚聲器接線注意事項 :
• 切勿把揚聲器導線接頭接至電池,否則本機將會嚴重損壞。
• 在把揚聲器導線接頭接至揚聲器之前,檢查您汽車上的揚聲器線路。
電路連接
為防止短路,建議在安裝本機之前,斷開電池的負極,並把所有電路都連接好。
• 安裝完畢後務必將本機的地線重新接至車身。
注意 :
• 把保險絲更換為額定負荷值的保險絲。如果保險絲經常燒壞,請向 JVC 汽車音響分銷商詢問。
• 後置和前置揚聲器的最大輸入功率應大於 70 W,其阻抗為 4 Ω – 8 Ω。如果最大功率小於
70 W,請調校“Amp Gain”設定值,以防止揚聲器損壞。(參閱使用說明書的第 39 頁)。
• 為防止電源短路,請用絕緣帶包住未使用電線的端子。
• 本機使用後,散熱片會很熱。因此,在移出本機時,小心不要觸摸散熱片。
ATypical Connections / 典型的接線方法
LINE IN (see diagram /參閱圖表 )
SUBWOOFER OUT (see diagram /
參閱圖表 )
Rear ground terminal
本機後背接地端子
LINE OUT (see diagram /
參閱圖表 )
White with black
stripe
白色帶有黑色條紋
White
白色
Gray with black stripe
灰色帶有黑色條紋
Left speaker (front)
左揚聲器(前置)
Gray
灰色
Right speaker (front)
右揚聲器(前置)
Green with black
stripe
綠色帶有黑色條紋
Brown
褐色
Orange with white stripe
橙色帶有白色條紋
Blue with white stripe
藍色帶有白色條紋
Red
紅色
Yellow*2
黃色 *2
Black
黑色
15 A fuse
15 A 保險絲 *1 Not included for this unit
*1 不包含在本機內 Ignition switch
點火開關
To metallic body or chassis of the car
接至金屬體或汽車底盤
To a live terminal in the fuse block connecting to the car battery
(bypassing the ignition switch) (constant 12 V)
接至保險絲單元內的附屬端子,保險絲單元於車裝電池相連接
(用於旁路點火開關)(恆定 12 V)
To an accessory terminal in the fuse block
接至保險絲單元內的附屬端子
To the remote lead of other equipment (200 mA max.)
連接至另一架音響設備的遙控導線(最大 200 mA)
Fuse block
保險絲單元
To car light control switch
連接至汽車車燈控制開關
To cellular phone system
連接至流動電話系統
Purple
紫色
Right speaker (rear)
右揚聲器(後置)
Purple with black stripe
紫色帶有黑色條紋
Left speaker (rear)
左揚聲器(後置)
Green
綠色
接線前 : 仔細檢查汽車內的線路。不正確的接線會導致本機嚴重損壞。
電力線的引線和車身的連接器引線在顏色上可能有所不同。
1 依照下圖所示之次序連接電源線的顏色導線。
2 將天線的電線連接起來。
3 將提供穩定電源的直流電/直流電變流器連接至接收器。
4 最後,把配線束的插頭插在本機上。
如果您在汽車安裝了三通揚聲器系統,請參閱圖表 有關揚聲器連接。
To automatic antenna if any (250 mA max.)
接至自動天線(若有裝設)(最大 250 mA)
Blue
藍色
*2
Before checking the operation of this unit prior
to installation, this lead must be connected,
otherwise power cannot be turned on.
*2 本機未安裝時,進行工作狀況檢查之前,必須把
這導線接上,否則不能開啟電源。
To disconnect the CD connector
若要拆除光碟連接器
Hold the connector top
tightly (1), then pull it out
(2).
握緊連接器上部
(1)
,
然後向外拉
(2)
。
Attach the DC/DC converter firmly with a
screw (not included for this unit).
•
Pay attention not to damage any
car fixings when attach the DC/DC
converter.
用螺絲(
不包含在本機內
)將直流電/直
流電變流器鎖緊。
•
安裝直流電/直流電變流器時注意不要
損壞任何汽車設備。
Make sure of the following for installing the converter.
• For safety, it is recommended to have the DC/DC
converter installed by a qualified technician.
• Do not run any cords nearby the DC/DC converter;
otherwise, noise may be generated.
安裝變流器時請確定以下幾點。
• 為安全起見,直流電/直流電變流器應該由合格技術人
員安裝。
• 不要在直流電/直流電變流器附近拉電線,否則會引起電
訊噪音。
Before connecting: Check the wiring in the vehicle carefully. Incorrect connection may cause
serious damage to this unit.
The leads of the power cord and those of the connector from the car body may be different in color.
1 Connect the colored leads of the power cord in the order specified in the illustration below.
2 Connect the antenna cord.
3 Connect the supplied DC/DC converter for constant power supply to the unit.
4 Finally connect the wiring harness to the unit.
If you have installed 3-way network speaker system in your car, see diagram for
speaker connection.
2
To CD changer or another external component
(see diagram )
連接至 CD 換碟器或其它外部組件(參閱圖表 )
Install1-2_SHX855_010A.indd 2 8/4/05 2:16:39 PM
