Nassenheider Fill Up 2 visco User manual

fill up
nassenheider
Bottling machine Fill up 2 visco
basic configuration for honey
Bottling technology
nassenheider
www.nassenheider.com
Manual


fill up
nassenheider
Manual Fill Up 2
Contents
1 Foreword 2
2 Manufacturer 3
3 Reading and application of the manual 3
4 Security instructions 4
5 Technical details 4
5 1 Intended use 5
5 2 Technical data 6
5 3 Safeguards 6
5 4 Connections on the drive module 6
6 Preparations for use 7
6 1 General instructions 8
6 2 Components included in delivery (basic configuration for honey, Art No 301001) 8
6 3 Unpacking and set up 9
6 4 Adjustment of the jar height 10
6 5 Transport and storage 10
7 Processing of honey 10
7 1 Suction out of a container 11
7 2 Connection to a container with valves 12
7 3 Preperation of the honey 12
7 4 Dosage 13
7 5 Transference of honey between containers/ creamed honey 13
8 Processing of other liquids (apart from honey) 13
8 1 Pre-settings 14
9 Assembly, dismantling and cleaning 14
9 1 filling nozzles 15
10 Operation 16
10 1 Membrane keyboard and display 16
10 2 General use of the keyboard 17
10 3 Modes of operation 17
© Stefan Weiland 15 11 2012 Page 1

fill up
nassenheider
Manual Fill Up 2
10 4 SETUP menu 23
10 5 External switches 24
11 Maintenance, troubleshooting and reparation 25
11 1 Maintenance 25
11 2 Update of the software 25
11 3 Troubleshooting 26
11 4 Support and reparation 27
11 5 Disposal of your old machine 27
12 Warranty 27
13 CE - DECLARATION OF CONFORMITY 28
© Stefan Weiland 15 11 2012 Page 2

fill up
nassenheider
Manual Fill Up 2
1 Foreword
Dear Customer,
Thank you for purchasing our filling machine "Nassenheider fill up 2 visco"
Your new appliance is specially designed and aimed to serve the requirements of small
to medium size apiaries and consumer goods manufacturers It will save you valuable time and work as
well as having cost benefits
We have developed a modular filling system, which enables the bottling of a variety of liquids and soft
mediums at a reasonable price We always research new technologies to improve our products and de-
velop additional components for the filling process This way we are able to continously broaden the
spectrum of our product line-up
Beside the standard gear-pumphead we offer various pumpheads like the impeller-pumphead, two diffe-
rent peristaltic-pumpheads, hoses and hoppers in many different shapes and sizes In this way particular
attention has been paid to providing the largest possible compatibility and options for adding additional,
modern and energy saving parts Please ask your local dealer for more information or have a look at our
homepage
If your company grows, our machine can grow, too! Additional parts like automatic turntables, con-
veyor-belts or a weighing-module will make your work even more effective
A future update of the appliance-software by means of an USB adaptor and PC is also possible
NASSENHEIDER-machines are developed and assembled in our own workshop in Dresden, Germany
Therefore we can provide full technical support and there is always the safety of getting qualified support
and spare-parts for many years
The manufacturing-process is done under consideration of the latest safety- and environmental laws and
guidelines We use electricity which is 100% made from renewable energies and our machines are easy
to maintain and to repair for a long life This sustainable production and the energy-saving design of our
machines is our current small contribution to prepare our planet for the future generations
We work towards having a long term partnership with you and wish you a lot of fun and economic suc-
cess with your new filler
Your Nassenheider team
2 Manufacturer
Contact data of the manufacturer for support:
Stefan Weiland Produktservice
Leipziger Str 33
01097 Dresden
Germany
Sales: +49 (0) 351-896691-01
Support: +49 (0) 351-896691-05
Fax: +49 (0) 351-896691-99
E-mail: support@nassenheider com
Homepage: www nassenheider com
© Stefan Weiland 15 11 2012 Page 3

fill up
nassenheider
Manual Fill Up 2
3 Reading and application of the manual
The manual is an important component of the product Therefore we ask that you read
it thoroughly before use This will allow the optimum and safe use if the machine
You can use the „quickstart-manual“ for your everyday filling work
In the service section of our website www nassenheider com you are provided with
manuals in different languages
4 Security instructions
There is a danger of injuring hands in the rotating gear wheels and motor a is. For
this reason, before assembly or dismantling, turn off the machine and ensure that the
power-plug of the transpormer is disconnected from the power network
There is a danger of injury through electrical current!
For this reason,
- always ensure that the power supply (transformer) is protected from moisture
- do not open or disassemble the driving-module of the machine, the transformer or any
of the plugs
There is a danger of worn out parts polluting your filling mediums!
That is why you should always check the assembly parts of the pumphead, the nozzles
and the hoses for their cleanliness and their condition
Clean dirty parts and replace broken or worn out parts immediatly!
Important:
This equipment is electronically steered by a microcomputer.
Although unlikely, malfunctions can occur through the effect of strong
electrical or electromagnetic fields.
If this were to happen, please reload the factory pre-sets again (RESET
of the software). Troubel shooting: see page 32.
© Stefan Weiland 15 11 2012 Page 4

fill up
nassenheider
Manual Fill Up 2
5 Technical details
© Stefan Weiland 15 11 2012 Page 5

fill up
nassenheider
Manual Fill Up 2
5.1 Intended use
The bottling-machine ʺNASSENHEIDER fill up 2 viscoʺ is desgned
for the dosing and pumping of the following liquids and creams:
Dynamic viscosity:
(depending on the pumphead and equipment) 10³ bis 106 mPa*s (thick oils, sirup, mayon-
naise, honey, shampoo, yoghurt, fresh cheese, quark, handcreme etc )
Temperature range for filling:
- from 32°F/ 0°C to 104 °F/ 40°C (gearpump standard version)
- from 104°F/ 40°C to 194°F/ 90°C (gearpump with wheels for hot filling Nr 302021 or
302022)
- from 32°F/ 0°C to 209°F/ 95°C (impeller- and peristaltic pumphead)
Never bottle any e plosive or flammable liquids or liquids containing solvents!
Before using the machine, possible incompatibilities of the filling product and the
parts of the machine have to be clarified (solvents and abrasiv components).
Therefore all products that have to be filled (e cept honey) are to be approved by
the manufacturer beforehand seperately for each product. If not approved, the ma-
nufacturer is not liable for any following damage or injuries!
5.2 Technical data
Nominal voltage drive module: UN = 24 V DC
No load current: I0 = 2,5 A
Power consumption motor: P = approx 100 VA
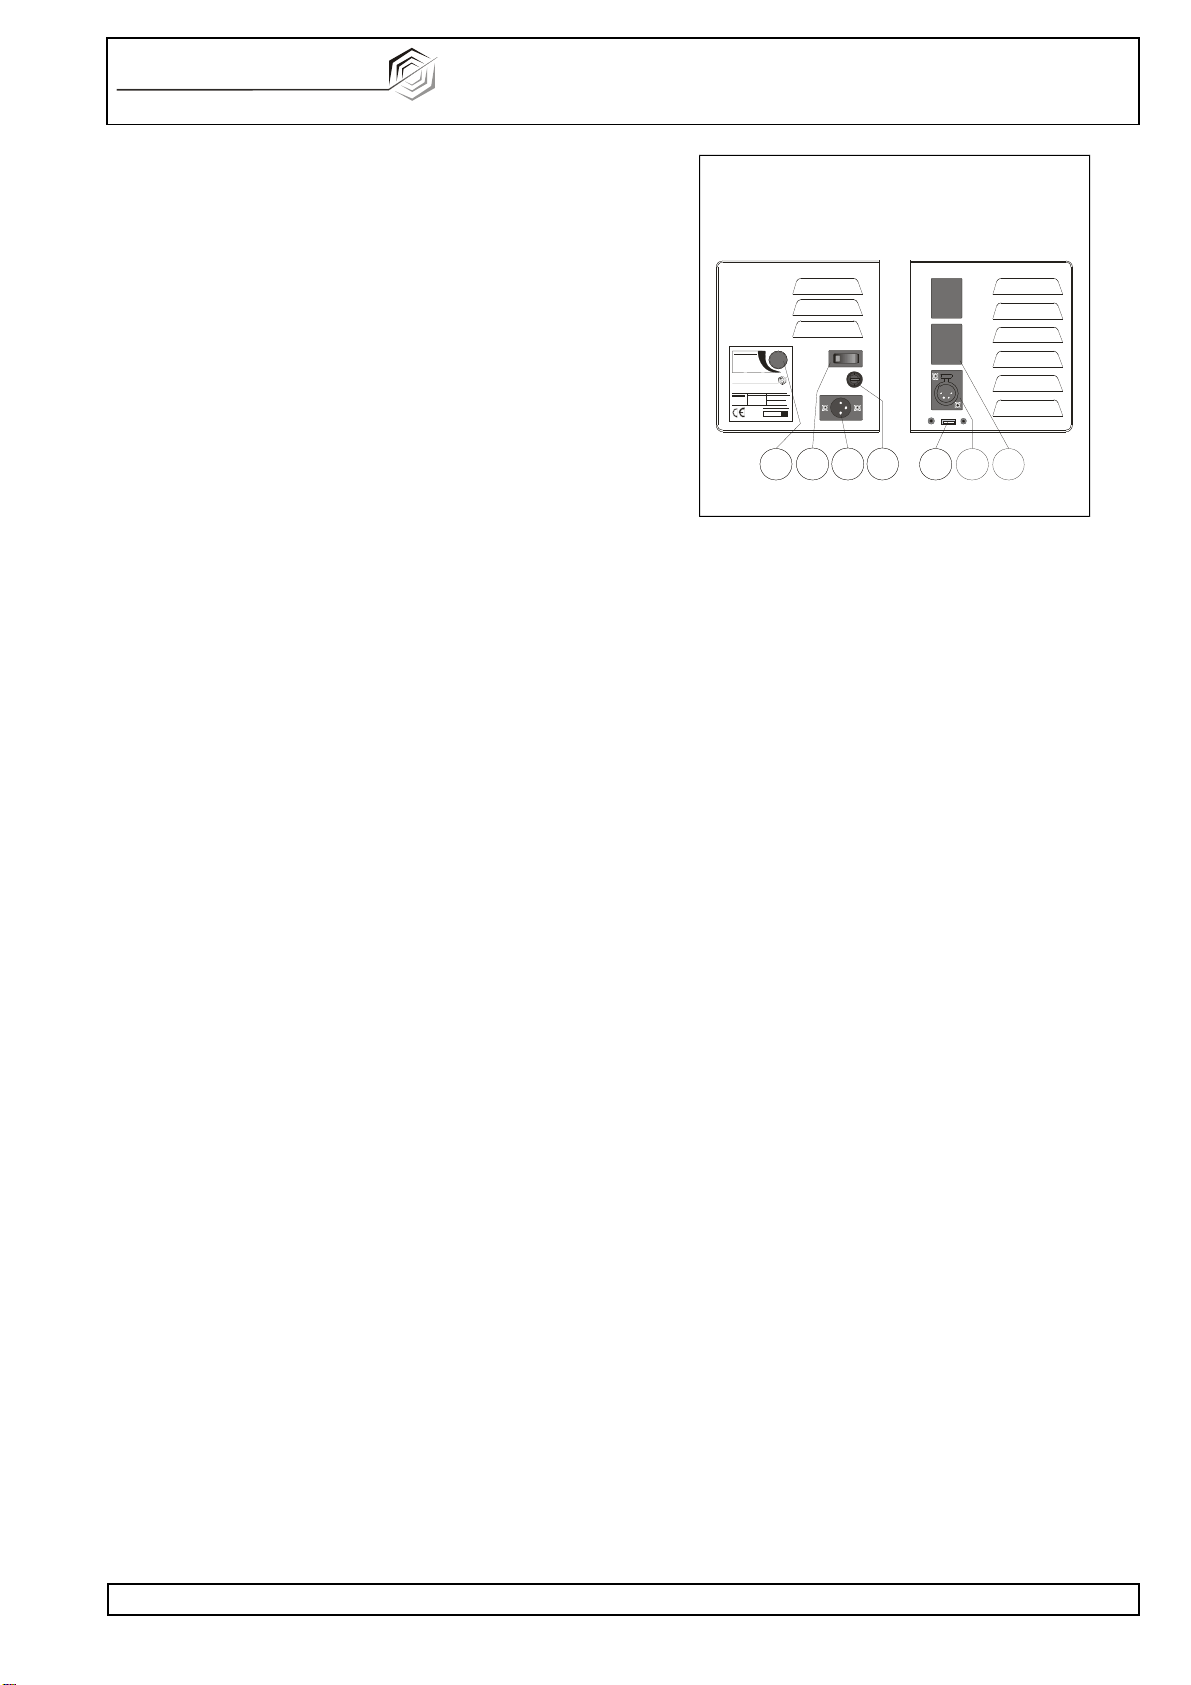
Revolutions per minute: 14-100 rpm (regulated with a control knob
righthandside of the machine)
Starting torque: MA = 90 Nm
Nominal torque: MN = 9,5 Nm
Noise emission: <70 dB
Set up area: width = 350 mm x depth = 320 mm
Overall height: 520 to 1200 mm (according to model)
Lower filling nozzle: 50-300 mm (standard stand 500 mm, Art No 303012)
50-500 mm (stand 700 mm, Art No 303006)
50-800 mm (stand 1000 mm, Art No 303023)
Weight: approx 40 lbs/ 18 kg incl transformer
pumping data for honey :
Max suction height: up to 3 3 ft/ 1,3 m
Max conveyor height pressure side: up to 13 ft/ 4 m
Max pump capacity per hour: up to 926 lbs/ 420 kg ≙ 300 l/h
5.3 Safeguards
Motor protection
An electronic overload protection guard is built into the system Should the pump head be-
come blocked, a warning sign “overload” will appear on the screen After acknowledging
the blockage by pressing the -key, work can be continued
Micro fuse
In the power supply and the drive mudule: 8 A, medium time lag, Art No 307009
© Stefan Weiland 15 11 2012 Page 6

fill up
nassenheider
Manual Fill Up 2
5.4 Connections on the drive module
Right side:
A - Control knob for speed regulation
B - On/ Off toggle switch/ main switch (no lighting)
C - Connection socket for 24V power supply
(24 V DC by power supply Art No 307014 or
24V attachment cable Art No 303003)
D - Fuse holder (contains micro fuse 8 A, medium time lag,
Art No 307009)
Left side:
E - USB port for updating of appliance software
F - Port for external switch (Flat switch, Art No
307006 or Foot switch, Art Nr 303001)
G - Blank port (optional port for additional connections)
© Stefan Weiland 15 11 2012 Page 7
fig. 2.4
right side left side
201 0
1000213
fill up
DS 20 000
n a sse n h eid e r
15 -100 /min
F
AA BB CC DD EE G

fill up
nassenheider
Manual Fill Up 2
6 Preparations for use
© Stefan Weiland 15 11 2012 Page 8

fill up
nassenheider
Manual Fill Up 2
6.1 General instructions
When unpacking, please make sure that the machine:
- has not been damaged
- is complete according to the following depiction
If this is not the case, please get in contact with your local reseller or the manufacturer:
STEFAN WEILAND PRODUKT SERVICE
within two weeks, either verbally or in writing
6.2 Components included in delivery (basic configuration for honey, Art No 301001)
(components may vary, if your machine is not meant for honey)
More components are available; please ask for catalogues and price lists!
© Stefan Weiland 15 11 2012 Page 9

fill up
nassenheider
Manual Fill Up 2
6.3 Unpacking and set up
- set up in a closed, dry area
- room temperature : 15 - 35°C/ 59 - 95°F
- before use, please allow allow about an hour for the the appliance
to become acclimatized to the room; this prevents damage from
condensation
When unpacking please take care of the following:
- Take the protective plastic film off the stainless steel parts
- Clean the pieces that come in contact with the honey or other
filling products with commercial dish washing
Assembly should take place on a table or hanging from a barrel or
with the hanger, Art No 303002
6.4 Adjustment of the jar height
The filling nozzle should always be as fitted as tightly as possible
over the jar opening The vertical adjustment takes place by means
of locking levers
The drive module must be held tightly in place,
so that it does not slip downward on the column.
The height below the filling nozzle can be adjusted between
appro . 50 mm - 280 mm (also see chapter 5.2).
6.5 Transport and storage
Transport and storage should only take place in the original packa-
ging in order to protect the equipment from contamination and da-
mage Always protect from moisture and vibrations
© Stefan Weiland 15 11 2012 Page 10
fig. 3.3
fig. 3 4

fill up
nassenheider
Manual Fill Up 2
7 Processing of honey
© Stefan Weiland 15 11 2012 Page 11

fill up
nassenheider
Manual Fill Up 2
7.1 Suction out of a container
Assembly of the hose using a bent pipe
- dip the hose and the bent pipeto hot water (approx 95°C / 203°F)
(fig. 4.1)
- after assembly immediatly pull the hose clamp tight, making sure that the
hose does not get damaged
Attach check valve to the other end (fig. 4.2)
- ensures that the honey does not flow back out of the hose
- ensures that the opening does not adhere to the container bottom, position (A)
Honey suction
- before assembly of the upper bent pipe, pour approx 2 tablespoons of honey
into the pumphead, position (C)
- this way the pumphead becomes sealed and coated and able to draw the air
out of the hose
When set up in the way described above, the machine is in position to fill
honey into jars, to a suction height of 1.5 m and without air bubbles.
Attention: The honey should be aspired into the pumphead after
about 15 seconds. If not, check the hose-connections because
of airleaks. A longer motion of the gears without or with only litt-
le honey may destroy the pumphead due to too little greasing by
the honey!
Suction of other mediums
Other mediums like mustard, ketchup, sauces etc have to be drawn with thinner
hoses For this we offer hoses and bent pipes with a diameter of 25 mm and 15
mm Please don't hesitate to ask, since we will be glad to counsel you!
Mediums, like e g creams usually cannot be drawn from below, but have to be
poured from above
For this case we offer various containers, hoppers and hose connections
leakages while drawing honey:
When there are suction problems, use additional honey to seal the
machine in the folowing places (fig 4.2):
-connection intake - suction hose, position (A)
-sealing ring on top of the pump head, position (C)
-sealing ring on bent pipe, position (B)
In case of the reverse flow of liquid honey and simultaneous
suction of air through the filling nozzle
-use the check valve
-fill liquid honey at the coolest temperature possible
(approx 15-20°C/ 59-68 °F)
-place container as high as possible
suction problems with honey that is too tough
-remove flange and membrane from check valve, but don't
remove the screws and wing nuts
© Stefan Weiland 15 11 2012 Page 12
fig. 4.1
fig. 4.2

fill up
nassenheider
Manual Fill Up 2
7.2 Connection to a container with valves
- Direct connection by means of a connection pipe (Art No 304013 - 304015)
and disk valve (Art No 304010 or 304012) The container should then be
raised accordingly
- Connection by hose with hose nozzle and swivel nut (Art No 304011) and
disk valve (Art No 304010 or 304012)
For more information about these components please check our website
7.3 Preperation of the honey
-Filter wax from honey in a cleaning basin
-Honey must be in liquid form
-Honey must be freshly stirred, in order to prevent possible temperature
differences (= density variations) in the container
-Dichteunterschiede verursachen Ungenauigkeiten bei der Abfüllung!
Processing temperatures of the honey
-liquid honey freshly extracted: 20-25°C/ 68-77°F
- Creamed honey with low water content: 26-35°C/ 79-95°F
- Ma imum temperature: 40°C/ 104°F
Using the machine at higher temperatures can clog the gear whels due
to an expansion in the pumphead
Attention:
If the honey is colder during the bottling, the machine could
be damaged - for that we assume no liability!
7.4 Dosage
- programming of the nominal filling amounts in the SETUP menu
- Operating mode "AUTO"
- Choose dosage amount according to jar size
(10 g - 32,5 kg/ 1 oz – 71 lbs)
- do the fine tuning (calibration of the filling amounts)
- the accuracy between each filling-process is ± 3g / 0,1 oz
(without air-bubbles)
7.5 Transference of honey between containers/ creamed honey
(with bent pipe, Art No 304001), our recommendation:
- the ʺpumpʺ or ʺtime switch clockʺ modes
- inject honey with creamed honey and/ or wait for crystalization process
- transference between containers at a rate of 5-8 times per day
Attention:
Never operate the pumphead dry, i.e. without honey!
Without the lubricating effect of honey between the gear
wheels the plastic pump module can be damaged, even de-
stroyed
© Stefan Weiland 15 11 2012 Page 13

fill up
nassenheider
Manual Fill Up 2
8 Processing of other liquids (apart from honey)
Each medium that is put through the machine requires a special selection of our
components according to the unit assembly system You can choose from diffe-
rent gear wheels, pump heads like the impeller module and peristaltic modules
as well as from different filling nozzles We can configure the machine to your
special medium and can supply it pre-assembled
The basis for this is our application form on our homepage:
http://abf.nassenheider.com/anfrags/inde _en
The answers to the questions asked help us to determine the perfect solution for
your filling premise
8.1 Pre-settings
In the configuration menu you can do your own pre-setting, in order to adapt your
filling machine to your own special medium This requires the following:
-Unit display: grams (g), milliliter (ml), ounce (oz)
-Thickness of liquid: oil (0,9 g/cm³), water 1,0 g/cm³), honey (1,4g/cm³),
or any numeric value between 0,8-1,8 g/cm³
- Pump head
Gear-1: Gear wheel pump head, small, stainless steel (Fill up Liquid)
Gear-2: Gear wheel pumphead, large, plastic (Fill up 2)
Impeller: Impeller pump head for liquid, slightly chunky mediums
Peris-1: Peristaltic pump head, small, for liquids
(filling amount 1 ml - 500 ml)
Peris-2: Peristaltic pump head,big, for liquids
(filling amount 250 ml - 1000 ml)
As far as possible, we configure the special settings of the machine in our factory
These can however be lost while loading the factory pre-sets (RESET) and may
need to be reset
© Stefan Weiland 15 11 2012 Page 14

fill up
nassenheider
Manual Fill Up 2
9 Assembly, dismantling and cleaning
© Stefan Weiland 15 11 2012 Page 15

fill up
nassenheider
Manual Fill Up 2
9.1 filling nozzles
Depending on the medium used, we provide suitable filling nozzles The cor-
rect assembly of the nozzles is described below
Wedge nozzle 22 mm soft (Art.No. 306014), hard (Art.No. 306015)
(fig. 6.9 a):
Put directly into the pump head with a clamping flange
Application:
hard implementation: for filling honey
soft implementation: for liquid honey, mustard and soft pastes
Wedge nozzle 10 mm soft (Art.No. 306011), hard (Art.No. 306032)
and wedge nozzle 17 mm soft (Art.No. 306012), hard (Art.No. 306013)
(fig. 6.9 b):
Always assemble together with appropriate filling pipe (10 or 15mm) and
sealing gasket at the bottom pump head The side of the sealing gasket with
the rounded edges always faces towards the filling pipe (downward)
Application:
for liquid mediums (oil, sauces etc )
Filling pipe without filling nozzle
Ø 10 mm (Art.No. 306008), Ø 15 mm ( Art.No. 306009),
Ø 25 mm immer ohne Düse (Art.No. 306010) (fig. 6.9 c):
Assemble with flange sealing gasket at the bottom of the pump head The
side of the sealing gasket with the rounded edges always faces towards the
filling pipe (downward)
Application:
for non dripping pastes like creams, cream cheese, curd
Conical filling nozzle with cover (Art.No. 306002) (fig. 6.9 e):
- insert conical filling nozzle into the pump head
- put the cover on the filling nozzle
- fasten the clamping flange with nuts
- screw the pump head to the pumping mudule
Application:
especially for liquid honey and smaller jar size
© Stefan Weiland 15 11 2012 Page 16
fig. 6.9 a
Wedge nozzle 22 mm
fig. 6.9 c
Filling pipe
fig. 6.9 e
Conical filling nozzle
with cover
fig. 6.9 b
Wedge nozzle with
filling pipe

fill up
nassenheider
Manual Fill Up 2
10 Operation
10.1 Membrane keyboard and display
Do not use the keys with you fingernails!
Do not use aggressive detergents!
10.2 General use of the keyboard
10.3 Modes of operation
The operation modes are chosen in the main menu
10.3.1 Operation mode HAND/PUMP
Pump (with bent pipe Art.No. 304001):
The pumping mode of operation is used for the self-priming, i e fill-
ing the hose and the pump-head, for continuous pumping as
well as to stirr creamy honey
For the stirring of creamy honey, the mode of operation "time switch
clock" can also be used
Self-priming:
In order for the pump to draw in the honey, the following measures are
necessary
- apply 3 teaspoons of honey, to the gear wheels from above
- connect the bent pipe to the pump head
- place an empty jar below the filling nozzle (approx 350 ml/ 500g)
- turn speed up to 100/min (max) with the turning knob on the right side
- draw the honey in, using PUMP mode, until the pump head is
filled without any bubbles
Attention: The honey should be aspired into the pumphead
after about 15 seconds. If not, check the hose-connections
because of airleaks. A longer motion of the gears without or
with only little honey may destroy the pumphead due to too
little greasing by the honey!
© Stefan Weiland 15 11 2012 Page 17

fill up
nassenheider
Manual Fill Up 2
You can select the pumping direction by marking the
arrow with the key and adjusting it by means of the
keys Confirm again with the key
Here you can select the following options:
Forward continously
A short press of the -key, sets the honey in motion, a second press
terminates this motion
The product is pumped from above downward (forward)
Forward interval
The forward motion of the honey remains unaffected while the -key
is pressed When letting go the motor stops
The product is pumped from above downward (forward)
Backward continously
A short press of the -key, sets the honey in motion, a second press
terminates this motion
The product is pumped from below upward (backwards)
Backward intervall
The forward motion of the honey remains unaffected while the -key
is pressed When letting go the motor stops
The product is pumped from below upward (backwards)
The filling nozzle (Art.No. 306015) must be removed each time
continuous pumping is carried out. To not do so would cause too
much resistance in the tubing witch may could damage the motor
by overloading the machine.
Use of the Niveau switch(Accessory Art.No. 303004)
Pumping freshly turned honey from the cleaning basin into a larger
container (e g onto a shelf) can be regulated with the niveau switch
For more information see chapter ʺexternal switchesʺ
The Mode of Operation to be selected is:
PUMP → INTERVAL → FORWARD or BACKWARD
10.3.2 Automatic dosage operation
This mode of operation is used for the filling of jars and/or other
containers with the desired quantity
General Operation:
1 Choice of nominal filling quantity of the contents (jar size, programmed in
the SETUP menu)
2 Filling of a jar
3 Weighing of the jar's contents
4 Correction (calibration) of the weight
5 Possible repetition of the points 2-4
6 filling of the desired number of jars
© Stefan Weiland 15 11 2012 Page 18
Table of contents
Popular Water Pump manuals by other brands

DAB
DAB CP-G Series Instruction for installation and maintenance

Northern Industrial Tools
Northern Industrial Tools 109097 owner's manual

Stenner Pumps
Stenner Pumps S Series Installation and maintenance manual

Powerfix
Powerfix PBMP 30 A1 operating instructions

Grundfos
Grundfos RF2 Installation and operating instructions

Predator
Predator 63404 Owner's manual & safety instructions

Hytek
Hytek ALPHA/50WAFC Technical data

Everbilt
Everbilt EBAU33 Use and care guide

Enerpac
Enerpac ZW3 Series instruction sheet

GORMAN-RUPP
GORMAN-RUPP AMT 4782-95 Specifications information and repair parts manual

Clarke
Clarke TAM101 Operating & maintenance instructions

Everbilt
Everbilt SBA025RP Use and care guide