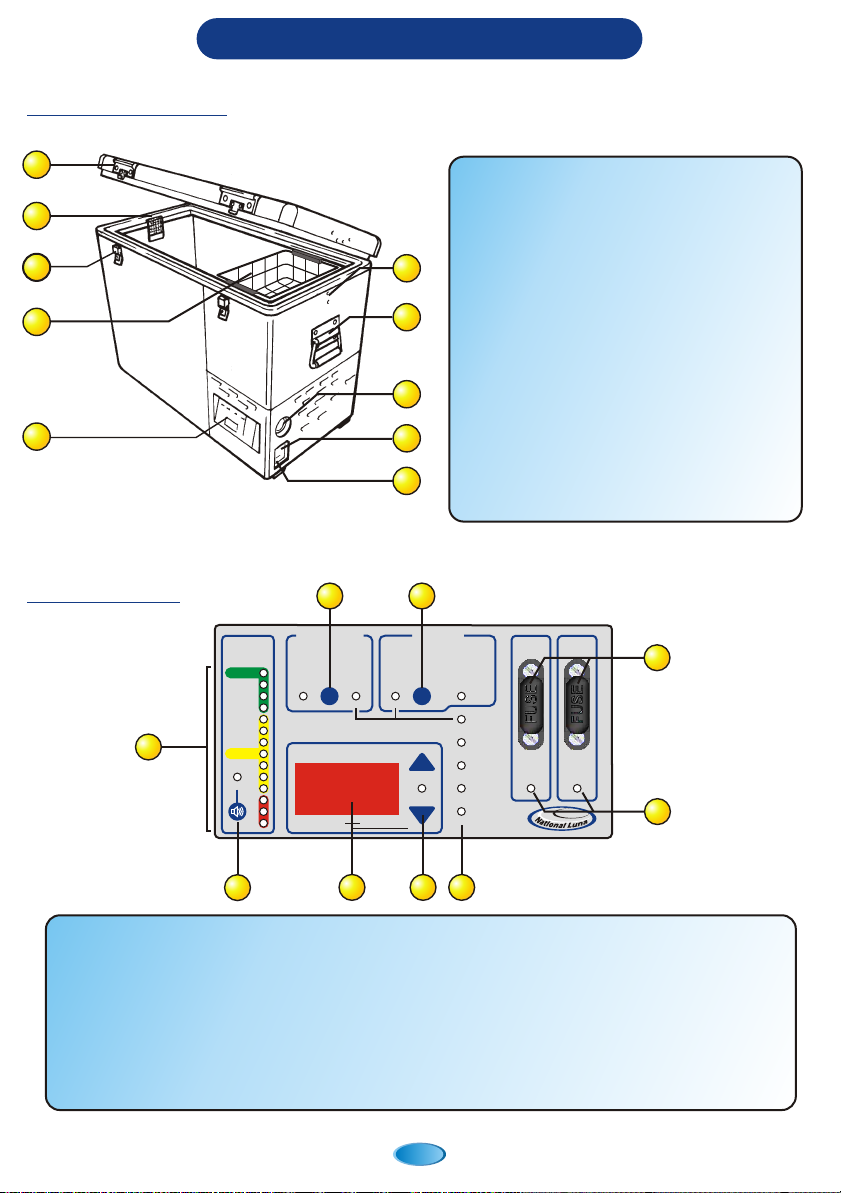
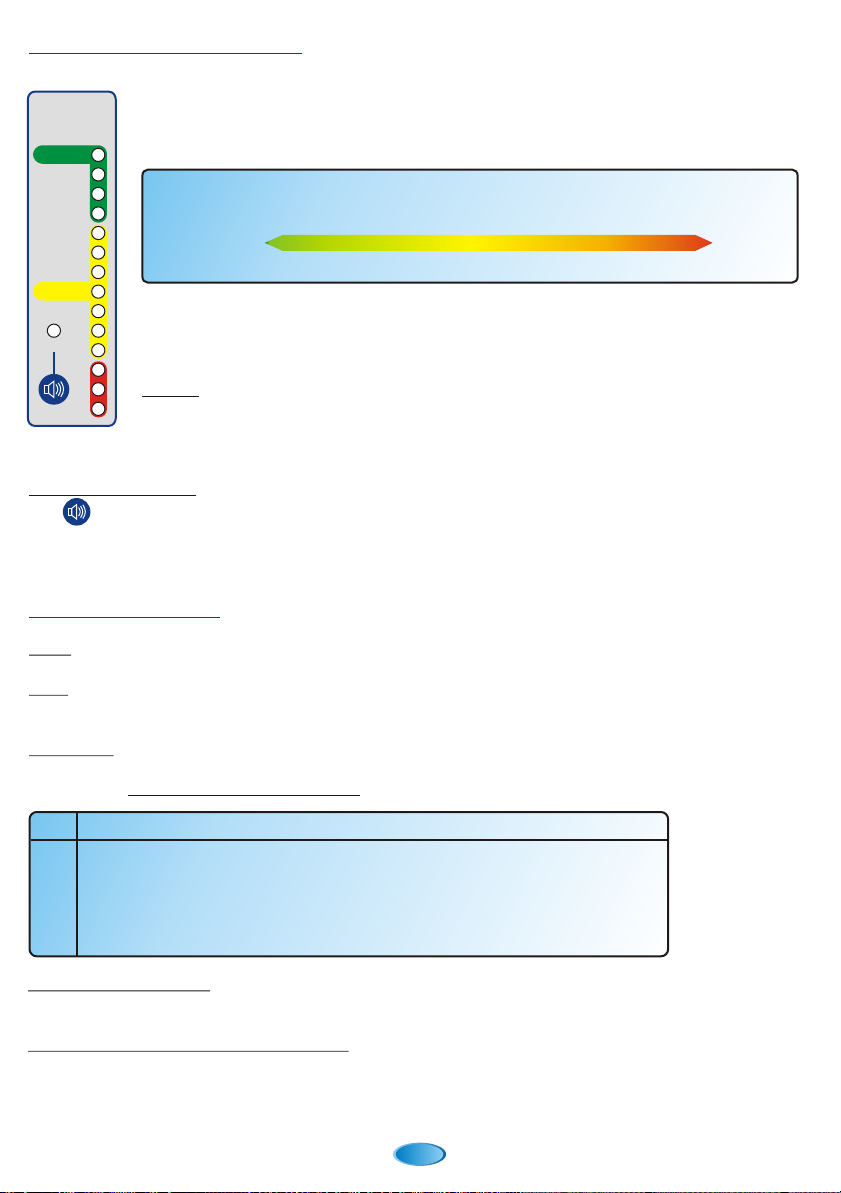
National Luna Weekender User manual

Portable Fridge / Freezer

NB. Never use sharp instruments to chip or loosen ice.
Defrosting
WARNING !
This
appliance
MUST be
earthed.
(E) Earth
Green and
Yellow
(N) Neutral
Blue
(L) Live
Brown
Do not store bottled food
or drinks when in the
freezer mode.
Do not use flammable sprays
near the refrigerator when it
is operating.
3
21
456
Never splash water / liquids
onto the refrigerator.
Do not operate the
refrigerator near flammable
gasses.
Do not put volatile chemicals
such as benzine in the
refrigerator.
This refrigerator is not
suitable for the storage of
corrosive chemicals.
Disconnect the refrigerator from the power supply before defrosting.
!Remove all food, drink and the basket from the refrigerator.
!Leave the refrigerator door open and allow any ice to melt. Do not chip or scrape ice with sharp instruments.
!Do not use strong solvents to clean the surface of the refrigerator.
!Once the ice has melted and the water has been removed, clean and dry the freezer with a soft cloth.
!Reconnect the power and check temperature settings.
!Replace the basket and any food or drink stored in the refrigerator once desired temperature is reached.
Failure to disconnect all power sources could result in electrical shock or personal injury!
Before use
!
If the supplied DC cable is re-wired, take
care to ensure correct polarity :
230V plug connection12V DC plug connection
The matching supply socket (located in vehicle)
must have the same polarity.
Centre pin - Positive, Outer shell - Negative
1

Freezing guide
Precautions during use
RECOMMENDED FREEZING TEMPERATURE SETTINGS
THIS STAR ICON MEANS
THAT THE APPLIANCE
HAS FREEZER
CAPABILITY.
THESE THREE STAR ICONS EACH
REPRESENT A -6°C ABILITY IN
COOLING TEMPERATURE.
(MAINTAINING -18°C)
3-STAR FREEZER
RATING GUIDE
FOR NON-FROZEN
FOODSTUFFS
6°C
FOR BEVERAGES.
0°C to 6°C
TO MAINTAIN FOOD IN
A FROZEN STATE
-6°C to -18°C
!For 230V operation, connect the refrigerator
to the 230V supply using the supplied cable.
If the cable is damaged or a replacement cable
is used, check the 3-pin plug wiring diagram on
page 1.
!When installing your
refrigerator, avoid areas
which may be exposed to
dampness as this may
adversely affect the
electrical insulation.
!For 12V operation, plug the supplied
DC cable into the matching receptacle on
the refrigerator side panel.
Do not use a damaged cable or loose-
fitting supply socket.
!Ensure that the refrigerator is positioned
with adequate clearance on all sides
for ventilation.
Top - Clear
Back, front and compressor side - 50mm
For secure mounting, use
the optional base mounting plate.
This plate locks the refrigerator in
position and prevents any
unnecessary movement.
21
34
Hint
7
!Keep the refrigerator
in a dry, well ventilated
area.
Keeping the refrigerator
away from sources of
heat and sunlight will
improve performance.
2
!Leave the lid open when
the refrigerator is not in
use.
This will help prevent odour
build-up.
56
!Do not tilt the refrigerator more than
35°when it is operating.

Connections and wiring
The supplied DC cable is intended to be used in conjunction with
a suitable DC supply socket.
It is recommended to install a dedicated high-quality socket with
22
adequate wiring (4mm to 6mm wire) connected via an in-line
fuse (minimum 15A) to the vehicle’s battery.
In vehicles equipped with dual-battery systems, it is preferable to
connect this socket to the auxiliary battery.
The supplied cable is suitable for two types of DC sockets ;
the more common “cigarette lighter” socket or the “Hella” type
socket. In order to fit the cable to the “Hella” socket, remove the
RED cap.
If the cable is used in the “cigarette lighter” socket, the RED cap
must be securely clipped in place.
Combination plug
Fuse replacement
If the Weekender fails to operate when
mains voltage is applied, check the input
fuse located under the power connection
point.
Slide the fuse draw open with a flat object
such as a screwdriver and remove the
fuse.
Replace fuse with same type and rating
to ensure safe operation. (3.15A 250V)
The Weekender can operate from a 12 volt battery or
230 Vac mains power.
To operate the Weekender on mains power, connect
the supplied cable to the 3-pin input on the side of the
refrigerator and then the the 230V supply.
Ensure the plug is correctly inserted in order to prevent
poor connections.
When using battery power, simply connect the polarised
DC cable to the corresponding input on the Weekender
and plug into the vehicles’ DC supply or to a fully-
charged battery.
230V AC
12V DC
Note that both 12V DC and 230V mains
can be connected at the same time.
When this is done, the Weekender will
automatically run on mains power.
If mains power is interrupted, the
Weekender will automatically switch to
DC power.
i
3

Features and controls
BATTERY PROTECTION SPEED CONTROL
5A
LIGHT
15A
MAIN
BATTERY
VOLTAGE
HIGH
11.6V 9.6V
LOW
TURBO
MANUAL
TURBO
AUTO
220V
RUN
FAULT ID
REVERSE
POLARITY
POWER PACK
OVER-TEMPERATURE
UP
DOWN
SET
MODE
“SET MODE” - PRESS DOWN FOR 3 SECONDS
14.2
13.7
13.2
13.0
12.6
12.5
12.4
12.2
12.1
12.0
11.8
11.6
11.4
12.3
NORMAL
ALARM
CHARGE
FUSE
BLOWN
FUSE
BLOWN
TEMPERATURE
THE FRIDGE WILL AUTOMATICALLY
DEFAULT TO THE HIGH CUT-OUT
SETTING WHEN INITIALLY
CONNECTING TO THE BATTERY.
SELECTING LOW WILL ALLOW THE
BATTERY TO BE COMPLETELY
DRAINED.
THE FRIDGE WILL OPERATE ON LOW-SPEED
WHEN CONNECTED TO A BATTERY BELOW 12.6V.
SHOULD THE USER REQUIRE MAXIMUM POWER,
PRESS THE MANUAL TURBO BUTTON.
THE FRIDGE AUTOMATICALLY SELECTS HIGH-
SPEED (AUTO TURBO) FOR BATTERY > 13.1V.
1.
2.
3.
4.
5.
6.
7.
8.
9.
Control panel
External features
12
3
46
57
8
9
Battery cut-out selector - choose between 11.6V and 9.6V
Running speed selector - choose AUTO turbo or MANUAL turbo.
Battery voltage display.
Low-voltage audible alarm on/off selector.
Temperature display.
Temperature UP / DOWN setting.
Status and error indicators.
Protection fuses for interior light and compressor.
Fuse-blown indicators.
1.
2.
3.
4.
5.
6.
7.
8.
9.
10.
Dual opening lid with handles
(pictured in front-opening configuration)
Interior light
Lockable latch
Stainless steel basket
Control panel
Alternative latch mounting holes
Carry handle
Electronics cooling fan
Mains input socket and fuse
DC input socket
7
8
9
10
1
2
3
5
4
6
4

DOWN
UP
SET
MODE
“SET MODE” - PRESS DOWN FOR 3 SECONDS
TEMPERATURE
BATTERY PROTECTION
HIGH
11.6V 9.6V
LOW
THE FRIDGE WILL AUTOMATICALLY
DEFAULT TO THE HIGH CUT-OUT
SETTING WHEN INITIALLY
CONNECTING TO THE BATTERY.
SELECTING LOW WILL ALLOW THE
BATTERY TO BE COMPLETELY
DRAINED.
SPEED CONTROL
TURBO
MANUAL
TURBO
AUTO
THE FRIDGE WILL OPERATE ON LOW-SPEED
WHEN CONNECTED TO A BATTERY BELOW 12.6V.
SHOULD THE USER REQUIRE MAXIMUM POWER,
PRESS THE MANUAL TURBO BUTTON.
THE FRIDGE AUTOMATICALLY SELECTS HIGH-
SPEED (AUTO TURBO) FOR BATTERY > 13.1V.
Setting the operating temperature
Using the speed control
Battery protection
The control panel of the Weekender is fitted with an easy to
operate temperature control and display.
During normal operation, the display will show the currently
measured internal temperature of the refrigerator.
To change the temperature setting, first enter the SET mode by pressing the button for
3 seconds. The SET MODE light will start to flash and the current temperature setting will be
displayed.
Press the or buttons to change the setting.
Once the desired setting is reached, release the buttons.
The new setting will take effect and the display will return
to the currently measured temperature after 10 seconds.
The thermostat is limited to
temperatures between 20°C
and -30°C
i
The Weekender features a 2-stage speed control for optimising
efficiency during running.
Running the refrigerator at high speed increases the cooling speed
and allows fridge contents to be cooled quickly.
Running at low speed reduces power consumption and optimises
effieciency.
The battery protection feature of the Weekender is designed to protect
batteries from being completely discharged. When the preset voltage is
reached, the Weekender will stop running and indicate a low-voltage error.
The user has the option to switch between two preset voltages by pressing
the button for 3 seconds. The chosen preset will be displayed.
The option exists to over-ride the automatic speed by pressing the speed control button for
3 seconds. When enabled, the MANUAL TURBO light will be illuminated and the Weekender
will run in high speed.
NOTE - When running at high speed, power consumption is increased.
A lead-acid battery at 11.6 volts is considered flat and should be recharged as soon as possible.
The 9.6V setting allows the user to force the Weekender to continue to run until 9.6 volts is
reached. Discharging a battery to this level is not recommended.
When connected to 230V mains power, the Weekender will default to the 9.6V setting.
5

BATTERY
VOLTAGE
14.2
13.7
13.2
13.0
12.6
12.5
12.4
12.2
12.1
12.0
11.8
11.6
11.4
12.3
NORMAL
ALARM
CHARGE
Battery voltage monitor
Status indicators
220V - This light will be illuminated when mains power is applied.
RUN - This indicator will be illuminated whenever the refrigerator
compressor is running. (either on mains or battery power)
FAULT ID. - This indicator is used to identify common faults. The light will
flash a sequence of pulses and then pause before repeating the code.
Refer to the Troubleshooting section Pg 8 for more details.
# of
flashes Fault description
The Weekender is fitted with a unique battery monitor on the control panel.
This monitor shows the voltage level applied to the 12V input. (Such as a battery)
As the battery becomes discharged, the monitor will show the drop in voltage , this
allows the user to be aware of available battery capacity.
In a vehicle, if the engine is running, the monitor should show a voltage between
13.2V and 14.2V. If this voltage is below this level, it is possible that the charging
system is damaged or that there is poor wiring.
Alarm: The monitor is fitted with a low-voltage alarm. This alarm will warn the user
of excessive battery discharge. In this case, the battery should be recharged as
soon as possible.
During a low-voltage alarm, an audible warning will be heard. (If enabled)
Enabling the alarm: The audible alarm is OFF by default but can be enabled by pressing
the button for 3 seconds. When enabled, the red ALARM light will be illuminated.
Perform the same procedure to disable the audible alarm.
REVERSE POLARITY - This indicator identifies that the power applied to the 12V input has the
incorrect polarity. Check all wiring connections for correct polarity.
POWER PACK OVER-TEMPERATURE - The Weekender has mult-stage over-temperature
protection. In the event that the electronics overheat, the refrigerator will automatically slow-down
(over-temperature light will flash). If temperatures continue to increase, the refrigerator will be
shut-down as a protection feature (over-temperature light will be permanently illuminated)
Battery voltage compared to capacity. (@ 25°C)
12.0V
1 .4V
2
12 V
.6
13.7V
10%50%75%100%
CHARGE
35%
FLAT
11.4V
Battery is being
charged.
Battery is
flat.
1 Low voltage. Battery is flat, there is poor wiring or poor connections.
2 Fan over-current cut-out. There is a problem with the ventilation fan.
3 Motor start error. The rotor is blocked or the system pressure is too high.
4 Minimum speed error. The motor cannot maintain a minimum speed of 1900 rpm.
5 Thermal cut-out. The electronic circuitry has over-heated.
6

Dual opening lid
Changing the lid hinging direction
Using the removeable hinges
A special feature of the Weekender is the ability for the user to change the hinging direction of the
lid. This feature is particularly useful in areas of limited space.
The Weekender is supplied with the lid in the front opening configuration. To change the hinging
direction follow these simple steps :
1. Remove both latches and lid handles from the
front using a flat screwdriver.
2. Re-fit one of the latches and lid handles to the
side of the refrigerator. Keep the spare parts in a
safe place.
3. Remove all three hinges from the rear of the
refrigerator.
4. Re-fit two of the hinges to the side of the
refrigerator. Keep the spare parts in a safe place.
Tip - Close the lid when changing the hinges.
This will help to keep the lid straight when
tightening the hinge screws.
i
Tip - The optional protection jacket has a
side pocket for the convenient storage of
spare hinges and latches.
i
If the location of the Weekender does not allow
the lid to be fully opened, the optional removeable
hinges can be used.
Allowing the lid to be completely removed.
!When the removeable hinges are fitted, remember to
keep a firm grip on the lid when opening to prevent
damage from accidentally dropping it.
Lid in side-opening configuration
7

Troubleshooting
Problem Possible cause Remedial action
In the event of unusual or undesired operation, consult the table below before contacting a
service agent.
8
The battery is low.
The DC supply has
inadequate wiring.
The ventilation fan is
blocked or damaged.
The fridge will not run
when connected to 12V,
but only when connected
to 230V mains.
Fault ID light flahes once
every 5 seconds.
Recharge the battery.
2
Ensure supply socket has 4mm wire
or thicker and the vehicle body is not
used as an earth.
Ensure all connections are secure.
Check the ventilation fan for
obstructions.
If the fan is broken, return the
refrigerator to an authorised agent for
repair.
The ventilation fan is
noisy or not running.
The Fault ID light is
flashing twice every
5 seconds.
The compressor failed
to start correctly or run
at its minimum speed.
If the refrigerator continues to show
the error for an extended period of
time, contact an authorised service
agent.
The Fault ID light is
flashing 3 or 4 times every
5 seconds.
The thermostat is not
correctly set.
The refrigerator is low
on refrigerant.
Set the desired temperature (Pg 5)
If the thermostat is correctly set and
there is no improvement after 10
minutes, contact an authorised
service agent.
The refrigerator is not
cooling down.
There are significant
cable losses.
When connected to
230V only, the monitor
is disabled.
Make sure the supply socket has
been installed with adequate wire
and good connections.
If another load (spotlight) is
connected to the same supply, cable
losses are magnified.
The battery voltage monitor
is not showing the correct
battery voltage.
The refrigerator is
connected to mains
power.
The button was not
pressed for long enough
When connected to mains power, the
speed will always default to HIGH.
The button must be pressed for 3-
seconds.
The speed control will not
change when the button
is pressed.

Optional accessories
Base locking plate
The Weekender can be securely mounted into
a vehicle, trailer or caravan with the base locking
plate.
The base plate can be securely bolted down to
a stable surface and allow the refrigerator to lock
into place.
The slide-lock mechanism ensures that the
refrigerator will not move or slide loose.
Protection jacket
The Weekender protection jacket fits snugly over
the refrigerator and provides protection from dents
and scratches.
The jacket features a removeable lid cover to
allow easy opening of the refrigerator in both lid
opening configurations.
The protection jacket also has a convenient
side-pocket for the storage of cables, spare
hinges and latches.
9
National Luna Split-charge systems
i
Portable Power Pack - This is a split-charge system in a
box. The system simply attaches to the vehicles’ charging
system and offers fused outputs for common appliances.
The plastic box can accomodate most standard automotive
batteries and features a slide-lock lid.
Installed split-charge system - This system is intended to be
installed into a vehicle permanently. The kit version of this
system has an isolator, dual monitor, cables, terminals,
in-line fuses, lugs, screws and cable ties.
This product provides a compact solution to
adding a secondary battery to your vehicle.
Stand-alone battery monitors are also available for
monitoring single or dual battery installations.

Warranty conditions
National Luna Limited Warranty
This National Luna Warranty supercedes any other advertised Guarantee or Warranty
provided with this appliance by any wholesaler or retailer.
National Luna warrants this product to be free from defects in materials and / or workmanship
under normal use and service to the original purchaser subject to the following :
1. At any time within THREE YEARS from the date of purchase by the original purchaser, National Luna
will at its discretion replace or repair without cost to the owner, and if necessary through an authorised
service agent, any part found to be defective by National Luna.
2. This warranty does not apply to light bulbs, pilot lights, fuses, cooling fan or item where the length of life
depends on the amount of use and care given.
3. The Danfoss BD35F compressor has a 1-year manufacturers guarantee.
Correct completion and submission of the Guarantee registration card supplied with this booklet allows
for an additional 2-year warranty to be provided by National Luna on the compressor.
4. Removal of the serial number on the appliance will render this warranty void.
5. National Luna shall not be responsible for any damages of any kind resulting from incorrect voltages or
faults with regards to power supply which falls outside of the appliance operating parameters.
6. National Luna shall not be responsible for damage to the appliance caused by negligent use, storage
of hazardous chemicals, use of corrosive substances, fire, flood, civil-disturbances, lightning or any
other natural phenomenon.
7. It is a condition of this warranty that National Luna shall not be responsible for transportation or any
costs incurred in transporting this appliance. (Including costs incurred by damage, incorrect packaging
or theft).
8. National Luna will not accept any responsibility for the loss or damage caused by, or due to, the
malfunctioning of this appliance.
9. National Luna shall not be held responsible for any injuries to persons caused by the incorrect or
negligent usage of this appliance.
10. Repair work to be done in terms of this warranty must be referred to National Luna for written
authorisation before any work is carried out.
11. National Luna reserves the right to refuse repair or service under warranty if the Gaurantee registration
card and original proof of purchase cannot be produced.
10
Serial No :
Model :
Date purchased :
Invoice No :
For tracking and warranty purposes, fill in the information below.
Dealer’s name / Stamp :

National Luna - South Africa
Tel : +27 (0)11 452-5438
Fax : +27 (0)11 452-5263
Specifications
lgeth
n
eigh
h t
width
External dimentions
(lid closed)
External dimentions
(lid open)
Weight
Internal volume
Power source 170V ~270V AC
9.6V ~ 16V DC
Refrigerant
Operating temperature
R134a (CFC free)
Power consumption 0.40A ( 230V AC )
2.50A ( 12.5V DC )
-30°C ~ 60°C
a
bc
d
e
f
Internal bin dimentions
a
b
c
d
e
f
- 392 mm
- 270 mm
- 389 mm
- 203 mm
- 198 mm
- 189 mm
710mm (L) x 385mm (W) x 506mm (H)
710mm (L) x 385mm (W) x 845mm (H)
23 Kg
approx. 52 litres
Supplied basket
L
W
D
- 210 mm
- 250 mm
- 165 mm
LW
D
www.nationalluna.com
Table of contents
Popular Freezer manuals by other brands

Thermo Forma
Thermo Forma 900 Series Operating and maintenance manual

Scan Cool
Scan Cool DKS62 instruction manual

Isotherm
Isotherm DR 160 INOX COMBO instruction manual

New Air
New Air AB-1200 owner's manual

Range Master
Range Master RSXSDL21 Deluxe User guide & installation & service instructions

Heinner
Heinner HFF-V280NFXF+ manual