nedis WIFIWP10GY User manual

ned.is/wiwp10gy
Wi-Fi Smart Irrigation Pump
automatically water up to 10 plants
WIFIWP10GY

t
y
u
i
8
q
w
5
3
2
1
7
9
4
e
r
6
aQuick start guide 4
cKurzanleitung 7
bGuide de démarrage rapide 10
dSnelstartgids 13
jGuida rapida all’avvio 17
hGuía de inicio rápido 20
iGuia de iniciação rápida 23
eSnabbstartsguide 26
gPika-aloitusopas 29
fHurtigguide 32
2Vejledning til hurtig start 35
kGyors beüzemelési útmutató 38
nPrzewodnik Szybki start 41
xΟδηγός γρήγορης εκκίνησης 45
1Rýchly návod 48
lRychlý návod 51
yGhid rapid de inițiere 54
A

7
8
4
2
1
3
5
6
B
C

4
Operating humidity 0 % – 90 % (RH)
Working water ow 23 L/hr
Working water
pressure
0.3 bar
Max. water pressure ≥ 200 kPa
Max. pumping height 3 m
Irrigation tube size 1/4"
Irrigation frequency 1 hour - 7 days
Irrigation duration 6 seconds - 30 minutes
Irrigation amount Manual irrigation: open
at any time
Automatic irritation:
accurate water output
Main parts (image A)
1Irrigation indicator LED
2Manual irrigation button
3Wi-Fi indicator LED
4Wi-Fi button
5Micro USB charging port
6Battery compartment
7Mounting clip
8Arrow drippers (10x)
9Cross connector (3x)
qTee connector (10x)
wStraight connector (3x)
eEnd plug (3x)
rWater lter
tWater inlet
yWater outlet
uIrrigation tube (10 m)
iMicro USB cable
App overview (image B)
1Remaining time until next irrigation
2Remaining time until current irrigation ends
3Working status
4Irrigation frequency
5Irrigation duration
6Enable or disable automatic irrigation
7Battery status
8Switch to activate or deactivate manual
irrigation
aQuick start guide
Wi-Fi Smart
Irrigation Pump
WIFIWP10GY
For more information see the extended
manual online: ned.is/wiwp10gy
Intended use
The Nedis WIFIWP10GY is a water control system
that allows you to wirelessly schedule automatic
irrigation via Wi-Fi connection.
The product can be controlled with the Nedis
SmartLife app.
This product is intended for indoor and outdoor use.
The product is not intended for professional use.
This product can be used by children aged from 8
years and above and persons with reduced physical,
sensory or mental capabilities or lack of experience
and knowledge if they have been given supervision
or instruction concerning use of the product in a safe
way and understand the hazards involved. Children
shall not play with the product. Cleaning and user
maintenance shall not be done by children without
supervision.
Any modication of the product may have
consequences for safety, warranty and proper
functioning.
Specications
Product Wi-Fi Smart Irrigation
Pump
Article number WIFIWP10GY
Dimensions (l x w x h) 81.5 x 87.5 x 77.5 mm
Weight 300g
Input voltage 5.0 VDC ; 1.0 A
Required power 5 W
Battery type 4 x 1.5 V AAA (not
included)
Max. radio transmit
power
17 dBm
Antenna gain 2.5 dBi
Frequency range 2.412 - 2.484 GHz
Operating temperature 3 °C - 50 °C

5
-
Do not use a USB power supply with a higher
voltage.
The Wi-Fi indicator LED A3blinks every 0.5 second
to indicate the product is ready for pairing.
3. Press and hold the Wi-Fi button A4to activate
the Wi-Fi pairing.
A3blinks every 1.5 seconds to indicate the product
is searching for a Wi-Fi network.
4. Tap + in the Nedis SmartLife app.
5. Select the device type you want to add from the
list.
6. Follow the instructions in the Nedis SmartLife
app.
4Make sure you connect the product to a 2.4 GHz
Wi-Fi network.
7. Rename the product after it has been found and
added.
8. After conrming you can control the product with
your smartphone.
To connect your SmartLife account to Amazon Alexa
and/or Google Home, set it up using the“Smart Life”
action or skill. For more details check the instruction
on either Amazon or Google.
Placing the batteries (optional)
The product works either on batteries or with a
micro USB cable and power adapter.
-
Disconnect the product from the power source
before placing or removing batteries.
-
Use only size AAA batteries (not included) for
this product.
1. Open the battery compartment A6.
2. Place 4 batteries into A6.
-
Make sure to match the (+) and (-) polarity
markings.
3. Close A6.
-
Make sure A6is completely closed to ensure
no water can run into A6.
A3blinks 0.5 second on and 3 seconds o to
indicate the batteries are connected.
Installing the product (image C)
1. Position the product and a water reservoir. Choose
between:
Option A:
Place the product on a at, stable surface.
Place a water reservoir close to the product.
Safety instructions
-
WARNING
• Ensure you have fully read and understood the
instructions in this document before you install or
use the product. Keep the packaging and this
document for future reference.
• Only use the product as described in this
document.
• Do not use the product if a part is damaged or
defective. Replace a damaged or defective product
immediately.
• Close supervision is necessary when the product is
used by or near children, animals or inrm persons.
Do not allow children to play with it or touch it.
• Keep the product out of reach from children.
• Battery usage by children should be supervised.
• Only use batteries that correspond with the
specications.
• Do not use any cell or battery that is not designed
for use with the product.
• Remove the battery before the product is
scrapped.
• This product may only be serviced by a qualied
technician for maintenance to reduce the risk of
electric shock.
Installing the Nedis SmartLife app
1. Download the Nedis Smartlife app for Android or
iOS on your phone via Google Play or the Apple
App Store.
2. Open the Nedis Smartlife app on your phone.
3. Create an account with your e-mail address and
tap Continue.
You will receive a verication code on your e-mail
address.
4. Enter the received verication code.
5. Create a password and tap Done.
6. Tap Add Home to create a SmartLife Home.
7. Set your location, choose the rooms you want to
connect with and tap Done.
Adding the product to the Nedis
SmartLife app
4Plugging the micro USB cable Aiis required
to connect the product to a Wi-Fi network.
1. Plug Aiinto the micro USB charging port A5.
2. Plug the other end of Aiinto a suitable 5.0 VDC
; 1.0 A USB power supply.

6
3. Set the desired irrigation frequency at How often
B4.
Select a delay between 1 hour and 7 days.
4. Set the desired irrigation duration at B5.
Select a duration between 6 seconds and 30
minutes.
5. Tap Auto Run B6to start the automatic
irrigation schedule.
After conrming the automatic irrigation settings,
the Working Status B3changes to Auto.
The product starts the countdown to the rst
irrigation at Next Irrigation B1.
The product starts irrigating for the selected
duration. The Remaining Watering Time B2
shows a countdown until the current irrigation ends.
When the rst irrigation has nished, the product
will irrigate again after the selected delay.
Status indicator LED
Irrigation
indicator LED
A1
Blinks every 0.5
second.
Lack of water.
Lights up. Irrigating.
Wi-Fi indicator
LED A3
Blinks every 0.5
second.
Ready for
pairing.
Blinks every 1.5
seconds.
Searching for a
Wi-Fi network.
Blinks every 3
seconds.
Batteries
almost empty.
Blinks 0.5
second on and
3 seconds o.
Batteries
connected.
Lights up. Paired with a
smartphone.
Declaration of Conformity
We, Nedis B.V. declare as manufacturer that the
product WIFIWP10GY from our brand Nedis®,
produced in China, has been tested according to all
relevant CE standards and regulations and that all
tests have been passed successfully. This includes,
but is not limited to the RED 2014/53/EU regulation.
The complete Declaration of Conformity (and the
safety datasheet if applicable) can be found and
downloaded via:
nedis.com/wiwp10gy#support
Option B:
Click the mounting clip A7on the back of the
product.
Use A7to mount the product to or near a water
reservoir.
2. Fill the water reservoir with water.
3. Press the irrigation tube Auinto the water inlet
At.
4. Cut a piece o Au. Make sure Aureaches the
bottom of the water reservoir.
5. Connect Auto the water lter Ar.
6. Place Auin the water reservoir.
7. Create an irrigation network using Auand the
provided connectors A9qw. See an installation
example in image C.
8. Insert the arrow drippers A8into the ends of
Aufor every irrigation point.
9. o any remaining tube ends of Auwith end
plugs Ae.
10. Connect the irrigation network to the water
outlet Ay.
Using the product
-
Disconnect the product when freezing
temperatures are expected, to avoid potential
freeze damage.
4Use the app to set and operate the product.
For more information about the working and
possibilities of the app, consult the extended manual
online.
Manual irrigation
1. Press the manual irrigation button A2to irrigate
the time set in the app.
The irrigation indicator LED A1lights up to indicate
the product is irrigating.
2. Press A2to manually stop the cycle.
Automatic irrigation
4Automatic irrigation is only available in the app.
4Plugging Aiis required to set or change the
automatic irrigation settings.
1. Plug Aiinto A5.
2. Plug the other end of Aiinto a suitable 5.0 VDC
; 1.0 A USB power supply.
-
Do not use a USB power supply with a higher
voltage.

7
Größe (L x B x H) 81.5 x 87.5 x 77.5 mm
Gewicht 300g
Eingangsspannung 5.0 VDC ; 1.0 A
Erforderliche Leistung 5 W
Batterietyp 4 x 1,5 V AAA (nicht
im Lieferumfang
enthalten)
Max. Funksendeleistung 17 dBm
Antennengewinn 2.5 dBi
Frequenzbereich 2.412 - 2.484 GHz
Betriebstemperatur 3 °C - 50 °C
Betriebsfeuchtigkeit 0 % – 90 % (rel.
Feuchte)
Betriebswasserdruck 23 l/h
Betriebswasserdruck 0.3 bar
Max. Wasserdruck ≥ 200 kPa
Max. Pumphöhe 3 m
Bewässerungsrohrgröße 1/4"
Häugkeit der
Bewässerung
1 Stunde - 7 Tage
Bewässerungsdauer 6 Sekunden - 30
Minuten
Bewässerungsmenge Manuelle
Bewässerung:
Jederzeit önen
Automatische
Bewässerung: genaue
Wasserausgabe
Hauptbestandteile (Abbildung A)
1Bewässerungs-Anzeige-LED
2Taste für manuelle Bewässerung
3WLAN-Anzeige-LED
4WLAN-Taste
5Mikro-USB Ladeanschluss
6Batteriefach
7Halterung
8Punkttropfer (10x)
9Kreuzverbindung (3x)
qT-Verbindung (10x)
wGerade Verbindung (3x)
eEndstopfen (3x)
rWasserlter
tWasserzulauf
For additional information regarding the
compliance, contact the customer service:
Web: www.nedis.com
E-mail: [email protected]
Nedis B.V., de Tweeling 28
5215 MC ’s-Hertogenbosch, the Netherlands
cKurzanleitung
WLAN-Smart-
Bewässerungspumpe
WIFIWP10GY
Weitere Informationen nden Sie in
der erweiterten Anleitung online:
ned.is/wiwp10gy
Bestimmungsgemäße Verwendung
Die Nedis WIFIWP10GY ist ein
Wassersteuerungssystem, mit dem Sie die
automatische Bewässerung kabellos über eine
WLAN-Verbindung planen können.
Das Produkt kann mit der Nedis SmartLife App
gesteuert werden.
Dieses Produkt ist zur Verwendung drinnen und
draußen gedacht.
Das Produkt ist nicht für den professionellen Einsatz
gedacht.
Kinder ab dem achten Lebensjahr und Personen
mit eingeschränkten körperlichen, sensorischen
oder geistigen Fähigkeiten oder ohne ausreichende
Erfahrung und Kenntnis dürfen dieses Produkt
nur dann verwenden, wenn sie beaufsichtigt
werden oder in die sichere Benutzung des Produkts
eingewiesen wurden und die bestehenden Gefahren
verstehen. Kinder dürfen nicht mit dem Produkt
spielen. Reinigung und Wartung durch den Benutzer
dürfen nicht von unbeaufsichtigten Kindern
durchgeführt werden.
Jegliche Modikation des Produkts kann Folgen
für die Sicherheit, Garantie und ordnungsgemäße
Funktionalität haben.
Spezikationen
Produkt WLAN-Smart-
Bewässerungspumpe
Artikelnummer WIFIWP10GY

8
• Dieses Produkt darf nur von einem ausgebildeten
Techniker gewartet werden, um die Gefahr eines
Stromschlags zu reduzieren.
Installation der Nedis SmartLife App
1. Laden Sie die Nedis SmartLife-App für Android
oder iOS aus dem Google Play Store oder dem
Apple App Store auf Ihr Smartphone.
2. Önen Sie die Nedis SmartLife-App auf Ihrem
Smartphone.
3. Erstellen Sie ein Konto mit Ihrer E-Mail-Adresse
und tippen Sie auf Weiter.
Sie erhalten einen Bestätigungscode an Ihre E-Mail-
Adresse gesandt.
4. Geben Sie den erhaltenen Bestätigungscode ein.
5. Erstellen Sie ein Passwort und tippen Sie auf Done
(Fertigstellung).
6. Tippen Sie auf Add Home (Familie hinzufügen),
um ein SmartLife-Zuhause zu erstellen.
7. Legen Sie Ihren Standort fest, wählen Sie die
Räume aus mit denen Sie eine Verbindung
herstellen möchten, und tippen Sie auf Done
(Fertigstellung).
Hinzufügen des Produkts zur Nedis
SmartLife-App
4Das Einstecken des Mikro-USB-Kabels Ai
ist erforderlich, um das Produkt mit einem
WLAN-Netzwerk.
1. Stecken Sie Aiin den Mikro-USB-Ladeanschluss
A5.
2. Verbinden Sie das andere Ende von Aimit einer
geeigneten 5.0VDC/1.0A USB-Stromversorgung
-
Verwenden Sie kein USB-Netzteil mit einer
höheren Spannung.
Die WLAN-Anzeige-LED A3blinkt alle
0.5Sekunden, um anzuzeigen, dass das Produkt für
die Kopplung bereit ist.
3. Drücken und halten Sie die WLAN-Taste A4, um
die Kopplung mit dem WLAN zu aktivieren.
A3blinkt alle 1.5Sekunden, um anzuzeigen,
dass das Produkt nach einem verfügbaren WLAN-
Netzwerk sucht.
4. Tippen Sie auf + in der Nedis SmartLife-App.
5. Wählen Sie den Gerätetyp, den Sie hinzufügen
möchten, aus der Liste aus.
yWasserauslass
uBewässerungsschlauch (10m)
iMicro-USB-Kabel
App-Übersicht (Abbildung B)
1Verbleibende Zeit bis zur nächsten
Bewässerung
2Verbleibende Zeit bis zum Ende der aktuellen
Bewässerung
3Betriebsstatus
4Häugkeit der Bewässerung
5Bewässerungsdauer
6Automatischen Bewässerung aktivieren oder
deaktivieren
7Batteriestatus
8Schalter zum Aktivieren oder Deaktivieren der
manuellen Bewässerung
Sicherheitshinweise
-
WARNUNG
• Vergewissern Sie sich, dass Sie die Anweisungen in
diesem Dokument vollständig gelesen und
verstanden haben, bevor Sie das Produkt
installieren oder verwenden. Heben Sie die
Verpackung und dieses Dokument zum späteren
Nachschlagen auf.
• Verwenden Sie das Produkt nur wie in diesem
Dokument beschrieben.
• Verwenden Sie das Produkt nicht, wenn ein Teil
beschädigt ist oder es einen Mangel aufweist.
Ersetzen Sie ein beschädigtes oder defektes
Produkt unverzüglich.
• Wird das Produkt von oder in der Nähe von
Kindern, Tieren oder hilfebedürftigen Personen
verwendet, ist eine aufmerksame Beaufsichtigung
erforderlich. Erlauben Sie Kindern nicht, mit dem
Gerät zu spielen oder es zu berühren.
• Halten Sie das Produkt stets von Kindern fern.
• Die Verwendung von Batterien durch Kinder sollte
beaufsichtigt werden.
• Verwenden Sie nur Batterien, die den
Spezikationen entsprechen.
• Verwenden Sie keine Akkus oder Batterien, die
nicht für die Verwendung mit dem Gerät
vorgesehen sind.
• Entfernen Sie die Batterien, bevor das Produkt
entsorgt wird.

9
Weitere Informationen zur Funktionsweise und
zu den Möglichkeiten der App nden Sie in der
erweiterten Anleitung online.
Manuelle Bewässerung
1. Drücken Sie die manuelle Bewässerungstaste
A2, um für die in der App eingestellte Dauer zu
bewässern.
Die Bewässerungs-Anzeige-LED A1leuchtet, um
anzuzeigen, dass das Produkt bewässert.
2. Drücken Sie A2, um die Abgabe manuell zu
beenden.
Automatische Bewässerung
4Die automatische Bewässerung ist nur in der
App verfügbar.
4Es ist erforderlich, Aieinzustecken, um
die Einstellungen für die automatische
Bewässerung zu setzen oder zu ändern.
1. Schließen Sie Aian A5an.
2. Verbinden Sie das andere Ende von Aimit einer
geeigneten 5.0VDC/1.0A USB-Stromversorgung
-
Verwenden Sie kein USB-Netzteil mit einer
höheren Spannung.
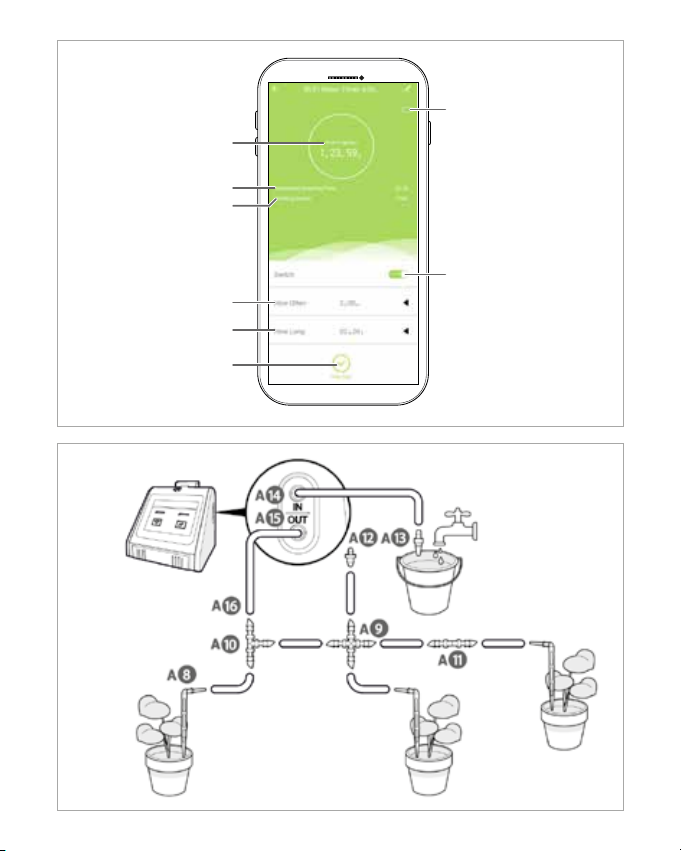
3. Stellen Sie die gewünschte
Bewässerungshäugkeit unter Wie oft B4ein.
Wählen Sie eine Verzögerung von 1 Stunden bis 7
Tagen.
4. Stellen Sie die gewünschte Bewässerungsdauer
unter B5ein.
Wählen Sie eine Dauer zwischen 6 Sekunden und
30 Minuten.
5. Tippen Sie auf Auto-Betrieb B6, um den
automatischen Bewässerungsplan zu starten.
Nach dem Bestätigen der automatischen
Bewässerungseinstellungen, wechselt der
Betriebsstatus B3zu Auto.
Das Produkt beginnt den Countdown zur ersten
Bewässerung unter Nächste Bewässerung B1.
Das Produkt beginnt mit der Bewässerung
für die gewählte Dauer. Die Verbleibende
Bewässerungszeit B2zeigt einen Countdown bis
zum Ende der aktuellen Bewässerung an.
Wenn die erste Bewässerung beendet ist, startet das
Produkt die Bewässerung erneut nach Ablauf der
gewählten Verzögerung.
6. Befolgen Sie die Anweisungen in der Nedis
SmartLife-App.
4Verbinden Sie das Produkt mit einem 2,4 GHz
WLAN-Netzwerk.
7. Geben Sie dem Produkt einen anderen Namen,
nachdem es gefunden und hinzugefügt wurde.
8. Nach dem Bestätigen können Sie das Produkt
über Ihr Smartphone steuern.
Um Ihr SmartLife-Konto mit Amazon Alexa und/oder
Google Home zu verbinden, richten Sie es einfach
über die„SmartLife“-Aktion oder den„Smart Life“-
Skill ein. Weitere Informationen dazu nden Sie in
der jeweiligen Anleitung von Amazon oder Google.
Einlegen der Batterien (optional)
Das Produkt funktioniert entweder mit Batterien
oder mit einem Mikro-USB-Kabel und einem
Netzadapter.
-
Trennen Sie das Produkt von der
Stromversorgung, bevor Sie Akkus einsetzen oder
entfernen.
-
Verwenden Sie für dieses Produkt nur Batterien
der Größe AAA (nicht im Lieferumfang enthalten).
1. Önen Sie das Batteriefach A6.
2. Setzen Sie 4 Batterien in A6ein.
-
Achten Sie dabei auf die korrekte Ausrichtung
der (+) und (-) Pol-Markierungen.
3. Schließen Sie A6.
-
Stellen Sie sicher, dass A6vollständig
geschlossen ist, damit kein Wasser in A6
eindringen kann.
A3blinkt 0.5Sekunde ein und 3Sekunden aus,
um anzuzeigen, dass die Batterien korrekt eingelegt
sind.
Installation des Produkts
(Abbildung C)
Siehe Abbildung C für eine Verbindungsübersicht.
Verwenden des Produkts
-
Entfernen Sie das Produkt, wenn Temperaturen
unter dem Gefrierpunkt zu erwarten sind, um
mögliche Frostschäden zu vermeiden.
4Verwenden Sie die App, um das Produkt
einzustellen und zu bedienen.

10
bGuide de démarrage rapide
Pompe d’arrosage
Wi-Fi Smart
WIFIWP10GY
Pour plus d'informations, consultez
le manuel détaillé en ligne :
ned.is/wiwp10gy
Utilisation prévue
Le Nedis WIFIWP10GY est un système de commande
d’eau qui vous permet de programmer sans l un
arrosage automatique via une connexion Wi-Fi.
Le produit peut être contrôlé avec l’application
Nedis SmartLife.
Le produit est prévu pour un usage intérieur et
extérieur.
Le produit n’est pas destiné à un usage
professionnel.
Ce produit peut être utilisé par des enfants
âgés de 8 ans et plus ainsi que des personnes
ayant des capacités physiques, sensorielles ou
mentales réduites ou manquant d’expérience et
de connaissances s’ils sont supervisés ou ont reçu
des instructions sur l’utilisation du produit en toute
sécurité et comprennent les dangers impliqués.
Les enfants ne doivent pas jouer avec le produit. Le
nettoyage et la maintenance ne doivent pas être
eectués par des enfants sans surveillance.
Toute modication du produit peut avoir des
conséquences sur la sécurité, la garantie et le bon
fonctionnement.
Spécications
Produit Pompe d’arrosage Wi-Fi
Smart
Article numéro WIFIWP10GY
Dimensions (L x l x H) 81.5 x 87.5 x 77.5 mm
Poids 300g
Tension d’entrée 5.0 VDC ; 1.0 A
Puissance requise 5 W
Type de batterie 4 x 1,5 V AAA (non
incluses)
Puissance max. de
transmission radio
17 dBm
Statusanzeige-LED
Bewässerungs-
Anzeige-LED
A1
Blinkt alle
0.5Sekunden.
Wassermangel.
Leuchtet auf. Bewässerung
im Gange.
WLAN-Anzeige-
LED A3
Blinkt alle
0.5Sekunden.
Bereit zum
Koppeln.
Blinkt alle
1.5Sekunden.
Suche nach
einem WLAN-
Netzwerk
läuft.
Blinkt alle
3Sekunden.
Die Batterien
sind fast leer.
Blinkt
0.5Sekunde
ein und
3Sekunden
aus.
Batterien
eingelegt.
Leuchtet auf. Mit einem
Smartphone
gekoppelt.
Konformitätserklärung
Wir, Nedis B.V., erklären als Hersteller, dass das
Produkt WIFIWP10GY unserer Marke Nedis®,
produziert in China, nach allen geltenden CE-
Standards und Vorschriften getestet wurde und alle
diese Tests erfolgreich bestanden hat. Dies gilt unter
anderem auch für die Richtlinie RED 2014/53/EU.
Die vollständige Konformitätserklärung (und das
Sicherheitsdatenblatt, falls zutreend) steht zum
Download zur Verfügung unter:
nedis.de/wiwp10gy#support
Weiterführende Informationen zur Compliance
erhalten Sie über den Kundenservice:
Web: www.nedis.com
E-Mail: [email protected]
Nedis B.V., de Tweeling 28
5215 MC ’s-Hertogenbosch, Niederlande

11
3Statut de fonctionnement
4Fréquence d’arrosage
5Durée de l’arrosage
6Activer ou désactiver l’arrosage automatique
7Statut des piles
8Commutateur pour activer ou désactiver
l’arrosage manuel
Consignes de sécurité
-
AVERTISSEMENT
• Assurez-vous d'avoir entièrement lu et compris les
instructions de ce document avant d'installer ou
d'utiliser le produit. Conservez l'emballage et le
présent document pour référence ultérieure.
• Utilisez le produit uniquement comme décrit dans
le présent document.
• Ne pas utiliser le produit si une pièce est
endommagée ou défectueuse. Remplacez
immédiatement un produit endommagé ou
défectueux.
• Une surveillance étroite est nécessaire lorsque le
produit est utilisé par ou à proximité d'enfants,
d'animaux ou de personnes inrmes. Ne pas
permettre aux enfants de jouer avec ou de le
toucher.
• Gardez le produit hors de portée des enfants.
• L'utilisation de la batterie par des enfants doit être
surveillée.
• N’utilisez que des piles conformes aux
spécications.
• N'utiliser aucune pile ou batterie qui n'est pas
conçue pour être utilisée avec le produit.
• Retirez les piles avant de mettre le produit au
rebut.
• Ce produit ne peut être réparé que par un
technicien qualié an de réduire les risques
d'électrocution.
Installez l'application Nedis
SmartLife
1. Téléchargez l'application Nedis Smartlife pour
Android ou iOS sur votre téléphone via Google
Play ou l’App Store d’Apple.
2. Ouvrez l'application Nedis Smartlife sur votre
téléphone.
3. Créez un compte avec votre adresse e-mail et
appuyez sur Continuer.
Gain de l’antenne 2.5 dBi
Gamme de fréquences 2.412 - 2.484 GHz
Température
fonctionnement
3 °C - 50 °C
Humidité en
fonctionnement
0 % – 90 % (HR)
Débit d’eau de service 23 L/h
Pression d’eau de
service
0.3 bars
Pression d’eau maxi ≥ 200 kPa
Hauteur de pompage
maxi
3 m
Taille du tuyau
d’arrosage
1/4"
Fréquence d’arrosage 1 heure - 7 jours
Durée de l’arrosage 6 secondes - 30 minutes
Quantité d’arrosage Arrosage manuel :
ouvert à tout moment
Arrosage automatique :
débit d’eau précis
Pièces principales (image A)
1Voyant LED d’arrosage
2Bouton d’arrosage manuel
3LED d’indication Wi-Fi
4Bouton Wi-Fi
5Port de charge micro USB
6Compartiment à piles
7Clip de montage
8Dispositifs goutte à goutte échés (10X)
9Raccord en croix (3x)
qRaccord en T (10X)
wRaccord droit (3X)
eBouchon d’extrémité (3X)
rFiltre à eau
tArrivée d'eau
ySortie d'eau
uTuyau d’arrosage (10 m)
iCâble micro USB
Aperçu de l'application (image B)
1Temps restant jusqu’au prochain arrosage
2Durée restante jusqu’à la n de l’arrosage en
cours

12
Insérer les piles (en option)
Le produit fonctionne soit sur piles, soit avec un
câble micro-USB et un adaptateur secteur.
-
Débranchez le produit de la source
d'alimentation avant de mettre ou de retirer
des piles.
-
Utilisez uniquement des piles AAA (non fournies)
pour ce produit.
1. Ouvrir le compartiment à piles A6.
2. Mettez 4 piles dans A6.
-
Assurez-vous de faire correspondre les repères
de polarité (+) et (-).
3. Fermez A6.
-
Assurez-vous que A6soit complètement fermé
an d’éviter que de l’eau ne puisse pénétrer
dans A6.
A3clignote 0.5 seconde allumé et 3 secondes
éteint pour indiquer que les piles sont connectées.
Installer le produit (image C)
Voir l'image C pour un aperçu de la connexion.
Utiliser le produit
-
Débranchez le produit lorsque des températures
glaciales sont attendues an d’éviter tout
dommage potentiel dû au gel.
4Utilisez l’application pour congurer et utiliser
le produit.
Pour plus d’informations sur le fonctionnement et
les possibilités de l’application, consultez le manuel
détaillé en ligne.
Arrosage manuel
1. Appuyez sur le bouton d’arrosage manuel A2
pour arroser la durée dénie dans l’application.
Le voyant LED d’arrosage A1s’allume pour
indiquer que le produit est en cours d’arrosage.
2. Appuyez sur A2pour arrêter manuellement le
cycle.
Arrosage automatique
4L’arrosage automatique n’est disponible que
dans l’application.
4Le branchement de Aiest requis pour
dénir ou modier les paramètres d’arrosage
automatique.
1. Branchez Aidans A5.
2. Branchez l’autre extrémité de Aidans une
Vous recevrez un code de vérication sur votre
adresse e-mail.
4. Entrez le code de vérication reçu.
5. Créez un mot de passe et appuyez sur Done
(Terminé).
6. Appuyez sur Add Home (Ajouter les familles) pour
créer une maison SmartLife.
7. Dénissez votre emplacement, choisissez les
pièces avec lesquelles vous souhaitez vous
connecter et appuyez sur Done (Terminé).
Ajouter le produit à l’application
Nedis SmartLife
4Le branchement du câble micro-USB Aiest
requis pour connecter le produit à un réseau
Wi-Fi.
1. Branchez Aiau port de charge micro-USB A5.
2. Branchez l’autre extrémité de Aidans une
source d’alimentation USB adaptée de 5.0 VCC ;
1.0 A.
-
Ne pas utiliser d’alimentation USB d’une tension
plus élevée.
Le voyant LED duWi-Fi A3clignote toutes les 0.5
seconde pour indiquer que le produit est prêt pour
l’appairage.
3. Appuyez et maintenez le bouton Wi-Fi A4pour
activer l’appairage du Wi-Fi.
A3clignote toutes les 1.5 seconde pour indiquer
que le produit recherche un réseauWi-Fi.
4. Appuyez sur + dans l'application Nedis SmartLife.
5. Sélectionnez le type d’appareil que vous
souhaitez ajouter dans la liste.
6. Suivez les instructions dans l’application Nedis
SmartLife.
4Assurez-vous de connecter le produit à un
réseau Wi-Fi de 2,4 GHz.
7. Renommez le produit après l'avoir trouvé et
ajouté.
8. Après conrmation, vous pouvez contrôler le
produit avec votre smartphone.
Pour connecter votre compte SmartLife à Amazon
Alexa et/ou Google Home, congurez-le à l'aide de
l'action ou de la compétence « Smart Life ». Pour plus
de détails, consultez les instructions sur Amazon
ou Google.

13
Déclaration de conformité
Nous, Nedis B.V., déclarons en tant que fabricant que
le produit WIFIWP10GY de notre marque Nedis®,
produit en Chine, a été testé conformément à toutes
les normes et réglementations CE en vigueur et
que tous les tests ont été réussis. Cela inclut, sans
toutefois s'y limiter, la directive RED 2014/53/UE.
La Déclaration de conformité complète (et la che
de sécurité le cas échéant) peut être trouvée et
téléchargée via:
nedis.fr/wiwp10gy#support
Pour plus d'informations sur la conformité, contactez
le service client:
Site Web: www.nedis.com
E-mail: [email protected]
Nedis B.V., de Tweeling 28
5215 MC ’s-Hertogenbosch, Pays-Bas
dSnelstartgids
Wi Slimme
Bewateringspomp
WIFIWP10GY
Zie voor meer informatie de uitgebreide
handleiding online: ned.is/wiwp10gy
Bedoeld gebruik
De Nedis WIFIWP10GY is een waterregelsysteem
waarmee u draadloos via een wi-verbinding
automatische bewatering kunt instellen.
Het product kan met de Nedis SmartLife app worden
bediend.
Dit product kan binnen en buiten worden gebruikt.
Het product is niet bedoeld voor professioneel
gebruik.
Dit product mag worden gebruikt door kinderen van
8 jaar en ouder en personen met een verminderd
lichamelijk, zintuiglijk of geestelijk vermogen, of die
gebrek aan ervaring of kennis hebben, als iemand
die verantwoordelijk is voor hun veiligheid toezicht
op hen houdt of hen is uitgelegd hoe het product
veilig dient te worden gebruikt en ze begrijpen wat
de potentiële risico's zijn. Kinderen mogen niet met
het product spelen. De reiniging en het onderhoud
door de gebruiker mogen niet worden uitgevoerd
door kinderen zonder toezicht.
source d’alimentation USB adaptée de 5.0 VCC ;
1.0 A.
-
Ne pas utiliser d’alimentation USB d’une tension
plus élevée.
3. Réglez la fréquence d’arrosage souhaitée sur How
often (Quelle fréquence) B4.
Sélectionnez un délai entre 1 heure et 7 jours.
4. Réglez la durée d’arrosage souhaitée sur B5.
Sélectionnez une durée entre 6 secondes et 30
minutes.
5. Appuyez sur Auto Run (Marche auto) B6pour
démarrer le programme d’arrosage automatique.
Après avoir conrmé les paramètres d’arrosage
automatique, le Working Status (Statut de
fonctionnement) B3passe sur Auto.
Le produit démarre le compte à rebours jusqu’au
premier arrosage sur Next Irrigation (Arrosage
suivant) B1.
Le produit commence l’arrosage pendant la durée
sélectionnée. Le Remaining Watering Time (Temps
d’arrosage restant) B2ache un compte à rebours
jusqu’à la n de l’arrosage en cours.
Une fois le premier arrosage terminé, le produit
arrose de nouveau après le délai sélectionné.
Voyant LED d’état
Voyant LED
d’arrosage
A1
Clignote
toutes les 0.5
seconde.
Manque d’eau.
S’allume. Arrosage en
cours.
Voyant LED
Wi-Fi A3
Clignote
toutes les 0.5
seconde.
Prêt pour
l’appairage.
Clignote
toutes les 1.5
secondes.
Recherche
d’un réseau
Wi-Fi.
Clignote toutes
les 3 secondes.
Les piles
sont presque
déchargées.
Clignote toutes
les 0.5 seconde
allumé et 3
secondes
éteint.
Batteries
connectées.
S’allume. Appairé à un
smartphone.

14
5Micro-USB oplaadpoort
6Batterijcompartiment
7Montageclip
8Pijldruppelaars (10x)
9Kruisstuk (3x)
qT-stuk (10x)
wRechte verbinding (3x)
eEindplug (3x)
rWaterlter
tWatertoevoer
yWateruitvoer
uBewateringsbuis (10 m)
iMicro USB-kabel
App-overzicht (afbeelding B)
1Resterende tijd tot volgende irrigatie
2Resterende tijd tot de actuele bewatering stopt
3Werkstatus
4Bewateringsfrequentie
5Bewateringsduur
6Automatische bewatering in- of uitschakelen
7Batterijstatus
8Schakelaar om handmatige bewatering in- of
uit te schakelen
Veiligheidsvoorschriften
-
WAARSCHUWING
• Zorg ervoor dat u de instructies in dit document
volledig gelezen en begrepen heeft voordat u het
product installeert of gebruikt. Bewaar de
verpakking en dit document voor toekomstig
gebruik.
• Gebruik het product alleen zoals in dit document
beschreven.
• Gebruik het product niet als een onderdeel
beschadigd of defect is. Vervang een beschadigd
of defect product onmiddellijk.
• Nauwlettend toezicht is noodzakelijk wanneer het
product door of in de buurt van kinderen, dieren
of zwakbegaafde personen wordt gebruikt. Laat
kinderen er niet mee spelen of het aanraken.
• Houd het product buiten bereik van kinderen.
• Gebruik van de batterij door kinderen moet onder
toezicht staan.
• Gebruik uitsluitend batterijen die aan de
specicaties voldoen.
Elke wijziging van het product kan gevolgen hebben
voor de veiligheid, garantie en correcte werking.
Specicaties
Product Wi Slimme
Bewateringspomp
Artikelnummer WIFIWP10GY
Afmetingen (l x b x h) 81.5 x 87.5 x 77.5
mm
Gewicht 300g
Ingangsspanning 5.0 VDC ; 1.0 A
Vereist vermogen 5 W
Batterijtype 4 x 1,5 V AAA (niet
meegeleverd)
Max. zendvermogen van
de radio
17 dBm
Antenneversterking 2.5 dBi
Frequentiebereik 2.412 - 2.484 GHz
Bedrijfstemperatuur 3 °C - 50 °C
Operationele vochtigheid 0 % – 90 % (RV)
Operationeel waterdebiet 23 L/uur
Operationele waterdruk 0.3 bar
Max. waterdruk ≥ 200 kPa
Max. pomphoogte 3 m
Diameter
bewateringsbuis
1/4"
Bewateringsfrequentie 1 uur - 7 dagen
Bewateringsduur 6 seconden - 30
minuten
Bewateringshoeveelheid Handmatige
bewatering: open op
elk gewenst moment
Automatische
bewatering:
nauwkeurige
waterafgifte
Belangrijkste onderdelen
(afbeelding A)
1Bewateringsindicatie LED
2Handmatige bewateringsknop
3WiFi-indicatie LED
4Wi-knop

15
4Zorg ervoor dat u het product met een 2,4 GHz
Wi-Fi-netwerk verbindt.
7. Hernoem het product nadat het gevonden en
toegevoegd is.
8. Na bevestiging kunt u het product met uw
smartphone bedienen.
Om uw SmartLife-account met Amazon Alexa en/of
Google Home te verbinden, stel deze met de "Smart
Life"-actie of -vaardigheid in. Voor meer informatie
raadpleeg de instructies op Amazon of Google.
Het plaatsen van de batterijen
(optioneel)
Het product werkt op batterijen of met een micro-
USB-kabel en voedingsadapter.
-
Haal de stekker van het product uit de
voedingsbron voordat u de batterijen plaatst of
verwijdert.
-
Gebruik voor dit product uitsluitend AAA-
batterijen (niet meegeleverd).
1. Open het batterijcompartiment A6.
2. Plaats 4 batterijen in A6.
-
Zorg ervoor dat de (+) en (-)
polariteitsaanduidingen overeenkomen.
3. Sluit A6.
-
Zorg ervoor dat A6helemaal gesloten is, zodat
er geen water in A6kan lopen.
A3knippert 0.5 seconden aan en 3 seconden uit
om aan te geven dat de batterijen aangesloten zijn.
Het product installeren (afbeelding C)
Zie afbeelding C voor een verbindingsoverzicht.
Het product gebruiken
-
Om mogelijke schade door bevriezing te
voorkomen, moet u het product loskoppelen
wanneer er vorst wordt verwacht.
4Gebruik de app om het product in te stellen en
te bedienen.
Zie de uitgebreide online handleiding voor meer
informatie over de werking en mogelijkheden van
de app.
• Gebruik geen cel of batterij die niet bedoeld is
voor gebruik met de apparatuur.
• Verwijder de batterijen voordat het product wordt
afgedankt.
• Dit product mag voor onderhoud alleen worden
geopend door een erkend technicus om het risico
op elektrische schokken te verkleinen.
De Nedis SmartLife app installeren
1. Download de Nedis Smartlife app voor Android
of iOS op je telefoon via Google Play of de Apple
App Store.
2. Open de Nedis Smartlife app op je telefoon.
3. Maak met uw e-mailadres een account aan en tik
op Continue (Verder).
U ontvangt een vericatiecode op uw e-mailadres.
4. Voer de ontvangen vericatiecode in.
5. Maak een wachtwoord aan en tik op Done
(Voltooid).
6. Tik op Add Home (Huis toevoegen) om een
SmartLife-huis aan te maken.
7. Stel je locatie in, kies de ruimtes waar je mee wilt
verbinden en tik op Voltooid.
Het product toevoegen aan de Nedis
SmartLife app
4Om het product met een Wi-netwerk te
verbinden, moet u de micro-USB-kabel Ai
aansluiten.
1. Sluit Aiaan op de micro USB-oplaadpoort A5.
2. Steek het andere uiteinde van Aiin een
geschikte 5.0 VDC ; 1.0 A USB-voeding.
-
Gebruik geen USB-voeding met een hogere
spanning.
De Wi-indicatie LED A3knippert om de 0.5
seconden om aan te geven dat het product
gekoppeld kan worden.
3. Houd de Wi-knop A4ingedrukt om het
koppelen met Wi te activeren.
A3knippert om de 1.5 seconden om aan te geven
dat het product naar een Wi-netwerk zoekt.
4. Tik op + in de Nedis SmartLife app.
5. Selecteer het apparaattype dat u wilt toevoegen
in de lijst.
6. Volg de aanwijzingen in de Nedis SmartLife app
op.

16
Led-statusindicator
Bewateringsindicatie
LED A1
Knippert
om de 0.5
seconde.
Watergebrek.
Gaat
branden.
Bewateren.
Wi-indicatie LED
A3
Knippert
om de 0.5
seconde.
Klaar om te
koppelen.
Knippert
om de 1.5
seconde.
Zoeken
naar een
Wi-netwerk.
Knippert
om de 3
seconde.
Batterijen
bijna leeg.
Knippert
0.5
seconden
aan en 3
seconden
uit.
Batterijen
aangesloten.
Gaat
branden.
Gekoppeld
met een
smartphone.
Conformiteitsverklaring
Wij, Nedis B.V., verklaren als fabrikant dat het
product WIFIWP10GY van ons merk Nedis®,
geproduceerd in China, is getest conform alle
relevante CE-normen en -voorschriften en dat alle
tests met succes zijn doorstaan. Dit omvat, maar is
niet beperkt tot de richtlijn RED 2014/53/EU.
De volledige conformiteitsverklaring (en het blad
met veiligheidsgegevens indien van toepassing) kan
worden gevonden en gedownload via
nedis.nl/wiwp10gy#support
Voor andere informatie met betrekking tot de
naleving neemt u contact op met de klantenservice:
Web: www.nedis.nl
E-mail: [email protected]
Nedis B.V., de Tweeling 28
5215 MC ’s-Hertogenbosch, Nederland
Handmatige bewatering
1. Druk op de handmatige bewateringsknop A2
om gedurende de in de app ingestelde tijd te
bewateren.
De bewateringsindicatie LED A1gaat branden
om aan te geven dat het product bezig is met
bewateren.
2. Druk op A2om de cyclus handmatig te stoppen.
Automatische bewatering
4Automatische bewatering is uitsluitend
beschikbaar in de app.
4Om de automatische bewateringsinstellingen in
te stellen of te wijzigen, moet u Aiaansluiten.
1. Sluit Aiaan op A5.
2. Steek het andere uiteinde van Aiin een
geschikte 5.0 VDC ; 1.0 A USB-voeding.
-
Gebruik geen USB-voeding met een hogere
spanning.
3. Stel de gewenste bewateringsfrequentie in bij
Hoe vaak B4.
Selecteer een vertraging tussen 1 uur en 7 dagen.
4. Stel bij B5de gewenste bewateringsduur in.
Kies een bewateringsduur tussen 6 seconden en 30
minuten.
5. Tik op Auto Run B6om de ingestelde
automatische bewatering te starten.
Na het bevestigen van de automatische
bewateringsinstellingen, verandert de Werkstatus
B3in Auto.
Bij Volgende Bewatering B1begint het product
met het aftellen naar de eerste bewatering.
Gedurende de gekozen bewateringsduur begint
het product met bewateren. De Resterende
bewateringstijd B2toont een aftelling tot de
actuele bewatering eindigt.
Zodra de eerste bewatering beëindigd is, zal het
product na de geselecteerde vertraging opnieuw
gaan bewateren.

17
Guadagno antenna 2.5 dBi
Intervallo di frequenza 2.412 - 2.484 GHz
Temperatura di
funzionamento
3 °C - 50 °C
Umidità d’esercizio 0 % – 90 % (RH)
Flusso d’acqua in
condizioni d’esercizio
23 L/h
Pressione d’esercizio 0.3 bar
Max. pressione
dell’acqua
≥ 200 kPa
Max. altezza di
aspirazione della
pompa
3 m
Dimensioni del tubo di
irrigazione
1/4"
Frequenza di
irrigazione
1 ora - 7 giorni
Durata di irrigazione 6 secondi - 30 minuti
Portata di irrigazione Irrigazione manuale:
apertura in qualsiasi
momento
Irrigazione automatica:
quantità di acqua
precisa
Parti principali (immagine A)
1Spia LED di irrigazione
2Pulsante di irrigazione manuale
3Spia LED Wi-Fi
4Pulsante Wi-Fi
5Porta di ricarica micro USB
6Vano batteria
7Gancio di montaggio
8Gocciolatori con astina (10x)
9Giunto a croce (3x)
qGiunto a T (10x)
wGiunto dritto (3x)
eTappo (3x)
rFiltro dell’acqua
tIngresso dell’acqua
yBocchetta dell'acqua
uTubo di irrigazione (10 m)
iCavo micro USB
jGuida rapida all’avvio
Centralina di
irrigazione
intelligente Wi-Fi
WIFIWP10GY
Per maggiori informazioni
vedere il manuale esteso online:
ned.is/wiwp10gy
Uso previsto
Il Nedis WIFIWP10GY è un sistema di irrigazione che
permette di programmare automaticamente i cicli di
irrigazione tramite connessione Wi-Fi.
Il prodotto può essere controllato con l’app Nedis
SmartLife.
Questo prodotto è inteso per utilizzo in interni e in
esterni.
Il prodotto non è inteso per utilizzi professionali.
Il prodotto può essere utilizzato da bambini che
hanno compiuto almeno 8 anni e da persone con
capacità siche, sensoriali e mentali ridotte o che
non dispongono di esperienza e conoscenza in
materia solo se monitorati o istruiti sull’uso sicuro
del prodotto e solo se in grado di capire i rischi
connessi. I bambini non devono giocare con il
prodotto. Le operazioni di pulizia e manutenzione
non possono essere eettuate da bambini non
sorvegliati.
Eventuali modiche al prodotto possono
comportare conseguenze per la sicurezza, la
garanzia e il corretto funzionamento.
Speciche
Prodotto Centralina di irrigazione
intelligente Wi-Fi
Numero articolo WIFIWP10GY
Dimensioni (p x l x a) 81.5 x 87.5 x 77.5 mm
Peso 300g
Tensione in ingresso 5.0 VDC ; 1.0 A
Potenza necessaria 5 W
Tipo batteria 4 x 1,5 V AAA (non
incluse)
Potenza di
trasmissione radio max
17 dBm

18
2. Aprire l’app Nedis Smartlife sul telefono.
3. Creare un account con il proprio indirizzo e-mail e
premere Continua.
Si riceverà un codice di verica sul proprio indirizzo
e-mail.
4. Immettere il codice di verica ricevuto.
5. Creare una password e toccare Fatto.
6. Toccare Aggiungi Casa per creare una casa
SmartLife.
7. Impostare la propria posizione, scegliere gli
ambienti a cui collegarsi e toccare Fatto.
Come aggiungere il prodotto
sull’app Nedis SmartLife
4Per collegare il prodotto alla rete Wi-Fi è
necessario inserire il cavo micro USB Ai.
1. Inserire Ainella porta di ricarica micro USB
A5.
2. Collegare l’altra estremità di Aia un’adeguata
sorgente di alimentazione USB da 5.0 VDC ; 1.0 A.
-
Non usare una sorgente di alimentazione USB
con una tensione superiore.
La spia LED del Wi-Fi A3lampeggerà ogni 0.5
secondi per indicare che il prodotto è pronto per
essere associato.
3. Tenere premuto il pulsante del Wi-Fi A4per
associare il Wi-Fi.
A3lampeggerà ogni 1.5 secondi per indicare che il
prodotto sta cercando una rete Wi-Fi.
4. Premere + nell’app Nedis SmartLife.
5. Selezionare il tipo di dispositivo che si desidera
aggiungere dall’elenco.
6. Seguire le istruzioni nell’app Nedis SmartLife.
4Assicurarsi di collegare il prodotto a una rete
Wi-Fi a 2.4 GHz.
7. Dare un nuovo nome al prodotto una volta che è
stato trovato e aggiunto.
8. Vericare di poter controllare il prodotto con il
proprio smartphone.
Per collegare il proprio account SmartLife ad
Amazon Alexa e/o Google Home, utilizzare l’azione o
abilità“Smart Life”. Per ulteriori dettagli controllare le
istruzioni di Amazon o Google.
Come inserire le batterie (opzionale)
Il prodotto funziona a batterie o con un cavo micro
USB e un adattatore di corrente.
Prospetto app (gura B)
1Tempo rimanente alla prossima irrigazione
2Tempo rimanente al termine del ciclo di
irrigazione attuale
3Stato operativo
4Frequenza di irrigazione
5Durata di irrigazione
6Attiva o disattiva irrigazione automatica
7Stato della batteria
8Scorrere il pulsante per attivare o disattivare
l’irrigazione manuale
Istruzioni di sicurezza
-
ATTENZIONE
• Assicurarsi di aver letto e compreso pienamente le
istruzioni presenti nel documento prima di
installare o utilizzare il prodotto. Conservare la
confezione e il presente documento per farvi
riferimento in futuro.
• Utilizzare il prodotto solo come descritto nel
presente documento.
• Non utilizzare il prodotto se una parte è
danneggiata o difettosa. Sostituire
immediatamente un prodotto danneggiato o
difettoso.
• È necessaria una supervisione costante quando il
prodotto è utilizzato da o accanto a bambini,
animali o persone inferme. Non lasciare che i
bambini giochino o tocchino il prodotto.
• Tenere il prodotto lontano dalla portata dei
bambini.
• L’utilizzo della batteria da parte dei bambini deve
avvenire solo se sotto la supervisione di un adulto.
• Usare soltanto batterie che soddisfano le
speciche tecniche.
• Non utilizzare alcuna cella o batteria che non sia
progettata per essere utilizzata con il prodotto.
• Rimuovere la batteria prima di smaltire il prodotto.
• Il prodotto può essere riparato e sottoposto a
manutenzione esclusivamente da un tecnico
qualicato per ridurre il rischio di scosse elettriche.
Installazione dell’app SmartLife di
Nedis
1. Scaricare l’app Nedis Smartlife per Android o iOS
sul telefono tramite Google Play o l’Apple App
Store.

19
3. Impostare la frequenza d’irrigazione desiderata in
How often (Con quale frequenza) B4.
Selezionare un intervallo compreso tra 1 ora e 7
giorni.
4. Impostare la durata d’irrigazione desiderata su
B5.
Selezionare una durata compresa tra 6 secondi e
30 minuti.
5. Premere Auto Run (Avvio automatico) B6per
avviare il programma d’irrigazione automatica.
Dopo aver confermato le impostazioni di irrigazione
automatica, lo Working Status (Stato operativo)
B3passerà ad Auto.
Il prodotto inizierà il conto alla rovescia per la
prima irrigazione in Next Irrigation (Prossima
irrigazione) B1.
Il prodotto avvierà l’irrigazione per la durata
selezionata. Il Tempo di irrigazione rimanente
(Remaining Watering Time) B2mostrerà un
conto alla rovescia no al termine dell’irrigazione
corrente.
Una volta terminata la prima irrigazione, il prodotto
riprenderà a irrigare dopo l’intervallo selezionato.
Spia LED di stato
Spia LED di
irrigazione
A1
Lampeggia
ogni 0.5
secondi.
Mancanza
d’acqua.
Si accende. Irrigazione in
corso.
Spia LED del
Wi-Fi A3
Lampeggia
ogni 0.5
secondi.
Pronto per
l’abbinamento.
Lampeggia
ogni 1.5
secondi.
Ricerca in
corso di una
rete Wi-Fi.
Lampeggia
ogni 3 secondi.
Batterie quasi
scariche.
Si accende per
0.5 secondi e si
spegne per 3
secondi.
Batterie
connesse.
Si accende. Associato
a uno
smartphone.
-
Scollegare il prodotto dalla sorgente di
alimentazione prima di inserire o rimuovere le
batterie.
-
Per questo prodotto usare solo batterie AAA
(non incluse in dotazione).
1. Aprire il vano batteria A6.
2. Inserire 4 batterie in A6.
-
Assicurarsi di rispettare i segni di polarità (+) e (-).
3. Chiudere A6.
-
Accertarsi che A6sia completamente chiuso
per assicurarsi che l’acqua non nisca in A6.
A3si accenderà per 0.5 secondi e si spegnerà per 3
secondi a indicare che le batterie sono collegate.
Installazione del prodotto
(immagine C)
Vedere l’immagine C per una panoramica del
collegamento.
Utilizzo del prodotto
-
Per evitare potenziali danni da congelamento,
scollegare il prodotto quando si attendono
temperature molto basse.
4Usare l’app per impostare e controllare il
prodotto.
Per maggiori informazioni sul funzionamento e sulle
possibilità oerte dall’app, consultare il manuale
completo online.
Irrigazione manuale
1. Premere il pulsante di irrigazione manuale A2
per irrigare nell’orario impostato nell’app.
La spia LED di irrigazione A1si accende per
indicare che il prodotto è in fase di irrigazione.
2. Premere A2per arrestare manualmente il ciclo.
Irrigazione automatica
4L’irrigazione automatica è disponibile solo
nell’app.
4Per impostare o cambiare le impostazioni
d’irrigazione automatica è necessario collegare
Ai.
1. Collegare Aia A5.
2. Collegare l’altra estremità di Aia un’adeguata
sorgente di alimentazione USB da 5.0 VDC ; 1.0 A.
-
Non usare una sorgente di alimentazione USB
con una tensione superiore.

20
no deben jugar con el producto. Los niños no deben
realizar las tareas de limpieza ni mantenimiento sin
supervisión.
Cualquier modicación del producto puede tener
consecuencias para la seguridad, la garantía y el
funcionamiento adecuado.
Especicaciones
Producto Bomba de riego
inteligente inalámbrica
Número de artículo WIFIWP10GY
Dimensiones (L x An
x Al)
81.5 x 87.5 x 77.5 mm
Peso 300g
Tensión de entrada 5.0 VDC ; 1.0 A
Alimentación necesaria 5 W
Tipo de batería 4 x 1,5 V AAA (no
incluidas)
Potencia máx. de
radiotransmisión
17 dBm
Ganancia de la antena 2.5 dBi
Rango de frecuencia 2.412 - 2.484 GHz
Temperatura de
funcionamiento
3 °C - 50 °C
Humedad de
funcionamiento
0 % – 90 % (HR)
Caudal de agua de
funcionamiento
23 l/h
Presión de agua de
funcionamiento
0.3 bar
Presión de agua máx. ≥ 200 kPa
Altura máx. de
bombeo
3 m
Tamaño del tubo de
riego
1/4"
Frecuencia de riego 1 hora - 7 días
Duración del riego 6 segundos - 30
minutos
Cantidad de riego Riego manual: abierto
en cualquier momento
Riego automático:
salida de agua precisa
Dichiarazione di conformità
Noi sottoscritti, Nedis B.V., dichiariamo, in quanto
fabbricanti, che il prodotto WIFIWP10GY con il
nostro marchio Nedis®, prodotto in Cina, è stato
collaudato ai sensi di tutte le norme e i regolamenti
CE pertinenti e che tutti i collaudi sono stati superati
con successo. Questo include, senza esclusione
alcuna, la normativa RED 2014/53/UE.
La Dichiarazione di conformità completa (e le
schede di sicurezza, se applicabili) sono disponibili e
possono essere scaricate da:
nedis.it/wiwp10gy#support
Per ulteriori informazioni relative alla conformità,
contattare il servizio clienti:
Sito web: www.nedis.com
E-mail: [email protected]
Nedis B.V., de Tweeling 28
5215 MC ’s-Hertogenbosch, Paesi Bassi
hGuía de inicio rápido
Bomba de riego
inteligente
inalámbrica
WIFIWP10GY
Para más información, consulte el manual
ampliado en línea: ned.is/wiwp10gy
Uso previsto por el fabricante
El Nedis WIFIWP10GY es un sistema de control
de agua que le permite programar de forma
inalámbrica el riego automático mediante conexión
Wi-Fi.
El producto puede controlarse a través de la
aplicación Nedis SmartLife.
Este producto está diseñado para uso en interiores
y en exteriores.
El producto no está diseñado para un uso
profesional.
Este producto lo pueden utilizar niños a partir de 8
años y adultos con capacidades físicas, sensoriales
o mentales reducidas o que no tengan experiencia
o conocimientos, siempre y cuando se les haya
explicado cómo usar el producto de forma segura y
los riesgos que implica o se les supervise. Los niños
Table of contents
Languages:
Popular Water Pump manuals by other brands

Additel
Additel ADT920 user manual

Zoox
Zoox LEVIATHAN 5000 user manual

Neptun
Neptun Blue Line NPGP 4100 Original operating instructions

Edwards
Edwards EXT200/200H ICPMS instruction manual

Silicon Solar
Silicon Solar AquaJet-Pro-Kit-6V-V1 user manual

Annovi Reverberi
Annovi Reverberi AR 80 bp instruction manual

Velp
Velp F30620198 instruction manual

GORMAN-RUPP
GORMAN-RUPP SUPER T SERIES Installation, operation and maintenance manual

Danfoss
Danfoss APP series Installation, operation and maintenance manual

Ingersoll-Rand
Ingersoll-Rand ARO 666300 C Series Operator's manual

Liberty Pumps
Liberty Pumps Pro370 Series installation manual

Graco
Graco 2200 repair parts