Neilsen CT1321 User manual

HYDRAULIC COIL SPRING COMPRESSOR
CT1321
ORIGINAL INSTRUCTIONS
SAVE THESE INSTRUCTIONS AND PRECAUTIONS.
READ ALL PRECAUTONS AND INSTRUCTIONS BEFORE USE.
Cannon Tools Limited
Address: 20 Station Road, Rowley Regis, West Midlands, B65 0JU.U.K.

EC DECLARATION OF CONFORMITY
We CANNON TOOLS LTD
20 Station road, Rowley Regis, West Midlands,B65 0JU.U.K.
Declare that the following machine complies with the appropriate basic safety
and health requirements of the EC Directive based on its design and type, as
brought into circulation by us.
In case of alteration of the machine, not agreed upon by us, this declaration
will lose its validity.
Product description: HYDRAULIC COIL SPRING COMPRESSOR
Model: CT1321
Applicable EC Directives:
EC Machinery Directive 2006/42/EC
Harmonized standards
EN ISO 12100:2010, EN 1494:2000+A1:2008
20 Station Road, Rowley Regis, West Midlands, B65 0JU.U.K.
Mr. Gurcharan Tony Singh Sanghera
Managing Director
CANNON TOOLS LTD
2021-02-23

IMPORTANT
PLEASE READ THESE INSTRUCTIONS CARFULLY. NOTE THE SAFETY INSTRUCTIONS
AND WARINGS. USE THE PRODUCT CORRECTLY AND WITH CARE FOR THE PURPOSE
FOR WHICH IT IS INTENDED. FALURE TO DO SO MAY CAUSE DAMAGE TO PROPERTY
AND/OR SERIOUS PERSONAL INJURY. PLEASE KEEPTHIS INSTRUCTION MANUAL
SAFE FOR FUTURE USE.
1. SPECIFICATIONS
Capacity: 1 TON
Ram Travel: 340mm
Max. Spring Diameter:180mm
Max Working Length: 570mm
Base size: 36.1cm x 50.2cm
Jack Height: 41.9cm
2. SAFETY INSTRUCTIONS AND WARNINGS
1. Use a qualified person to maintain the strut spring compressor in good condition. Keep it
clean for best and safest performance.
2. The maximum load is 1ton. DO NOT exceed this rated capacity.
3. Use the compressor only on passenger cars and pickup truck. DO NOT use it for any other
purpose it is not designed to perform.
4. Keep children and unauthorized persons away from the work area.
5. Remove loosen clothing. Remove ties, watches, ring and other loose jewelry, and contain
long hair.
6. Wear ANSI approved safety goggles when using the strut spring compressor.
7. Keep proper balance and footing, DO NOT overreach and wear non-skid footwear. Always
keep your fingers, hands and feet away from compressing area.
8. Only use this compressor on a surface that is stable, level, dry and not slippery, and capable
of sustaining the load. Keep the surface clean, tidy and free from unrelated materials and
ensure adequate lighting.
9. Inspect the tool before each use. DO NOT use if bent, broken, cracked, leaking or otherwise
damaged, any suspect parts are noted or it has been to a shock load.
10. Use extreme caution when applying or releasing a load. Never allow the load to suddenly
drop. Slowly and carefully apply and release the load.
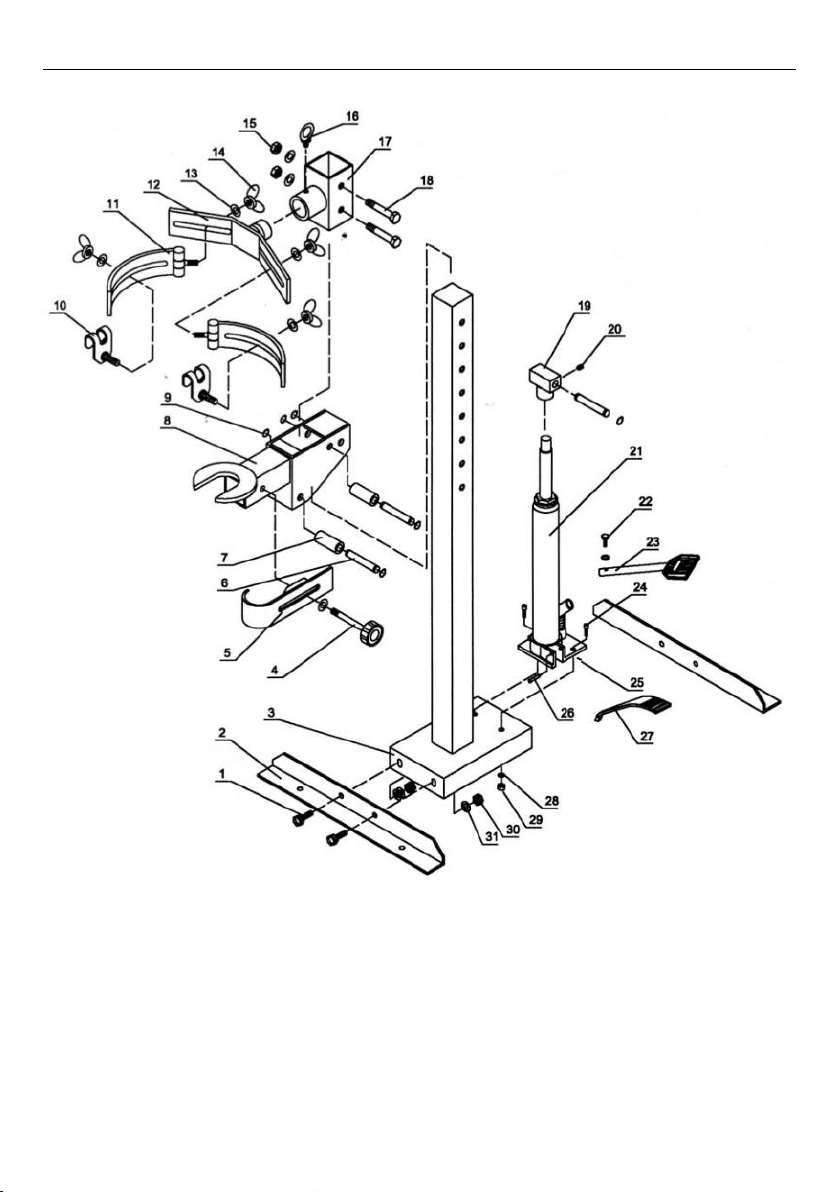
11. DO NOT allow any lubricants to contact the spring clasp bracket (12), spring clasp holder
(11), spring clasp/claw (10), lower strut support (8), adjustable strut shaft clasp (5) as that
will diminish the ability of the strut spring compressor to firmly and safely grip and hold a
strut spring in position, which may result in personal injury and/or property damage.
12. DO NOT operate the compressor when you are tired or under the influence of alcohol,
drugs or any intoxicating medication.

13. DO NOT allow untrained persons to operate the strut spring compressor.
14. DO NOT make any modifications to the strut spring compressor.
15. DO NOT use brake fluid or any other improper fluid and avoid mixing different types of oil
when adding hydraulic oil. Only good quality hydraulic oil can be used.
16. DO NOT expose the compressor to rain or any other kind of bad weather.
17. If the compressor need repairing and/or there are any parts that need to be replaced, have
it repaired by authorized technicians and only use the replacement parts supplied by the
manufacturer.
18. WARNING: the warnings, cautions and instructions discussed in this instruction manual
cannot cover all possible conditions and situations that may occur. It must be understood
by the operator that common sense and caution are factors, which cannot be built into this
product, but must be supplied by the operator.
3. ASSEMBLY
Use the exploded drawing as your guide to assemble the compressor. Lay all parts and
assemblies out in front of you before beginning. The following procedure is recommended.
1. Take the upright (3) out of the carton, then attach the brackets (2) to the upright by inserting
the bolts (1) into the hole in the base of the upright (3) and tightening the nuts and washers
(30,31).
2. Temporarily remove the upper strut support (17) away from the upright (3) by unscrew the
bolts (18) and the nuts (15).
3. Temporarily remove the screw (20) on the bolt in the saddle (19), Slid the lower strut support
(8) down the upright (3) until it rests firmly on the ram of the bottle jack (21), then tighten the
screw (20).
4. Re-attach the upper strut support (17) to the upright by inserting and tightening the bolts (18)
and nuts (15) through the aligned holes both in the upper strut support (17) and the upright
(3). The holes you need in the upright (3) are just in accordance with the height of the strut
spring to be compressed.
5. Attach the spring clasp assembly (10,11,12,13.14) to the upper strut support (17) by firmly
wrench the screw ring (16).
6. Attach the lift foot pedal (23) to the bottle jack (21) using bolt (22).
4. BEFORE FIRST USE
1. Depress the release foot pedal (27) to lower the ram of the bottle jack (21) in its lowest
position.
2. Fully Press the release foot pedal (27) and pump the lift foot pedal (23) 6 to 8 times to
eliminate any air in the system.
3. Test the strut spring compressor.

5. OPERTTING INSTRUCTIONS
WARNING! Ensure that you read, understand and apply the safety instructions and warnings
before use.
WARNING! Ensure that you have familiarized yourself thoroughly with the product and the
hazards associated with its improper use.
NOTE: Always refer to and have available a credible service manual covering the year, make
and model of the vehicle being serviced. Follow manufacture’s guidelines for strut removal,
service and installation procedures.
1. De-grease the spring to be compressed. Never attempt to compress a dirty spring,
2. Depress the release foot pedal (27), and lower the ram in its lowest position.
3. Secure base of vehicle's strut spring assembly in compressor fixture by adjust the adjustable
strut shaft clasp (5).
4. Remove the bolts (18) and the nuts (15), then slid the upper strut support (17), and the
attached spring clasp assembly (10,11,12,13,14), up and down along the upright (3), until
the spring clasp assembly is at about the same height as the top of the vehicle's strut spring
assembly. Once the desired height of the spring clasp assembly is reached, secure the
upper strut support (17) on the upright (3) by re-inserting and tightening the bolts (18) and
the nuts (15).
5. Secure vehicle’s strut spring with spring clasp/claw (10).
NOTE: Check to make sure that both the top and the base of the vehicle's strut spring
assembly is firmly secured in place.
6. Slowly pump the lift foot pedal (23) to compress the vehicle's strut spring.
7. After the spring is fully compressed, remove nut and retainer cup assembly.
WARNING! Do not remove the But with first compressing the spring. Only compress spring
sufficiently to remove retaining nut and hardware.
8. Decompress the spring by depressing the release foot pedal (27) and remove it. Replace
damaged components.
9. Install spring and pump to compress.
10. Install retainer cup assembly and nut. Tighten retainer nut
11. Decompress spring by depress the release foot pedal (27) and remove vehicle's strut spring
assembly from fixture.

6. MAITAINANCE
CAUTION: Always release the load from the strut spring compressor before you do any service
for it.
1. Lubrication of upright (3) is required in normal service.
2. Clean the outside of the compressor with a dry, clean and soft cloth. Wipe off the strut spring
compressor using a mild detergent
3. When not in use, the compressor should be stored in a dry location with ram fully retracted to
inhibit rust and covered with a cloth cover.
4. Before each use check all parts. If any part of the compressor is damaged or suspect,
remove the compressor from service and take necessary action to repair.
5. Check the hydraulic oil level: remove the filler plug on the bottle jack (21), If the oil is not
adequate, fill with high quality hydraulic oil to the lower rim of the fill hole.
6. When compress efficiency drops, purge away air from the bottle jack (21).
7. DISPOSAL
At the end of the machine's working life, or when it can no longer be repaired, ensure that it is
disposed of according to national regulations.
Contact your local authority for details of collection schemes in your area.
In all circumstances:
Do not dispose of this tool with domestic waste.
Do not incinerate.
8. EXPLANATION OF SYMBOLS
In this manual and/or on the machine the following symbols are used:
Denotes risk of personal injury, loss of life or damage to the tool in
case of non-observance of the instructions in this manual.
First read the instruction manual.
Wear safety goggles.
Wear gloves.
In accordance with essential safety standards of applicable
European directives

9. EXPLODE DRAWING

PARS LIST
Part
No.
Description
Qty
Part
No.
Description
Qty
Part
No.
Description
Qty
1
Bolt
4
12
Spring clasp
bracket
1
23
Lift foot pedal
1
2
Bracket
2
13
Washer
7
24
Bolt
2
3
Upright
1
14
Fly nut
4
25
R-pin
1
4
Screw rod
1
15
Nut
2
26
Pin
1
5
Adjustable strut
shaft clasp
1
16
Screw ring
1
27
Release foot
pedal
1
6
Handle sleeve
3
17
Upper strut
support
1
28
Washer
3
7
Bushing
2
18
Bolt
2
29
Nut
2
8
Lower strut
support
1
19
Saddle
1
30
Nut
4
9
Retaining ring
6
20
Screw
1
31
Washer
4
10
Spring clasp
claw
2
21
Bottle jack
1
11
Spring clasp
holder
2
22
Bolt
1
CANNON TOOLS LTD
Add: 20 station road, Rowley Regis, west midlands,B65 0JU.U.K.
Made in China
Table of contents
Other Neilsen Air Compressor manuals