Nello DVR5K-BLK User manual

Please read this manual carefully!
U S E R 'S M A N U A
Digital camcorder
DVR5K-BLK
L

....................................... ....... 1
1 About ...... ...... . ...... . ...... . ...... . ...... . ...... . ...... . ...... ...... . ...... . ...... . ...... . ...... . ...... . ...... ...... . ...... . ...... . ...... . ...... . ...... . .... 3
1.1 ......................................................................................................................................................... 3
1.2 ......................................................................................................................................................... 3
1.3 ................................................................................................................................................... 5
2 S ............................................................................................................................................................ 6
2.1 I ............................................................................................................................................... 6
2.2 I .........................................................................................................................................................7
2.3 C .......................................................................................................................................................7
2.4 .........................................................................................................................................8
2.5 ..................................................................................................................................................8
2.6 ......................................................................................................................................................9
2.7 ....................................................................................................................................................10
2.8 ....................................................................................................................................................11
2.9 ............................................................................................................................................12
2.10 ...........................................................................................................................................................13
2.11 IR night vision.....................................................................................................................................................13
3 ...........................................................................................................................................................14
3.1 .........................................................................................................................................................14
3.2 .........................................................................................................................................................18
3.3 ........................................................................................................................................................21
3.4 Setup. . . . . . . . . . . . . . . . . . . . . . . . . . . . . . . . . . . . . . . . . . . . . . . . . . . . . . . . . . . . . . . . . . . . . . . . . . . . . . . . . . . . . . . . . . . . . . . . . . . . . . . . . . . . . . . . . . . . . . . . . . . . . . . . . . . . . . . . . . . . . . . . . 2 2
4 ...................................................................................................................................................26
4.1 ..........................................................................................................................................26
4.2 ......................................................................................................................................................26
5 .................................................................................................................................................................28
5.1 .......................................................................................................................................................28
5.2 ..........................................................................................................................................29
Safety a n d warnin g
System requirements
Picture presentations
Functions of keys
tart to use
nstallation of the memory card
nstallation of battery
harging the battery
Power on and power off the camera
Switch working mode
Instructions of use remote
Connect to PC
Connect to TV
Use external microphone
Use zoom function
Use the camera
Video mode
Photo mode
Playback mode
WiFi connection
APP installation on mobile phone
Connect to mobile phone
Appendix
Specification
Common problems and solutions
. . . . . . . . . . . . . . . . . . . . . . . . . . . . . . . . . . . . . . . . . . . . . . . . . . . . . . . . . . . . . . . . . . . . . . . . . . . . . . . . . . .
Content

1
Please read carefully and refer to this instruction manual. Please keep this manual.
This chapter contains important safety information and warnings, violation of these may
result in fire, explosion or electric shock, and may result in serious personal injury.
Children are forbidden to use the unit and accessories alone. These can pose a risk to
children of electrocution, poisoning and suffocation.
Electric shock and fire
◇If the unit is damaged, flooded or short-circuited, shut down immediately and remove the
battery.
◇Use the charger correctly. Keep dry and ventilated when using, do not cover any articles.
Do not use the charger when there is lightning.
◇When using the charger to connect this machine, weak current may be felt in contact with
metal. This is because the charger has an electromagnetic interference suppression element
that forms the necessary loop. This weak current is controlled within the limit of national
safety standard,please feel free to use it.
About the battery
Batteries are chemicals that can cause fire or explosion and chemical burns if used incorrectly.
◇Do not short-circuit, impact, squeeze, puncture, disassemble or burn the battery.
◇Do not store and use in high temperature. Do not use batteries that expand or leak.
◇Do not swallow.If the battery may have been swallowed or entered the body, seek medical
attention immediately.
◇Only the specified type of battery is allowed.
Safety and warning

2
Safety and warning
LCD screen
◇LCD screen is fragile, do not throw, squeeze or knock.
◇If the screen is broken, do not touch it. In case of contact, rinse immediately with water.
◇Do not swallow. If swallowed, gargle immediately and drink plenty of water. Seek medical
advice immediately.
Precautions for use and storage
◇Do not use corrosive solvents.
◇Do not direct LED lights into your eyes, as strong light may damage your eyesight.
◇When not in use, remove the battery and place it in a dry place.
◇Do not disassemble by yourself. This machine has no user can repair the parts, in case
of failure,please find a professional or dealer. Artificial damage or self-dismantling will lose
the warranty qualification.
Environment
Operating environment: Temperature 0℃ to 0℃, humidity ≦70%.
Storage environment: temperature -20℃-50℃, humidity ≦50%.
Do not use or store in the following conditions:
◇A damp or dusty area
◇A place of high or low temperature
◇A place of sun exposure
◇A place with strong vibration
Proper disposal of waste
◇Do not discard the unit and accessories at will. To avoid environmental pollution, dispose
of waste products in accordance with local laws.

Other warnings
◇This machine may interfere with aircraft, medical equipment, do not use in prohibited
places.
Comply with local laws and regulations regarding wireless devices.
◇Please comply with local laws and regulations on personal privacy protection.
Pre-use inspection
To ensure your benefit, before use, please fully charge it, load the memory card and take
a test shot.
We are not responsible for any additional loss caused by improper use or malfunction of
the machine.
Trademark
Microsoft/ Windows is a registered trademark of Microsoft Corporation.
Pentium is a registered trademark of Inter Corporation.
Macintosh/Mac OS/iOS is a registered trademark of Apple.
References to business or product names, proper nouns or trademarks are registered
trademarks of the relevant owners.
About this manual
◇The picture is for reference only. We try to keep the content correct. If the product is
updated,please refer to the actual product.
◇To improve user experience, the APP may be upgraded, please refer to the actual
situation of the APP operation, without prior notice.
◇We reserve all rights in this manual. No unit or individual shall copy or disseminate in
any form without consent.
Safety and warning
3

Welcome to choose this product, we will service you warmly!
This is a multi-function 4K UHD camcorder, which has the function of photo and video. It supports WiFi
wireless application and has the following features:
◇4K UHD video ◇H.264 ◇Loop-recording ◇Time-lapse ◇Slow motion video ◇Infrared night vision
◇13MP CMOS sensor ◇48MP Photo ◇EIS Anti-shake ◇3.0 inch IPS HD touch screen
◇WiFi wireless connection ◇IR remote control ◇Max. support 128GB Memory card
◇Support external microphone ◇Support external 37MM extend lens
1.1System requirement
If the camcorder is connected to computer, the following specifications are required at least:
The Pentium2.0 GHZ or upper processor / Windows XP/ 4GB RAM/500GB of available disk space /
Standard USB2.0 port/ 1GB display card/1024x768 or higher screen definition.
If the configuration of computer is quite low, camcorder may not work properly or get stuck when
connecting to computer.
1.2 Picture Presentation
【 】Front view 【 】rear view
Lens
remote receiver
window
LED
4
microphone
charging
indicator
working
indicator
video button
battery
compartment
1 About

USB port
【 】Top view 【 】Bottom view
【 】left view
Cold boots
5
zoom key Mode key
speaker
Battery lock
memory card cover
external microphone input port
HD output port
The tripod hole
Display key
Menu key
Powdr/Night key
Photo key
1 About

6
Icon Key name Function description
1.3 Functions of keys
【POWER/LIGHT】
Short press to power on the camera;
After powering on, long press for 2 seconds to power off the camera;
short press to turn on/off IR light.
【MENU】
MODE 【MODE】Switch working mode: Video mode/Photo mode/Playback mode.
【DISP/WIFI】
Short press to switch screen display: Display icon, close icon,
close screen.
In photo/video mode: Long press for 2 seconds to turn WiFi on/off.
【PHOTO】
In photo mode, press it lightly for focus, press it heavily to take photo.
In video mode, during recording video, press it heavily to pause/
continue video.
In playback mode: press it again to pause/play.
【VIDEO】In video mode: Start/stop recording video
【W/T】
In Photo/video mode: Zoom in/out.
In video playback: Turn up/down the volume.
In playback mode: Page forward/backward.
In the menu: Select forward/backward.
Pop-up menu/Back to the previous menu/Exit menu.
In this manual, places with【】represent keys or switches, such as【MENU】represents MENU key.
1 About
2 Start to use
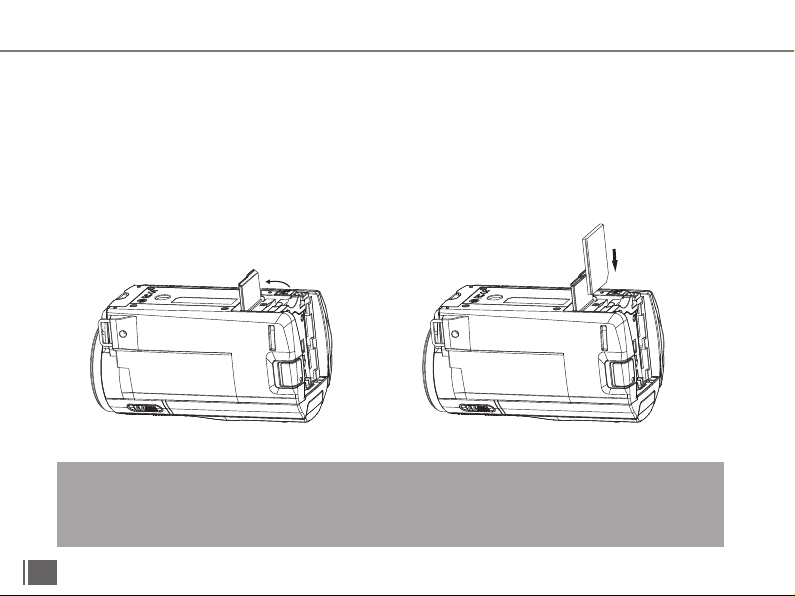
2.1Installation of the memory card
This machine needs to install the memory card, please follow the instructions.
2.1.1Open the memory card cover.
2.1.2 Insert the memory card in the direction shown and push it inward until you hear a click.
2.1.3 Close the memory card cover.
Notice:
Please use a regular brand of Class 6 or above memory card.
Do not insert or remove the memory card during work, which may damage the memory card or lose data!
Some memory cards may cause the unit to crash or work improperly.
If the “Card is Full” is displayed, Indicates that the card is full. Replace the memory card or delete the file.
7
Open the SD card cover according
to the direction of arrow
Insert the SD card according
the direction of arrow

2.2 Installation of battery
This machine uses external battery, please refer
to the picture to install.
2.2.1 Install the battery with the metal contact of
the battery facing upwards.
2.2.2 Follow the arrow direction on battery
compartment, push the battery until a “Click” is
sounded which means the installation is complete.
Notice:
Please install battery correctly, incorrect installation
will not boot or damage the camcorder, and may
cause accidents!
Notice:Please confirm local power specifications! Keep ventilation during charging, no covering. After charging,
remove the power asap!
When using computer USB to charge the unit, please turn off the unit, otherwise the computer may be damaged!
2.3Charge the battery
2.3.1 Install the battery, connect the unit and charger with USB cable to the mains. The indicator“CHG”lights
up indicating the battery is being charged, and the indicator lights off after the battery is charged.
2.3.2 Connect the computer to charge the unit. Connect the unit to the computer with a USB cable. The
indicator“CHG”lights up indicating the battery is being charged, and the indicator lights off after the battery
is charged.
2.3.3 Charger specifications: Input AC100~240V/50~60HZ, Output DC 5V/15A, please confirm the charger
andpower supply specifications.
2.3.4 In order to adapt to long time shooting, the unit can be charged while shooting. To use this function,
please use the tripod to fix the unit, and follow the steps of 2.3.1 to open the unit.
8
1.Install battery into the
battery compartment
according to this
direction.
2.Push battery until a
“Click” is sounded
2 Start to use

Power on and power off the camcorder
1.Short press【Power/IR LIGHT】to power on the camcorder;
2. Long press【Power/IR LIGHT】to power off the camcorder;
3. Open the screen and the machine will start up automatically. Close the screen, automatic shutdown.
4.The camcorder support the function of auto power-off. When not in use for a period of time, the unit
automatically shut down to save power.
2.5 Switching working Mode
To switch the working mode of the machine, press 【MODE】to pop up the " MODE Selection" menu.
Press 【W/T】to select the mode and press 【Photo】 to enter the selected mode.
9
2.5.1 Video mode
This machine supports ordinary video, slow photography, cyclic video, time-lapse video and other modes.
Ordinary video: The icon is displayed in the upper left corner of the screen, indicating it's recording a
common video.Slow photography: The icon is displayed in the upper left corner of the screen, indicating it's
recording a slow motion. Cyclic video:The icon is displayed in the upper left corner of the screen, indicating
it's recording cyclic video automatically. Time-lapse video:The icon is displayed in the upper left corner of
the screen, indicating it's recording time-lapse video.
In video mode, press 【VIDEO】to record video, and press 【VIDEO】again to stop shooting.
2.5.2 Photo mode
This machine supports ordinary photo, automatic photo, continuous photo, timing photo mode.
Ordinary photo: The icon is displayed in the upper left corner of the screen, press 【PHOTO】to take common
photos.Automatic photo:The icon is displayed in the upper left corner of the screen, press 【PHOTO】 to
automatically take photos at regular intervals.
Continuous photo:The icon is displayed in the upper left corner of the screen, press 【PHOTO】 to take 3
photos in succession.Timing photo: The icon is displayed in the upper left corner of the screen, press
【PHOTO】 to take photos after a certain time.
2.5.3 Playback mode
View photos or videos and perform related operations.
2 Start to use

2.6 Instructions of remote control
The machine can be operated by remote control, and the key functions of the remote control are as follows:
10
Notice:
Before use remote control please take off the battery protective slice.When use remote control, please
aim at the remote receive window of camcorder, objects can not be shielded in the middle.
Icon Function description
In photo mode: Take photo;
In video mode: Pause/continue recording.
In video mode: Start/stop video
In photo/video mode: Turn on/off IR light;
In the menu: Select up
Bring up the menu/back to the previous menu/exit the
menu.
Confirm operation
In photo/video mode: turn WIFI on/off
Switch working mode; In setup menu: To switch the menu.
In menu mode: Select down.
In photo/video mode: Zoom in the picture.
Enter playback mode
In photo/video mode: Zoom out
Photo
Confirm
Menu
Mode
Playback
Video
IR Light/UP
WIFI
Zoom in
Zoom out
Down
Please take off the battery protective
slice before use.
2 Start to use

2.7Connect to PC
The unit can be connected to the computer using USB cable. After connected, it can be charged,
transferred files or used as a camcorder.
After the connection is successful according to the figure, the screen displays options: charging mode,
large-capacity storage mode, camcorder mode.
Select charging mode to charge the unit only.
Select the large-capacity storage mode, which can be used like a USB flash drive.
Select camcorder mode and use it as a computer camcorder.
Notice:
Because of the computer system, if you select camcorder mode, download the required software.
Connect the USB port of
your computer
11
Connect the USB port
2 Start to use
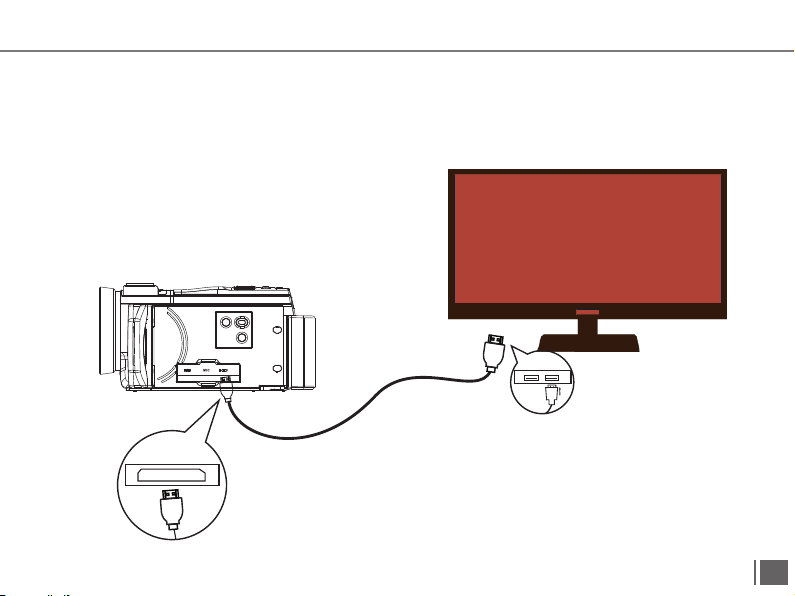
2.8 Connected TV
The unit can be connected to the TV.
2.8.1 Use HDMI cable to connect the unit to the HD port of the TV.
2.8.2Switch the signal input of the TV set to a port connected to the unit.
2.8.3Turn on the unit, normal operation, all contents will be displayed on the TV.
Connect the HD port to your TV
12
Connect the HD port
2 Start to use

Fix external microphone
Insert the 3.5mm coaxial plug into the microphone
2.9 Use external microphone (optional accessory)
Using external microphone can effectively improve sound quality, and get good recording effect.
2.9.1Read the technical specifications and instructions of the external microphone carefully to avoid damaging
the device.
2.9.2Install the external microphone as shown and lock the nut.
2.9.3Insert the microphone 3.5mm coaxial plug into the MIC interface of the machine and turn on the microphone
switch.
Notice:
Adaptable external microphone parameters: output impedance 0.2KΩ~2.2KΩ, 3.5mm coaxial port.
After the external mic is connected, the host automatically switches to an external mic. Because each
external microphone parameter is different, the specific effect is selected after actual adaptation.
Tighten the nut
13
2 Start to use

2.10 Use zoom function
This machine has the digital zoom function, in the video/photo mode, toggle [W/T] rightward to bring the
object closer (enlarge the scene), toggle [W/T] leftward to pull away from the object (shrink the object).
2.11Use night vision function
This machine has infrared night vision function, can shoot black and white photos and videos in the dark
environment.
In Photo/Video mode: short press【Power/LIGHT】to enable night vision, short press【Power/LED】
again to turn off the IR light.
Notice:
Night vision can only be turned on or off in camcorder mode or video mode.
14
2 Start to use
3.1.1Video Recording
Install the memory card and battery, short press 【POWER/LIGHT】 to start up and enter the recording mode.
Focus the camera on the object, press the 【Video】to start recording, and press【Video】again to stop
recording. During recording, the red icon in the upper left corner of the screen continues flashing.
In the video mode, users can set various parameters to help take a more beautiful picture. If you are not familiar
with the machine, you can use the default settings.The following settings are performed in video mode.
3Use the camcorder
This chapter helps you understand how to use the various advanced features of the camera.
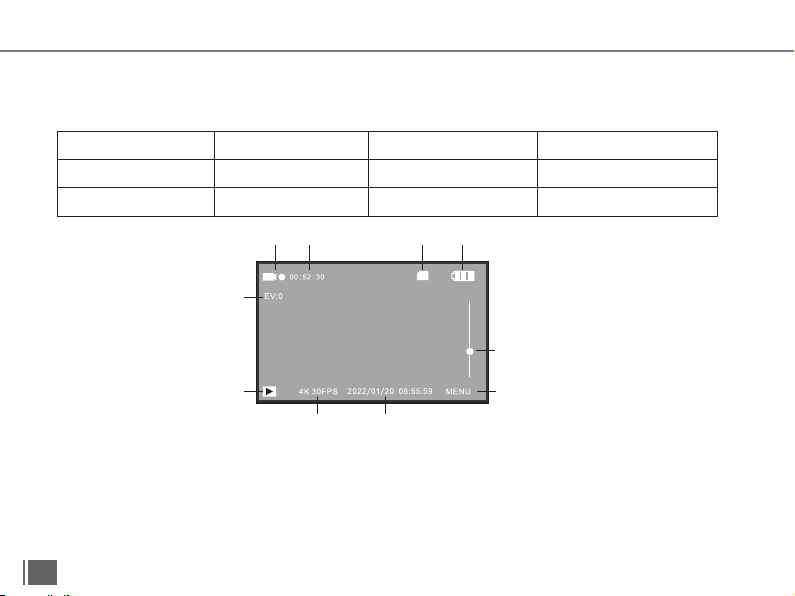
3.1 Video Mode
In video mode, the screen displays relevant icons with the following meanings:
9
10
78
123 4
5
6
3 Use the camera
15
1Video mode indicator 2Recording time indicator 3Memory card indicator
5 Zoom indicator 6 Menu icon 7 Date time indicator
9 Playback icon 10 Exposure indicator
4Battery capacity indicator
8Resolution indicator
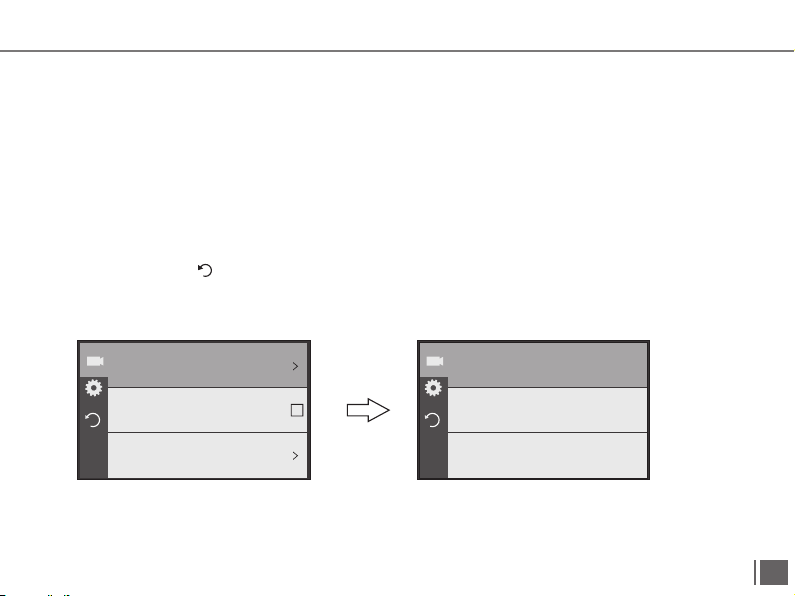
3.1.2Resolution
Set the video resolution. The higher the resolution, the better the clarity, but the bigger the file.
3.1.2.1 Press 【Menu】to bring up menu options, press【W/T】 to select "Resolution", press【PHOTO】to
enter into the sub-menu;
3.1.2.2 Press【W/T】to select desired resolution:
4K P60/4K P30/2.7K P30/FHD P60/FHD P30/HD P60/HD P30;
3.1.2.3Press【PHOTO】to save, press【Menu】again to back to video mode.
This function supports touch screen operation:
A Click the "MENU" icon in the lower right corner of the screen to enter the setting menu, click the "Video
resolution" icon to pop up the resolution option.
B Click desired resolution to back to previous menu.
C Click the back icon to return to the video mode.
The following functions in this section support touch operations. The usage method is the same as 3.12.
录像分辨率
电子防抖
白平衡
4K30FPS
关闭
自动
4K60FPS
4K30FPS
2.7K30FPS
16
3 Use the camera

3.1.3 Electronic anti-shake
Turn on or off the electronic anti-shake function. Enable this function to reduce the blur caused by shake.
3.1.3.1 Press 【Menu】to bring up menu options, press【W/T】 to select "Electronic anti-shake", press
【PHOTO】to enter into the sub-menu;
3.1.3.2 Press【W/T】to select desired option:On/Off;
3.1.3.3Press【PHOTO】to save,press【Menu】again to back to video mode..
3.1.4 White balance
Adjust the color deviation of the picture according to the light source environment.
Automatic mode is recommended.
3.1.3.1 Press 【Menu】to bring up menu options, press【W/T】 to select "White balance", press【PHOTO】
to enter into the sub-menu;
3.1.3.2 Press【W/T】to select desired option: Auto / Daylight / Cloudy / Tungsten /Fluorescence
3.1.3.3Press【PHOTO】to save,press【Menu】again to back to video mode..
3.1.5Exposure
Adjust exposure value (EV) according to the environment. The higher the EV, the brighter the video, and the
smaller the EV, the darker the video.
3.1.5.1 Press 【Menu】to bring up menu options, press【W/T】 to select "Exposure", press【PHOTO】to enter
into the sub-menu;
3.1.3.2 Press【W/T】to select desired value of exposure: -3/-2/-1/0/+1/+2/+3;
3.1.3.3Press【PHOTO】to save,press【Menu】again to back to video mode.
Notice:This function is invalid when ambient brightness is low.
3.1.6 Metering mode
Set metering mode when recording.
3.1.5.1 Press 【Menu】to bring up menu options, press【W/T】 to select "Metering mode", press【PHOTO】
to enter into the sub-menu;
3.1.3.2 Press【W/T】to select desired option: Average metering/central key metering/point metering/matrix
testing;
3.1.3.3Press【PHOTO】to save,press【Menu】again to back to video mode.
17
3 Use the camera

3.1.7Sharpness
Adjust the sharpness of the video to make the edges clearer or softer.
3.1.7.1 Press 【Menu】to bring up menu options, press【W/T】 to select "Sharpness", press【PHOTO】to enter
into the sub-menu;
3.1.7.2 Press【W/T】to select desired option: High/Middle/Low;
3.1.7.3Press【PHOTO】to save,press【Menu】again to back to video mode.
3.1.8 Video Quality
Adjust the quality of the video.
3.1.8.1 Press 【Menu】to bring up menu options, press【W/T】 to select "Video Quality", press【PHOTO】to
enter Into the sub-menu;
3.1.8.2 Press【W/T】to select desired option: High/Middle/Low;
3.1.8.3Press【PHOTO】to save,press【Menu】again to back to video mode.
3.1.9Sensitivity
Adjust video sensitivity (ISO), automatic mode is recommended;
3.1.9.1 Press 【Menu】to bring up menu options, press【W/T】 to select "Sensitivity", press【PHOTO】to enter
into the sub-menu;
3.1.9.2 Press【W/T】to select desired option: Auto/100/200/400/800/1600/3200/6400
3.1.9.3Press【PHOTO】to save,press【Menu】again to back to video mode.
3.1.10 Time watermark
Sets whether the time and date are displayed on the video
3.1.10.1Press 【Menu】to bring up menu options, press【W/T】 to select "Time watermark".
3.1.10.2 Press【PHOTO】to select :Turn on/turn off,press【Menu】to back.
3.1.11 Record Audio
Set whether to record sound at the same time when recording a video.
3.1.11.1Press 【Menu】to bring up menu options, press【W/T】 to select "recording Audio".
3.1.11.2 Press【PHOTO】to select :Turn on/turn off,press【Menu】to back.
18
3 Use the camera
Table of contents


