neostein cS6 User manual
installation guide
cS6
DRAFT
DRAFT

cS6 install guide
Contents
Application � � � � � � � � � � � � � � � � � � 1
How Does it Work? � � � � � � � � � � � � � 1
Key Features � � � � � � � � � � � � � � � � � 2
What’s in the box � � � � � � � � � � � � � � 3
Construction Variations � � � � � � � � � � 4
Glossary and Terms � � � � � � � � � � � � � 5
System Specification � � � � � � � � � � � � 7
Environment & Safety � � � � � � � � � � � 9
Installation Overview � � � � � � � � � � � 11
Installation � � � � � � � � � � � � � � � � � 14
Run Cable � � � � � � � � � � � � � � � 14
Fitting Brackets � � � � � � � � � � � � 15
Cabinet & Connection � � � � � � � 16
Port Adjustment � � � � � � � � � � � � 17
Test Subwoofer � � � � � � � � � � � � 18
Close Ceiling � � � � � � � � � � � � � 19
Finish Ceiling � � � � � � � � � � � � � 20
Attach Port Trim � � � � � � � � � � � � 21
cS6 Specification � � � � � � � � � � � � � 22
Troubleshooting � � � � � � � � � � � � � 23
Warranty Information � � � � � � � � � � 25
Contact � � � � � � � � � � � � � � � � � � � 26
DRAFT
DRAFT

1
cS6 install guide
Application
Neostein cS6 Subwoofers are designed to provide solid
bass extension and low frequency enhancement with
minimal visual impact�
Designed to be hidden away, cS6 can be installed in
walls, ceilings, within or under furniture, free-standing
or built into kitchen cabinetry� With only a small circular
port visible on your ceiling/wall etc�, cS6 delivers great
performance while seamlessly blending into your
interior design�
With a choice of 3 different adjustable port locations, cS6
can easily fit into any space� Screwing directly to ceiling
joists using the supplied brackets, the subwoofer has an
adjustable port, allowing bass to be effortlessly pumped
into the listening room rather than the ceiling�
With a low-profile port cover included, the small
opening in your ceiling is further disguised� Alternatively,
use the flush-mount plaster up-to port trim (available
separately) to create a solution with the ultimate visual
discretion� Whether you love to really feel the music, or
want to enjoy the true depth of your movies, cS6 delivers
a truly powerful sound from a system that you cannot
see�
While installation and operation of cS6 are simple, it is
critical that this manual is read and followed� Failure to
install cS6 as per this guide may void the warranty or
result in sub-standard performance�
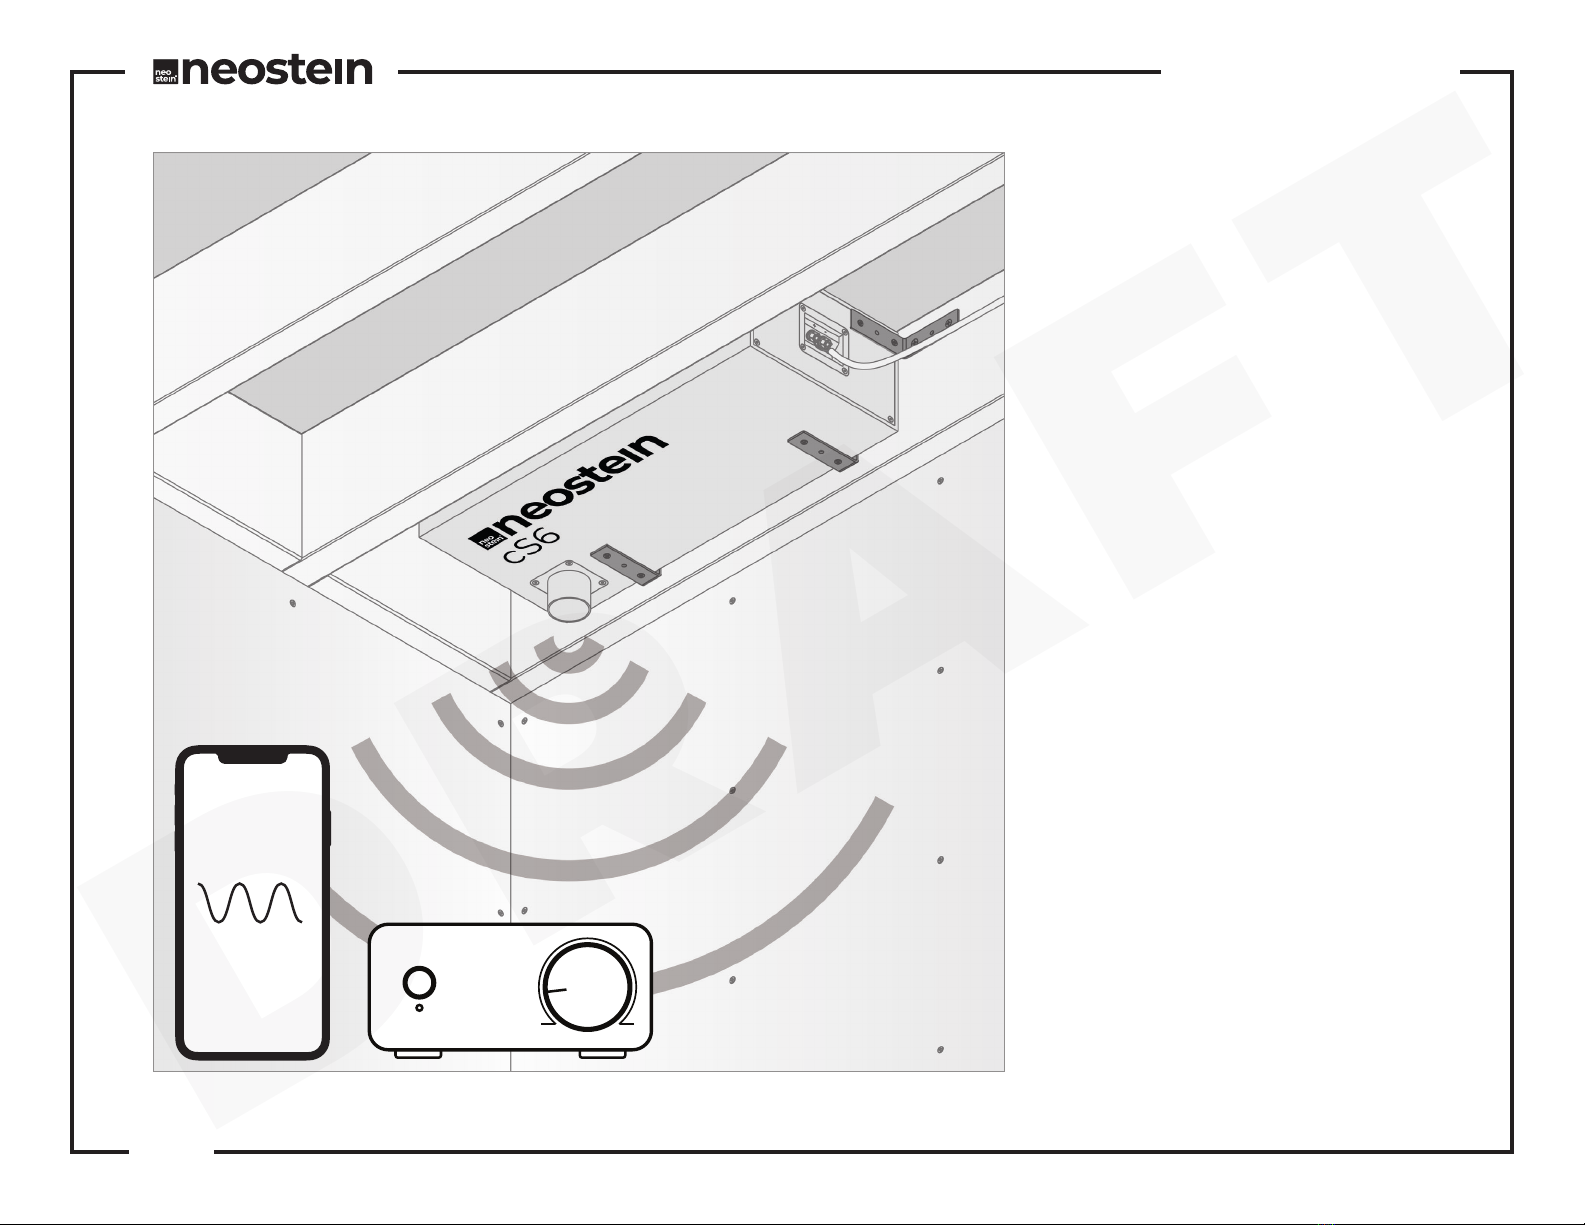
How Does it Work?
A fourth-order band-pass subwoofer, cS6 uses precise
filtering to give solid bass down to 37Hz with only a
small port opening about the size of a down-light
(approximately 70mm diameter)�
Perfect as part of a surround system or for a full-
bandwidth music system� A passive subwoofer with
on-board filtering, cS6 can be used with AV receivers
(using bass management and an external power amp
fed from the LFE/SW output) or as part of a multi-room
music system using a standard multi-channel amplifier�
Any standard power amplifier may be used, it is not
necessary to use an amplifier with additional filtering
(such as would be found on an active subwoofer, or
dedicated subwoofer amplifier)�
For a great sounding and long-lasting system, Neostein
recommends turning off all amplifiers before making
or changing any connections within the system�
This includes any speaker cables, amplifier inputs, or
anything that may introduce high power spikes to be
sent to the subwoofer� It is also recommended to use
a stable power-supply, ideally with surge protection or
even a filtered uninterrupted power supply if possible�
Failure to correctly install the subwoofer
or mistreatment of the system may result
in damage to the subwoofer that is not
covered under warranty.
DRAFT
DRAFT

2
cS6 install guide
Key Features
Port Tube
Port Plate
Alternative Port Location - Blanking Plate
Alternative Port Location - Blanking Plate
DRAFT
DRAFT

3
cS6 install guide
What’s in the box
Part Name Quantity
AcS6 Subwoofer 1
BScrews 20
CShallow Port Trim 1
DMounting Bracket 4
A B C
D
Parts not shown to scale
DRAFT
DRAFT
4
cS6 install guide
Construction Variations
cS6 Subwoofers are designed to be primarily installed
into timber framed ceilings, however, they may also be
installed into metal framed ceilings, stud walls (with
sufficient depth), cabinetry, or even used as an in-room
free-standing unit� It is not recommended to install cS6
into, or port through, solid block-work�
Ceilings
With an omni-directional output, and reduced ability
for humans to detect directionality of bass, cS6 is ideally
suited to ceiling installation� Pairing this information
with the fact that ceiling cavities are typically deeper
than wall cavities, most cS6 subwoofers will be installed
into ceilings� The subwoofer ports through a small
opening in the ceiling, which can be covered with the
included port trim, or the optional plaster-up-to port
trim� Both trim options provide a neat visual termination
as well as disguising the opening�
Most ceiling boards and joist frames will be sufficient
to install cS6 subwoofers into, however, it is important
to confirm that the cavity depth is at least 180mm deep
and the joists can safely support 10kg of weight� cS6 is
supplied with ceiling installation brackets which are
screwed directly to the joists as per this installation
guide� If using alternative installation method, it is
critical that any fixings used must be sufficiently rated
as to take the weight of the subwoofer� While the
subwoofer is designed such that it can be screwed into,
if using screws that are not supplied with the subwoofer,
ensure they do not exceed 13mm in length as this may
fully puncture the cabinet of the subwoofer and lead
to poor acoustic performance, or product failure which
would not be covered under warranty�
While the majority of low frequency energy will be
emitted from the port opening, some energy will
inevitably be transferred to the structure of the building�
It is therefore recommended that subwoofers should
not be installed in ceilings directly below noise-sensitive
rooms such as bedrooms or separate dwellings�
Walls
Where sufficient depth is available, it may be possible to
install cS6 into walls or cabinetry, installation principles
match those of ceiling installations so will not be
specifically covered in this guide�
Neostein subwoofers should never be
installed outdoors, or in external walls/
ceilings.
cS6 should never be installed in high-
moisture rooms such as swimming pools,
bathrooms or saunas.
DRAFT
DRAFT

5
cS6 install guide
Glossary and Terms
Joist
Timber framed ceilings use joists to suspend ceiling
finishes, support flooring above and also to easily house
insulation/wiring/ventilation/services� As such, ceiling
voids may contain many hazardous or physically large
items which will need to be safely worked around� For
the sake of this installation guide, the term “joist” will
refer to a timber joist�
Plasterboard
Most plasterboard consists of a gypsum based core
with paper skins� Often referred to as drywall, sheet-
rock or wall-board, plasterboard comes in a variety
of compositions offering different performance
characteristics� While the plasterboard choice itself is
unlikely to impact installation of a cS6 subwoofer, it
is important to understand the entire ceiling build-
up before proceeding with installation� A maximum
distance from the subwoofer cabinet to the finished
ceiling surface of 100mm cannot be exceeded
(maximum 110mm port length, allowing for clearance
needed for brackets and screws etc�)� For information
on installations using specialist construction methods,
contact your Neostein dealer�
Port
cS6 subwoofer emits bass energy through a cylindrical
port� It uses a 6” driver in a fourth-order bandpass
configuration, which means that the driver is not
visibly exposed� As only the port opening is required
to penetrate the ceiling/wall, it allows for great bass
performance without the requirement for a large in-
room subwoofer or grille� The port opening can be
disguised using the supplied grille, or alternatively a
plaster-up-to flush mount grille is available separately�
The supplied port has 3 options for its location on the
cabinet and can be easily changed over to allow for
easier installation/cabinet orientation� The port cannot
be bent or substituted for a different length section of
pipe, however, it can be adjusted such that it protrudes
from the cabinet between 0mm-110mm� This level
adjustment ensures the port opening lines up with
the finished surface of the ceiling, rather than venting
directly into the ceiling cavity which may result in
unsatisfactory acoustic performance�
Amplification and Cabling
cS6 subwoofers are passive devices, and therefore
require external amplification in order to work� Most
audio amplifiers used for home-audio application will
work effectively, however care should be taken to ensure
that the amplifier can effectively handle a 4 Ohm load
and is not excessively over-powered for the subwoofer�
Integrated amplifiers, audio video receivers (AVR’s),
multi-room and multi-channel amplifiers all typically
work well, although if using an AV receiver you will
require an external power amplifier fed from the LFE/
SW line level output of the AVR� cS6 has an in-built filter
which removes excess high and low frequency energy
DRAFT
DRAFT

6
cS6 install guide
from the signal� It is therefore not a requirement to use
a dedicated subwoofer amplifier (however these may
be used if more control over crossover, gain, phase,
tone or power management is required)� It is perfectly
adequate to use a ‘simple’ power amplifier, although it is
recommended that there is an element of gain control
within the system to adequately balance the subwoofer
to the rest of the system, ensuring the bass is not over or
under powered compared to the speakers� Cable should
be run from the amplifier to the subwoofer location
prior to installation for the sake of ease� Neostein
recommends the used of double-insulated stranded
loudspeaker cable for use in installation (no thicker than
8GA or 3�5mm diameter core)� For more information
on appropriate amplification or cabling, contact your
Neostein distributor�
Wiring
It is recommended that each loudspeaker and
subwoofer should be wired to its own amplifier channel�
It is also possible to wire Neostein subwoofers in series or
series-parallel configurations, however, it is critical that
total impedance load is suitable for the amplifier being
used� If series or series-parallel wiring is to be used, it is
always recommended to make these connections at
the amplifier and not in-ceiling� This helps with speaker
testing or re-configuration of the system in the future�
Speakers and subwoofers should not be wired in parallel
or series-parallel configurations together, as it will not
be possible to adequately balance tonal performance
without advanced equalisation�
Testing
Every single Neostein subwoofer should be fully tested
during installation� Once plasterboard or ceiling
finish has been hung, it is unlikely that you will
have easy access to the subwoofer, so all cabling
and continuity should be checked thoroughly prior
to this stage� It is also important to observe cable
polarity with a visual check� While polarity can be
inverted at the amplifier, best practice dictates
that it is preferable to ensure correct polarity at
the speaker/subwoofer as well, making for much
simpler fault finding and system calibration later
on� For more information refer to the section of
this guide on testing or contact your Neostein
distributor�
DRAFT
DRAFT

7
cS6 install guide
System Specification
Neostein loudspeaker systems can be used in place
of all ‘traditional’ installed speakers for use in multi-
room, surround sound, distributed audio, media room,
background music and many other configurations�
Loudspeaker and subwoofer placement will often
be dictated by the performance requirements of the
system, and all industry standards and conventions
should be adhered to when positioning loudspeakers
(for example angles and locations for speakers in a
surround sound system)�
Due to the size of a cS6 subwoofer, and the required port
opening, it is likely that these physical constraints will
also have an impact on the location of the subwoofer�
For example, finding a location where the port opening
works with the aesthetics of the room while also fitting
into the ceiling frame layout etc� Although it is possible
to calculate room modes to position subwoofers for
optimal performance, it is likely that construction
constraints will reduce the likelihood of achieving
technically perfect results�
As a general rule, Neostein recommends installing cS6
subwoofers such that the port is close to the corner of
a room� This provides the highest chance of even room
mode distribution (lowering the chances of significant
nulls and peaks within the low-frequency band) as well
as enhancing the subwoofers output through eighth-
space boundary loading�
Speaker Spacing
For background music or other distributed audio
systems where an even soundfield is required across a
large listening area, it is important to specify the correct
number of loudspeakers and space them accordingly to
give great results� This is especially important in open-
plan living spaces as well as commercial premises such
as bars, restaurants or retail spaces�
See the provided speaker spacing guide for suggested
arrangements in ceilings�
For stereo systems, Neostein recommends 2 invisible
loudspeakers paired with a single cS6 subwoofer (with
a mono-summed signal feeding it’s own dedicated
amplifier channel)�
For background music systems, Neostein typically
recommends one cS6 subwoofer for every 4 invisible
speakers used� Exact specification will always depend on
listening requirements, and may require separate level
adjustment of the subwoofers to adequately balance
their output to that of the speakers�
High Ceilings
While Neostein loudspeakers work well in large spaces,
installing speakers or subwoofers in extremely high
ceilings may give a very diffuse soundfield� There is
no exact cut-off in maximum ceiling height as factors
such as interior finish and decor as well as system
performance requirements can play a large role in
the specification process� With this in mind, Neostein
recommends that installations in ceilings above 5m are
DRAFT
DRAFT

8
cS6 install guide
avoided where possible� In spaces with high ceilings,
it may be preferable to install speakers in the walls at
a height close to 2�4m-3m from floor level (if this will
provide accurate coverage across the centre of the
room)� For more information on potential loudspeaker
placement, please contact your Neostein distributor�
In large rooms, it is likely that higher numbers of
subwoofers should be used to help achieve adequate
performance�
Wet rooms
When fully installed, plastered over and painted
adequately, Neostein loudspeakers are as waterproof as
the wall or ceiling into which they are installed, however
cS6 subwoofers do not have the same protection from
moisture� As such, cS6 subwoofers should not be used
in wet rooms, for example, in bathrooms, shower rooms,
swimming pool areas and gyms�
Surround Sound
An ideal solution for multi-channel audio systems,
Neostein unlocks the potential to have a fully immersive
surround sound system in a room such as a living space,
bedroom or even a dedicated media room�
cS6 subwoofer offers a near-invisible bass solution for
surround systems in small to medium sized rooms,
perfect for livingrooms and media rooms where a
discreet solution is required�
Bass management should be correctly configured
within the AVR� If using Neostein speakers, speaker
size should be set to “small” with a crossover at
approximately 120Hz� Gain/level, distance and polarity/
phase etc� should all be set to give best results within
the room� For more information about how to correctly
configure your surround system, contact your Neostein
supplier�
DRAFT
DRAFT
9
cS6 install guide
Environment
It is critical that the construction site is sealed from the
elements with all glazing fitted, and is temperature
stable before installation of Neostein subwoofers�
Maximum recommended humidity of RH50%, and at a
stable temperature of at least 16ºC (61ºF)�
Tools
For installation of Neostein cS6 Subwoofer, you will
require the following tools:
•Pencil
•Measuring tape
•Cable strippers
•Screwdriver
•57mm hole saw/drywall saw
If fitting the optional plaster-up-to grille (not covered in
this guide) you will also need the following tools:
•75mm holesaw
•Stapler
Safety and Precautions
Electrical & Mechanical
No attempt should be made to install this
product within existing building structures
unless you are certain that no electric
cables, water pipes, gas pipes or supporting
joists will be cut through�
Fire Protection
When making an intrusion into an
internal wall or ceiling to install a
Neostein subwoofer, be sure to check the
appropriate regulations pertaining to the
required fire rating� Depending on the
location of the intrusion and the applicable
regulations it may be necessary to build in
or install additional fire rated components
or products to enclose the subwoofer�
Neostein take no responsibility for the
correct specification and installation of any
such fire protection system that is required
behind their loudspeakers�
Metal Frame Ceilings
When installing in metal frame (MF)
ceilings (& walls), please ensure the
assembled metal frame is fully solid,
secure and that all metal mating joints are
DRAFT
DRAFT

10
cS6 install guide
mechanically fixed or bonded together�
It may be necessary to provide additional
mechanical structural support for the
cS6 subwoofer (not supplied)� Please
ensure your structure is capable of safely
supporting the entire weight of the cS6
subwoofer� Neostein takes no responsibility
for incorrectly specified/constructed
structures which may result in mechanical
failure or injury�
Cleanliness During Installation
Always install the subwoofer when the
general environment is clean and dust free�
Keep each sub protected in its shipping
carton until cutting work is complete and
the installation room has been cleaned
down thoroughly� Attempting to keep dust
and debris from entering the port opening
is critical� Any debris could be difficult to
remove and may result in undesirable
acoustic performance�
Other Considerations
•Install cS6 in a cool, dry, clean place away from direct
sunlight, cold bridges and heat sources, strong
vibrational forces, chemical fumes, dust and moisture
(steam)�
•Do not install cS6 subwoofer where its location may
impact thermal or acoustic performance of the
structure such that it would impact on local building
regulations�
•Only clean the product using a clean, dry or damp
cloth� Do not use solvents as this may cause damage�
•Ensure that all installation mounting surfaces are
able to support the weight of the product and any
mounting accessories�
•Do not attempt to modify or repair the product�
Contact your distributor if a fault should occur�
The supplied port tube should not be replaced or
supplemented with any additional pipes as this
will impact acoustic performance�
•Where using the optional plaster-up-to port
(available separately), avoid using silicone
sealants within the area of installation�
Sublimation of silicone will deposit a thin layer of
material on material surfaces which may degrade
the ability of plaster to bond�
•During installation, aligning the port opening in
the plasterboard to the subwoofer port is critical�
It is worth double checking all measurements of
port location to ensure the port lines up correctly�
•Please be aware that when this product is fitted
in simple (stud or rafter with plasterboard/
floorboard attached on either side) stud walls
DRAFT
DRAFT

11
cS6 install guide
or ceilings, vibrational energy is inevitably
transferred into the building structure� This
energy can travel for some considerable distance
up, down and along the structure� It is therefore
recommended the product be fitted within
acoustically isolated stud walls or ceilings where
possible� Special care should be taken when
installing into multi-occupancy buildings�
•Neostein takes no responsibility for inappropriate
use of materials and environmental conditions
under which they are applied�
Installation
Installation is simple, but should only be attempted by
professional building trades�
cS6 subwoofer is typically installed into a ceiling (or
wall) prior to hanging ceiling-board (such as drywall/
plasterboard/sheetrock)� It is essential that trades are
organised such that the subwoofer is installed prior to
hanging of sheet materials, and that the port opening
is carefully measured and cut, ensuring the port tube
is not moved/damaged while hanging the surrounding
board�
Check that your carton contains the correct number
of items - a single subwoofer, mounting brackets, port
trim and screws� Ensure the port trim is kept safe for
installation once ceiling/wall finish has been completed�
Retain this Installation Guide� If you pass the unit on to a
third party make sure you pass on the Installation Guide�
Installation Variations
This guide explains the installation process for Neostein
cS6 subwoofer into simple wooden joist/rafter ceilings
with plasterboard skins� The subwoofer is secured to the
joist or stud using the supplied mounting brackets (x4)�
Three of the mounting brackets are secured to the joist
frame, the subwoofer installed and secured using the
supplied screws, then finally the last mounting bracket
is used to fully secure the cabinet within the ceiling�
The subwoofer may be installed into walls and ceilings
that have double skin plasterboard, or any standard
thickness of board� The port is designed such that it can
have it’s location adjusted, either changing to one of 3
optional port positions, or having its length adjusted
in relation to the cabinet, allowing it to correctly vent
through the opening in the ceiling� A maximum port
length of 110mm (from the cabinet) is possible, so
cabinet should be installed so that the cabinet is no
further than 110mm from the final finished ceiling
surface�
Port Adjustment
The cS6 port can be adjusted to achieve correct
alignment with the ceiling opening as well as allowing
for several cabinet orientation options�
Three different port locations are available on the cS6,
DRAFT
DRAFT
12
cS6 install guide
however only one should be used� Two blanking plates
are included for the unused port locations�
To switch the port location to one of the alternative
positions, carefully remove the screws from the port
plate and blanking plate of choice (new port location)�
Be careful not to drop the screws into the port opening�
An O-ring is used to secure the port tube, while it should
hold in place on the port tube, it may become loose
once the plate has been removed, be careful not to lose
or damage it�
When reinstalling the port tube, ensure the O-ring
remains on the port-tube and is seated within the rebate
on the cabinet around the port opening� To adjust the
relative length of the port tube (aligning the port to the
eventual finished surface of the ceiling), carefully loosen
the screws on the port plate without fully removing
them� This will allow the port to be extended up to a
maximum of 110mm in length� Alternatively completely
removing the port plate allows for slightly more precise
adjustment of the o-ring position on the port tube, and
therefore the resulting port extension length� Take care
not to accidentally allow the O-ring to come off the
port tube fully as this will prevent the subwoofer from
operating correctly� Ensure port plate screws are fully
tightened such that the O-ring is compressed, locking
the port tube in position� Failure to tighten the port plate
may result in the port tube becoming loose over time,
which could cause undesirable acoustic performance�
Note: Blanking plates must always be screwed down
tight over port locations not in use�
O-ring
Port Plate
Port Tube
Blanking Plate
DRAFT
DRAFT

13
cS6 install guide
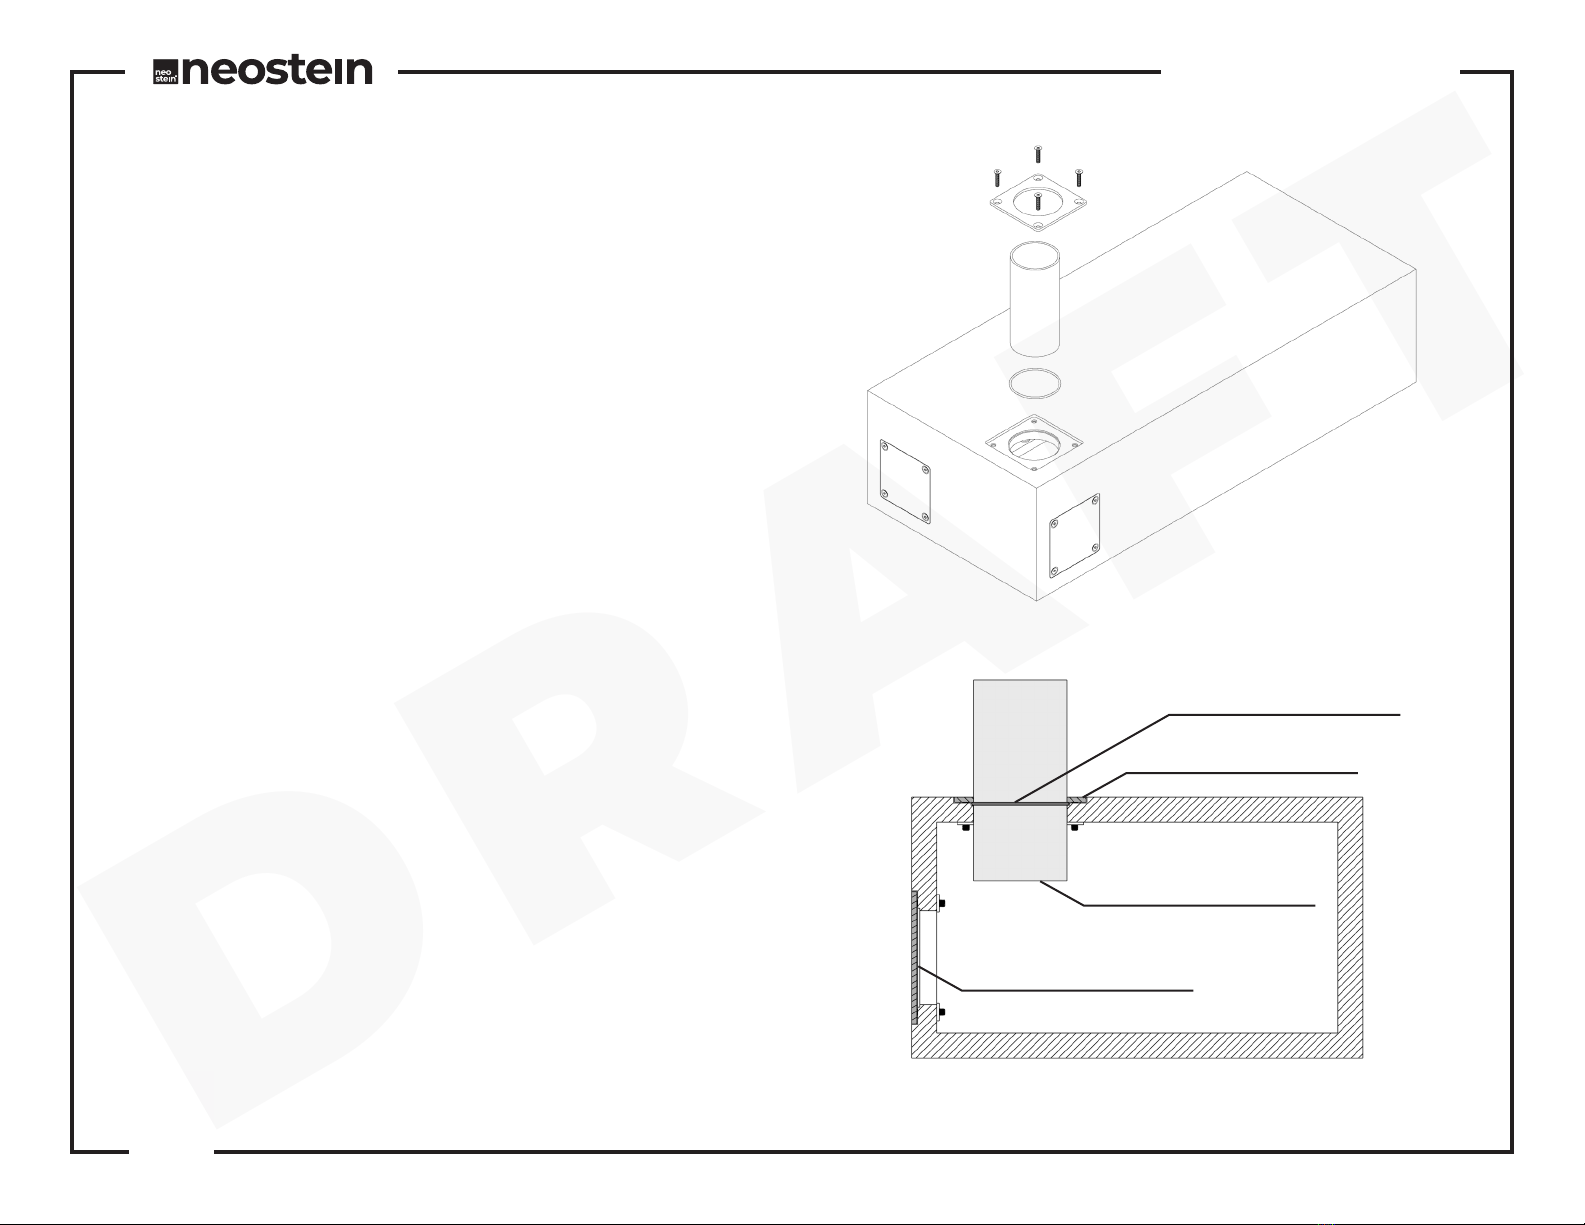
Joist / Frame
Mounting Bracket
Port Tube
cS6 Cabinet
Finished Ceiling
Port Blanking Plate
Port Trim
Max. 110mm
DRAFT
DRAFT

14
cS6 install guide
Run Cable
Pre-run cabling to sub location,
making sure cable will not rest
on the rear of the plasterboard
once ceiling is hung if near the
location of Neostein Invisible
Loudspeakers�
Neostein recommends using
double-insulated stranded
loudspeaker cable with a
maximum thickness of 8GA or
3�5mm diameter�
Take the opportunity to double
check ceiling construction/
layout, ensuring that there
is no conflict of space once
ceiling is closed� Check you have
sufficient cavity depth for the
cS6 subwoofer to fit� Depending
on chosen cabinet orientation,
a minimum depth of 180mm is
required�
Check you know the final ceiling
construction/finish build up so
that you can adequately align
the cabinet and port tube�
DRAFT
DRAFT

15
cS6 install guide
Fit First 3 Brackets
Once correct cabinet height has
been established (leaving a slight
gap behind plasterboard for
the brackets, but no more than
100mm gap) screw the first three
brackets directly to the joists�
Note: Brackets are countersunk
such that screws going into the
joists are countersunk from the
inside of the bracket, allowing
the cabinet to sit flush� Use
the longer screws supplied to
securely attach the brackets,
leaving the shorter screws for
attaching the cabinet to the
brackets in a later step�
DRAFT
DRAFT

16
cS6 install guide
Fit cS6 and Cable
Carefully slide the cS6 subwoofer
onto the brackets, using the
short screws provided to
secure the cabinet in place� The
subwoofer has been designed
such that it is safe to use the
provided screws to screw directly
into the cabinet� Pilot holes
should not be drilled and are not
required�
Attach cable, observing correct
polarity�
Note: Using incorrect length
screws, or drilling holes in the
cabinet may lead to incorrect
product performance or failure�
DRAFT
DRAFT

17
cS6 install guide
Final Bracket and Port
Adjustment
Fix the fourth and final bracket
to the joist and cabinet using the
supplied longer screws into the
joist and shorter screws into the
cabinet�
Ensure the port tube length has
been correctly set such that it
will meet the front of the ceiling-
board once hung� Failure to
correctly set the port length may
impact acoustic performance of
the subwoofer�
To adjust the port tube length,
carefully loosen the bolts on
the port plate, this will relax an
O-ring which is used to grip the
tube� Carefully slide the port tube
to the correct position, ensuring
it does not protrude more than
110mm from the cabinet�
If the port tube accidentally
becomes free from the cabinet,
fully remove the port plate and
re-fit the O-ring prior to setting
final depth�
Tighten all bolts are fully to
secure the port in place�
DRAFT
DRAFT
18
cS6 install guide
Test Subwoofer
Prior to installation of ceiling
board, it is important to test the
subwoofer and perform a final
visual inspection�
Check wiring polarity and port
length are set correctly and then
proceed to perform an acoustic
test�
Playing music/test tone through
the subwoofer is important
to confirm cable integrity/
continuity as well as ensuring all
components have been securely
fitted within the ceiling�
If any component is loose or
damaged, it is important to
rectify the problem at this stage�
Once ceiling-board is hung, it
will not be as easy to rectify any
issues�
MIN MAX
100Hz - 1000Hz
DRAFT
DRAFT
Table of contents


