NetGenie Home NG11VHQSG User manual

Supports VDSL2, ADSL2+,
Cable Internet, 3G USB modem
Excellent Wireless Range
& High Performance Gigabit Port
NetGenie is furnished under the terms of NetGenie's End User license agreement, the details and links of which are given
on the last page of this Quick Start Guide. By using this Appliance, it shall be presumed that you have read the said license
and you agree to be bound by the terms and conditions of the same.
N300
VDSL2/ADSL2+
www.netgenie.net
QUICK START GUIDE
Wireless VDSL2/ADSL2+
Modem Router
Secure Wi-Fi for
Multiple Devices
Share your 3G
USB modem Internet
Protection from
Bots & Hackers
Age-wise
Parental controls

English
Français
Deutsch
Español
Italiano
Nederlands
Ελληνικά
Português
Türkçe
2
12
23
34
45
56
67
79
90
Index
Reach us at:
www.netgenie.net

Unboxing Your New NetGenie…
Congratulations on your purchase of NetGenie Wireless VDSL2/ADSL2+
Modem Router. After unboxing NetGenie, please ensure that you have
all these components:
1. NetGenie Wireless Base Unit - NG11VH
2. Two (2) detachable Wi-Fi Antennas
3. RJ-45 Ethernet Cable
4. Telephone Cable i.e. RJ-11 Cable
5. Multi-Country Power Adapter
6. External Splitter
7. USB Broadband Extension Cable
8. Quick Start Guide
Please contact your vendor immediately if you find anything missing.
NetGenie: The Appliance
INET
DSL
WLAN
1
2
3
4
Power LED
LAN-Your Computer
Connectivity LED
LAN / WAN-Internet
Connectivity LED
Wireless (Wi-Fi)
Connectivity LED
DSL LED
Internet
Connectivity LED
Connect Your
RJ-11 / Telephone
Line here
Connect Your
PC / LAN here
Connect Your LAN
/ Direct Internet
Cable i.e. RJ-45
(WAN) here
3G USB
Modem
Port
Power
Adapter
Jack
Power
On / Off
Switch
Wi-Fi Antennas
Wi-Fi
On / Off
Switch
Reset
Button
WPS
On / Off
Switch
1
2
Section 1 Know Your NetGenie
23
1
56
4
7 8
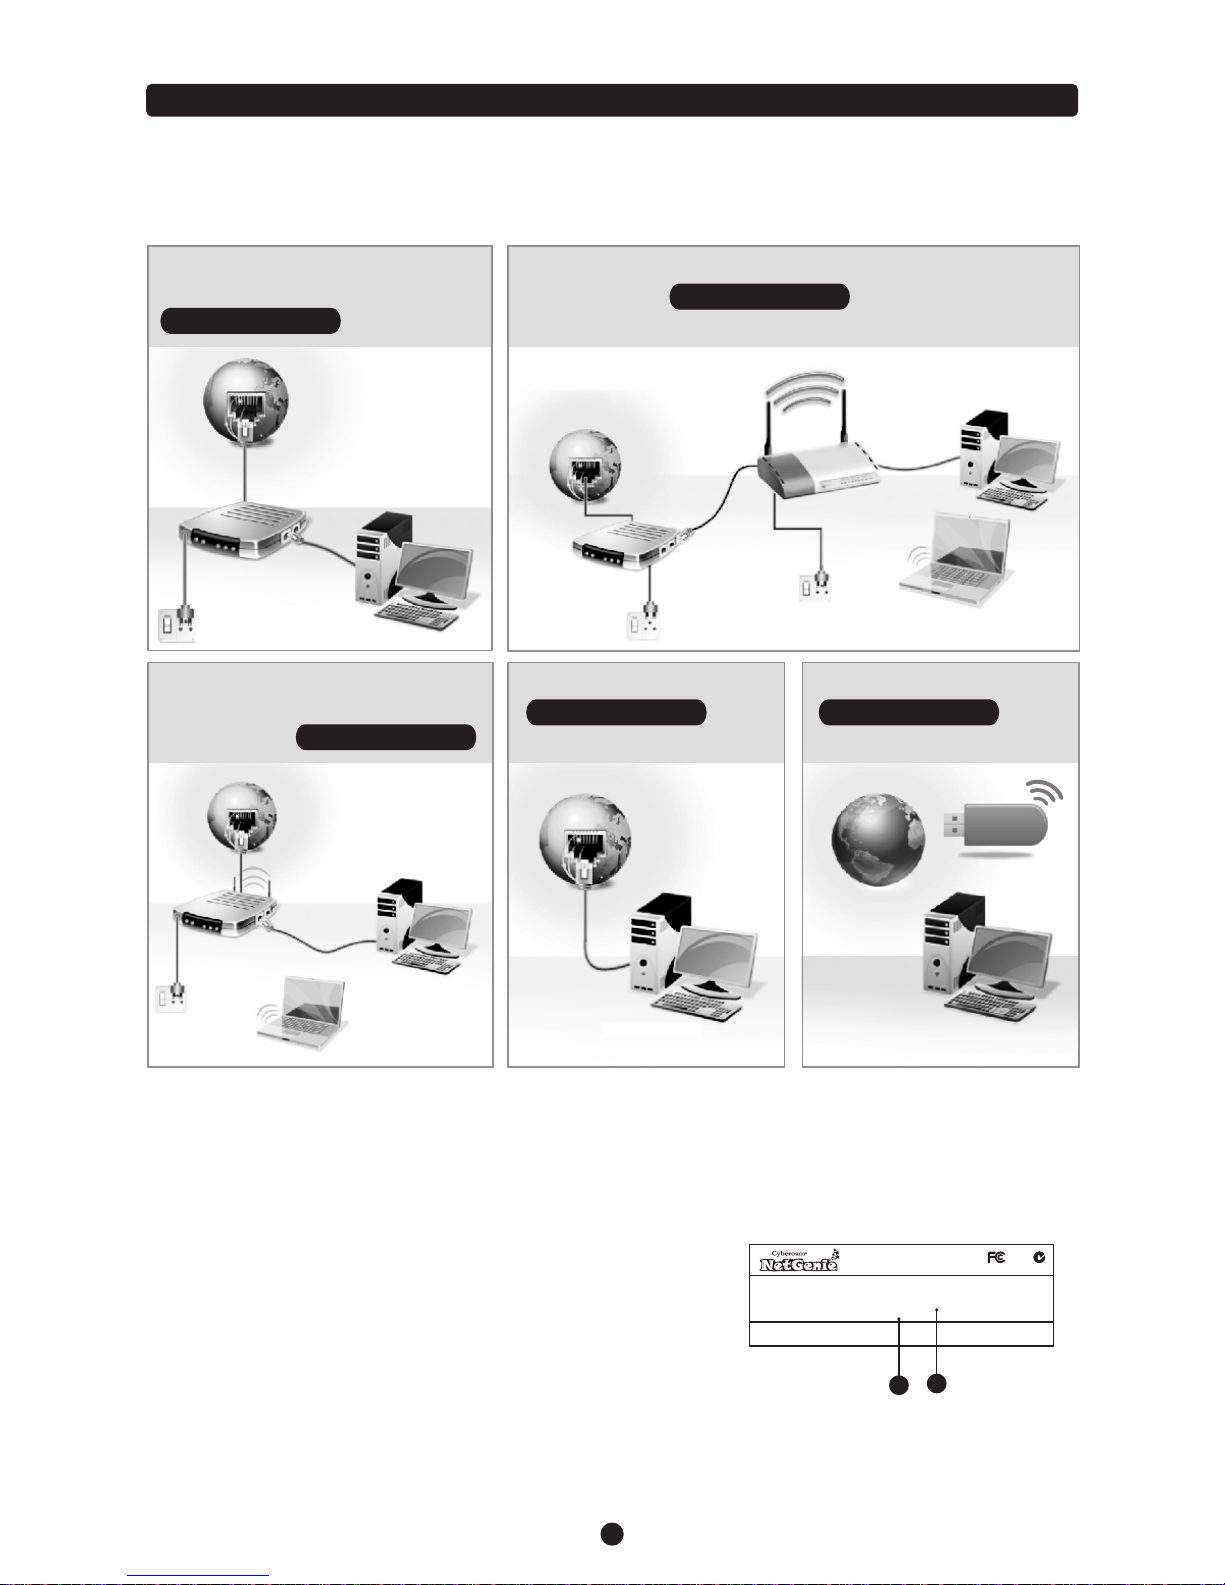
Phone Line → VDSL/ADSL/Cable
Modem → PC / Laptop:
Refer to Scenario 1
Internet
VDSL/ADSL/Cable Modem
Desktop
Modem
Power
Cable
Internet
VDSL/ADSL/Cable Modem
+ Wireless Router
Laptop
Desktop
Modem
Power
Cable
Phone Line → VDSL/ADSL/Cable
Modem also acts Wi-Fi access point
→ PC / Laptop: Refer to Scenario 1
Internet
VDSL/ADSL/
Cable Modem Laptop
Desktop
Wi-Fi Router
Modem
Power
Cable
Power
Cable
Phone Line → VDSL/ADSL/Cable Modem → Wi-Fi access point
→ PC / Laptop: Refer to Scenario 1
Desktop
Internet
USB Modem:
Refer to Scenario 3
Internet
Desktop
Direct Cable → PC / Laptop:
Refer to Scenario 2
Identify your Internet Set up
Depending on your network set-up, you can connect NetGenie to the Internet by referring to any of the
following scenarios:
Getting your NetGenie Ready
Before you begin surfing the Internet using NetGenie, you need to assemble the appliance.
1. Look out for a sticker at the back of the appliance containing the
default wireless network name, technically known as SSID and
a pass key specific for your appliance. Please note down your
pass key for future reference.
2. Plug one end of the power adapter into the socket on the back of
NetGenie Base Unit and the other end into the nearest main
socket.
3. Before you access the Internet through NetGenie, make sure
the power is switched on. The Power LED on the front panel
should turn green. 1. Wireless Network Name
2. Security/Pass Key
1
2
1
3
Section 2 Connecting to the Internet
Model Name : Cyberoam NetGenie NG11VH
Serial Number : W118300302-Q26QRB MAC : 02:10:18:01:07:01
Wireless Network Connection Name (SSID) : Netgenie
Network Security Key (Pass Key) : MCAU7I8X
This device complies with Part 15 of the FCC Rules. Operation is subject to the following two conditions:
(1) This device may not cause harmful interference, and (2) this device must accept any interference received,
including interference that may cause undesired operation. Power: 12V/1A
Manufactured in China
CE

Defaults:
!Default IP Address to access NetGenie: http://10.1.1.1
!Default User Name: admin
!Default Password: admin
After your first login, it is recommended that you change your default password for security reasons.
Appliance Reset Button:
To reset appliance to factory default settings, keep the Reset Button pressed for 5 seconds. On doing so, all
past upgrades and configurations will be lost.
Scenarios - 'Connecting through NetGenie’
Please check how you connect to the Internet and make note of it before making any changes. We have
provided three (3) different usage scenarios. Check the relevant scenario applicable for you and follow given
instructions.
To configure User-specific Internet access, refer the 'Internet Controls’ section.
In case you cannot connect to the Internet after configuring NetGenie, revert back to your original setup and
contact NetGenie support at [email protected]
1
4
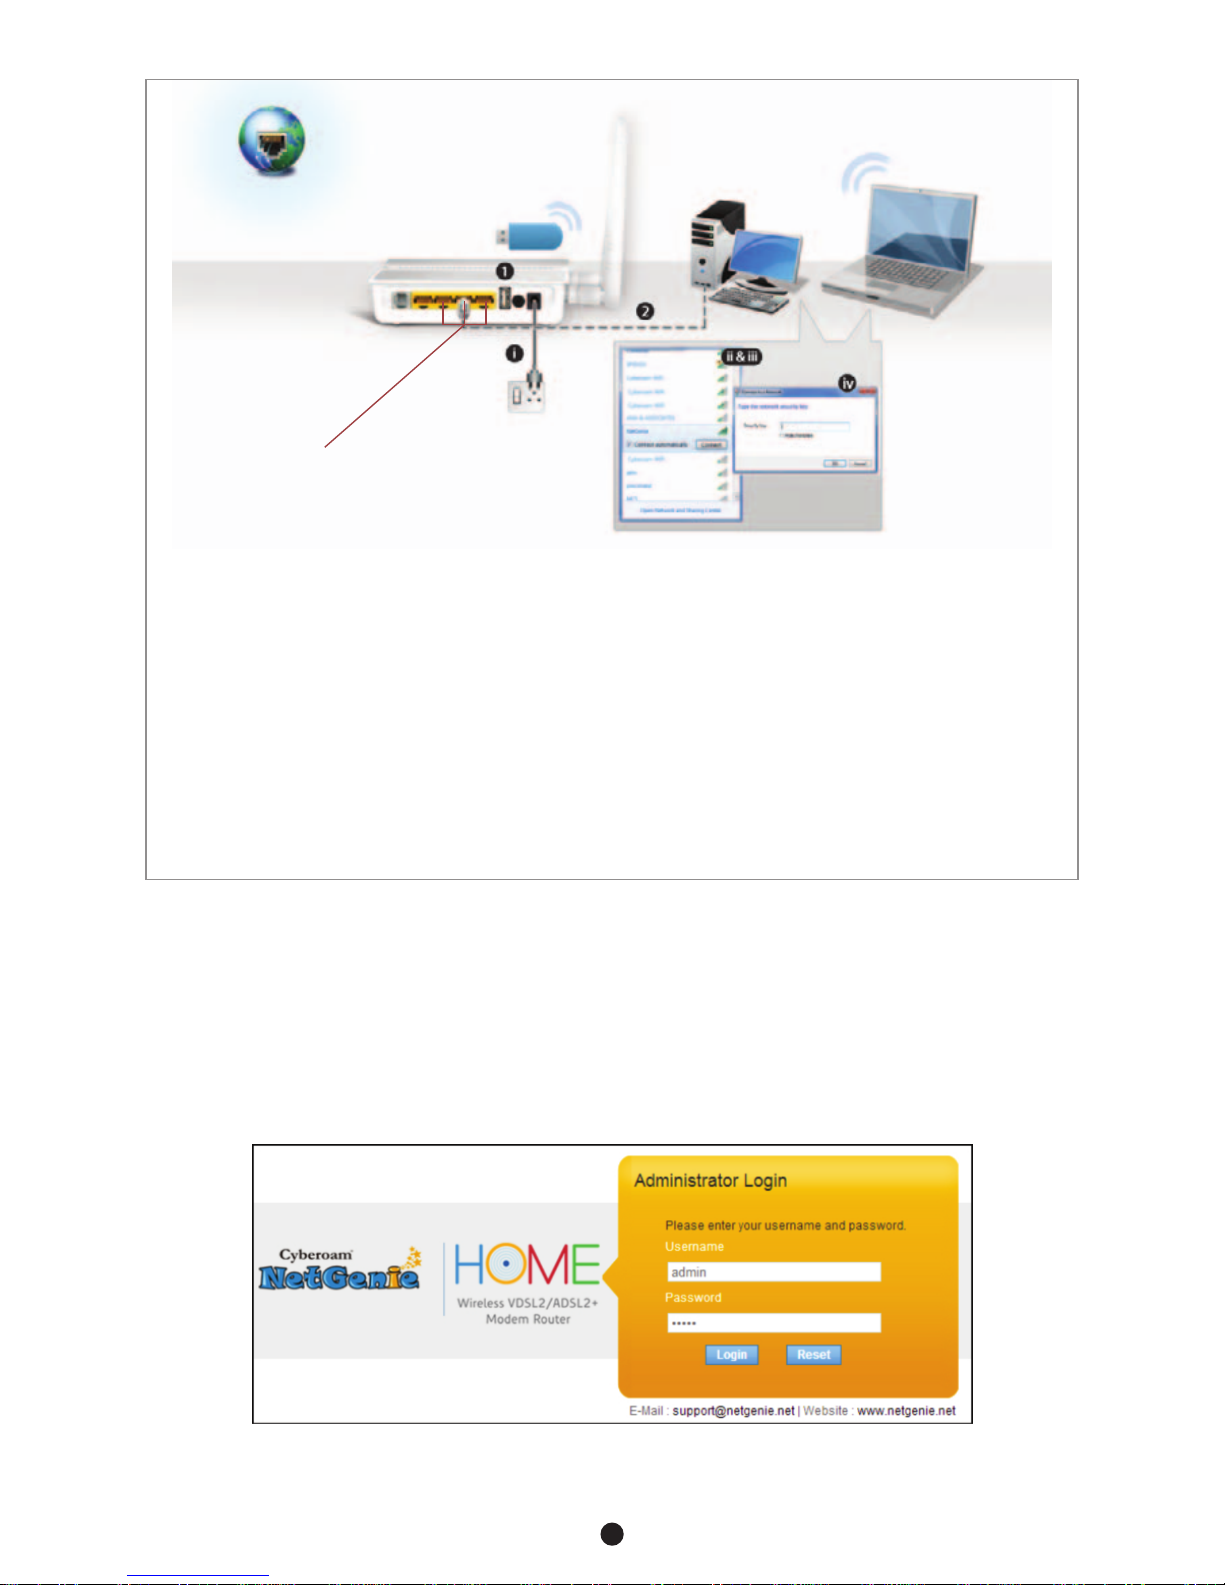
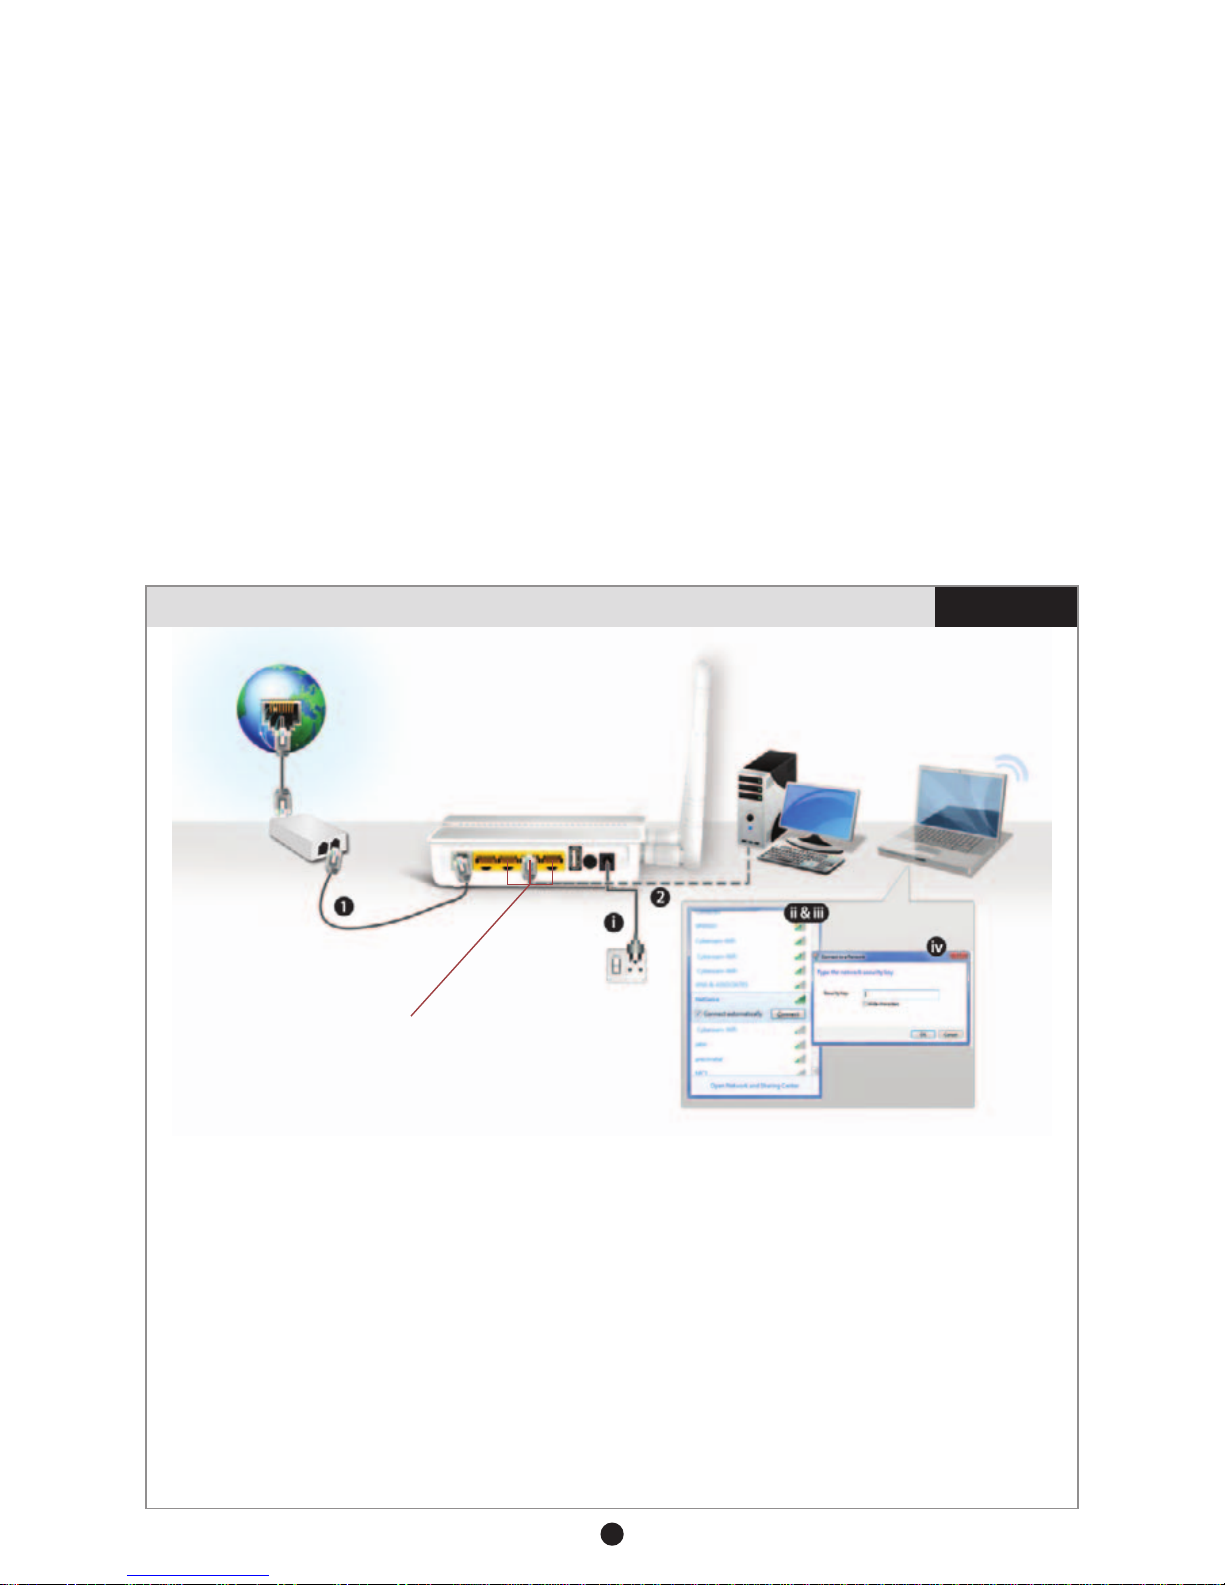
Secure Internet Connectivity through VDSL/ADSL Scenario 1
NetGenie Wireless VDSL2/ADSL2+
Modem Router
Connect your Computer/
LAN to any of the ports
Connect your Internet
cable here
Laptop
Desktop
NetGenie
Power Cable
Internet
Splitter
1. Unplug the existing telephone broadband wire from your VDSL/ADSL/Cable Modem and plug it into
the NetGenie socket labelled as “DSL”.
2. Use the RJ-45 Ethernet cable provided with the NetGenie appliance to connect your computer to any
of the “LAN” NetGenie sockets and switch-on the NetGenie appliance.
OR
i) Switch-on your NetGenie appliance. Wait till the Power LED and “DSL” LED turns green and for the
WLAN/WPS LED to turn green and stabilize.
ii) Start your laptop. Make sure that your Wireless Network Adapter is enabled. Your laptop will auto
detect the wireless network (SSID) named “NetGenie - XXXX” (XXXX- alpha numeric characters).
iii) Click the Network icon in computer's system tray (bottom-right of your screen) from where you can
view available wireless networks. Select “NetGenie - XXXX”.
iv) After selecting “NetGenie - XXXX”, you will be asked to enter the exact Security/Pass Key printed
on the sticker at the back of your appliance (Refer to Getting your NetGenie Ready section).

NetGenie Wireless VDSL2/ADSL2+
Modem Router
Internet
Laptop Or
Desktop
NetGenie
Power Cable
Connect your Internet
cable here
Connect your Computer/
LAN to any of the ports
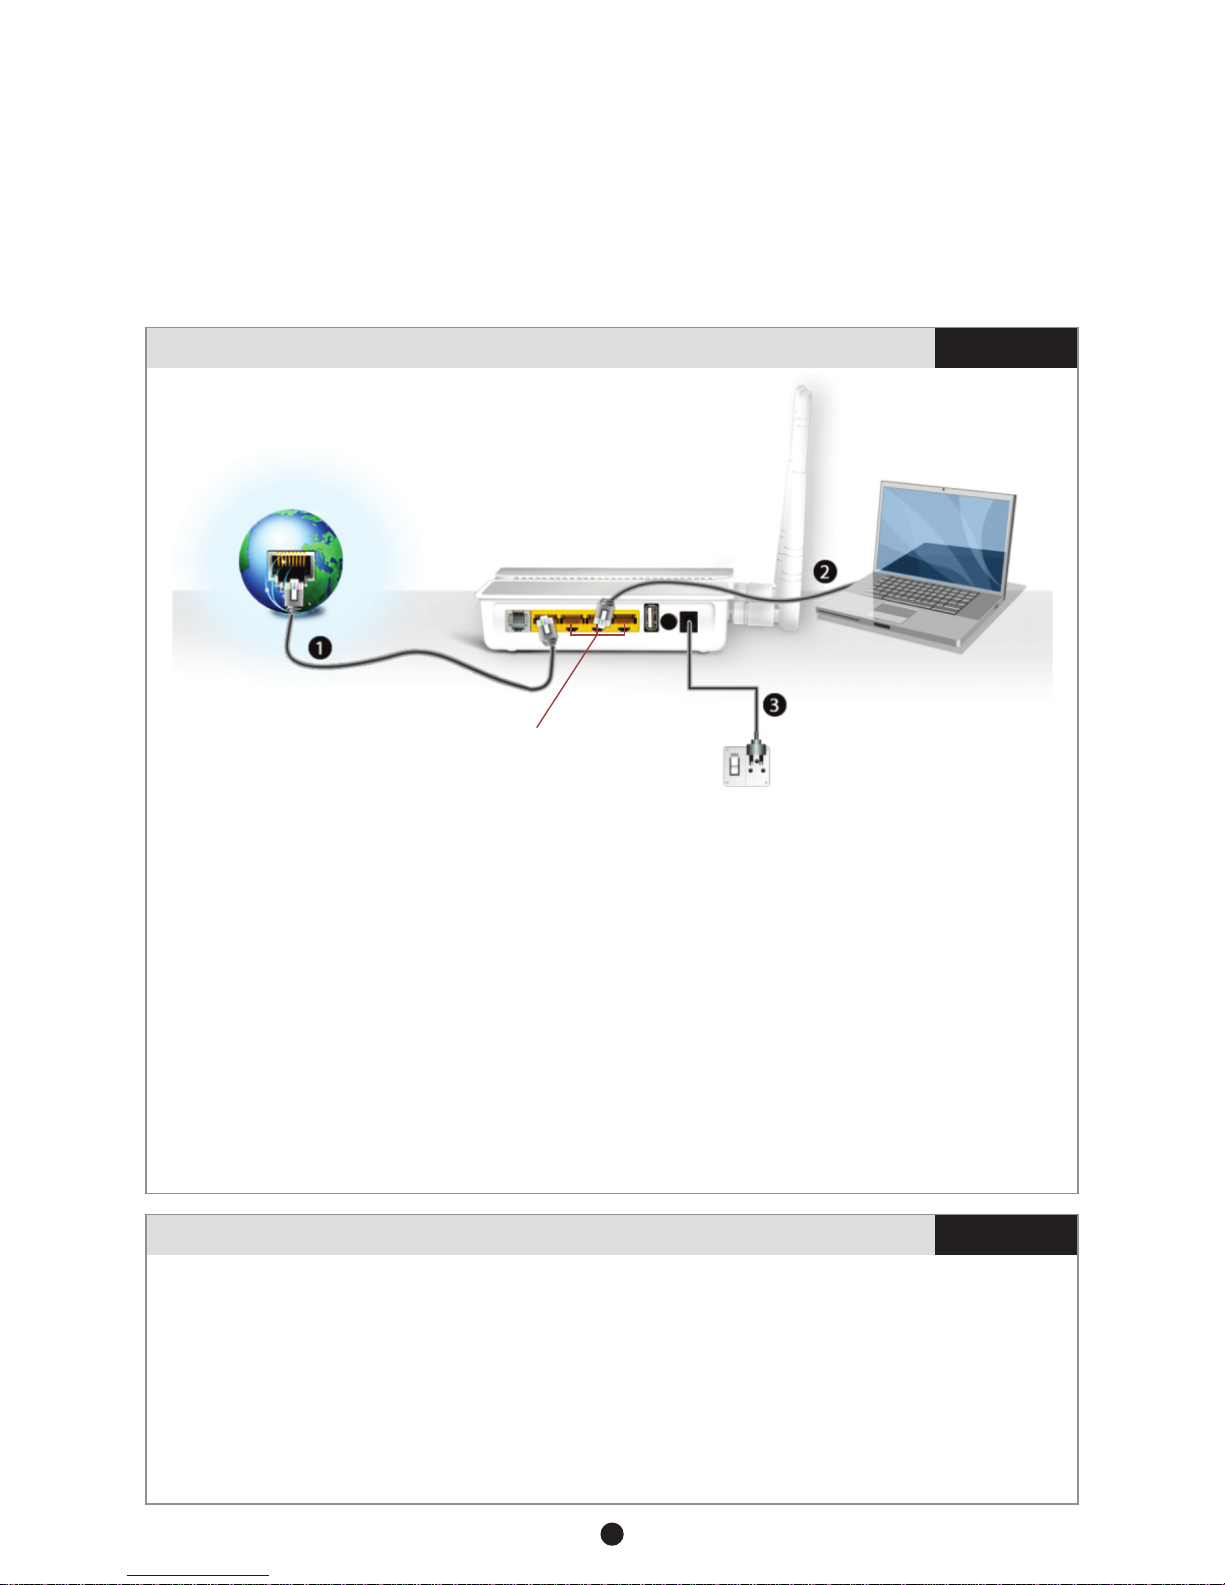
Secure Internet Connectivity through Direct Cable Scenario 2
1. Unplug the Internet cable that connects to your computer and plug it into the “ETH 4” NetGenie socket.
2. Use the RJ-45 Ethernet cable provided with the NetGenie appliance to connect your computer to any
of the “LAN” NetGenie sockets.
3. Switch-on your NetGenie appliance. Wait till the Power LED and “WAN” LED turns green and for
“LAN” LED to turn green and remain steady.
4. Open your browser and go to the default IP Address i.e. http://10.1.1.1 to access NetGenie Web
Admin Console. Use the default User Name and Password i.e. ‘admin’ to log in.
5. You need to configure network settings to connect to the Internet. You can either run the NetGenie
‘Network Configuration Wizard’ or configure the settings manually through NetGenie user interface.
6. Once you finish configuring necessary network settings, start surfing the Internet, you will be served
with NetGenie Splash Screen.
Your computer is now secured with the Quick Security feature automatically turned on.
3. Open your browser and go to the default IP Address i.e. http://10.1.1.1 to access NetGenie Web
Admin Console. Use the default User Name and Password i.e. ‘admin’ to log in.
4. You need to configure network settings to connect to the Internet. You can either run the NetGenie
‘Network Configuration Wizard’ or configure the settings manually through NetGenie user interface.
5. Once you finish configuring necessary network settings, you can start surfing the Internet. You will be
served with NetGenie Splash Screen.
Your computer is now secured with the Quick Security feature automatically turned on.
1
5
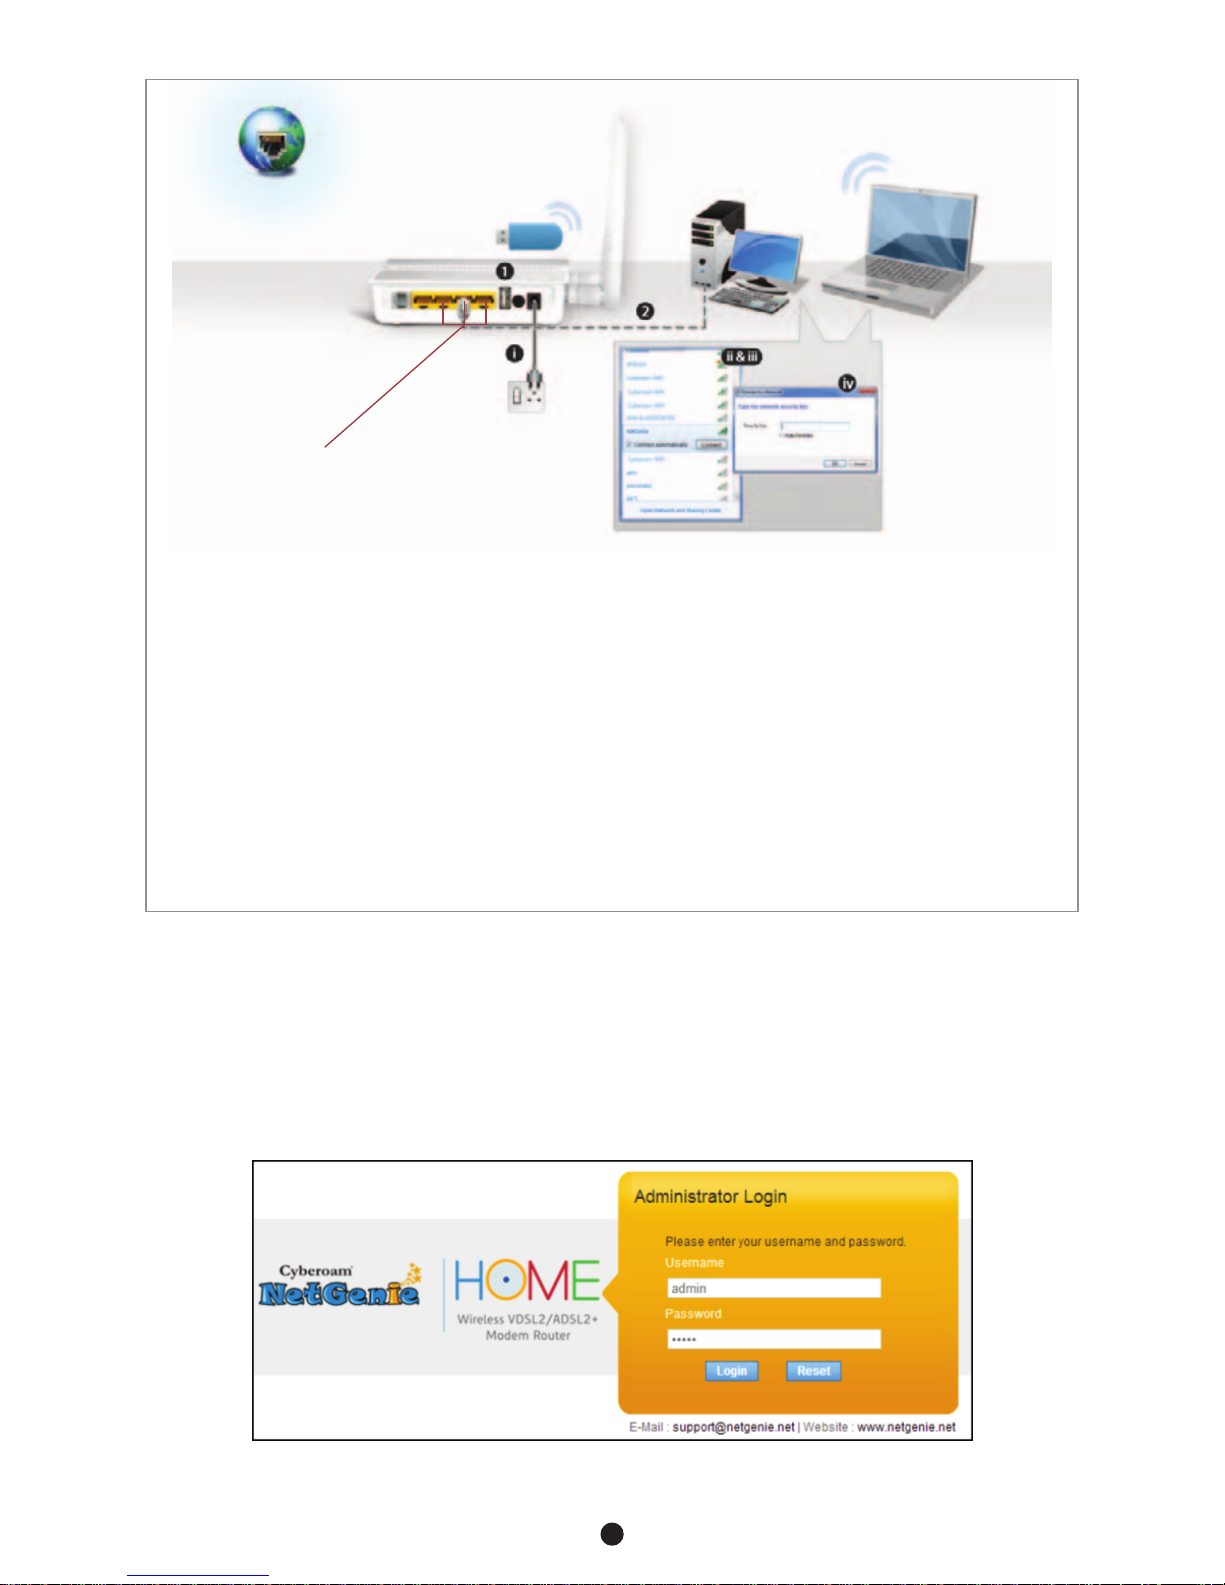
Secure Internet Connectivity using 3G USB Modem Scenario 3
1. Plug a 3G USB modem in the USB slot provided in the NetGenie appliance.
2. Use the RJ-45 Ethernet cable provided with the NetGenie appliance to connect your computer to any
of the “LAN” NetGenie sockets and switch-on the NetGenie appliance.
OR
i) Switch-on the NetGenie appliance. If you are connecting to the Internet over Wi-Fi, start your
laptop.
ii) Make sure your Wireless Network Adapter is enabled. Your laptop will automatically detect the
wireless network (SSID) named “NetGenie - XXXX” (XXXX- alpha numeric characters).
NetGenie Wireless VDSL2/ADSL2+
Modem Router
NetGenie
Power Cable
Internet
Connect your Computer/
LAN here to any of the ports
Laptop
Desktop
Network Configuration Wizard
The wizard will help you configure network settings to connect to the Internet.
1. Enter http://10.1.1.1 in your browser's address bar where you type in URLs of various websites such as
www.google.com.
2. Next, you will come across the following Admin Screen. Use the default User Name and Password i.e.
‘admin’ to log in and click ‘Login’.
1
6
iii) Click the network icon in computer's system tray (bottom-right of your screen) and Select
“NetGenie - XXXX”.
iv) After selecting “NetGenie - XXXX”, you will be asked to enter the exact Security/Pass Key printed
on the sticker at the back of your appliance.
3. Enter the IP Address: http://10.1.1.1 in the address bar. Use the default User Name and Password i.e.
‘admin’ to log in.
4. Go to Network Settings > Internet.
5. Select USB Modem and apply the configurations after filling in the required details. NetGenie will
automatically connect to the Internet.
6. Open your browser and start surfing the Internet, you will be served with NetGenie Splash Screen.
Your computer is now secured with the Quick Security feature automatically turned on.

3. To access the Network Configuration Wizard, go to Network Settings and click ‘Launch Network
Configuration Wizard’.
4. Click ‘Next’ to continue or ‘Skip Wizard’ to configure the network settings manually, through the NetGenie
user interface.
5. Select your Internet connection type i.e. VDSL/ADSL or Ethernet. Click ‘Next’ to continue.
1
7
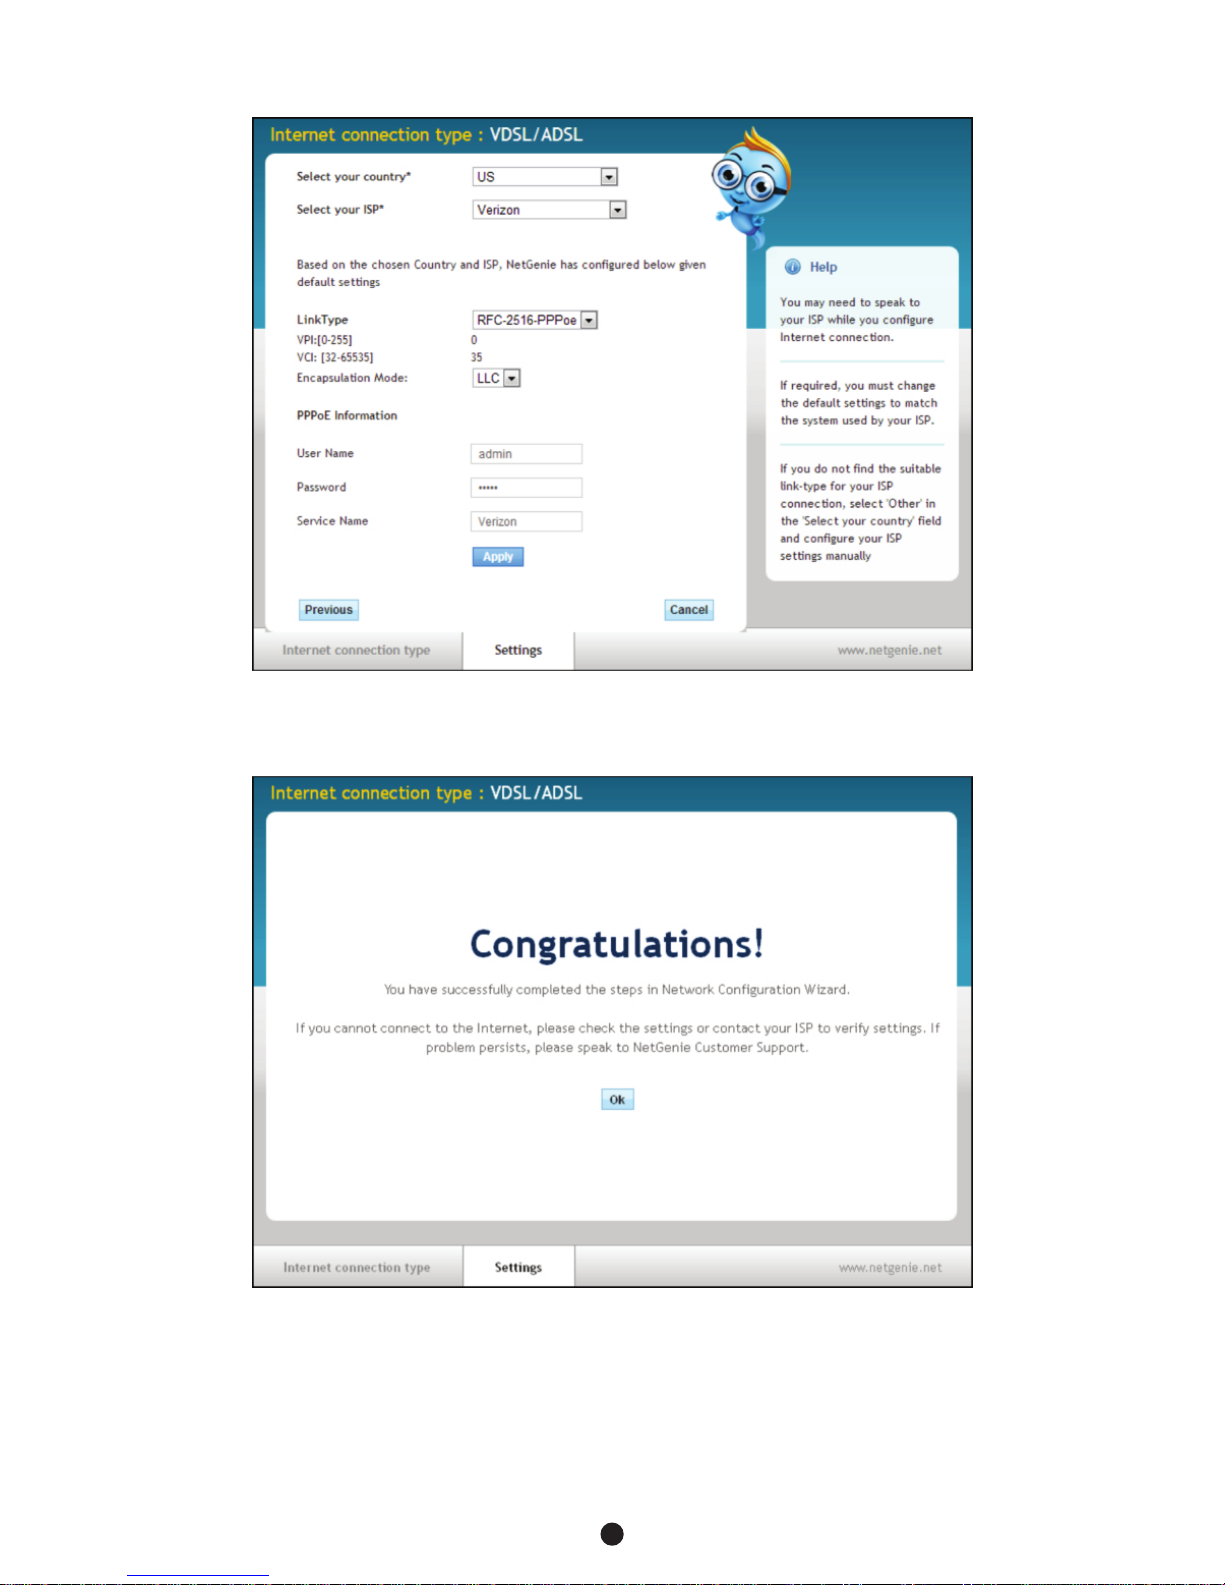
Note:
In case your ISP provides IP over DHCP, you may need not to provide any User Name and Password to
connect to the Internet.
You can now start surfing the Internet. Click ‘Ok’ to exit the wizard.
Note:
!Above screen shots are for VDSL/ADSL connection type only. In case of Ethernet, click ‘Next’ after selecting
Ethernet as your Internet connection type and NetGenie will automatically connect to the Internet.
!However for Ethernet connection type with a static IP Address, you need to configure the Network settings
manually through the NetGenie user interface.
Select your country and ISP from the list. Enter Username and Password as provided by your ISP.
1
8

NetGenie Splash Screen
When you start surfing the Internet through NetGenie, you will be served with a splash screen.
This introductory splash screen gives an overview of NetGenie features along with multiple options. You can
perform following actions:
1. Click 'Learn more about NetGenie's Security' button to read detailed information regarding security
features offered by NetGenie.
2. Click the URL below 'Continue Surfing' to skip this page.
3. Click 'Why NetGenie' to know benefits of NetGenie over other available products.
4. Click 'Customer Portal' to access customer portal of NetGenie. Customer portal allows you to register
your appliance in order to avail support.
5. Click 'Administrator Login' button to access NetGenie appliance. Please note that administrator login is
mandatory to configure Internet controls for your family members.
6. If you do not wish to view this page again, tick the check-box against 'Do not show this page again'.
Note:
!Once you have created a user in NetGenie or whitelisted any device, this splash screen will not be displayed
anymore.
NetGenie's Internet Controls
Once you begin surfing the web, you would want to ensure online safety for your family members to give them
controlled internet access to websites and applications. Since, your family members maybe of diverse age
groups, you might want to setup age-appropriate Internet controls. In order to reflect your family members'
activity in NetGenie, you will have to create different users and assign Internet restriction zones for each and
everyone. The user here refers to the name of the individual for whom you want to set Internet surfing access
policies.
Step 1: Basic Configuration
Login to the NetGenie Web Admin Console using the default username and password i.e. ‘admin’. Once you
have logged in into the appliance,
1. You can select your preferred language.
2. In ideal case, NetGenie appliances are programmed to automatically set time zone according to your
geographical location within first 30 seconds, once the Internet is connected. We suggest you to verify
the time zone from System > Time and update it, if required.
3. Register your NetGenie appliance from System > Registration to avail support.
1
9
Section 3 NetGenie’s Internet Controls
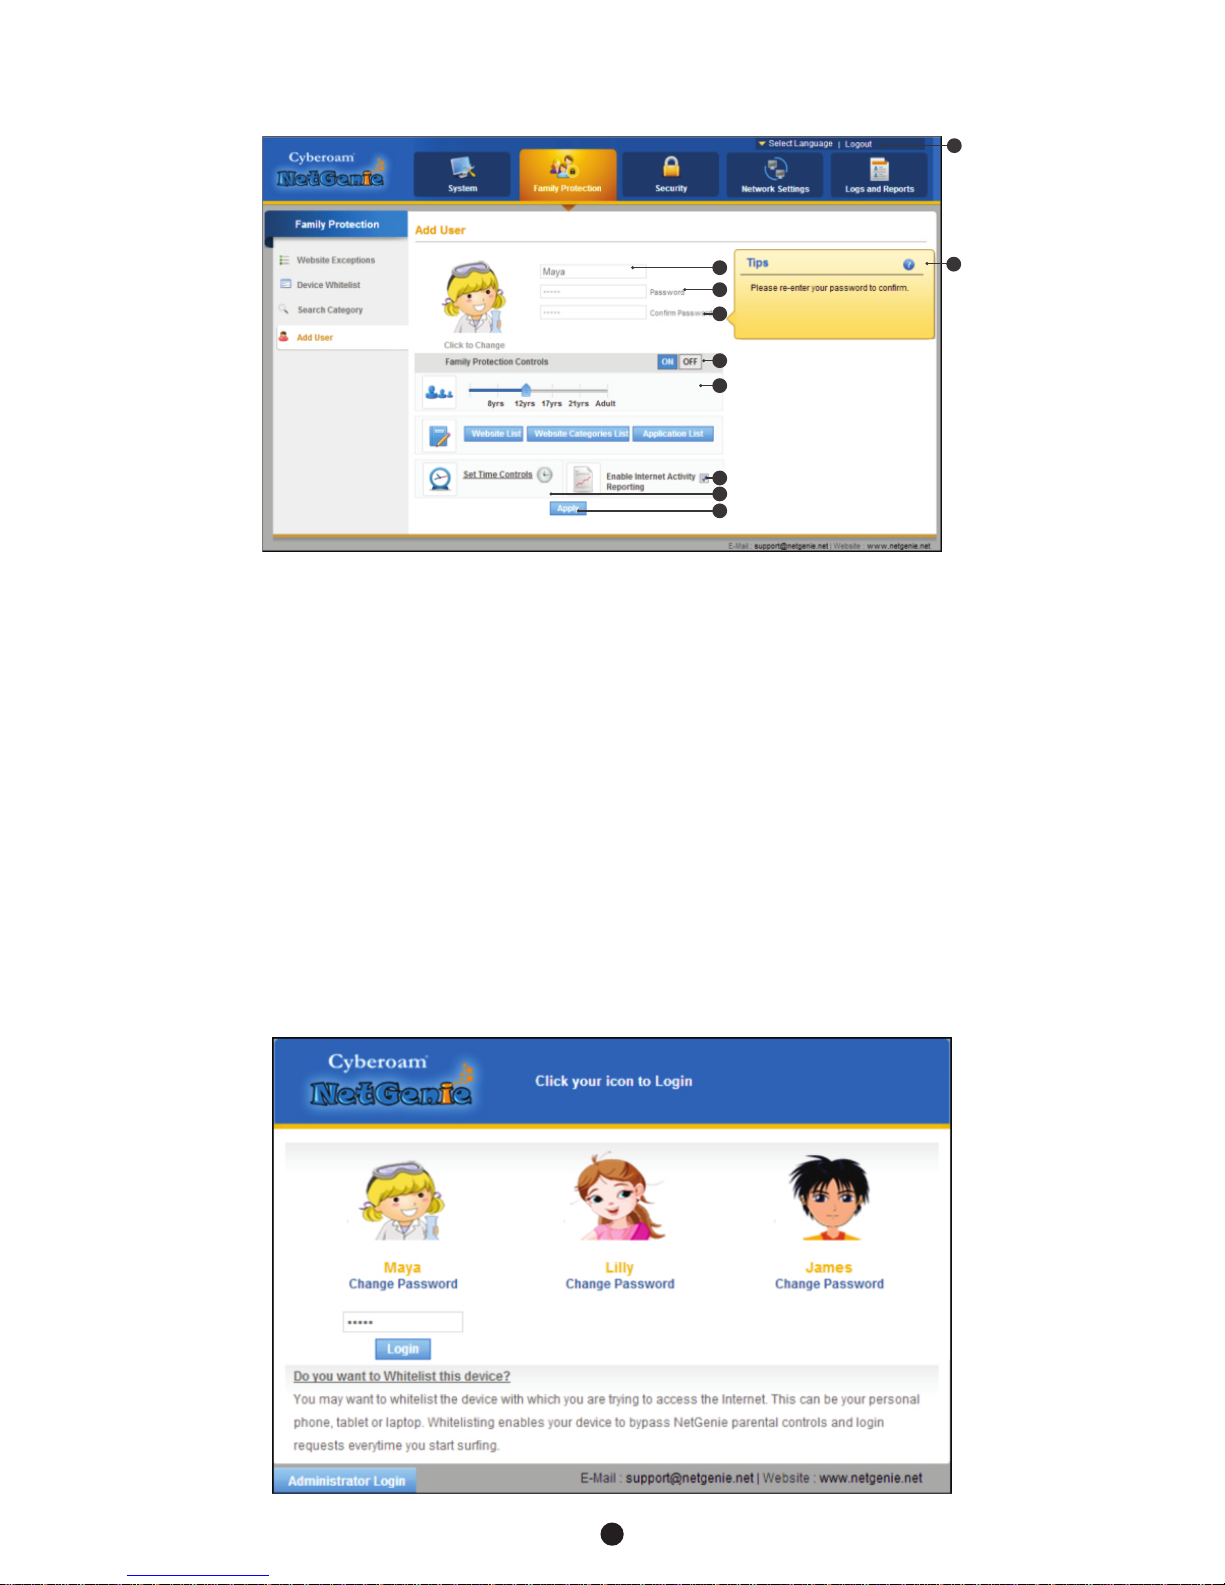
Step 2: Adding your family members
1. To add various users, visit the Internet Controls Page. Enter the name of the individual for whom you wish
to allow Internet access in the Username section. Here, for example, the username used is "Maya".
2. Choose a password. Re-enter the password in the Confirm Password field.
3. By default, Internet Controls are ON for the user. To bypass it, click OFF.
4. Drag the slider bar to reflect the Internet Restriction level for any of your family members. This selection
will block any websites and applications deemed inappropriate for those users.
5. If you wish to change the picture of an individual, simply click the image icon. Similarly, if you wish to keep
logs of Internet activity for that user, tick the "Enable Internet Activity Reporting" checkbox.
6. Click 'Set Time Controls' to enable time based Internet access to the user.
7. In case of any confusion on how to configure, please refer instructions given in the "Tips" panel on the
right hand side of your screen.
8. Click the Apply button to save changes.
9. Click the Logout link to exit the NetGenie admin interface.
Step 3: Start Surfing
1. Open a new browser window and enter a URL of the website that you want to visit, e.g. www.google.com,
in the address bar. You will come across a user authentication page. Click the image associated with your
username and enter the password.
1
10
3
9
7
1
2
2
4
5
6
8

3. Click the given link to open the website. After surfing, do not forget to click 'Logout' for security reasons.
Similarly, you can apply the appropriate Internet Controls for all your users for a safe and secured Internet
experience.
Step 4: Deleting Users or Deactivating/Activating Users
Deleting Users
1. If you wish to delete a user, click the icon next to username in the left hand panel of the Internet
Controls page.
2. When prompted, confirm your action by clicking the OK button. The user will be deleted.
Deactivating or Activating Users
1. If you wish to deactivate a user, click the icon next to the username in the left hand panel of the Internet
Controls page. To activate the user, click against the icon next to the username.
2. When prompted, confirm your action by clicking the OK button.
2. You will come across the following page.
1
11

Français
Le guide d'installation rapide
1
12

Déballage de votre nouveau NetGenie…
Nous vous félicitons d'avoir acheté Modem Routeur NetGenie
Wireless VDSL2/ADSL2+. Après avoir déballé le NetGenie, veuillez
vérifier que vous disposez bien de tous les éléments suivants :
1. La base sans fil NetGenie - NG11VH
2. Deux (2) antennes Wi-Fi amovibles
3. Câble Ethernet RJ-45
4. Câble téléphonique (câble RJ-11)
5. Adaptateur multi-pays d'alimentation
6. Répartiteur externe
7. Port USB haut débit Extension Cable
8. Le guide d'installation rapide
Si un élément est manquant, contactez immédiatement votre
fournisseur
NetGenie : l'appliance
INET
DSL
WLAN
1
2
3
4
Power LED
LAN-Your Computer
Connectivity LED
LAN / WAN-Internet
Connectivity LED
Wireless (Wi-Fi)
Connectivity LED
DSL LED
Internet
Connectivity LED
Connect Your
RJ-11 / Telephone
Line here
Connect Your
PC / LAN here
Connect Your LAN
/ Direct Internet
Cable i.e. RJ-45
(WAN) here
3G USB
Modem
Port
Power
Adapter
Jack
Power
On / Off
Switch
Wi-Fi Antennas
Wi-Fi
On / Off
Switch
Reset
Button
WPS
On / Off
Switch
1
13
Section 1 Connaître votre NetGenie
23
1
56
4
7 8

Phone Line → VDSL/ADSL/Cable
Modem → PC / Laptop:
Refer to Scenario 1
Internet
VDSL/ADSL/Cable Modem
Desktop
Modem
Power
Cable
Internet
VDSL/ADSL/Cable Modem
+ Wireless Router
Laptop
Desktop
Modem
Power
Cable
Phone Line → VDSL/ADSL/Cable
Modem also acts Wi-Fi access point
→ PC / Laptop: Refer to Scenario 1
Internet
VDSL/ADSL/
Cable Modem Laptop
Desktop
Wi-Fi Router
Modem
Power
Cable
Power
Cable
Phone Line → VDSL/ADSL/Cable Modem → Wi-Fi access point
→ PC / Laptop: Refer to Scenario 1
Desktop
Internet
USB Modem:
Refer to Scenario 3
Internet
Desktop
Direct Cable → PC / Laptop:
Refer to Scenario 2
Identifier votre configuration Internet
Selon la configuration de votre réseau, vous pouvez connecter NetGenie à Internet en vous reportant à l'un
des scénarios suivants :
Préparer votre NetGenie
Avant de pouvoir naviguer sur Internet avec NetGenie, vous devez assembler les différents éléments.
1. Vous trouverez au dos de l'appareil un autocollant indiquant le
nom par défaut du réseau sans fil (également appelé SSID) et
une clé de sécurité spécifique à votre appareil. Veuillez noter
cette clé de sécurité pour un usage ultérieur.
2. Branchez l'une des extrémités du câble d'alimentation dans la
prise située à l'arrière de la base NetGenie et l'autre extrémité
dans la prise électrique la plus proche.
3. Avant d'accéder à Internet via NetGenie, assurez-vous que
l'appareil est sous tension. Le voyant DEL Power situé à l'avant
de l'appareil doit être vert. 1. Nom du réseau sans fil
2. Clé de sécurité
1
14
Section 2 Se connecter à Internet
Model Name : Cyberoam NetGenie NG11VH
Serial Number : W118300302-Q26QRB MAC : 02:10:18:01:07:01
Wireless Network Connection Name (SSID) : Netgenie
Network Security Key (Pass Key) : MCAU7I8X
This device complies with Part 15 of the FCC Rules. Operation is subject to the following two conditions:
(1) This device may not cause harmful interference, and (2) this device must accept any interference received,
including interference that may cause undesired operation. Power: 12V/1A
Manufactured in China
CE
1
2
Paramètres par défaut :
!Adresse IP par défaut pour accéder à NetGenie : http://10.1.1.1
!Nom d'utilisateur par défaut : admin
!Mot de passe par défaut : admin
Pour des raisons de sécurité, nous vous recommandons de modifier le mot de passe par défaut après votre
première connexion.
Bouton de remise à zéro (Reset) de l'appareil :
Pour restaurer les paramètres par défaut de l'appareil, appuyez sur le bouton de remise à zéro (Reset)
pendant 5 secondes. Attention : toutes les mises à jour et configurations précédentes seront perdues.
Scénarios - « Se connecter à l'aide de NetGenie »
Veuillez vérifier la manière dont vous vous connectez à Internet, et prenez des notes avant d'effectuer des
modifications. Nous avons prévu trois (3) scénarios d'utilisation différents. Déterminez le scénario qui
correspond le mieux à votre situation et suivez les instructions s'y rapportant.
Pour configurer l'accès Internet en fonction de l'utilisateur, reportez-vous à la section « Contrôles Internet ».
Si vous ne parvenez pas à vous connecter à Internet après avoir configuré NetGenie, rétablissez la
configuration initiale et contactez l'assistance NetGenie à l'adresse suivante : [email protected]
1
15
Connexion Internet sécurisée via VDSL/ADSL Scénario 1
NetGenie Wireless VDSL2 /ADSL2+
Modem Router
Connect your Computer/
LAN to any of the ports
Connect your Internet
cable here
Laptop
Desktop
NetGenie
Power Cable
Internet
Splitter
1. Débranchez le fil téléphonique existant de votre modem VDSL/ADSL/câble et branchez-le dans la
prise « DSL » sur le NetGenie.
2. Utilisez le câble Ethernet RJ-45 fourni avec NetGenie pour connecter votre ordinateur à l'une des
prises « LAN » situées à l'arrière de l'appareil, puis allumez l'appareil.
OU
I) Allumez votre appareil NetGenie. Attendez que les voyants DEL Power et « DSL » soient verts et
que le voyant DEL WLAN/WPS soit vert et reste allumé.
ii) Démarrez votre ordinateur. Assurez-vous que votre carte réseau sans fil est activée. Votre
ordinateur détectera automatiquement le réseau sans fil (SSID) appelé « NetGenie - XXXX »
(XXXX- caractères alphanumériques) .
iii) Cliquez sur l'icône de réseau dans la barre d'état de votre ordinateur (en bas à droite de votre écran),
à l'endroit où vous pouvez afficher tous les réseaux sans fil disponibles. Sélectionnez « NetGenie -
XXXX ».
iv) Après avoir sélectionné « NetGenie - XXXX», vous serez invité à entrer la clé de sécurité qui se
trouve sur l'autocollant figurant à l'arrière de votre appareil (reportez-vous à la section Préparer
votre NetGenie).
NetGenie Wireless VDSL2 /ADSL2+
Modem Router
Internet
Laptop Or
Desktop
NetGenie
Power Cable
Connect your Internet
cable here
Connect your Computer/
LAN to any of the ports
Connexion Internet sécurisée par câble direct Scénario 2
1. Débranchez le câble Internet relié à votre ordinateur et branchez-le dans la prise « ETH 4 » de votre
NetGenie
2. Utilisez le câble Ethernet RJ-45 fourni avec NetGenie pour connecter votre ordinateur à l'une des
prises « LAN » situées à l'arrière de l'appareil.
3. Allumez votre appliance NetGenie. Attendez que les voyants DEL Power et « WAN » soient verts et
que le voyant DEL « LAN » soit vert et reste allumé.
4. Ouvrez votre navigateur et entrez l'adresse IP par défaut (http://10.1.1.1) pour accéder à la console
admin Web de NetGenie. Entrez le nom et le mot de passe par défaut (admin) pour vous connecter.
5. Vous devez configurer les paramètres réseau pour vous connecter à Internet. Vous avez la possibilité
de lancer l'« Assistant de configuration du réseau » de NetGenie ou de configurer manuellement les
paramètres via l'interface utilisateur de NetGenie.
6. Une fois que vous avez correctement configuré les paramètres réseau, vous pouvez commencer à
naviguer sur Internet. La page d'accueil de NetGenie s'affiche.
Votre ordinateur est maintenant protégé grâce à la fonction de Sécurité Rapide (Quick Security) qui
s'active automatiquement.
3. Ouvrez votre navigateur et entrez l'adresse IP par défaut (http://10.1.1.1) pour accéder à la console
admin Web de NetGenie. Entrez le nom et le mot de passe par défaut (admin) pour vous connecter.
4. Vous devez configurer les paramètres réseau pour vous connecter à Internet. Vous avez la possibilité
de lancer l'« Assistant de configuration du réseau » de NetGenie ou de configurer manuellement les
paramètres via l'interface utilisateur de NetGenie.
5. Une fois que vous avez correctement configuré les paramètres réseau, vous pouvez commencer à
naviguer sur Internet. La page d'accueil de NetGenie s'affiche.
Votre ordinateur est maintenant protégé grâce à la fonction de Sécurité Rapide (Quick Security) qui
s'active automatiquement.
1
16
Connexion Internet sécurisée à l'aide d'un modem USB 3G Scénario 3
1. Branchez votre modem USB 3G dans le port prévu à cet effet sur l'appareil NetGenie.
2. Utilisez le câble Ethernet RJ-45 fourni avec NetGenie pour connecter votre ordinateur à l'une des
prises « LAN » situées à l'arrière de l'appareil, puis allumez l'appareil.
OU
I) Allumez l'appliance NetGenie. Si vous vous connectez à Internet par Wi-Fi, allumez votre
ordinateur.
ii) Assurez-vous que votre carte réseau sans fil est activée. Votre ordinateur détectera
automatiquement le réseau sans fil (SSID) appelé « NetGenie - XXXX » (XXXX- caractères
alphanumériques).
NetGenie Wireless VDSL2 /ADSL2+
Modem Router
NetGenie
Power Cable
Internet
Connect your Computer/
LAN here to any of the ports
Laptop
Desktop
Assistant de configuration du réseau
Cet assistant vous aide à configurer les paramètres réseau pour vous connecter à Internet.
1. Entrez http://10.1.1.1 dans la barre d'adresse de votre navigateur (à l'endroit où vous tapez les URL de
sites Web comme www.google.com).
2. L'écran admin suivant s'affiche. Entrez le nom et le mot de passe par défaut (admin) et cliquez sur « Se
connecter ».
1
17
iii) Cliquez sur l'icône de réseau dans la barre d'état de votre ordinateur (en bas à droite de votre
écran) et sélectionnez « NetGenie - XXXX ».
iv) Après avoir sélectionné « NetGenie - XXXX », vous serez invité à entrer la clé de sécurité figurant
sur l'autocollant situé à l'arrière de l'appareil.
3. Entrez l'adresse IP : http://10.1.1.1 dans la barre d'adresse. Entrez le nom et le mot de passe par
défaut (admin) pour vous connecter
4. Allez dans Paramètres réseau > Internet.
5. Sélectionnez Modem USB, renseignez les différentes informations et validez la configuration.
NetGenie se connectera automatiquement à Internet.
6. Lancez votre navigateur et commencez votre navigation sur Internet. La page d'accueil de NetGenie
s'affiche.
Votre ordinateur est maintenant protégé grâce à la fonction de Sécurité Rapide (Quick Security) qui
s'active automatiquement.

3. Pour accéder à l'assistant de configuration du réseau, allez dans Paramètres réseau et cliquez sur «
Lancer l'assistant de configuration du réseau ».
4. Cliquez « Suivant » pour poursuivre ou « Ignorer l'assistant » pour configurer manuellement les
paramètres réseau via l'interface utilisateur de NetGenie.
5. Sélectionnez votre type de connexion Internet (VDSL/ADSL ou Ethernet). Cliquez « Suivant » pour
continuer.
1
18

Sélectionnez votre pays et votre FAI dans la liste. Entrez le nom d'utilisateur et le mot de passe fournis
par votre FAI.
Remarque:
Si votre FAI fournit une IP par DHCP, il est possible que vous n'ayez pas à fournir de nom d'utilisateur et de
mot de passe pour vous connecter à Internet.
Vous pouvez commencer à naviguer sur Internet. Cliquez sur « OK » pour quitter l'assistant.
Remarque:
!Les copies d'écran ci-dessus concernent uniquement le type de connexion VDSL/ADSL. Dans le cas d'une
connexion Ethernet, cliquez « Suivant » après avoir sélectionné Ethernet en tant que type de connexion
Internet et NetGenie se connectera automatiquement à Internet.
!Toutefois, pour le type de connexion Ethernet avec une adresse IP statique, vous devez configurer
manuellement les paramètres réseau via l'interface utilisateur de NetGenie.
1
19
Table of contents
Languages:


