NEW POL XV185CEL Manual

461304175 25/10/01 Litograf s.r.l. Jesi
GCS28H-rel.100701

Rel. 250601
CONGELATORE
Manuale uso e manutenzione
FREEZER
Use and maintenance handbook
GEFRIERSCHRANK
Bedienungs- und Wartungshandbuch
CONGÉLATEUR
Livret d’instructions et d’entretien
CONGELADOR
Libro de instrucciones sobre uso y mantenimiento
CONGELADOR
Manual de Uso e Manutenção
I
GB
D
F
ES
P
GC2906-010
2
1 PRIMA DI USARE L’APPARECCHIO....................................................................................................................................................................... 4
2 DISIMBALLO ............................................................................................................................................................................................................ 6
3 CARATTERISTICHE TECNICHE.............................................................................................................................................................................. 8
4 INSTALLAZIONE .................................................................................................................................................................................................... 12
5 USO......................................................................................................................................................................................................................... 18
6 SBRINAMENTO...................................................................................................................................................................................................... 24
7 PULIZIA E MANUTENZIONE ................................................................................................................................................................................. 26
8 RICERCA GUASTI ................................................................................................................................................................................................. 28
9 SERVIZIO ASSISTENZA TECNICA ....................................................................................................................................................................... 28
1 BEFORE USINGTHE APPLIANCE ......................................................................................................................................................................... 4
2 REMOVAL OF PACKAGING .................................................................................................................................................................................... 6
3 TECHNICAL SPECIFICATIONS............................................................................................................................................................................... 8
4 INSTALLATION....................................................................................................................................................................................................... 12
5 USE ......................................................................................................................................................................................................................... 18
6 DEFROSTING ......................................................................................................................................................................................................... 24
7 CLEANING AND MAINTENANCE ......................................................................................................................................................................... 26
8 TROUBLESHOOTING ............................................................................................................................................................................................ 28
9 TECHNICAL ASSISTANCE SERVICE ................................................................................................................................................................... 28
• Questo apparecchio è destinato a venire in contatto con i prodotti alimentari ed è conforme al D.L.108 del 25.01.1992 (Direttiva Europea 89/109/
CEE).
Questo prodotto è stato concepito, costruito e immesso sul mercato rispettando le seguenti conformità:
• obiettivi di sicurezza della Direttiva “Bassa Tensione” 73/23/CEE;
• requisiti di protezione della Direttiva“EMC” 89/336/CEE, modificata dalla Direttiva 93/68/CEE.
DICHIARAZIONE DI CONFORMITÀ
SOMMARIO
I
CONTENTS
• This appliance will come into contact with food products and complies with the Executive Order 108 of 25.01.1992 (European Directive 89/109/
EEC).
This product was designed, manufactured and marketed in compliance with the following norms:
• safety aims of the “LowVoltage”Directive 73/23/EEC;
• protection requisites of the “EMC” Directive 89/336/EEC, modified by the Directive 93/68/EEC.
DECLARATION OF CONFORMITY
GC2906-030
GB
GC2906-010
3
1 VOR DER INBETRIEBNAHME DES GERÄTS ................................................................................................................................................... 4
2 ENTFERNUNG DER VERPACKUNG .................................................................................................................................................................. 7
3 TECHNISCHE EIGENSCHAFTEN ...................................................................................................................................................................... 9
4 AUFSTELLUNG................................................................................................................................................................................................. 13
5 GEBRAUCH ....................................................................................................................................................................................................... 19
6 ABTAUEN .......................................................................................................................................................................................................... 25
7 REINIGUNG UND WARTUNG ........................................................................................................................................................................... 27
8 FUNKTIONSTÖRUNGEN .................................................................................................................................................................................. 29
9 TECHNISCHER KUNDENDIENST .................................................................................................................................................................... 29
• DiesesGerät ist für die Aufbewahrungvon Lebensmittelnvorgesehenund entspricht derVorschriftD.L.108 vom25.01.1992(Europäische Richtlinie
87/308/EWG).
Dieses Produkt wurde unter Berücksichtigung der folgenden Konformitätsvorschriften entworfen,hergestellt und auf den Markt gebracht:
• Sicherheitsvorschriften der Richtlinie „Niederspannung“ 73/23/EWG;
• Schutzvorrichtungen entsprechend der Richtlinie „EMC“ 89/336/EWG, modifiziert durch die Richtlinie 93/68/EWG.
KONFORMITÄTSERKLÄRUNG
INHALT
D
1 AVANT D’UTILISER L’APPAREIL ........................................................................................................................................................................... 5
2 DEBALLAGE ........................................................................................................................................................................................................... 7
3 DONNEESTECHNIQUES ....................................................................................................................................................................................... 9
4 INSTALLATION...................................................................................................................................................................................................... 13
5 UTILISATION ......................................................................................................................................................................................................... 19
6 DEGIVRAGE .......................................................................................................................................................................................................... 25
7 NETTOYAGE ET ENTRETIEN ............................................................................................................................................................................... 27
8 EVENTUELLES PANNES ..................................................................................................................................................................................... 29
9 SERVICE D’ASSISTANCETECHNIQUE .............................................................................................................................................................. 29
• Cet appareil est destiné au contact avec des produits alimentaires et il est conforme au D.L. 108 du 25.01.1992 (Directive Européenne 87/308/
CEE).
Ce produit a été conçu, construit et mis en commerce en respectant les conformités suivantes:
• Objectifs de sécurité de la Directive “Basse Tension”73/23/CEE ;
• Caractéristiques de protection de la Directive “EMC” 89/336/CEE, modifiée par la Directive 93/68/CEE.
DECLARATION DE CONFORMITE
SOMMARIE
F
1 ANTES DE USAR EL APARATO ............................................................................................................................................................................. 5
2 DESEMBALADO ...................................................................................................................................................................................................... 7
3 CARACTERISTICASTECNICAS ............................................................................................................................................................................. 9
4 INSTALACION ........................................................................................................................................................................................................ 13
5 USO......................................................................................................................................................................................................................... 19
6 DESCONGELADO.................................................................................................................................................................................................. 25
7 LIMPIEZAY MANTENIMIENTO ............................................................................................................................................................................. 27
8 BUSQUEDA DE AVERIAS ..................................................................................................................................................................................... 29
9 SERVICIO DE ASISTENCIA TECNICA .................................................................................................................................................................. 29
• Este aparato, destinado a ponerse en contacto con productos alimenticios es conforme al Decreto Ley 108 del 25/01/1992 (Directiva Europea
87/308 CEE).
Este producto está concebido, construido y colocado en el mercado, respetando las siguientes conformidades:
• Objetivos de seguridad de la Directiva “BajaTensión" 73/23/CEE;
• Requisitos de protección de la Directiva “EMC" 89/336/CEE, modificada por la Directiva 93/ 68/CEE.
DECLARACION DE CONFORMIDAD
SUMARIO
E
1 ANTES DE USAR O APARELHO ............................................................................................................................................................................ 5
2 DESEMBALAGEM.................................................................................................................................................................................................... 7
3 CARACTERÍSTICASTÉCNICAS ............................................................................................................................................................................. 9
4 INSTALAÇÃO ......................................................................................................................................................................................................... 13
5 USO......................................................................................................................................................................................................................... 19
6 DESCONGELAMENTO .......................................................................................................................................................................................... 25
7 LIMPEZA E MANUTENÇÃO .................................................................................................................................................................................. 27
8 PROCURA DEFEITO .............................................................................................................................................................................................. 29
9 SERVIÇO DE ASSISTÊNCIA TÉCNICA ................................................................................................................................................................ 29
• Este aparelho é destinado a estar em contacto com produtos alimentares e é em conformidade com o DL. 108 de 25.01.1992 (Diretiva Européia
87/308/CE).
Este produto foi elaborado, construído e colocado no mercado respeitando as seguintes conformidades:
• objectivos de segurança da Diretiva “Baixa Tensão” 73/23/CEE;
• requisitos de proteção da Diretiva“EMC”89/336/CEE, modificada através da Diretiva 93/68/CEE.
DECLARAÇÃO DE CONFORMIDADE
SOMMARIO
P

4
Non mangiate cubetti di ghiaccio o ghiaccioli subito dopo averli
tolti dal comparto congelatore poiché potrebbero causare bru-
ciature da freddo.
• Conservate questo libretto per future consultazioni.
•Dopo aver disimballato l’apparecchio, accertatevi che non sia danneggia-
to.Eventuali danni devono essere comunicati al rivenditore entro 24 ore.
• L’apparecchio che avete acquistato è ad uso esclusivamente domestico.
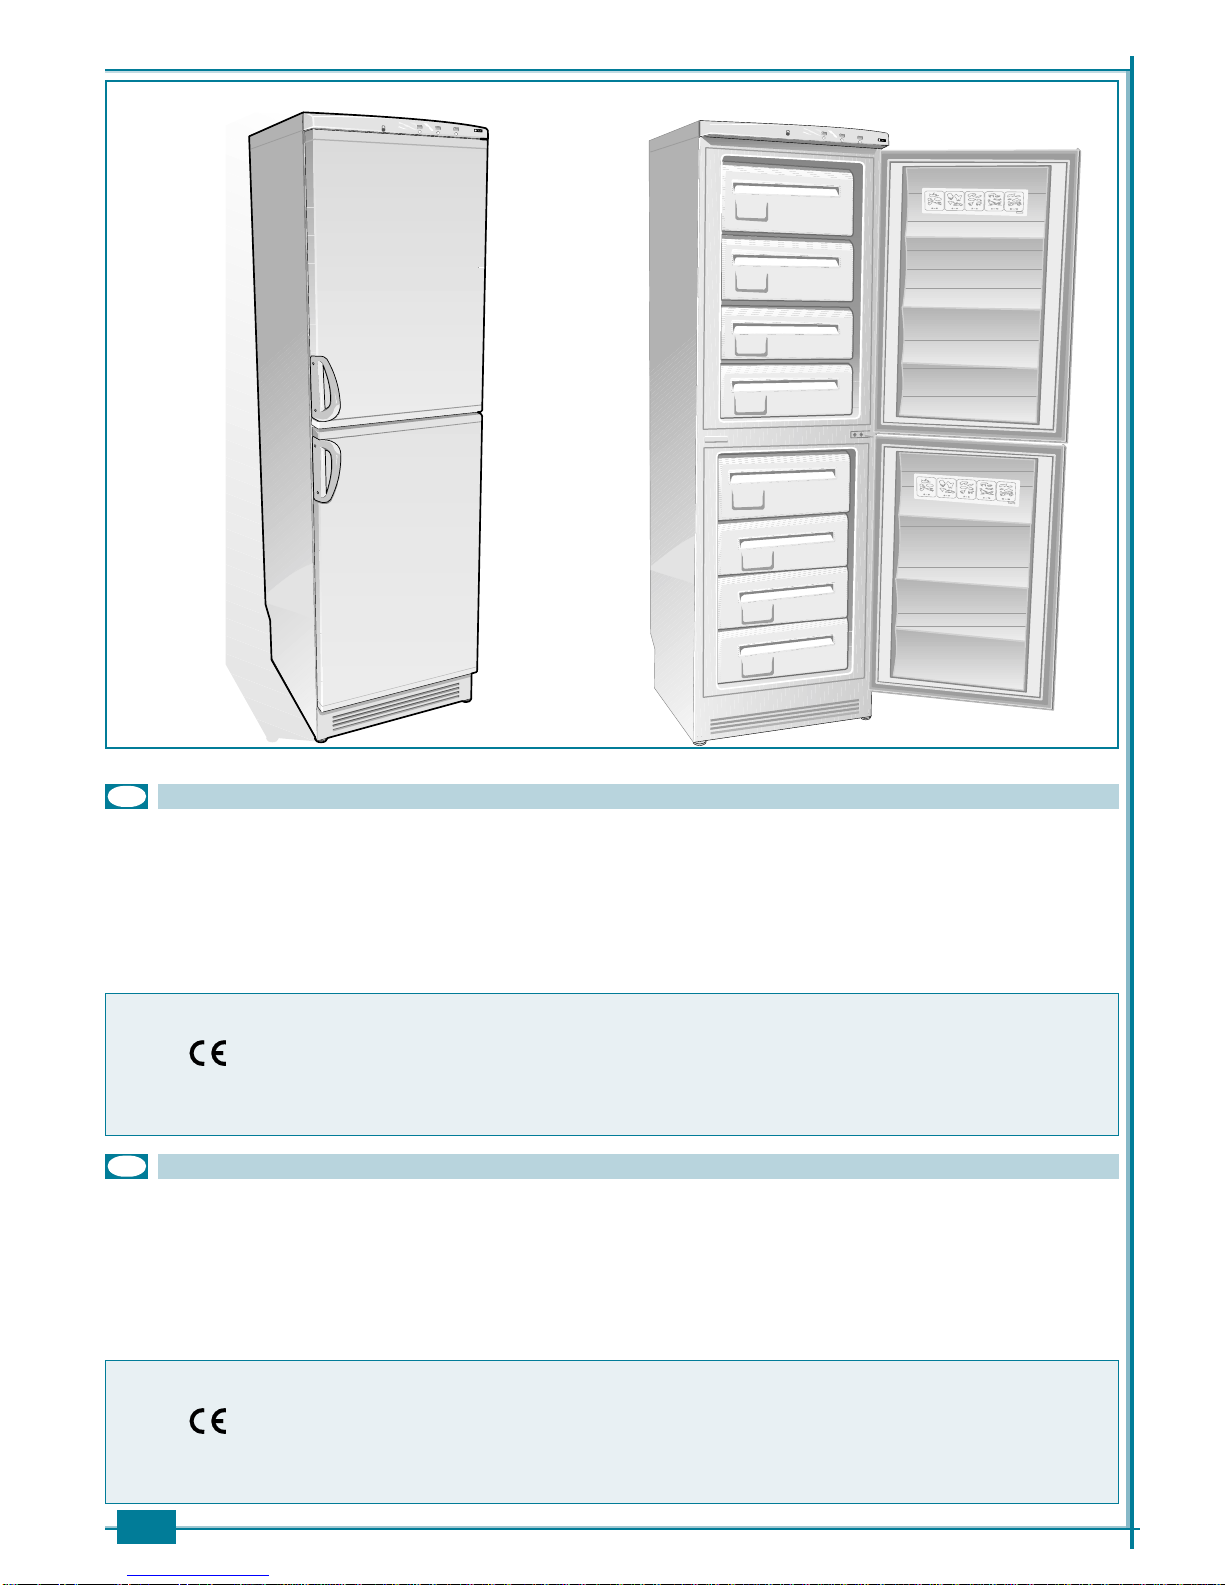
• Il comparto congelatore consente una perfetta congelazione di
cibi freschi e cotti, la produzione di cubetti di ghiaccio e la conservazione di
alimenti surgelati e congelati.
Per utilizzare al meglioil vostroapparecchio,raccomandiamo di leg-
gere attentamente le istruzioni per l’uso in cui troverete consigli utili
per la conservazione dei cibi.
Consigliamo di attendere almeno due ore prima di mettere in
funzione l’apparecchio, per dar modo al circuito refrigerante di
essere perfettamente efficiente.
•Accertatevi che l’installazione ed il collegamento elettrico siano effettuati
da un tecnico qualificato, secondo le istruzioni del fabbricante e le norme
locali in vigore.L’impianto elettrico deve essere munito di un efficace pre-
sa di terra, a norma di legge (46/90).
1.1 PRECAUZIONE E SUGGERIMENTI GENERALI
• Usate il:
- comparto congelatore solo per la conservazione di alimenti surgelati,
il congelamento di alimenti freschi, la produzione di cubetti di ghiaccio.
Prima di qualsiasi operazione di manutenzione o pulizia,
disinserite la spina dalla presa di corrente.
• Non tirate il cavo di alimentazione per staccare la spina dalla presa di
corrente.
• Dopo l’installazione, accertatevi che l’apparecchio non poggi sul
cavo di alimentazione.
1 PRIMA DI USARE L’APPARECCHIO
I
ATTENZIONE! Mantenete libere da ostruzioni le aperture di ventilazione
nell’involucro dell’apparecchio o nella struttura ad incasso.
Do not eat ice cubes or ice lollies as soon as you have removed
them from the freezer because they could cause frost burns.
• Keep this book for later use.
• When you have removed the packaging, make sure that the appliance is
notdamaged.Anydamagemustbe reportedtoyourdealer within 24 hours.
• The appliance you have purchased is designed for household use only.
• The freezer compartment freezes fresh and cooked food
perfectly, it produces ice cubes and stores frozen food.
In order to use your appliance to its best, we advise reading these
instructions carefully as they contain useful information on how to
store food.
We advise you to wait for at least two hours before switching on
the appliance, in order to ensure that the refrigerating circuit is
completely efficient.
• Make sure that installation and electrical wiring are carried out by a quali-
fiedtechnician according to the manufacturer’s instructionsandto the local
norms in force.The electrical system must be equipped with an effective
earth according to the law (46/90).
1.1 GENERAL PRECAUTIONS AND SUGGESTIONS
• Use the:
- freezer compartment only to store frozen food, to freeze fresh food, to
produce ice cubes.
Before carrying out any maintenance or cleaning operation,
remove the plug from the mains socket.
• Donotpull on the supply cable in ordertoremove the plug from the socket.
• When the appliance has been installed, make sure it is not resting on the
mains supply cable.
1 BEFORE USING THE APPLIANCE
GB
WARNING! Keep ventilation openings in the appliance enclosure or in the
structure for building in, clear obstruction.
• Non introducete nel comparto congelatore contenitori di vetro con liquidi
poiché potrebbero esplodere.
• Per evitare il rischio di soffocamento e di intrappolamento, non permet-
tete ai bambini di giocare o di nascondersi all’interno dell’apparecchio.
• Non toccate l’apparecchio con mani o piedi bagnati o umidi.
• Do not place glass containers with liquids in the freezer compartment as
they could explode.
• Do not allow children to play or hide inside the appliance as they could
remain trapped and suffocate.
• Do not touch the appliance with wet, damp hands or feet.
Eiswürfel oder Wassereis dürfen nicht direkt nach an ihrer
Entnahme aus dem Gefrierfach verzehrt werden, weil dadurch
Erfrierungen verursacht werden können.
• BewahrenSie dasHandbuchauf,sodassSiees jederzeitzuRateziehen können.
•NachdemSiedieVerpackungentfernt haben, vergewissernSie sich, dass
an dem Gerät kein Schaden entstanden ist.Eventuelle Schäden müssen
dem Händler innerhalb von 24 Stunden mitgeteilt werden.
• DiesesProduktwurdeausschließlich für den privatenHaushalt konzipiert.
• Das Eisfach ermöglicht Ihnen das perfekte Einfrieren von rohen
und zubereiteten Lebensmitteln, die Herstellung von Eiswürfeln und die
Aufbewahrung von Tiefkühlkost und eingefrorenen Speisen.
UmdenoptimalenEinsatz des Geräts garantieren zu können, empfiehlt
derHersteller,die Bedienungsanleitungaufmerksam zu lesen,dieauch
nützliche Hinweise für das Einfrieren von Lebensmitteln bietet.
Der Hersteller empfiehlt, vor der ersten Inbetriebnahme des
Geräts mindestens zwei Stunden zu warten, damit der
Kühlkreislauf seine volle Leistungsfähigkeit erreichen kann.
•Sorgen Sie dafür, dass die Aufstellung und der Anschluss des Geräts an
das Stromnetz von qualifiziertem Personal vorgenommen wird,
entsprechend der Anweisungen des Herstellers und in Übereinstimmung
mit den örtlichen Sicherheitsvorschriften.
• Benutzen Sie:
-
das Gefrierfach nur für die Aufbewahrung von tiefgefrorenen Lebensmitteln, für
dasEinfrierenvonfrischen Lebensmitteln undfürdieHerstellung von Eiswürfeln.
• Ziehen Sie aber nicht am Stromkabel, um den Stecker aus der Steckdose
zu entfernen.
• Nach der Aufstellung des Geräts vergewissern Sie sich, dass das Gerät
nicht auf dem Stromkabel aufliegt.
1 VOR DER INBETRIEBNAHME DES GERÄTS
D
ACHTUNG! Die Belüftungsöffnungen des Standgerät-Gehäuses oder die
der Einbaustruktur dürfen nicht verstopft werden.
• Legen Sie keine mit Flüssigkeit gefüllten Glasbehälter in das Gefrierfach,
da diese explodieren können.
• Kinder dürfen nicht im Innern des Gefrierschranks spielen oder sich dort
verstecken. Sie laufen Gefahr, zu ersticken oder im Gefrierschrank
eingeschlossen zu werden.
•
BerührenSie denGefrierschrank nicht mitfeuchten odernassen Händen oderFüßen.
1.1 VORSICHTSMASSNAHMEN UND ALLGEMEINE
HINWEISE
Vor jeder Wartungsarbeit und bei jeder Reinigung muss der
Stecker vom Stromnetz gelöst werden.

5
Ne mangez pas des glaçons ou des sorbets à peine sortis du
congélateur car ils pourraient provoquer des brûlures de froid.
• Conservez ce livret pour des prochaines consultations.
• Après avoir déballé l’appareil, vérifiez qu’il ne soit pas endommagé. Tout
endommagement doit être communiqué au revendeur dans un délai de
24 heures.
• Le produit que vous avez acheté il ne doit être employé que de façon
domestique.
• Lecompartiment congélateur permet une congélation parfaite
des aliments frais et cuits, la production de glaçons et la conservation
d’aliments surgelés et congelés.
Pour utiliser au mieux votre appareil, nous vous recommandons de
lire avec attention les instructions pour l’emploi qui vous fourniront
des conseils utiles pour la conservation des aliments.
Nous conseillons d’attendre au moins deux heures avant de
mettre en fonctionnement l’appareil, pour permettre au circuit
réfrigérant d’être parfaitement efficace.
• Vérifiez que l’installation et le branchement électrique soient réalisés par
un technicien qualifié, conformément aux instructions du fabricant et des
normes locales en vigueur. L’installation électrique doit être munie d’une
efficace prise de terre, conformément aux termes de la loi (46/90).
1.1 PRECAUTIONS ET CONSEILS GENERAUX
• Utilisez le:
- compartiment congélateur que pour la conservation des aliments
surgelés, la congélation des aliments frais, la production de glaçons.
Avant chaque opération d’entretien ou de nettoyage,débranchez
l’appareil de la prise.
• Ne tirez pas sur le cordon d’alimentation pour débrancher la prise.
• Après l’installation, vérifiez que l’appareil n’écrase pas le cordon
d’alimentation.
1 AVANT D’UTILISER L’APPAREIL
F
ATTENTION! Laisser les prises d'air libres de toute entrave au niveau du
corps de l'appareil ou du meuble à l'intérieur duquel il est encastré.
• N’introduisezpas danslecompartiment congélateurdes récipients enverre
contenants des liquides car ils pourraient exploser.
• Pour éviter le risque d’étouffement et de prise au piège, interdisez aux
enfants de jouer ou de se cacher à l’intérieur de l’appareil.
• Netouchez pas l’appareil avec les mains oulespieds mouillés ou humides.
No coman cubitos de hielo o polos nada más haberlos sacado
del congelador ya que el frío podrían causarles quemaduras.
• Conserven este libro de instrucciones para consultas futuras.
•Después de haber desembalado el aparato, asegúrense de que no esté
estropeado. Eventuales daños tienen que comunicarse a la parte
vendedora antes de que pasen 24 horas.
• El producto que han comprado se utiliza única y exclusivamente para uso
doméstico.
• Laparte destinadaa congelador , permite la perfectacongelación
de alimentos frescos y cocinados, la producción de cubos de hielo y la
conservación de alimentos congelados.
Para utilizar lo mejor posible su aparato, les recomendamos que
lean atentamente las instrucciones sobre el uso, en las que
encontrarán consejos útiles para la conservación de los alimentos.
Les aconsejamos que esperen por lo menos dos horas antes de
poner en marcha el aparato,para que el circuito de refrigeración
esté en perfecto estado.
•Asegúrense de que la instalación y la conexión eléctrica las realice un
técnicocualificado,siguiendo las instrucciones del fabricante ylasnormas
locales en vigor. La instalación eléctrica tiene que disponer de una toma
de tierra eficaz, según las normas legales (46/90).
1.1 PRECAUCIONES Y SUGERENCIAS GENERALES
• Usen la:
-
parte del congelador solamente para laconservaciónde alimentoscongelados,
la congelación de alimentos frescos y la producción de cubitos de hielo.
Antes de realizar cualquier operación de mantenimiento o de
limpieza, desconecten el enchufe de la corriente.
• Para desconectar el enchufe, no tiren del cable que está enchufado, sino
del enchufe mismo.
• Despuésde la instalación, asegúrense de que elaparatono esté colocado
sobre el cable.
1 ANTES DE USAR EL APARATO
E
ATENCION! Mantengas libre de obstrucciones los orificio de ventilación de
la caja extrema del aparato o de la estructura para empotrar.
• No introduzcan en el congelador recipientes de cristal con líquidos ya que
podrían explotar.
• Para evitar el peligro de que los niños se ahoguen o de que queden
encerrados en el mismo, no permitan a los niños que jueguen o que se
escondan dentro del aparato.
• No toquen el aparato con las manos o los pies mojados o húmedos.
Não comer os cubos de gelo ou sorvetes imediatamente após a
sua retirada do freezer, pois os mesmos podem causar
queimaduras do frio.
• Conservar este manual para futuras consultas.
•Depois do aparelho ter sido desembalado, controlar se o mesmo não foi
danificado. Eventuais danos devem ser comunicados ao revendedor em
24 horas.
• O produto que você comprou e foi projetado para uso exclusivamente
doméstico.
•
O compartimento do freezer permite um perfeito congelamento de
alimentos frescos e cozidos, a produção de cubos de gelo e a conservação
de alimentos congelados e gelados.
Para a melhor utilização do seu aparelho, recomendamos a leitura
atenta do manual de instrucções para a utilização do mesmo, no
qualse encontram conselhosúteisparaaconservaçãodosalimentos
.
Aconselhamos esperar pelo menos duas horas antes de colocar
o aparelho em função, para que o circuito refrigerador seja
perfeitamente eficiente.
•Certifique-sedeque a instalação e a ligação elétrica sejam efetuadaspor
um técnico especializado, segundo as instrucções do fabricante e das
normas locais em vigor. O implante elétrico deve ser munido de uma
eficiente agancho ao chão, em conformidade com as leis vigentes.
1.1 PRECAUÇÕES E SUGESTÕES GERAIS
• Utilizar:
-ocompartimento congelador somente paraa conservaçãode alimentos
congelados, congelamento de alimentos frescos e para a produção de
cubos de gelo.
Antes de qualquer operação de manutenção ou limpeza,
desinserir a tomada da corrente.
• Não puxar o cabo de alimentação para destacar a tomada da parede.
• Depois da instalação, certifique-se de que o aparelho não esteja apoiado
no fio de alimentação.
1 ANTES DE USAR O APARELHO
P
ATENÇÃO: Mantenha livre de obstruções as aberturas de ventilação do
invólucro do aparelho e da estrutura de encaixe.
• Não introduzir no compartimento congelador recipente de vidro com
líquidos pois podem explodir.
• Para evitar o risco de sufocamento, não permitir às crianças de brincar
com o aparelho, pois podem permanecer trançadas no seu interior.
• Não tocar o aparelho com mãos ou pés molhados ou úmidos.
6
ME160699-020
CR
R
B
FS
1
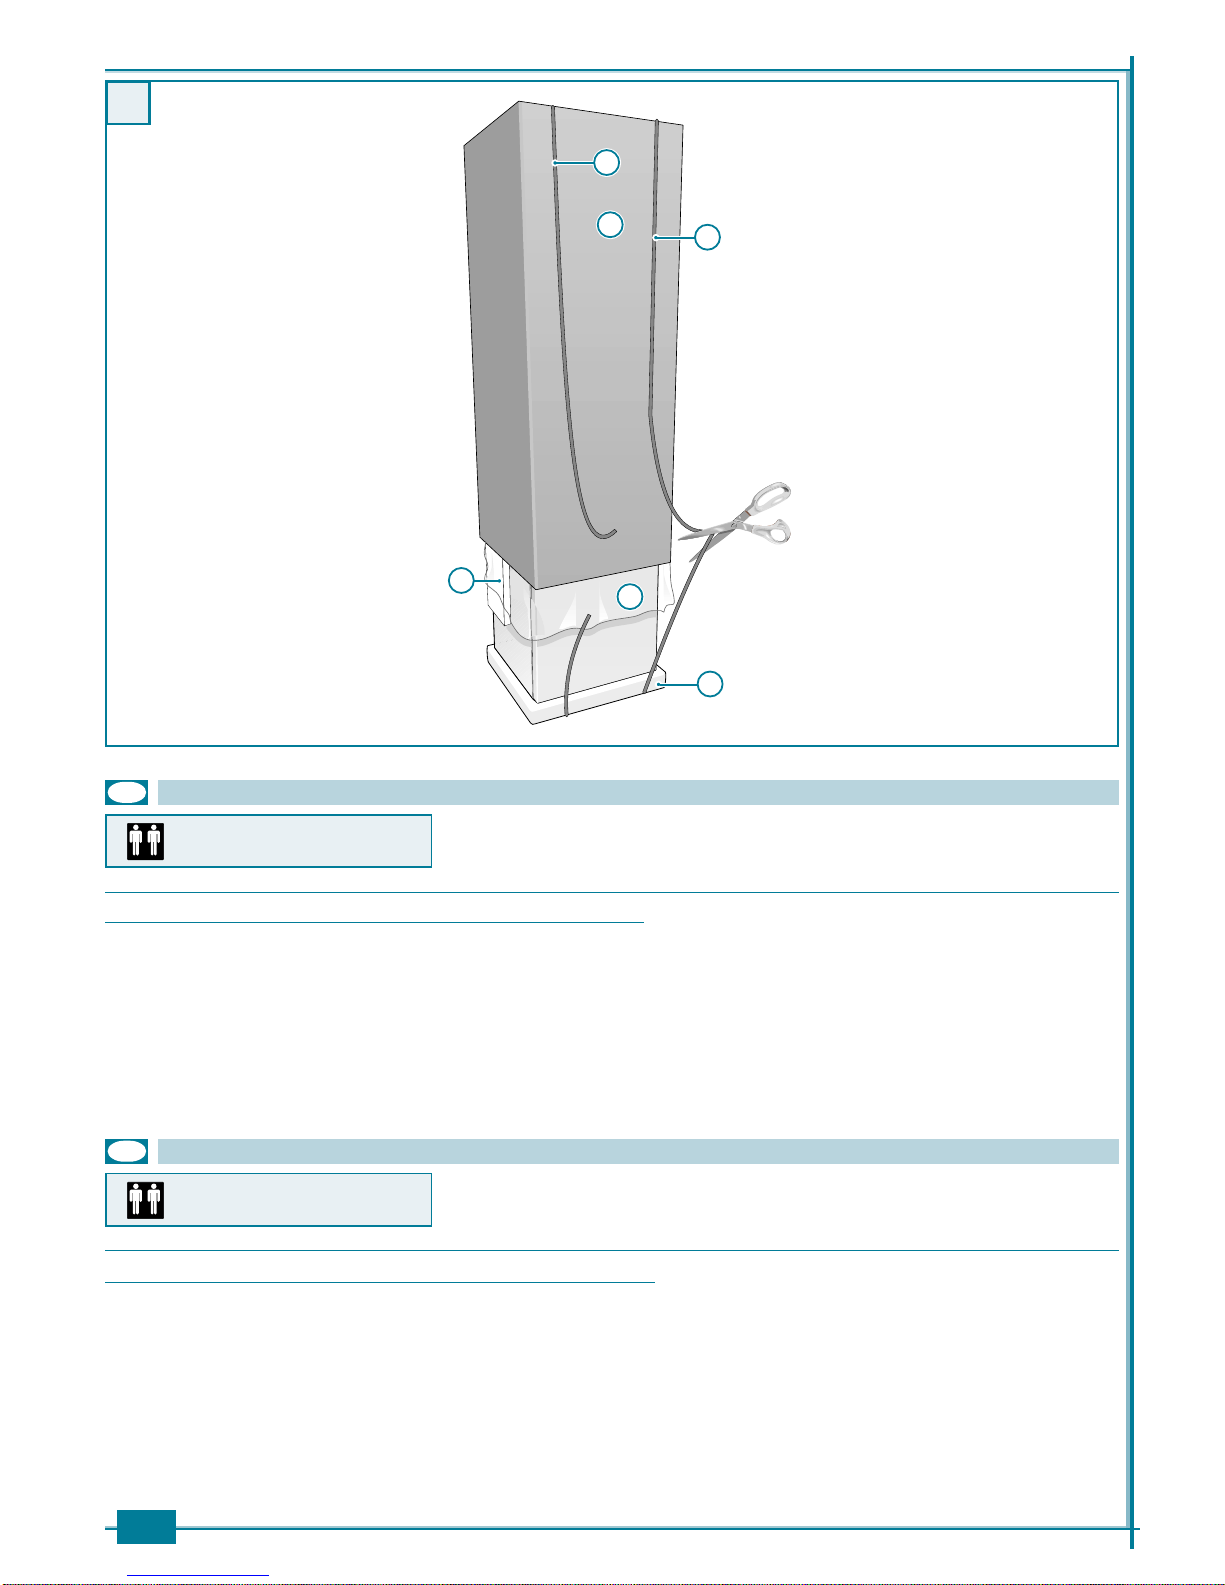
2 DISIMBALLO
I
• Ponete l’apparecchio nel punto d’installazione (cap. 4- INSTALLAZIONE).
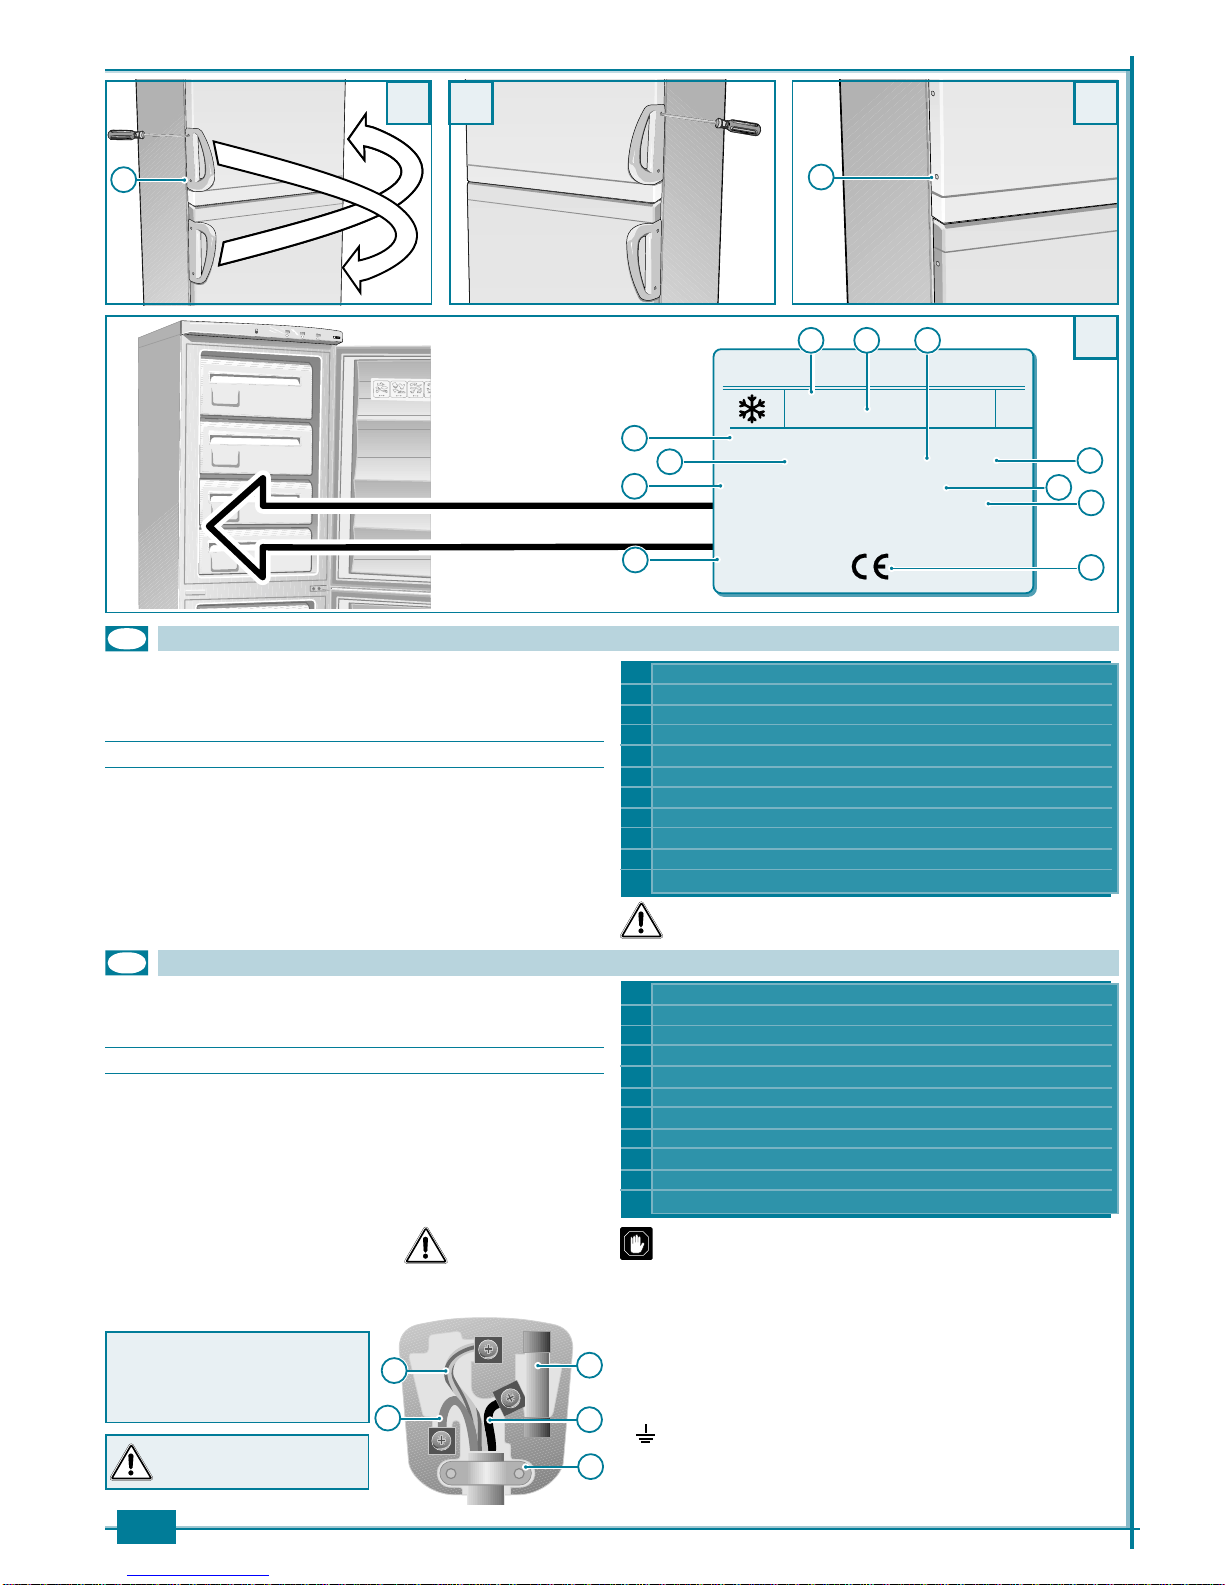
• Tagliate le reggette Re sfilate il cartone o sacco in plastica esterno C.
• Eliminate subito i sacchi in plastica Si quali possono rappresentare pericolo per i bambini.
• Una volta liberato l’apparecchio dal suo imballo eliminate ancora i fianchi Fe quindi il basamento B.
Questa operazione deve essere
compiuta da almeno due persone.
2.1 CONSIGLI PER LA SALVAGUARDIA DELL’AMBIENTE
2 REMOVAL OF PACKAGING
GB
• Place the appliance in its installation site (chap. 4 - INSTALLATION).
• Cut straps Rand remove the box or plastic bag C.
• Immediately destroy the plastic bags Sas they could be dangerous for children.
• Once the appliance is free from its packaging, remove the side protections Fand then the base B.
This operation must be carried out
by at least two people.
2.1 ADVICE ON HOW TO PROTECT THE ENVIRONMENT
Imballo
Il materiale di imballo è riciclabile al 100%. Per lo
smaltimentoseguite le normativelocali.Ilmateriale
di imballaggio (sacchetti di plastica, parti in
polistirolo, ecc.) deve essere tenuto fuori dalla
portata dei bambini in quanto potenziale fonte di
pericolo.
Prodotto
L’apparecchio è stato fabbricato con materiale
riciclabile. La rottamazione dovrà avvenire
seguendo le normative locali per lo smaltimento
deirifiuti.L’apparecchiodarottamare dovràessere
reso inservibile tagliando il cavo elettrico di
alimentazione. L’apparecchio da rottamare non
dovrà essere disperso nell’ambiente, ma
consegnato presso gli appositi centri di raccolta
per il recupero dei gas refrigeranti e oli lubrificanti.
Informazione
Questo apparecchio è senza CFC (il circuito refri-
gerante contiene R134a) o senza HFC (il circuito
refrigerante contiene R600a Isobutano).
Per maggiori dettagli, riferitevi alla targhetta ma-
tricola postaall’internodell’apparecchio (paragra-
fo 3).
Packaging
Packaging material is 100% recyclable.
For its disposal follow your local regulations.
The packaging material (plastic bags, polystyrene
parts etc.) must be kept out of children’s reach as
it could be dangerous.
Product
The appliance has been manufactured with
recyclable material.
Scrapping must be carried out according to your
localregulations onthedisposal ofwastematerials.
Before scrapping the appliance, cut the electrical
supply cable so that it can no longer be used.
The appliance must not be left in the environment,
it must be handed over to a collection centre
specialized in the recovery of refrigerating gases
and lubrificating oils.
Information
Thisappliance isCFC-free (if therefrigeratingcircuit
contains R134a) or HFC-free (if the refrigerating
circuit contains R600a Isobutane).
Formore details,see matriculationplate inside the
appliance (paragraph 3).
7
2 DESEMBALADO
E
• Coloquen el aparato en el punto de instalación (cap. 4 INSTALACION).
• Quiten las cintas que lo sujetan R y saquen el cartón o la bolsa de plástico exterior C.
• Eliminen enseguida las bolsas de plástico Sporque pueden representar un peligro para los niños.
• Una vez liberado el aparato de su embalaje, quiten los laterales Fy las bases B.
Esta operación tienen que realizarla,
por lo menos, dos personas.
2.1 CONSEJOS PARA SALVAGUARDAR EL AMBIENTE
2 DESEMBALAGEM
P
• Colocar o aparelho no local a ser instalado (ítem 4 - INSTALAÇÃO);
• Cortar as tiras Re tirar a embalagem de papelão ou o saco de plástico externo C;
• Eliminar logo em seguida os sacos de plástico S, os quais podem representar uma situação de
perigo para as crianças;
• Depois que o aparelho for liberado da sua embalagem, eliminar as laterais F e em seguida a base
de suporte B.
Esta operação deve ser realizada
por pelo menos duas pessoas.
2.1 CONSELHOS PARA A DEFESA DO AMBIENTE
2 ENTFERNUNG DER VERPACKUNG
D
• Transportieren Sie das Gerät an dieStelle,woes aufgestellt werden soll.(s.Kap.4,AUFSTELLUNG).
• Zerschneiden Sie die Eisenbänder Rund entfernen Sie den Karton oder die äußere Plastikhülle C.
• Entsorgen Sie die Plastikhüllen Sumgehend, da diese eine Gefahr für Kinder darstellen.
• Nachdem Sie das Gerät von derVerpackung befreit haben, entfernen Sie auch die Seitenteile F und
anschließend den SockelB.
Diese Arbeitsschritte müssen von
mindestens zwei Personen
durchgeführt werden.
2.1 UMWELTSCHUTZEMPFEHLUNGEN
2 DEBALLAGE
F
• Portez l’appareil à l’endroit prévu pour l’installation (chap.4 INSTALLATION).
• Coupez les feuillards Ret ôtez le carton ou le sac en plastique externe C.
• Eliminezimmédiatementles sacs en plastique Squi peuventreprésenter un danger pour les enfants.
• Une fois ôté l’emballage, enlevez encore les côtés Fet ensuite le socle B.
Cette opération doit être réalisée par
au moins deux personnes.
2.1 CONSEILS POUR LA PROTECTION DE L’ENVIRONNEMENT
Verpackung
Das Verpackungsmaterial ist 100% recyclefähig.
Das Verpackungsmaterial (Plastikhüllen,
Steroporteileusw.) müssenfür Kinder unerreichbar
aufbewahrt werden, da diese eine potenzielle
Gefahrenquelle darstellen.
Produkt
Das Gerät wurde aus recyclefähigem Material
hergestellt.Die Entsorgung des Gerätsmussunter
Berücksichtungder lokalgültigen Abfallvorschriften
vorgenommenwerden.DurchDurchschneiden des
Stromkabels wird das zu entsorgende Gerät
funktionsuntüchtig gemacht. Das zu entsorgende
Gerät muss an den entsprechenden Sammelstel-
len für Wiederaufbereitung und Sammlung von
Kühlgasen und Schmierölen abgegeben werden.
Information
Dieses Gerät wurde ohne die Verwendung von
CFC (der Kühlkreislauf enthält R134a) und ohne
HFC (der Kühlkreislauf enthält R600a Isobutan)
hergestellt.
Für weitere Details, siehe Matrikelplakette im
Inneren des Geräts (Paragraph 3).
Emballage
Le matériel d’emballage est recyclable à 100%.
Pour le traitement des déchets, reportez-vous aux
normatives locales.Le matériel d’emballage (sacs
enplastique,parties enpolystyrène, etc…)doit être
tenu hors de portée des enfants car il représente
une réelle source de danger.
Produit
L’appareil a été fabriqué avec des matériaux
recyclables.L’élimination devraêtre réalisée suivant
les normatives locales pour le traitement des
déchets. Lorsque l’appareil devra être détruit,
coupez le cordon électrique d’alimentation pour le
rendre inutilisable.
L’appareil destiné à la ferraille
ne doit pas être abandonné dans la nature, mais
vous devrez le confier à un des centres spécialisés
pourla récupérationdesgazréfrigérants etgraisses.
Information
Cet appareil est sans CFC (le circuit réfrigérant
contient R134a) ou sans HFC (le circuit réfri
gérant contient R600a Isobutane).
Pour plus de détails, voir la plaque du matricule
située à l’intérieur de l’appareil (paragraphe 3).
Embalaje
Elmaterialdeembalaje se puede reciclar al100%.
Para la destrucción del congelador, respeten la
normativa local.
Elmaterialdeembalaje(bolsas de plástico,partes
depolesterol, etc.) tiene que mantenerse fueradel
alcance de los niños porque es potencialmente
peligroso.
Producto
El aparato se fabricó con material reciclable.
La destrucción del mismo se realizará siguiendo
lanormativalocal para ladestruccióndela basura.
El aparato que haya que destruir no podrá ser
abandonado en el ambiente, sino que hay que
entregarlo en los correspondientes centros de
recogida para que se puedan recuperar los gases
refrigerantes y los aceites lubrificantes.
Información
Este aparato no tiene CFC (el circuito de refrige-
ración que contiene R134a) ni HFC (el circuito de
refrigeración que contiene R 600 a Isobutano).
Paramayoresdetalles,hagan referenciaalaplaca
de matrícula colocada en el interior del aparato
(párrafo 3).
Embalagem
O material de embalagem é 100% reciclável.
Para a desintegração do material, seguir as
normas locais. O material de embalagem (sacos
de plástico, partes em poliestireno, etc) deve ser
mantido fora do alcance das crianças, pois trata-
se de uma potencial situação de perigo.
Produto
Oaparelhofoifabricadocom materialreciclável.A
sua destruição deve seguir as normas locais de
desintegração de materiais. O aparelho a ser
destruído deve ser mantido inutilizado, cortando o
cabo elétrico de alimentação.O aparelho que não
será mais utilizado não deve ser deixado no meio-
ambiente sem prévia destruição e deverá ser
entregue nos centros especializados de recolhi-
mento para a recuperação de gases refrigerantes
e óleos lubrificantes.
Informação
Esteaparelho não contémCFC (o circuitorefrigerador
contém R134a) ou sem HFC (o circuito refrigerador
contém R600a Isobutano).
Para maiores detalhes,
referir-se à placa de inscrição colocada no interno
do aparelho (parágrafo 3).
8
GO31BH-010
GC2906-030
2
H
L
P
TOTAL GROSSVOLUME l ...
l ...
R134a
FREEZER kg ...
...-...V ~ ... Hz
... W
Model. ..........
000000000
CLASS . .. kg/24h
H 185 cm
P 60 cm
L 60 cm
...
Kg
min 10°C max 32°C
min 16°C max 32°C
min 18°C max 38°C
min 18°C max 43°C
SN
N
ST
T
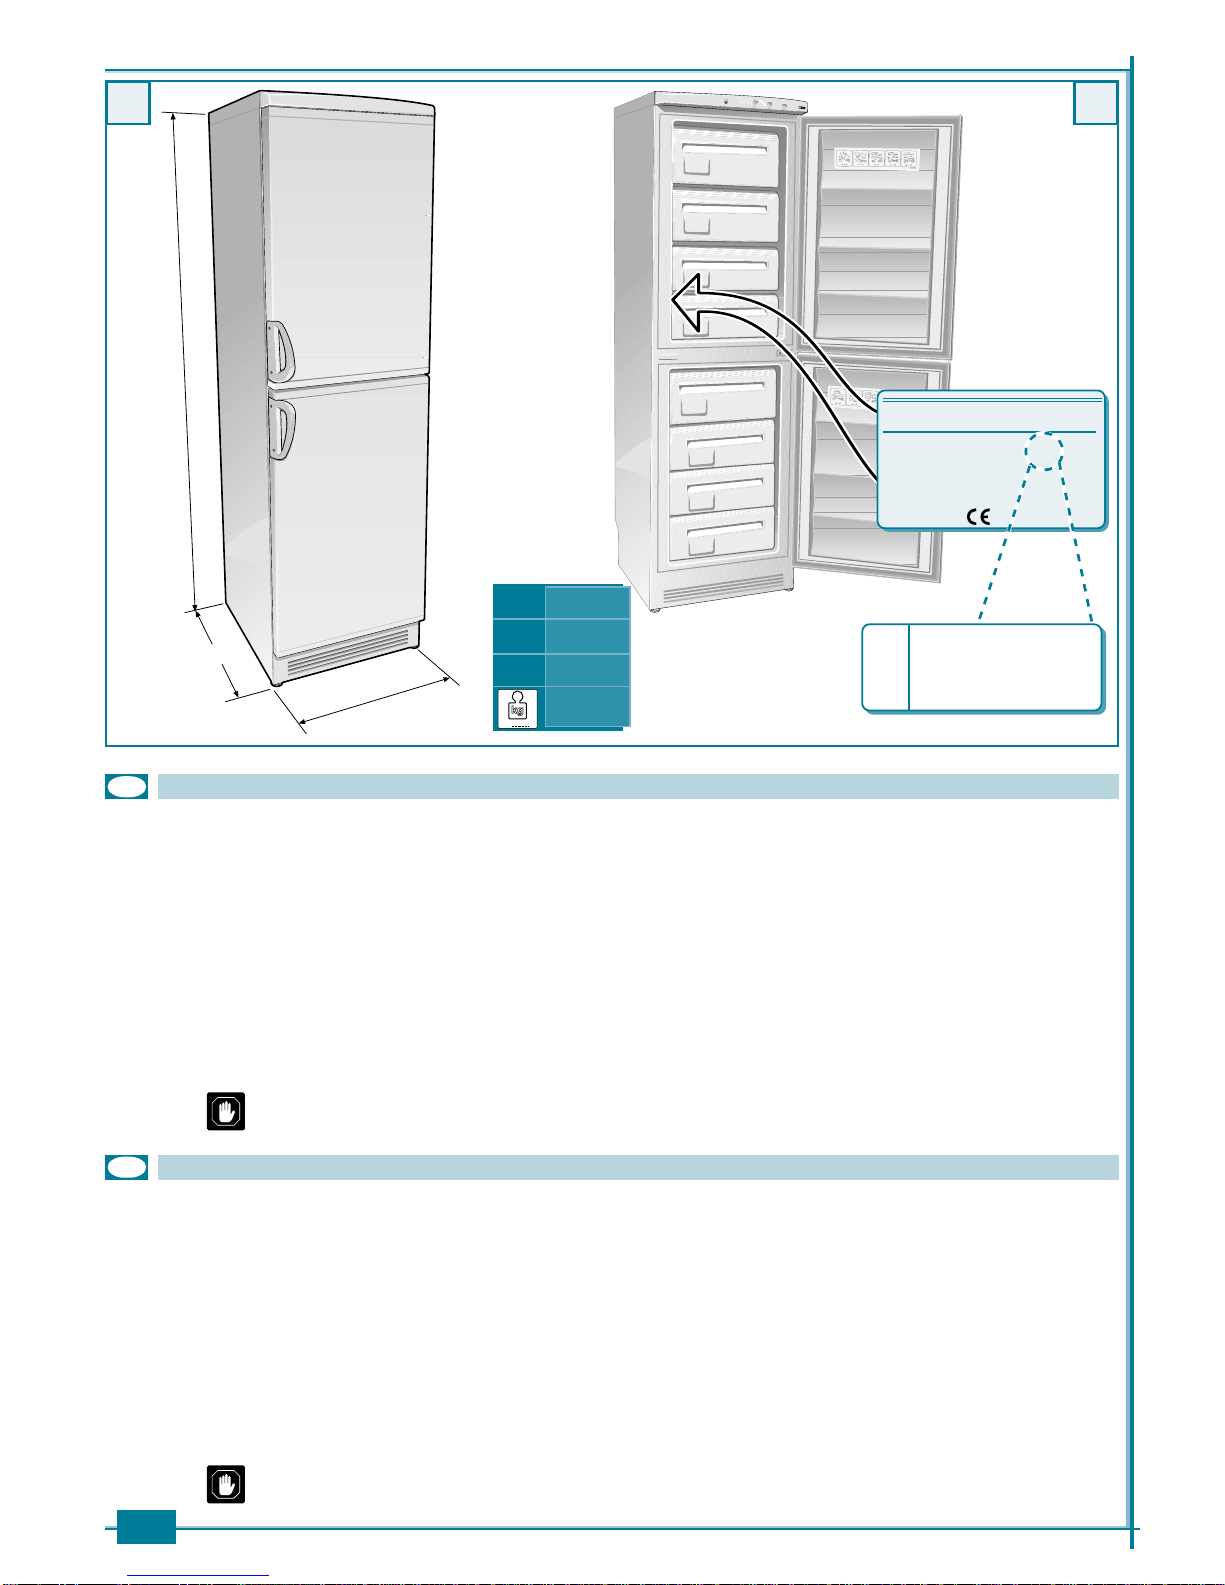
STRUTTURA PORTANTE:realizzatainpannelli di lamiera trattatie verniciati
elettrostaticamenteper resistere ai maltrattamentie rimanere bella e lucente
nello stesso tempo.
ISOLAMENTI:scelti per mantenere costante la temperatura interna e avere
grandi spazi interni.
SPAZIO INTERNO: studiato per poter ospitare qualsiasi forma di cibo da
conservare con una facilità di spostamento dei ripiani.
SBRINAMENTO: manuale.
CONTROLLO TEMPERATURA: Tramite il potenziometro, accessibile con
porta superiore aperta.
ATTENZIONE! Quando installate il vostro apparecchio è importante tener conto della classe climatica del prodotto. Per
conoscere la classe climatica del vostro apparecchio controllate la targa dati qui riportata.
L’apparecchio funziona correttamente nel campo di temperatura
ambiente indicato in tabella, secondo la classe climatica.
3 CARATTERISTICHE TECNICHE
I
CARRYING STRUCTURE:made of electrostaticallytreated and paintedplate
panels to resist heavy duty wear and tear and keep its beautiful shine as
well.
INSULATION: selected to keep internal temperature constant and to give
large internal spaces.
INTERNAL SPACE: designed to store any kind of food with easy to move
shelves.
DEFROSTING: manual.
TEMPERATURE CONTROL: Use the temperature dial, which can be
accessed when the upper door is open.
3 TECHNICAL SPECIFICATIONS
GB
The appliance will function correctly within the ambient temperature
range indicated in the tabel, according to its climatic rating.
WARNING!When you install your appliance, it is important to bear in mind the climatic rating of the appliance.
In order to find out the climatic rating of your appliance, check the data rating plate.
3

9
GEHÄUSE: das Gehäuse ist aus Blechplatten gefertigt, die elektrostatisch
lackiert wurden, weshalb sie gegen unsachgemäße Behandlung geschützt
sind und ihr schönes und glänzendes Aussehen behalten.
ISOLIERUNG:die Isolierung garantiert sowohl eine konstante Innentempe-
ratur als auch eine geräumige Innenaufteilung des Geräts.
DER INNENRAUM:der Innenraum wurde so konzipiert, dass er jede Art von
Lebensmitteln aufnehmen kann und gleichzeitig einen problemlosen Umbau
der Ablagen ermöglicht.
EINTEISEN EISFACH: manuell.
REGULIERUNG TEMPERATUR EISFACH: Mit Hilfe des Kältereglers, zu
erreichen wenn die obere Tür geöffnet ist.
ACHTUNG! Bitte achten Sie bei der Installation Ihres Kühlschranks auf die Kühlungsklasse des Produktes. Die
Kühlungsklasse Ihres Kühlschranks können Sieden Daten auf dem hier aufgeführtenTypenschild entnehmen.
Das Gerät funktioniert richtig bei Raumtemperatur, die in derTabelle
nach der Kühlungsklasse angegeben ist.
3 TECHNISCHE EIGENSCHAFTEN
D
STRUCTURE PORTANTE:la structure est réalisée à l’aide de panneaux de
tôle traités et vernis de façon électrostatique pour résister aux mauvais
traitements tout en restant belle et luisante.
ISOLATIONS: elles ont été choisies pour maintenir la température interne
constante et laisser beaucoup de place à l’intérieur.
PLACE INTERIEURE: elle a été étudiée pour accueillir toutes les for mes
d’alimentsà conserveravecune grandefacilitéde déplacement desétagères.
DEGIVRAGE: manuel.
CONTROLE TEMPERATURE: Par le potentiomètre accessible lorsque la
porte supérieure est ouverte.
ATTENTION! Quand vous installez votre appareil, il est important de tenir compte de la classe climatique du produit.
Pour savoir à quelle classe climatique appartient votre appareil, veuillez contrôler la plaque des données comme
indiquée ci-après.
L’appareil fonctionne correctement dans les valeurs de températures
ambiantes indiquées dans le tableau, suivant la catégorie climatique.
3 DONNEES TECHNIQUES
F
ESTRUCTURA PORTANTE: realizada en paneles de chapa tratados y pin
tados electrostáticamente para resistir al des gaste del tiempo y para que
continúe hermo sa y brillante, al mismo tiempo.
AISLAMIENTO: sistema elegido para mantener constante la temperatura
interior y disponer de grandes es pacios interiores.
ESPACIO INTERIOR: estudiado para poder contener cualquier forma de
alimento que haya que conservar debido a la gran facilidad con la que se
pueden mover los estantes.
DESCONGELADO: automático.
CONTROL DE LATEMPERATURA: Mediante el potenciómetro, accesible
con la puerta superior abierta.
¡ATENCION! Cuando instalen su aparato es importante que tengan en cuenta la clase climática del producto.
Para conocer la clase climática de su aparto, controlen la placa con los datos que aparece aquí.
El aparato funciona correctamente en el campo de temperatura
ambiente indicado en el cuadro, según la clase climática.
3 CARACTERISTICAS TECNICAS
E
ESTRUTURA PORTANTE:realizada em painéis de chapa de ferro tratados
e envernizados eletrostaticamente para resistir aos maltratamentos e para
permanecer bonita e brilhosa ao mesmo tempo.
ISOLAMENTOS:escolhidos para manter constante a temperatura interna e
oferecer grandes espaços internos.
ESPAÇO INTERNO:estudado para hospedar qualquer forma de alimento a
ser conservado com facilidade de deslocamento das prateleiras.
DESCONGELAMENTO: manual.
CONTROLE DETEMPERATURA :Atravésdopotênciometro, acessívelcom
a porta superior aberta.
ATENÇÃO! Ao instalar o seu aparelho, é importante observar a classe climática do produto.
Para conhecer a classe climática do seu aparelho, controlar a chapa de dados abaixo demonstrada.
O aparelho funciona corretamente no campo de temperatura
ambiente indicado pela tabela, segundo a classe climática.
3 CARACTERÍSTICAS TÉCNICAS
P

10
4
O
GC2906-040
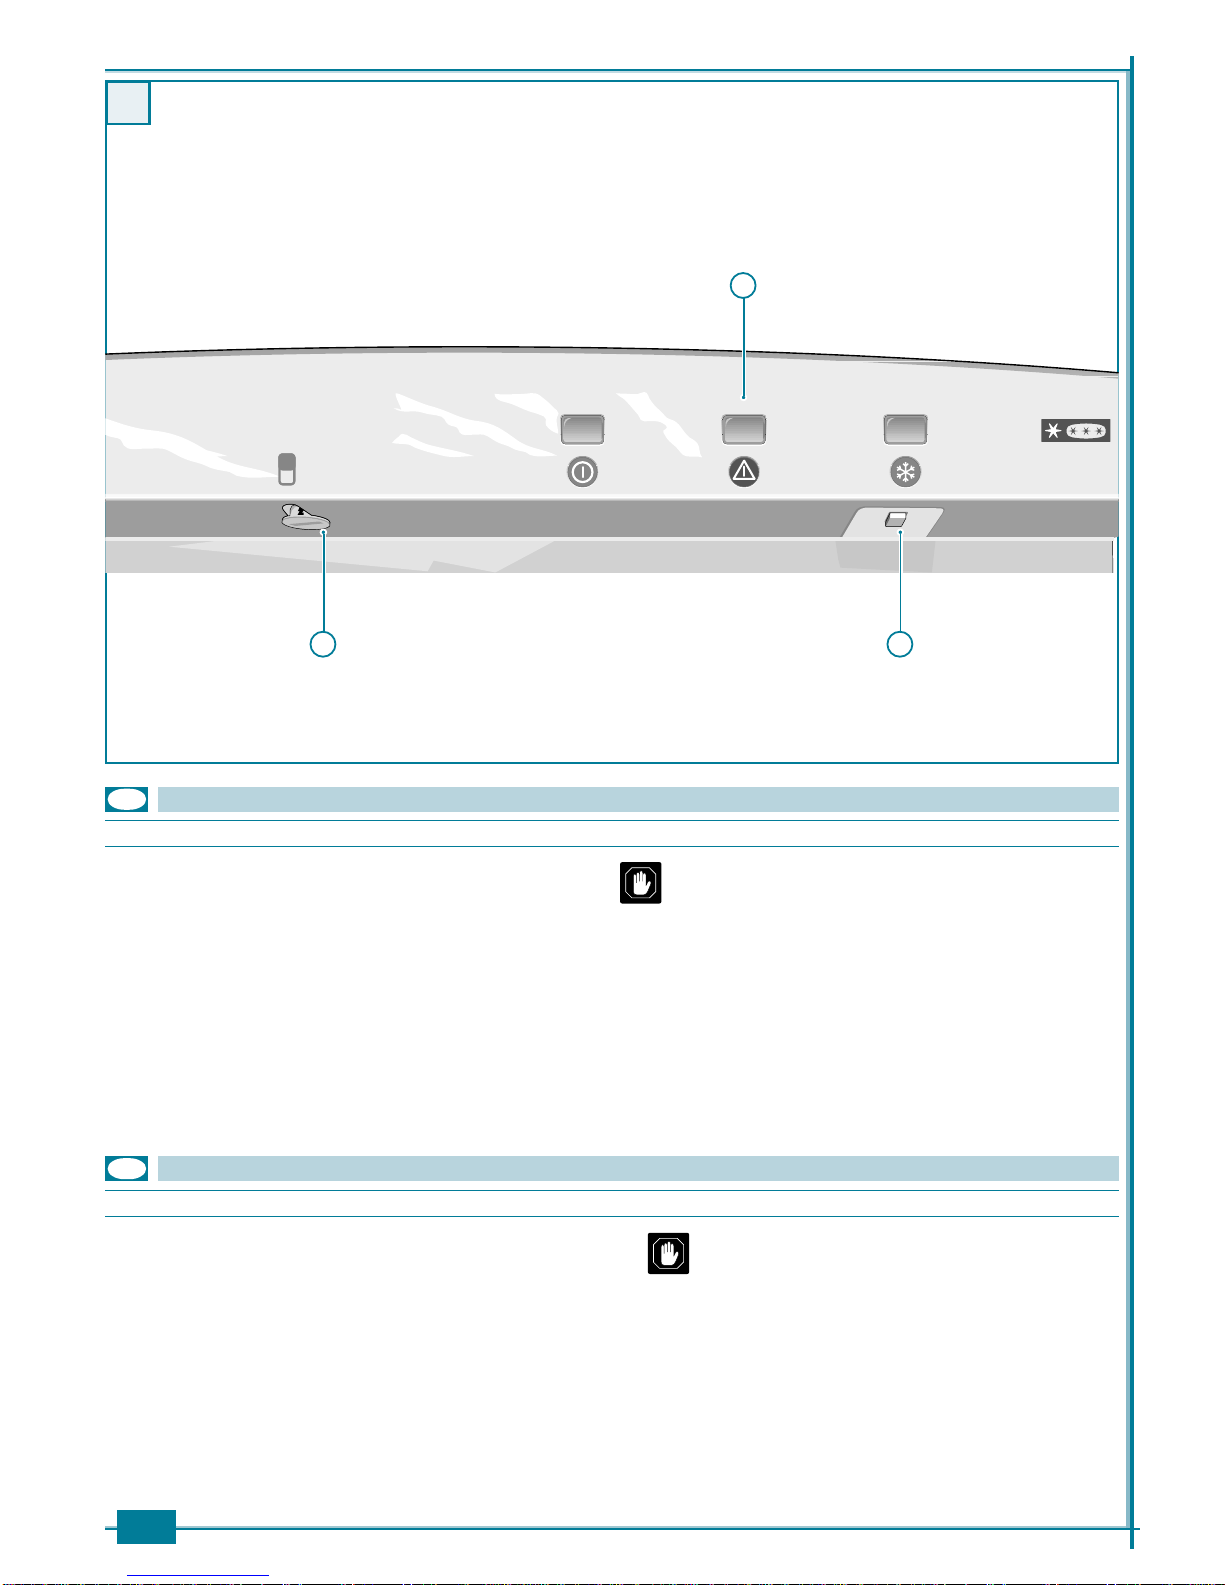
QUADRO COMANDI (fig. 4)
L FREEZERTEMPERATURE ADJUSTMENT
M RUNNINGWARNING LIGHT
N ALARM WARNING LIGHT
O WARNING LIGHTTHAT FREEZER IS RUNNING CONTINUOUSLY
P FREEZER CONTINUOUS RUNNING PUSH-BUTTON FOR RAPID FREEZING
I
CONTROL PANEL (fig. 4)
3.1 GENERAL DESCRIPTION OF THE APPLIANCE
GB
L REGOLAZIONETEMPERATURA CONGELATORE
M SPIA DI FUNZIONAMENTO
N SPIA DI ALLARME
O SPIA DI FUNZIONAMENTO CONTINUO DEL CONGELATORE
P PULSANTE FUNZIONAMENTO CONTINUO DEL CONGELATORE PER
CONGELAMENTO RAPIDO
3.1 DESCRIZIONE GENERALE DELL’APPARECCHIO
NM
L P

11
L RÉGLAGE TEMPÉRATURE CONGÉLATEUR
M LAMPE-TÉMOIN DE FONCTIONNEMENT
N LAMPE-TÉMOIN D’ALERTE
O LAMPE-TÉMOIN DE FONCTIONNEMENT CONTINU DU CONGÉLATEUR
P BOUTON FONCTIONNEM
L REGULACIÓN DE LATEMPERATURA DEL
CONGELADOR.
M PILOTO DE FUNCIONAMIENTO.
N PILOTO DE ALARMA.
O PILOTO DE FUNCIONAMIENTO CONTINUO
DEL CONGELADOR.
P PULSADOR DE FUNCIONAMIENTO CONTINUO
DEL CONGELADOR PARA CONGELADO RÁPIDO.
L. REGULAGEM DETEMPERATURA DO FREEZER
M. BOTÃO LUMINOSO DE FUNCIONAMENTO
N. BOTÃO LUMINOSO DE ALARME
O. BOTÃO LUMINOSO DE FUNCIONAMENTO
CONTÍNUO DO FREEZER
P. BOTÃO DE FUNCIONAMENTO CONTÍNUO DO
FREEZER PARA CONGELAMENTO RÁPIDO.
KONTROLLSCHALTER (Abb. 4)
3.1 BESCHREIBUNG DES GERÄTS
D
TABLEAU DE COMMANDE (fig. 4)
3.1 DESCRIPTION GENERALE DE L’APAPREIL
CUADRO DE MANDOS (fig. 4)
3.1 DESCRIPCION GENERAL DEL APARATO
E
QUADRO DE COMANDOS (fig. 4)
3.1 DESCRIÇÕES GERAIS DO APARELHO
P
F
L REGULIERUNG DER GEFRIERGERÄTTEMPERATUR
M BETRIEBSKONTROLLEUCHTE
N ALARMKONTROLLEUCHTE
O
KONTROLLEUCHTE FÜR DIE KONTINUIERLICHE FUNKTION DES GEFRIERGERÄTS
P
GEFRIERGERÄTS BEIM SCHNELLEINFRIEREN
12
GH2901-080
GH2601-140
GC2906--052
GH2601-070
GC2906-050
5
P
AN0807-115
AN0807-070
Z
V
V
V
C
Make sure that the appliance is on a level.
• Adjust the front feet P, if necessary.
• The appliance is equipped with rear wheels so that it may be moved
easly
• Do not install the appliance near a source of heat.
• Put it in a dry, well ventilated place.
4 INSTALLATION
The position of the door can be inverted on all models in order to fit in better
with the kitchen furnishings.
In order to invert the door proceed as follows:
• Slightly tilt the appliance and rest it against the wall in order to reach the
bottom.
• Raise cover Z by pushing the fastening tabs from behind (fig.8).
• Remove scews V (fig. 9).
• Remove the lower hinge C (fig. 10).
• Remove the freezer door in the direction shown by the arrow (fig. 11).
This operation must be carried out by at least two people.
6 7
8 9 10
11
Accertatevi che l’apparecchio sia livellato.
• Regolate i piedini Panteriori se necessario.
• L’apparecchio è dotato di ruote posteriori per consentire un facile
spostamento.
• Non installate l’apparecchio vicino ad una sorgente di calore.
• Posizionatelo in un luogo asciutto e ben ventilato.
Tutti i modelli sono predisposti per l’inversione dell’apertura della porta, per
un più coordinato allineamento con l’arredo cucina.
Per effettuare l’inversione della porta procedete nel seguente modo:
• Inclinate leggermente l’apparecchio e appoggiatelo al muro per accede-
re alla parte inferiore.
• Sollevate la mascherina Z spingendo da dietro in corrispondenza delle
alette di bloccaggio (fig.8).
• Svitate le viti V (fig. 9).
• Sfilate la cerniera inferiore C (fig. 10).
Questa operazione deve essere compiuta da almeno due
persone.
ME160699-120
ME160699-110
I
K
12 13
• Sfilate la porta del congelatore nel senso indicato dalla freccia (fig. 11).
• Svitate le viti Kche tengono fissata la cerniera intermedia I (fig. 12).
• Estraete la cerniera intermedia aprendo la porta superiore come indica-
to dalla freccia (fig. 13).
• Remove screws Kwhich hold the middle hinge Iin place (fig. 12).
• Open the upper door in order to remove the middle hinge in the direction
of the arrow (fig.13).
4.1 LIVELLAMENTO
4 INSTALLAZIONE
I
4.2 INVERSIONE APERTURA PORTA
GB
4.1 HOW TO LEVEL THE APPLIANCE
4.2 INVERSION OF DOOR OPENING
VISTA LATERALE
SIDEVIEW
SEITENANSICHT
VUE LATERALE
VISTA LATERAL
VISTA LATERAL
VISTA ANTERIORE
FRONT VIEW
FRONTANSICHT
VUE DE FACE
VISTA ANTERIOR
VISTA ANTERIOR
4 INSTALLATION
13
KontrollierenSiemit einerWasserwaagedie korrekte AufstellungdesGeräts.
• RegulierenSiegegebenenfalls die Position mit den vorderenverstellbaren
Füßen P.
• Das Gerät ist mit hinteren Rädern ausgestattet, um ein leichteres
Bewegen zu ermöglichen.
• DasGerät darf nicht in der NäheeinerWärmequelle aufgestelltwerden.
• Stellen Sie das Gerät in einem trockenen und gut belüfteten Raum auf.
Bei allen Modellen kann die Öffnungsrichtung der Tür gedreht werden,
weshalb sich das Gerät an jede Kücheneinrichtung anpassen lässt.
Wenn Sie dieTür drehen wollen, verfahren Sie bitte wie folgt:
• Neigen Sie das Gerät leicht, und stützen Sie es an derWand ab, damit Sie
an den unteren Bereich gelangen können.
• Nehmen sie die Verkleidung Zab, indem sie an den Haltebereichen von
hinten drücken (Abb.8).
• Lösen Sie die Schrauben V (Abb.9).
• Nehmen sie das untere Scharnier Cheraus (Abb. 10).
Diese Arbeitsschritte müssen immer von mindestens zwei
Personen durchgeführt werden.
Vérifiez que l’appareil soit mis à niveau.
• Réglez les pieds Pantérieurs si cela est nécessaire.
• L’appareil est équipé de roues postérieures pour permettre un
déplacement aisé.
• N’installez pas l’appareil près d’une source de chaleur.
• Positionnez-le dans un endroit sec et bien aéré.
Tousles modèles sont prédisposéspourl’inversionde l’ouverturede la porte,
pour permettre un alignement plus coordonné avec le reste de la décoration
de la cuisine.
Pour effectuer l’inversion de la porte, veuillez procéder de la façon suivante:
• Inclinez légèrement l’appareil et appuyez-le contre le mur pour accéder à
la partie inférieure.
• Soulevez la plinthe Zen poussant depuis derrière en correspondance des
ailettes de blocage (fig.8).
• Dévissez les vis V (fig.9).
Cette opération doit être réalisée par au moins deux personnes.
Asegúrense de que el aparato esté nivelado.
• Regulen los soportes anteriores P, si es necesario.
• El aparato dispone de ruedas posteriores para permitir un fácil
movimiento del mismo.
• No instalen el aparato cerca de una fuente de calor.
• Colóquenlo en un sitio seco y bien ventilado.
Todos los modelos están preparados para que se pueda cambiar el lado
hacia el que se abre la puerta, para que se pueda coordinar mejor con la
decoración de la cocina.
Para realizar el cambio de la puerta, procedan de la siguiente manera:
• Inclinen ligeramente el aparato y apóyenlo en la pared para poder llegar a
la parte inferior.
•
Quitenlamascarita Z empujando por detrás de las aletas de bloqueo (fig.8).
• Aflojen los tornillos V (fig. 9).
• Saquen la bisagra inferior C (fig. 10).
Esta operación la tienen que realizar, por lo menos, dos
personas.
Certifique-se de que o aparelho esteja nivelado.
• Regular os pés Panteriores se necessário.
• O aparelho é dotado de rodas posteriores para permitir um fácil
deslocamento.
• Não instalar o aparelho perto de uma fonte de calor;
• Posicioná-lo em local seco e bem ventilado;
Todos os modelos são predispostos para a inversão de abertura de porta,
para melhor combinar com a decoração.
Para efectuar a inversão da porta, proceder da seguinte maneira:
• Inclinar ligeiramente o aparelho e apoiá-lo na parede para ter acesso à
parte inferior.
• Levantar a tampa Zpuxando por dentro em correspondência às travas de
bloqueio (fig. 8).
• Desaparafusar os parafusos V (fig.9).
Esta operação deve ser realizada por pelo menos duas
pessoas.
4 AUFSTELLUNG
D
4.1 WAAGERECHTE AUFSTELLUNG
4.2 UMKEHRUNG DER ÖFFNUNGSRICHTUNG DER TÜR
• Ziehen Sie die Tür des Gefrierschranks in Pfeilrichtung heraus (Abb. 11).
• Lösen Sie die Schrauben K, mit denen das mittlere Scharnier I befestigt
ist (Abb. 12).
• Ziehen Sie das mittlere Scharnier heraus, indem Sie die obere Tür in
Pfeilrichtung öffnen (Abb. 13).
• Enlevez la charnière inférieure C (fig. 10).
• Enlevez la porte du congélateur dans le sens indiqué par la flèche (fig.
11).
• Dévissez les vis Kqui fixent la charnière intermédiaire I (fig. 12).
• Enlevez la charnière intermédiaire en ouvrant la porte supérieure comme
indiqué par la flèche (fig. 13).
4 INSTALLATION
F
4.1 MISE A NIVEAU
4.2 INVERSION DE L’OUVERTURE DE LA PORTE
4 INSTALACION
E
4.1 NIVELADO
4.2 CAMBIO DE LA APERTURA DE LA PUERTA
• Saquen la puerta del congelador en el sentido indicado por la flecha (fig.
11).
• Desenrosquen los tornillos Kque mantienen sujeta la bisagra intermedia
I (fig. 12).
• Saquen la bisagra intermedia abriendo la puerta superior como indica la
flecha (fig. 13).
4 INSTALAÇÃO
P
4.1 NIVELAÇÃO
4.2 INVERSÃO DE ABERTURA DE PORTA
• Retirar a dobradiça inferior C (fig. 10).
• Tirar a porta do freezer no sentido indicado pela seta (fig. 11).
• Desaparafusarosparafusos Kque mantém fixa adobradiçaintermediária
I (fig. 12).
• Tirar a dobradiça intermediária abrindo a porta superior como indicado
pela seta (fig. 13).
14
GO31BH-130
14
ME160699-140
15
A
ME160699-150
16
S
17
ME160699-160
S
GH2601-110
ME160699-170
18 19
20 21
S
GO31BH-140
I
S
F
C
AN0807-090
Y
K
GH2601-050
24
M
AN00807-110
23
S
GH2601-130
GH2601-120
Z
Z
22

15
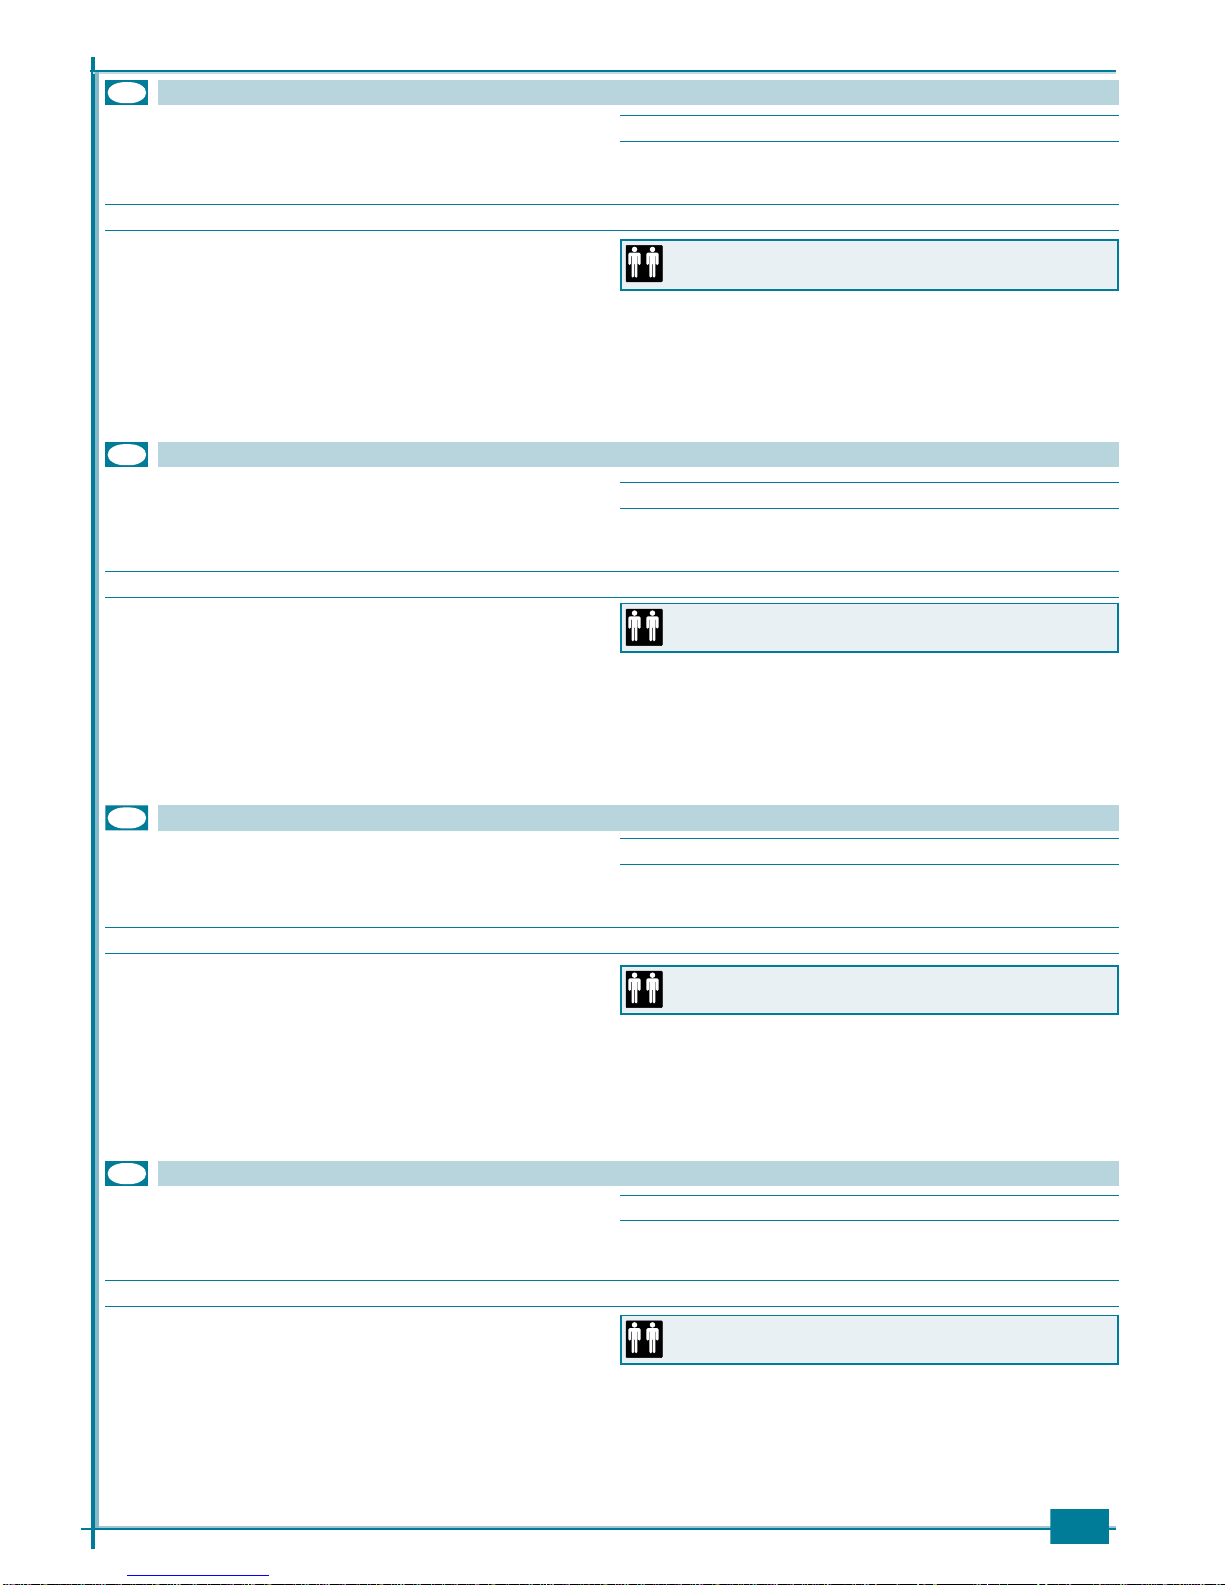
• Sfilate via la porta superiore nel senso indicato dalla freccia (fig. 14).
• Estraete il piastrino A dalla parte sinistra e inseritelo nella zona destra
(occupata precedentemente dalla cerniera intermedia) (fig. 15).
• Svitate il perno superiore S (fig. 16).
• Riavvitate il perno superiore S nella parte sinistra (fig. 17).
• Inserite la porta superiore accoppiando correttamente il perno S (fig.18).
• Inserite la cerniera intermedia I e fissatela con le proprie viti (fig. 19).
Per facilitare il montaggio agite contemporaneamente sulla chiusura della
porta.
I
• Remove the upper door in the direction of the arrow (fig.14).
• Remove plate Aon the left-hand side and insert it in the right-hand side
(previously occupied by the middle hinge) (fig.15).
• Unscrew the upper pin S (fig. 16).
• Screw the upper pin Sback into the left-hand side (fig.17).
• Insert the upper door so that pin Sfits in correctly (fig. 18).
• Insert the middle hinge Iand use its own screws to fasten it (fig. 19).
To facilitate assembly move the door lock at the same time.
• Saquen la puerta superior en el sentido indicado por la flecha (fig. 14).
• Quiten la plaquita Acolocada en la parte izquierda y pónganla en la parte
derecha (ocupada anteriormente por la bisagra intermedia) (fig. 15).
• Desenrosquen el perno superior S (fig. 16).
• Enrosquen el perno superior S en la parte izquierda (fig. 17).
• Coloquen la puerta superior colocando correctamente el perno S (fig.18).
• Coloquen la bisagra intermedia I y sujétenla con sus propios tornillos (fig.
19).Para facilitar el montaje, actúen contemporáneamente en el cierre de
la puerta.
• Tirar a porta superior no sentido indicado pela seta (fig.14).
• Tirar a chapa Ada parte esquerda e inserí-la na parte direita (ocupada
anteriormente pela dobradiça intermediária) (fig. 15).
• Desaparafusar o eixo superior S (fig. 16).
• Aparafusar novamente o eixo superior Sna parte esquerda (fig. 17).
• Inserir a porta superior juntando corretamente o eixo S (fig. 18).
• Inserir a dobradiça intermediária Ie fixá-la com os próprios parafusos (fig.
19). Para facilitar a montagem, operar contemporaneamente no
fechamento da porta.
• ZiehenSie die obereTürdesGefrierschranksin Pfeilrichtung heraus(Abb.
14).
• Ziehen Sie das Plättchen Aauf der linken Seite heraus und setzen Sie es
auf der rechten Seite ein, dort wo zuvor das mittlere Scharnier befestigt
war (Abb. 15).
• Lösen Sie den oberen Stift S (Abb. 16).
• Schrauben Sie den oberen Stift S jetzt auf der linken Seite fest (Abb. 17).
• Setzen Sie die obere Tür ein. Der Bolzen Smuss sich korrekt einpassen
(Abb. 18).
• Setzen Sie das Zwischenscharnier Iein und befestigen Sie es mit den
Scharnierschrauben.UmdieMontage zuErleichtern, wirkenSie gleichzeitig
auf den Verschluss der Tür ein (Abb.19).
• Otez la porte supérieure dans le sens indiqué par la flèche (fig. 14).
• Enlevez la plaquette Ade la partie gauche et introduisez-la dans la partie
droite (occupée précédemment par la charnière intermédiaire) (fig.15).
• Dévissez la cheville supérieure S (fig. 16).
• Revissez la cheville supérieure Sdans la partie gauche (fig. 17).
• Introduisez la porte supérieure en assemblant correctement la cheville S
(fig. 18).
• Introduisez la charnière intermédiare I et fixez-la avec ses propres vis (fig.
19).Pour faciliter le montage intervenez en même temps sur la fermeture
de la porte.
• Insert the freezer door so that it fits on to the hinge correctly (fig.20).
• Unscrew pin Ffrom hinge C (right-hand side) and insert it into hinge S
(left-hand side) supplied with the appliance (fig. 21).
• Remove the left disc Yfrom the lower case Z (fig. 22).
• Insert the included right disk K.
• Insert cover M by pushing the fastening tabs (fig.23).
• Replace the lower hinge S on the left-hand side and use the screws to
fasten it into position (fig.24).
• Setzen Sie dieTür des Eisschrankes ein (Abb. 20).
Das Zwischenscharnier muss sich korrekt einpassen.
• Entfernen sie den Stift F von Scharnier C (rechts) und montieren sie ihn
an das beigefügte Scharnier S (links) (Abb.21).
• Entfernen sie das linke Scheibchen Yvon der unterenVerkleidung Z (Abb.
22).
• Fügen sie das beigefügte rechte Scheibchen Kein.
• Bringen sie dieVerkleidung M an, indem sie an den Haltebereichen Druck
ausüben (Abb. 23).
• Bringen sie nun das untere Scharnier S links an und befestigen sie es mit
den Schrauben (Abb. 24).
D
F
• Introduisez la porte du congélateur en assemblant correctement la
charnière intermédiare (fig. 20).
• Dévissez la cheville F de la charnière inférieure C (droite) et montez-la
dans la charnière S (gauche) fournie avec l’appareil (fig. 21).
• Enlever la plaque gauche Yde la calandre inférieure Z (fig.22).
• Remettre la plaque droite Kfournie.
• Insérezla plinthe Men poussanten correspondance desailettes deblocage
(fig. 23).
• Remontez la charnière inférieure S sur le côté gauche et fixez-la avec les
vis (fig. 24).
• Coloquenla puerta delcongelador poniendo enposición correcta labisagra
intermedia (fig. 20).
• Desenrosquen el perno F de la bisagra inferior C (derecha) y móntenla en
la bisagra S (izquierda ) que se entrega con el aparato (fig.21).
• Saquen la plaquita izquierda Yde la máscara inferior Z (fig. 22).
• Coloquen la plaquita derecha Kque se entrega con el aparato.
• Coloquen la mascarita M empujando en las aletas de bloqueo (fig.23).
• Montenla bisagra inferior S enellado izquierdo y sujétenla conlostornillos
(fig.24).
• Inserir aportado freezer juntando corretamenteadobradiçaintermediária
(fig. 20).
• Desaparafusar o eixo Fda dobradiça C(direita) e montá-lo na dobradiça
S (esquerda) que acompanha o aparelho (fig. 21).
• Retirar a chapa esquerda Yda tampa inferior Z (fig. 22).
• Inserir a chapa direita Kque acompanha a aparelhagem.
• Inserir a tampa M empurrando em correspondência às travas de bloqueio
(fig. 23).
• Montar novamente a dobradiça inferior Sno lado esquerdo e fixá-la com
os parafusos (fig. 24).
P
E
GB
• Inserite la porta del congelatore accoppiando correttamente la cerniera
intermedia (fig. 20).
• Svitate il perno Fdalla cerniera C (destra) e montatelo nella cerniera S
(sinistra) in dotazione (fig. 21).
• Sfilate il piastrino sinistro Y dalla mascherina inferiore Z (fig. 22).
• Inserite il piastrino destro Kin dotazione (posizione destra).
•
Rimonate la cerniera inferiore S sul lato sinistro e fissatela con le viti (fig.23).
• Inserite la mascherina M spingendo in corrispondenza delle alette di
bloccaggio (fig. 24).
16
GO1810-300
GO1810-280
GO1810-290
25 26 27
T
V
GC2906-030
28
TOTAL GROSS VOLUME l ...
R134a
FREEZER. kg ...
...-...V ~ ... Hz
... W
Model. ..........
000000000
COMPRESSION SYSTEM
TYPE:
...
CLASS . .. kg/24h
111 7
8
910
23
4
56
I
GB
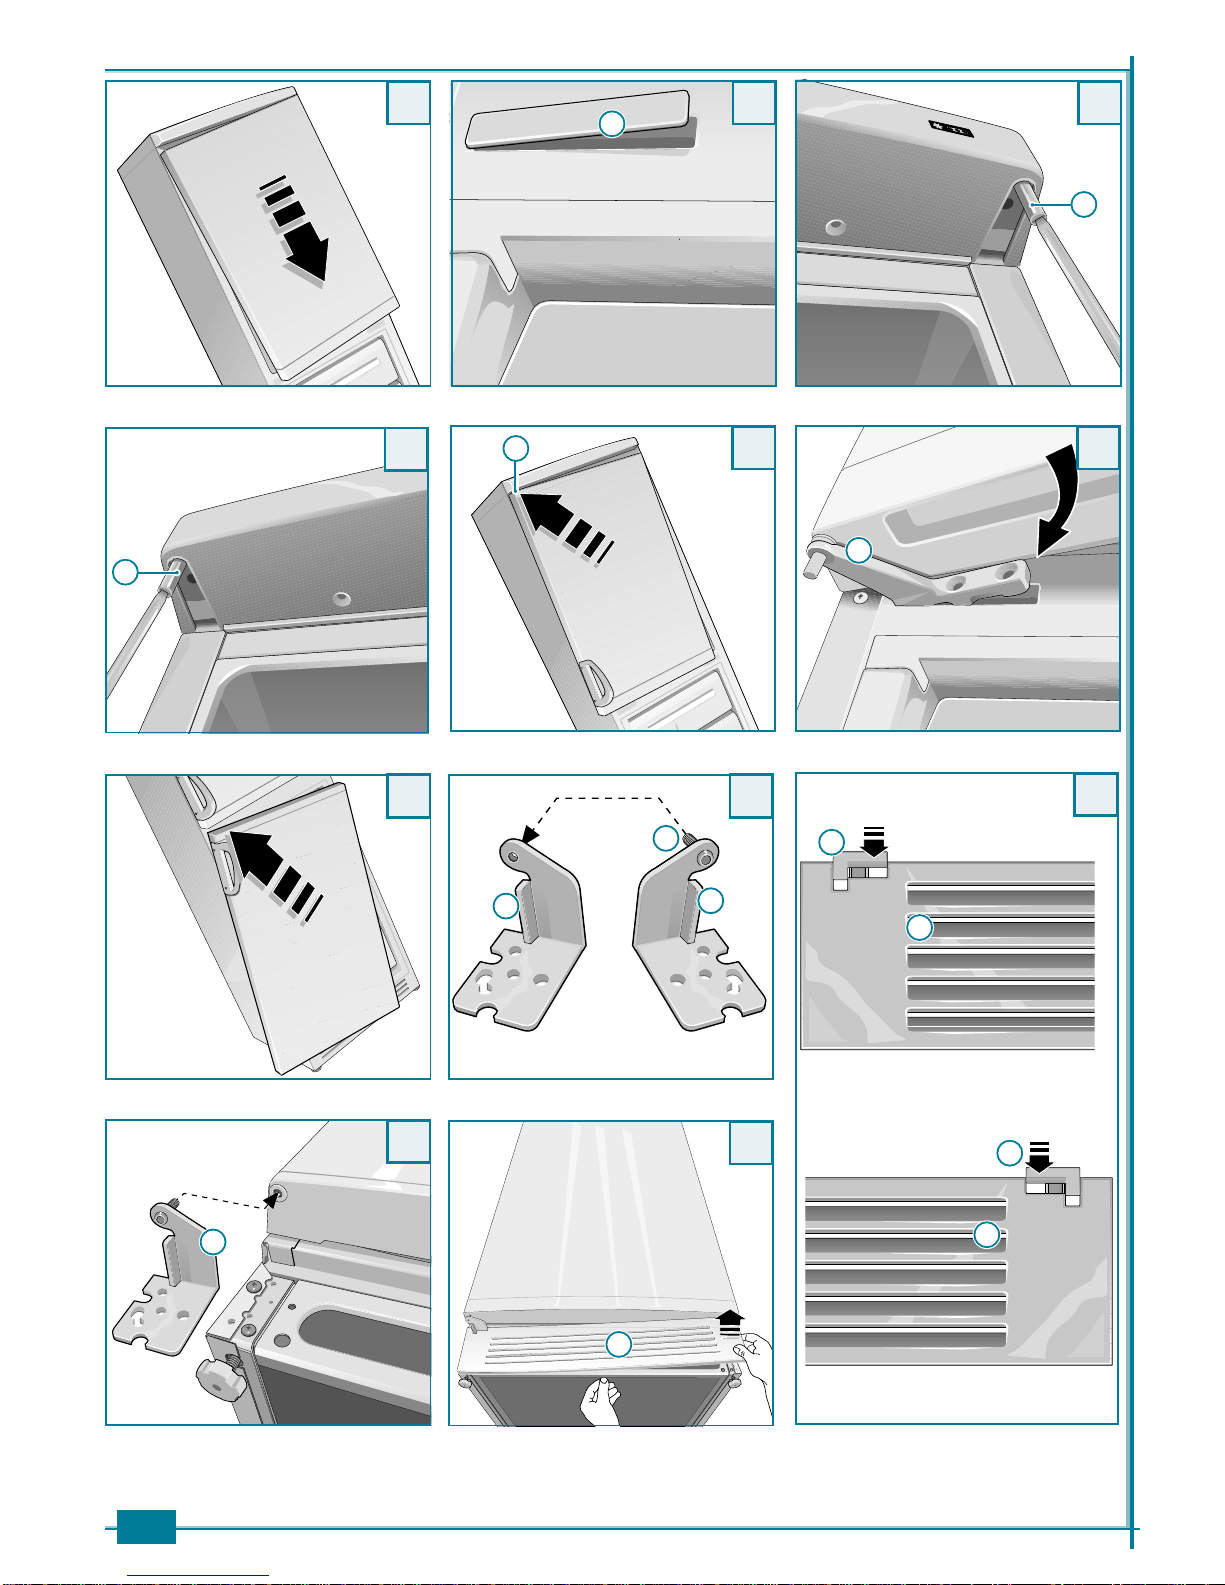
• Svitate le viti V che tengono fissate le maniglie alle porte del congelatore
(fig. 25)
.
• Riavvitate le maniglie dalla parte opposta
(fig. 26)
.
• Inserite i tappetti T(in dotazione)
(fig.27)
.
• I collegamenti elettrici devono essere conformi alle normative di sicurezza elettrica.
• Controllate che il voltaggio sulla targhetta matricola corrisponda alla ten-
sione della vostra abitazione.
• La messa a terra dell’apparecchio è obbligatoria a termini di legge. Il fab-
bricante declina ogni responsabilità per eventuali danni subiti da persone,
animali o cose, derivanti dalla mancata osservanza di queste norme.
• Se la spina e la presa non sono dello stesso tipo, fate sostituire la spina da
un tecnico qualificato. Non usate adattatori, prese multiple o prolunghe.
4.3 COLLEGAMENTO ELETTRICO
1 MODELLO
2 TENSIONE DI ALIMENTAZIONE E FREQUENZA
3 ASSORBIMENTO MASSIMO
4 CAPACITÀ LORDATOTALE
5 NUMERO DITIPO
6 MARCHIO DI CONFORMITÀ CE
7 CLASSE CLIMATICA
8 CAPACITÀ DI CONGELAMENTO
9 TIPO DI REFRIGERANTE
10 QUANTITÀ REFRIGERANTE
11 NUMERO DI MATRICOLA
• Insert the stoppers T(supplied with the appliance)
(fig.25)
.
• Remove screws Vthat fasten the handle to the appliance door
(fig.26)
.
• Screw the handles back on to the doors on the opposite side
(fig. 27)
.
• The electrical wiring must comply with the norms on electrical safety.
• Check that the voltage on the rating plate corresponds to the voltage in
your home.
• The appliance must have an earth according to the laws in force. The
manufacturerdeclines all responsibilityforanydamageto persons, animals
or things as a result of failure to comply with these norms.
• Ifthe plug andthe socketarenot of thesame kind, askaqualified technician
to change the plug.
4.3 ELECTRICAL WIRING
For your convenience the flexible supply
cable is supplied already connected to a B.
S. 1363 fused plug with a 13 amp fuse.
Should this plug not fit the socket outlets in your home, it should be cut off
and replaced with a suitable plug, as follows:
This plug cannot be used for any other appliance and should therefore be
properly disposed of and not left where children might find it and plug it
into a supply socket with the obvious this implies danger.We recommend
the use of good quality plugs and wall sockets that can be switched off
when the machine is not in use.
1 GREEN ANDYELLOW EARTH
2 BLUE NEUTRAL
3 BROWN LIVE
4 13 AMP FUSE
5 CABLE CLAMP
ME160699-370
As the colours of the wires in the mains lead of this appliance may not correspond
tothecoloured markings identifying the terminals in your plug,proceedasfollows:
• the wire which is coloured green and yellow must be connected to the
terminal in the plug which is markedwiththe letter Eor bythe earth symbol
or coloured green or green and yellow;
• the wire which is coloured blue must be connected to the terminal which is
marked with the letter Nor coloured black;
• the wire which is coloured brown must be connected to the terminal which
is marked with the letter Lor coloured red.
WARNING!THIS APPLIANCE
MUST BE EARTHED
Do not use adaptors,
multiple sockets or
extensions.
1
23
4
5
IMPORTANT: the wires in the mains lead fitted to this appliance are coloured as
follows.
1 MODEL
2 SUPPLYVOLTAGE AND FREQUENCY
3 MAXIMUM ABSORPTION
4 TOTAL GROSS VOLUME
5 TYPE NUMBER
6 EEC CONFORMITY CHECKMARK
7 CLIMATIC CLASS
8 FREEZER CAPACITY
9 TYPE OF REFRIGERANT
10 QUANTITY OF FREEZER REFRIGERANT
11 MATRICULATION NUMBER

17
D
• Legen Sie jetzt die Abdeckstopfen T(beiliegenden) ein (Abb.25).
• Lösen Sie die Schrauben V, mit denen der Türgriff an der Türe des
Gefrierschranks befestigt sind (Abb.26).
• Schrauben Sie die Türgriffe dann an der gegenüberliegenden Seite fest
(Abb.27).
• Die elektrischen Anschlüsse müssen den Vorschriften für die Sicherheit
im Bereich der Stromversorgung entsprechen.
• Prüfen Sie, ob die Voltzahl, die auf dem Schild mit den Kenndaten des
Geräts angeben ist, der Stromspannung an ihrem Wohnort entspricht.
• Die Erdung des Geräts ist gesetzlich vorgeschrieben.Der Hersteller lehnt
jedeVerantwortung für Schäden an Personen, Tieren oder Sachen ab, die
aus der Missachtung dieser Vorschriften entstehen.
• WennStecker undSteckdosenichtübereinstimmen, lassenSie den Stecker
von einem qualifizierten Techniker austauschen. Verwenden Sie keine Adapter,VielfachsteckeroderVerlängerun-
gskabel.
4.3 ANSCHLUSS AN DAS STROMNETZ
F
• Introduisez les capuchons T(fournis) (fig.25).
• Dévissez les vis Vqui fixent la poignée à la porte de l’appareil (fig.26).
• Revissez les poignées dans le sens contraire (fig.27).
• Les branchements électriques doivent être conformes aux normatives de
sécurité électrique.
• Contrôlez que le voltage reporté sur la plaquette de données corresponde
à la tension de votre habitation.
• La mise à terre de l’appareil est rendue obligatoire par la loi.Le fabricant
décline toute responsabilité pour d’éventuels dommages causés à des
personnes, des animaux ou des choses, ayant pour origine la non-
observation de ces normes.
• Si la fiche et la prise ne sont pas du même type, faites remplacer la fiche
par un technicien qualifié. N’utilisez pas d’adaptateurs, de multiprises ou de rallonges.
4.3 BRANCHEMENT ELECTRIQUE
E
• Coloquen los cierres T(que se entregan con el congelador) (fig.25).
• Desenrosquen los tornillos Vque mantienen sujeta la manilla a la puerta
del aparato (fig.26).
• Enrosquen de nuevo las manillas a la parte opuesta (fig. 27).
• Las conexiones eléctricas tienen que respetar las normas de seguridad
eléctrica.
• Controlen que el voltaje escrito en la placa de matrícula corresponda a la
tensión de su casa.
• La toma de tierra del aparato es obligatoria, según establece la ley. El
fabricantedeclinatoda responsabilidad porlos eventualesdañoscausados
a las personas, a los animales o a las cosas, que deriven de la
inobservancia de estas normas.
• Si el enchufe del congelador y el enchufe de la corriente no son del mismo
tipo, hagan que un técnico cualificado cambie el enchufe. No usen adaptadores, enchu fes múltiples o cables volantes.
4.3 CONEXION ELECTRICA
P
• Inserir os tampões T(que acompanham o aparelho) (fig. 25).
• Desaparafusar os parafusos V que mantém fixo o puxador na porta do
aparelho (fig. 26).
• Aparafusar novamente os puxadores da parte oposta (fig. 27).
•
Asconexõeselétricasdevem estar sempre emconformidadecom as normas
de segurança elétrica.
• Verificarse a voltagemnachapa damatrículacorresponde àtensão elétrica
de sua casa.
• A colocação do fio terra no aparelho é obrigatória por lei. O fabricante se
exime de toda e qualquer responsabilidade por eventuais danos subidos
porpessoas,animais ou objetos,derivadosda faltade observaçãodestas
normas.
•
Casoa tomadaea tomada deparede não forem domesmo tipo,providenciar
a substituição da mesma através de um técnico qualificado.
Não utilizar adaptadores, tomadas múltiplas ou extensões.
4.3 CONEXÃO ELÉTRICA
1 MODELL
2 VERSORGUNGSSPANNUNG UND FREQUENZ
3 MAX. ABSORPTION
4 BRUTTOKAPAZITÄT INSGESAMT
5 TYPENNUMMER
6 EG-KONFORMITÄTSSIEGE
7 KLIMAKLASSE
8 GEFRIERKAPAZITÄT
9 KÜHLMITTELTYP
10 KÜHLMITTELMENGE
11 MATRIKELNUMMER
1 MODÈLE
2 TENSION D’ALIMENTATION ET FRÉQUENCE
3 ABSORPTION MAXIMALE
4 CAPACITÉ LOURDETOTALE
5 NUMERO DETYPE
6 LABEL DE CONFORMITÉ CE
7 CATEGORIE CLIMATIQUE
8 CAPACITÉ DE CONGÉLATION
9 TYPE DE RÉFRIGÉRANT
10 QUANTITÉ RÉFRIGÉRANT
11 NUMÉRO DE MATRICULE
1 MODELO
2 TENSION DE LA CORRIENTEY FRECUENCIA
3 MAXIMA ABSORCION
4 CAPACIDADTOTAL BRUTA
5 NUMERO DETIPO
6 MARCA DE CONFORMIDAD CE
7 CLASE CLIMATICA
8 CAPACIDAD DE CONGELACION
9 TIPO DE REFRIGERANTE
10 CANTIDAD DE REFRIGERANTE DEL FRIGORIFICO
11 NÚMERO DE MATRÍCULA
1 MODELO
2 TENSÃO DE ALIMENTAÇÃO E FREQUÊNCIA
3 ABSORÇÃO MÁXIMA
4 CAPACIDADE BRUTATOTAL
5 NÚMERO DOTIPO
6 MARCA DE CONFORMIDADE CE
7 CLASSE CLIMÁTICA
8 CAPACIDADE DE CONGELAMENTO
9 TIPO DE REFRIGERAÇÃO
10 QUANTIDADE REFRIGERADORA
11 NÚMERO DE INSCRIÇÃO
18
29
5 USO
I
5.1 MESSA IN FUNZIONE
5USE
GB
5.1 START-UP
L’arresto del funzionamento si ottiene ponendo la manopola L in posizione O.
The compartment can be turned off by setting the switches L to the 0-Position.
• L’apparecchiovieneavviatoautomaticamente (posizione
manopola L diversa da O).
•La spia N rimane accesa, fino al raggiungimento della tem-
peratura critica di allarme.
La spia N inoltre si accende quando:
- l’apparecchio viene collegato per la prima volta alla rete
elettrica;
- la porta del congelatore è rimasta aperta a lungo;
- è stata caricata una quantità di alimenti da congelare
superiore a quella indicata sulla targhetta matricola;
- latemperaturadelcomparto congelatorenon èadeguata.
Attenzione!
La temperatura viene regolata agendo sulla
manopola L dalla posizione 1 (più calda) alla
posizione 5 (più fredda).
Posizione consigliata tra 2 e 3.
• Dopo la messa in funzione sono necessarie circa 3 ore prima
che vengano raggiunte le temperature adeguate di conserva-
zione degli alimenti surgelati.
Warning!
The temperature can be adjusted by
turning knob L from 1 (the warmest
temperature) to 5 (the coldest
temperature).
The ideal temperature range is
between 2 and 3.
• The appliance is turned on automatically (if the switch
L in not in the 0-position).
• The warning light Nwill remain switched on until the critical
alarm temperature has been reached.
The warning light Nwill also switch on when:
- the appliance is connected to the mains for the first time;
- the freezer door has been left open for a long time;
- more food than the quantity shown on the rating plate
has been stored in order to be frozen;
- the temperature of the freezer compartment is not cor-
rect.
• Once the freezer has switched on, about 3
hours are needed before it reaches the cor-
rect temperature for preserving frozen food.
GC2906-040
L
N
P

19
5 GEBRAUCH
D
5.1 INBETRIEBNAHME
5 UTILISATION
F
5.1 MISE EN FONCTIONNEMENT
5 USO
E
5.1 PUESTA EN MARCHA
5USE
P
5.1 ATIVAÇÃO
Kühl- und Gefrierfach werden ausgeschaltet indem man die Schalter L auf die 0-Position einstellt.
On obtient l’arrêt du fonctionnement mettent les boutons
L sur la position 0 .
La parada del funcionamiento se obtiene colocando las manivelas o L en posición O.
A parada do funcionamento dos compartimentos obtém-se colocando os respectivos botões de regulagem L em posição O.
• Das Gefrierfach schaltet sich automatisch an (falls der
Schalter L nicht in 0-Position steht).
•DieKontrollleuchteN leuchtet auf,bis diekritischealarmtem-
peratur erreicht ist.
Die Kontrollleuchte Nschaltet sich ein wenn:
- das Gerät zum ersten Mal mit Elektrizität versorgt wird;
- dieTür des Gefriergerät längere Zeit offen stehen bleibt;
- eine Menge von Lebensmitteln in das Gefriergerät ge-
laden wurde, die die im Rahmen der technischen Daten
angegebene Obergrenze überschreitet;
- die Temperatur im Gefriergerät nicht angemessen ist.
Vorsicht!
DieTemperaturindiesem GerätwirddurchEinstellendes
Knopfes L reguliert: Position 1 ist die wärmste Stellung,
Position 5 die kälteste. Es wird empfohlen,das Gerät auf
Position 2-3 einzustellen.
• Zirka drei Stunden nach Inbetriebnahme des Gefriergeräts
werden für die Konservierung von Lebensmitteln angemes-
seneTemperaturen erreicht.
Attention !
On peut régler la température en tournant le bouton
L de la position 1 (plus chaud) à la position 5 (plus
froid).
Position conseillée entre 2 et 3.
• Le compartiment congélateur se met en route automa-
tiquement (bouton L pas sur le 0).
•La lampe témoin Nrestera allumée jusqu’au moment où la
température critique d’alerte sera atteinte.
La lampe témoin Nen outre s’allume quand :
- l’appareil est branché pour la première fois au réseau
électrique;
- la porte du congélateur est restée ouverte pendant
longtemps;
- onachargé unequantitéd’aliments àcongeler supérieure
àcelle qui est indiquée surla plaquette d’immatriculation;
- la température du compartiment congélateur n’est pas
juste.
• Après la mise en fonctionnement du congélateur, il faut
attendre environ 3 heures pour atteindre la température
appropriée pour la conservation des aliments surgelés.
¡Atención!
La temperatura del congelador se regula moviendo
la manivela L desde la posición 1 (más caliente )
hasta la posición 5 (más fría).
Posición aconsejada entre 2 y 3.
• El compartimento del congelador se pone en marcha
automáticamente (posición de la manivela L distinta
de O).
• El piloto N permanece encendido, hasta que se alcance la
temperatura crítica de alarma.
El piloto N, además, se enciende cuando:
- elaparato se conecta por la primera veza la red eléctrica;
- la puerta del congelador quedó abierta durante bastante
tiempo;
- se introdujo una cantidad de alimentos para congelar
superior a la indicada en la placa de matrícula;
- la temperatura del congelador no es adecuada.
• Despuésde quese poneen marchael aparato, senecesitan
unas 3 horas, aproximadamente, antes de que se alcancen
la temperatura adecuada para la conservación de los
alimentos congelados.
Atençao!
Atemperatura é reguladaatravésdo botão regulador
L,partindo da posição 1 ( mais quente) até a posição
5 ( mais fria). Posição aconselhada entre 2 e 3.
• O freezer é acionado automaticamente ( posição do
botão de regulagem L diferente de O).
•O botão luminoso N permanecerá aceso até a obtenção da
temperatura crítica de alarme.
Além disso, este botão se acende quando:
- oaparelhoforconectadopelaprimeiravezà redeelétrica;
- a porta do freezer ficar aberta por muito tempo;
- for colocada uma quantidade de alimentos a serem
congelados superior àquela indicada na chapa de
inscrição;
- a temperatura do congelador não for adequada.
• Depois da ativação do aparelho, são necessárias
aproximadamente 3 horas antes que sejam obtidas as
temperaturas adequadas de conservação dos alimentos
congelados.
Table of contents
Other NEW POL Freezer manuals

NEW POL
NEW POL NW170P2 User manual

NEW POL
NEW POL NWFZ1851I User manual

NEW POL
NEW POL NWC201EE User manual

NEW POL
NEW POL NWF1861PEEI User manual

NEW POL
NEW POL NWF1851PIF User manual

NEW POL
NEW POL NWC186ELD User manual

NEW POL
NEW POL NWC187EID User manual

NEW POL
NEW POL NW170IP2 User manual

NEW POL
NEW POL XV120EL User guide

NEW POL
NEW POL NW1005F1 User manual
Popular Freezer manuals by other brands


Midea
Midea MRU17F6AWW user manual

GE
GE FUM9 Owner's Manual & Installation Instructions

Fridgemaster
Fridgemaster MUZ5580 How to use

True Manufacturing Company
True Manufacturing Company 922341 installation manual

Polar Electro
Polar Electro CK640 quick start guide

SMC Networks
SMC Networks HRGC001-A Series Service manual


