National Electronics & Watch Co,. Ltd.
BC04
6.2.2) The watch will prompt you to select GPS or INDOOR. Press S1/S3 to select. If you
select GPS, the watch will automatically search for GPS signal. If you select
INDOOR, you will be performing your exercise without GPS signal.
6.2.3) After your selection, the watch will display the remaining BATTERY power level,
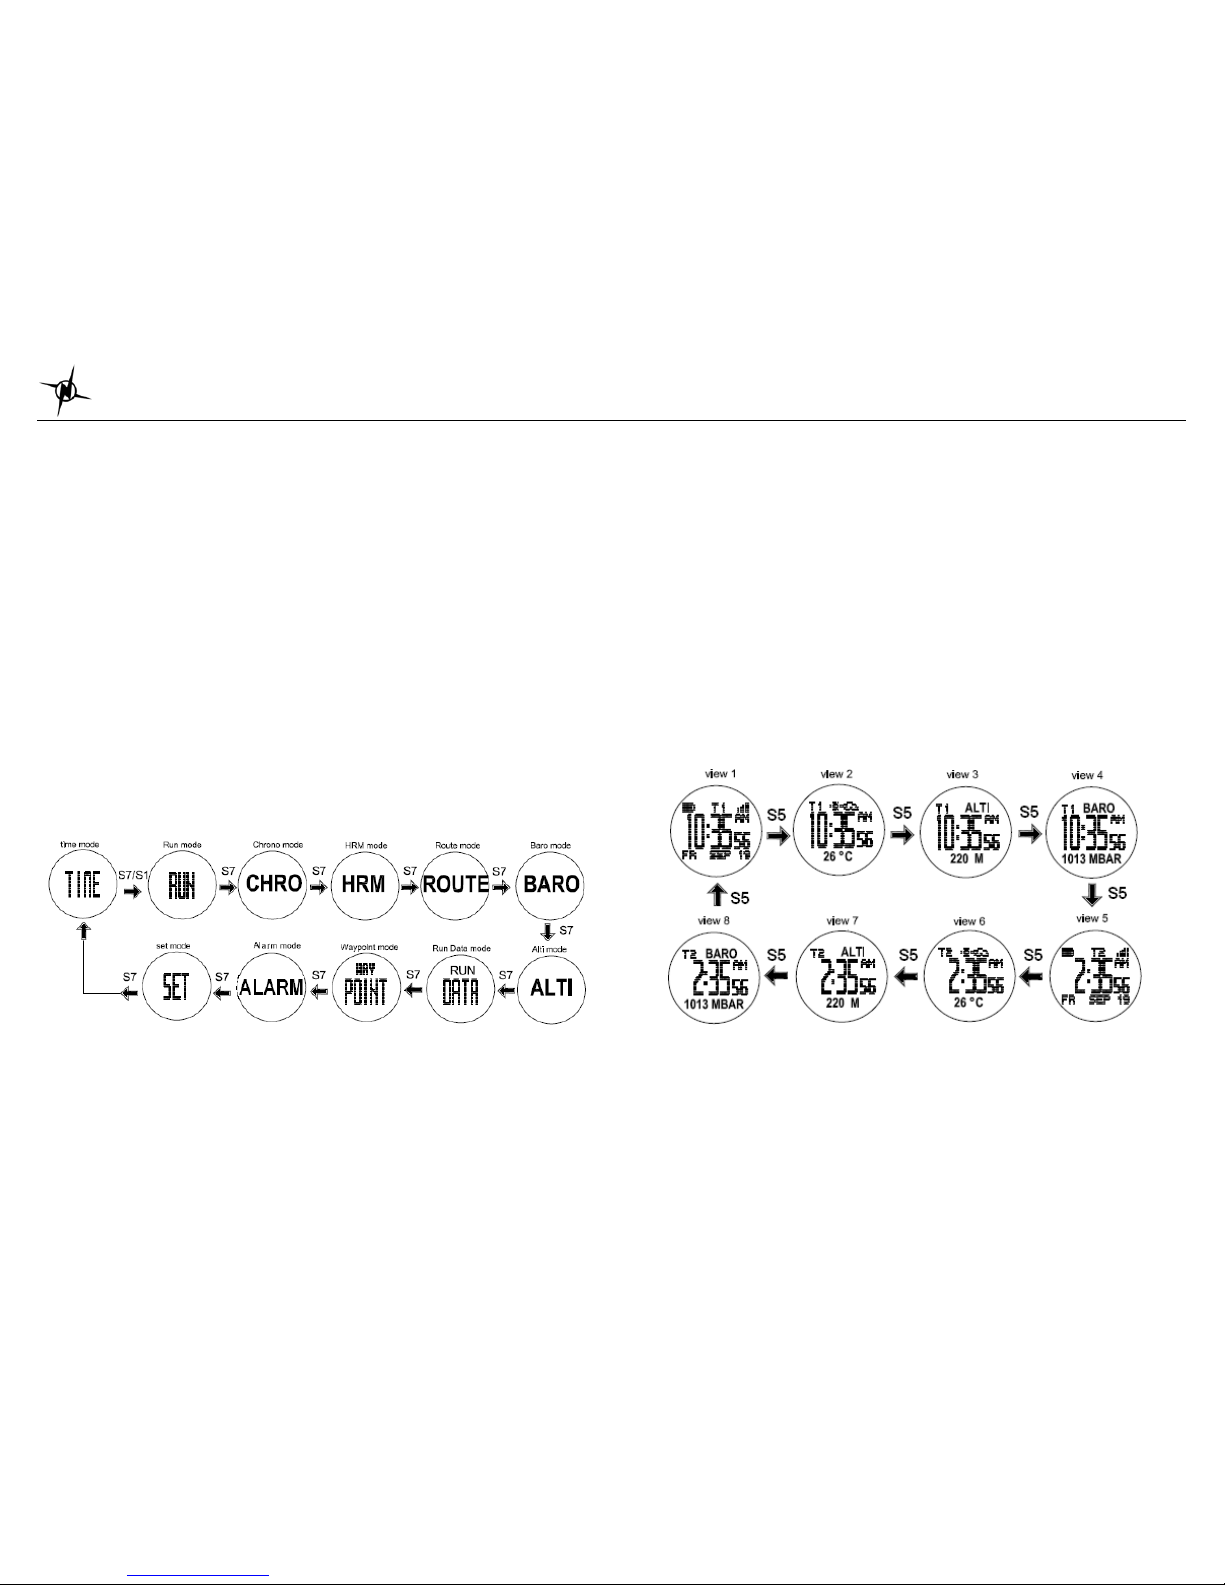
remaining DATA TRACK MEMORY and then display view 1. Press S5 to change
views.
6.2.4) Press S1 to START or TAKE LAP. If auto lap function is set, the watch will take lap
automatically based on auto lap setting. The EL will turn ON and there is beep
sound during taking auto lap.
6.2.5) Press S3 to stop after completing your run.
6.2.6) Press and hold S3 to save your data.
6.3) Using HRM mode:
RUN mode and HRM mode has the same timer counter. When the chronograph is started or
stopped in RUN mode, the same thing happens in HRM mode. They just differ in the views
when you press S5. This mode is dedicated to HRM views
6.3.1) Press S3 from Time to HRM mode or press S7 from CHRO mode to go to HRM
mode.
6.3.2) The watch will prompt you to select GPS or INDOOR. Press S1/S3 to select. If you
select GPS, the watch will automatically search for GPS signal. If you select
INDOOR, you will be performing your exercise without GPS signal.
6.3.3) After your selection, the watch will display the remaining BATTERY power level,
remaining DATA TRACK MEMORY and then display view 1. Press S5 to change
views.
6.3.4) Press S1 to START or TAKE LAP. If auto lap function is set, the watch will take lap
automatically based on auto lap setting. The EL will turn ON and there is also a
beep sound during taking auto lap.
6.3.5) Press S3 to stop after completing your run.
6.3.6) Press and hold S3 to save your data.
6.4) Using Altimeter mode:
6.4.1) Press S7 from Barometer mode to go to Altimeter mode.
6.4.2) The watch will prompt you to select GPS or INDDOR. Press S1/S3 to select. If you
select GPS, The watch will automatically search for GPS signal. If you select
INDOOR, you will be performing your exercise without GPS signal.
6.4.3) After your selection, the watch will display the remaining BATTERY power level,
remaining DATA TRACK MEMORY and then display the view 1. Press S5 to change
the views.
6.4.4) Press S1 to START or TAKE LAP. If auto lap function is set, the watch will take lap
automatically based on auto lap setting.
6.4.5) Press S3 to stop after completing your run.
6.4.6) Press and hold S3 to save your data.
Important note:
Before User can perform above steps, the ff. should be set in SET mode:
•Go to SET mode.
•Press S1 or S3 to select ALTI
•Press S5 to enter
•Press S1 or S3 to change the value. ALTI should be set / calibrated based on
the current location (current weather / Barometric sea level pressure).
•Press S5 to confirm setting.
•Press S7 to exit.
•Press S7 again to go to Altimeter mode.
6.5) Using Barometer mode:
6.5.1) Press S7 from Time mode to go to BARO mode (the watch will display the Temp.
/Sea Level/current Barometric pressure).
6.5.2) The watch will prompt you to select GPS or INDDOR. Press S1/S3 to select. If you
select GPS, The watch will automatically search for GPS signal. If you select INDOOR,
you will be performing your exercise without GPS signal.
6.5.3) After your selection, the watch will display the remaining BATTERY power level,
remaining DATA TRACK MEMORY and then display the view 1. Press S5 to change the
views.
6.5.4) Press S5 to change view to 24 hour recall view.
6.5.5) Press S1 or S3 to change the hourly record for the past 24 hours.
6.5.6) Press S7 to exit.
6.6) Using GOTO waypoint function in WAYPOINT mode
If there is no GPS signal, RUN mode, or GO BACK function of Run Data mode is running, you
cannot use GOTO waypoint function. Also there should also be a waypoint save in the memory
to go to.
6.6.1) Press S7 from Run Data mode to go to Waypoint mode. The watch will display the
list of available waypoints.
6.6.2) Press S1/S3 to select which waypoint to go to.
6.6.3) Press S5 to open GOTO/ VIEW/ EDIT/ DELETE/ EXIT sub modes.
6.6.4) Press S5 to select GOTO sub mode. The chronograph will automatically start.
6.6.5) Press S5 again to change views.
6.6.6) Press S1 to START or TAKE LAP. If auto lap function is set, the watch will take lap
automatically based on auto lap setting.
6.6.7) Press S3 to STOP after you complete your exercise.
6.6.8) Press and hold S3 to save your exercise.
6.7) Using GOBACK function in RUN DATA mode:
6.7.1) Press S7 from RUN mode to go to RUN DATA mode. The watch will display the list
of available Data files.
6.7.2) Press S1/S3 to select which file to open.
6.7.3) Press S5 to view the details of the selected file. Press S1/S3 to scroll through the
details
6.7.4) Press S5 to open the RUN DATA sub modes: GO BACK, VIEW, EDIT, DELETE,
DELETE ALL, and EXIT.
6.7.5) Press S1/S3 to select which sub mode to use. In this case select GO BACK.