Nexxt NHC-O612 User manual

WARRANTY
nexxtsolutions.com/warranty
YEAR
2
Smart Wi-Fi camera
Outdoor Wired PTZ Camera

English
User guide
Thank you for purchasing the Smart Wi-Fi camera from
Nexxt Solutions. We are excited in being a part of making
your life easier, safer, and bringing peace of mind inside
and outside your home.
Product overview
1. Light sensor
2. Camera lens
3. LED infrared light: for night vision
4. Wi-Fi antenna connector
5. Built-in microSD™ card slot: supports local storage for a
card of up to 128GB
6. Reset button: press and hold this button to reset the
device. If you have modied any settings, they will return
to factory default
7. Wi-Fi antenna
8. Installation base: enables to screw the camera to the
wall or the ceiling
9. Camera rotating head
10. RJ45 network protection
11. Power cable
1
2
3
5
4
6
7

Package content
• Smart Wi-Fi camera
• Power adapter
• 7.8ft USB cable attached to camera
• Quick setup guide
• 3 screws
• 3 concrete anchors
Installing the Nexxt Home App
Download the Nexxt Home app from Google Play or Apple
App Store.
60 %
9:41 AM
Nexxt Home
Nexxt Home App
Cancel
GET
Accvent LLC
Login with existing account
Create New Account
SOLUTIONS
Iniciarsesión con cuenta existente
Crear Cuenta Nueva
SOLUTIONS
60 %
9:41 AM
Nexxt Home
Nexxt Home App
Cancel
INSTALL
Accvent LLC
11
810
9

Step 1
Register by email. Fill in the required elds.
60 %
9:41 AM
Register by email
United States of America
Email
Get authentication code
Step 2
Enter the verication code you received.
60 %
9:41 AM
Enter verication code
Verication code has been sent to your

Step 4
The Nexxt Solutions Home App has been successfully
installed.
Step 3
Create a new password and then select Completed.
60 %
9:41 AM
Set Password
Completed
6-20 characters, including letters and numbers

Plug in
Plug in the camera using the provided AC adapter.
After 30 seconds, you will hear a rst tone indicating that
the camera has started correctly.
After another 10 seconds, a second tone will be heard
indicating that the camera is ready to be paired.
If you do not hear the tones, hold down the reset button for
8 seconds to reset the device.
Add device
Step 1
Select the +icon to add the device, followed by the smart
camera.
60 %
9:41 AM
60 %
9:41 AM

Step 2
Select next step.
60 %
9:41 AM
Step 3
You must connect to a 2.4GHz WiFi network. Enter your
network password. Make sure you enter the correct
password, otherwise the device will not connect.
60 %
9:41 AM

Step 4
Scan the QR code from your mobile device with the smart
camera. Once you hear the tone, click on the I Heard a
Prompt button.
If you experience any issues, reset the camera. If a
Registered Account added the camera through the app,
then another user will be prevented from setting up that
camera in a dierent account, unless permission is granted
through the Share access option.
60 %
9:41 AM
Step 5
If pairing is successful, the notication Device added
successfully will be displayed on the screen. Click on the
pencil icon to rename the camera, and then select Save to
store your settings.
60 %
9:41 AM
60 %
9:41 AM

Camera settings Screenshot: Takes a picture of what the camera is
viewing.
Speak: Allows voice communications through the
microphone.
Record: Starts recording a video.
Playback: If a microSD™ is installed, you can use the
playback function to watch recordings.
Direction: Can move the camera left, right, up or down.
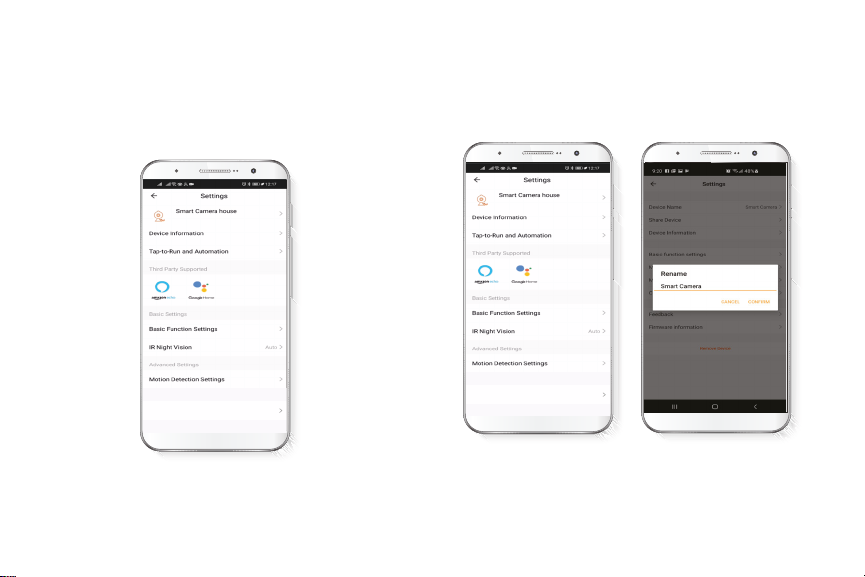
Motion Detection: Sets the motion detection settings.
Photo album: View your photos and videos.
Cloud storage: Allows you to purchase a cloud storage
service.
HD/SD: Switches between High Denition and
Standard Denition modes.
Mute: Mutes the microphone on the camera.
Full screen: Switches to full screen mode.
Signal: Shows the Wi-Fi signal strength.
Settings: See the next section.

Settings
60 %
9:41 AM
Storage
VAS
Memory Card Settings
Device name
It allows the user to rename the device. To change the
default name, click on device name.
60 %
9:41 AM
Storage
VAS
Memory Card Settings

Share device
Additional users will need their own Nexxt Home Account.
Select Add sharing and then enter the e-mail address of
family or friends. Tap on Completed.
60 %
9:41 AM
To remove a user on iOS, slide the name to the left. On
Android, press and hold the name of the person you wish
to delete. When the pop-up box comes up, select Delete. A
Notication conrming that you no longer want to share
the device with the selected user will be displayed. Tap on
Conrm to permanently remove the user.
60 %
9:41 AM
60 %
9:41 AM

Device information
This menu will display information about the camera.
60 %
9:41 AM
Basic function settings
Flip screen: Flips the image 180 degrees, if the camera is
mounted upside down.
Talk Mode: Allows either one-way or two-way speech.
60 %
9:41 AM

Motion Detection Settings
Motion detection settings: Turns the motion detection
feature on and o. Sets up a schedule to turn the motion
detection feature on and o. Changes the sensitivity
between Low, Medium, or High.
60 %
9:41 AM
Cloud storage purchase options
Cloud storage: Provides the option to purchase a
selection of cloud storage services.
60 %
9:41 AM
60 %
9:41 AM

Total capacity: Shows the capacity of the microSD™ card.
Used: Shows how much memory has been used.
Remaining capacity: Shows how much space is left on the
microSD™ card.
Local recording: Move the on/o switch to record on the
microSD™ card.
Recording mode: You can set the camera to constantly
record 24/7. How much it records, depends on the size of
the microSD™ card.
Schedule: Sets up a schedule to turn microSD™ card
recording on and o.
Format memory card: This will format the microSD™ card
to be used on the camera.
Memory card settings
60 %
9:41 AM

Nexxt Solutions® is a registered trademark. All rights reserved. SD™
and microSD™ are trademarks owned by SD-3C, LLC. All other brand
names and trademarks are the property of their respective owners.
Made in China.
FCC ID: X4YNHCO612
Feedback and firmware
Write feedback: Please let us know if you have any issues
setting up the product.
Firmware information: We will sometimes add new
features or provide updates with a new
rmware upgrade.
Remove device:
Remove the camera from your account.
Tap on
Conrm
when done.
60 %
9:41 AM
60 %
9:41 AM

Español
Guía del usuario
Gracias por adquirir la cámara inteligente Wi-Fi de Nexxt
Solutions. Nos complace ser parte de la solución destinada
a no solo simplicar tu vida, sino además poder brindar
mayor seguridad y tranquilidad tanto en el exterior como al
interior de tu hogar.
Descripción del producto
1. Sensor de luz
2. Lente de la cámara
3. Luz LED infrarroja: para visión nocturna
4. Conector de antena Wi-Fi
5. Ranura para tarjeta microSD™: admite el
almacenamiento local a través de una tarjeta microSD™
de hasta 128GB
6. Botón de reposición: mantén presionado este botón
para reiniciar el dispositivo. De haber modicado tu
conguración, se restituirán los parámetros a sus valores
originales de programación
7. Antena Wi-Fi
8. Base para jación: permite la instalación en pared o
techo
9. Cabeza rotativa de la cámara
10. Protección de red RJ45
11. Cable de alimentación
1
2
3
5
4
6
7

Contenido del empaque
• Cámara inteligente Wi-Fi
• Adaptador de corriente
• Cable USB de 2,4m de longitud conectado a la cámara
• Guía de conguración rápida
• 3 tornillos
• 3 tarugos para concreto
Instalación de la aplicación
Nexxt Home
Descarga directamente la aplicación Nexxt Solutions Home
de Google Play o de Apple App Store.
60 %
9:41 AM
Nexxt Home
Nexxt Home App
Cancel
GET
Accvent LLC
Login with existing account
Create New Account
SOLUTIONS
Iniciarsesión con cuenta existente
Crear Cuenta Nueva
SOLUTIONS
60 %
9:41 AM
Nexxt Home
Nexxt Home App
Cancel
INSTALL
Accvent LLC
11
810
9

60 %
9:41 AM
Register by email
United States of America
Email
Get authentication code
Paso 1
Registro por email. Completa los campos requeridos.
Paso 2
Ingresa el código de vericación que recibiste.
60 %
9:41 AM
Enter verication code
Verication code has been sent to your

Paso 3
Crea una contraseña nueva y selecciona Completo a
continuación.
60 %
9:41 AM
Set Password
Completed
6-20 characters, including letters and numbers
Paso 4
La aplicación Nexxt Home ha sido instalada satisfactoria-
mente.

Conexión
Conecta la cámara con el adaptador de CA suministrado.
Después de 30 segundos, la cámara emite el primer tono
para indicar que se ha iniciado correctamente.
10 segundos después, se genera un segundo tono para
indicar que la cámara está lista para emparejarse. De lo
contrario, mantén presionado el botón de reposición por 8
segundos para reiniciar el dispositivo.
Agregar dispositivo
Paso 1
Selecciona el ícono +para agregar el dispositivo y a
continuación, la cámara que deseas instalar.
60 %
9:41 AM
60 %
9:41 AM
Table of contents
Languages:
Other Nexxt Security Camera manuals